Biketronics BT4180.14 User manual

AMPLIFIER INSTALLATION MANUAL
biketronics.com 800-735-2419
BT4180.14
FITMENT
2014+ FLH
SPECIFIACTIONS
4-Channel 2 ohm stable
720W RMS total output at 4 ohm
1,440W total peak output


Parts Layout for Kit Package 4
Tools Required 4
Introduction 5
General Information and Notes 6
Preparation 6
STEP 1: Mount Amp Plate 7
STEP 2: Amplifier Placement 8
STEP 3: Ground Wire 9
STEP 4: Amp Enable 10
STEP 5: RCA Connectors 11
STEP 6: Speaker Output 12
STEP 7: Power Connection 13
STEP 8: Test Amplifier 13
Troubleshooting 13
Warranty Policy 14
Contents

4
Parts Layout for Kit Package
AB
D
E
F
H
G
I
K
J
C
Tools Required
• Torxheadscrewdrivers#25and#27
• PhillipsScrewdriver
• 1/4”drivesocketset
• Harley-Davidson®shopmanaul(optional)
• Ashoptoweltolayyourfairingon(recommended)
A. Amplifier
B. Speakerwires
C. REMwire
D. Continuouspowercable
E. Groundingcable
Package Contents
F. AmpPlate
G. Zip-ties(2)
H. RCACable
I. AmpEnableWire
J. Powercablewithfuse
K. Transformers(2)
(x2)

5
Introduction
Congratulationsonyourpurchase!TheBT4180isastate-of-the-artamplifier
designedspecificallyformotorcyclesandbuiltby American hands. Should
youhavequestionsregardingyouramplifier,feelfreetocallBiketronicsInc.
at1-800-735-2419andourlifetimesupportteamwillhelpyouout.
• Read all instructions FIRST. It will make installation easier and eliminate
potentialproblems.
• Disconnect battery cables from Harley®battery–negativecablefirst.Do
thisnow!Failuretodosoisanimproperinstallationandwillcauseashort
togroundandisNOTcoveredunderwarranty!
• Ouramplifierspackalotofpowersopleaseoperatewithgoodjudgement
toprotecthearingandrespectthenoiseoridinanceofwhereyouride.
• Goeasy.Don’tforceparts.
• Priortodisassembly,ensurethatyouhaveallnecessarytoolsandpartsfor
thejob.
• Protectbikefinishusingtowelsandblankets.Beforefairingremoval,prepare
asafepaddedareatostorefairing.
• Allowplentyoftime–don’trushthejob.Allocate1-2hoursforcompletion.
PLEASE READ
Visitwww.biketronics.com/support
orgiveusacallat1-800-735-2419
NEED HELP?

6
Preparation
• Removeouterfairing(Removefairingboltsanddisconnectheadlightwire
connector).
• Removeseattoaccessthebattery.
Failure to disconnect the battery will cause a short to ground and is not
coveredunderwarranty.
DISCONNECT BATTERY
General Information and Notes
Speaker use–Usea2or4ohmspeaker.Foraparallelset-upuse4ohm.
Care–Theampenclosureiswaterresistantusingaspecialbafflesystemto
preventwaterfromenteringthecustomenclosure.However,pleaseexercise
goodjudgementwhenlocatingtheamptominimizeexposuretoanypotential
sourceofwater.
Do not modify–Modificationsmadetotheamplifierwithvoidthewarranty.
PleasecallBiketronicsifyouarenotsureaboutinstallation.
7
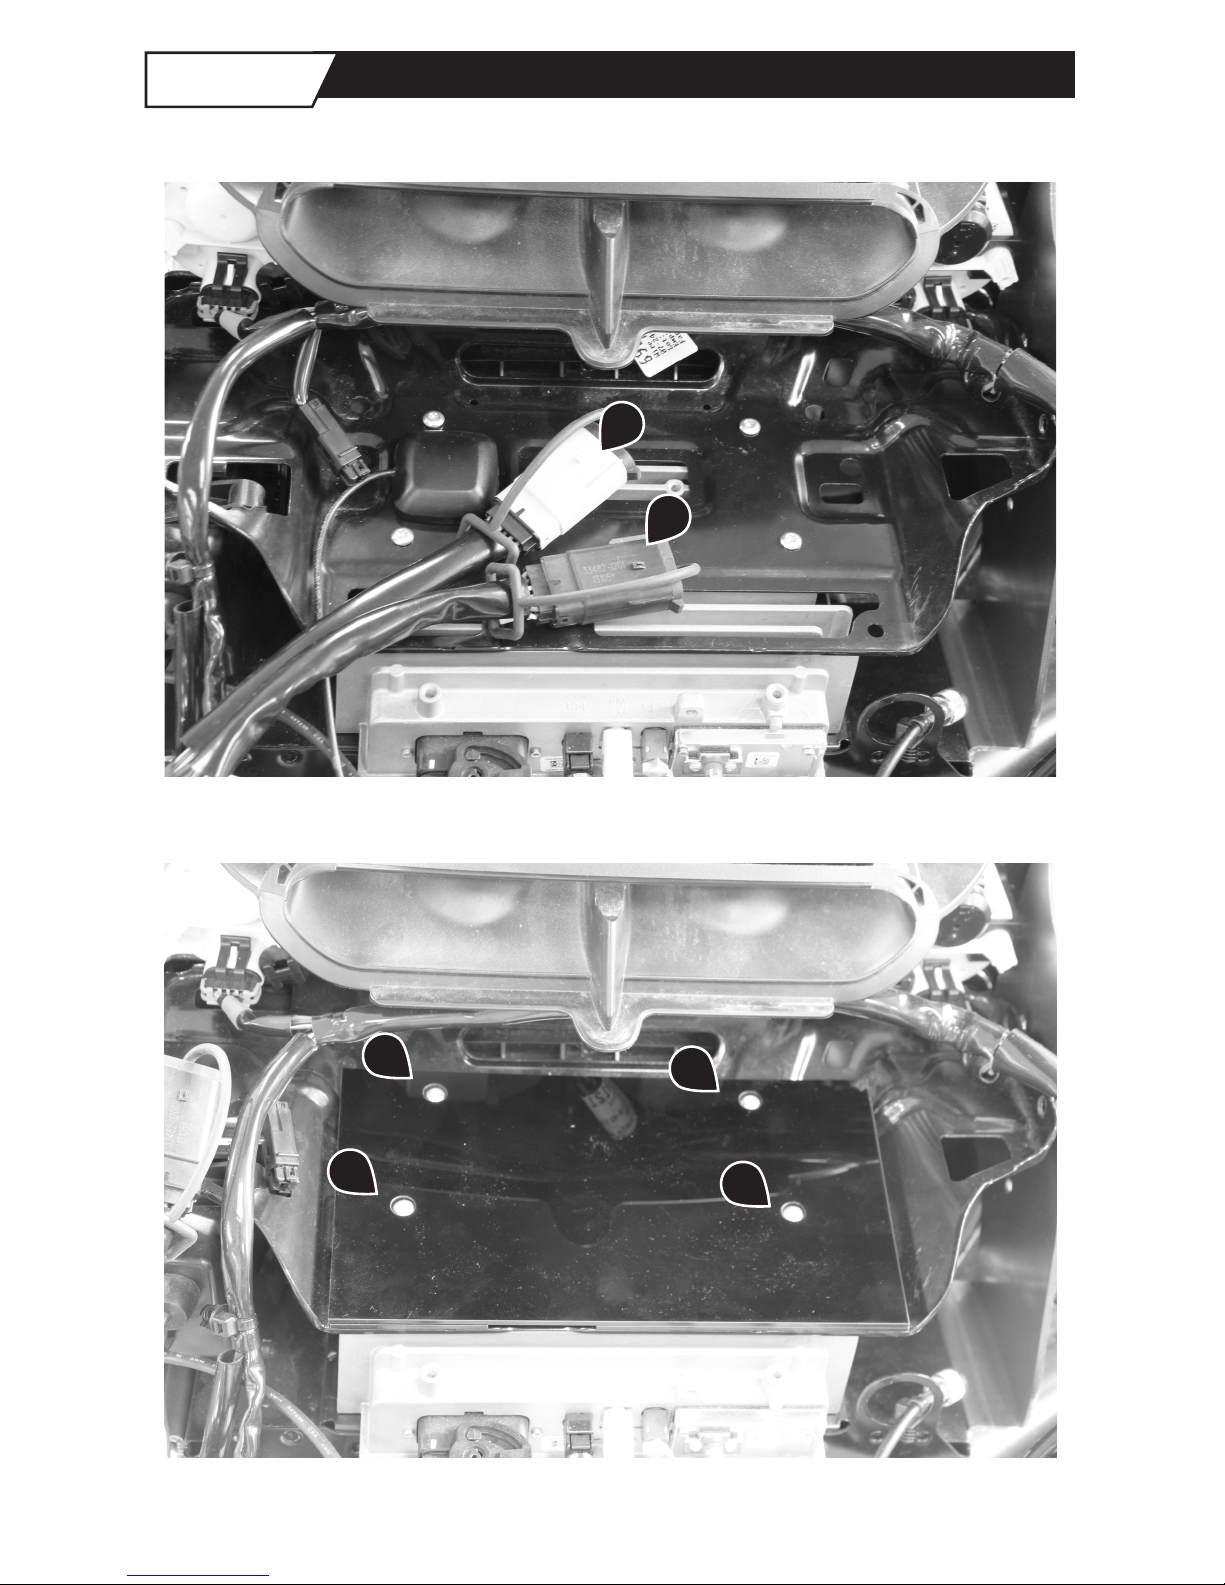
Mount Amp Plate
Step 1
• Removeconnectorsandsatelliteantennafromradioplate.
• Mountampplateusingstockscrews.
!
!
!
!
!
!

8
• Peeladhesivestripsfromampbottomandplaceasshown.
Amplifier Placement
Step 2
!

9
• Installgroundwirefromamplifierusingradiomountbolt.
• Replacesatelliteantennaandsecureconnectorswithzip-tie.
Ground Wire Connection
Step 3
!
!

10
Amp Enable
Step 4
• Connectampenableadapterintoaccessoryplugharnessandconnectto
blueampenablewire..
!
11
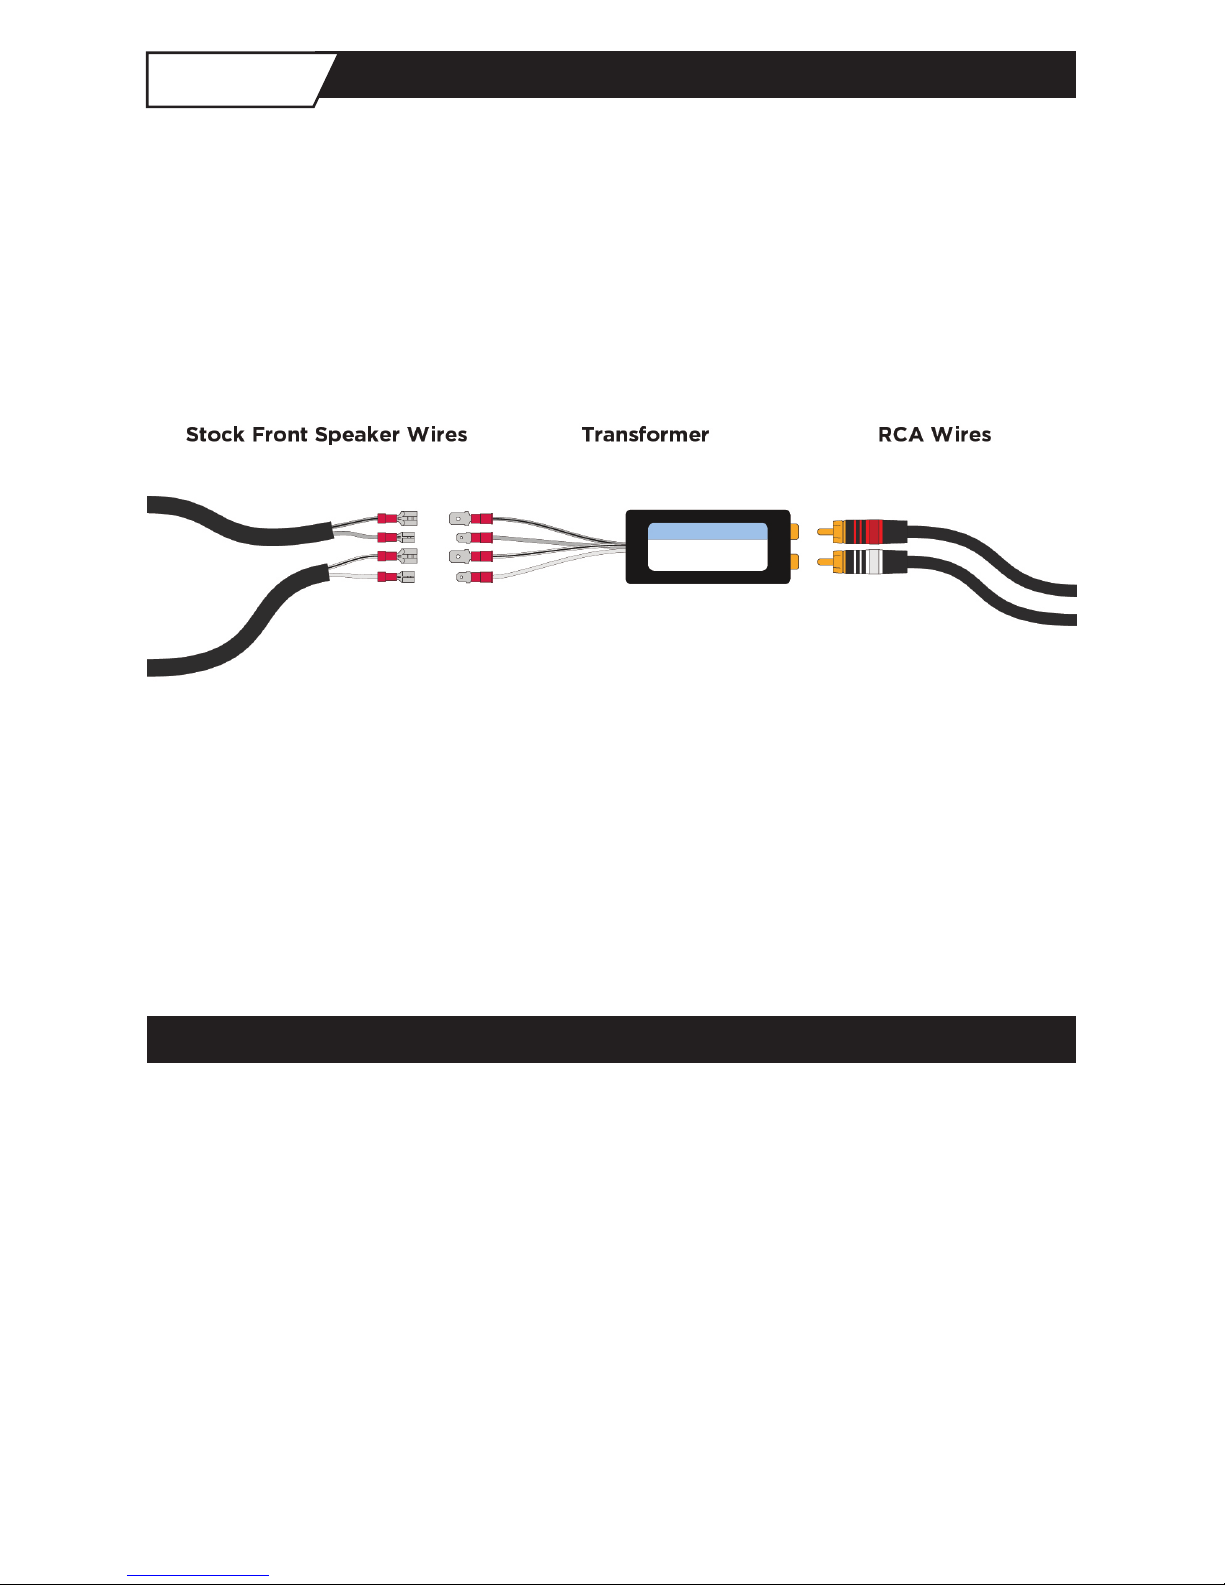
RCA Connectors
Step 5
• ConnectRCAconnectorstoamplifier.
• Installationrequiresuseoftransformerbetweenstockspeakerwires(high-
level)andamplifier’sinputRCAconnectors(low-level).
• Connectstockfrontspeakerwirestogreyandwhitewiresontransformer.
• Useincludedheatshrinktosecureandinsulateconnections.
• Connectamp’sfrontRCAplugstoRCAjacksfoundontransformer.Since
some stock radios do not have balance control, RCA polarity may not
matter.
Rear Amp Input
Dependingonbikeconfiguration,therearspeakersignalwillbeconnectedto
thereartransformeroneofthreeways:
Ultra Classic®–customharnessbringingsignalfromrearpodarea.
Road Glide®and Street Glide®–usingtherearspeakerconnectorinfairing.
Custom Setup–splicedintorearspeakerwiring.
12
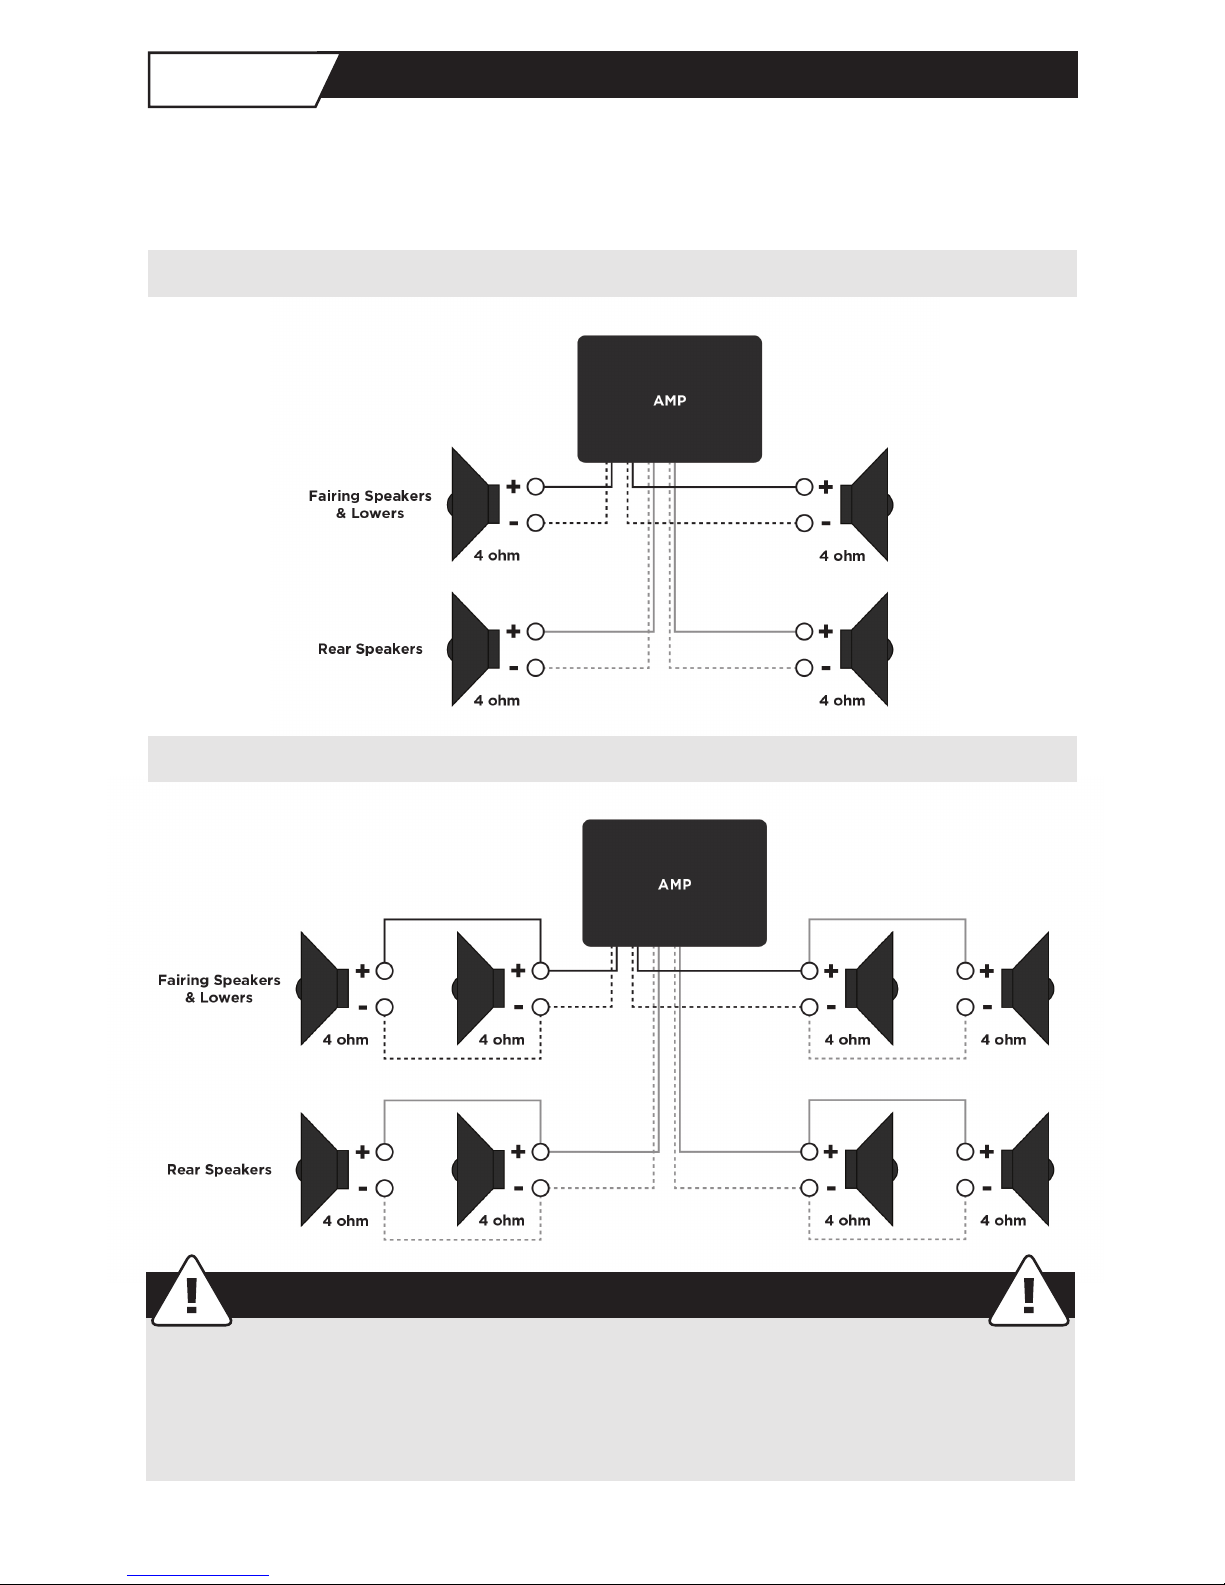
Speaker Outputs
Step 6
• Connectdirectlyfromtheamptospeakers.
• Seeillustrationsforacceptableconfigurations.
Only use speakers capable of handling at least 100 watts RMS. Contact
your speaker manufacturer if you are unsure if your speakers meet these
requirements.
CAUTION
CONFIGURATION 2
CONFIGURATION 1

13
• Runsupplyleadwiretothebattery.
Power Connection
Step 7
• Reconnectbattery(positivecablefirst)
• Checkamplifierfunction:
• Powerupradioandturnvolumedownasquickaspossiblesoyoucanstart
atlowvolumeandslowlyworkup.
• Addvolumeandmakesureallspeakershavegoodsound.
• Checktomakesureeverythingisinstalledcorrectly.
• Reinstallfairingandgoriding!
Test Amplifier
Step 8
Itisunsafetolookdownatradiowhileriding.Familiarizeyourselfwithradio
controls in garage. Allow yourself time to normalize working the unit with
handcontrolsand“hearing”theresult.Pleaseexerciseproperridingsafety!
It’salsoworthnotingthatourgearisdesignedtobeloud.Pleaseusecaution
whenturningthevolumeupsoyoudon’tdamageyourhearing.
SAFETY NOTICE
• Ensureproperconnectionshavebeenmade.
• Checkthatradioappearstobeoperationalanddisplayisactive.
• CheckstatusLED:orange=powerapplied,green=ampenabled.
Troubleshooting

14
Warranty Policy
General Warranty Information: Warranty applies to the original retail purchaser only and is not
transferable. Proof of purchase is required for all warranty claims.
Auction Sales Policy: Products purchased through auction type websites, such as EBay, are subject
to the return and warranty policies of the seller. Please make sure you understand their service and
return policies beforeany funds are exchanged. Biketronics Inc. will warranty products purchased
this way but the customer will be responsible for all shipping costs.
Satisfaction Guarantee: Products purchased directly from Biketronics Inc. come with a 30 day
satisfaction guarantee. Refunds exclude shipping charges and a 7% restocking fee. For a full refund:
products must be in excellent condition and kits must be complete in original packaging. *Biketronics
products that are purchased through a dealer are subject to the dealers return policy.
Warranty Coverage on Aftermarket Radios: Radios purchased from Biketronics Inc. come with the
manufactures warranty. Warranty does not cover damage due to improper installation, shipping,
handling or water damage caused from failure to use a protective cover. This coverage is handled by
the customer through the radio manufacturer. Biketronics Inc. can handle this process for a handling
fee and all shipping costs.
Warranty Coverage on Biketronics Inc. Products: All products manufactured by Biketronics Inc.
come with a lifetime warranty. Warranty does not cover damage due to improper installation,
shipping or handling.
Exclusions: Any defects resulting from water damage, fire, acts of nature, misuse, abuse, modification,
improper installation, vehicle crash, or any type of impact will void the warranty. We will not be
responsible for damages to motorcycles resulting from the use or misuse of the product. In no
event shall Biketronics Inc. be liable for any damages whatsoever (including consequential damages,
incidental damages, or damages for loss of use, loss of time, inconvenience, or other losses) arising
out of the use, misuse, or inability to use our product. Biketronics Inc. reserves the right to change
the design of its products without any obligation to modify any previous product.
Repair or Replacement: If your product is not functioning properly, please call us at 1-800-735-2419
as soon as possible so we can assist you in diagnosing and resolving your product problems. In cases
where a product is defective, please call us for an RMA (return merchandise authorization) number.
If the product is found to be defective and covered under warranty, it will be repaired or replaced
at our option. Any charges accrued for removal, installation, reinstallation and shipping will not be
covered by this warranty.
Damaged or modified equipment: will be subject to a charge equal to the parts and labor required
to return the product to as-new condition.This includes damaged wires, connectors, housings and
shipping damage.If the product is not found defective Biketronics Inc. will return the product at the
customers cost.
International Customers: Customer will pay shipping on all warranty services.
Warranty repair: repair or replace shipping time: We will ship out a repaired or replacement unit after
receiving and testing, 6-8 business days from arrival at biketronics. There is a refundable core charge
if Biketronics sends a replacement part before receiving the defective part. The old/defective part
must be returned within 60 days.

15

Version:04172015
LIFETIMEWARRANTY
MadeintheU.S.A.
1-800-735-2419
www.biketronics.com
Table of contents
Other Biketronics Amplifier manuals


