Billabong BBCHAR User manual
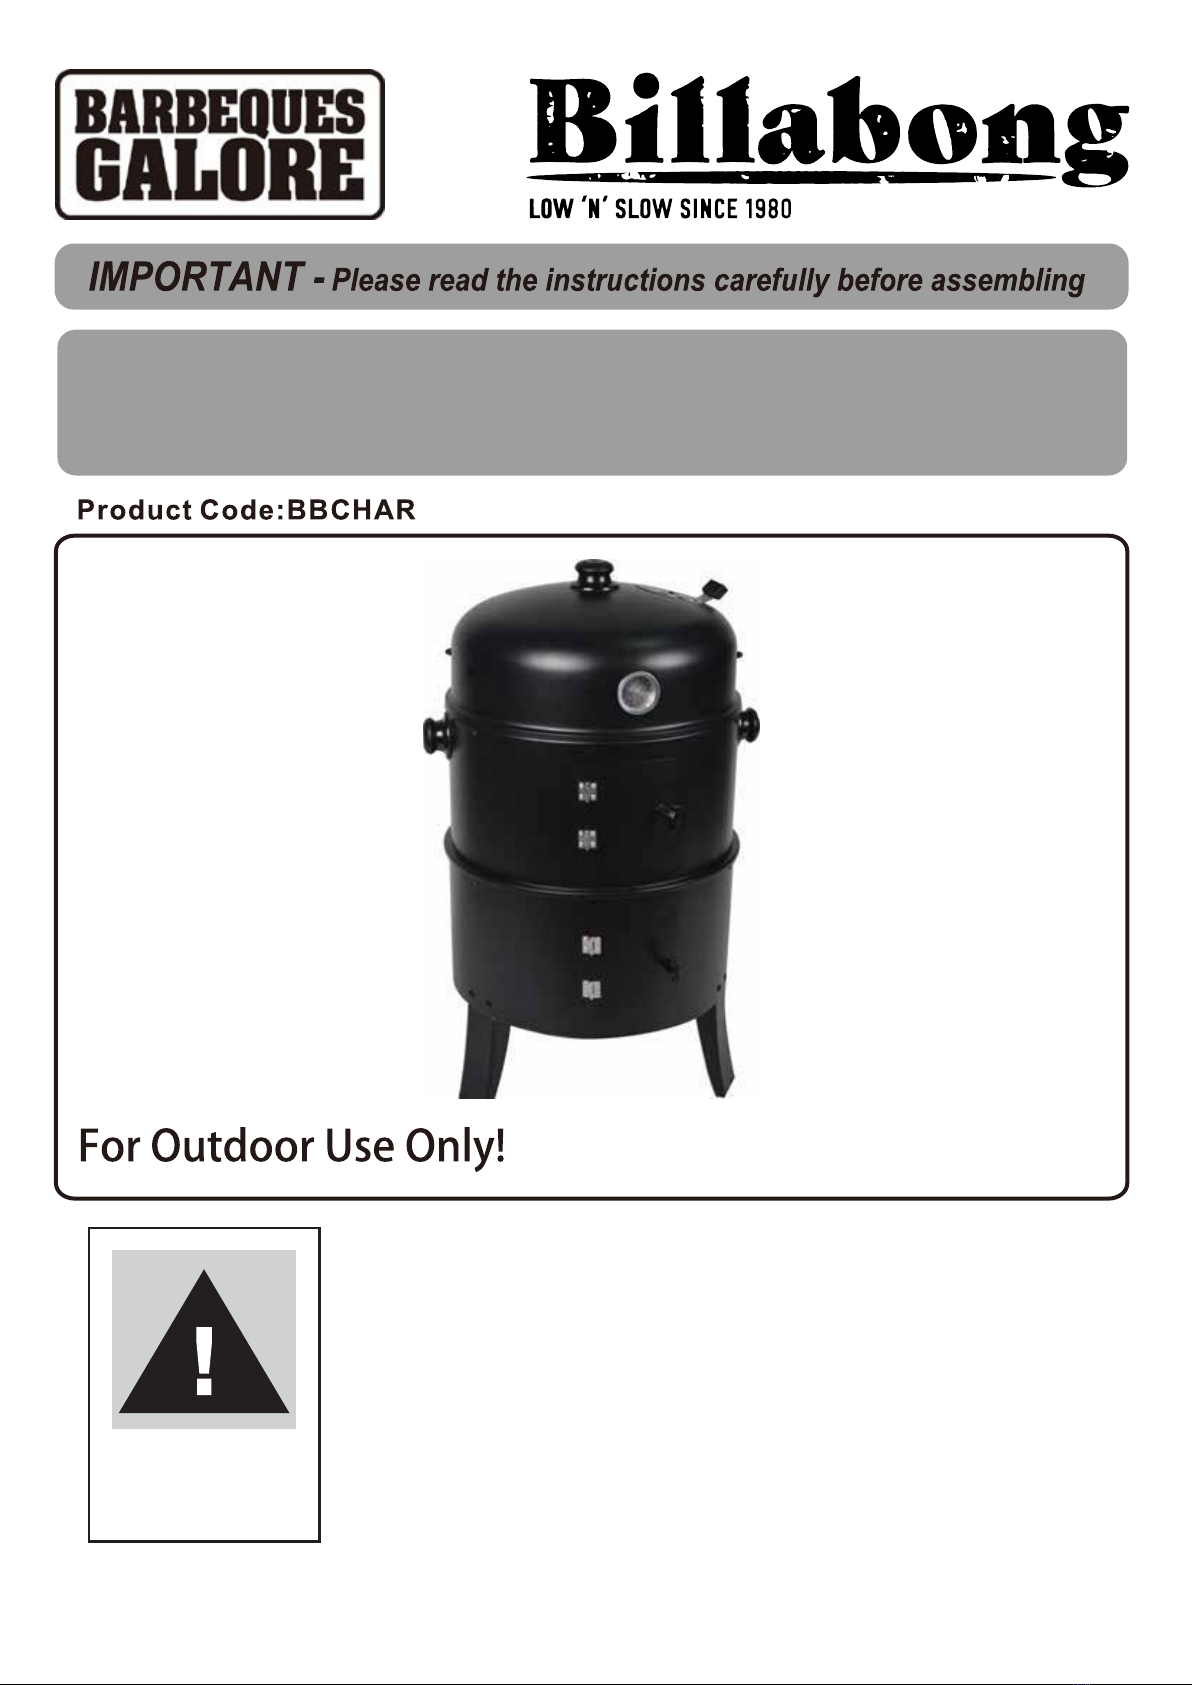
BILLABONG BULLET SMOKER
KEEP THIS MANUAL IN A SAFE PLACE FOR FUTURE REFERENCE.
1
- Never touch metal parts which may be hot.
- Do not light or re-light with petrol, methylated spirits, lighter fuel, paraffin or
comparable fluids.
- Use specially formulated barbecue gel or firelighters.
- Do not use indoors.
- The barbecue will become very hot, so do not attempt to move it
while in use and filled with hot coals.
- Never handle litcharcoal.
- Keep children and pets clear of cooking area.
- Do not attempt to light barbecue if lighting gel has been spilt on clothes.
- Take care when disposing of used coals. Coals can smolder, then re-
ignite without warning. Do not extinguish hot coals with water. Let them
burn out completely or extinguish with sand or wet soil if urgent.
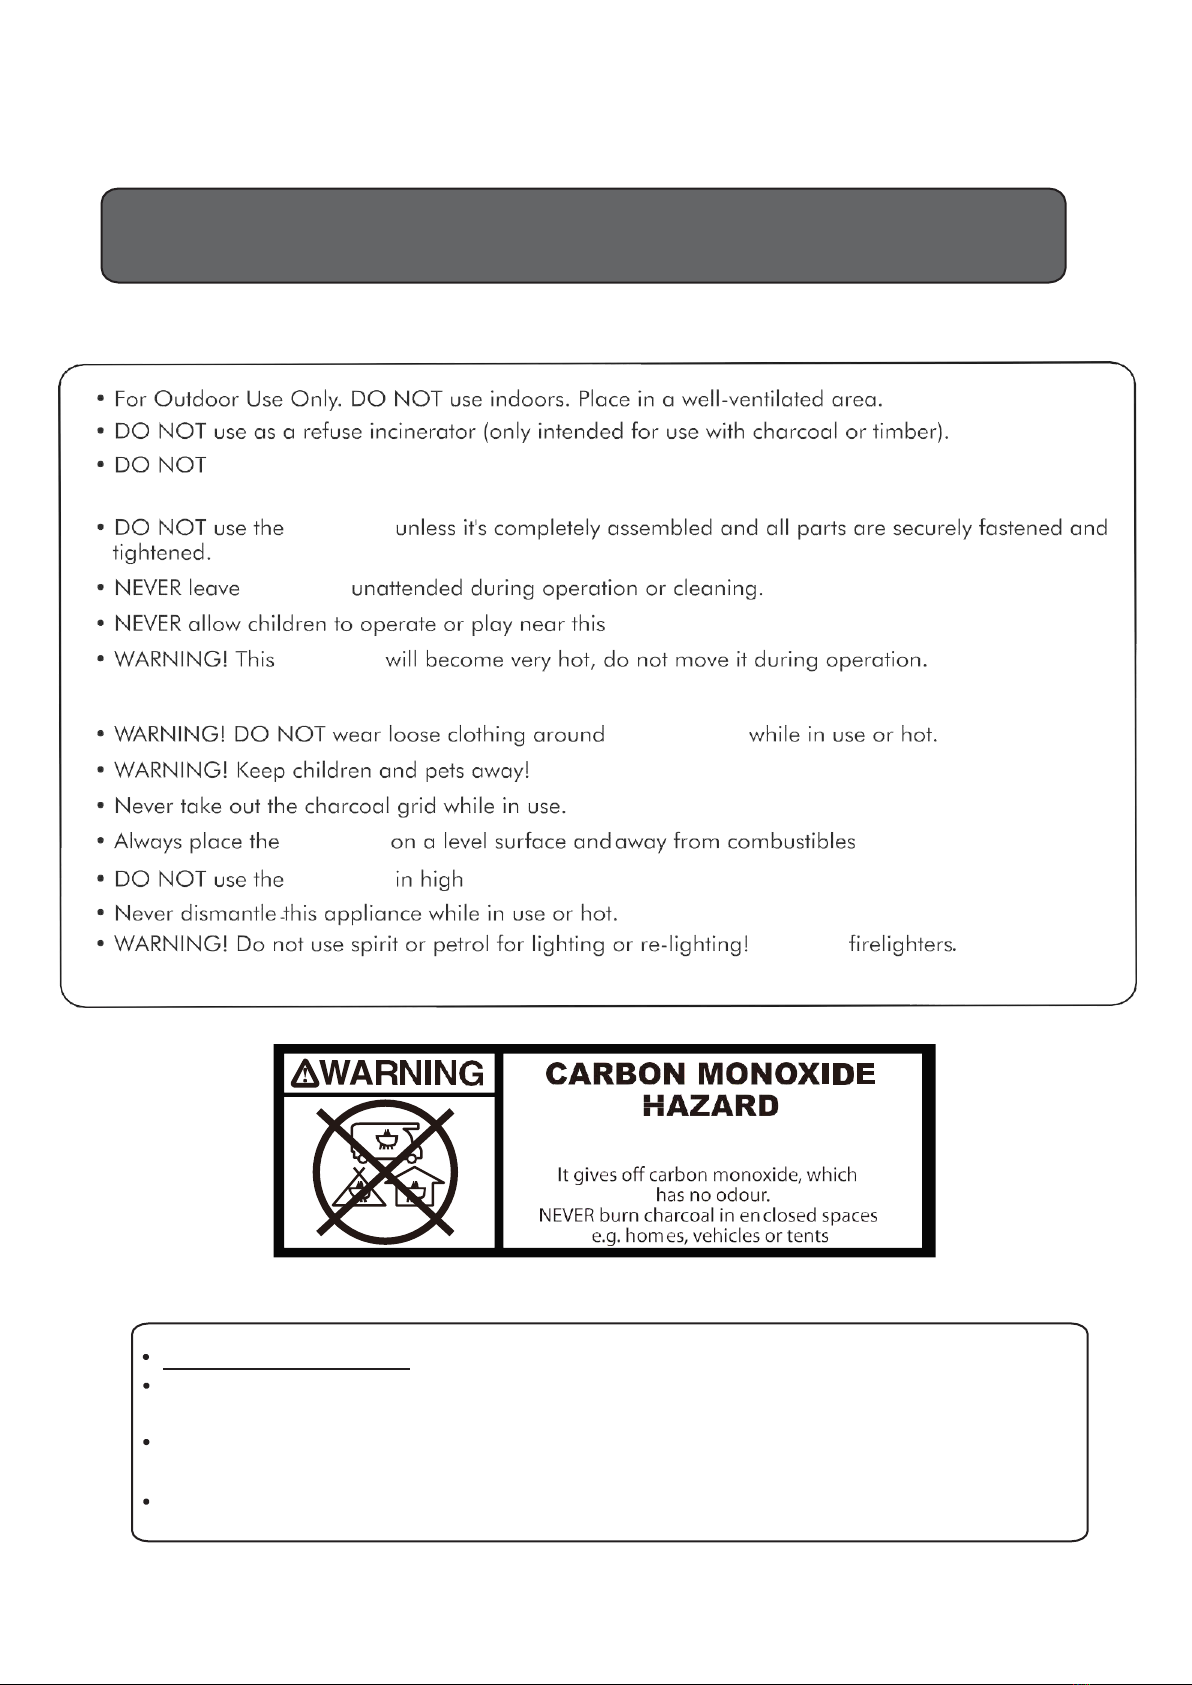
WARNING
Instruction Manual
2
touch the firebowl until it has completely cooled to avoid burns, unless you are wearing
protective gear (ex, potholders, gloves, etc.) DO NOT cover firebowl until completely cooled.
barbecue
barbecue item.
barbecue
Wait for it to become cool.
the barbecue
barbecue
barbecue
.
winds.
Only use
Burning charcoal inside can cause harm which
mainly results in serious injury
For outdoor use only.
Allow a minimum of 1m clearance between this product and any surface which may
be affected by heat.
Combustible or flammable materials should never be stored within 3m of this product
when in use. Never leave the unit unattended when it is in use.
Always use on a flat, firm and level surface. Never move the unit when it is in use.
Safety and Care Advice

3
Cooking Instructions
1. Make sure the assembly, safety and care instructions have been read and are followed correctly.
2. Before each use, check all screws, nuts and bolts to make sure they are secured firmly.
3. Ensure at least 3 metres clearance around all sides of the barbecue. Keep away from fences, over hanging branches and other combustible materials .
4. Set the barbecue up in a suitable position, on a level surface, well away from areas likely to catch fire. The base of the barbecue will get hot so ensure it
stands on a suitable surface.
5. Leave the Domed Lid and the Upper Body aside and fully open the Lower Door for lighting.
6. Use Charcoal and a suitable lighting method:
Method 1 - Charcoal & Lighting Gel:
(a) Set up your barbecue in a safe place.
(b) Set the Charcoal Pan in place into the Lower Body, resting on top of the legs. Set the Charcoal Grate in place into the Charcoal Pan.
(c) Place charcoal in onto the Charcoal Grate to a depth of 3-5 cm.
(d) Apply the lighting gel carefully over the charcoal. Take care not to spill any gel onto your hands or clothes.
(e) Do not use flammable liquids to light or to re-light charcoal. Do Not use flammable liquids
(f) Light the charcoal using a safety lighter or long matches.
(g) DO NOT squirt gel onto burning charcoal.
(a) When the flames die down, check that the charcoal is beginning to glow red. If the coals are going out allow the barbecue to cool down before trying to
apply more gel or else add a solid firelighter. After lighting, the fire should be ready for cooking in 30-40 minutes, or when an even white ash is visible
by day, or an even red glow is visible by night.
Method 2 - Firelighters
(b) Set up your barbecue in a safe place.
(c) Set the Charcoal Pan in place into the Lower Body, resting on top of the legs. Set the Charcoal Grate in place into the Charcoal Pan.
(d) Place three or four firelighter blocks in the centre of the Charcoal Grate and light with a long match or safety lighter.
(e) Place pieces of charcoal around each burning block. Add more charcoal as required, in a pyramid formation.
(f) When burning is established, spread the charcoal out evenly. After lighting, the fire should be ready for cooking in 30-40 minutes, or when an even
white ash is visible by day, or an even red glow is visible by night.
7. ALWAYS WEAR OVEN GLOVES WHEN HANDLING HOT ITEMS!
8. Carefully set the Water Pan, Cooking Grills, Upper Body and Dome Lid in place to suit your desired cooking configuration (see below for details).
9. Do not cook before the charcoal has a coating of ash.
10. It is best to use a small amount of charcoal to begin with. Opening the top vent more increases the temperature. If the top vent is fully open and the
temperature is still not high enough, then add more charcoal through the lower door, wait for the temperature to stabilise, then re-adjust the top vent.
Direct Barbeque Cooking
To sear, sizzle and grill regular barbeque foods like steak, chops, sausages, chicken wings, eggplant slices, haloumi chees over direct heat:
1. Light the bbq as outlined above
2. Make sure the charcoal is well lit and evenly spread out
3. Normally, don’t use the Water Pan or the Upper Body. Just use one Cooking Grill on the Lower Support Brackets.
4. Configuration from the bottom up should be: Lower Body - Charcoal Pan - Charcoal Grate - Charcoal–Cooking Grill –Food.
5. Use a little vegetable oil spray on the Cooking Grill if necessary.
6. Most cooking results will be more moist and flavoursome if the Dome Lid is kept on as much as possible during cooking
7. It is possible to simultaneously cook more food slowly or keep cooked food warm by fitting the Upper Body and another Cooking Grill on the Upper
Support Brackets. The temperature on the upper Cooking Grill will be much cooler than the lower grill. The Dome Lid helps a lot in this configuration.
8. Use a probe thermometer to be sure when the meat is done. Properly rest meats for best results.
Dripping fats and oils can ignite on the charcoal, and can suddenly flare if the dome lid is removed quickly. To minimise flare ups, trim excess fat form
meats, turn and move food away from the flare, use a fine mist water spray on small flare ups (do not try and extinguish a self-sustaining grease fire
with water).
OPERATING INSTRUCTIONS

4
Roasting
To roast larger cuts of meat or vegetables with indirect heat:
1. Light the bbq as outlined above
2. Make sure the charcoal is well lit and evenly spread out
3. Fit the Water Pan into the Lower Support Bracket in the Lower Body. This will act as a heat deflector / drip pan.
4. You can also add pre-soaked wood chips or chunks to the Water Pan or together with the charcoal. The wood needs to smolder, so does not work in
the Water Pan together with liquid. Your food will be roasted, but with a smoky flavour.
5. For hotter, crispier roasting: position your roast on a Cooking Grill directly above the Water Pan. Do not add liquid to the pan. Fit the Upper Body and
the Domed Lid into place. Configuration from the bottom up should be: Lower Body –Charcoal Pan –Charcoal Grate –Charcoal –(Wood Chunks) -
Water Pan –Cooking Grill –Roast –Upper Body - Domed Lid. You can also roast instead or simultaneously on a Cooking Grill positioned into the
Upper Body. The higher cooking grill will be at a lower temperature. Usually you will need a bigger charcoal fire for a shorter time. Aim for temperatures
180°C to 220°C. Use a probe thermometer to know for sure when the meat is ready. Rest the roast properly for best results.
6. For slower, moister carefully add liquid to the Water Pan. You can use any mixture of water, juice, wine, beer. Do not use any flammable
liquids like very strong wine or spirits. Be very careful when adding the liquid not to spill any onto the charcoal. Use maximum around 4 litres, which will
last about 2 hours. Fit the Upper Body into place. Fit a Cooking Grill onto the Upper Support Brackets. Position your roast onto the upper Cooking Grill.
Fit the Domed Lid into place. Configuration from the bottom up should be: Lower Body –Charcoal Pan –Charcoal Grate –Charcoal –(Wood Chunks) -
Water Pan –Liquid - Upper Body - Cooking Grill –Roast –Domed Lid. You can also smoke instead or simultaneously on a Cooking Grill positioned
into the Lower Body. The higher cooking grill will be at a lower temperature. Usually, you will need a smaller charcoal fire for a longer time. Aim for
temperatures 150°C to 180°C. Use a probe thermometer to know for sure when the meat is ready. Rest the roast properly for best results.
7. The Dome Lid needs to be kept on as much as possible during cooking. Use the doors to carefully add charcoal, wood chips or liquid if required.
8. To Control the temperature, opening the top vent more will increase the temperature. Closing the top vent more will reduce the temperature. When
opening the top vent no longer increases the temperature, more charcoal will be required. Use the Lower Door to add charcoal. Add a small amount at
a time to avoid a sudden temperature increase. Be careful when opening any part of the smoker as a sudden increase in air can cause a flash of flame.
9. Using a roasting rack and a drip pan is helpful to more easily handle the roast, collect flavousome drippings and avoid flare ups.
10. Take care when positioning any smoker components that they are located securely into place. Long mitts are a must!
11. Take extra care when using liquid in the Water Pan. Liquid in the Water Pan will be extremely hot.
Dripping fats and oils can ignite on the charcoal, and can suddenly flare if the dome lid is removed quickly. To minimise flare ups, trim excess fat form
meats, turn and move food away from the flare, use a fine mist water spray on small flare ups (do not try and extinguish a self-sustaining grease fire
with water).
Smoking, Water Smoking and Slower Cooking
To smoke or slow cook larger cuts of meat with indirect heat:
1. Light the bbq as outlined above, except use only a minimal amount of charcoal and do not spread the fire out. Its best to start the charcoal in the middle
of the pile so that the fire gradually spreads outwards as you are cooking. Use minimal charcoal and add small amounts as required. The aim will be to
cook slowly at temperatures 125°C to 150°C. Pre-soaked wood chunks can be dispersed amongst the charcoal so that they smolder and do not all
ignite at the same time. The food will be at least partially “cured” by the smoke infusion. Treat any food prepared this way as usual –do not rely on the
smoke infusion to act as a preservative –consume immediately or refrigerate as usual.
2. Fit the Water Pan into the Lower Support Bracket in the Lower Body. This will hold liquid to help moderate the heat and keep the food moist and
tender. Carefully add liquid to the Water Pan. You can use any mixture of water, juice, wine, beer. Do not use any flammable liquids like very strong
wine or spirits. Be very careful when adding the liquid not to spill any onto the charcoal. Use maximum around 4 litres, which will last about 3 hours.
3. For drier, crispier smoking: Position your food on a Cooking Grill directly above the Water Pan. Fit the Upper Body and the Domed Lid into place.
Configuration from the bottom up should be: Lower Body –Charcoal Pan –Charcoal Grate –Charcoal –Wood Chunks - Water Pan –Cooking Grill –
Food –Upper Body - Domed Lid. You can also smoke instead or simultaneously on a Cooking Grill positioned into the Upper Body. The higher
cooking grill will be at a lower temperature. Usually you will need a bigger charcoal fire for a shorter time. Aim for temperatures 125°C to 150°C. Use a
probe thermometer to know for sure when the meat is ready. Rest the roast properly for best results.
4. For slower, moister smoking: Fit the Upper Body into place. Fit a Cooking Grill onto the Upper Support Brackets. Position your roast onto the upper
Cooking Grill. Fit the Domed Lid into place. Configuration from the bottom up should be: Lower Body –Charcoal Pan –Charcoal Grate –Charcoal –
Wood Chunks- Water Pan –Liquid - Upper Body - Cooking Grill –Food –Domed Lid. You can also smoke instead or simultaneously on a Cooking Grill
positioned into the Lower Body. The higher cooking grill will be at a lower temperature. Usually, you will need a smaller charcoal fire for a longer time.
Aim for temperatures 125°C to 150°C. Use a probe thermometer to know for sure when the meat is ready. Rest the roast properly for best results.
5. The Dome Lid needs to be kept on as much as possible during cooking. Use the doors to carefully add charcoal, wood chips or liquid if required.
Minimise opening doors as much as possible. Aim for a long, stable cook.
6. To Control the temperature, opening the top vent more will increase the temperature. Closing the top vent more will reduce the temperature. When
opening the top vent no longer increases the temperature, more charcoal will be required. Use the Lower Door to add charcoal. Add a small amount at
a time to avoid a sudden temperature increase. Be careful when opening any part of the smoker as a sudden increase in air can cause a flash of flame.
7. Using a roasting rack and a drip pan is helpful to more easily handle the roast, collect flavousome drippings and avoid flare ups.
8. Take care when positioning any smoker components that they are located securely into place. Long mitts are a must!
9. Take extra care when using liquid in the Water Pan. Liquid in the Water Pan will be extremely hot.
Dripping fats and oils can ignite on the charcoal, and can suddenly flare if the dome lid is removed quickly. To minimise flare ups, trim excess fat form
meats, turn and move food away from the flare, use a fine mist water spray on small flare ups (do not try and extinguish a self-sustaining grease fire
with water).
roasting:

5
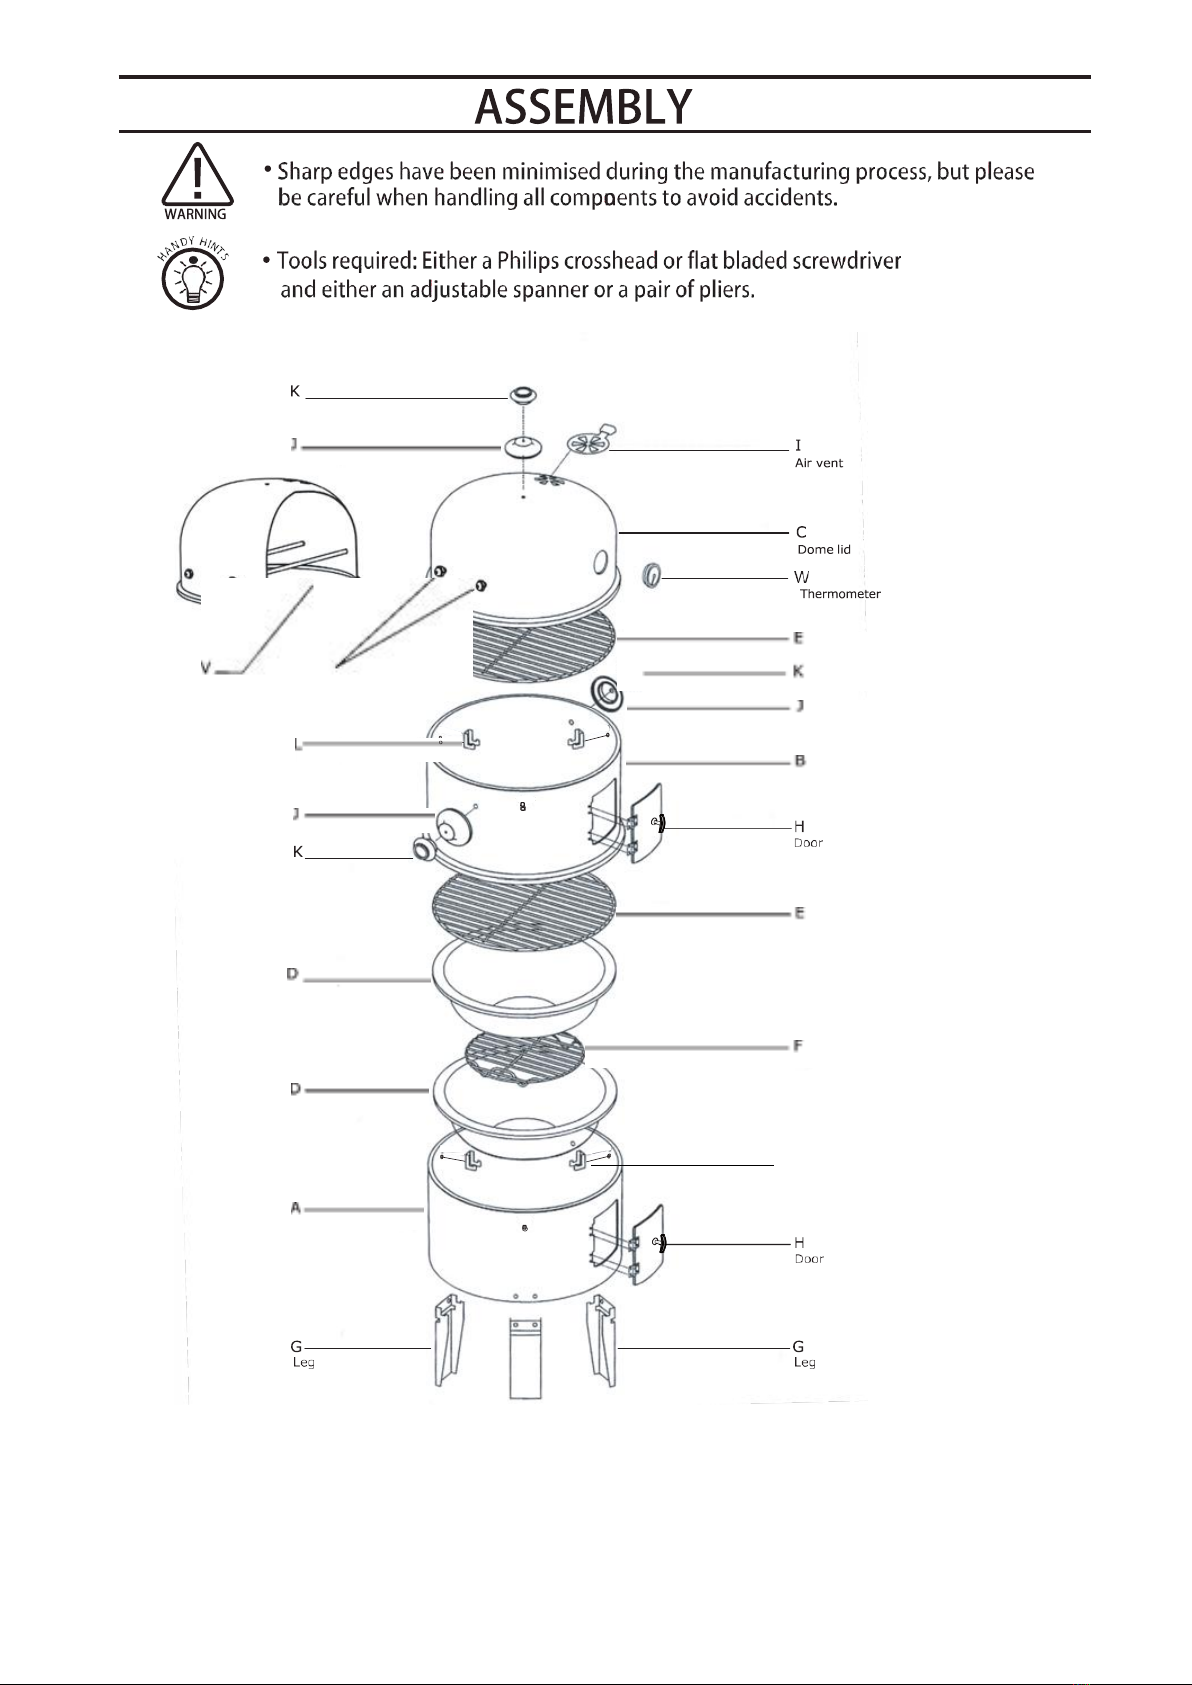
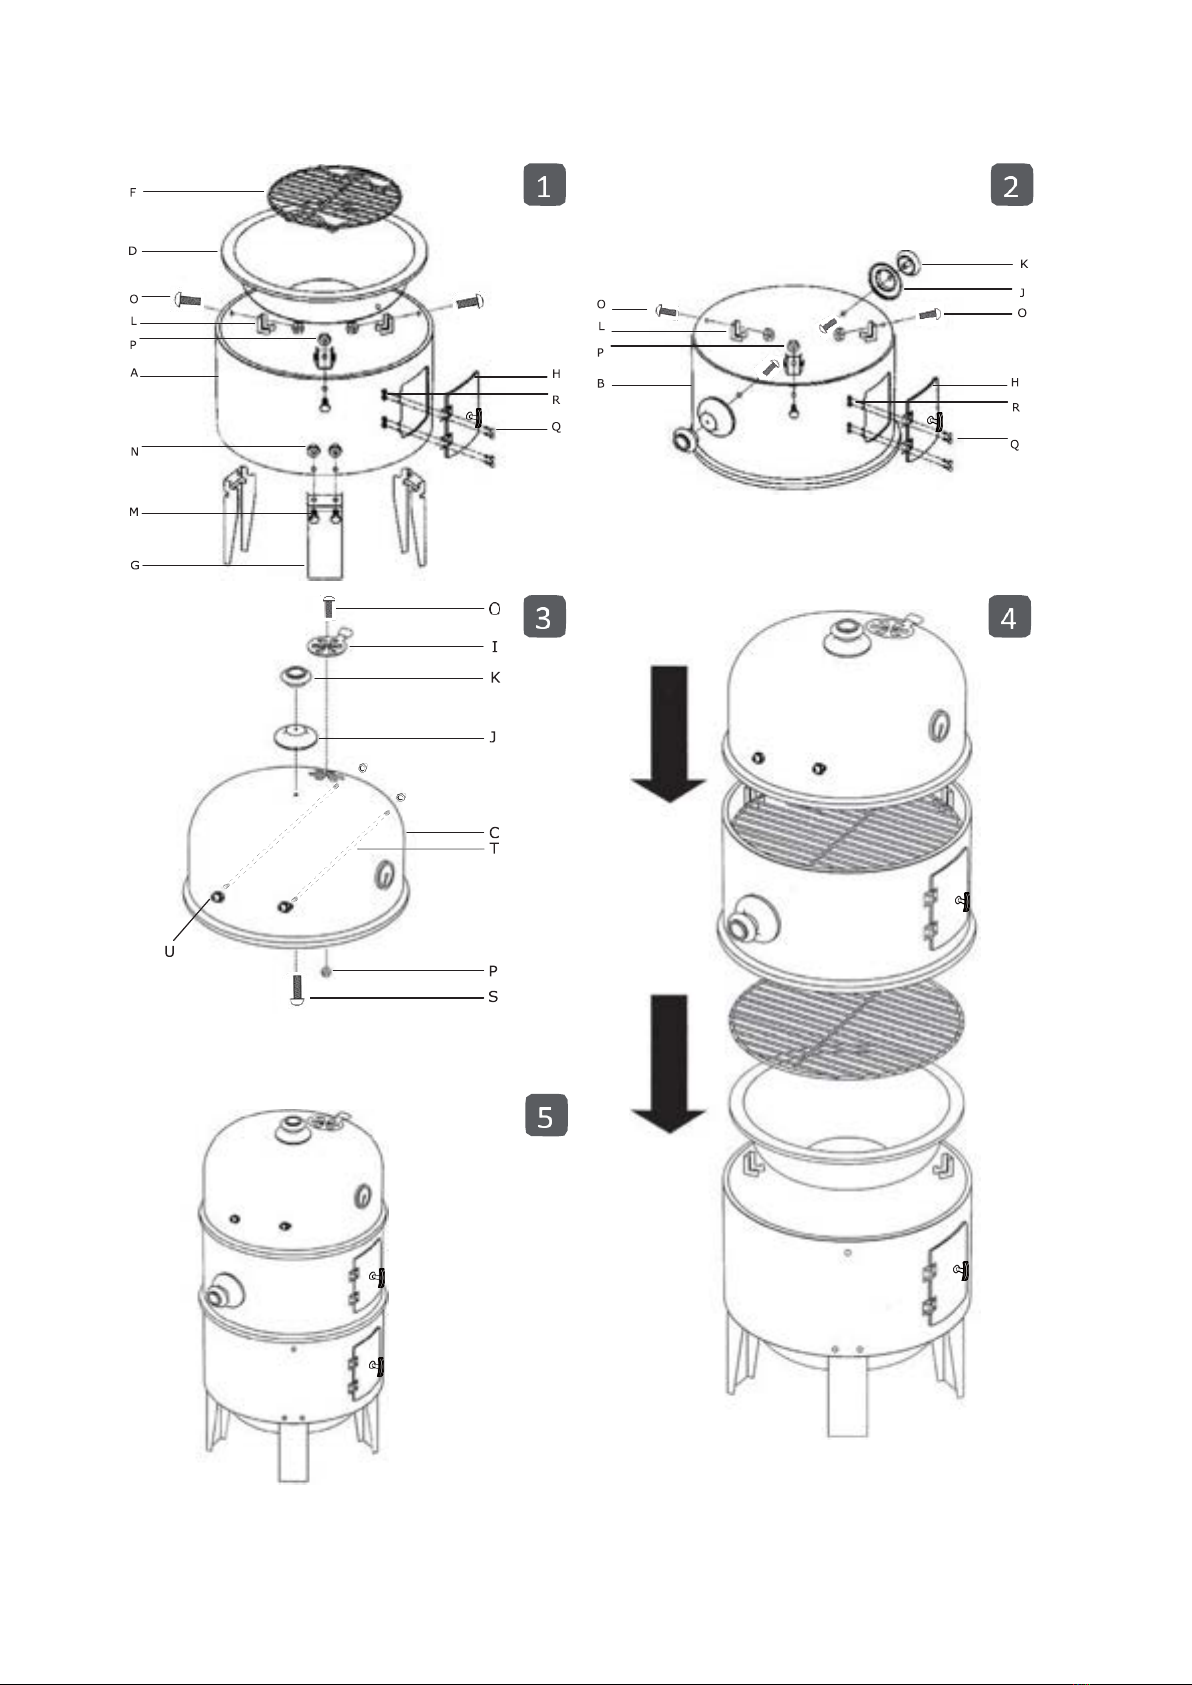
BBCHAR-A
BBCHAR-B
BBCHAR-C
BBCHAR-D
BBCHAR-E
BBCHAR-F
BBCHAR-G
BBCHAR-H
BBCHAR-I
BBCHAR-J
BBCHAR-K
BBCHAR-L
BBCHAR-T
BBCHAR-V
BBCHAR-W
6
BBCHAR-BP
7
Handle
Handle Base
T
Hanging Bars Nuts
Upper Support Bracket
Handle Base
Handle
Water Pan
Charcoal Pan
Lower Body
Cooking Grill
Handle
Handle Base
Upper Body
Cooking Grill
Charcoal Grate
L
Lower Support Bracket
8

9
Need more information or assistance in any way?
You can call Barbeques Galore where barbeque experts will be happy to help you.
Simply call 1800 978 555for your nearest store.
Or visit our website at:
www.barbequesgalore.com.au
G.L.G Australia Pty Ltd (ACN001 185 002)
Building A2, Campus Business Park, 350-374 Parramatta Road
Homebush, NSW 2140
AUSTRALIA
Phone 02 9735 4111
More Information?

10
WARRANTY AND CONSUMER GUARANTEE
The BBQ’s Galore Warranty and consumer guarantees set out in this document
override all other warranties on this product.
Barbeques Galore Warranty is provided in add
iti
on to other rights and remedies as set out
below under ‘Consumer Guarantees’.
Warranty Term
Subject to the cond
iti
ons set out below, this product is warranted to the purchaser to be free from
defects in workmanship and materials from the date of purchase for the terms speci
fi
ed below.
1YEAR
-
Paint deterioration and rust from exposure and normal use are
not covered by this
warranty.
Damage caused by improper operation, lack of cleaning and maintenance
or obvious failure to assemble is
not covered by this warranty.
Warranty Conditions
1.
Barbeques Galore warranty is non transferable and is limited to the original purchaser.
2.
Sa
ti
sfactory proof of the purchase (as de
fi
ned in the Compe
titio
n and Consumer Act 2010
(CCA))must befurnishedatthetimeofnotificationofthedefectfora claimunderthis
warranty to be enforceable.
3.
This warranty covers all parts found to be defe
cti
ve in workmanship and/or materials during
the warranty period. Barbeques Galore total liability in respect of a claim by a consumer
undertheCCAforaminorproblem(asdefinedintheCCA)withaproductislimited,atour
option,toprovidingtheconsumerwitharefund,replacementproductorrepairingthe
product.
4.
For major failures (as the term is de
fi
ned in the CCA) you are en
ti
tled to a replacement or
refundandforcompensation for any other reasonably foreseeable loss ordamage.
5.
Toimplementthiswarranty,pleasereturn theproducttotheplaceofpurchaseor
nominated service agent, otherwise a service call out fee will be charged and refunded if
claim is warrantable.
Installation Conditions
This appliance is for OUTDOOR USE ONLY! Assemble, position and operate only according to the
attached instructions.

11
Warranty Exclusions
1.
This warranty will be void and accordingly no claim of any nature will be enforceable
if the product has not been assembled, installed or operated according to the
instructions, or has been subject to abuse, improperly treated, neglected and/or if
any repairs, maintenance or service has been done by an unauthorised person.
2.
This warranty does not cover
•
rust due to improper care or lack of maintenance. Contact your place of
purchase for care and maintenance instructions. Cool, clean, oil and store
covered away from the elements when not in use.
•
commercial use
•
claims arising from damage caused by abrasive chemical cleaners, heat
discoloration or fat
fi
res
Consumer Guarantee
Our goods come with guarantees that cannot be excluded under the Australian Consumer Law.
You are entitled to a replacement or refund for a major failure and for compensation for any
other reasonably foreseeable loss or damage. You are also entitled to have the goods repaired or
replaced if the goods fail to be of acceptable quality and the failure does not amount to a major
failure.
Subject to the above paragraphs, all express or implied representations, conditions, statutory
guarantees, warranties and provisions (whether based on statute, common law or otherwise),
relating to this warranty, that are not contained in it, are excluded to the fullest extent
permitted by law.
Nothing in this warranty excludes, restricts or modi
fi
es any condition, warranty, statutory
guarantee, right or remedy, implied or imposed by common law, statute or regulation, which
cannot be lawfully excluded, restricted or modi
fi
ed.
For Customer Reference (keep these details filed in a safe place)
Purchased from
Date Purchased
/ /
Record SerialNumber
N.B. Satisfactory proof of purchase like your sales docket must be kept for any
claim under this warranty to be enforceable.
Service Contact Point
–
Please contact your place of purchase for warranty repairs or service.
BRANCHES AUSTRALIA WIDE
Phone-1800 978 555foryournearest store
CSR1@bbqgalore.com.au
Barbeques Galore Limited
Build A2, Campus Business Park, 350-374 Parrama
tt
a Road, Homebush, NSW 2140 AUSTRALIA
Phone 02 9735 4111
BBCHAR-JUL-2023
Table of contents
Popular Smoker manuals by other brands


Outdoor Leisure
Outdoor Leisure Smoke Hollow Smoke-Tronix D4015SSC Assembly, care & use manual

Smoky Mountain
Smoky Mountain 32901 Assembly and owner's manual

BarrelHouse
BarrelHouse BHC 14 DELUXE owner's manual

Dansons Group
Dansons Group PIT BOSS SPORTSMAN PB5000SP Assembly guide

Masterbuilt
Masterbuilt SPORTSMAN ELITE Assembly, care & use manual warning & safety information

Char-Broil
Char-Broil 7701413 product manual


