Smoky Mountain 32901 User manual

MODEL #32901/ 32910
1
ASSEMBLER / INSTALLER:
Leave these instructions with the consumer.
CONSUMER / USER:
This instruction manual contains important information necessary for the proper
assembly and safe use of this appliance. Read and follow all warnings and instructions
before assembling and using this appliance. Follow all warnings and instructions when
using this appliance. Keep this manual for future reference.
Failure to follow these instructions could result in fire, explosion or burn hazard,
which could cause property damage, personal injury or death.
Assembly and Owner’s Manual
ELECTRIC SMOKER
THIS SMOKER IS FOR
OUTDOOR USE ONLY
Français p. XX
Español p. XX
Français p. 21
Español p. 41

2
TABLE OF CONTENTS
Important Safeguards ......................................................................................................3
Package Contents ............................................................................................................5
Hardware Contents ..........................................................................................................7
Preparation ......................................................................................................................7
Assembly Instructions .....................................................................................................8
Initial Use Instructions ....................................................................................................11
Operating Instructions ....................................................................................................12
Cooking Instructions ......................................................................................................14
Care and Maintenance ..................................................................................................15
Troubleshooting ............................................................................................................16
Warranty .......................................................................................................................18
Replacement Parts List ................................................................................................18
SPECIFICATIONS
IMPORTANT: For your future records, please fill:
Model Number___________________________
Serial Number___________________________
Date of Purchase_________________________
Place of Purchase_________________________

IMPORTANT SAFEGUARDS
Please read and understand this entire manual before attempting to assemble, operate or install the
product. Read all instructions.
3
• DO NOTuse appliance for other than intended. It is NOT intended for commercial use.
• This item is NOT intended to be installed or used in or on a recreational vehicle and/or boats.
• The smoker is NOT to be used as a heater.
• Use only on properly grounded outlet. Unplug from outlet when not in use and before cleaning. To
disconnect, turn the control to OFF, then remove plug from wall outlet. Allow to cool before putting
on or taking off parts.
• Make sure the smoker is completely assembled and ready for operation before plugging into
electrical outlet. DO NOT operate any appliance with a damaged cord or plug or after the
appliance malfunctions or has been damaged in any manner. Return appliance to nearest
authorized service facility for examination, repair or adjustment.
• To protect against electrical shock, do not immerse cord, plugs or electrical parts in water or other
liquids. Smoker should NOT be exposed to water at any time.
• DO NOT operate smoker during rain or storms. If possible, disconnect from electrical source and
move smoker to dry and protected location.
• Protect electrical cord from damage, hot surfaces and/or moisture. DO NOT let cord hang over
edge of table or counter or touch hot surfaces.
• The use of alcohol, prescription or non-prescription drugs may impair the user’s ability to properly
assemble and safely operate this smoker.
• This smoker is for OUTDOOR use only, in a well-ventilated area. DO NOT operate the smoker
indoors, in a garage, or in any other enclosed area or under overhead construction.
• Use caution when assembling and operating the smoker to avoid cuts and scrapes from rough or
sharp edges.
• Use caution when lifting and/or moving the smoker to avoid strains or back injury. Two (2) people
are recommended to lift the smoker. DO NOT move the smoker while it is in use. Allow the
smoker to cool completely before moving or storing. Extreme caution must be used when moving
an appliance containing hot oil or other hot liquids.
• DO NOT operate the smoker near or under flammable or combustible materials such as decks,
porches or carports. The minimum clearance shall be at least 24 inches from any
structure or combustible material.
• Operate the smoker only on stable, level, non-flammable surfaces such as asphalt, concrete or
solid ground. DO NOT operate the smoker on flammable surfaces such as carpet or wood decks.
• DO NOT place or operate on tables or counters.
• DO NOT store the smoker near gasoline or other combustible liquids or where combustible vapors
may be present.
• Store smoker indoors when not in use - out of reach of children.DO NOT store or operate the
smoker in an area accessible to children or pets. Store the smoker in a dry, protected location.
• DO NOT leave the smoker unattended while it is in use. Close supervision is necessary when
any appliance is used by or near children.
• DO NOT allow anyone to conduct activities around the smoker during or following its use until it
has completely cooled. It is hot during operation and remains hot for a period of time.
• DO NOT leave hot ashes unattended until the smoker cools completely.
• DO NOT touch hot surfaces. Use handles or knobs. If you must handle the smoker when it is hot,
ALWAYS use protective mitts or heat-resistant gloves.
•The water pan, wood chip box and grease pan should not be moved while the smoker is operating
or until the smoker has cooled sufficiently. These will contain hot liquid, hot ashes and hot grease
that may cause serious injury. If you must move these components, ALWAYS use protective oven
mitts or heat-resistant gloves.

IMPORTANT SAFEGUARDS
4
• Dispose of cold ashes by wrapping them in heavy aluminum foil and putting them in a
non-combustible container. Be sure there are no other combustible materials in or near the
container. If you must dispose of ashes in less time than it takes for them to completely cool,
remove the ashes from the smoker, keeping them in heavy aluminum foil and soaking them
completely with water before disposing of them in a non-combustible container.
• DO NOT cover smoking racks with any type of metal foil as this may cause serious damage to
the smoker.
• DO NOT obstruct the flow of combustion air and/or ventilation air for the smoker.
• Use CAUTION when operating. Tie back long hair while operating the smoker. ALWAYS wear
fully-covering shoes while operating the smoker.
• NEVER use glassware, plastic or ceramic cookware on or in the smoker.
• NEVER operate the smoker without water in the water pan. NEVER allow the water to completely
evaporate. DO NOT clean this product with a water spray or the like.
• Check the water level at least every 2 hours. A sizzling sound may indicate a low water level or
billowing smoker may indicate no water in the water pan (grease from the meat will be falling on a
hot, dry water pan). Use caution and follow the instructions in this manual for adding water while
smoker is operating, as hot water may splash up and cause serious injury.
• When using flavoring wood, add a sufficient amount prior to operation to avoid having to add wood
while smoker is operating.
• The use of accessory attachments, not recommended by the manufacturer may cause injuries.
• While the smoker is not in use, the electrical cord should be unplugged and stored in a safe, dry
location.
•A short power-supply cord (or detachable power-supply cored) shoud be used to reduce the risk
resulting from becoming entangled in or tripping over a longer cord. Longer detachable power-
supply cords or extension cords are available and may be used if care is exercised in their use. If
a longer detachable power-supply cord or extension cord is used: (1) the marked electrical rating
of the cord set or extension cord should be at least as great as the electrical rating of the
appliance and (2) the cord should be arranged so that it will not drape over the countertop or
tabletop where it can be pulled on by children or tripped over unintentionally. Connection to an
extension cord should be kept dry and off the ground.
•Outdoor extension cords should be used with outdoor use products and are surface marked with
the suffix letter “W” and with a tag stating “Suitable for use with outdoor appliances”.
• DO NOT use the smoker if the heating element fails to heat up. Under such conditions, the
smoker should be turned to the OFF position and the electrical cord should be disconnected.
Refer to TROUBLESHOOTING guide in this manual.
• DO NOT use the smoker if the power indicator light or LED display fails to function. Refer to
TROUBLESHOOTING guide in this manual.
• Alternative fuels such as charcoal and wood pellets should NOT be used with this smoker or any
of its accessories.
• Fuel, such as charcoal briquettes, is not to be used with appliance.
• DO NOT place on or near a hot gas or electric burner or in a heated oven.
• DO NOT place smoker cover on the smoker if it is still hot from use.
• All installations are to conform to local, state and federal fire codes.
• KEEP fire extinquisher accessible at all times.
• Burning wood gives off carbon monoxide which can cause death.
• DO NOT burn wood chips inside homes, vehicles, tents, garages or any enclosed areas.
SAVE THESE INSTRUCTIONS
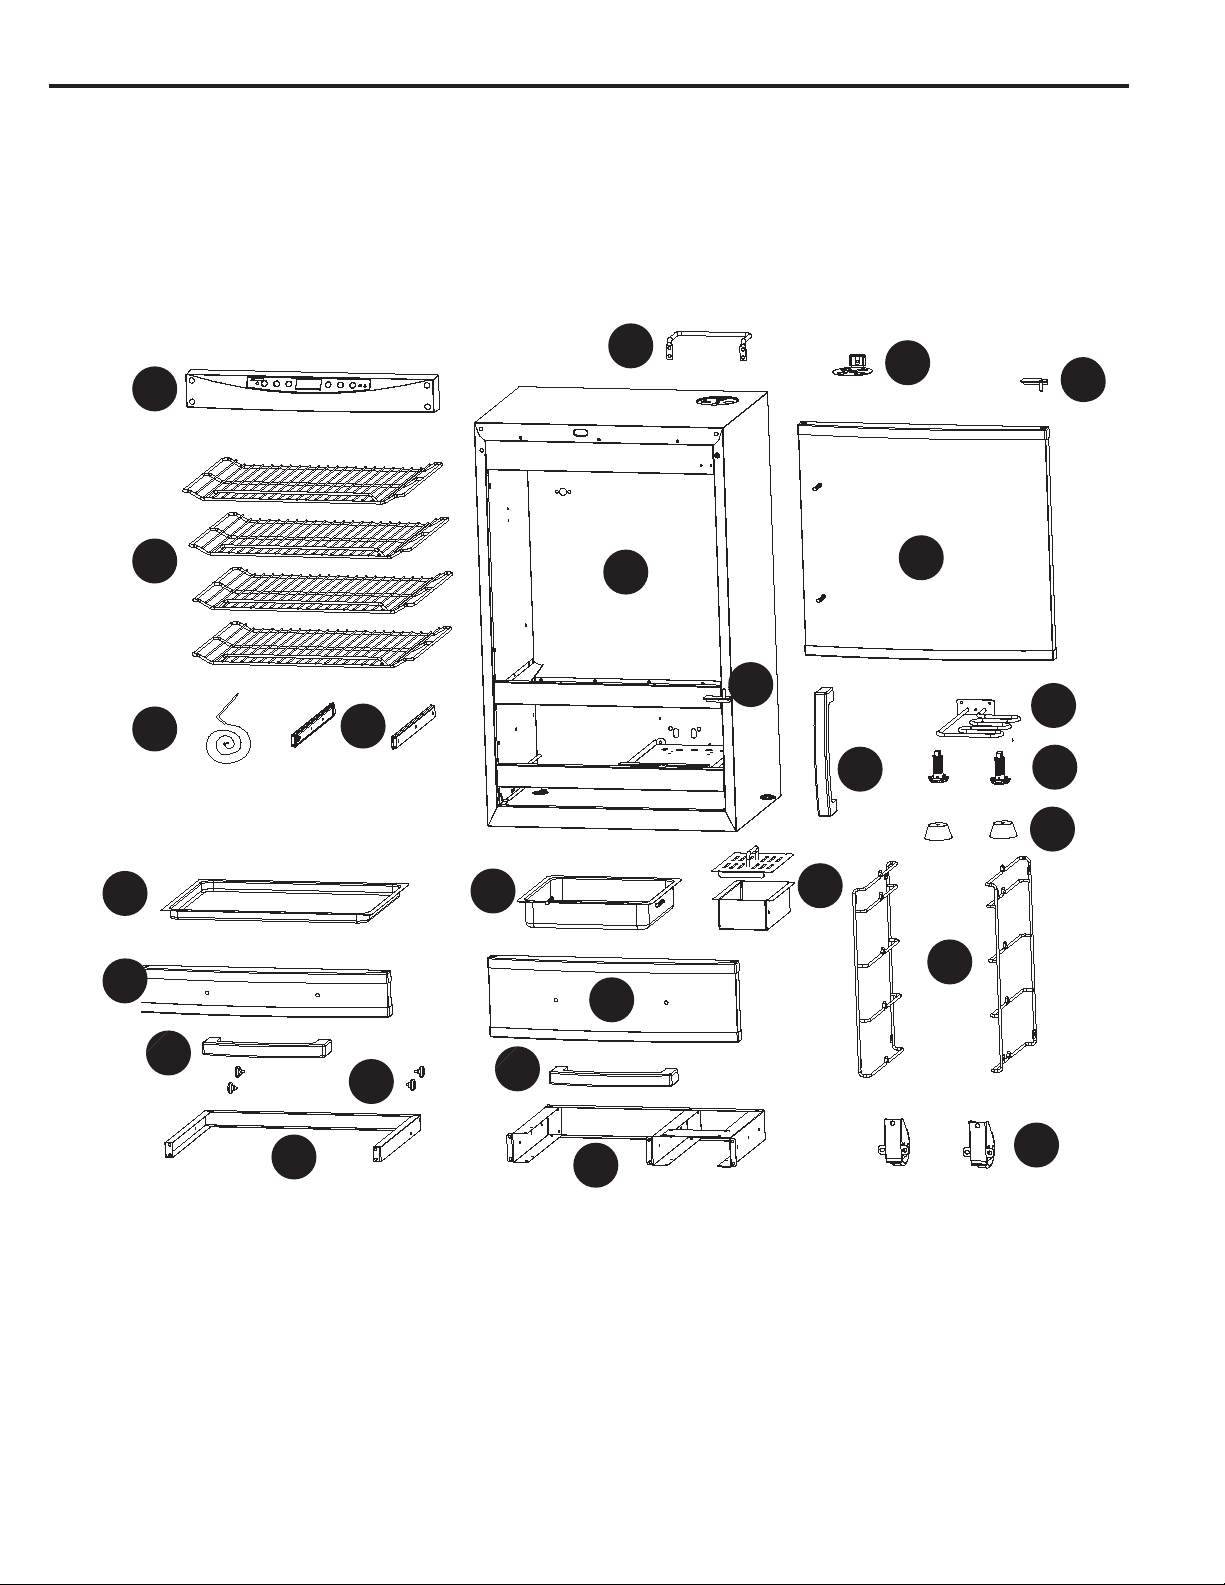
PARTS
5
A
G
U
B
F
O
W
T
J
I
P
N
M
Q
S
H
K
X
E
C
D
J
J
L
R
V

PARTS DESCRIPTION
6
PART DESCRIPTION QUANTITY
A Cabinet 1
B Door
(preassembled) 1
C Control panel (preassembled) 1
D Smoking rack 4
E Smoking rack side support (preassembled) 2
F Damper vent with guard 1
G Wood chip box with lid 1
H Water pan 1
I Grease pan 1
J Handle 3
K Adjustable feet 2
L Fixed feet 2
M Heating element (preassembled) 1
N Wheel assembly 2
O Back handle 1
P Top drawer front panel
(preassembled)
2
Q Top drawer support frame
(preassembled)
1
R Bottom drawer front panel
(preassembled)
1
S Bottom drawer support frame
(preassembled)
1
T Top drawer slides
(preassembled)
2
U Bottom drawer wheels 4
V Meat temperature probe (preassembled) 1
W Top door hinge
(preassembled)
1
X Bottom door hinge crossbar
(preassembled)
1

HARDWARE CONTENTS (shown actual size)
M5 x 12 mm
Short bolt
Qty: 13
Spring
washer
Qt: 13
7
AA DD
BB
M5 x 50 mm
Long bolt
Qty: 4
EE
Flat
washer
Qty: 6
PREPARATION
SPECIFICATIONS
Before beginning assemby of the product, make sure all parts are present.
Compare parts with package contents list on page 5 and the hardware contents list
on page 6. If any part is missing or damaged, do not attempt to assembly the
product. Contact customer service for replacement parts.
Estimated Assembly Time: 15 - 20 minutes
Tool Required for Assembly (not included): Phillips screwdriver
Helpful Tools (not included): Level
CC
M5 x 45 mm
Long bolt
Qty: 2

ASSEMBLY INSTRUCTIONS
8
1. Carefully place the cabinet (A) on its back.
First, insert both the fixed feet (L) into the front holes of
the bottom of cabinet (A) with spring washer (CC) and
short bolt (AA) and tighten.
Second, insert both adjustable feet (K) into the back
holes of the bottom of the cabinet (A) and tighten.
Carefully stand the cabinet (A) upright. To level the
cabinet (A), place a level (not included) on the side of the
unit, adjust the adjustable feet (K) as needed so the
cabinet (A) is level.
2. With the cabinet (A) in an upright position, carefully
attach each wheel assembly (N) to each side of
the bottom of the cabinet (A) with
spring washer (CC)
and short bolt (AA)
in each of the 3 bolt locations and
loosely tighten. Once all 3 short bolts (AA) are
adequately threaded, tighten securely.
3. With the cabinet (A) still in the upright position,
carefully insert
spring washer (CC) and short bolt (AA)
into each of the back handle (O) bolt holes and loosely
tighten. Once all 4
short bolts (AA)
are adequately
threaded, tighten securely.
1
2
3
A
L
K
AA
CC
A
A
CC
CC
AA
AA
N
O
Hardware Used
AA M5 x 12 mm Short bolt x 3
CC Spring washer x 3
Hardware Used
AA M5 x 12 mm Short bolt x 2
CC Spring washer x 2
Hardware Used
AA M5 x 12 mm Short bolt x 4
CC Spring washer x 4

ASSEMBLY INSTRUCTIONS
9
4. Place
spring washer (CC) and short bolt (AA) through
center hole of the damper vent with guard (F) and
and attach to top of the cabinet (A) and tighten. Be
sure not to overtighten damper vent with guard (F)
as it must be able to turn for adjustment.
5. Insert the
flat washer (DD) and long bolt (EE)
through the door (B) and partially fasten to handle (J).
Once fastened, securely tighten both long bolts (EE).
6. Insert the
flat washer (DD) and long bolt (BB)
through the top drawer front panel (P) and partially
fasten to handle (J). Once fastened, securely tighten
both long bolts (BB). Insert the
flat washer (DD)
and long bolt (BB)
through the bottom drawer front
panel (R) (not shown) and partially fasten to handle (J).
Once fastened, securely tighten both long bolts (BB)
6
5
4
Hardware Used
EE M5 x 45 mm Long bolt
DD Flat washer x 2
A
A
A
CC
AA
F
DD
EE
BB
DD
J
J
P
Hardware Used
AA M5 x 12 mm Short bolt x 1
CC Spring washer x 1
x 2
Hardware Used
BB M5 x 50 mm Long bolt
DD Flat washer x 2
x 2
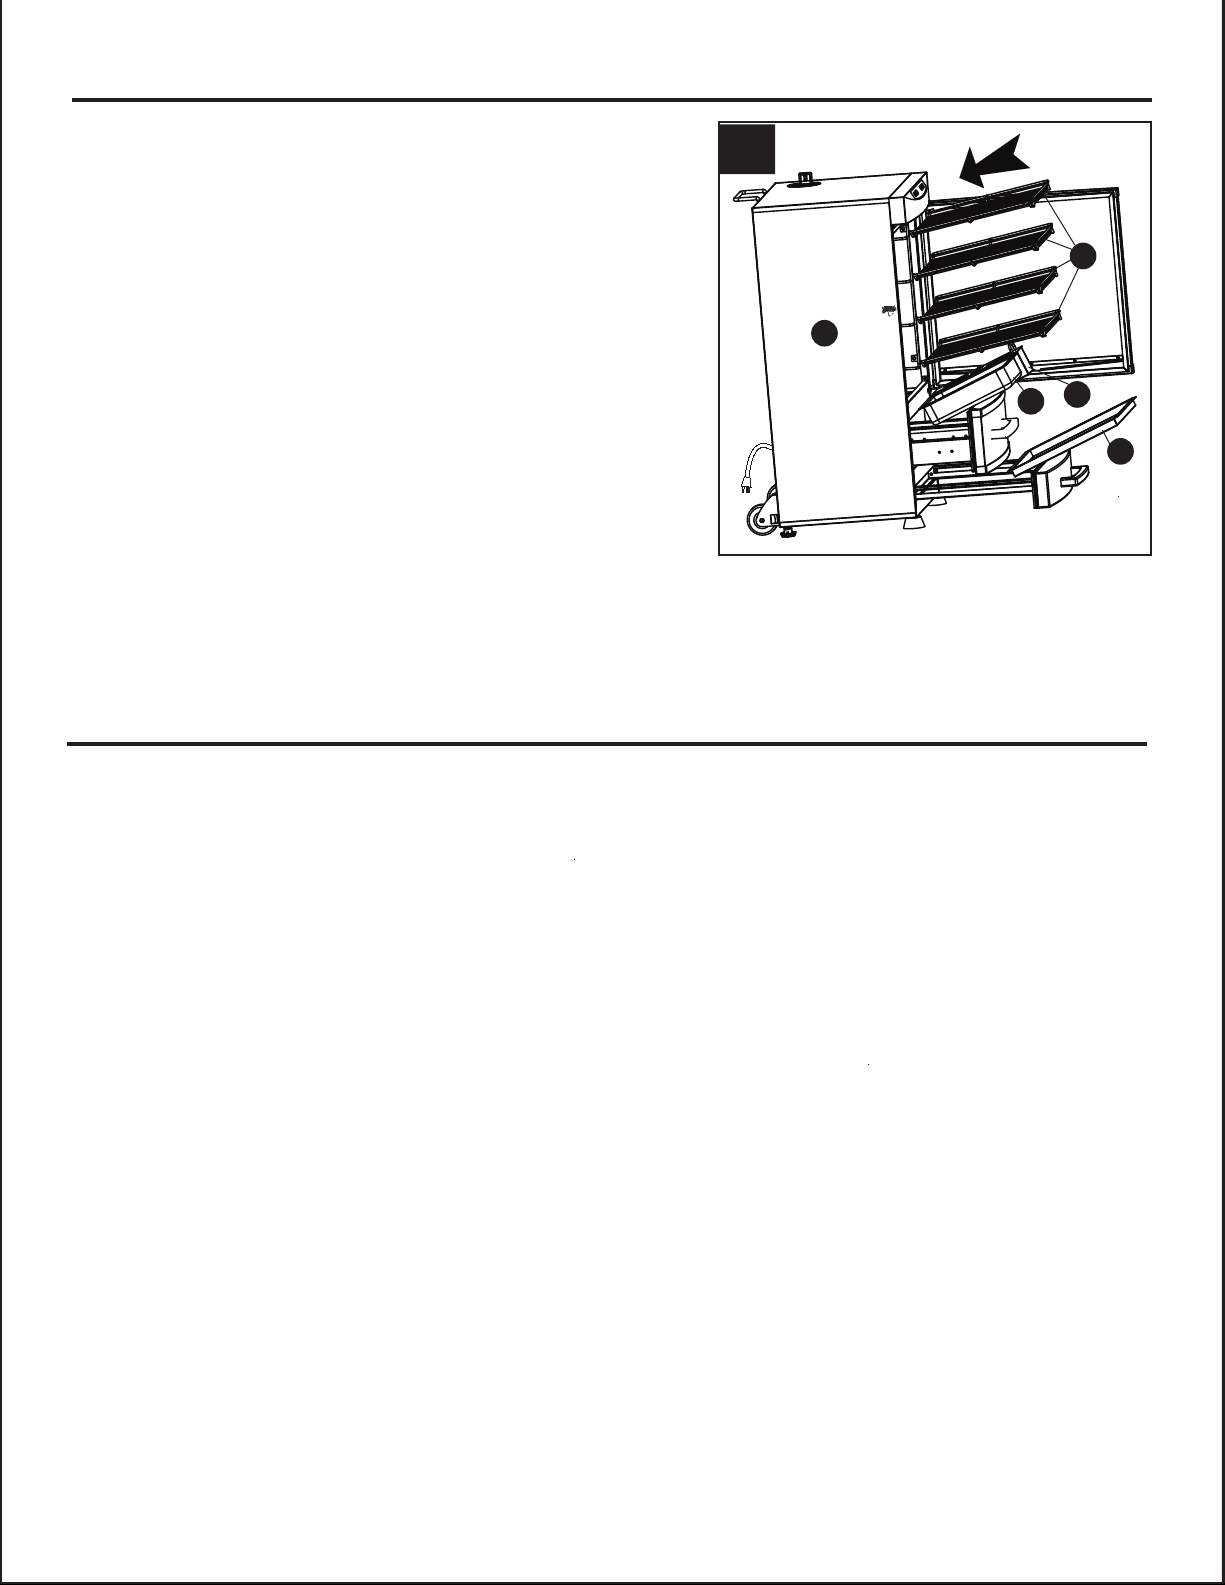
ASSEMBLY INSTRUCTIONS
10
7. With the top drawer completely open, carefully place
the water pan (H) in the water pan frame (left side of
drawer). Repeat same steps for placing wood chip box
with lid (G) in the wood chip box frame (right side of the
drawer)
With the bottom drawer completely open, carefully
place the grease pan (I) in grease pan frame.
Insert each smoking rack (D) into the associated rack
positions. It is recommended to keep these racks
inside the smoker when NOT in use. For use, only
use the number of racks required to hold the meat.
.
DD
8
8
7
A
D
H
I
G
INITIAL USE INSTRUCTIONS
Before you cook food in the smoker, it is important to prepare the smoker.
The below procedure is designed to clean and prepare the smoker for its initial smoking. Set the
temperature of the smoker to 225ºF and the time to run between 2 and 3 hours (see control
panel operating instructions, page 12).
For this procedure,
(1) The water pan should be in its drawer position with NO WATER in the pan.
(2) The wood chip box and lid should NOT be in its drawer position.
(3) DO NOT place any food in the smoker during this procedure.
At the second hour, add wood to the wood chip box, open top drawer and CAREFULLY insert
wood chip box with lid into its drawer position. Allow the wood to burn for the remaining hour
(60 minutes).
When this procedure is completed, allow the smoker to cool and remove the wood ashes and
residue from a cool or cold wood chip box. Also make sure the adjacent water pan is also cool
or cold when performing this clean out.

OPERATING INSTRUCTIONS
Control Panel: Push ON/OFF button and the LED display will show the temperature setting. The
smoker is ready to set the temperature and smoking time. Note: The smoker will not start heating
until both the temperature and smoking times are set.
Setting the Smoking Temperature:
1. Push the TEMP button to start the temperature setting.
2. Use the INCREASE and DECREASE buttons to set the smoker at the desired smoking
temperature. Note: The maximum temperature this smoker is capable of is 275ºF.
3. Once the desired temperature setting is reached, push the TEMP button once to lock in the
temperature.
Setting the Smoking Time:
1. Push the TIME button to start the smoking timer.
2. LED display should display a time reading of hours and minutes.
3. Use the INCREASE and DECREASE buttons to set the smoker timer to the desired smoking
time. Note: The maximum time allowed on this smoker is 24 hours.
4. Once the desired smoking time is reached, push the TIME button once to set the timer.
Note: This smoker has an automatic shut-off feature when the time reaches 00:00.
If the smoking is not completed, reset timer for the remaining smoking time desired.
Checking the Meat Temperature Probe:
1. Optimally, the meat temperature probe (V) should be inserted in the meat prior to starting
the smoker.
2. With the meat temperature probe (V) in the meat, the interior temperature of the meat will be
displayed on the LED display when the MEAT button is pushed. Push the MEAT button again to
return the LED display back to the original temperature and time settings.
Once started, the temperature and time on the LED display will alternate every 5 seconds.
If the control panel shows an error message, turn the smoker off and unplug it from the electrical
source; wait 10 seconds, plug the smoker back in to the electrical source; and turn the smoker on.
This will reset the control panel.
11
POWER HEATING

Adding water and wood to the smoker:
1. Open top drawer for access to the water pan and wood chip box.
2. Add water to water pan and fill up to 1 in. below the rim.
3. To add wood, lift the wood chip box lid completely off and add wood to the box.
Note: The amount and type of wood used is entirely up to you. It is recommended to start with
small amounts of wood initially.
4. Once the water and wood is added, SLOWLY and STEADILY push the top drawer closed until it
comes to a complete stop. Then set the temperature and timer to begin smoking.
Note: DO NOT set temperature and timer until the water and wood are loaded and both drawers
and door are completely closed.
Checking water and wood during operation:
• To check water while the smoker is in operation and HOT, SLOWLY open the top drawer to prevent
any splashing of remaining water in water pan. Replenish water as need - BE CAREFUL NOT to
touch any part of the interior of the drawer or door, the wood chip box or the water pan with bare
skin. Then SLOWLY and CAREFULLY push the top drawer closed until it comes to a complete
stop.
• To check wood while the smoker is in operation and HOT, SLOWLY open the top drawer to prevent
any splashing of remaining water in water pan. Use a heat-resistant oven glove or mitt to
CAREFULLY open the wood chip box lid. Once the lid is open, using a long-handle utensil, stir the
remaining wood ashes flat and carefully add wood. BE CAREFUL NOT to touch any part of the
interior of the drawer or door, the wood chip box or the water pan with bare skin. Then SLOWLY
and CAREFULLY push the top drawer closed until it comes to a complete stop.
Damper vent adjustments:
The key to effective smoking is via temperature maintenance that is controlled by a steady
temperature setting and by applying different damper vent adjustments.
• Damper vent with guard (F) helps to exhaust both heat and smoke.
• Damper vent with guard (F) SHOULD NEVER BE COMPLETELY CLOSED during the smoker operation.
Completely closing the damper vent with guard (F) can cause a dangerous build up of pressure inside
the cooking chamber.
• To maintain lower temperatures, keep damper vent with guard (F) partially to fully open. Note that
this will allow the heat and the smoke to escape at the same time.
• To maintain high temperatures, damper vent with guard (F) should be positioned from its smallest
opening to partially open. This will keep in both heat and smoke during the operation.
OPERATING INSTRUCTIONS
12

COOKING INSTRUCTIONS
IMPORTANT: Before use, clean and inspect the entire smoker.
Place and fill the wood chip box with flavoring wood chips and place the wood chip box with lid
in the appropriate location of the water pan/wood chip box drawer as instructed in the assembly
section of this instruction manual. The amount and type of wood(s) you use is entirely up to you.
Checking and adding wood to the wood chip box is covered on page 13 of this manual.
Place the water pan inside the water pan/wood chip box drawer as instructed in the assembly
section of this instruction manual. Carefully fill the water pan with water (or similar liquid like beer
or apple juice) up to 1 in. below the water pan rim.
DO NOT overfill or allow water to overflow from the water pan. A full water pan should last for
approximately 3 or more hours. Checking and adding water to the water pan is covered on
page 13 of this manual.
Insert or adjust the smoking racks to the desired positions. For better access to the food with
tongs or spatulas, (1) use only the smoking racks needed for your smoking and (2) be sure the
grids of the smoking racks run front-to-back as shown in the assembly section. Smoking tip:
Coating the smoking rack(s) with cooking oil or spray before placing meat will help in after use
clean up.
Place the food on the smoking racks in a single layer with space between each piece. This will
allow smoke and hot moisture to circulate evenly around the food pieces.
Depending on the meat and size, smoking for 2 to 3 hours at the ideal constant cooking
temperature of 225º to 250ºF will get the best results. For more tender and heavily smoked
meat, a temperature of 220º to 240ºF and smoking 4 to 6 hours (or longer) may be preferred.
If time is critical, a higher temperature range is recommended. One common time measurement
used is to allow 45-60 minutes smoking time per pound of meat. Note this will vary for bone-in
and boneless meats.
Flavoring wood tips:
• Small wood chips work best inside the wood chip box.
• Use dry hardwoods such as hickory, pecan, apple, cherry or mesquite.
• Most fruit wood and nut trees produce an excellent smoke flavoring.
• DO NOT use resinous woods such as pine. These usually produce an unpleasant flavoring.
• Let your taste be your guide - experiment with different types and quantities of wood chunks,
chips or sticks. You may also mix different woods together.
• To produce longer smoking and prevent faster burning, pre-soak the wood in water for at least
30 minutes. [See wood chip manufacturer’s instructions]
• Most smoking flavor occurs within the first few hours of smoking. Adding wood chips after
this is typically not necessary unless extra-heavy smoking flavor is desired.
13

CARE AND MAINTENANCE
CAUTION: All care and maintenance procedures are be performed only while the smoker is
turned off, completely cooled and unplugged from the electrical source.
To clean, remove the water pan, wood chip box with lid, grease pan and cooking racks from the
smoker. Clean with hot, soapy water and rinse and dry thoroughly. To make cleaning easier, you
may prefer to coat the cooking racks lightly with a cooking oil or cooking spray before each use.
To clean the inside and outside of the smoker cabinet, simply use a damp cloth. Spray washing with
a water hose is not recommended. All moisture should be wiped away and not allowed to stay inside
or on top of the smoker.
After the ashes are completely cool, remove the wood chip box with lid and thoroughly clean out all
wood ashes and unburned wood, and wipe the box clean of any residue.
Make sure the grease in the grease pan is completely cool before removing the grease pan for clean-
ing. Dispose of the grease and wash thoroughly.
Frequently inspect and clean the smoker for insects and insect nests.
Inspect the electrical cord before each use to make sure it is in good condition. If there are signs of
cuts or damage, DO NOT use the electrical cord.
To protect your smoker from weather and other elements, it is recommended to keep your smoker
covered when not in use and stored in dry area.
It is recommended that this electric smoker is NOT stored outside or in an area where outside
elements may have a detrimental effect on the smoker and its operation.
Weather-resistant covers for this smoker are available for purchase.
14

15
TROUBLESHOOTING
PROBLEM POSSIBLE CAUSE CORRECTIVE ACTION
Power indicator light
does not illuminate
1. Electrical cord not plugged into outlet
2. Main house fuse has been tripped
3. Wire connection on control panel is
not properly connected to the cabinet
4. Control panel has malfunctioned
1. Check outlet connection
2. Check house fuses. Do not
operate other appliances on
same electrical circuit
3. Remove control panel and
to check all wire connections
4. Do not use the smoker and
contact the manufacturer
Longer than normal
heating time
No smoke
Control panel
displaying
error message
Power indicator
light is on but the
smoker is not
heating.
Control panel does
not adjust heat or
time.
Meat Probe does
not show
temperature on
display.
Temperature
decreases sharply
or shuts down
prematurely
1. Door not closed completely
2. Control panel has malfunctioned
3. Use of extension cord
1. No wood in wood chip box
2. Heating element is not functioning
1. Control panel has malfunctioned
1. Control panel has malfunctioned
1. Control panel has malfunctioned
1. Meat probe not properly installed in
back panel of cooking cabinet
2. Meat probe is damage
3. Control panel has malfunctioned
1. Control panel has malfunctioned
1. Close door securely
2. Do not use the smoker and
contact the manufacturer
3. Discontinue use of extension
cord
1. Add wood to wood chip box
2. Do not use the smoker and
contact the manufacturer
1. Do not use the smoker and
contact the manufacturer
1. Do not use the smoker and
contact the manufacturer
1. Do not use the smoker and
contact the manufacturer
1. Reinstall and test
2. Do not use the probe
Contact manufacturer for
replacement probe
3. Do not use the smoker and
contact the manufacturer
1. Do not use the smoker and
contact the manufacturer

16
TROUBLESHOOTING
PROBLEM POSSIBLE CAUSE CORRECTIVE ACTION
Gap between the
door and the cabinet
1. Door is out of aligment
2. Door seal is damaged
1. Check outlet connection
2. Do not use the smoker and
contact the manufacturer
Excessive smoke
is escaping
through
door
Grease leaking
from cabinet
1. Door is out of aligment
2. Door seal is damaged
1. Grease pan is not properly
positioned
2. Grease pan is filled up with grease
and is overflowing
1. Check door hinge bolts to
make sure they are tight
2. Do not use the smoker and
contact the manufacturer
1. Reposition grease pan
2. Empty grease pan

WARRANTY
17
This electric smoker is warranted to be free from defects in material and workmanship when properly
assembled, used and cared for as directed in these instructions for one (1) year from the date of
original retail purchase. Painted surfaces are guaranteed to be free of defects for 90 days from the
date of original retail purchase (except for rust, which may appear from repeated use). This warranty
does not cover damage or issues related to neglect, abuse, accident, transportation damages,
commercial use or ANY modifications made to this product. Repair labor is not covered. This
warranty is the only warranty offered and is in lieu of all other warranties, whether expressed or
implied, which includes implied warranty, merchandising or use for a particular purpose.
REPLACEMENT PARTS LIST
For replacement parts, call our customer service department at 1-800-963-0211, 8 a.m. - 6 p.m., EST,
Monday-Thursday, 8 a.m. - 5 p.m., Friday.
Printed in China
PART DESCRIPTION PART #
A Cabinet ES0001
B Door ES0002
C Control panel ES0003
D Smoking rack ES0004
E Smoking rack side support ES0005
F Damper vent with guard ES0006
G Wood chip box with lid ES0007
H Water pan ES0008
I Grease pan ES0009
J Handle ES0010
K Adjustable feet ES0011
L Fixed feet ES0012
M Heating element ES0013
N Wheels assembly ES0014
O Back handle ES0015
P Top drawer front panel ES0016
Q Top drawer support frame ES0017
R Bottom drawer front panel ES0018
S Bottom drawer support frame ES0019
T Top drawer slides ES0020
U Bottom drawer wheels ES0021
V Meat temperature probe ES0022
W Top door hinge ES0023
X Bottom door hinge ES0024
AA M5 x 12 mm Short bolt ES0030
BB M5 x 50 mm Long bolt ES0031
CC Spring washer ES0032
DD Flat washer ES0033
EE M5 x 45 mm Long Bolt ES0034
FOR ILLUSTRATIONS OF THE
PARTS AND HARDWARE THAT
ARE AVAILABLE TO ORDER
REFER TO PAGE 5, 6 AND 7
OF THIS INSTRUCTION MANUAL

Here is a chart for measuring properly cooked meat temperature:
(USDA Standard)
The below temperatures are measured with a meat probe thermometer. The heat
indicator on the door of the smoker SHOULD NOT be used as an accurate meat
temperature reading.
CAUTION
Ground Meats & Meat Mixtures:
Turkey 165°F (74°C)
Veal, Lamb 160°F (71°C)
Beef, Pork 160°F (71°C)
Fresh Beef:
Medium Rare 145°F (63°C)
Medium 160°F (71°C)
Well Done 170°F (77°C)
Fresh Lamb:
Medium Rare 145°F (63°C)
Medium 160°F (71°C)
Well Done 170°F (77°C)
Fresh Beef:
Medium Rare 145°F (63°C)
Medium 160°F (71°C)
Well Done 170°F (77°C)
Fresh Pork:
Medium 160°F (71°C)
Well Done 170°F (77°C)
Ham:
Fresh (raw) 160°F (71°C)
Pre-cooked 140°F (60°C)
Poultry:
Chicken (whole) 180°F (82°C)
Turkey (whole) 180°F (82°C)
Breasts, roast 170°F (77°C)
Thighs, wings 180°F (82°C)
Duck and Goose 180°F (82°C)
Fish:
Cook until opaque and flakes easily
18
FOOD TEMPERATURE CHART

19
RECIPES:
GLAZED PORK RIBS:
Ingredients:
Meat: 3 lbs Pork Spare ribs Wood Chips: Mesquite or Applewood
RUB: GLAZE:
1/3 cup black pepper ¼ cup unsalted butter 2 tbsp Worcestershire sauce
2 tbsp white sugar ¼ cup vegetable oil ½ tsp salt
1 tbsp salt 2/3 cup Ketchup 1 cup minced onions
1 tbsp garlic powder ½ cup vinegar
1 tbsp Lawry Salt ½ cup maple syrup
Melt butter and add ingredients and cook at low heat for 30 minutes until it thickens. Stir often.
Using half of the rub mix, rub the ribs the night before and place in plastic bag and refrigerate. Before smoking, remove
ribs from bag, apply remaining rub and let ribs come up to room temperature (roughly 30 minutes).
Remove cooking racks and pre-heat smoker to 225º. Add cooking racks needed (coating racks with cooking oil or
cooking spray before placing ribs) and carefully place ribs on racks.
Smoke ribs for approximately 3 hours. Brush on Glaze and let smoke 30 minutes and then brush on 2nd coat of Glaze.
Test ribs in 30 minutes for proper internal temperature (160º+) If done, remove the ribs from the smoker and allow to sit
15 minutes and then serve.
THANKSGIVING TURKEY:
Ingredients:
Meat: 12-15 lb turkey (maximum size) Wood chips: Your favorite flavoring
RUB: BASTE:
2 tbs Black Pepper 1 cup melted unsalted butter
2 tbsp Salt Any preferred seasoning can be added to baste
2 tbsp Garlic Powder (if more baste is desired, increase butter
2 tbsp Sage and seasoning)
2 tbsp Accent
Rub mix on all exposed parts of the turkey. Rub can also be added in cavities. Allow turkey to come up room
temperature (roughly 30 minutes)
Remove cooking racks and pre-heat smoker to 225º. Center cooking rack to the chamber to allow enough room for the
turkey (coating rack with cooking oil or cooking spray before placing turkey) and carefully place turkey on rack with
breast side down.
Allow approximately 45 minutes smoking time per turkey pound. Baste turkey every 60-90 minutes and turn turkey
slightly for every basting When turkey internal temperature at thickest part reaches170º-175º, it should be completely
cooked. Test several areas of the turkey to be sure. Remove turkey from the smoker and allow to sit 15 minutes before
carving.

20
RECIPES:
SMOKED BOSTON BUTT
Ingredients:
Meat: 6-8 lb. Boston (Pork) Butt (or similar roast) – bone-in or boneless
Wood Chips: Mesquite or Applewood
RUB: INJECTION:
1/3 cup black pepper 3/4 cup unsalted butter (melted)
2 tbsp white sugar 1 tbsp garlic powder
1 tbsp salt
1 tbsp garlic powder
1 tbsp Lawry Salt
1 tbsp Accent
Using half of the rub mix, rub the butt the night before and wrap in plastic wrap and refrigerate. Before smoking, remove
butt from wrap, apply remaining rub and let Butt come up to room temperature (roughly 30 minutes). Carefully inject
the butter mix into several areas deep inside the butt.
Remove cooking racks and pre-heat smoker to 235º. Center cooking rack to the chamber to allow enough room for the
Butt (coating rack with cooking oil or cooking spray before placing butt) and carefully place Butt on the rack.
Allow approximately 45-60 minutes smoking time to Butt pounds. When butt internal temperature at thickest part
reaches 165º+, it should be complete cooked. Test several areas of the Butt to be sure. Remove Butt from the smoker
and allow to sit 15 minutes before carving.
SMOKED SALMON
Ingredients:
Meat: 4 lbs Salmon
Wood Chips: Hickory, Applewood, Alder
BRINE:
1 to 2 gallons cold water
2-3 cups granulated white sugar (or 2 cups granulated brown sugar)
Non-iodized salt (you can use kosher or pickling salt)
Additional flavoring like garlic or onion powder, hot sauces, lemon or soy juice, Worcestershire sauce, etc. can be
added to brine.
Mix water and salt together in glass or plastic bowl, then add sugar and other flavorings. Completely immerse the
salmon in brine skin side up for 2-3 hours. The thicker the filet, the more brine time required. When brine time is done,
remove filet and thoroughly rinse with cold water and pat dry with paper towels. Salmon should have glossy look when
finished with brine(referred to as Pellicle).
Remove cooking racks and pre-heat smoker to 220º. Use proper number of cooking racks for filets (coating rack with
cooking oil or cooking spray before placing butt) and carefully place Salmon on the racks. You can place Salmon on
individual heavy duty aluminum foil sheets. Be sure that (1) sheets are strong enough to lift Salmon, (2) sheets are
greased with cooking oil, and (3) that there is room between individual Salmon sheets to allow proper airflow in the
smoker chamber.
Allow approximately 45 minutes smoking time per pound. The Salmon should be done when white film comes to the
surface, feels firm and has a golden glaze on the surface.
This manual suits for next models
1
Table of contents
Languages:
Popular Smoker manuals by other brands

Brinkmann
Brinkmann Vertical Smoker Charcoal/Wood Smoker Grill owner's manual

New Braunfels
New Braunfels Bandera 09201553 Product guide

Mac's BBQ
Mac's BBQ ProQ quick start guide

Weber
Weber SMOKEY MOUNTAIN COOKER 63230 user manual

vMyst
vMyst vTube instructions

Char-Broil
Char-Broil Digital Electric Smoker manual


True North
True North 11001 instruction manual

Outdoor Gourmet
Outdoor Gourmet 163912 Assembly instructions & user manual

Masterbuilt
Masterbuilt ELECTRIC SMOKER Assemble and operating instructions

oklahoma joes
oklahoma joes RIDER Assembly guide

Char-Broil
Char-Broil 12101625 Product guide

BURNHARD
BURNHARD FRED Jr. Deluxe Black Series manual