Bimar VR23 User manual

1/48
LIBRETTO ISTRUZIONI
INSTRUCTION BOOKLET
BEDIENUNGSANLEITUNG
NOTICE D'INSTRUCTIONS
FOLLETO DE INSTRUCCIONES
VENTILATORE E RINFRESCATORE D’ARIA
AIR COOLER FAN
LÜFTER UND LUFTERFRISCHER
VENTILATEUR ET RAFRAICHISSEUR D'AIR
VENTILADOR Y ENFRIADOR DE AIRE
type VR23 (mod.
AC100-16BR
)
Questo manuale d’istruzione è fornito da trovaprezzi.it. Scopri tutte le offerte per Bimar VR23 o
cerca il tuo prodotto tra le migliori offerte di Trattamento Aria

2/48
Questosimboloviinvitaaleggereattentamentequesteistruzioni
prima dell’uso dell’apparecchio, ed eventualmente informare terzi,
senecessario.Conservareillibrettoperulterioriconsultazionieper
l’intera durata di vita dell’apparecchio. Se nella lettura di queste
istruzionid’uso alcune parti risultassero difficili nella comprensione
osesorgesserodubbi,primadiutilizzareilprodottocontattare
l’azienda all’indirizzo scritto in ultimapagina.
QuestosimboloindicalaclasseIIisolamentoelettrico,percuila
spinadelcordoneèprivadelpoloperlamessaaterra.
ATTENZIONE!
Istruzionieavvertenzeperunimpiegosicuro.
Questosimboloindicadinon toccare l’apparecchioconmani
bagnate.
Questosimboloindicadivieto.
Questosimbolosignificaattenzionepericolodiscossaelettrica.
AVVERTENZEGENERALI
Questo apparecchio è destinato solo all’impiego domestico, per
ventilareeraffrescareambientiinternisecondolemodalitàindicatein
questeistruzioni:nonutilizzateloperaltroscopo.
L’apparecchio Non deve essere utilizzato in ambienti polverosi o con
materiali estremamente volatili (potrebbero ostruire griglie), o in
ambienti con elevata umidità, o con prodotti infiammabili, o in
ambienti esterni (all’aperto). Ogni altro uso è da considerarsi improprio
e pericoloso. Il costruttore non potrà essere ritenuto responsabile di
eventuali danni derivanti da uso improprio, erroneo e irresponsabile
e/odariparazionieffettuatedapersonalenonqualificato.
Esempi di apparecchi per ambiente domestico sono apparecchi per
tipiche funzioni domestiche, usati in ambito domestico, che possono

3/48
essereutilizzatipertipichefunzionidomesticheanchedapersonenon
esperte:
-innegozi,ufficiealtriluoghidilavorosimilari;
-inaziendeagricoleosimilari;
-daclientidialberghi,motelealtriambientiditiporesidenziale;
-inambientideltipobedandbreakfast.
Non utilizzare l’apparecchio con temperatura ambiente superiore a
40°C.
Attenzione: quando si utilizzano apparecchi elettrici, occorre sempre
rispettare le precauzioni di sicurezza di base per evitare i rischi di
incendio,discosseelettricheedilesionifisiche.Ancorpiùattenzionee
precauzione necessita nell’uso di apparecchi elettrici che incorporano
un serbatoio con acqua: nel caso di tracimazioni di acqua per prima
cosa disattivare la presa di corrente spegnendo l’interruttore del
quadro elettrico, e solo dopo togliere la spina dalla presa di corrente.
Verificare che le parti elettriche dell’apparecchio non siano bagnate, e
se lo fossero asciugare completamente e con cura. Re-inserire la
spina nella presa di corrente, e poi utilizzare l’apparecchio. In caso di
dubbio,rivolgersiapersonaleprofessionalmentequalificato.
Non usare l’apparecchio se non funziona correttamente o se sembra
danneggiato; in caso di dubbio rivolgersi a personale
professionalmentequalificato.
Assicurarsi che la ventola funzioni correttamente: nel caso contrario
spegnere l’apparecchio e farlo controllare da personale
professionalmentequalificato.
Se l’apparecchio non è in funzione togliere la spina dalla presa di
corrente.
Scollegare sempre l’apparecchio dalla presa di corrente prima di
assemblare, smontare, riempire e svuotare il serbatoio, e prima di
pulire i filtri e l’apparecchio.
Non lasciare l’apparecchio esposto agli agenti atmosferici (sole,
pioggia,ecc.).
Non toccare l’apparecchio con mani o piedi bagnati.
Non spostare l’apparecchio quando è in funzione.

4/48
Questo apparecchio può essere utilizzato da bambini dagli 8 anni in
suedapersoneconridottecapacitàfisiche,sensorialiomentaliocon
mancanza di esperienza o conoscenza se a loro è stata assicurata
un’adeguata sorveglianza oppure se hanno ricevuto istruzioni circa
l’uso in sicurezza dell’apparecchio e hanno compreso i pericoli
correlati. I bambini non devono giocare con l’apparecchio. Le
operazionidipuliziae dimanutenzionenondevonoessereeffettuate
dabambiniamenochenonabbianopiùdi8anniesianosorvegliati.
Questo apparecchio non è destinato a essere fatto funzionare per
mezzo di un temporizzatore esterno o con un sistema di comando a
distanza separato, per evitare il rischio di incendio nel caso
l’apparecchio sia coperto o sia posizionato in modo noncorretto.
L’apparecchio può essere utilizzato
da bambini di età non inferiore a 8
anni e da persone con ridotte
capacità fisiche, sensoriali o mentali,
o prive di esperienza o della
necessaria conoscenza, purchè
sottosorveglianzaoppuredopoche
le stesse abbiano ricevuto istruzioni
relative all’uso sicuro
dell’apparecchio e alla
comprensione dei pericoli ad esso
inerenti. I bambini non devono
giocare con l’apparecchio. La pulizia
e la manutenzione destinata ad
essere effettuata dall’utilizzatore
non deve essere effettuata da
bambinisenzasorveglianza.
Non infilare alcun utensile o
le dita fra la maglia delle
griglie di protezione della
ventola.
L’apparecchio deve essere
mantenuto fuori dalla portata di
bambini.

5/48
Non tirare il cavo d’alimentazione o
l’apparecchio stesso per disinserire la
spinadallapresadicorrente.
Non toccare l’apparecchio o
laspinadicorrenteconmani
bagnateepiedibagnati.
Se il cavo di alimentazione è
danneggiato deve sostituito dal
costruttore o dal suo servizio
assistenza tecnica o comunque da
una persona con qualifica similare, in
mododaprevenireognirischio.
Assicurarsi che il cavo sia
posizionato correttamente e
non appoggiare sopra
nessunoggetto.
Mattonelle
Attenzione: mantenere sempre il tappo chiuso. La soluzione
contenuta all'interno non deve essere toccata o ingerita o
inalata. Tenere fuori dalla portata dei bambini e degli animali.
INSTALLAZIONE
Dopo aver tolto l’imballaggio, assicurarsi dell’integrità dell’apparecchio; in caso di dubbio
non utilizzarlo e rivolgersi a personale professionalmente qualificato. Gli elementi
d’imballaggio (sacchetti di plastica, polistirolo espanso, chiodi, ecc.) non devono essere
lasciati alla portata di mano di bambini in quanto potenziali fonti di pericolo, ma vanno
smaltiti secondo le norme vigenti negli appositi contenitori per la raccolta differenziata.
Attenzione: eventuali adesivi o fogli pubblicitari applicati, devono essere rimossi prima
dell’uso dell’apparecchio.
Prima di collegare l’apparecchio controllare che i valori di tensione riportati sulla targa
dati corrispondano a quelli della rete elettrica. In caso di incompatibilità tra la presa e la
spina dell’apparecchio, far sostituire la presa con altra di tipo adatto da personale
professionalmente qualificato, il quale accerti che la sezione dei cavi della presa sia
idonea alla potenza assorbita dall’apparecchio. In generale è sconsigliato l’uso di
adattatori e/o prolunghe; se il loro uso si rendesse indispensabile, devono essere
conformi alle vigenti norme di sicurezza e la loro portata di corrente (ampères) non deve
essere inferiore a quella massima dell’apparecchio.
Prima di ogni utilizzo verificare che l’apparecchio sia in buono stato, che il cordone
elettrico non sia danneggiato: in caso di dubbio rivolgersi a personale professionalmente
qualificato.

6/48
La presa di corrente deve essere facilmente accessibile in modo da poter disinserire con
facilità la spina in caso di emergenza.
Posizionare l’apparecchio lontano da:
-fonti di calore (ad es. fiamme libere, fornello gas, ecc.)
-contenitori di liquidi (ad esempio, vasche da bagno, doccia, lavelli ecc.) per evitare
schizzi d’acqua o che vi possa cadere (distanza minima 2 metri)
-finestre
-tessuti (tende, ecc.) o materiali volatili che possano ostruire la griglia di aspirazione;
verificare che anche la parte anteriore sia sgombra da materiali volatili (polvere, ecc.).
L’apparecchio non richiede opere di installazione, cioè pre-disposizione di attacchi
elettrici/acqua/fissaggio/o altro, per il suo utilizzo.
In caso di guasto o cattivo funzionamento spegnere l’apparecchio e farlo controllare da
personale professionalmente qualificato; le riparazioni effettuate da personale non
qualificato possono essere pericolose e fanno decadere la garanzia.
DESCRIZIONE
L’apparecchio è composto dall’unità principale (part. 18), alla cui base sono applicate 4
ruote piroettanti (part 6 e part 7): se queste non fossero già innestate alla base si
prendano come riferimento la figura, e si proceda come di seguito descritto: appoggiare
l’unità principale su una superficie stabile e priva di asperità per evitare graffi e
innestare (a fondo) le ruote negli appositi fori della base: nel lato
anteriore inserire quelle senza fermo (7), nel lato posteriore
inserire le 2 ruote con fermo (6): il fermo si aziona abbassando la
levetta, nel sollevarla si libera. Controllare che tutte e 4 siano in
appoggio.
L’apparecchio è inoltre composto dagli elementi di seguito descritti:
-Serbatoio (4). È inserito posteriormente e per sganciarlo dalla sede, premere in basso la
clip posteriore (10), e poi sfilarlo. Re-inserire il serbatoio nella propria sede premere a
fondo il serbatoio in modo che la clip blocchi nuovamente il serbatoio.
Attenzione: scollegare sempre l’apparecchio dalla presa di corrente prima di inserire
acqua nel serbatoio.
Frontalmente il serbatoio ha una parte sporgente per visualizzare il livello minimo e
massimo dell’acqua (1L-5L), ha filtro a mo’ di spugna che trattiene impurità (11)
eventualmente presenti nell’acqua, e due comparti: in
quello piccolo vanno immerse le 2 mattonelle di ghiaccio in
gel (vedere riferimento figure). Riempire solo con acqua di
rubinetto priva di calcare (es.: acqua demineralizzata) fino
al livello massimo indicato e nn oltre per evitare
tracimazioni quanto si sposta l’apparecchio, e non al di
sotto del livello minimo (per assicurare che la pompa
elettrica sia immersa).
Non aggiungere all’acqua alcun additivo (aromi o essenze o detergenti). Il serbatoio
contiene circa 5 litri e assicura un’autonomia di raffrescamento di circa 8-9 ore.

7/48
Mattonelle di ghiaccio in gel (9). Raffreddano l’acqua del serbatoio e di conseguenza
raffrescano il flusso d’aria del ventilatore. Lasciare le mattonelle in freezer per almeno 12
ore, prima di utilizzarle.
Griglia frontale. Quando l’apparecchio è in funzione la griglia deve essere aperta. Si apre
e si chiude (manualmente) semplicemente premendo una delle alette: se aperte
completamente orientano il flusso d’aria orizzontalmente, se aperte parzialmene
orientano il flusso d’aria verso verso il basso.
Telecomando (3). consente di azionare tutte le
funzioni. Per utilizzarlo, inserire 1 batteria del tipo
CR2032 all’interno del suo supporto: quest’ultimo si
sflia dalla parte inferiore come indicato nella figura
a lato.
È necessario rispettare la polarità della batteria, quindi il polo positivo risulterà rivolto
nella parte superiore quando si installa la batteria. Per azionare le funzioni col
telecomado, dal fronte dell’apparecchio tenere una distanza entro 4 metri e entro un
angolo di deviazione di 30°.
Filtri. Sono inseriti nella parte posteriore, davanti alla griglia di aspirazione dell’aria. Sono
racchiusi in una cornice che si estrae semplicemente tirando attraverso l’asola superiore.
Il filtro esterno (15) è in materiale sintetico, a maglie fini, e trattiene polvere, lanugine,
etc.; il filtro interno è in cellulosa e ad alveoli, viene costantemente irrorato d’acqua e
l’aria si raffresca nell’attraversarlo.
Avvolgicavo (2). Nella parte posteriore apposite linguette per avvolgere il cavo e assicura
una distanza minima fra griglia di asirazione e parete.
Attenzione: l’apparecchio può essere utilizzato solo se completamente e correttamente
assemblato. Nel caso di dubbio far controllare o eseguire l’operazione da personale
professionalmente qualificato. La superficie d’appoggio su cui utilizzarlo deve essere
stabile, e orizzontale.
USO
Con la funzione “ -COOLING” l’apparecchio arricchisce l’aria di micro-particelle d’acqua,
che evaporando rinfrescano l’aria: tale funzione è più efficace quanto più l’aria è secca, e
diminuisce con l’aumentare dell’umidità relativa (UR) dell’aria. Oltre il 75% di UR il
raffrescamento non è apprezzabile. La funzione “ -COOLING” avviene solo con la
presenza di acqua nel serbatoio, in quantità entro i valori min-max. Se l’acqua è terminata
all’interno del serbatoio dopo alcuni secondi udirete un bip e la pompa si arresterà
automaticamente, mentre il ventilatore continuerà a funzionare.
Le funzioni dell’apparecchio si azionano con i tasti del pannello di controllo o col
telecomando:
-stand-by/funzione (tasto D) aziona le funzioni dell’appareccchio e lo interrompe
ponendolo i stand-by (disattivato momentaneamente). Per spegnere l’apparecchio
disinserire la spina dalla presa di corrente.
-ventilazione Min/Med/Max. (tasto E): regola la velocità dell’aria.
-raffresca (tasto E): aziona o esclude la funzione rinfrescante, quindi in pratica la pompa
che innaffia il filtro ad alveoli.
-temporizzatore (tasto A): aziona o esclude il timer (max 7h. con intervalli di 1-2-4 h.), che
allo scadere del tempo interrompe l’apparecchio. Se il timer non viene azionato,
l’apparecchio funziona ininterrottamente sino a quando non verrà spento manualmente.
-oscillazione delle alette verticali (tasto B): aziona o esclude l’oscillazione automatica
destra-sinistra.
-modalità (tasto C): seleziona le modalità Normal/Natural/Sllep. In dettaglio: Normal: la
ventilazione è costante alla velocità selzionata (Min.Med. Max); Natural: ventilazione

8/48
ciclica 3 livelli di velocità. Sleep: ventilazione ciclica 2 livelli di velocià, riducendo
progressivamente.
Tutte le funzioni sopra esposte sono evidenziate da simboli luminosi sul pannello
comandi.
Prima di ogni utilizzo verificare che l’apparecchio sia in buono stato, che il cordone
elettrico non sia danneggiato: se il cavo di alimentazione fosse danneggiato, deve essere
sostituito dal costruttore o dal suo servizio assistenza tecnica o comunque da una
persona con qualifica similare, in modo da prevenire ogni rischio.
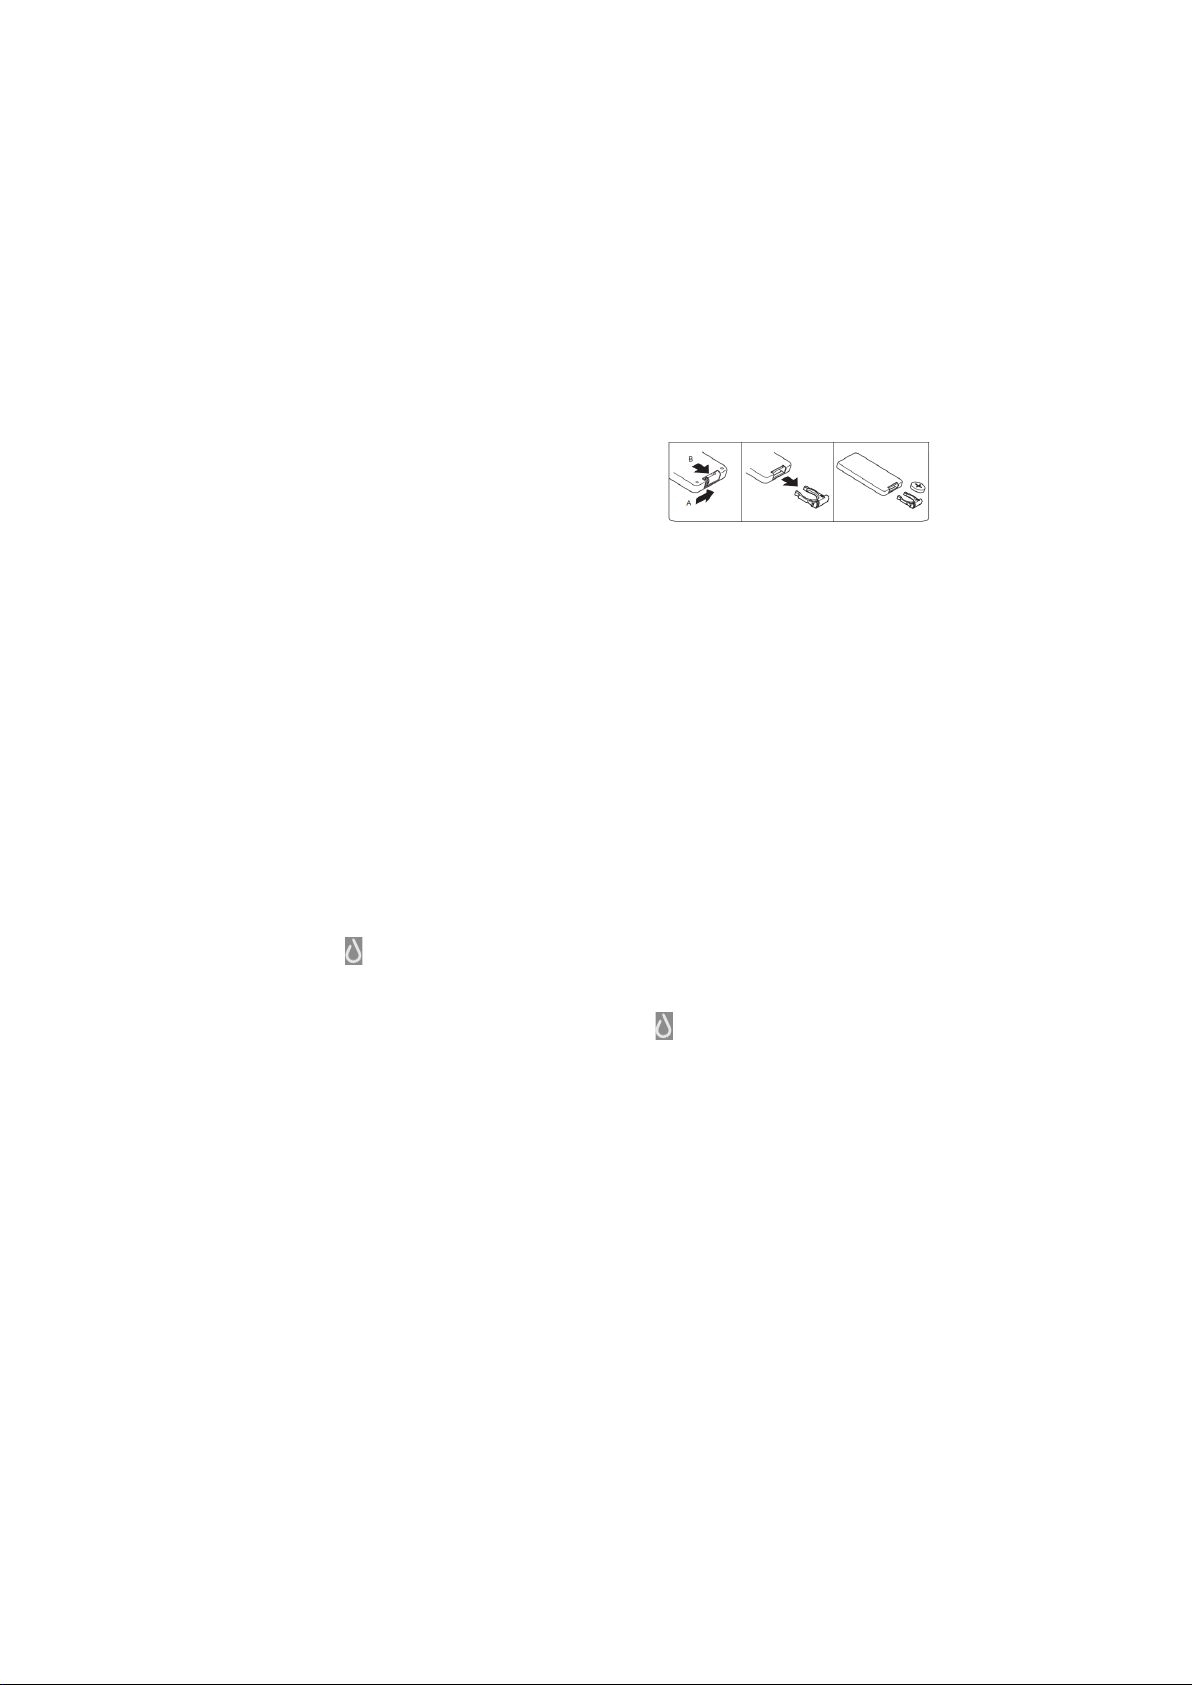
Le funzioni dell’apparecchio possono essere azionate sia con la pulsantiera posta sul
pannello comandi (1), che col telecomando (3). Il telecomando deve essere puntato nella
direzione del pannello comandi.
1. Inserire la spina nella presa di corrente, l’apparecchio è in stand-by.
2. Per azionare l’apparecchio, premere il tasto ON/OFF-” (D) del telecomando o del
pannello comandi.
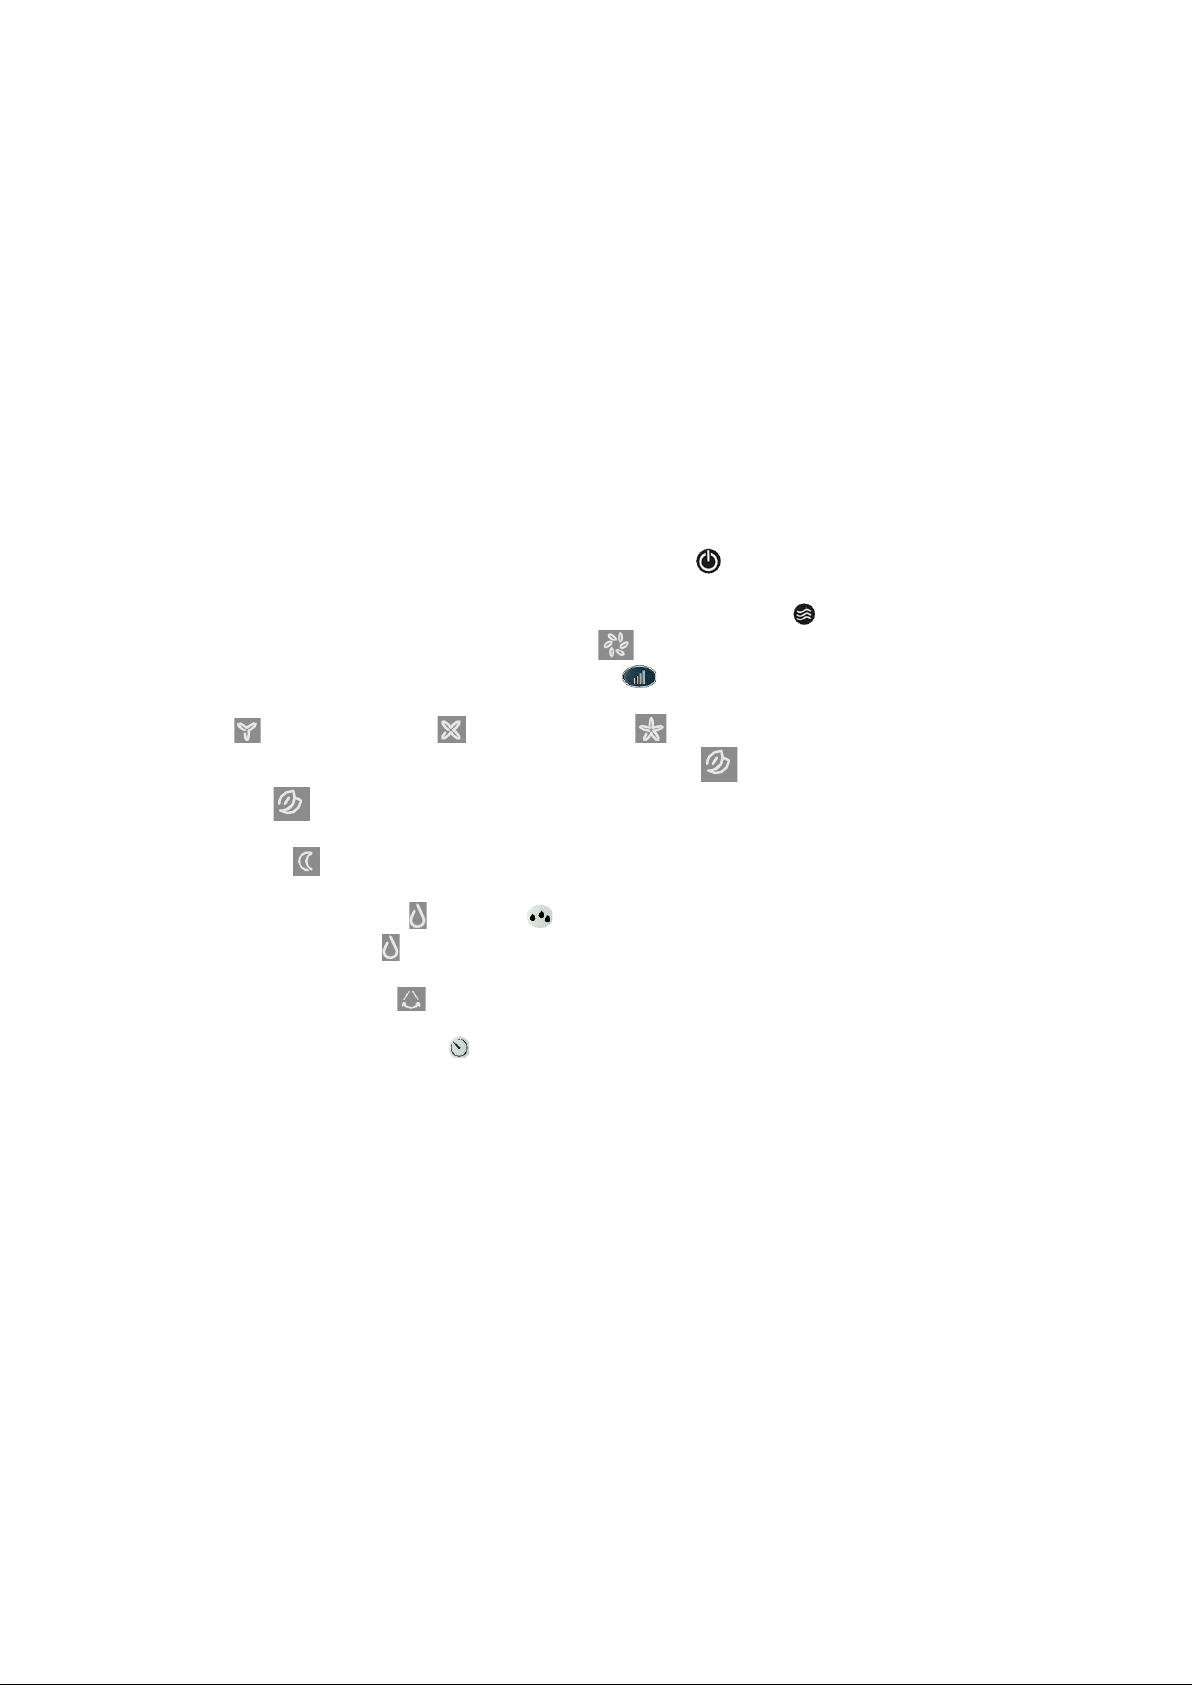
3. Per selezionare la modalita “NORMAL”, premere il tasto “MODE-”e selezionare la
funzione normale, si illuminerà la spia “ ”; selezionare la velocità desiderata,
premere ripetutamente il tasto “SPEED- ”: sul pannello comandi o sul
telecomando (minima, media o massima).
“ ”= velocità minima “ ”= Velocità media “ ”= Velocità massima
4. Premendo il tasto “
MODE
” (C), si passa alla modalità “
NATURE
”: si illuminerà la
spia “ ”.
5. La modalità “
SLEEP
” si attiva premendo una seconda il tasto “
MODE
” (C): si illuminerà
la spia “ ”.
6.
7. Premendo il tasto “ -
COOLING-
” (F), la funzione raffrescamento si attiva: si
illuminerà la spia “ - C
OOLING
”.
8. Premendo il tasto “ ” (C) l’oscillazione destra/sinistra si attiva, si illuminerà la spia
corrispondente. Per disattivare l’oscillazione, premere nuovamente il tasto.
9. Premendo il tasto
“Timer- ”
del pannello comandi o del telecomando (A), la funzione
si attiva: ad ogni pressione del tasto varia il tempo impostato, premuto una volta si
attiva il tempo di 1 ora, si illuminerà la spina corrispondente “1”, premuto una seconda
volta si attiva il tempo di 2 ore, si illuminerà la spina corrispondente “2”, premuto una
terza volta si attiva il tempo di 3 ore, si illumineranno le spie corrispondente “1-2”,
premuto una quarta volta si attiva il tempo di 4 ore, si illumineranno la spia
corrispondente “4”, infine premuto una quinta volta si attiva il tempo di 7 ore, si
illuminerà la spina corrispondente “1-2-4h”. Per disattivare questa funzione premere
nuovamente (sesta volta) il tasto, non si illuminerà nessuna spia.
10.Per disattivare il funzionamento dell’apparecchio e metterlo in stand-by, premere il
tasto “ON/OFF. Per spegnere l’apparecchio disinserire la spina dalla presa di corrente.
11.Avvolgere il cordone elettrico sull’apparecchio tramite le due linguette posteriori (2).
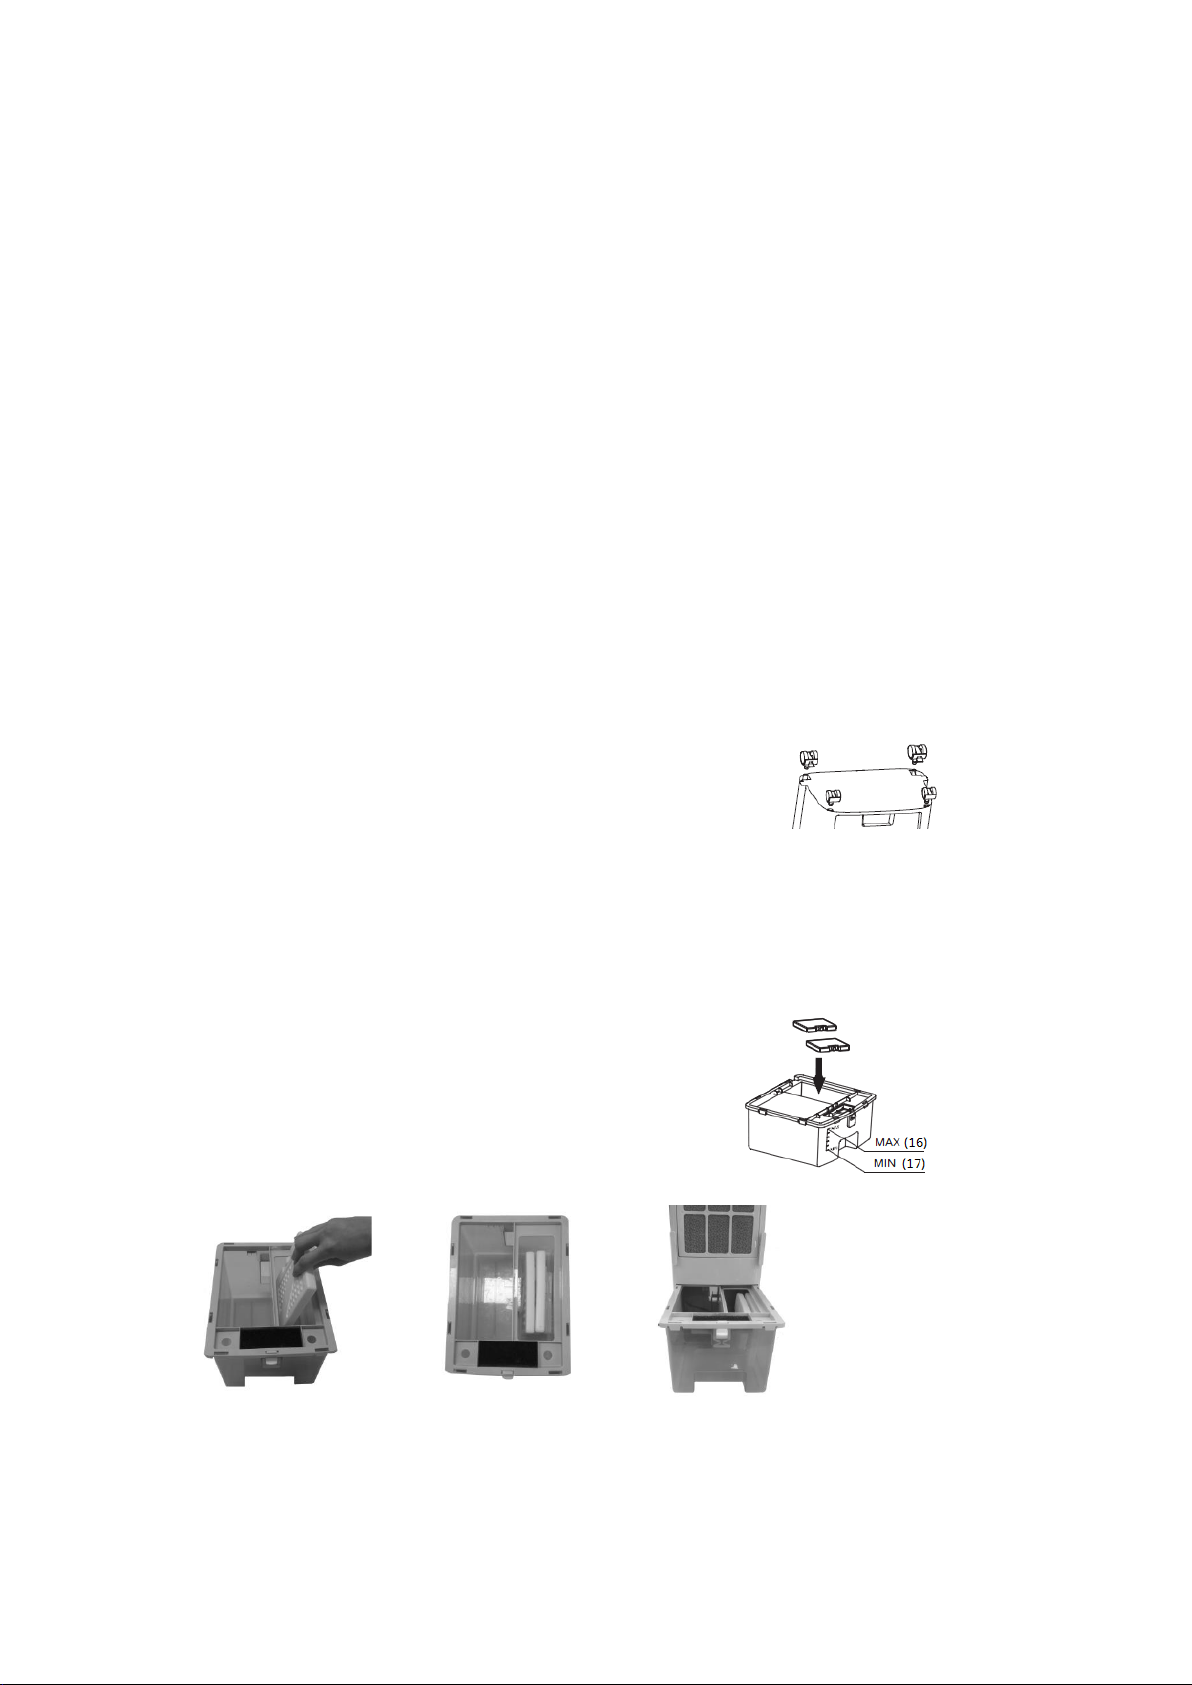
Dopo ogni uso è consigliato svuotare il serbatoio dall’acqua.
Per lunghi periodi di inattività, togliere la spina dalla presa di corrente.
PULIZIA E MANUTENZIONE
Attenzione: prima di eseguire le normali operazioni di pulizia, togliere la spina dalla presa
di corrente. L’apparecchio funziona al meglio se i filtri e il serbatoio sono puliti per evitare
la formazione di sporco e la formazione di calcare.

9/48
Assicurarsi periodicamente che il filtro di aspirazione (15) posteriore non risulti ostruita
da polvere, lanugine o sfilacci. Nel caso sia sporco, sganciarlo, e pulire la retina
mediante una spazzola o con acqua, facendo attenzione a non danneggiarla; poi
asciugarla perfettamente e riporlo nella propria sede.
Assicurarsi periodicamente che il filtro ad alveoli non sia sporco. Nel caso lo fosse,
toglierlo dalla propria sede e pulirlo con acqua con diluito un po’di detergente per uso
domestico e tramite un pennello o una spazzola morbida pulire gli alveoli esterni. Fare
attenzione a non danneggiare gli alveoli o altre parti. Risciacquare con cura sotto il
rubinetto dell’acqua, lasciarlo sgocciolare e prima di riporlo nella propria sede,
controllare che nessuna parte elettrica sia bagnata. Nel caso lo fosse, asciugare
perfettamente e con cura.
Per evitare depositi di calcare (o più frequentemente se l’acqua è molto dura) o
impurità, pulire periodicamente il foro uscita acqua ed i fori della cornice tramite uno
spazzolino od un pennellino, fare attenzione a non danneggiare i fori.
Per la pulizia del serbatoio e delle mattonelle di ghiaccio utilizzare acqua con diluito un
po’ di detergente e tramite un panno morbido pulire con cura. Sciacquare il serbatoio e
le mattonelle sotto acqua corrente, e lasciarli sgocciolare prima di riporli in sede.
Per la pulizia del corpo utilizzare un panno morbido, leggermente
inumidito; non utilizzare prodotti abrasivi o corrosivi.
Non immergere nessuna parte elettrica dell’apparecchio in acqua o altro liquido: nel
caso dovesse succedere non immergere la mano nel liquido ma per prima cosa togliere
la spina dalla presa di corrente. Asciugare con cura e verificare che tutte le parti
elettriche siano asciutte: in caso di dubbio rivolgersi a personale professionalmente
qualificato.
Per periodi lunghi di inutilizzo, è necessario porre l’apparecchio al riparo da polvere e
umidità; consigliamo di utilizzare l’imballo originale.
Se si decide di non utilizzare più l’apparecchio, si raccomanda di renderlo inoperante
tagliando il cavo di alimentazione (prima assicurarsi d’aver tolto la spina dalla presa di
corrente), e di rendere innocue quelle parti che sono pericolose qualora utilizzate per
gioco dai bambini (ad esempio mattonelle di ghiaccio).
Lo smaltimento della batteria del telecomando deve avvenire negli appositi contenitori,
smaltirle nel rispetto delle norme vigenti.
Avvertenze per il corretto smaltimento del prodotto ai sensi della Direttiva Europea
direttiva 2011/65/UE.
Alla fine della sua vita utile il prodotto non deve esser smaltito insieme ai rifiuti urbani.
Può essere consegnato presso gli appositi centri di raccolta differenziata predisposti
dalle amministrazioni comunali, oppure presso i rivenditori che forniscono questo
servizio.
Smaltire separatamente un elettrodomestico consente di evitare possibili conseguenze
negative per l’ambiente e per la salute derivanti da un suo smaltimento inadeguato e
permette di recuperare i materiali di cui è composto al fine di ottenere un importante
risparmio di energia e di risorse. Per rimarcare l’obbligo di smaltire separatamente gli
elettrodomestici, sul prodotto è riportato il marchio del contenitore di spazzatura mobile
barrato. Lo smaltimento abusivo del prodotto da parte dell’utente comporta
l’applicazione delle sanzioni amministrative previste dalla normativa vigente.

10/48
Thissymbolinvitesyoutoreadtheseinstructionscarefully
beforeusingtheappliance,andalsotoinformotherusers,if
necessary.Storethisbookletforfuturereferenceandforthe
entirelifetimeofthedevice.Ifanypartsoftheseinstructions
aredifficulttounderstandorifindoubt,contactthe
manufacturerattheaddressindicatedonthelastpagebefore
usingtheproduct.
ThissymbolindicatesClassIIelectricalinsulation,thatis,the
plugofthecordiswithoutthegroundpin.
CAUTION!
Instructionsandwarningsforsafeuse.
Thissymbolindicatesnottotouchthedevicewithwethands.
Thissymbolindicatesprohibition.
Thissymbolindicatescautionriskofelectricshock.
GENERALWARNINGS
This appliance is intended for domestic use, to ventilate and cool
interiorsinthemannerspecifiedintheseinstructions:donotuseitfor
otherpurposes.
The device must Not be used in dusty environments or in areas with
extremely volatile materials (which may block the grids), or in
environments with high humidity, or with flammable products, or in
external environments (outdoor). Any other use must be considered
inappropriate and dangerous. The manufacturer cannot be held
responsible for any damages caused by improper, incorrect, or
irresponsibleuseand/orbyrepairsdonebyanunqualifiedstaff.
Examplesofappliancesfordomesticuseareappliancesforcommon
domesticfunctions,usedinadomesticenvironmentthatcanbeused
fortypicaldomesticfunctionsalsobynon-expertpeople:

11/48
-inshops,offices,andothersimilarplacesofwork;
-infarmsorsimilarbusinesses;
-byguestsinhotels,motels,andotherenvironmentsofresidentialtype;
-inbedandbreakfastaccommodation.
Donotusetheapplianceiftheambienttemperatureisabove40°C.
Warning: when using electrical appliances, always adhere to basic
safety precautions to prevent the risk of fire, electric shocks and
physical injury. Even more caution and precaution is needed in the
use of electrical appliances which incorporate a tank with water: in
caseofoverfillingofthewaterfirst,turnoffthemainsbyswitchingoff
theswitchontheelectricalpanel,andthenremovetheplugfromthe
socket.Verifythattheelectricalpartsoftheappliancearenotwet,and
ifsodrythoroughlyandcarefully.Plugintothepowerpointagainand
then continue to use the device. If in doubt consult a qualified
professional.
Do not use the appliance if it does not work properly or if it appears
damaged;whenindoubt,contactprofessionallyqualifiedstaff.
Make sure that the fan works correctly: if not, turn the appliance off
andhaveitcheckedbyprofessionallyqualifiedstaff.
Iftheapplianceisnotbeingused,unplugitfromthesocket.
Always unplug the appliance from the socket before assembly,
disassemblyorfillingandemptying thetank,andbeforecleaning the
filtersandtheappliance.
Donotleavetheapplianceexposedtotheweather(sun,rain,etc..).
Donottouchtheappliancewithwethandsorfeet.
Donotmovetheappliancewhenitisrunning.

12/48
The appliance can be used by
children over 8 and by people whose
physical, mental or emotional
capacity is limited or compromised,
or who lack the appropriate
experienceorknowledge,onlyifthey
are supervised or after receiving
instructions about safe use of the
appliance and they have understood
the related hazards. Children must
notplaywiththeappliance.
Cleaning andmaintenance thatmust
be carried out by the user must not
beperformedbychildrenunlessthey
are supervised. The appliance must
bekeptoutofreachofchildren.
Do not put any tools or
fingers through the mesh of
thefan'sprotectivegrid.
Do not pull on the power cord or the
appliance itself to unplug it from the
mains.
Donottouchtheappliance
ortheplugwithwethands
orfeet.

13/48
Ifthepowercordisdamaged,itmust
be replaced by the manufacturer or
its technical assistance centre or
anyway by someone who is similarly
qualified,inordertopreventanyrisks.
Make sure the cord is
positioned correctly and do
notplaceanyobjectsonit.
Tiles of ice gel
WARNING: Use as directed. Solution inside this bottle not to be
consumed. Keep out of reach of children and pets.
INSTALLATION
After unpacking, check the integrity of the appliance; if in doubt, do not use and contact
professionally qualified staff. The packaging materials (plastic bags, polystyrene, nails,
etc.) must not be left within reach of children, as they constitute possible sources of
danger and must be disposed of according to applicable regulations in the appropriate
recycling containers. Warning: any stickers or advertising leaflets applied, must be
removed before using the appliance.
Before connecting the appliance, check that the voltage values on the data tag match
with those of the electric system. In the event of incompatibility between the power
socket and the appliance plug, have the plug replaced with a suitable model by
professionally qualified staff, who ensures that the cables section is appropriate with the
power rating of the appliance. The use of adaptors or extensions is generally not
advisable; if it is necessary to use them, they must comply with current safety regulations
and the total current (amps) must not be lower than the maximum current of the
appliance.
Before each use, ensure that the appliance is in good working order, and that the power
cable is not damaged: if you have any doubts, consult professionally qualified staff.
The socket must be easily accessible so as to easily remove the plug in case of an
emergency.
Place the appliance far from:
-heat sources (e.g. open flames, gas stoves, etc.)
-liquid containers (e.g. bathtubs, showers, sinks etc.) to avoid water splashes and to
prevent it from falling into them (minimum distance 2 metres).
-windows
-fabrics (curtains, etc.) or volatile materials that may block the aspiration grid; check also
that the front part is free from volatile materials (dust, etc.).
The appliance does not require any installation work, i.e. pre-arrangement of electrical
connections/water/fastening/or other for its use.
This appliance is not intended to be operated by means of an external timer or a separate
remote control system in order to avoid the risk of fire where the appliance is covered or
is not positioned correctly.

14/48
If there is a fault or the appliance is not working correctly, switch the appliance off and
have it checked by professionally qualified staff; repairs done by an unqualified person
can be dangerous and cause the guarantee to become void.
DESCRIPTION
The appliance is comprised of a main unit (part 18), beneath which 4 caster wheels are
slotted in (part 6 and part 7): if these have not already been attached to the base, refer to
the diagram and proceed as follows: Place the main unit on a stable, smooth surface
to prevent scratches and insert (fully) the wheels into the holes in
the base: at the front insert those without the lock (7), at the rear
insert the 2 wheels with locks (6): the lock is engaged by lowering
the lever, and released by lifting the lever. Check that all 4 wheels
touch the floor.
The appliance is also made up of the following parts:
- Tank (4). It is located at the back and to disengage it from its seat, push down on the
rear clip (10), and then remove it. Place the tank back in its seat and press it down so that
the clip blocks the tank once more.
Caution: Always disconnect the appliance from the socket outlet before adding water to
the tank.
In front, the tank has a protruding part to view the minimum and maximum water level
(1L-5L), it also has a sponge-like filter which retains impurities (11) present in the
water, and two compartments: in the small one, 2 gel ice
packs are placed (see images as reference). Fill only with
lime-free tap water (e.g.: demineralised water) up to the
maximum level indicated. Do not exceed the level to avoid
spillage when moving the appliance, and do not fill to
below the minimum level (to ensure that the electric pump
is immersed).
Do not add any additives to the water (fragrances or essences or detergent). The tank
contains about 5 liters and provides cooling autonomy of about 8-9 hours.
Gel ice packs (9). These cool the water in the tank and consequently cool the air flow
from the fan. Leave the ice packs in the freezer for at least 12 hours before using them.
Front grid. When the appliance is running, the grid must be open. It opens and closes
(manually) by simply pressing one of the fins: if fully opened, they direct the air flow
horizontally, while if partially opened, they direct the air flow downwards.
Remote control (3). It allows you to operate all
functions. To use it, place one CR2032-type battery
inside its holder: the latter slides out from the
bottom as shown in the diagram.

15/48
The polarity of the battery must be observed, i.e. the positive terminal is towards the top
of the remote when installing the battery. To operate the functions by remote control,
remain within 4 meters from the front of the appliance and within an angle of 30°.
Filters. These are inserted at the back of the appliance, in front of the air intake grid. They
are enclosed in a frame that is simply extracted by pulling it through the upper slot. The
external filter (15) is made of a fine mesh, synthetic material and captures dust, lint, etc.;
the internal filter is made of cellulose and foam. It is constantly sprayed with water and
the air cools passing through it.
Cable reel (2). At the back of the appliance there are tabs to wind the cable around and
these ensure a minimum distance is maintained between the suction grid and the wall.
Caution: the device can only be used if completely and correctly assembled. If in any
doubt, have it checked by professionally qualified personnel or request that they
assemble it. The surface on which it is used must be stable, and horizontal.
USE
With the " -COOLING " function the appliance fills the air with micro-particles of water,
which evaporate and cool the air: this function is at its most effective when the air is dry,
and decreases with increasing relative humidity (RH) of the air. With an RH greater than
75%, cooling is not noticeable. The " -COOLING" function only takes place in the
presence of water in the tank, within the min-max values. When the water in the tank is
used up, after a few seconds you will hear a beep and the pump will stop automatically,
whereas the fan will continue to run.
The appliance's functions are operated using the buttons on the control panel or the
remote control:
-stand-by / function (button D) activates the functions of the appliance and stops it,
putting it in stand-by mode (temporarily turned off). To turn off the appliance, disconnect
the plug from the socket.
-Min / Med / Max. ventilation (button E): adjusts the air speed.
-cooling (button E): activates or excludes the cooling function, and therefore the pump
that sprays the foam filter too.
-timer (button A): activates or disables the timer (max 7 hours with 1-2-4 hour intervals).
When time runs out, it stops the device. If the timer is not activated, the device runs
continuously until it is turned off manually.
- swinging of the vertical blades (button B): activates or excludes the automatic left-right
swinging.
-Mode (button C): selects Normal / Natural / Sleep mode. In detail: Normal: ventilation is
constant at the selected speed (Min. Med. Max); Natural: cyclic ventilation with 3 speed
levels. Sleep: 2 speed levels of cyclic ventilation, which gradually decrease.
All the functions described above are highlighted by lit symbols on the control panel.
Before each use, check that the appliance is in good condition, and that the power cord is
not damaged: if the power cord is damaged, it must be replaced by the manufacturer or
by its technical support service or a similarly qualified person, in order to avoid any risks.
The appliance's functions can be operated both with the buttons found on the control
panel (1), or the remote control (3). The remote control must be pointed at the control
panel.
1. Insert the plug into the socket outlet; the appliance is in standby.
2. To operate the appliance, press the "ON/OFF- " button (D) on the remote control or
the control panel.
3. To select "NORMAL" mode, press the "MODE- ”" button and select the normal
function, the " " indicator will light up; to select the desired speed, press the

16/48
"SPEED- " button repeatedly on the control panel or the remote control
(minimum, medium or maximum).
" "= Minimum speed " "= Medium speed " "=Maximum speed
4. By pressing the "
MODE
" button (C), the mode changes to"
NATURE
": the " "
indicator will light up.
5. "
SLEEP
" mode is activated by pressing the "
MODE
" button (C) once again: the " "
indicator will light up.
6. By pressing the “-
COOLING--
” button (F), the cooling function is activated: the
“- C
OOLING
” indicator will light up.
7. By pressing " " button (C), the right / left swing is activated. The respective
indicator will light up. To stop the swinging, press the button again.
8. By pressing the
"Timer- "
button on the control panel or remote control (A), the
function is activated: each press of the button changes the time set. Pressing it once
activates a time of 1 hour and the corresponding indicator "1" will light up; pressing it
twice activates a time of 2 hours, the corresponding indicator "2" will light up. By
pressing a third time, it activates a time of 3 hours, the corresponding indicators "1-2"
will light up; by pressing it a fourth time, it activates a time of 4 hours, the indicator
"4" will light up, and finally by pressing the button a fifth time, it activates a time of 7
hours, the corresponding indicator "1-2-4h" will light up. To disable this function
press the button again (a sixth time): no indicators will light up.
9. To stop the appliance running and put it in stand-by mode, press the "ON / OFF"
button. To turn off the appliance, disconnect the plug from the socket.
10.Wind the power cord using the two rear tabs (2).
After each use it is recommended to empty the water tank.
For long periods of inactivity, remove the plug from the socket.
CLEANING AND MAINTENANCE
Caution: before performing routine cleaning operations, remove the plug from the
socket. The appliance works best if the filters and the tank are clean in order to avoid the
formation of dirt and lime scale.
Periodically check that the back air filter (15) is not clogged by dust, lint or fluff. If it is
dirty, unhook it by pressing and acting on the 2 tabs (12), and clean the mesh using a
brush or water, being careful not to damage it; then dry it perfectly, then place it in its
housing.
Regularly ensure that the foam filter is not dirty. If necessary, remove it from its
housing and clean it with a bit of water and household detergent and using a small
brush or a soft brush, clean the outer cells. Be careful not to damage the cells or other
parts. Rinse thoroughly under running water, let it drip dry and before placing it in its
housing, make sure that no electrical part is wet. If it is, dry thoroughly and carefully.
To avoid limescale (or more frequently if water is very hard) or impurities, periodically
clean the water outlet holes in part by using a small brush or a little brush, be careful
not to damage the holes.
To clean the tank and the ice tiles use water with a little of thinned detergent and by
using a soft cloth clean with care. Rinse the tank and tiles under running water, and let
them drip dry before placing them back into position.

17/48
To clean the body use a soft, slightly damp cloth; do not use
abrasive or corrosive products.
Do not immerse any electrical part of the appliance into water or other liquid: in such
an event, do not place your hand into the liquid but first remove the plug from the
socket. Dry the appliance thoroughly and check that all electrical parts are dry: if in
doubt consult professionally qualified staff.
When unused for long periods of time it is necessary to protect the appliance from dust
and moisture; we recommend to use the original packaging.
If you decide not to use the appliance any longer, it is recommended that it is made
inoperative by cutting the power cable (first ensure that the appliance has been
unplugged from the power supply), and ensure that any parts that are dangerous to
playing children are rendered harmless (e.g. the ice tiles).
Remote control battery disposal must take place in the appropriate containers, dispose
of them in accordance with current regulations.
Important information for the correct disposal of the product under the European
Directive directive 2011/65/EU.
At the end of its lifespan, the product must not be disposed of as part of ordinary waste.
It can be handed in to specific collection points set up by the local authorities, or to
retailers who provide such a service.
Disposing of a household appliance separately avoids possible negative consequences
for the environment and human health resulting from an inappropriate disposal and
allows to recover the materials from which it is made in order to obtain significant savings
in energy and resources. As a reminder of the obligation to dispose of household
appliances separately, the product is marked with a crossed-out wheelie bin symbol.
Illegal disposal of the product by the user will lead to administrative sanctions according
to the current law.

18/48
DiesesSymbolfordertSieauf,dieseAnleitungvordemGebrauch
desGerätszulesenundbeiBedarfauchanderePersonendarüber
zuinformieren.BewahrenSiedieseAnleitungzumspäteren
NachschlagenundwährenddergesamtenLebensdauerdesGeräts
auf.SolltenTeiledieserAnleitungschwerverständlichseinoder
wennSieZweifelhaben,kontaktierenSiebittedasUnternehmen
unterderaufderletztenSeitegenanntenAdresse,bevorSiedas
Produktbenutzen.
DiesesSymbolzeigtdieelektrischeIsolationsklasseIIan.Deshalbist
derSteckerdesKabelsohneErdungspol.
ACHTUNG!
HinweiseundWarnungenfürdiesichereBenutzung.
DiesesSymbolzeigtan,dassdasGerätnichtmitnassenHänden
berührtwerdendarf.
DiesesSymbolzeigteinVerbotan.
DiesesSymbolbedeutet,AchtungStromschlaggefahr.
ALLGEMEINEHINWEISE
Dieses Gerät ist nur für die Verwendung in Haushalten zum Belüften und
Kühlen von Innenräumen, unter Beachtung der in dieser Anleitung
enthaltenen Anweisungen vorgesehen und darf nicht für andere Zwecke
eingesetztwerden.
Das Gerät darf nicht in staubigen Umgebungen oder Umgebungen mit
übermäßig flüchtigem Material (die Gitter können sich verstopfen) bzw. mit
hoher Feuchtigkeit und entzündbaren Produkten oder außen (im Freien)
verwendet werden. Jede davon abweichende Verwendung wird als
unsachgemäß und gefährlich angesehen. Der Hersteller haftet nicht für
eventuelle Schäden, die durch unsachgemäßen, fehlerhaften oder
unverantwortlichen Gebrauch und/oder durch Reparaturen entstehen, die
vonnichtqualifiziertenPersonendurchgeführtwerden.
HaushaltsgerätesindGeräte,diefürtypischeHaushaltsfunktionenauchvon
unerfahrenen Personen, oder in den folgenden Umgebungen für typische
Haushaltsfunktionenverwendetwerdendürfen:
-InGeschäften,BürosundanderenArbeitsumgebungen.
-InlandwirtschaftlichenoderähnlichenUnternehmen.
-VonGästeninHotels,MotelsundanderenWohnumgebungen.

19/48
-InFrühstückspensionen.
DasGerätnichtbeiUmgebungstemperaturenüber40°Cverwenden.
Achtung:BeiBenutzungvonElektrogerätensindimmerdiegrundlegenden
Sicherheitsvorschriften einzuhalten, um die Gefahr von Feuer,
Stromschlägen und Verletzungen zu vermeiden. Elektrische Geräte, die
einen Wassertank enthalten müssen mit besonderer Vorsicht und
Aufmerksamkeitverwendetwerden:BeimHerauslaufendesWassersmuss
zuallererstdieSteckdosedurchAusschaltendesSchaltersanderSchalttafel
deaktiviertwerden,ErstdanndenSteckerausderSteckdoseziehen.Prüfen,
ob die elektrischen Teile nass geworden. Falls ja, sie vollständig und
sorgfältig abtrocknen. Den Stecker wieder in die Steckdose stecken und
dann das Gerät wieder benutzen. Wenden Sie sich bei Zweifeln an einen
Fachmann.
DasGerätnichtbenutzen,wennesnichtrichtigfunktioniertoderbeschädigt
ist.SichimZweifelsfallaneinenFachmannwenden.
Sich vergewissern, dass das Flügelrad korrekt funktioniert. Das Gerät
andernfalls ausschalten und es von einem qualifizierten Fachmann
überprüfenlassen.
Ziehen Sie, wenn das Gerät nicht benutzt wird, den Stecker aus der
Steckdose.
ZiehenSievordemZusammenbauen,demZerlegendesGerätsdemFüllen
bzw. Entleeren des Tanks, der Säuberung der Filter und des Geräts immer
zuerstdenSteckerausderSteckdose.
SetzenSiedasGerätnichtderWitterung(Sonne,Regen,usw.)aus.
BerührenSiedasGerätnichtmitnassenHändenoderFüßen.
DasGerätnichtverschieben,wennesinFunktionist.
Das Gerät kann von Kindern ab 8 Jahren
und Personen mit eingeschränkten
körperlichen, sensorischen oder geistigen
Fähigkeiten oder mangelnder Erfahrung
undWissen benutztwerden,sofern sie die
notwendigeAufsichtoderAnweisungenin
Hinblick auf den sicheren Umgang mit
dem Gerät erhalten, und wenn sie sich der
möglichen Gefahren bewusst sind. Kinder
dürfen nicht mit dem Gerät spielen. Die
KeineWerkzeugeundauchdie
FingernichtindieMaschendes
Schutzgitters des Flügelrads
stecken.

20/48
vom Benutzer durchzuführende
Säuberung und Wartung darf nicht von
Kindern ohne Aufsicht vorgenommen
werden.
Das Gerät muss sich außerhalb der
ReichweitevonKindernbefinden.
Ziehen Sie den Stecker nicht am Kabel
oder mit dem Gerät selber aus der
Steckdose.
DasGerätoderdenStecker
nichtmitnassenHändenoder
Füßenberühren.
Wenn das Stromkabel beschädigt ist,
muss es vom Hersteller, seinem
technischen Kundendienst oder einer
Person, die in ähnlicher Weise qualifiziert
ist, ersetzt werden, um etwaige Gefahren
zuvermeiden.
Sich vergewissern, dass das
Kabel richtig liegt. Keine
Gegenstände auf das Kabel
stellen.
Table of contents
Languages:
Other Bimar Air Conditioner manuals
Popular Air Conditioner manuals by other brands

North American
North American INVENTER SPLIT-TYPE ROOM AIR CONDITIONER installation manual

Stealth
Stealth Designer SC-24CC-UM quick start guide

Admiral
Admiral AW-05CM1FLU use and care manual

air choice
air choice TY-EA-03 user manual

Daikin
Daikin J Series Service manual

Technibel
Technibel KPAFP125R5IA Series instruction manual