Biocare AccurateCheck AG50E User manual
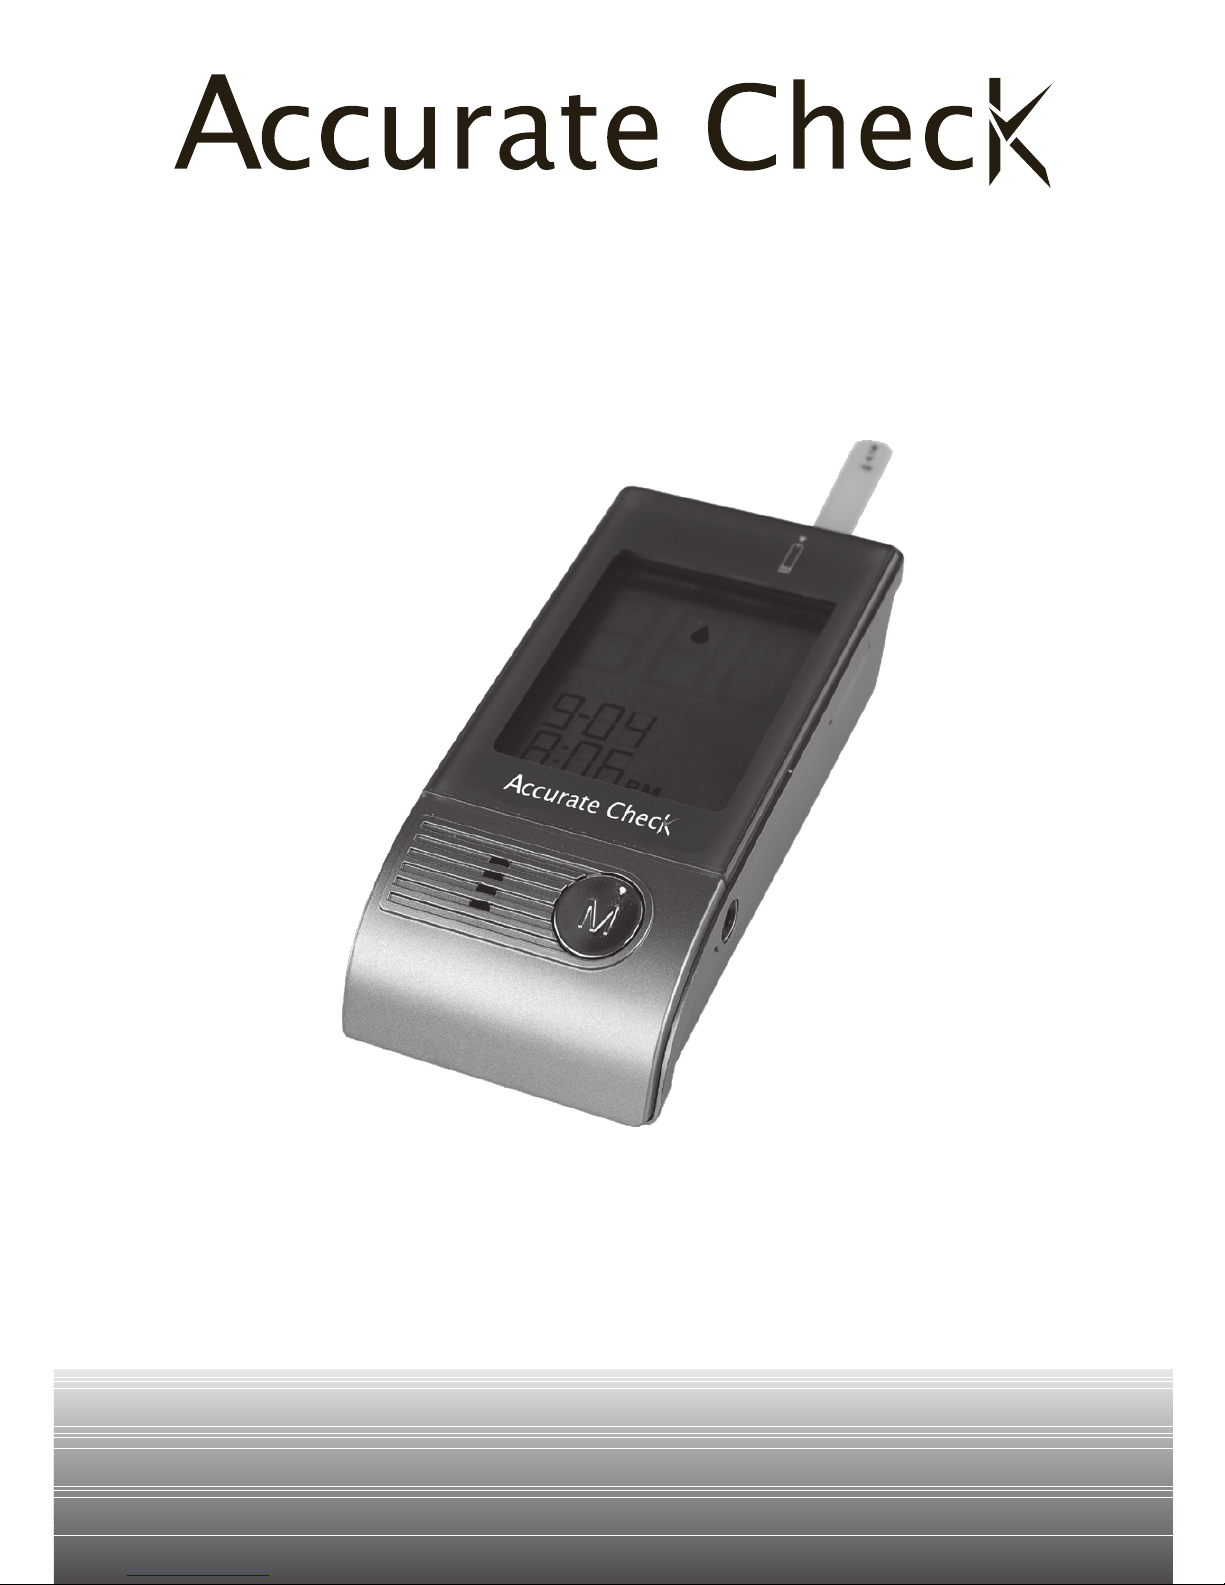
BLOOD GLUCOSE MONITORING SYSTEM
OWNER’S
MANUAL
AG50E


BLOOD GLUCOSE
MONITORING SYSTEM
OWNER’S
MANUAL
Ver 1.0 , 2010.04
311-4227000-005
AG50E

4
Dear AccurateCheck AG50E System Owner:
You have chosen one of the best blood glucose monitoring sys-
tems. This manual contains important information you must know
about the system. Please read it thoroughly and carefully.
The feature of this system is its no code. Not only simplify the glu-
cose test, it also provides you and your doctor with more precise
and accurate test results.
The system is intended for use outside the body (in vitro diagnos-
tic use). It should be used only for testing glucose (sugar) and
only with fresh capillary whole blood samples. The system is in-
tended for use in the home and in clinical settings. It should not be
used on the diagnosis of diabetes or on the testing of newborns.
Blood glucose monitoring plays an important role in diabetes con-
trol. A long-term study shows that keeping blood glucose levels
close to normal can reduce the risk of diabetes complications by
up to 60%*. The results you get with the system can help you and
your healthcare professional monitor and adjust your treatment
plan to gain better control of your diabetes.
A warranty registration card is included with your system. Please
complete it and mail it to us.
* American Diabetes Association position statement on the
Diabetes Control and Complications Trial(1993).
CAUTION !
Before using any product to test your blood glucose, read all instructions
thoroughly and practice the test. Do all quality control checks as directed and
consult with a diabetes healthcare professional. These recommendations apply
to all blood glucose monitoring systems and are supported by the Diabetes
Educator Section of the Canadian Diabetes Association.

5
IMPORTANT INFORMATION
Severe dehydration and excessive water loss may cause
readings which are lower than actual values. If you be-
lieve you are suffering from severe dehydration, consult
a healthcare professional immediately.
If your blood glucose results are lower or higher than usu-
al, and you do not have symptoms of illness, rst repeat
the test. If you have symptoms or continue to get results
higher or lower than usual, follow the treatment advice of
your healthcare professional.
Use only capillary whole blood sample to test your blood
glucose. Using other substances will cause wrong re-
sults.
If you are experiencing symptoms that are inconsistent
with your blood glucose test results and you have fol-
lowed all instructions described in this owner’s manual,
call your healthcare professional.
Inaccurate results may occur in severely hypotensive in-
dividuals or patients in shock. Readings which are lower
than actual values may occur for individuals experiencing
a hyperglycemic-hyperosmolar state, with or without ke-
tosis. Critically ill patients should not be tested with blood
glucose meters.
Please refer to your test strip package insert for additional
important information.

6
TABLE OF CONTENTS
IMPORTANT INFORMATION 05
ABOUT ALTERNATIVE SITE TESTING(AST) 08
GETTING STARTED 10
Contents of the System 10
Appearance and Key Function of the Meter 11
Meter Display Segments 12
Test Strip 13
Important Test Strip Information 14
BEFORE TESTING 15
Display Self-Checks 15
About the Control Solution 15
Important Control Solution Test Information 16
TESTING YOUR BLOOD SUGAR 17
Getting a Drop of Blood 17
Step-by-Step Test Procedure 20
USING THE METER MEMORY 22
VIEWING RESULTS ON A PERSONAL COMPUTER 24
COMPARING METER AND LABORATORY RESULTS 25

7
SETTING THE METER AND DELETING THE MEMORY 27
TAKING CARE OF YOUR METER 31
Maintenance 31
Battery Replacement 31
PROBLEM-SOLVING GUIDE 33
Result indicator 34
Error Message 35
Operational problem 36
SPECIFICATIONS 38
Performance Characteristics 38
EXPECTED TEST RESULTS 39
SYMBOLS INFORMATION 40
SUMMARY OF OPERATION 41
8
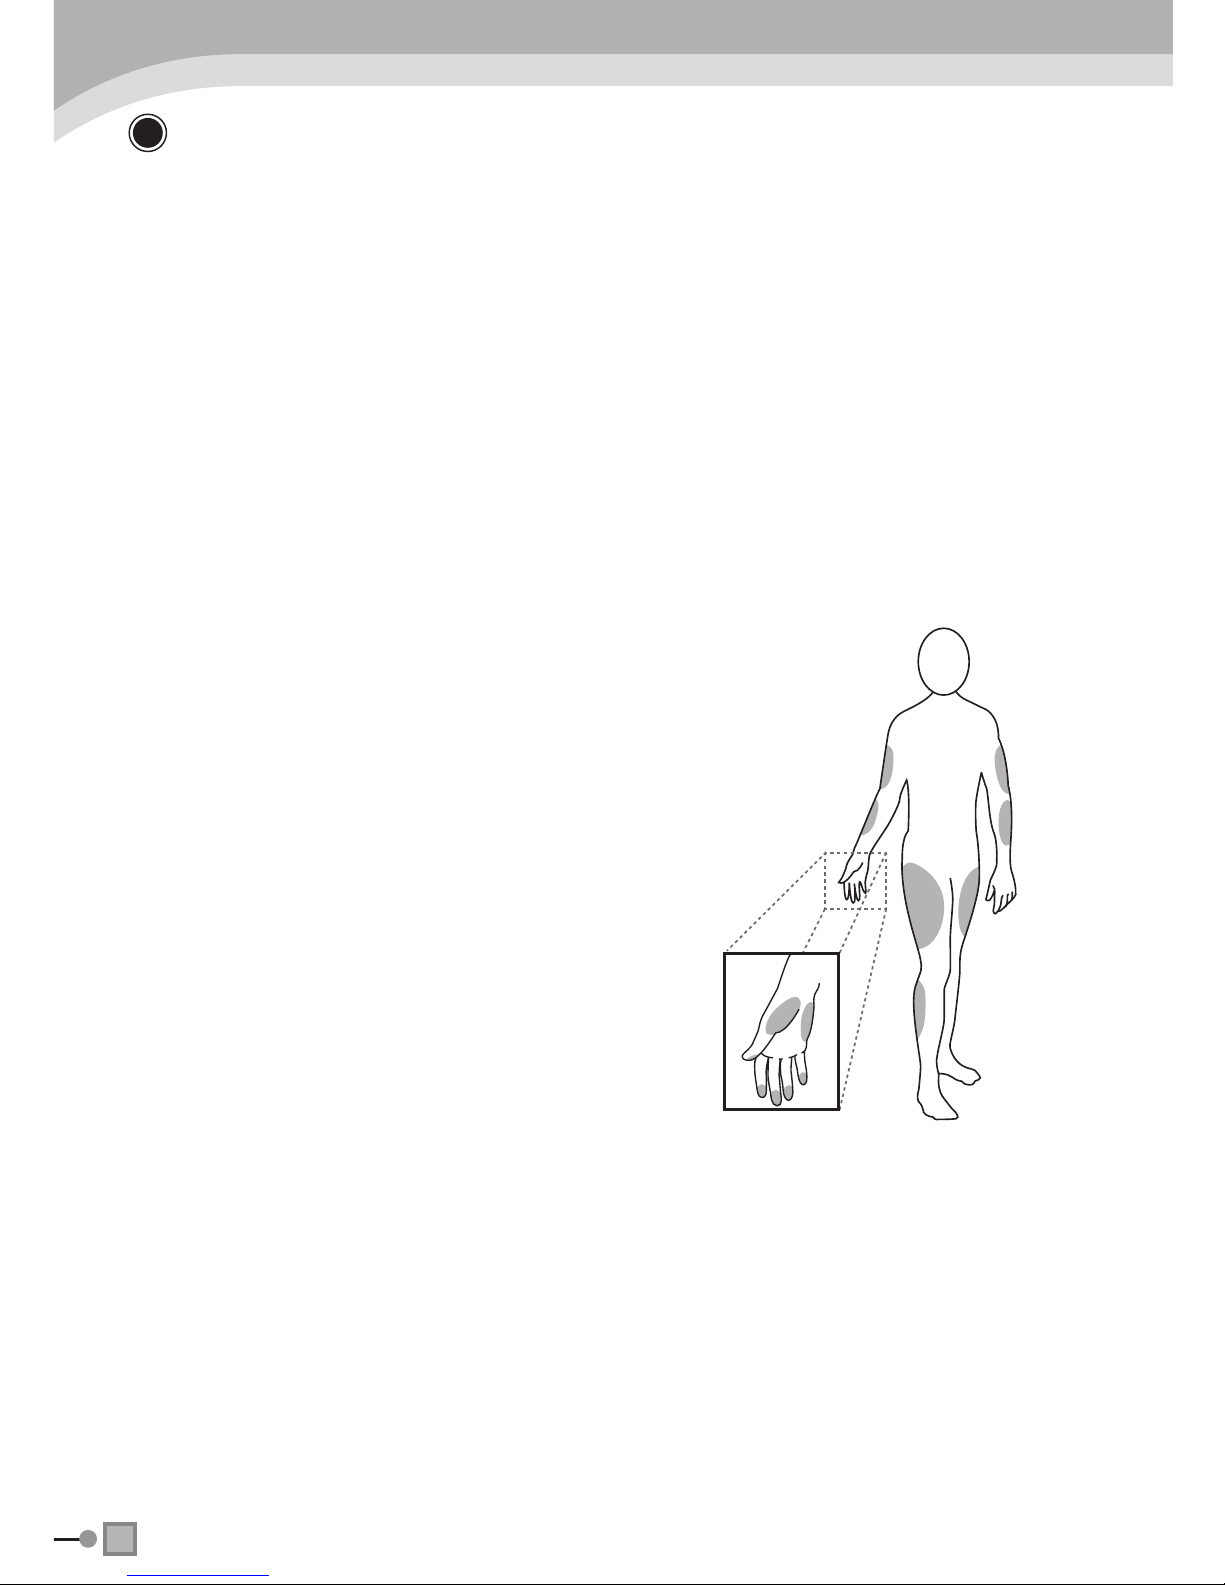
ABOUT ALTERNATIVE SITE TESTING (AST)
Important: AST results serve as references only.
Please consult your healthcare professional before
you begin AST.
What is AST?
Alternative site testing (AST) means that people use parts
of the body other than ngertips to check their blood glu-
cose levels. This system provides you to test on your fore-
arm, upper arm, calf, or thigh with the equivalent results to
ngertip testing.
What’s the advantage?
Fingertips feel pain more read-
ily because they are full of nerve
endings (receptors). At other body
sites, since nerve endings weren’t
so condensed, you won’t feel as
much pain as at the ngertip.
When to use AST?
Food, medication, illness, stress
and exercise can affect blood glucose levels. Capillary
blood at ngertip reects these changes faster than capil-
lary blood at other sites. Therefore when testing blood glu-
cose during or immediately after meal, physical exercise, or
any other event, take blood sample from your nger only.

9
We strongly recommend you do AST in the fol-
lowing intervals:
In a pre-meal or fasting state (more than 2 hours since
the last meal).
Two hours or more after taking insulin.
Two hours or more after exercise.
Do NOT use AST if:
you think your blood glucose is low.
you are unawareness of hypoglycemia.
your AST results do not match the way you feel.
you are testing for hyperglycemia.
your routine glucose results are often uctuating.
How to increase the accuracy?
Stimulating blood perfusion by rubbing the puncture site
prior to blood extraction has a signicant inuence on the
glucose value obtained. Blood from a site has not been
rubbed exhibits a measurably different glucose concentra-
tion than blood from the nger. When the puncture site was
rubbed prior to blood extraction, the difference was signi-
cantly reduced.
Please follow suggestions below before getting a
drop of blood:
Rub the puncture site about 20 seconds before
penetration.
Use a clear cap (included in the kit) instead while setting
the lancing device.
10
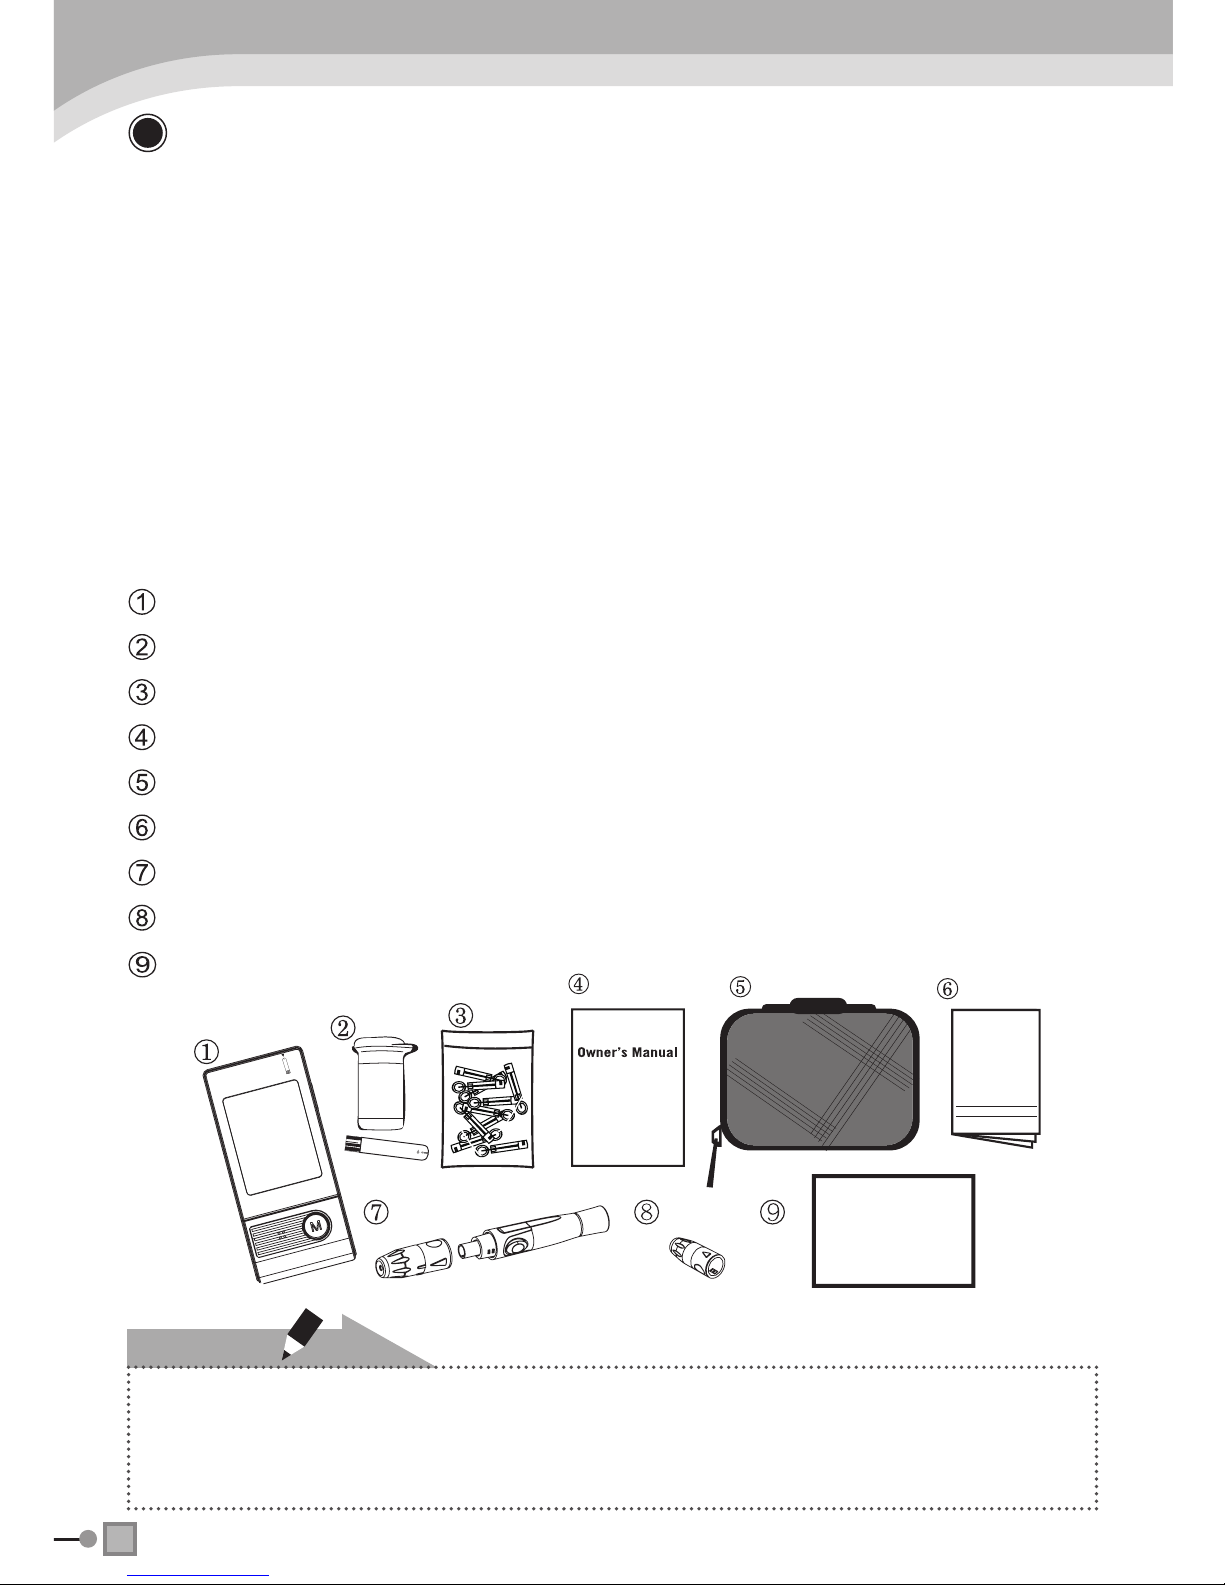
GETTING STARTED
Contents of the System
The system consists of three main products: a blood glu-
cose meter, test strips, and a control solution. These prod-
ucts have been designed, tested, and proven to work to-
gether as a system to produce accurate blood glucose test
results. Use only the same brand-name test strips and a
control solution with the blood glucose meter.
Your system includes:
A meter
test strips
sterile lancets
Owner’s manual
Sporty carrying bag
Quick start user guide
A lancing device
A clear cap
daily log book
NOTE !
Check your system to be sure that it is unopened prior to use and that
it contains all parts listed above. If either of these conditions occurred,
please return your system to the place of purchase.
Quick start user guide
daily log book
BLOOD GL UCOSE MONITORING SYS TEM

11
Appearance and Key Function of the Meter
TEST SLOT
is where you insert
the test strip. The
meter will turn on
automatically after
insertion.
LCD SCREEN
guides you through
the test using
symbols and simple
messages.
MAIN BUTTON
located in front of
the meter with “M”
on it, is used to
turn on the meter,
enter the memory
mode and navigate
through settings.
SET BUTTON
(in the back)
located in the
battery com-
partment, is
used to set up
the meter. DATA PORT
located at the
side, is for cable
connection.
12
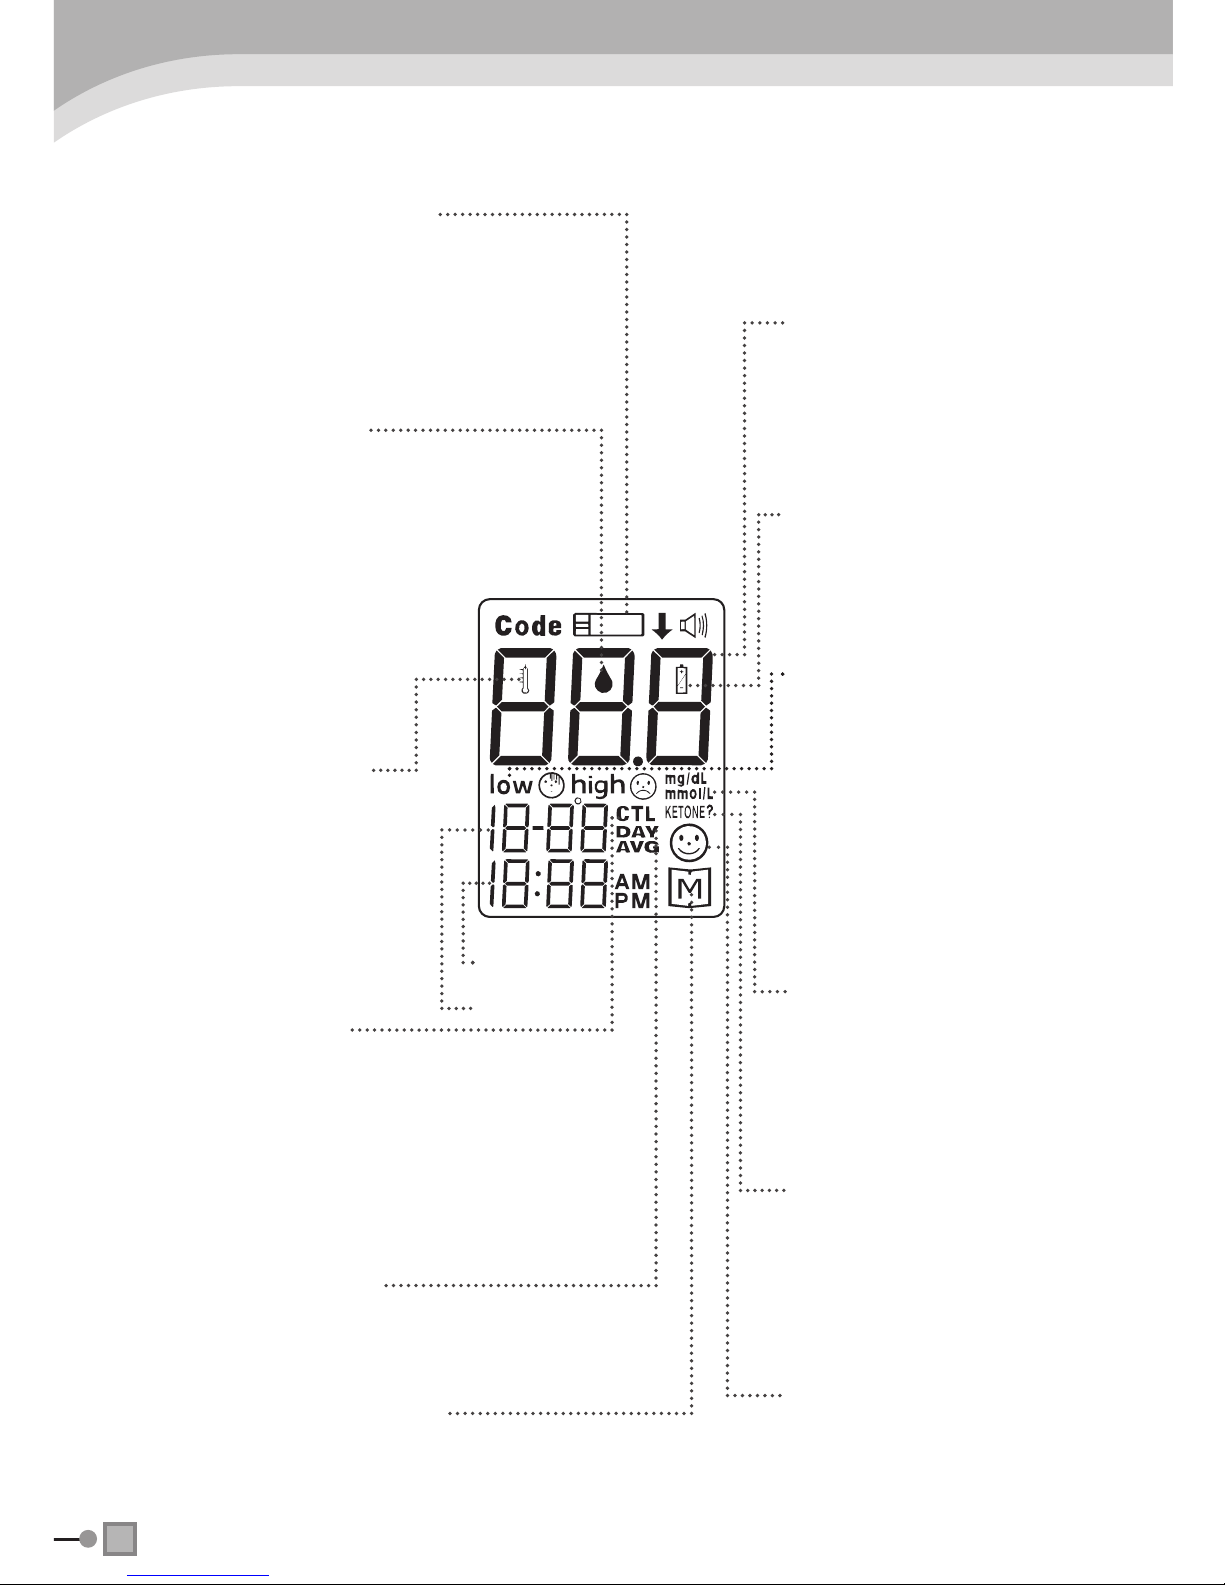
Meter Display Segments
TEST STRIP SYM-
BOL
Appears when the meter
is turned on.
BLOOD DROP
SYMBOL
Flashes when it is
ready to apply the
sample.
TEST RESULT AREA
Displays glucose results.
A decimal point appears
when the measurement
unit is mmol/L.
LOW BATTERY
SYMBOL
Appears when the bat-
tery power is low.
TEMPERTURE
SYMBOL
Appears when ambi-
ent temperature is
outside operating
temperature.
CTL SYMBOL
Appears when doing a
control test and indicates
that the result won’t be
stored in the memory.
MEASUREMENT
UNIT
Appears with the test
result either in mmol/L
or in mg/dL.
KETONE WARNING
Appears when the
test result is equal or
higher than 13.3mmol/L
(240mg/dL).
SMILE SYMBOL
Appears when the test
result is within refer-
ence range.
DATE
TIME
MEMORY SYMBOL
Appears when you review the
memory.
DAY AVERAGE
Indicates that the displayed
test result is an average.
FACE SYMBOL
LOW/HIGH SYM-
BOL
Both are result indica-
tors. They appear
together with the test
result which exceeds
the reference range.

13
Appearance of the Test Strip
Your system measures the amount of sugar (glucose) in
whole blood. Blood is applied to the absorbent hole of the
test strip and is automatically drawn into the reaction cell
where the reaction takes place.
Please see “Testing Your Blood Sugar”, for complete in-
structions.
The test strip consists of the following parts:
Contact Bars
Insert this end of the test strip into the meter.
Push it in rmly until it will go no further.
Test Strip Handle
Hold this part to insert the test strip into the
slot.
Conrmation Window
This is where you conrm if enough blood
has been applied to the absorbent hole of the
strip.
Absorbent Hole
Apply a drop of blood here
the blood will be sucked automatically.
14
Important Test Strip Information
Store test strip packages in a cool, dry place at 4-40˚C
(39.2-104˚F). Keep away from direct sunlight and heat.
Do not refrigerate.
Store your test strips in their original vial only. Do not
transfer them to a new bottle or any other container.
After removing a test strip from the vial, immediately re-
place the vial cap and close it tightly.
With clean, dry hands, you may touch the test strip any-
where on its surface when removing it from the vial or
inserting it into the meter.
Use each test strip immediately after removing it from the
vial.
Write the discard date on the vial label when you rst
open it. Discard remaining test strips 3 months after rst
opening date.
Apply only blood sample or control solution to the ab-
sorbent hole. Applying other substances to the absorbent
hole will cause inaccurate results.
Do not use test strips beyond the expiration date printed
on the package since they may cause inaccurate re-
sults.
Do not bend, cut, or alter a test strip in any way.
WARNING !
Keep the test strip vial away from children; the cap is a choking haz-
ard.

15
BEFORE TESTING
Display Self-Checks
Each time you insert a test strip, the meter
displays “CH” and “ ”. This tells you that
the system is performing several self-checks.
About the Control Solutions
Our control solutions contain a known amount of glucose
that reacts with test strips. By comparing your control solu-
tion test results with the expected range printed on the test
strip vial label, it is able to check that the meter and the test
strips are working together as a system and that you are
performing the test correctly. It is very important that you do
this simple check routinely to make sure you get accurate
results.
How often the control solution test should perform?
When you use this system to test your blood for the rst
time, practice the procedure using control solution. When
you can do three tests in a row that are within the ex-
pected range, you are ready to test your blood.
For routinely check the meter and test strips, perform a
single test for each level of control solution at least once
a week.
When the control solution test should perform?
When you rst get your Glucose Meter.
When you begin using a new vial of test strips.

16
Important Control Solution Test Information
Use only our control solutions.
Check the expiry date on the control solution vial. Do not
use if expired.
Control solution, meter, and test strips should come to
room temperature (20°C-25°C / 68°F-77°F) before test-
ing.
Shake the vial before use. Discard the rst drop of con-
trol solution. After squeezing, wipe off the dispenser tip to
avoid contamination. The above tips ensure you to get a
clean sample and an accurate result.
Use a period of 3 months from the date that you rst open
it. Record the discard date (date opened plus 3 months)
on the control solution vial .Discard after 3 months.
Store the control solution tightly closed at temperatures
2°C-30°C (35.6°F-86°F). Do not refrigerate.
The control solution range printed on the test strip vial is for our control
solution only. It is used to test meter and test strip performance. It is not
a recommended range for your blood glucose level.
NOTE !
Whenever you suspect that the meter or test strips are
not working properly.
When your blood glucose test results are not consistent
with how you feel, or when you think your results are in-
accurate.
When your test strips are exposed to extreme environ-
mental conditions (See Important Test Strip Information
section of this manual).
When you want to practice running the test.
If you drop the meter.

17
TESTING YOUR BLOOD SUGAR
Getting a Drop of Blood
WARNING !
To reduce the chance of infection:
Never share a lancet or the Lancing Device with anyone.
Always use a new, sterile lancet. Lancets are for single use only.
Avoid getting hand lotion, oils, dirt, or debris in or on the lancets and
the Lancing Device.
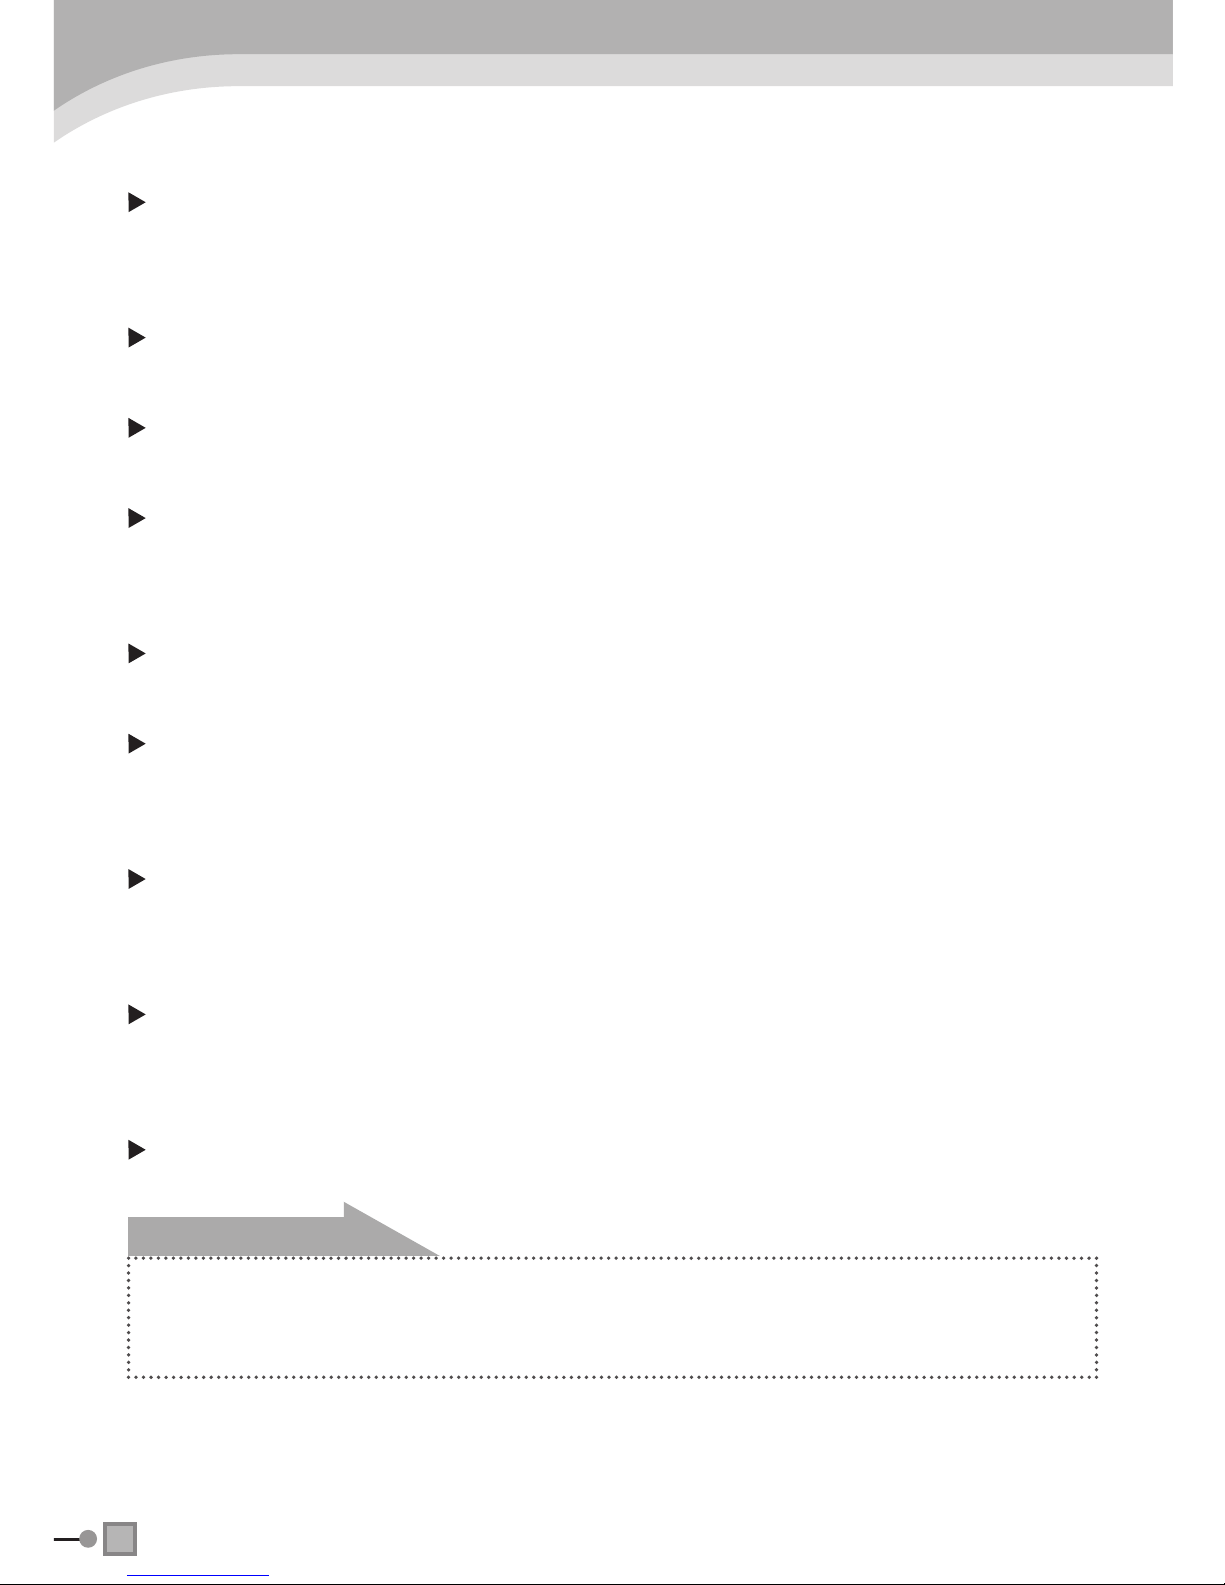
STEP 1 Insert a Lancet in the Adjustable Lancing
Device
Pull off the cap of the lancing device.
Insert a lancet into the lancet holder
and push down rmly until it is fully se-
cured.
Twist the protective disk off the lancet.
Replace the cap by aligning the arrow
on the cap with the release button.
Select the depth of penetration by turn-
ing the adjustable tip in either direction
so that the arrow on the cap points to
the desired depth.

18
When obtain blood from sites other than the
ngertip
A clear cap, together with the kit, makes you easier to get a
drop of blood for AST. When you want to obtain blood from
sites except the nger, replace the clear cap instead of the
lancing device cap. Screw the clear cap until it is snug but
not too tight, and then go to step 2.
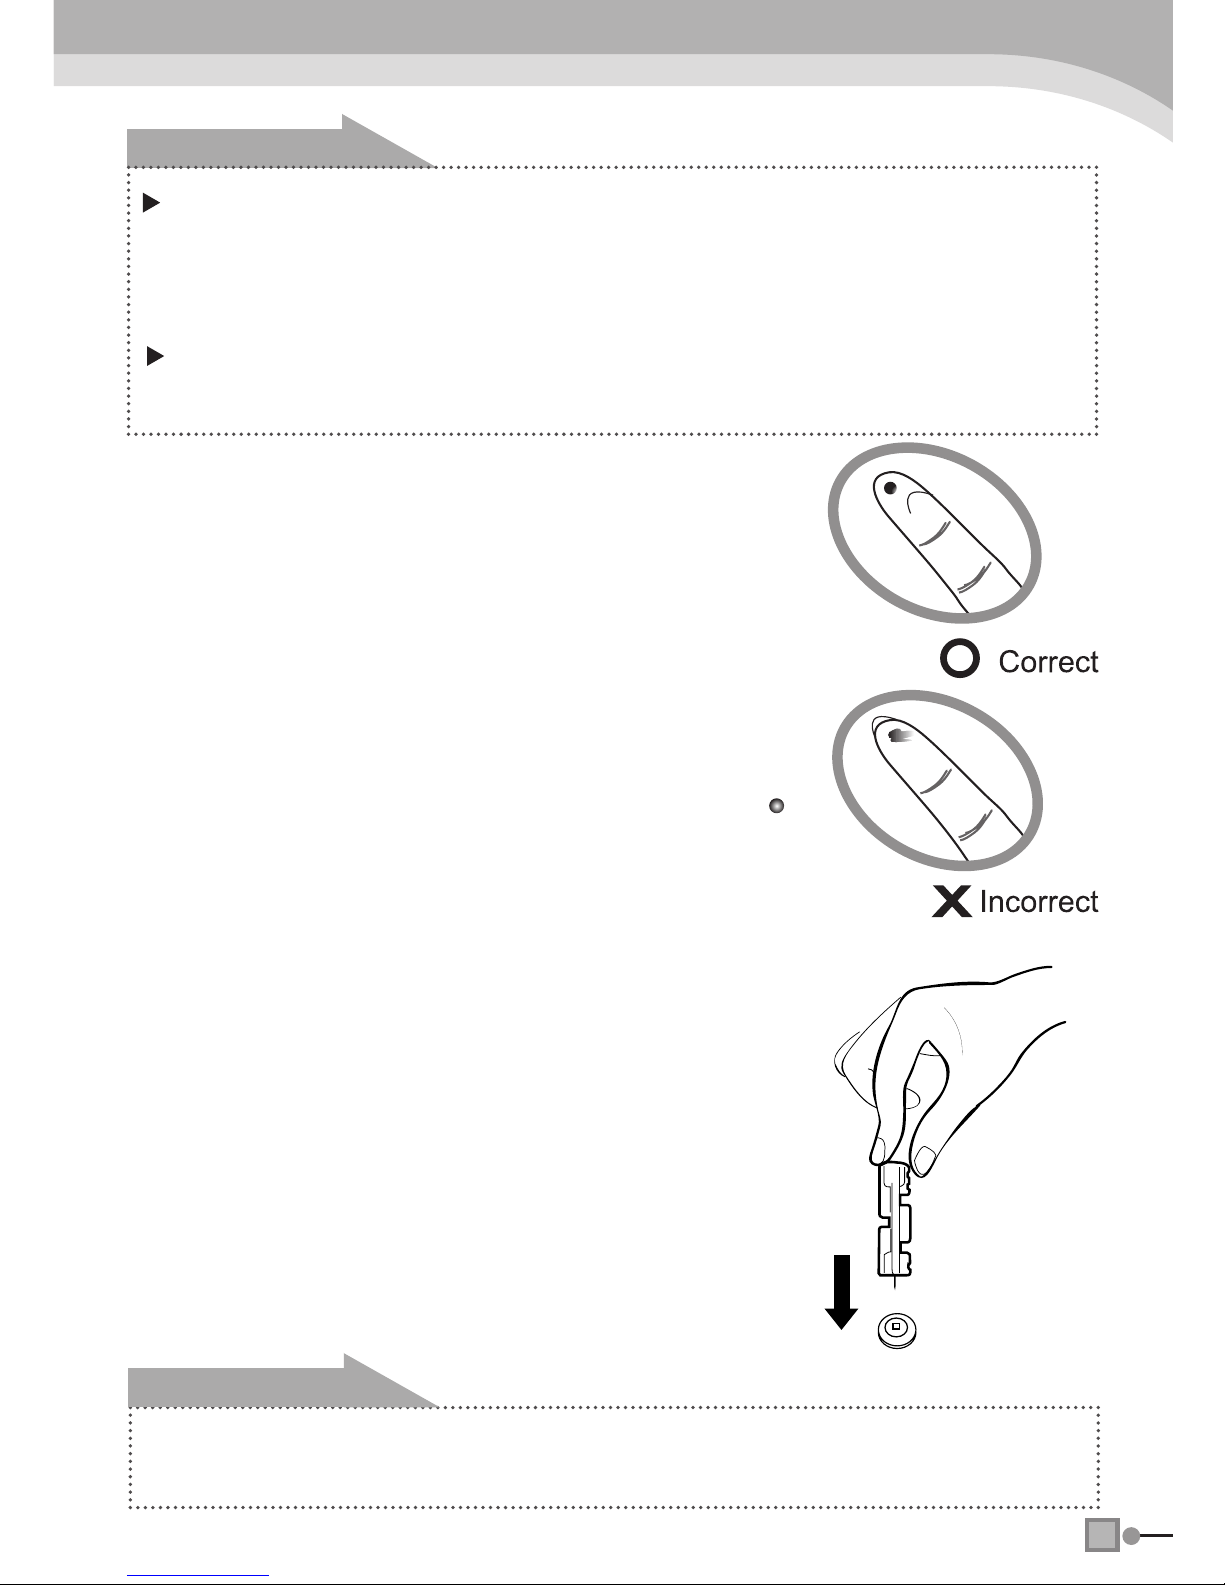
STEP 3 Wash Your Hands and the Puncture Site
Use warm, soapy water. Rinse and dry thoroughly.
STEP 4 Select and Lance a Puncture Site
Fingertip
Press the lancing device’s tip rmly
against the lower side of your ngertip.
Press the release button to prick your
nger, then a click indicates that the
puncture is complete.
Pull the cocking control back until it
clicks. You will see a color change
inside the release button when it is
ready.
Sites other than ngertip
Please refer to the section of “About Alternative Site Test-
ing (AST)” for possible punctured sites. Please consult
your health professional before obtaining blood from sites
other than ngertip.
STEP2 Cock the Lancing Device Hold your ngers
on the body NOT
the cap.
19
WARNING !
The system requires a very small blood drop to perform a test. You
can obtain it from a ngertip. Choose a different spot each time you
test. Repeated punctures at the same spot may cause soreness and
calluses.
Before you decide to do palm testing, please consult your health
professional rst.
STEP 5 Gently Massage the area
Do not smear the blood sample.
To obtain best accurate results, it is rec-
ommended that the rst drop of blood
should be discarded with a clean tissue
paper or cotton. Use the second drop
of blood for testing. The required blood
sample is 0.7 microlitre in volume ( “ ”
actual size).
STEP 6 Remove the Lancet
Take the lancet out carefully.Place the
disk on a hard surface and push the ex-
posed tip into the protective disk. Always
use caution when removing the lancet.
Discard lancet according to your local
regulation.
It is recommended that you discard the rst drop of blood as it might
contain tissue uid and serum, which may affect the test result.
WARNING !
20
Step-by-Step Test Procedure
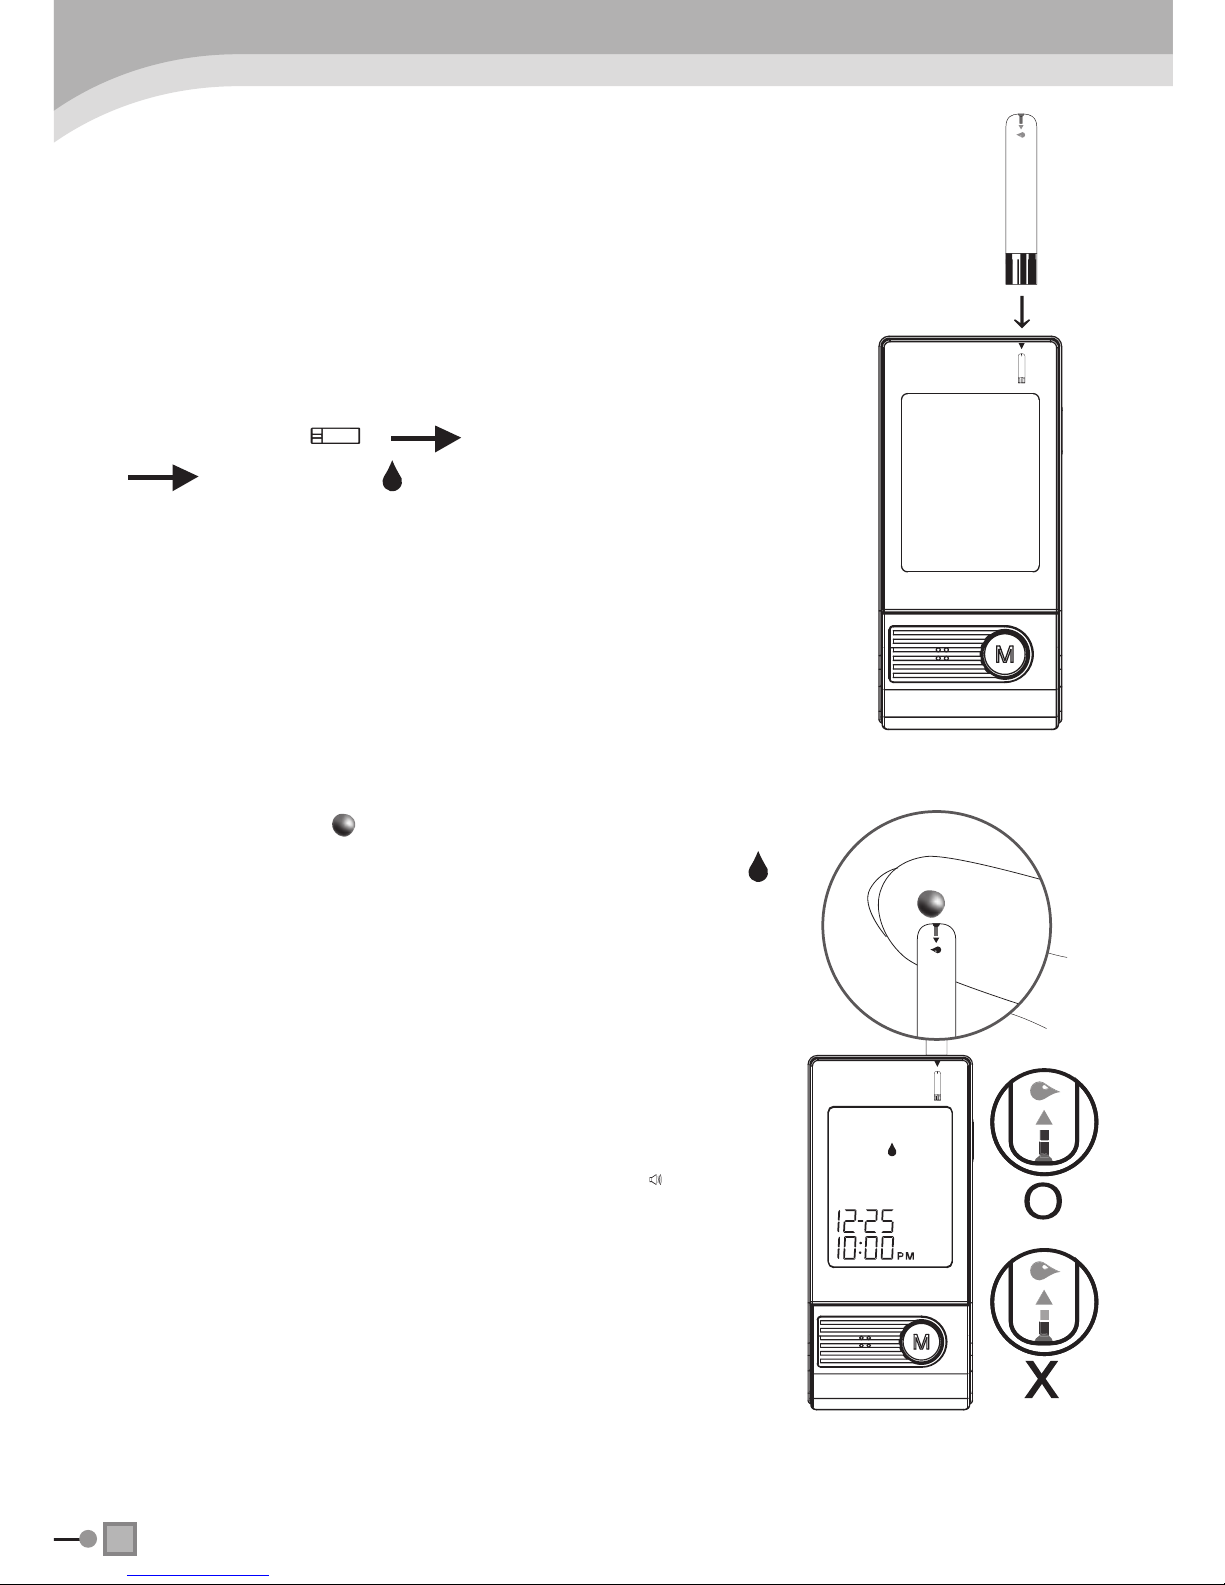
STEP 1 Insert the Test Strip
Fully insert test strip face up with con-
tact bars end rst, into the test slot.
The meter will turn on automatically
and display the following in sequence:
“CH” and “ ” room temperature
ashing “ ”.
STEP 2 Apply Sample
Obtain a drop of blood using the ad-
justable Lancing Device. The blood
sample must be at least 0.7 microliter
in volume ( actual size) or you may
get an inaccurate test result. When “
” appears on the display, apply blood
to the absorbent hole of the test strip
where it meets the narrow channel. Do
not push your nger against the test
strip or try to apply a smeared sample.
The blood should be completely lled
the conrmation window before the
meter begins to count down. If not, do
not try to add more blood to the test
strip. Discard the test strip and retest
with a new one.If you have trouble ll-
ing the test strip, please contact the
dealer for assistance.
This manual suits for next models
1
Table of contents
Other Biocare Blood Glucose Meter manuals


