ForaCare FORA D40 User manual

A1-1
FORA D40
Blood Glucose plus Blood Pressure
Monitoring System
Owner’s Manual
09/2009
Version 1.0
01

A1-2
Dear FORA D40 System Owner:
Thank you for purchasing the FORA D40 Blood Glucose plus Blood Pressure
Monitoring System. This manual provides important information which helps
you to operate this system smoothly. Before using this product, please read
the following contents thoroughly and carefully.
According to the clinical studies from American Diabetes Association, elevated
blood pressure often accompanies adult diabetes patients. These studies also
suggest that diabetes patients could reduce the risk of cardiovascular diseases
by managing their blood glucose levels and blood pressure. Therefore, with
the compact size and easy operation of this FORA D40 Blood Glucose plus
Blood Pressure Monitoring System, you can easily monitor your blood glucose
levels and blood pressure by yourself. In addition, this system can help you
and your healthcare professionals to monitor and adjust your treatment plans,
and keep your diabetes and blood pressure under control.
If you have other questions regarding this product, please contact the place of
purchase or the local customer service.
02

A1-3
IMPORTANT SAFETY INSTRUCTIONS
READ THIS BEFORE USE
The following basic safety precautions should always be taken.
1. Use the device only for the intended use described in this manual.
2. Do not use accessories which are not supplied by the manufacturer.
3. Keep the equipment and its flexible cord away from hot surfaces.
4. Do not use the equipment where aerosol sprays are being used, or where
oxygen is being administered.
5. Do not use the device if it is not working properly or has been damaged.
6. Before using product to test your blood glucose, read all instructions
thoroughly and practice the test. Do all quality control checks as directed
and consult with a diabetes healthcare professional.
KEEP THESE INSTRUCTIONS
03

A1-4
Table of Contents
BEFORE YOU START 06
Warnings and Precautions 06
HealthInformation 07
Blood Glucose 07
BloodPressure 08
ABOUTALTERNATIVE SITE TESTING (AST) 09
ABOUT THIS SYSTEM 11
Intended Use 11
PrincipleofMeasurement 11
MajorFeatures 11
ContentoftheSystem 13
Appearance and Key Functions of the Monitor 14
LCDScreen 15
SpeakingFunction 16
TestStripDescription 19
PREPARATIONSBEFOREUSE 20
Battery and DC adaptor 20
Battery Installation and Replacement 21
Use of the DC Adaptor 22
SettingtheMonitor 23
UserNumberSelection 25
BLOODGLUCOSEMEASUREMENT 26
ImportantInformation 26
QualityControlwithFORAControlSolutions 27
ImportantControlSolutionInformation 28
PerformingaControlSolutionTest 29
TestingYourBloodGlucose 31
SpecialMessage 37
Comparing Monitor and Laboratory Results 38
04

A1-5
BLOOD PRESSURE MEASUREMENT 39
Suggestions before Measuring 39
ApplyingthePressureCuff 40
Proper Measurement Position 41
Take a Reading 42
Measurement Average Mode 44
MONITORMEMORY 45
ViewingResultsontheMonitor 45
Reading the Average of Blood Glucose Results 47
Viewing Results on a Personal Computer 49
DataTransmissionviaBluetooth 50
DataTransmissionviaGPRS 51
TAKINGCAREOFYOURMONITOR&STRIP 52
Cleaning 53
Storage 54
TROUBLESHOOTING 55
SPECIFICATIONS 59
FCCSTATEMENT 60
05

A1-6
BEFORE YOU START
Warnings and Precautions
The FORA D40 system is designed for use on
individuals age 16 and above. It shall NOT be
used under any circumstances on newborns,
infants or persons who cannot communicate.
This device does NOT serve as a cure for any
symptoms or diseases. The data measured are
for reference only. Always consult your physician
to have the results interpreted.
This device is NOT able to take measurements in
the presence of common arrhythmia, such as
arterial or ventricular premature beats or arterial
fibrillation. It may produce reading error.
Do NOT use the device for purposes other than
measuring blood glucose and blood pressure for
human beings.
Do NOT apply the cuff to areas other than your
arm.
06

A1-7
Health Information
Blood Glucose
Blood glucose monitoring plays an important role in diabetes control. A
long-term study showed that keeping blood glucose levels close to normal
can reduce the risk of diabetes complications by up to 60%*1.
The results you acquire with the FORA D40 system can help you and your
healthcare professionals monitor and adjust your treatment plan to gain better
control of your diabetes.
Time of day Normal plasma glucose range for
people without diabetes
Fasting and before meal Less than 100 mg/dL
(5.6 mmol/L)
2 hours after meals Less than 140 mg/dL
(7.8 mmol/L)
Source: American Diabetes Association (2008). Clinical Practice Recommendations. Diabetes
Care, 31 (Supplement 1): S1-108.
Time of day Plasma glucose range for people
with diabetes Your target
range
Fasting and before meal 70 mg/dL -130 mg/dL
(3.9 mmol/L -7.2 mmol/L)
2 hours after meals Less than180 mg/dL
(10.0 mmol/L)
Source: American Diabetes Association (2008). Standards of Medical Care in Diabetes.
Diabetes Care, 31 (Supplement 1): S12–S54.
Please work with your doctor to determine a target range that works best for
you.
*1: American Diabetes Association position statement on the Diabetes Control and
Complications Trial (1993).
07

A1-8
Blood Pressure
Clinical studies show that the adult diabetes is often accompanied by elevated
blood pressure. People with diabetes can reduce their heart risk by managing
their blood pressure along with diabetes treatment*5.
Knowing your routine blood pressure trend tells whether your body is in good
condition or not. Human blood pressure naturally increases after reaching
middle age. This symptom is a result of continuous aging of the blood vessel.
Further causes include obesity, lack of exercise, and cholesterol (LDL)
adhering to the blood vessels. Rising of blood pressure accelerates hardening
of the arteries, and the body becomes more susceptible to apoplexy and
coronary infarction. The recommended blood pressure range is as below:
Classification Systolic Pressure (mmHg) Diastolic Pressure(mmHg)
Hypotension*3Less than 90 Less than 60
Normal*4Less than 120 Less than 80
Prehypertension*4120 –139 80 –89
Stage 1 Hypertension*4140 –159 90 –99
Stage 2 Hypertension*4160 or more 100 or more
*3 National Heart, Lung, and Blood Institute, Diseases and Conditions
*4 The Seventh Report of the Joint National Committee on Prevention, Detection, Evaluation,
and Treatment of High Blood Pressure. NIH Publication. 2003. No. 03-5233
*5: American Diabetes Association: The Diabetes-Heart Disease Link SurveyingAttitudes,
Knowledge and Risk (2002)
08

A1-9
ABOUT ALTERNATIVE SITE TESTING (AST)
Important: There are limitations for doing AST.
Please consult your healthcare professional before you do AST.
What is AST?
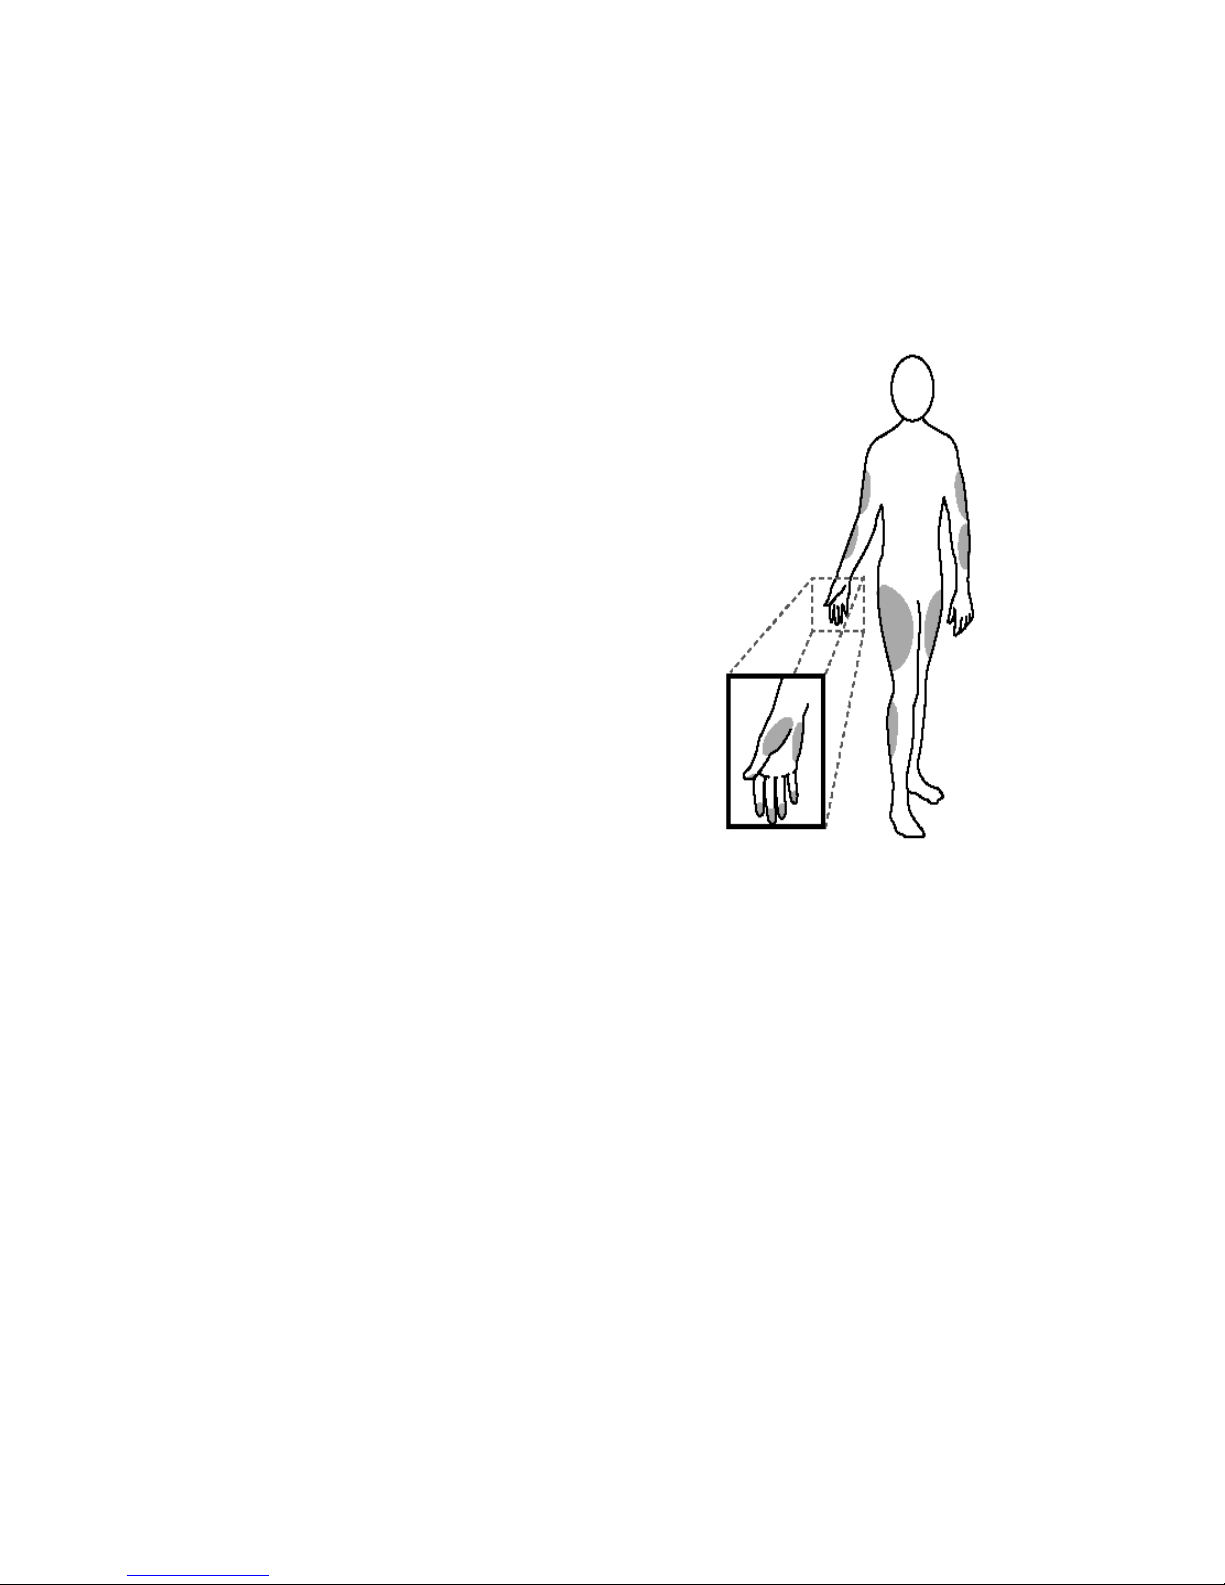
Alternative site testing (AST) means that
people use parts of the body other than
fingertips to check their blood glucose levels.
This system provides you to test on the palm,
the forearm, the upper arm, the calf, or the
thigh with equivalent results to fingertip testing.
What’s the advantage?
Fingertips feel pain more readily because they
are full of nerve endings (receptors). At other
body sites, since nerve endings weren’t so
condensed, you won’t feel as much pain as at
the fingertip.
When to use AST?
Food, medication, illness, stress and exercise can affect blood glucose levels.
Capillary blood at fingertip reflects these changes faster than capillary blood at
other sites. Therefore when testing blood glucose during or immediately after
meal, physical exercise, or any other event, take blood sample from your
finger only.
We strongly recommend that you doAST ONLY in the following intervals:
In a pre-meal or fasting state (more than 2 hours since the last meal).
Two hours or more after taking insulin.
Two hours or more after exercise.
09

A1-10
Do NOT use AST if:
You think your blood glucose is low.
You are unaware of hypoglycemia.
Your AST results do not match the way you feel.
You are testing for hyperglycemia.
Your routine glucose results are often fluctuating.
How to increase the accuracy?
Stimulating blood perfusion by rubbing the puncture site prior to blood
extraction has a significant influence on the glucose value obtained.
Blood from the site without rubbing exhibits a measurably different glucose
concentration than blood from the finger. When the puncture site was rubbed
prior to blood extraction, the difference was significantly reduced.
Please follow suggestions below before getting a drop of blood:
Rub the puncture site about 20 seconds before penetration.
Use a clear cap (included in the kit) instead while setting the lancing device.
10

A1-11
ABOUT THIS SYSTEM
Intended Use
The FORA D40 system is a 2 in 1 system designed to measure blood glucose
and to measure blood pressure non-invasively (in vitro diagnostic use.) It is
intended for use at home and at clinical settings. It shall not be used for the
diagnosis of diabetes or hypertension, or for the testing of newborns.
Principle of Measurement
Blood glucose is based on the measurement of electrical current generated by
the reaction of glucose with the reagent of the strip. The monitor measures the
current and displays the corresponding blood glucose level. The strength of
the current produced by the reaction depends on the amount of glucose in the
blood sample.
Blood pressure is measured non-invasively at the arm based on the
Oscillometric method.
Both functions work independently of each other (one measurement, either
blood glucose or blood pressure, at one time) in order to avoid any interference
problems.
Major Features
This system has the following distinguishing features and allows you to perform
your measurements effectively.
1. Talking function – Instructions will be given throughout the measurement.
The settings and test results will be repeated as well.
2. No calibration required – Users do not need to calibrate the monitor.
3. AC/PC/QC records – Glucose AC is the glucose value before meal and PC
is the glucose value after meal. QC is the control solution value which users
perform to check if the system works effectively.
4. Multi-user function – It provides different users to store their results in the
memory individually.
5. Data transmission options – It helps users to manage their test results
easily and efficiently.
11

A1-12
There are three subtypes of FORA D40 system available. Each one of them
offers a different way to transmit allowing users to choose their own desired
ways to manage their test results. The data transmissions are listed below:
Model Data Transmission Function
Test results can be viewed on the PC
through the cable connection.
Test results can be viewed on the PC
through a wireless connection by using
Bluetooth technology.
Test results can be viewed on the PC
through a wireless connection by using
GPRS technology.
12

A1-13
CONTENT OF THE SYSTEM
1Blood glucose plus blood pressure
monitor 6Warranty card
2Lancing device 7A clear cap
3First time user guide 8Daily log book
4Owner’s manual 9An arm cuff
5Sporty bag Batteries
These products have been designed, tested, and proven to work together as a
system to produce accurate blood glucose test results. Use only FORA D40
test strips and control solution with your FORA D40 monitor.
NOTE
One 3.7V rechargeable Li-ion battery is included in the kit of FORA D40g
instead of alkaline batteries. Use ONLY rechargeable Li-ion battery for FORA
D40g (battery pack no.S14500 1S4P).
Make sure your system is properly packaged prior to use and that it includes
all components listed above. If not, please return your system to the place of
purchase.
Please note that test strips, control solutions and lancets are not included in
the standard kit. Please ask your local agent or the place of purchase for
availability.
13

A1-14
Appearance and Key Functions of the Monitor
1. TEST SLOT- is where you insert the test strip.
2. LCD SCREEN- guides you through the test using symbols and simple
messages.
3. RF BUTTON- assists you with wireless data transmission.
AVERAGE BUTTON- assists you with blood pressure average mode.
4. S BUTTON- is used to set up the monitor.
5. M BUTTON- is used to turn on the monitor and enter the memory.
6. ON/OFF BUTTON
7. USER SELECTION BUTTON- assists you with user number selection.
8. SPEAKER
9. RF INDICATOR- lights up for data transmission.
10. USB INDICATOR- lights up for data transmission.
11. POWER INDICATOR
12. BATTERY COMPARTMENT
13. AC ADAPTER PORT- is for power supply.
14. USB LINK PORT- For data transmission.
15. STRIP-EJECTION BUTTON- is where the used strip will be automatically
ejected after you push up the button.
16. Air jack
17. Arm Cuff
18. Air Tube
19. Air Plug- connects to air jack.
14

A1-15
LCD Screen
1. Date
2. Systolic Pressure Symbol
3. PC Mode
4. & 6. Test Result Area
5. Diastolic Pressure Symbol
7. Voice Volume
8. Ketone Warning
9. Time
10. Code Number
11. Unit of Measurement in Blood Glucose
12. Unit of Measurement in Blood Pressure
13. Memory
14. Battery Symbol
15. Smile Symbol
16. Day Average
17. Pulse Rate
18. Blood Drop Symbol
19. Test Strip Symbol
20. User Number
21. Pulse Symbol
15

A1-16
Speaking Function
The monitor “speaks” aloud step-by-step instructions on how to test your blood
glucose and blood pressure. The following table tells you when and what the
monitor“speaks”.
WHEN
does the monitor speak? WHAT
does the monitor speak?
When the monitor is turned on.
Thank you for using this product.
The user’s number is one, please
select the user’s number.
The user’s number is one, please
relax during measurement.
When room temperature is outside
operating range of 10-40ºC. Room temperature out of range,
unable to measure.
When the glucose test is completed
(the result appears on display).
The blood glucose is (number)
milligram per deciliter/ millimole per
liter.
You are now in setting mode. The
Year is (number).
The month is (number).
The day is (number)
The hour is (number).
The minute is (number).
Blood glucose unit is milligrams per
deciliter/ millimole per liter.
Temperature unit is degrees
Fahrenheit/ Celsius.
Voice volume is (number).
Delete memory record function, press
the key the clear all the records.
Repeat all the setting status.
When the monitor is in the setting
mode.
Have a nice day.
16

A1-17
WHEN
does the monitor speak? WHAT
does the monitor speak?
Thank you for using this product.
Test strip is inserted. Today’s day is
(number), the time is (number), the
room temperature is (number), the
user’s number is one, please apply
blood onto the test strip.
Now testing.
When the test strip is inserted into the
monitor.
The user’s number is one. Your blood
glucose is (number) milligram per
deciliter/ millimole per liter.
When the glucose test result is
outside measurement range of
20-600 mg/dL.
The blood glucose is out of range,
unable to measure.
Battery is low, please recharge
When power is insufficient. Battery is dead, please recharge
You are now in testing mode.
This is before meal measurement.
This is after meal measurement.
When the monitor is in blood glucose
measurement mode. You are now in control solution mode.
When the blood pressure test is
completed (the result appears on
display).
Your systolic blood pressure is
(number) millimeter of mercury, the
diastolic blood pressure is (number)
millimeter of mercury and the heart
rate is (number) beats per minute.
17

A1-18
WHEN
does the monitor speak? WHAT
does the monitor speak?
Thank you for using this product.
Today’s date is (number), the time is
(number), you are now in memory
mode, the user’s number is one,
please select the user’s number.
When the monitor is in memory mode.
Memory record for (Time), your blood
glucose is (number) milligram per
deciliter/ millimole per liter. Your
memory record for (Time). Your
systolic blood pressure is (number)
millimeter of mercury, the diastolic
blood pressure is (number) millimeter
of mercury and the heart rate is
(number) beats per minute.
Thank you for using this product.
You are now in day average mode, the
user’s number is one, please select
the user’s number.
When the monitor is in day average
memory mode. The user’s number is (number), the
7-,14-,21-,28,,60-,90- day blood
glucose average is (number)
18

A1-19
Test Strip Description
Your system measures the amount of sugar (glucose) in whole blood. Blood is
applied to the absorbent hole of the test strip and is automatically drawn into
the reaction cell where the reaction takes place.
The test strip contains the following parts:
See section “Testing Your Blood Glucose” for complete instructions.
19

A1-20
PREPARATIONS BEFORE USE
Battery and DC adapter
The monitor is powered by batteries or a DC adapter.
Low Power Signal
When the power is low, the monitor will remind you by displaying two
messages:
When the flashing “ ” symbol is displayed on the
main screen, this indicates that batteries are dead
and it is time to change the batteries.
The power indicator located above the main screen
would light up in red as well.
20
Table of contents
Other ForaCare Blood Glucose Meter manuals

ForaCare
ForaCare FORA 6 Plus Installation guide

ForaCare
ForaCare 6 Connect Installation guide

ForaCare
ForaCare D20 No-Coding User manual

ForaCare
ForaCare iDiamond User manual

ForaCare
ForaCare FORA 6 Plus Installation guide

ForaCare
ForaCare TD-3260 User manual

ForaCare
ForaCare G30a User manual

ForaCare
ForaCare Pet Gluc User manual

ForaCare
ForaCare POCT S10a User manual

ForaCare
ForaCare FORA 6 Connect User manual