biodex RTM 600 User manual
RTM 600 REHABILITATION TREADMILL
APPLICATION/OPERATION MAN AL
950-420
950-421
950-422
950-423
950-426
950-427
BIODEX
Biodex Medical Systems, Inc.
20 Ramsay Road, Shir ey, New York, 11967-4704, Te : 800-224-6339 (Int’l 631-924-9000), Fax: 631-924-9338, Emai : [email protected], www.biodex.com
FN: 11-086 3/11

— II —
This manual covers installation and operation procedures
for the following products:
950-420 Treadm ll, RTM600, 115 VAC
950-421 Treadm ll, RTM600, 230 VAC
950-422 Treadm ll, RTM600, 115 VAC, w th Extended Handra ls
950-423 Treadm ll, RTM600, 230 VAC, w th Extended Handra ls
950-426 Treadm ll, RTM600, 115 VAC, w th Ger atr c/Ped atr c Handra ls
950-427 Treadm ll, RTM600, 230 VAC, w th Ger atr c/Ped atr c Handra ls
RTM 600
NOTE: All or some of t e following symbols, cautions, warnings and notes may apply to your Gait Trainer 2 and
correspond to t is operation manual:
CAUTION: Federal law restricts t is device to sale by or on t e order of a medical practitioner. W en prescribed for
t erapeutic purpose, a p ysician s ould clearly define t e parameters of use (i.e., total work, maximum eart rate, etc.) to
reduce t e risk of patient injury.
!
!
!
!
Symbol Meaning
DANGER: will result in an imminently azardous situation if not avoided.
WARNING: will result in a potentially azardous situation if not avoided.
CAUTION: may result in a potentially azardous situation if not avoided.
ATTENTION: consult accompanying documents.
Symbol Signification
DANGER : aura comme conséquence une situation d'une manière imminente dangereuse sinon évitée.
AVERTISSEMENT : aura comme conséquence une situation potentiellement dangereuse sinon évitée.
ATTENTION : peut avoir comme conséquence une situation potentiellement dangereuse sinon évitée.
ATTENTION : consultez les documents d'accompagnement.
!
!
!
!

$"%$
#$)#"$#""%#
#$%
• Connecting the Safety Lanyard ..................................................................................................3 1
• Handrail Installation (Optional) ................................................................................................3-2
!%#$"$ "$
• Quick Start Track/Numeric Display Parameters ....................................................................4-1
% "$
• Manual Operation ........................................................................................................................5-1
• Manual Mode Exercise Track/Numeric Display Parameters ................................................5-2
" "$
• Choosing a Pre-Defined Exercise Profile ..................................................................................6-1
• Designing a Custom Exercise Profile ........................................................................................6-3
"$%$$#
• Configuration ................................................................................................................................7-1
• System Maintenance ....................................................................................................................7-3
• Speed and Elevation Calibration ................................................................................................7-3
$
• Daily Maintenance ........................................................................................................................8-1
• Quarterly Maintenance ................................................................................................................8-1
• Annually or Every 1,000 Hours ..................................................................................................8-1
• Maintenance Procedures ..............................................................................................................8-2
$"%#$
$"$ $$)
# $#
""#" )
##)"'##$#
TABLE OF CONTENTS
— III — CONTENTS

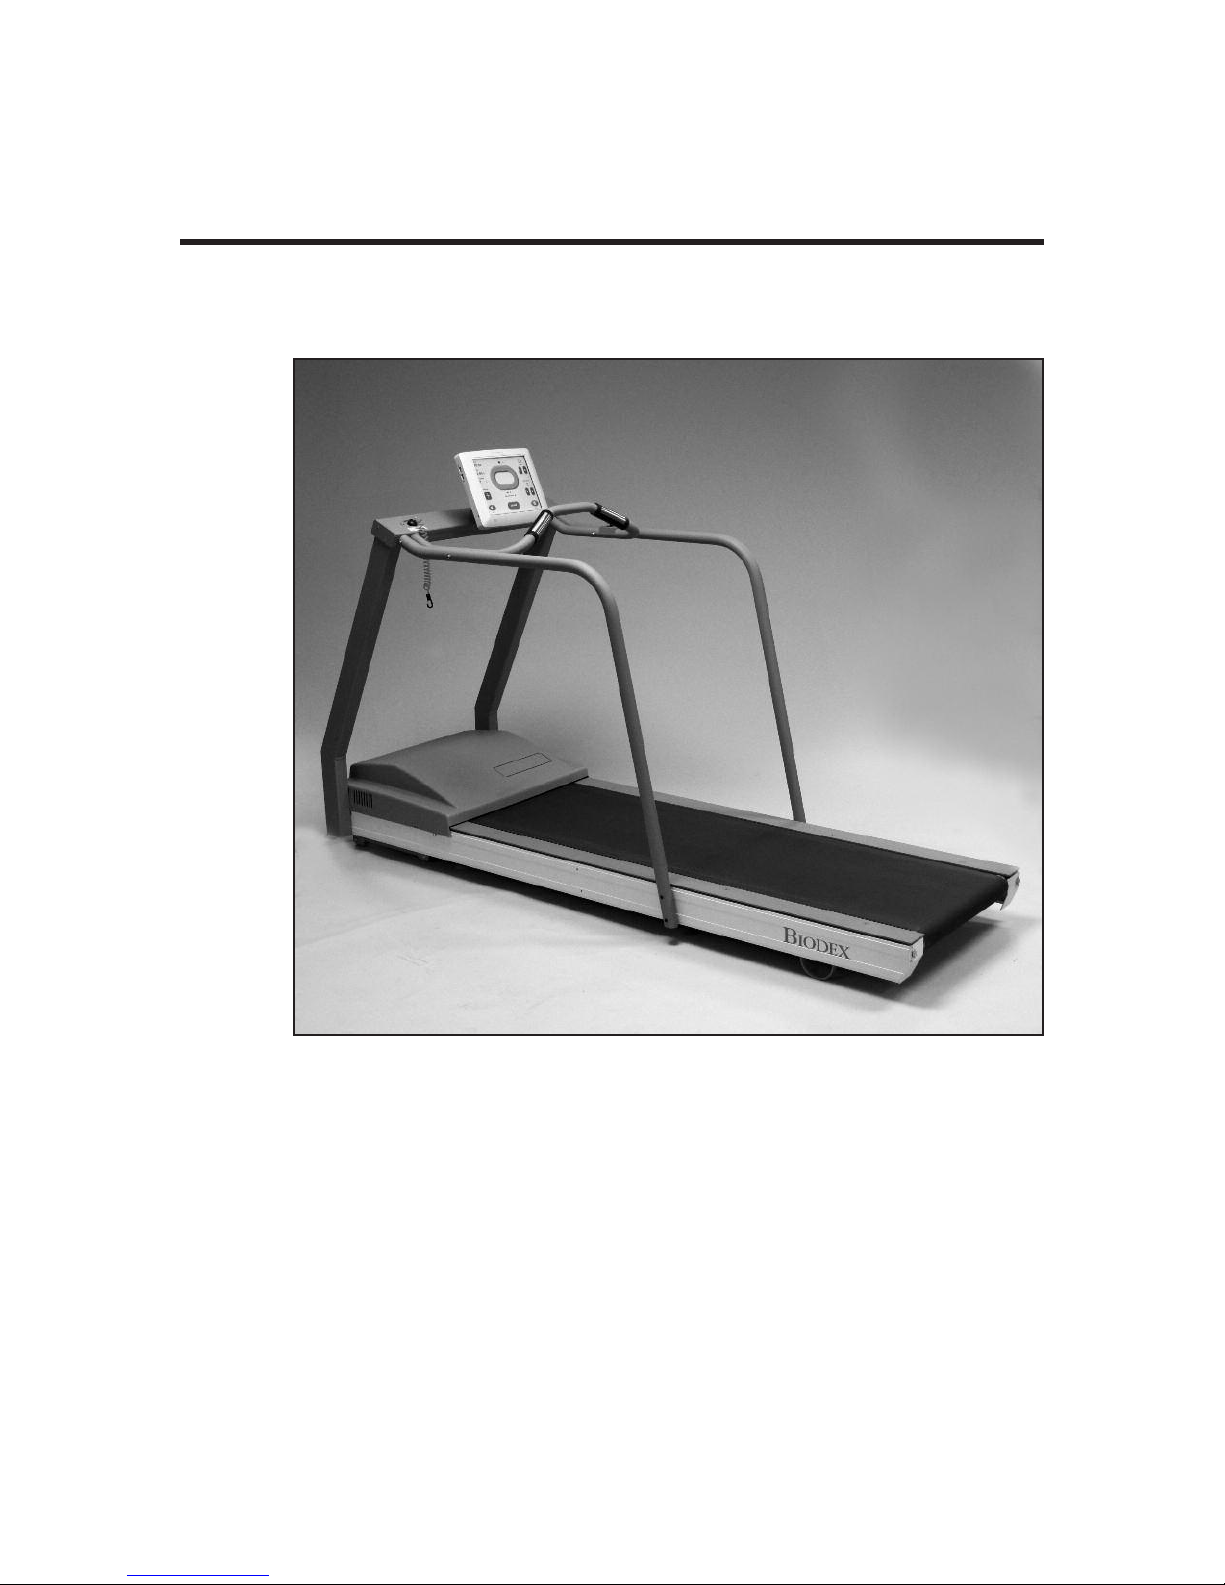
The RTM 600 is the only treadmill to offer a true zero starting speed, 1/10 mph speed increments
over a range of 0-10 mph, plus powered incline and decline in both forward and reverse direc-
tions. Extremely versatile, it’s perfect for exercise with acute post-operative, neuro, pediatric, car-
diopulmonary, respiratory, seniors and orthopedic/sports medicine patients in need of strength-
ening and aerobic conditioning.
Biodex, the leader in motor control technology for medical applications, uses the same our
Quadrant Pulse Width Modulation (PWM) technology for the Biodex RTM 600 as is used in the
world-famous Biodex Dynamometer. With more power and consistent speed control than con-
ventional AC or DC motors, the RTM 600 can operate at the slowest speeds, regardless of weight
strain. This advantage proves especially beneficial when treating larger patients in the earliest
phases.
The spacious 20" x 64" (50.8 x 160 cm) low profile, Teflon-impregnated running deck has a low
step-up and incorporates a shock-absorbing surface to reduce stress and trauma to the lower back
and extremities. Add in our Exact-Track belt, which eliminates tracking problems, and it’s easy to
see why patients who might not be able to tolerate other treadmills can get a head start on the
RTM 600. The RTM 600 is also the only treadmill that allows retro-walking exercise while facing
forward for more effective proprioception training in a safe environment. Retro-walking promotes
extension of the knee and dorsiflexion of the foot, which at the same time uses eccentric control of
the hamstrings to actively decelerate the joint. Ideal for training patients to negotiate handicap
ramps
Unusually quiet and easy to operate, the RTM 600 features an intuitive Touch Screen LCD Graphic
Display that provides both pre-defined and user-defined programmability, quick start and manu-
al modes. Heart rate monitoring is accomplished using contact heart rate handgrips. The system
comes with a sturdy support bar, but optional Extended and Geriatric/Pediatric Handrails are
also available. The treadmill can be configured for either 0 to 15% or -3 to 12% incline.
1. INTROD CTION
— 1-1 — INTROD CTION

!
The following safety considerations should be observed for all patients who exercise on the
RTM 600.
1. All patients should consult a physician before beginning any rehabilitation program.
2. Instruct patient on proper use and all RT 600 safety features before beginning exercise.
3. Always attach the Safety Lanyard to the patient’s clothing or wrist before allowing exercise to begin.
4. Ensure patient has stretched and warmed-up prior to starting exercise.
5. Do not allow any patient to exercise unattended on the RT 600. Never leave the RT 600 running
unattended.
6. Periodically monitor the heart rate of patients exercising on the RT 600.
7. Begin all exercise at a slow pace, increasing speed gradually to patient tolerance and progressing toward
exercise goals. Always inform the patient immediately prior to increasing or decreasing speed or eleva-
tion.
8. If reversing belt direction, bring the RT 600 to a complete stop and inform patient that the belt will
begin moving in the opposite direction.
9. Immediately discontinue exercise if patient feels faint, dizzy or short of breath.
10. Never allow anyone to step onto the RT 600 while the treadbelt is in motion. Always stop the RT
600 prior to allowing the patient to step up onto the treadbelt.
11. Instruct patients to use the handrails when first learning to walk on the RT 600.
On devrait observer les considérations suivantes de sûreté pour tous les patients qui s'exercent sur
le RTM 600.
1. Tous les patients doivent voir leur médecin responsable avant d’entreprendre la séance de rééducation.
2. Expliquer au patient la bonne utilisation des systémes de sécurité du tapis avant de démarrer la séance.
3. Connector toujours la sangle de sécurité aux vêtements du patient ou poignet avant que le patient ne
commence à travailler.
4. Vérifier que la patient s’est échauffé et a fait des étirements avant de commencer l’entraînement sur le
tapis.
5. Ne pas laisser le patient seul sur le tapis pendant la séance. Ne jamais laisser le tapis tourner sans
patient et sans surveillance.
6. Surveiller de temps à autre la fréquence cardiaque du patient pendant la séance.
7. Démarrer les protocloes à une vitesse lente et augmenter progressivement la vitesse en fonction de la
tolérance du patient et progres uers les objectifs de la séance. Signaler avant de l’appliquer tonte aug-
mentation ou diminution de vitesse ou d’inclinaison.
8. Avant de changer la direction de déplacement du tapis, arrêter le tapis complétement et expliquer au
patient que le tapis va démarrer dans le sens opposé.
9. Arrêter la séance immédiatement en cas de dyspnée, d’étourdissements ou d’autres signes de malaise.
10. Ne jamais faire monter personne sur le tapis pendant que le tapis est en marche. Arrêter toujours le
tapis avant que le patient ne s’y positionne.
11. Donner la consigne au patient d’utiliser les barres horizontales lors de sa premiére séance sur le tapis.
2. SAFETY CONSIDERATIONS FOR GENERAL SE
— 2-1 — CLINICAL CONSIDERATIONS FOR GENERAL SE

Figure 3.1. Attaching the Safety Lanyard.
Included with the RTM 600 is a Safety Lanyard that must be attached prior to operation.
$$#$))"
(See Figure 3.1.)
A Safety Lanyard is provided. The RTM 600 will not operate unless the lanyard is attached. Attach
the Safety Lanyard at the left corner of the top cross bar supporting the Display panel. The round
end of the Safety Lanyard attaches to the unit via a Velcro® brand hook and loop fastener. The clip
end of the lanyard should be attached to the patient’s clothing or wrist in a way that does not
interfere with the patient’s exercise.
NOTE: Disconnecting the Safety Lanyard (left side of Display/Control Panel) or pressing the red Safety
Stop (atop the right side of the Support Bar) at any time will cause the treadbelt to immediately ramp down
to a full stop and reset to 0.0 mph. The Display will read <Safety Lanyard Removed> and the treadbelt will
not restart until the Safety Lanyard is once again in position or <Start> is pressed following use of the
Safety Stop. Display data is not lost in either case. Data accumulation will resume once the lanyard is recon-
nected and/or <Start> has been pressed.
3. SET- P
— 3-1 — SET- P
Attach Safety Lanyard

"#$$ $
(See Figures 3.2 – 3.4.)
Figure 3.2.
Figure 3.3.
Figure 3.4. The Biodex RT 600 comes with a sturdy support bar installed (Figure 3.2).
Optional Extended (Figure 3.3) and Geriatric/Pediatric handrails (Figure 3.4) are also available.
CONTENTS
SET- P — 3-2 —

The Biodex RTM 600 comes with a sturdy support bar, but optional Extended and
Geriatric/Pediatric handrails are also available. Both optional handrails are installed as follows:
NOTE: Do not fully tighten any screws until all the screws and hardware have been positioned and par-
tially secured.
1. Using a Phillips screwdriver, remove the two screws that attach the cover plate to side of the
display support bar. Set the screws and mounting plates aside.
2. Using a 9/16-inch box wrench, attach the optional handrail to the display support bar with a
3/8-inch lock washer and hex head bolt.
3. Slide the handrail mounting bar into the bottom of the optional handrail so that the screw
holes align.
4. Attach the bottom of the handrail to the platform deck frame using two 1/4 - 20 x 1.75-inch
socket-head screws.
5. Using one 1/4 - 20 x 1.75-inch button-head screw, secure the optional handrail to the support
bar. Pass the screw, threads to the outside of the deck, through the support bar first and into
the optional handrail.
6. Tighten all screws.
7. Using a Phillips screwdriver, replace the cover plate on the display support bar with the two
screws set aside in step #1.
8. Repeat the procedure to attach the opposite optional handrail.
CONTENTS
— 3-3 — SET- P

Figure 4.1. The Quick Start feature allows the user to begin the exercise session with minimal input.
!%#$"$ "$
(See Figure 4.1.)
Although the RTM 600 offers advanced programming capability, it also features a "Quick Start"
function that allows the user to immediately begin exercise on the system with 1/4-mile scaled
track views.
Quick-Start operation is simple. With the system turned ON, position the user on the treadbelt and
proceed as follows:
1. Touch Display. The Opening Menu should now be displayed.
2. Touch <Quick Start>. The Quick Start Exercise Track should now be displayed. (See igure 4.1)
3. Press <Start> on the display to activate the treadbelt. The treadbelt will ramp up to .01 mph.
4. Touch the <▲> and <▼> arrows on the screen to adjust <Speed> and <Elevation> as desired.
5. Touch the display icons at the bottom left of the screen to toggle between the Quick Start
Exercise Track display and a Numeric display.
6. Touch <Pause> to pause the exercise session at any time. Touch <Resume> to resume the
exercise session.
7. Touch <End> to end the exercise session at any time.
8. Touch <Reset> to return to the Opening screen.
4. Q ICK START OPERATION
— 4-1 — Q ICK START OPERATION

!%#$"$$"%"# ) "$"#
Users can choose from a Quick Start Exercise Track or Numeric display during Quick Start exer-
cise sessions. The following parameters are displayed for both choices.
NOTE: To toggle between displayed parameters (i.e., to change measurement units for calories, pace or dis-
tance) touch the yellow dot next to each parameter heading.
Time: Cumulative time in minutes/seconds from the point at which the treadbelt begins to move
in either direction.
Distance: The distance covered in miles or KM from the beginning to the end of the current exer-
cise session.
Calories: Toggle between:
• Calories: Total calories burned by the user during the current exercise session. This value is dis-
played in real-time.
• Calories/Hr: Total calories that will be burned in one hour if exercise continues at the current
rate. This parameter is dependent upon a default weight of 150 pounds.
• METs: This value reflects the resting rate of Oxygen consumption with one MET equal to the
Oxygen consumption of a seated individual at rest. Thus, a seated individual in a resting state is
consuming one MET. A seated individual exercising at a rate of two METs is consuming twice the
Oxygen of a seated, resting individual. A person exercising at 10 METs is consuming ten times the
Oxygen of a seated, resting individual. To compute the METs of a person actively exercising on
the Gait Trainer 2, the system uses standard calculations based on American College of Sports
Medicine Guidelines for Testing and Exercise. The METs value is always displayed in real/time
for current speed.
Pace: The amount of time it will take the user to move one mile or KM at the current treadbelt
speed.
Heart Rate: This is the real-time heart rate of the user during the exercise session measured using
the contact handgrips.
CONTENTS
Q ICK START OPERATION — 4-2 —
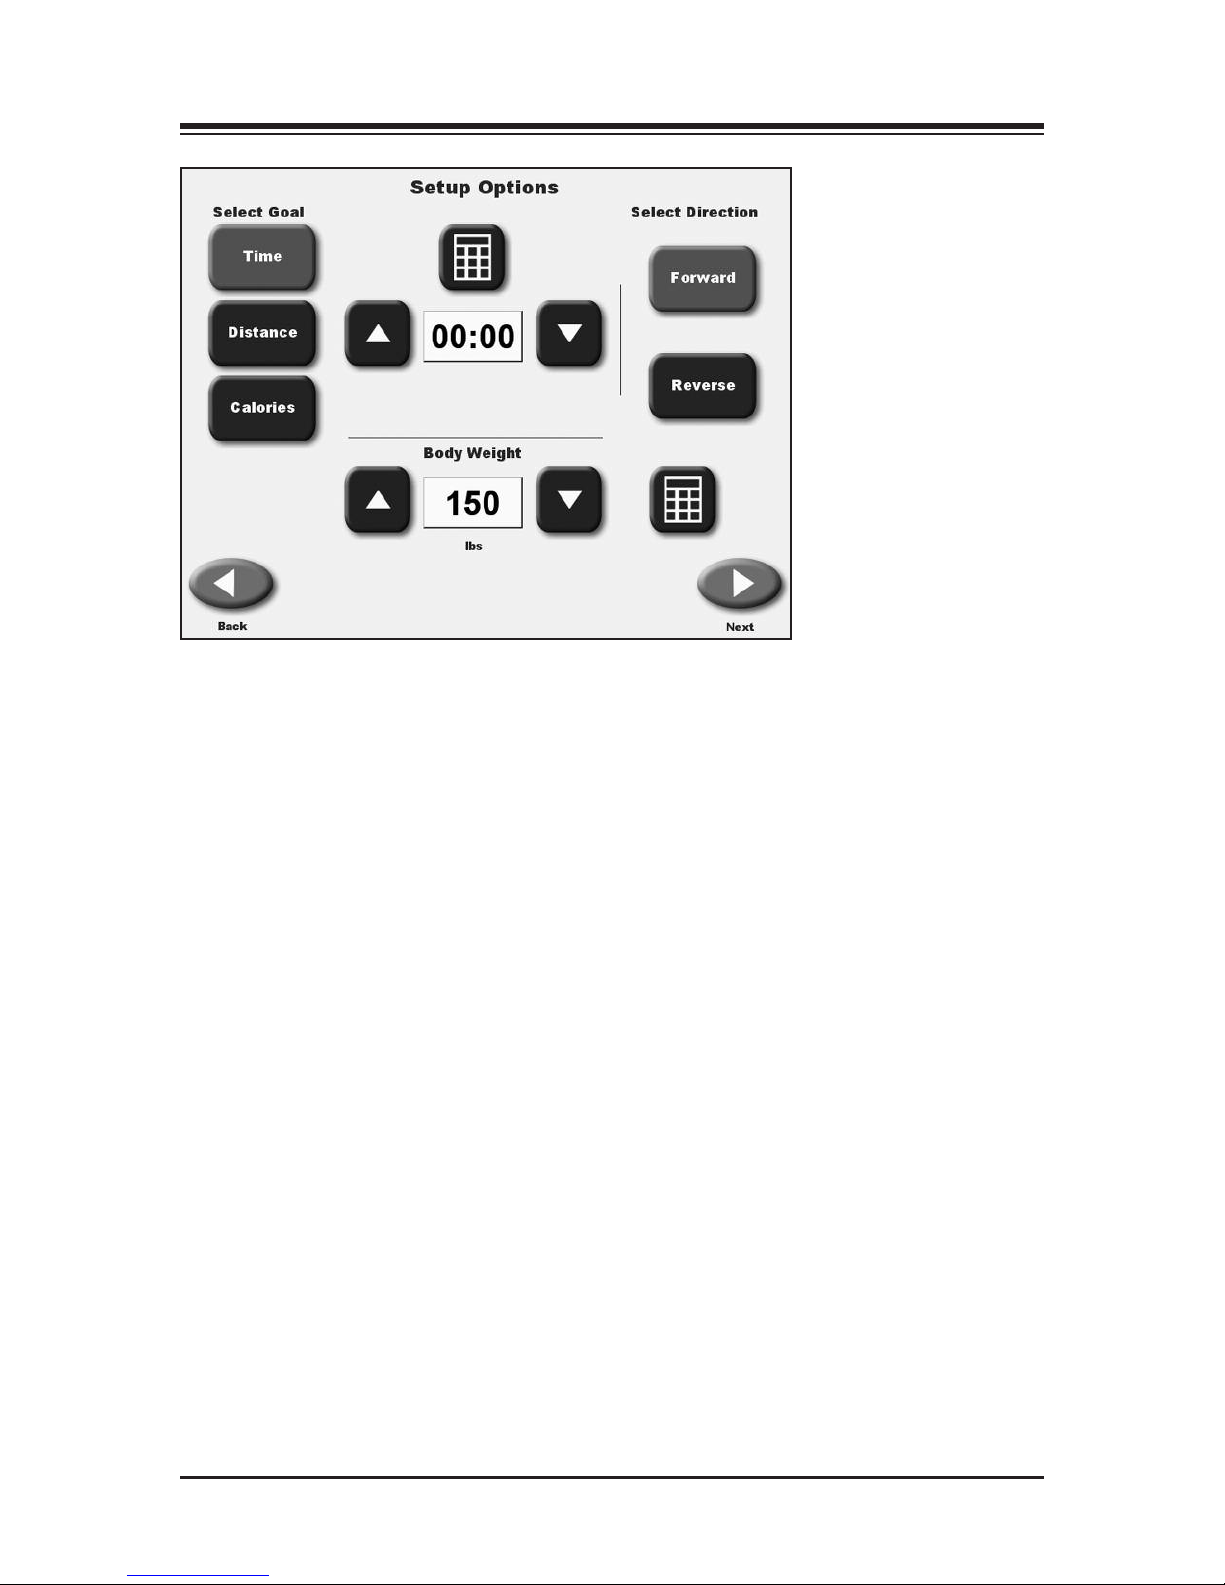
Figure 5.1. The RT 600 Setup Options screen allows entry of patient-specific information and parameters.
% "$
(See Figure 5.1.)
Manual Operation is easy with the Biodex 600 RTM. Like the Quick Start function, Manual Start
allows the user to begin exercising quickly. Rather than use default settings, however, this mode
of operation prompts the clinician to enter the patient’s body weight, select the treadbelt direction,
and enter values for Time, Distance and Calories. During the exercise, the user can choose
between Exercise Track or Numeric displays.
,9@,7;0=,?4:9 =:.0/@=0
NOTE: For all screens, <Next> advances to the next screen, <Back> returns the user to the previous screen.
1. At the RTM 600 Opening Menu select <Manual Start>. The Setup Options screen should now
be displayed.
2. At the Setup Options screen, touch the appropriate icons to enter information and select tread-
belt direction. In addition to the <▲> and <▼> arrows, a pop-up keypad can be used to enter
values for Distance, Calories and Body Weight. Once the desired information is
entered/selected, touch <Next> to advance to the Exercise Track display.
3. At this point, you can touch the Display icons at the lower left of the screen to toggle between
the Exercise Track display and a Numeric display.
4. With the Exercise Track or Numeric Display on the screen, simply touch the yellow dot next
to any heading or icon if you want to change the value. To toggle between value settings (i.e.,
miles/KM) touch the displayed parameter.
5. MAN AL OPERATION
— 5-1 — MAN AL OPERATION

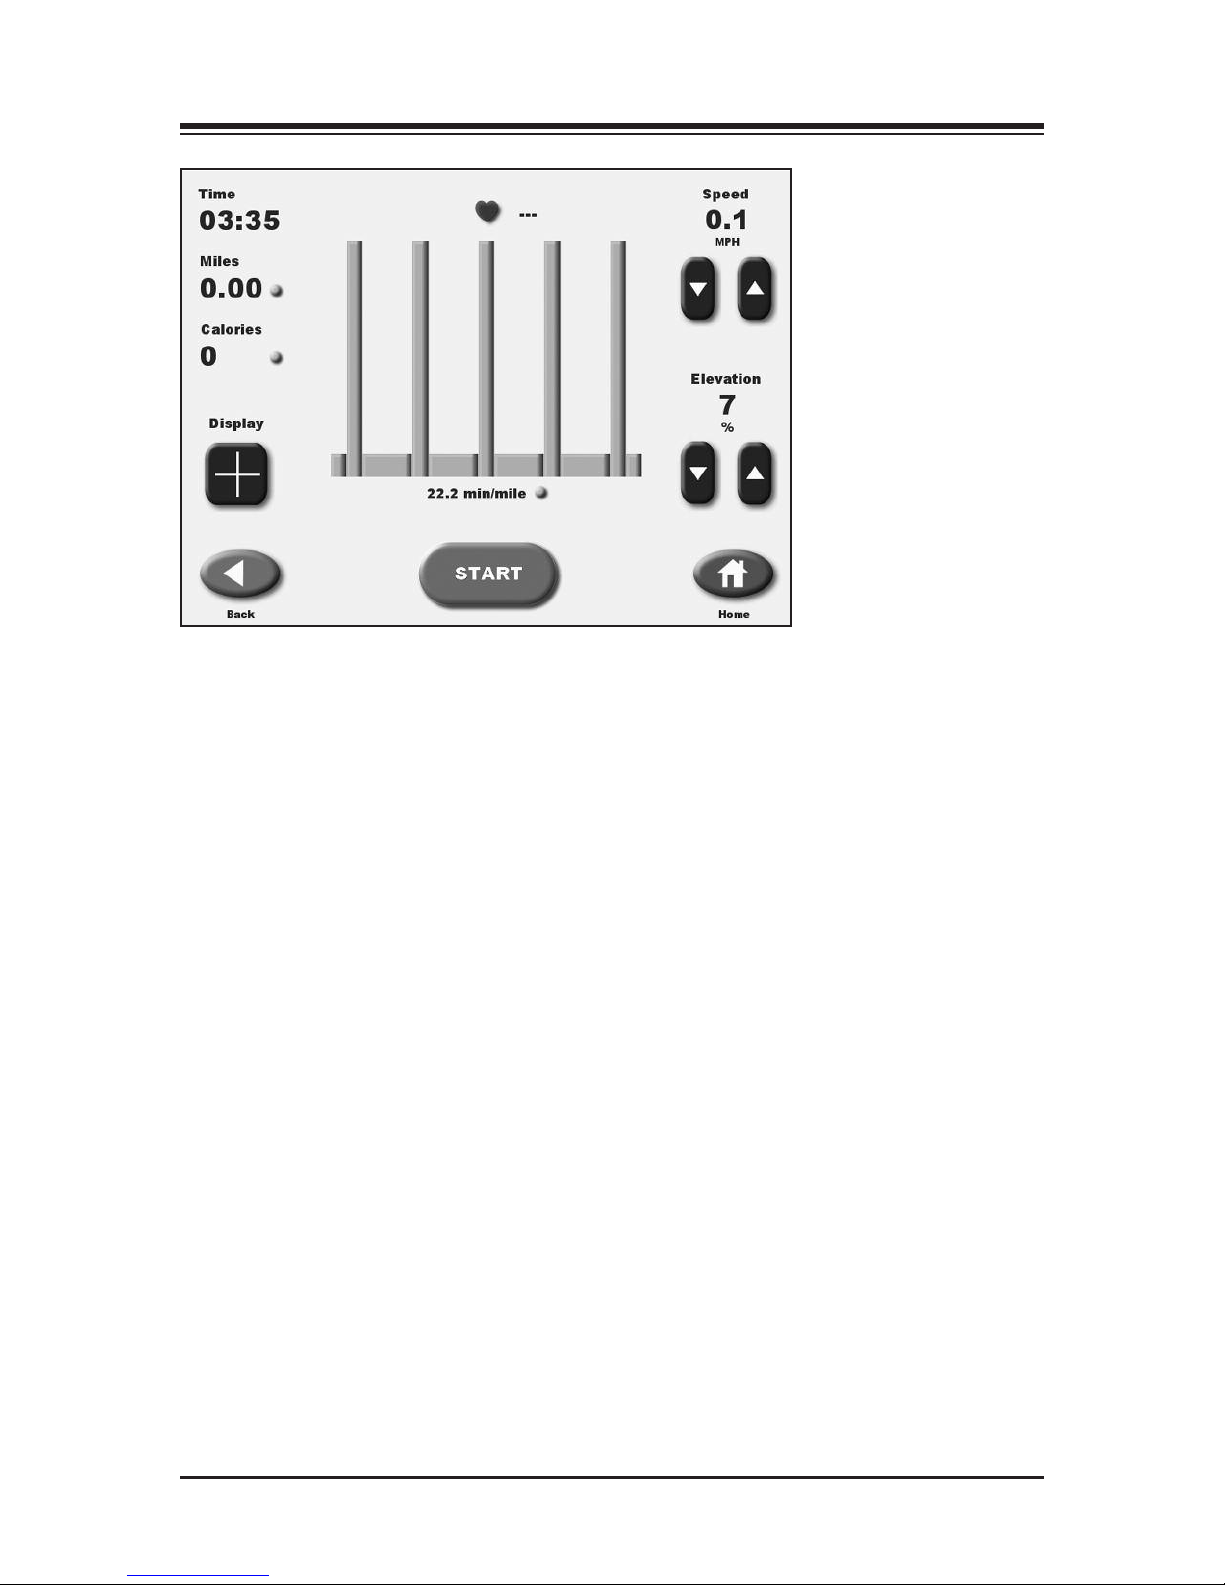
5. When all parameters are entered/selected, press <Start> on the display to activate the tread-
belt and begin the exercise session. The treadbelt will ramp up to .1 mph.
6. Use the <▲> and <▼> arrows on the Exercise Track or Numeric Display to adjust the speed
setting to the desired value. Both speed and elevation can be adjusted at any time during the
exercise session.
7. Touch <Pause> to pause the exercise session at any time. Press <Resume> to resume the exer-
cise session.
8. Touch <End> to end the exercise session at any time.
9. Touch <Reset> to return to the Opening screen.
%("#$"%"# ) "$"#
(See Figures 5.2 and 5.3.)
The same parameters are displayed on both the Exercise Track and Numeric displays. A brief
explanation of these parameters follows.
Time: Counts down in minutes and seconds the total time entered for the exercise on the Setup
Options screen.
Distance: Displays the distance in miles or kilometers that the patient is expected to complete in
the exercise session.
Calories: Toggle between:
• Calories: Total calories burned by the user during the exercise session.
• Calories/Hr: Calories that will be burned per hour at the current pace.
• METs: This value reflects the resting rate of Oxygen consumption with one MET equal to the
Oxygen consumption of a seated individual at rest. Thus, a seated individual in a resting state is
consuming one MET. A seated individual exercising at a rate of two METs is consuming twice the
Oxygen of a seated, resting individual. A person exercising at 10 METs is consuming ten times the
Oxygen of a seated, resting individual. To compute the METs of a person actively exercising on
the Gait Trainer 2, the system uses standard calculations based on American College of Sports
Medicine Guidelines for Testing and Exercise. The METs value is always displayed in real/time
for current speed.
Select Direction: Use the < orward> and <Reverse> icons to select the desired treadbelt direction.
Pace: The amount of time it will take the user to move one mile or KM at the current treadbelt
speed.
CONTENTS
MAN AL OPERATION — 5-2 —
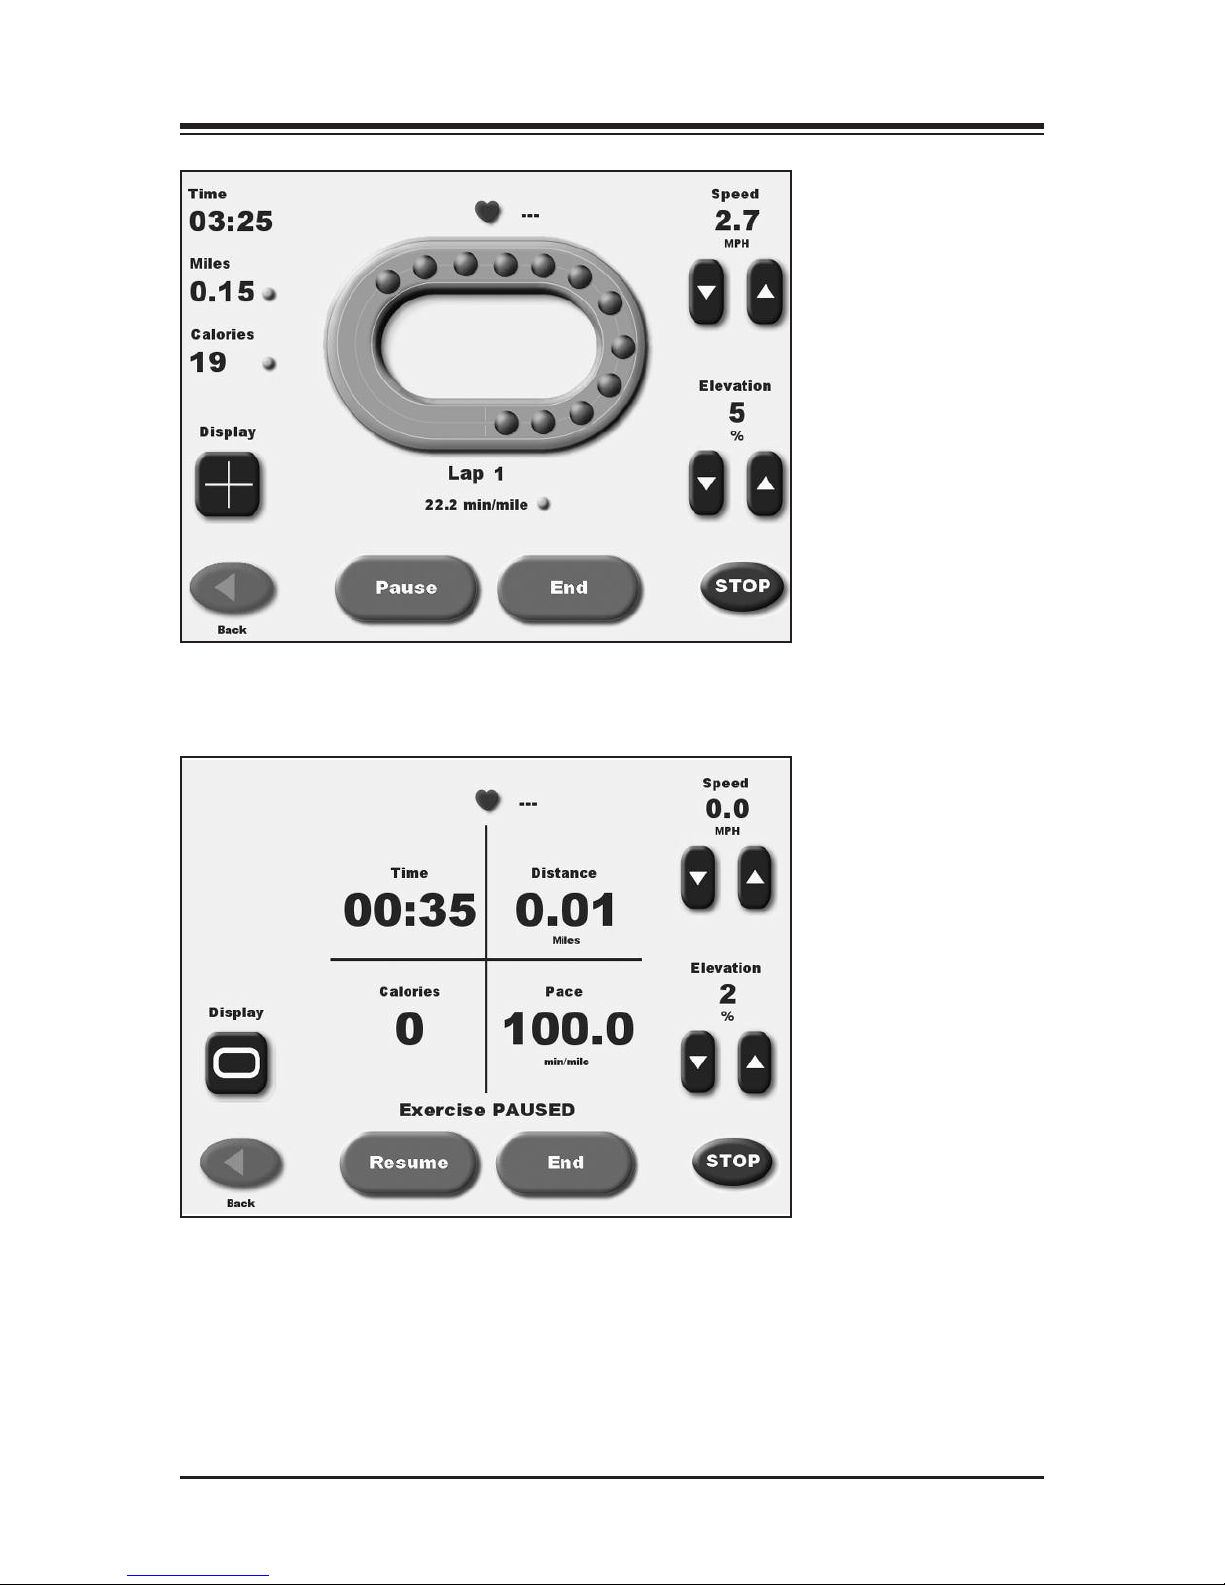
Figure 5.2. The Exercise Track display.
Figure 5.3. The Numeric display.
CONTENTS
— 5-3 — MAN AL OPERATION

The Biodex RTM 600 comes with five pre-loaded exercise profiles and the ability to create and
select up to 12 custom exercise profiles. These programs allow the clinician to select pre-deter-
mined exercise format routines. Exercise profiles are divided into as many as ten segments each.
Users can select any of the pre-defined exercise profiles, review or edit any exercise profile, or
delete an existing exercise profile.
The pre-defined exercise profiles include:
• Anerobic
• Aerobic
• Pyrimiding
• Surge
• Random
# "("# "
(See Figures 6.1, 6.2 and 6.3.)
To choose a pre-defined exercise profile:
1. At the RTM 600 Opening Menu touch <Profile>. The Select Profile screen should now be dis-
played
2. Touch to select the desired pre-defined exercise profile. The Profile Setup Options screen
should now be displayed.
3. At the Profile Setup Options screen, enter the Time duration, user’s body weight, and the
maximum elevation for the exercise profile. Touch <Next> to advance to the Profile Exercise
screen.
4. At the Profile Exercise screen, push <Start> on the display to activate the treadbelt and begin
the exercise session. The treadbelt will automatically ramp up to the speed required by the
first segment of the desired protocol. The treadmill will also automatically rise or lower to the
required elevation.
5. The RTM 600 will automatically beep to signal the end of each profile segment and then pro-
ceed to match the required speed and elevation for the next segment. If necessary, the <▲>
and <▼> arrows on the Exercise Track or Numeric Display can be used to adjust the speed
and elevation setting at any time.
6. Touch <Pause> to pause the exercise session at any time. Press <Resume> to resume the exer-
cise session.
7. Touch <End> to end the exercise session at any time.
8. Touch <Reset> to return to the Opening screen.
9. Touch <Reset> to return to the Opening screen.
6. PROFILE OPERATION
— 6-1 — PROFILE OPERATION

PROFILE OPERATION — 6-2 —
CONTENTS
Figure 6.1. The Select Profile screen allows the user to choose from five
pre-defined profiles.
Figure 6.2. At the Profile Setup Options screen, users can enter values for
time, body weight and maximum elevation.
— 6-3 — PROFILE OPERATION
CONTENTS
Figure 6.3. Ready to begin an exercise session with Profile 1, Anaerobic, selected.
#%#$("# "
(See Figure 6.4.)
To design a custom exercise profile:
1. At the RTM 600 Opening Menu touch <Profile>. The Select Profile Menu should now be dis-
played
2. Touch option six, <Custom>. The Custom Profiles screen should now be displayed.
3. Touch <Edit Profile> and then enter the number (1 – 12) of the profile you would like to
design. Touch <OK>. The Editing Profile screen should now be displayed with the number
of the profile you have decided to design.
4. Each exercise profile can be divided into as many as ten separate stages. Enter the speed, ele-
vation and time duration for each stage. If you make a mistake and need to clear the stages,
touch <Clear Stages>. Touch <OK> to return to the Custom Profile menu.
5. At this point, you can touch to select any of the custom profiles designed. The Custom Profile
Setup Options screen should now be displayed. Proceed as if using a pre-defined profile.
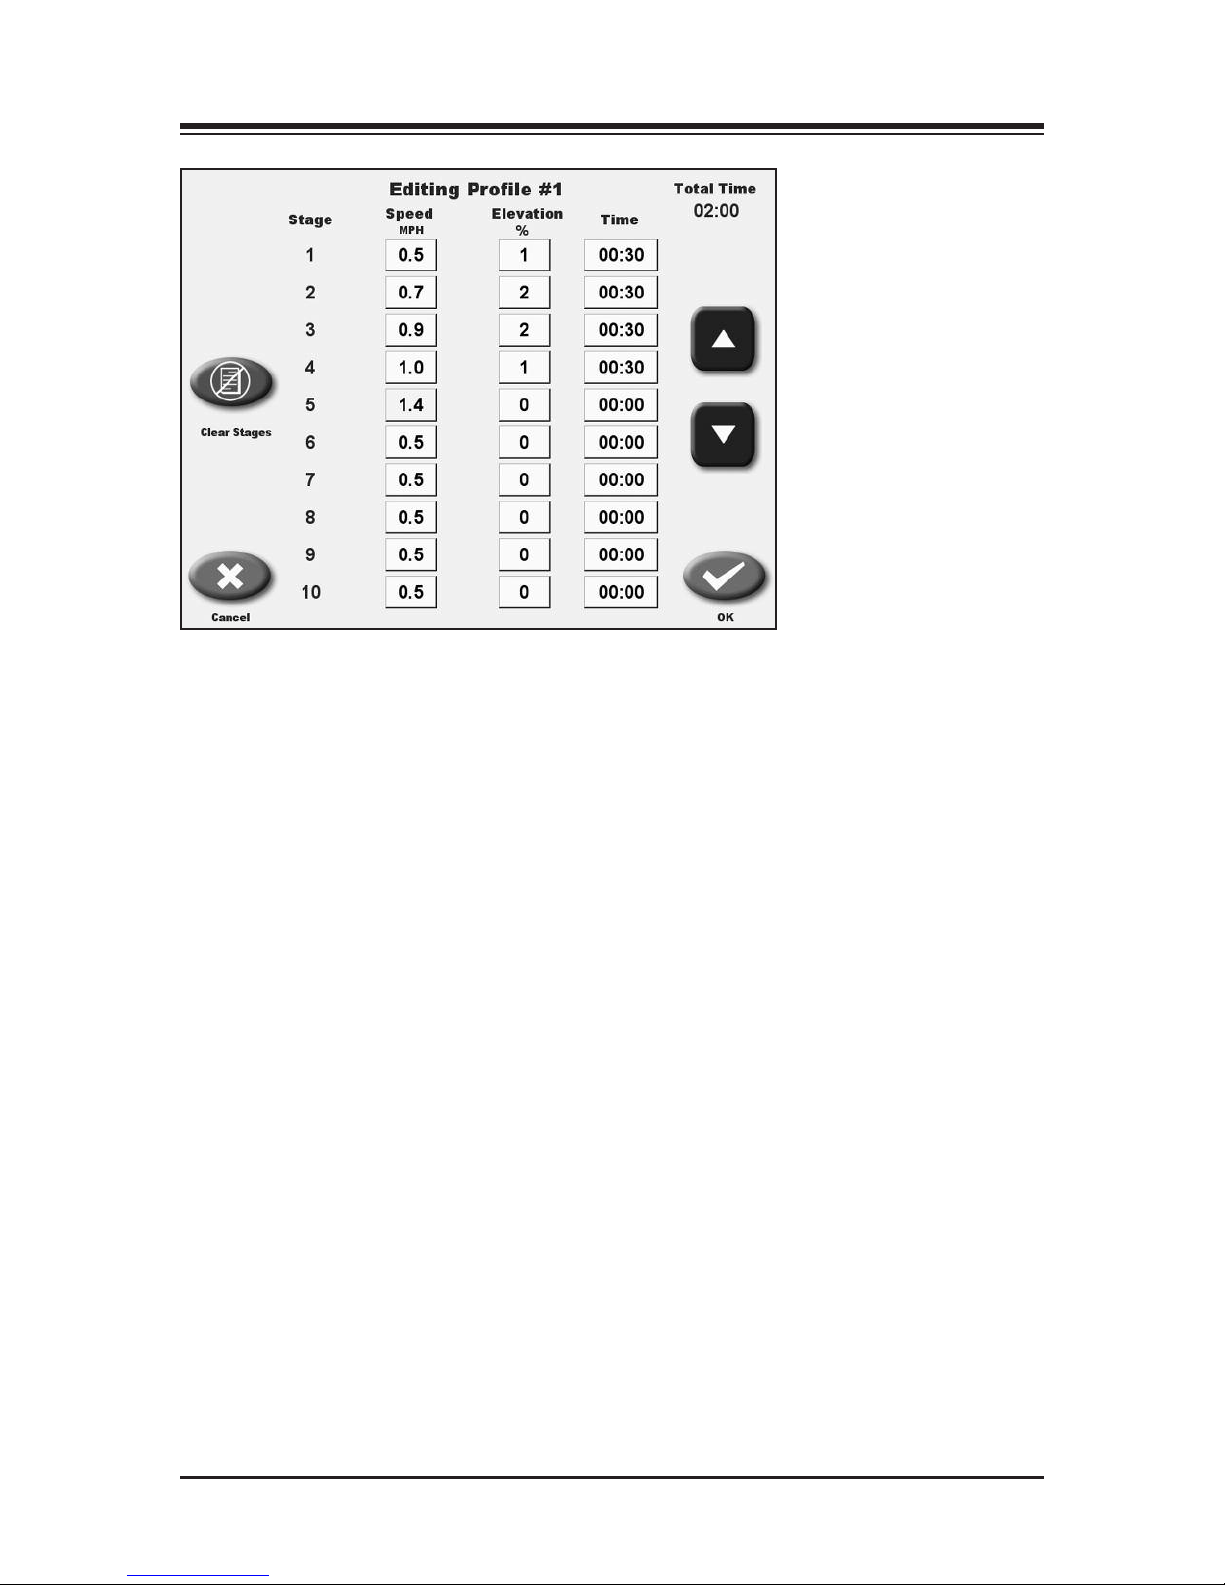
Figure 6.4. At the Editing Profile screen, clinicians enter values for speed,
elevation and time for each of up to ten stages for any profile.
CONTENTS
PROFILE OPERATION — 6-4 —
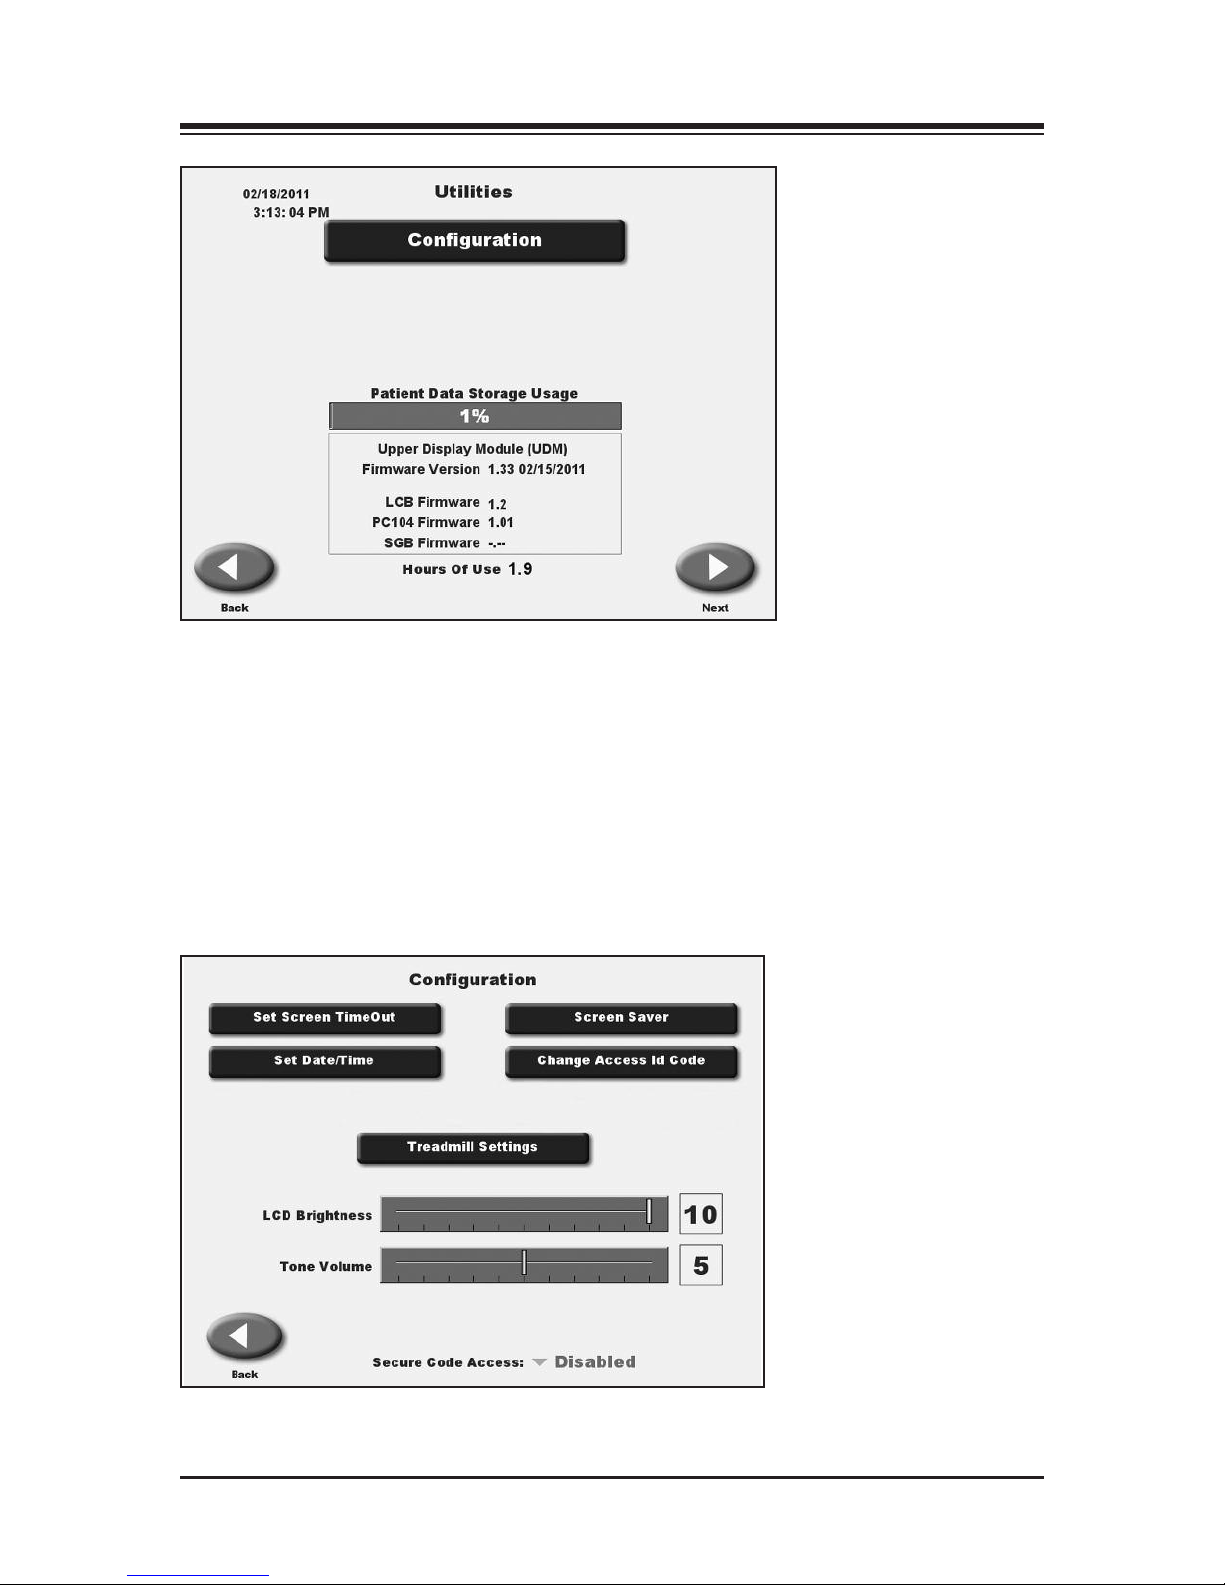
Figure 7.1. The Utilities enu allows access to the Configuration screen.
The System aintenance screen, not displayed, is also accessed through
the Utilities enu.
The Utilities Menu allows users to access the Configuration and System Maintenance (not shown)
screens. The Utilities Menu also displays technical information about the RTM 600, firmware ver-
sion, and cumulative hours of use.
To access the Utilities Menu, touch <Utilities> on the Main. The Utilities Menu should now be dis-
played.
%"$
(See Figures 7.2 and 7.3.)
Figure 7.2. The Configuration screen.
7. RTM 600 TILITIES
— 7-1 — RTM 600 TILITIES

To advance to the Configuration screen from the Utilities Menu, touch <Configuration>. Enter 781
at the “Access ID Code” prompt and touch <OK>. The Configuration screen should now be dis-
played. This screen allows the user to choose between various display options and to set specific
parameters for a variety of treadmill functions.
ollowing is a description of Configuration screen options. Once all parameters and values are set
as desired, touch <Back> to exit and return to the Utilities Menu. Touch <Back> again to return to
the Main Menu.
:9142@=,?4:9#.=009 ,=,80?0=>
Figure 7.3. The Set Test/Exercise Complete Screen Time Out screen.
Set Screen Time Out: Touch this option to advance to the Set Test/Exercise Complete Time Out
Screen. This setting determines how long the Exercise Results screen will be displayed before the
screen saver kicks in following completion the exercise session. Default is 1:00 minute but the
range can be adjusted from 0:00 to 30:00 minutes. Touch the <▲>or <▼> icons to increase or
decrease the value. Touch <OK> to continue and return to the Configuration screen.
Screen Saver: The setting determines how long the display screen remains ON when the
system is no longer in use. Once the selected time expires, the screen fades to black even if the
system remains ON.
1. At the Configuration Screen, touch <Screen Saver>.
2. Use the < ▲> or < ▼> arrows to increase or decrease the value displayed in 1 minute
increments. The Time Out range is from 00:00 to 60:00.
3. Touch <OK> to confirm your changes and return to the Configuration screen. Touch
<Cancel> to return to the Configuration screen without making any changes.
Set Date/Time: Touch <Set Date/Time> to change the system time or date. Touch to highlight the
value to change, then use the <▲>or <▲> icons to increase or decrease the value as desired. Touch
<OK> to return continue and return to the Configuration screen.
CONTENTS
RTM 600 TILITIES — 7-2 —

LCD Brightness: Touch any section of the horizontal bar to select a new brightness setting. Selecting
low numbers along the bar will result in a darker screen while selecting high numbers makes the
screen appear brighter. Brightness levels range from 1 to 15.
Tone Volume: Touch any section of the horizontal bar to select a new tone volume setting. Selecting
low numbers along the bar will result in lower volume while selecting high numbers makes the
louder. Tone volume settings range from 0 to 10.
$=0,/8477#0??492>
Figure 7.4. The Treadmill Settings screen.
• Zero Balance: This feature is used to eliminate treadbelt “creep” (slow movement of the treadbelt
while the speed is set to zero.) Select negative values to zero out forward treadbelt creep and pos-
itive values to zero out reverse belt creep.
Note: Belt ovement While at Zero Speed
Inherent "belt creep" is common with Pulse Width odulation otor Control. Allow the treadmill
sufficient time to "warm up" prior to making any adjustments for belt creep.
• Incline Range: The RTM 600 comes with a choice of 0 to 15 or –3 to 12 degrees of incline. Touch
the displayed value to show both options and then touch the desired setting to select.
• easure Units: The RTM 600 can be configured to display either U.S. or metric measurements.
To change units, touch the displayed units and then touch the desired setting to select.
• Access Protection for Custom Profiles: Access protection requires entry of an I.D. code (781) to access
custom profiles. Touch the displayed value to show both options, then touch the desired setting to
select.
CONTENTS
— 7-3 — RTM 600 TILITIES
This manual suits for next models
13
Table of contents
Other biodex Treadmill manuals


Popular Treadmill manuals by other brands


Horizon Fitness
Horizon Fitness Ti 10K owner's guide

NordicTrack
NordicTrack NTL99011.4 user manual

Rogerblack
Rogerblack 309/8459 Assembly & user instructions
ICON Health & Fitness
ICON Health & Fitness GOLD'S GYM TRAINER 720 user manual

Horizon Fitness
Horizon Fitness T103 owner's manual

Weslo
Weslo Cadence 200 Treadmill Bedienungsanleitung


