Confidence MTI User manual

MTI Treadmill User Manual

2
Table of Contents
Important Safety Informaon 3
Geng Started 5
Technical Parameters 5
Major Parts of the treadmill 5
Control Pad Structure 5
Assembly 6
Usage Instrucon 6
Usage Aenon 7
Maintenance 7
Debugging 8
Trouble Shoong 9
Parts 10
Packing List 10
Exploded View 10
Parts 11
Contact Details 12

3
Important Safety Information
Please read this information and keep the manual in a safe place for reference.
1. It is important to read this enre manual before assembling and using the equipment. Safe and ecient use can
only be achieved if the equipment is assembled, maintained and used properly. It is your responsibility to ensure
that all users of the equipment are informed of all warnings and precauons.
2. Before starng any exercise program you should consult your doctor to determine if you have any physical or
health condions that could create a risk to your health and safety, or prevent you from using the equipment
properly. Your doctor's advice is essenal if you are taking medicaon that aects your heart rate, blood pressure
or cholesterol level.
3. Be aware of your body's signals. Incorrect or excessive exercise can damage your health. Stop exercising if you
experience any of the following symptoms: Pain, ghtness in your chest, irregular heartbeat, extreme shortness of
breath, feeling light headed, dizzy or nauseous. If you do experience any of these condions you should consult
your doctor before connuing with your exercise program.
4. Keep children and pets away from the equipment. The equipment is designed for adult use only.
5. The equipment is designed for home-use and must be kept indoors.
6. Use the equipment on a solid, at level surface with a protecve cover for your oor or carpet. For safety, the
equipment should have at least 0.5 meter of free space around it and 1.5 meters behind it.
7. Before using the equipment, check the nuts and bolts are securely ghtened.
8. The safety level of the equipment can only be maintained if it is regularly examined for damage and/or wear and
tear.
9. Always use the equipment as indicated. If you nd any defecve components whilst assembling or checking the
equipment, or if you hear any unusual noise coming from the equipment during use, stop. Do not use the equip-
ment unl the problem has been reced.
10. Wear suitable clothing whilst using the equipment. Avoid wearing loose clothing which may get caught in the
equipment or that may restrict or prevent movement. Please run it slowly in the beginning.
11. Maximum weight of user is 150kgs.
12. Care must be taken when liing or moving the equipment so as not to injure your back. Always use proper liing
techniques and/or use assistance.

4
13. The treadmill is not to be started whilst standing on the running belt. Please stand on the plasc edgings
with hands on the handrails. Once started normally begin exercising.
14. Safety key to be kept in your clothing whilst exercising in case of emergency stop.
15. Connuous operaon me should not be more than 99 minutes.
16. Please turn o the safety switch and power aer use.
17. To ensure opmum working eect of the photoelectric sensor please ensure all dust and dirt is kept away.
18. To avoid electrostac acvity please ensure the treadmill is kept indoors in a cool dry area.
Important Safety Information

5
Technical Parameters
Input voltage: 220V+-10% (50Hz-60Hz)
Working temperature: 0-40 C
Nominal power: 1100W
5A current: <= 5A
Speed: 1.0-12.00km/h
Time: 00-99.59 min’s
Distance: 0.00-99.9km/h
Acve running area: 1210 x 400mm
Floor Space of treadmill: 1620 x 720mm
Major Parts of the Treadmill
1. Electric control pad
2. Hand sensors for heart rate monitoring and +- switch
3. Le and right hand rail.
4. Motor cover
5. Running belt
6. Adjusng bolt of running belt.
7. Frame.
8. Under Frame
9. Air Cylinder
Control Pad Structure
1. Heart rate display
2. Speed display
3. Time display
4. Calorie display
5. Distance display
6. Speed +
7. Speed –
8. Direct elected speed
9. Safety key
10. Reset
11. Start
12. Program
13. Seng
14. MP3 plug
15. Stop
1
2
3
45
6
7
1
2
345
6
7
8
9
10
11 12
13
15
14
Getting Started
8

6
Assembly
1. Li up the treadmill and using the ship bolts, x it onto the connecon board.
2. To install the handrail tubes rstly connect the holding wire and then plug in the armrest pipeline into the pillar
and bolt down.
3. Plug the two heartbeat lines according to right and le and then plug in the connecng lines.
4. Whilst aligning the indents to the tube also ensure both holes are aligned and fasten with M6 bolts.
Usage Instrucon
Warning: Please be sure to read the following before operang.
Do not stand on the running belt when starng the treadmill.
Please adjust the speed gradually to avoid sudden change of speed.
Please ensure the safety switch is kept on your body at all mes whilst using the treadmill.
Please ensure the key pad is dry at all mes to avoid the leakage of electricity.
Aer installaon and debugging the treadmill is ready for use.
1. Place the plug in the power socket.
2. Be sure the safety switch is placed in the safety socket, press the start buon to start the treadmill running.
Getting Started
1. 2.
3. 4.

7
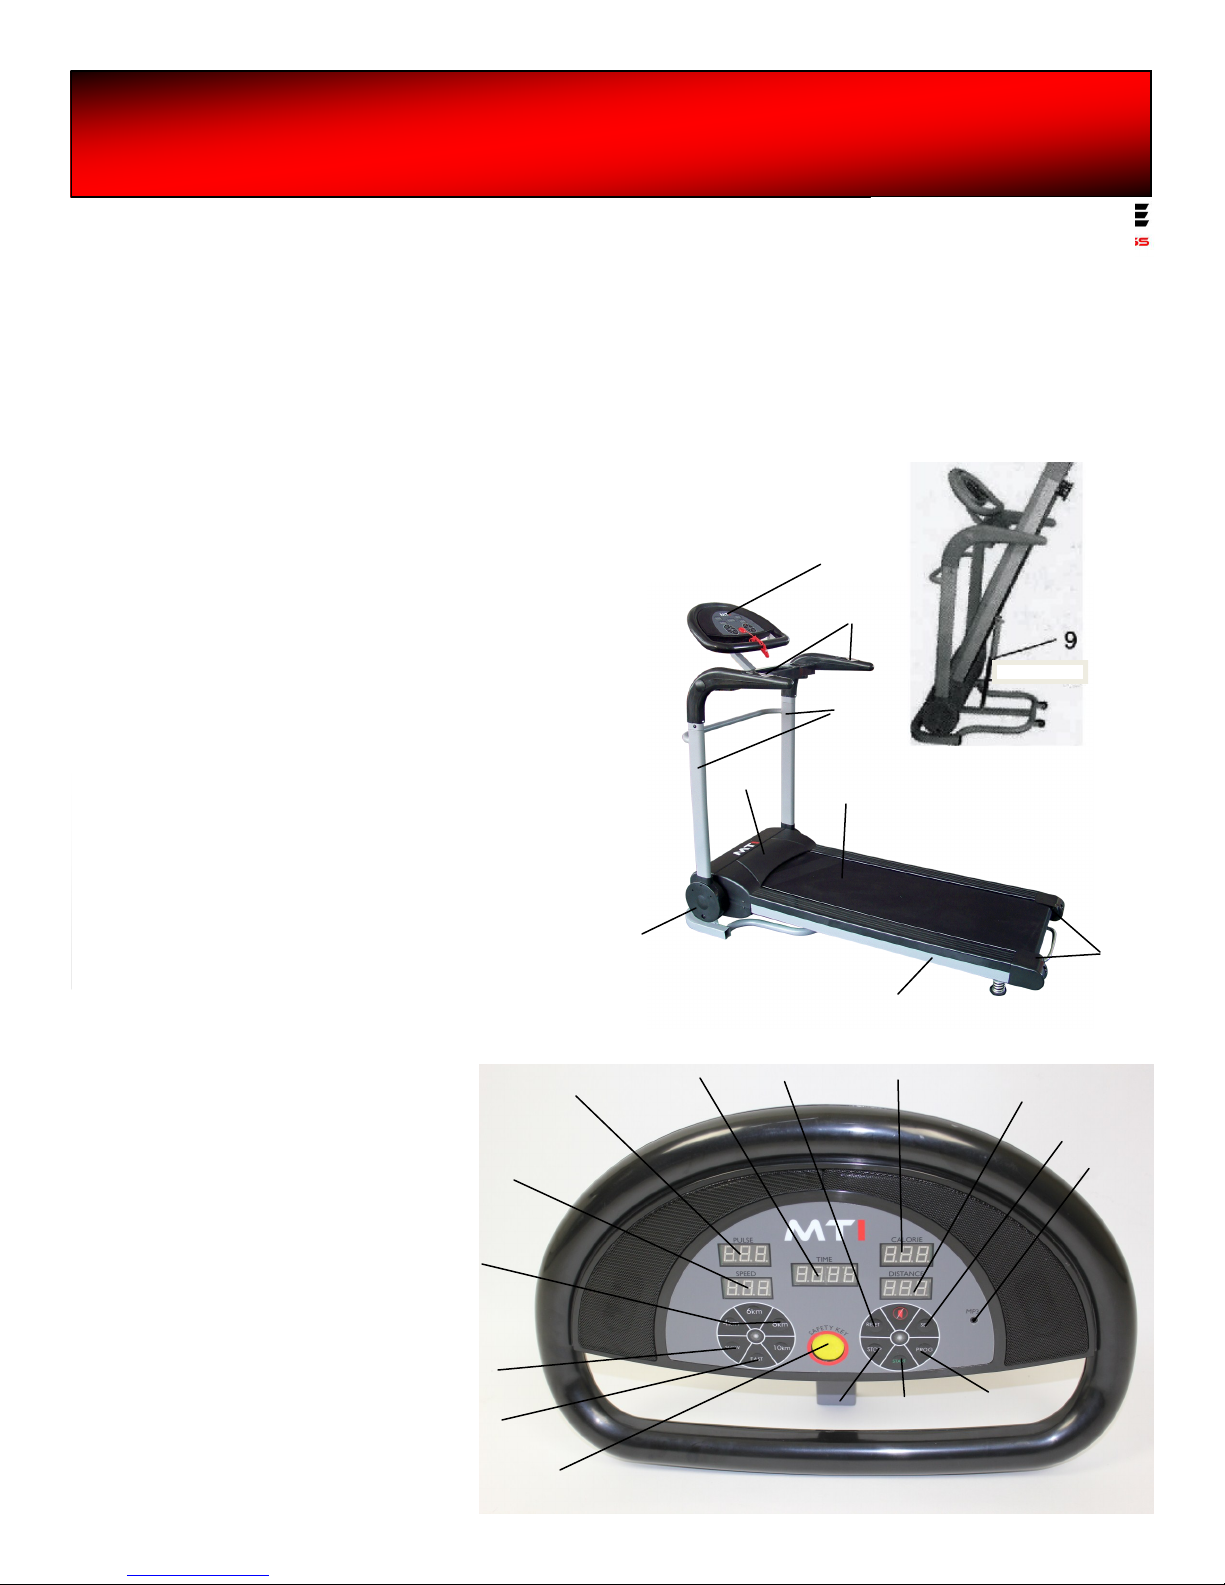
3. Adjust the speed with the buon +-, the maximum speed is 12km per hour press the reset buon to clear.
4. To set the operang parameter press the set buon under Standby state, the instrument window will show the
me, distance and calories in turn press the +- buon to adjust the parameter, then press the start key to
work under the parameter chosen. Choose the parameter according to your needs.
5. To operate the 12 xed programs, press the program buon under the standby state, the speed window will
display the xed programs from P1-P12 then press the start program to work the program.
5. To test your heart rate, rub your hands several mes, hold the heart rate sensor on the hand rail ghtly and
aer a while the LCD displayer will display your current heart rate.
6. To fold the treadmill, li it up and loosen the cylinder underneath and it will fold up automacally. Please
ensure that there are no children in the vicinity whilst folding up the treadmill.
7. Keep the safety key on you at all mes so that the treadmill can be stopped automacally in case of emer-
gency.
8. When closing down the treadmill aer exercising the treadmill will stop gradually.
9. Please ensure the safety switch is removed so that children are unable to use the treadmill.
Usage Aenon
1. Whilst using the treadmill for the rst me please ensure a low speed is selected aer you have adapted to the
pace of the treadmill your hands can be loosened and you can begin to exercise.
2. Your running pace should be the equivalent of the pace of the belt as this will ensure longevity of the treadmill.
3. The safety key is only to be used in case of emergencies, it is not to be used to turn the treadmill on and o on
a regular basis.
4. Children, the elderly, pregnant women and the disabled should not use the treadmill in case of injury.
5. The treadmill is not to be used aer alcohol consumpon and or aer eang.
6. The heart rate monitor is for your personal reference only and is not for medical usage
7. In case of emergency whilst using the treadmill, place your hands on the railing and jump o the treadmill with
your feet landing on the feet plaorm.
Warning: if the power line is damaged, please take it to a local service department, do not repair it yourself. If
the supply cord is damaged it must be replaced by the manufacturer, its service agent or similar qualied
person to avoid hazards.
Maintenance
1. Before cleaning please ensure the power supply is cut , whilst cleaning clear the dust o the running belt, the
running board and footstep edgings if this is not done on a regular basis it cause fricon which in turn will
shorten the life span of the treadmill.
Getting Started

8
Getting Started
Debugging
Warning: Not having the ground wire connected to the treadmill will increase the chance of electric shock. Please
ensure that the appropriate voltage is used and that the plug is also grounded.
1. Aer installaon place the safety switch in the corresponding socket of the control pad.
2. Before turning on please pull the run belt to check whether it is exible and rolling and that it has no abnor-
malies.
3. Press the start buon, the treadmill speed will begin at 1.0 km then check whether the control pad is working.
4. Press the speed buon +- to check whether it is working.
5. Press the stop to stop the treadmill.
2. Aer running the treadmill for a maximum of 3 months, special lubricaon is to be used, however please do
not over lubricate. Appropriate lubricaon will improve the longevity of the treadmill. If the treadmill is not
lubricated on a regular basis, the oil will reduce and the fricon between the belt and the board will increase
and damage may occur.
3. If your feet are not in the center of the running belt or your weight is not distributed evenly whilst it is in use,
the running belt over me will require adjustment as it would have moved from the correct posion. If the run-
ning belt has deviated to the right, then adjust the screw on the right side clockwise or the screw on the le
an clockwise. If the running belt has deviated to the le then adjust the screw on the le side clockwise or the
screw on the right an clockwise .
4. Before the treadmills leave the factory all the running belts are adjusted to the best posion however aer a
period of running the belt may become loose. At this me you can adjust the screws on both sides at the same
me in a clockwise direcon with a semi circle rotaon. If the running belt is to loose, a slip may occur between
the running belt and the roller however is it is to ght this is also not good and may increase the burden on the
motor which in turn will damage the motor, running belt and roller.

9
Trouble Shooting
Fault Cause Solution
1. Normal display but not
starng.
2. Normal display, but the
belt is not running smooth
and a buzzing sound.
The input voltage is too low or
the carbon brush is badly worn.
1.Please input the voltage according to
the requirements
2. Check and change the carbon brush or
clear the dust.
Normally working or
instrument normally
displaying.
Photoelectric sensor has
accumulated dust.
Clear dust
E--2
Safety key has not been
connected properly.
Re connect the safety key
E--3
The electric watch have connected
well with the electric controller.
Check the quad and then re connect
the plug.
E--4
The electric controller power
tube is damaged
Change the electric controller
E--5
The motor is not turning and
the signal has no access
Check the photoelectric sensor
E--6
Electronic device thermal protec-
on
Add lubricang oil under the running
belt and the restart aer 30 mins
Let it run for 30 minutes and then stop.
E--7
Motor overload Add lubricang oil under the running
belt
To remove the fault code press the reset buon

10
Ordinal
Number
Ordinal Name Unit Quanty
1Mainframe Piece 1
2Handrail Set 1
3Electric Switch Piece 1
4Safety Key Set 1
5Bolts M8*45 Set 2
6Bolts M8*12 Pieces 4
7Hexagon wrench 5# Pieces 1
8Hexagon wrench 6# Pieces 1
9Manual Instrucon Piece 1
Parts
Exploded View

11
ordinal
No.
Name Quanty
1
Safety switch
1
2
wire neng le and right
2
3
electric board upper cover\
1
4
electric board lower cover
1
5
running belt
1
6
non-slip mat
2
7
edgings
2
8
running board
1
9
ST4 screw
4
10 le hook
2
11 board nails
8
12 motor lower cover
1
13 M6 bolt
8
14 transformer
1
15 contril pad
1
16 ST3 screw
4
17 motor upper cover
1
18 M5 bolts
6
19 Tail decorave covers
(le and right)
2
20 back roll
1
21 M8 bolts
2
22 handle
1
23 foot aer
2
24 M6 bolts+M6 nuts 4+4
25 M8 bolts+M8 nuts 1+4
26 Gas Spring
1
27 Board strengthen piece
2
28
frame
1
Ordinal
No.
Name Quanty
29 mains switch
1
30 front roll
1
31 M8 bolts
1
32 M8 bolts
1
33
motor
1
34 M8 bolts+M8 nuts 4+4+4
35 V-ribbed belts
1
36 V-ribbed belts
5
37 idler wheel
2
38 Square tube plug
2
39 foot pad
3
40 pedestal
1
41 M12 bolts
2
42 Decorave covers of handrail
2
43 middle handrail
1
44 M8 bolts
5
45 upper and lower cover of hand-
rail
2
46 Handrail small stuy cover
2
47 upper handrail
1
48 ST5 screw 10
49 pedestal of panel xed
1
50 pedestal of teacup
1
51 buon switch
4
52 Heart stamping
4
53 heart rate circuit board
2
54 electric wire
1
55 M10 bolts
2
Parts List

12
UK & Europe
www.thesportshq.com
Units 3 and 4 Lower Park Farm
Storrage Lane
Alvechurch
UK B48 7ER
Telephone: 01527 598388
USA
www.golfoutletsusa.com
72320 Manufacturing Drive
Thousand Palms, CA 92276
Telephone: 1-800-603-0004
AUS/NZ
www.oo.com.au
25-55 Rothschild Ave,
Rosebery, 2018, NSW
Australia,
Phone: 1300 132 151
Contact Details


Table of contents
Other Confidence Treadmill manuals