biopod AQUA User manual
C
M
Y
CM
MY
CY
CMY
K
Biopod Setup Guide Large.pdf 1 2016-12-27 11:46 PM

Terms of Use
HOW CONSUMER LAW RELATES TO THIS WARRANTY
THIS WARRANTY GIVES YOU SPECIFIC LEGAL RIGHTS, AND YOU MAY HAVE OTHER RIGHTS THAT VARY FROM STATE TO STATE (OR BY COUNTRY OR PROVINCE). OTHER THAN AS PERMITTED BY LAW,
BIOPOD DOES NOT EXCLUDE, LIMIT OR SUSPEND OTHER RIGHTS YOU MAY HAVE, INCLUDING THOSE THAT MAY ARISE FROM THE NONCONFORMITY OF A SALES CONTRACT. FOR A FULL UNDERSTANDING
OF YOUR RIGHTS YOU SHOULD CONSULT THE LAWS OF YOUR COUNTRY, PROVINCE OR STATE.
WARRANTY LIMITATIONS SUBJECT TO CONSUMER LAW
TO THE EXTENT PERMITTED BY LAW, THIS WARRANTY AND THE REMEDIES SET FORTH ARE EXCLUSIVE AND IN LIEU OF ALL OTHER WARRANTIES, REMEDIES AND CONDITIONS, WHETHER ORAL, WRITTEN,
TATUTORY, EXPRESS OR IMPLIED. BIOPOD DISCLAIMS ALL STATUTORY AND IMPLIED WARRANTIES, INCLUDING WITHOUT LIMITATION, WARRANTIES OF MERCHANTABILITY AND FITNESS FOR A PARTICULAR
PURPOSE AND WARRANTIES AGAINST HIDDEN OR LATENT DEFECTS, TO THE EXTENT PERMITTED BY LAW. IN SO FAR AS SUCH WARRANTIES CANNOT BE DISCLAIMED, BIOPOD LIMITS THE DURATION AND
REMEDIES OF SUCH WARRANTIES TO THE DURATION OF THIS EXPRESS WARRANTY AND, AT BIOPOD’S OPTION, THE REPAIR OR REPLACEMENT SERVICES DESCRIBED BELOW. SOME STATES (COUNTRIES AND
PROVINCES) DO NOT ALLOW LIMITATIONS ON HOW LONG AN IMPLIED WARRANTY (OR CONDITION) MAY LAST, SO THE LIMITATION DESCRIBED ABOVE MAY NOT APPLY TO YOU.
WHAT IS COVERED BY THIS WARRANTY?
Biopod Systems Inc. of Calgary, Canada (“Biopod”) warrants the Biopod-branded hardware product and Biopod-branded accessories contained in the original packaging (“Biopod Product”) against defects in
materials and workmanship when used normally in accordance with Biopod's published guidelines for a period of ONE (1) YEAR from the date of original retail purchase by the end-user purchaser ("Warranty Period").
Biopod’s published guidelines include but are not limited to information contained in technical specifications, user manuals and service communications.
WHAT IS NOT COVERED BY THIS WARRANTY?
This Warranty does not apply to any non-Biopod branded hardware products or any software, even if packaged or sold with Biopod hardware. Manufacturers, suppliers, or publishers, other than Biopod, may
provide their own warranties to you – please contact them for further information. Software distributed by Biopod with or without the Biopod brand (including, but not limited to system software) is not covered
by this Warranty. Please refer to the licensing agreement accompanying the software for details of your rights with respect to its use. Biopod does not warrant that the operation of the Biopod Product will be
uninterrupted or error-free. Biopod is not responsible for damage arising from failure to follow instructions relating to the Biopod Product’s use.
This Warranty does not apply: (a) to consumable parts, such as batteries or protective coatings that are designed to diminish over time, unless failure has occurred due to a defect in materials or workmanship;
(b) to cosmetic damage, including but not limited to scratches, dents and broken plastic on ports unless failure has occurred due to a defect in materials or workmanship; (c) to damage caused by use with a third
party component or product that does not meet the Biopod Product’s specifications (Biopod Product specifications are available www.biopod.com under the technical specifications for each product and
also available in stores); (d) to damage caused by accident, abuse, misuse, fire, liquid contact, earthquake or other external cause; (e) to damage caused by operating the Biopod Product outside Biopod’s published
guidelines; (f) to damage caused by service (including upgrades and expansions) performed by anyone who is not a representative of Biopod or an Biopod Authorized Service Provider (“AASP”); (g) to an Biopod
Product that has been modified to alter functionality or capability without the written permission of Biopod; (h) to defects caused by normal wear and tear or otherwise due to the normal aging of the Biopod Product;
(i) if any serial number has been removed or defaced from the Biopod Product; or (j) if Biopod receives information from relevant public authorities that the product has been stolen or if you are unable to deactivate
passcode-enabledor othersecurity measures designed to prevent unauthorized access to the Biopod Product, and you cannot prove in any way that you are the authorized user of the product (eg. by presenting proof
of purchase).
YOUR RESPONSIBILITIES
Before receiving warranty service, Biopod or its agents may require that you furnish proof of purchase details, respond to questions designed to assist with diagnosing potential issues and follow Biopod's procedures
for obtaining warranty service. DURING WARRANTY SERVICE IT IS POSSIBLE THAT THE CONTENTS OF THE Biopod PRODUCT’S STORAGE MEDIA WILL BE LOST, REPLACED OR REFORMATTED. IN SUCH AN
EVENT BIOPOD AND ITS AGENTS ARE NOT RESPONSIBLE FOR ANY LOSS OF SOFTWARE PROGRAMS, DATA OR OTHER INFORMATION CONTAINED ON THE STORAGE MEDIA OR ANY OTHER PART OF THE
Biopod PRODUCT SERVICED.
Following warranty service your Biopod Product or a replacement device will be returned to you as your Biopod Product was configured when originally purchased, subject to applicable updates. You will be
responsible for reinstalling all other software programs, data and information. Recovery and reinstallation of other software programs, data and information are not covered under this Warranty.
WHAT WILL Biopod DO IN THE EVENT THE WARRANTY IS BREACHED?
If during the Warranty Period you submit a claim to Biopod or an AASP in accordance with this warranty, Biopod will, at its option:
(i) repair the Biopod Product using new or previously used parts that are equivalent to new in performance and reliability,
(ii) replace the Biopod Product with the same model (or with your consent a product that has similar functionality) formed from new and/or previously used parts that are equivalent to new in performance and
reliability, or
(iii) exchange the Biopod Product for a refund of your purchase price.
Biopod may request that you replace certain user-installable parts or Biopod Products. A replacement part or Biopod Product, including a user-installable part that has been installed in accordance with instructions
provided by Biopod, assumes the remaining term of the Warranty or ninety (90) days from the date of replacement or repair, whichever provides longer coverage for you. When a Biopod Product or part is replaced
or a refund provided, any replacement item becomes your property and the replaced or refunded item becomes Biopod's property.
HOW TO OBTAIN WARRANTY SERVICE?
Please access and review the online help resources described below before seeking warranty service. If the Biopod Product is still not functioning properly after making use of these resources, please contact an
Biopod representative or, if applicable, an Biopod owned retail store ("Biopod Retail") or AASP, using the information provided below. An Biopod representative or AASP will help determine whether your
Biopod Product requires service and, if it does, will inform you how Biopod will provide it. When contacting Biopod via telephone, other charges may apply depending on your location.
Online information with details on obtaining warranty service is provided below.
WARRANTY SERVICE OPTIONS
Biopod will provide warranty service through one or more of the following options:
(i) Carry-in service. You may return your Biopod Product to your original Retailer or AASP location oering carry-in service. Service will be performed at the location, or the Retailer or an AASP may send your
Biopod Product to an Biopod Repair Service (“ARS”) location to be serviced. Once you are notified that service is complete, you will retrieve the Biopod Product from the Biopod Retail or AASP location without d
elay unless Biopod notifies you that the Biopod Product will be sent directly to your location from the ARS location.
(ii) Mail-in service. If Biopod determines that your Biopod Product is eligible for mail-in service, Biopod will send you prepaid waybills and if applicable, packaging material and instructions on how to properly
pack and address your Biopod product, so that you may ship your Biopod Product to an ARS or AASP location. Instructions may be sent to you via email or in hard copy with the packaging material. Once service is
complete, the ARS or AASP location will return the Biopod Product to you. Biopod will pay for shipping to and from your location if all instructions regarding the method of packaging and shipping the Biopod
Product are followed.
(iii) Do-it-yourself (DIY) parts service. DIY parts service allows you to service your own Biopod Product. If DIY parts service is available in the circumstances, the following process will apply.
(a) Service where Biopod requires return of the replaced Biopod Product or part. Biopod may require a credit card authorization as security for the retail price of the replacement Biopod Product or part and
applicable shipping costs. If you are unable to provide credit card authorization, DIY parts service may not be available to you and Biopod will oer alternative arrangements for service. Biopod will ship a
replacement Biopod Product or part to you with installation instructions, if applicable, and any requirements for the return of the replaced Biopod Product or part. If you follow the instructions, Biopod will cancel
the credit card authorization, so you will not be charged for the Biopod Product or part and shipping to and from your location. If you fail to return the replaced Biopod Product or part as instructed or return a
replaced product or part that is ineligible for service, Biopod will charge your credit card for the authorized amount.
(b) Service where Biopod does not require return of the replaced Biopod Product or part. Biopod will ship you free of charge a replacement Biopod Product or part accompanied by instructions on installation, if
applicable, and any requirements for the disposal of the replaced Biopod Product or part.
(c) Biopod is not responsible for any labor costs you incur relating to DIY parts service. Should you require further assistance, contact Biopod at the telephone number listed below.
Biopod reserves the right to change the method by which Biopod may provide warranty service to you, and your Biopod Product’s eligibility to receive a particular method of service. Service will be limited to the
options available in the country where service is requested. Service options, parts availability and response times may vary according to country. You may be responsible for shipping and handling charges if the
Biopod Product cannot be serviced in the country it is in. If you seek service in a country that is not the country of purchase, you will comply with all applicable import and export laws and regulations and be r
esponsible for all custom duties, V.A.T. and other associated taxes and charges. For international service, Biopod may repair or replace Biopod Products and parts with comparable Biopod Products and parts that
comply with local standards.
LIMITATION OF LIABILITY
EXCEPT AS PROVIDED IN THIS WARRANTY AND TO THE MAXIMUM EXTENT PERMITTED BY LAW, Biopod IS NOT RESPONSIBLE FOR DIRECT, SPECIAL, INCIDENTAL OR CONSEQUENTIAL DAMAGES RESULTING
FROM ANY BREACH OF WARRANTY OR CONDITION, OR UNDER ANY OTHER LEGAL THEORY, INCLUDING BUT NOT LIMITED TO LOSS OF USE; LOSS OF REVENUE; LOSS OF ACTUAL OR ANTICIPATED
PROFITS (INCLUDING LOSS OF PROFITS ON CONTRACTS); LOSS OF THE USE OF MONEY; LOSS OF ANTICIPATED SAVINGS; LOSS OF BUSINESS; LOSS OF OPPORTUNITY; LOSS OF GOODWILL; LOSS OF
REPUTATION; LOSS OF, DAMAGE TO, COMPROMISE OR CORRUPTION OF DATA; OR ANY INDIRECT OR CONSEQUENTIAL LOSS OR DAMAGE HOWSOEVER CAUSED INCLUDING THE REPLACEMENT OF
EQUIPMENT AND PROPERTY, ANY COSTS OF RECOVERING, PROGRAMMING, OR REPRODUCING ANY PROGRAM OR DATA STORED IN OR USED WITH THE BIOPOD PRODUCT OR ANY FAILURE TO MAINTAIN
THE CONFIDENTIALITY OF INFORMATION STORED IN THE BIOPOD PRODUCT.
THE FOREGOING LIMITATION SHALL NOT APPLY TO DEATH OR PERSONAL INJURY CLAIMS, OR ANY STATUTORY LIABILITY FOR INTENTIONAL AND GROSS NEGLIGENT ACTS AND/OR OMISSIONS. BIOPOD
DISCLAIMS ANY REPRESENTATION THAT IT WILL BE ABLE TO REPAIR ANY BIOPOD PRODUCT UNDER THIS WARRANTY OR REPLACE THE BIOPOD PRODUCT WITHOUT RISK TO OR LOSS OF INFORMATION
STORED ON THE BIOPOD PRODUCT.
SOME STATES (COUNTRIES AND PROVINCES) DO NOT ALLOW THE EXCLUSION OR LIMITATION OF INCIDENTAL OR CONSEQUENTIAL DAMAGES, SO THE ABOVE LIMITATION OR EXCLUSION MAY NOT
APPLY TO YOU.
GENERAL
No Biopod reseller, agent, or employee is authorized to make any modification, extension, or addition to this Warranty. If any term is
held to be illegal or unenforceable, the legality or enforceability of the remaining terms shall
not be aected or impaired. This Warranty is governed by and construed under the laws of the
country in which the Biopod Product purchase took place. Biopod or its successor in title is the warrantor
under this Warranty.
Page 2
C
M
Y
CM
MY
CY
CMY
K
Biopod Setup Guide Large.pdf 2 2016-12-27 11:46 PM
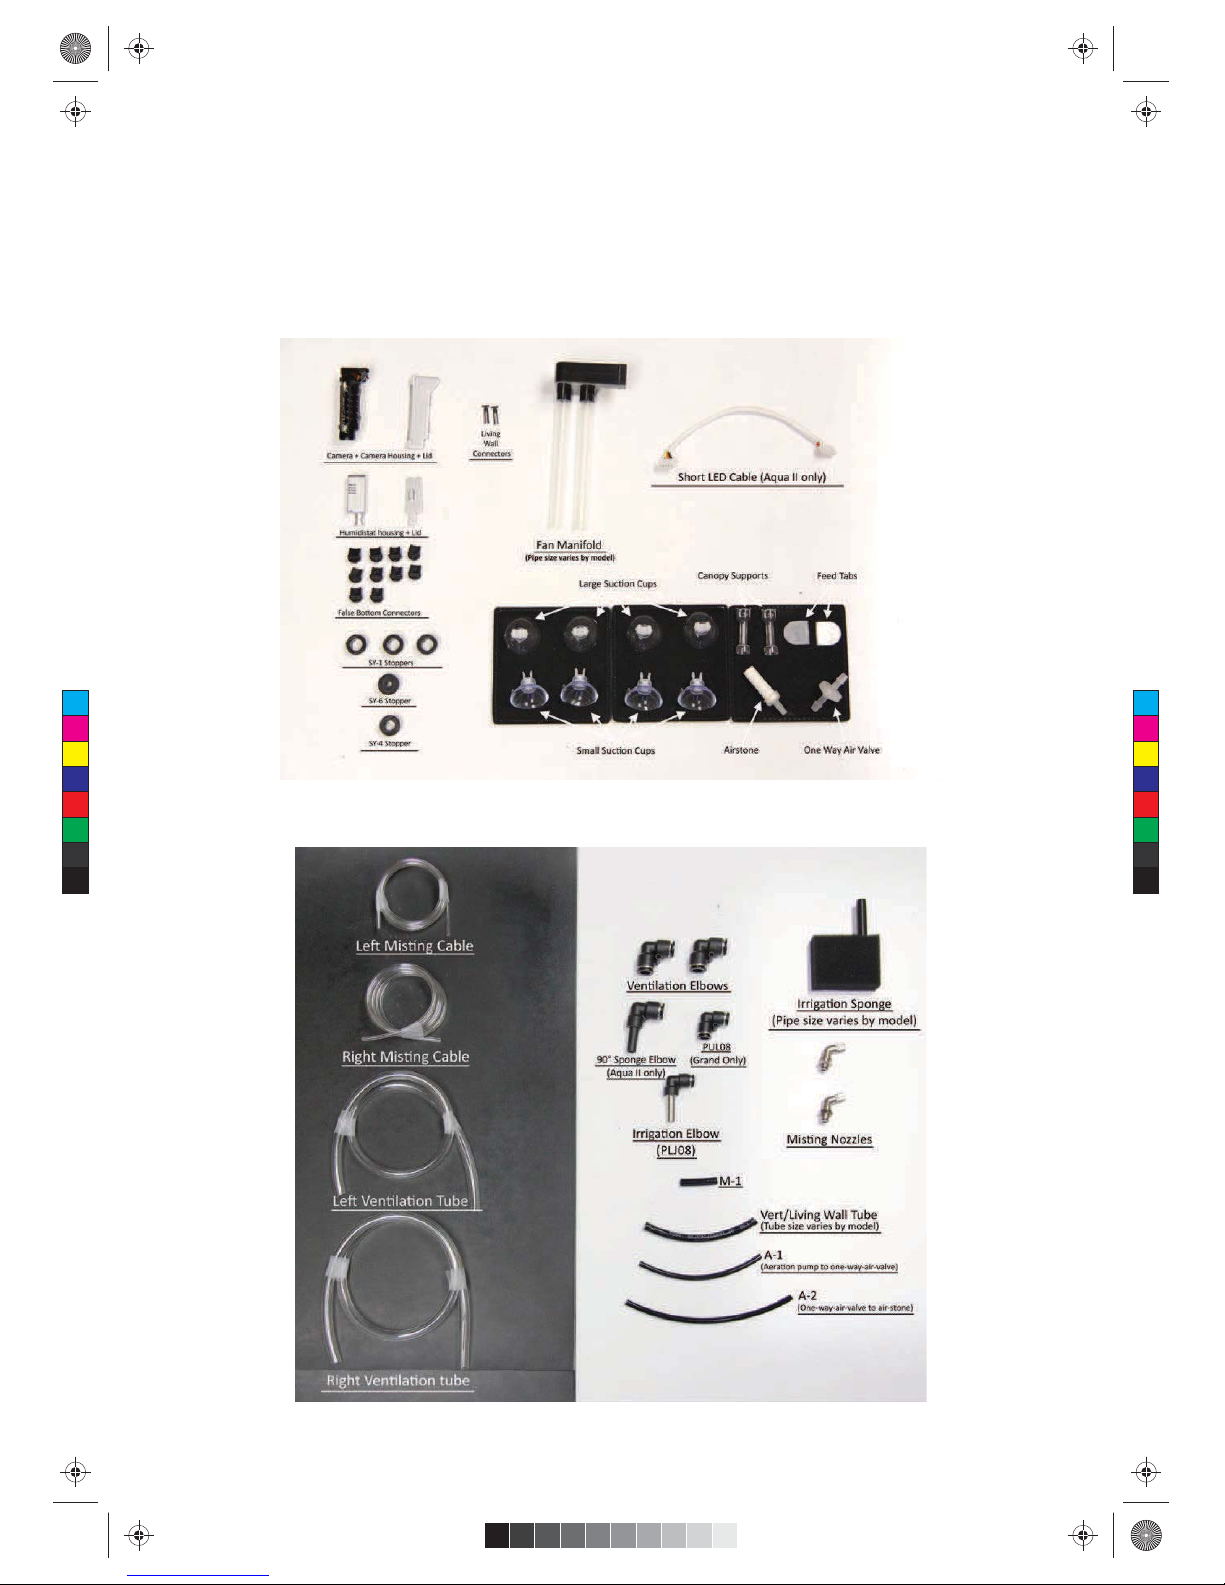
Figure1. List of all components and pieces that should be inside the box with amounts, and pictures.
PART1– UNBOXING
Step1. Remove all the large parts from the box carefully,and separate them. Remove the tank from the main box
withthe help of a friend.
Step2. The box contains large and medium-sized components, as well as small sized components inside two
accessorybags. Ensure you have all these components and in the correct amounts by referring to the component
list:
Step 1. Remove all the large parts from the box carefully, and separate them. Remove the tank from the main box
with the help of a friend.
Step 2. The box contains large and medium-sized components, as well as small sized components inside two
accessory bags. Ensure you have all these components and in the correct amounts by referring to the component list:
Figure1
Accessory Bag 1
Accessory Bag 2
PART 1 – UNBOXING
Page 3
C
M
Y
CM
MY
CY
CMY
K
Biopod Setup Guide Large.pdf 3 2016-12-27 11:46 PM
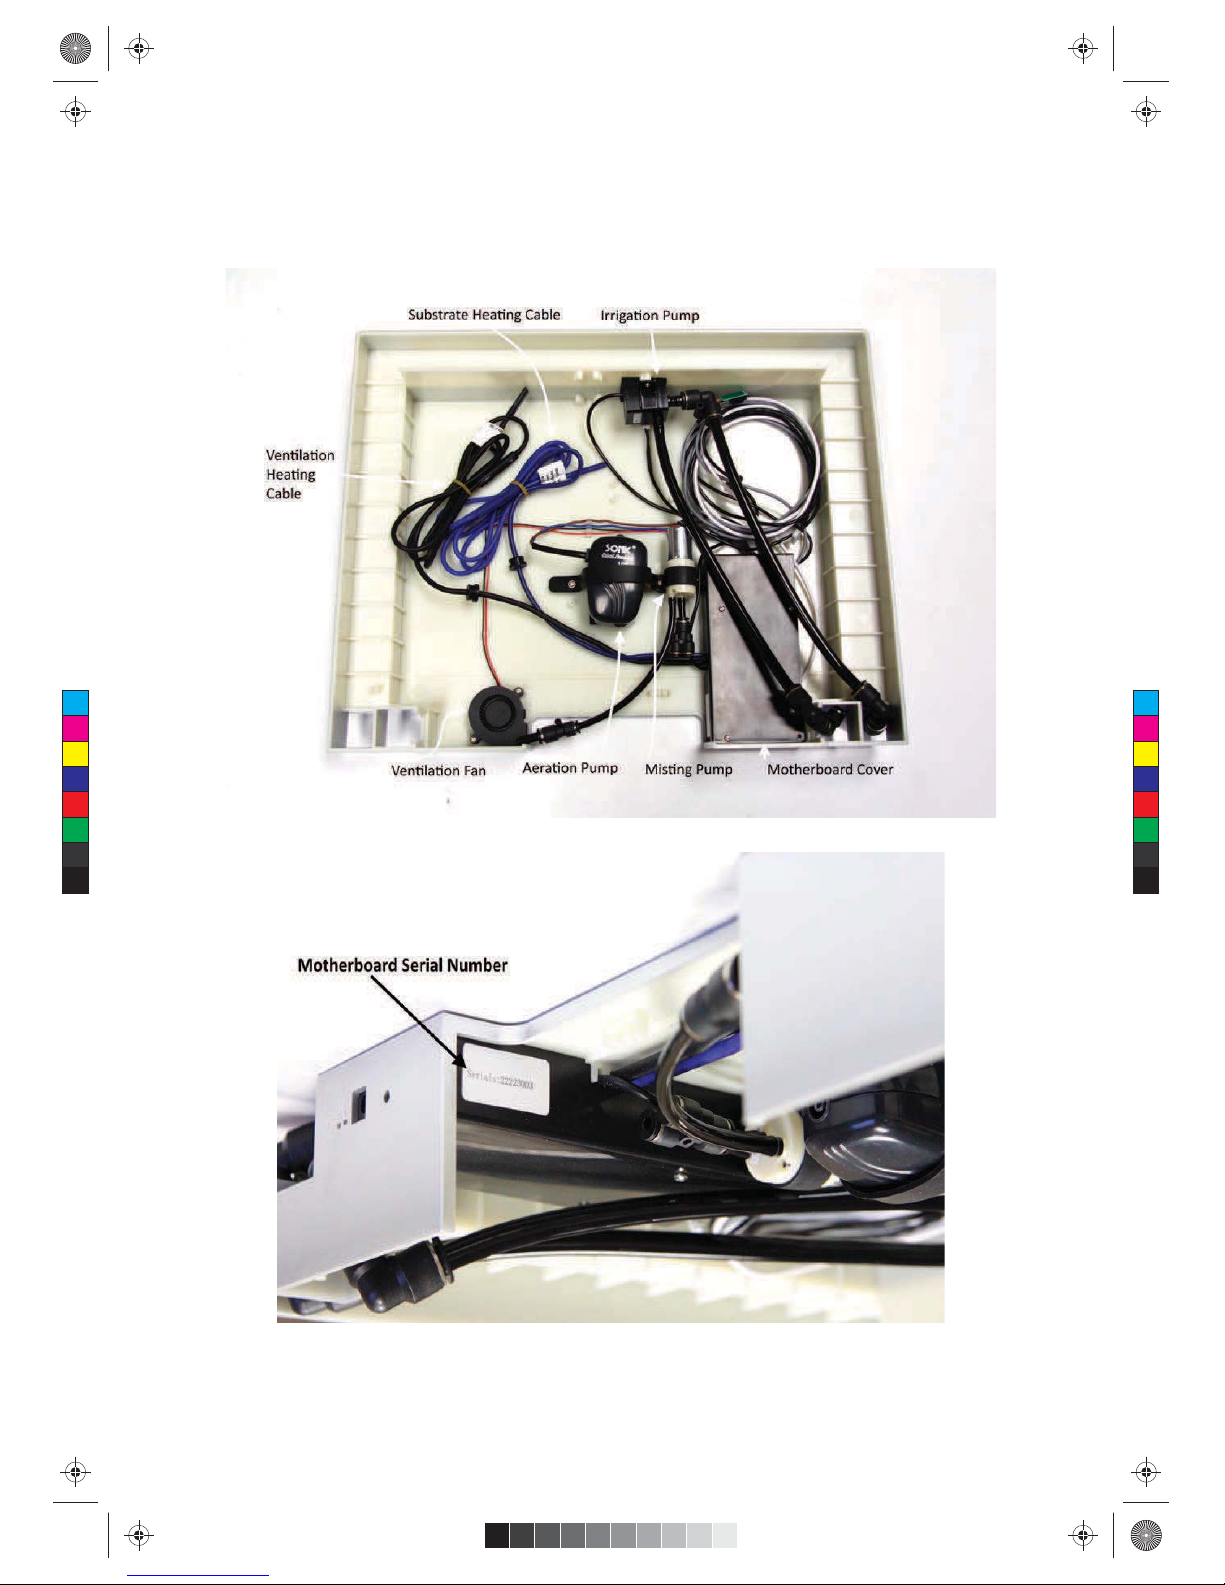
PART 2 – TUBE ROUTING & BASE ASSEMBLY
Section 1 - Base
Find the serial number written on your Biopod which is located on the motherboard cover. Copy the serial number for future
reference. The serial number is essential for connecting your Biopod to the APP.
Fig 1
Fig 2
Page 4
C
M
Y
CM
MY
CY
CMY
K
Biopod Setup Guide Large.pdf 4 2016-12-27 11:46 PM
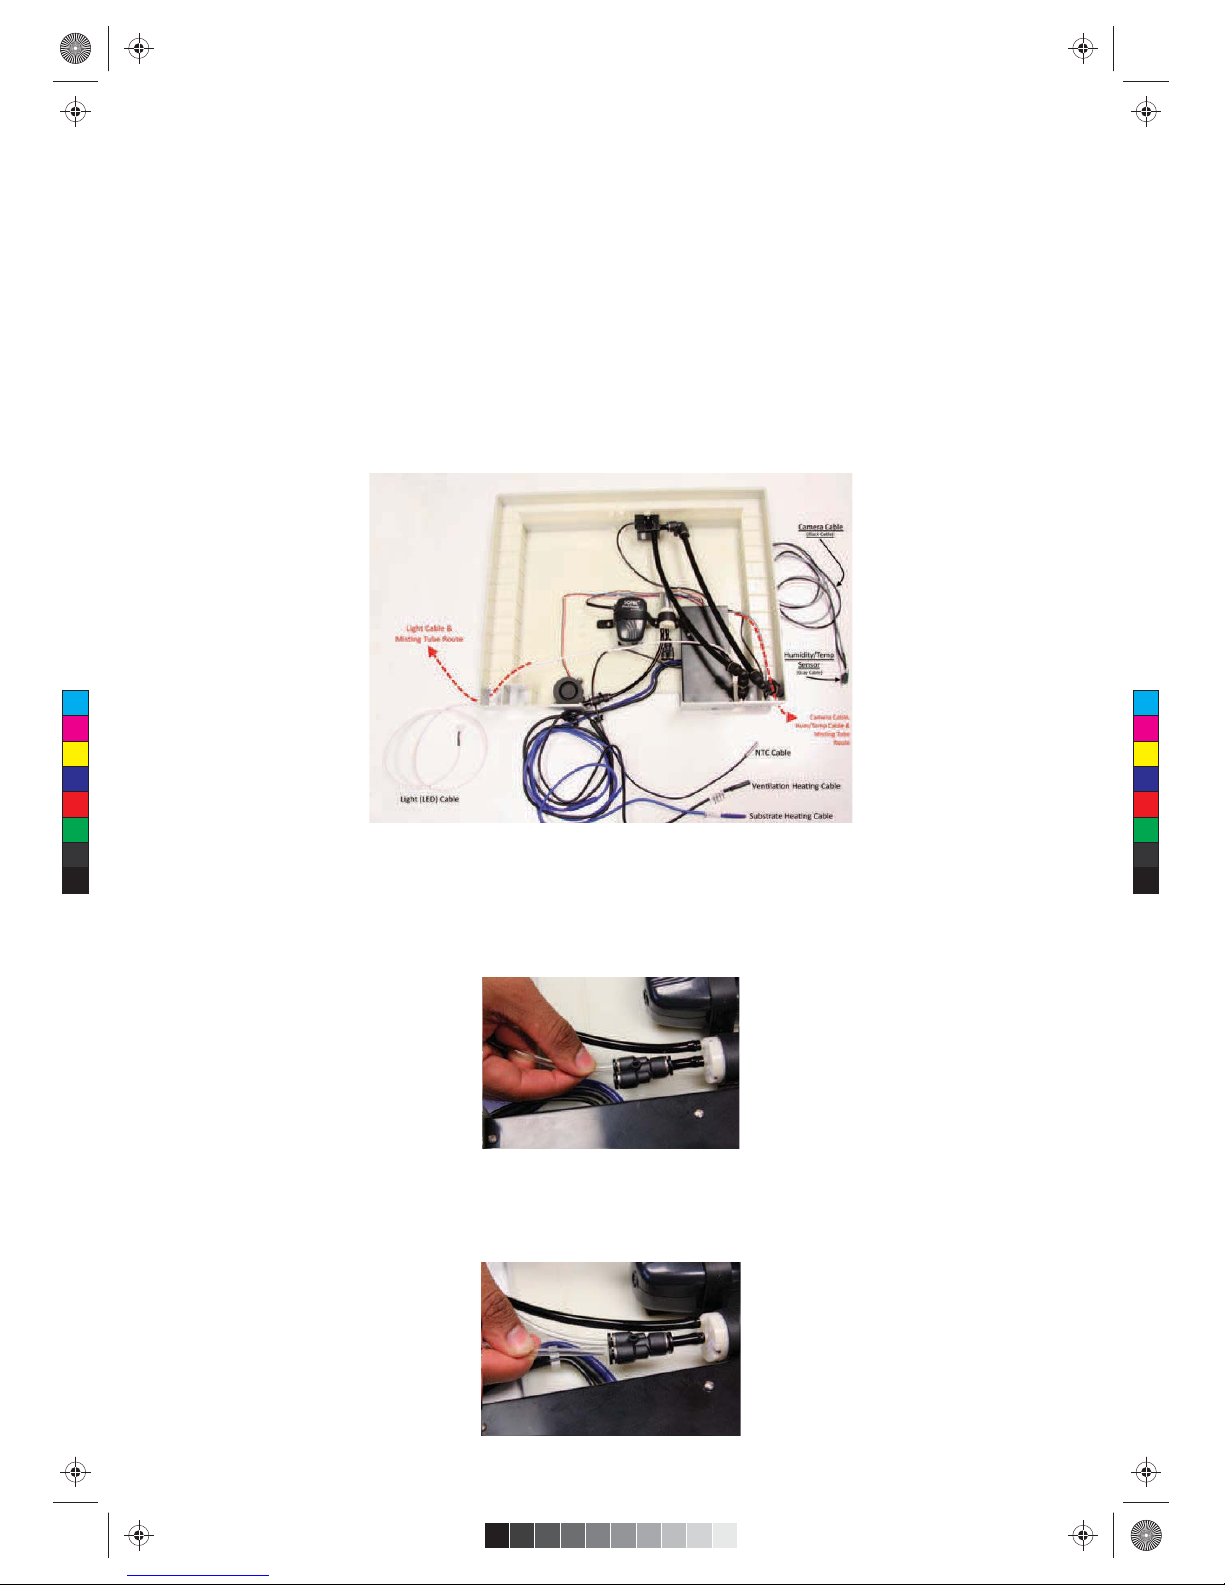
Section 2 – Cable & Tube Routing
Carefully remove tape from any components, and unravel all cables. All unraveled cables must be properly routed now:
Step 1.
The 3 cables and 2 tubes that must be properly routed through the base are:
Light cable (White cable)
Temp/Humidity sensor (Gray cable)
Camera cable (Black cable)
Two misting tubes (Thin clear tubes)
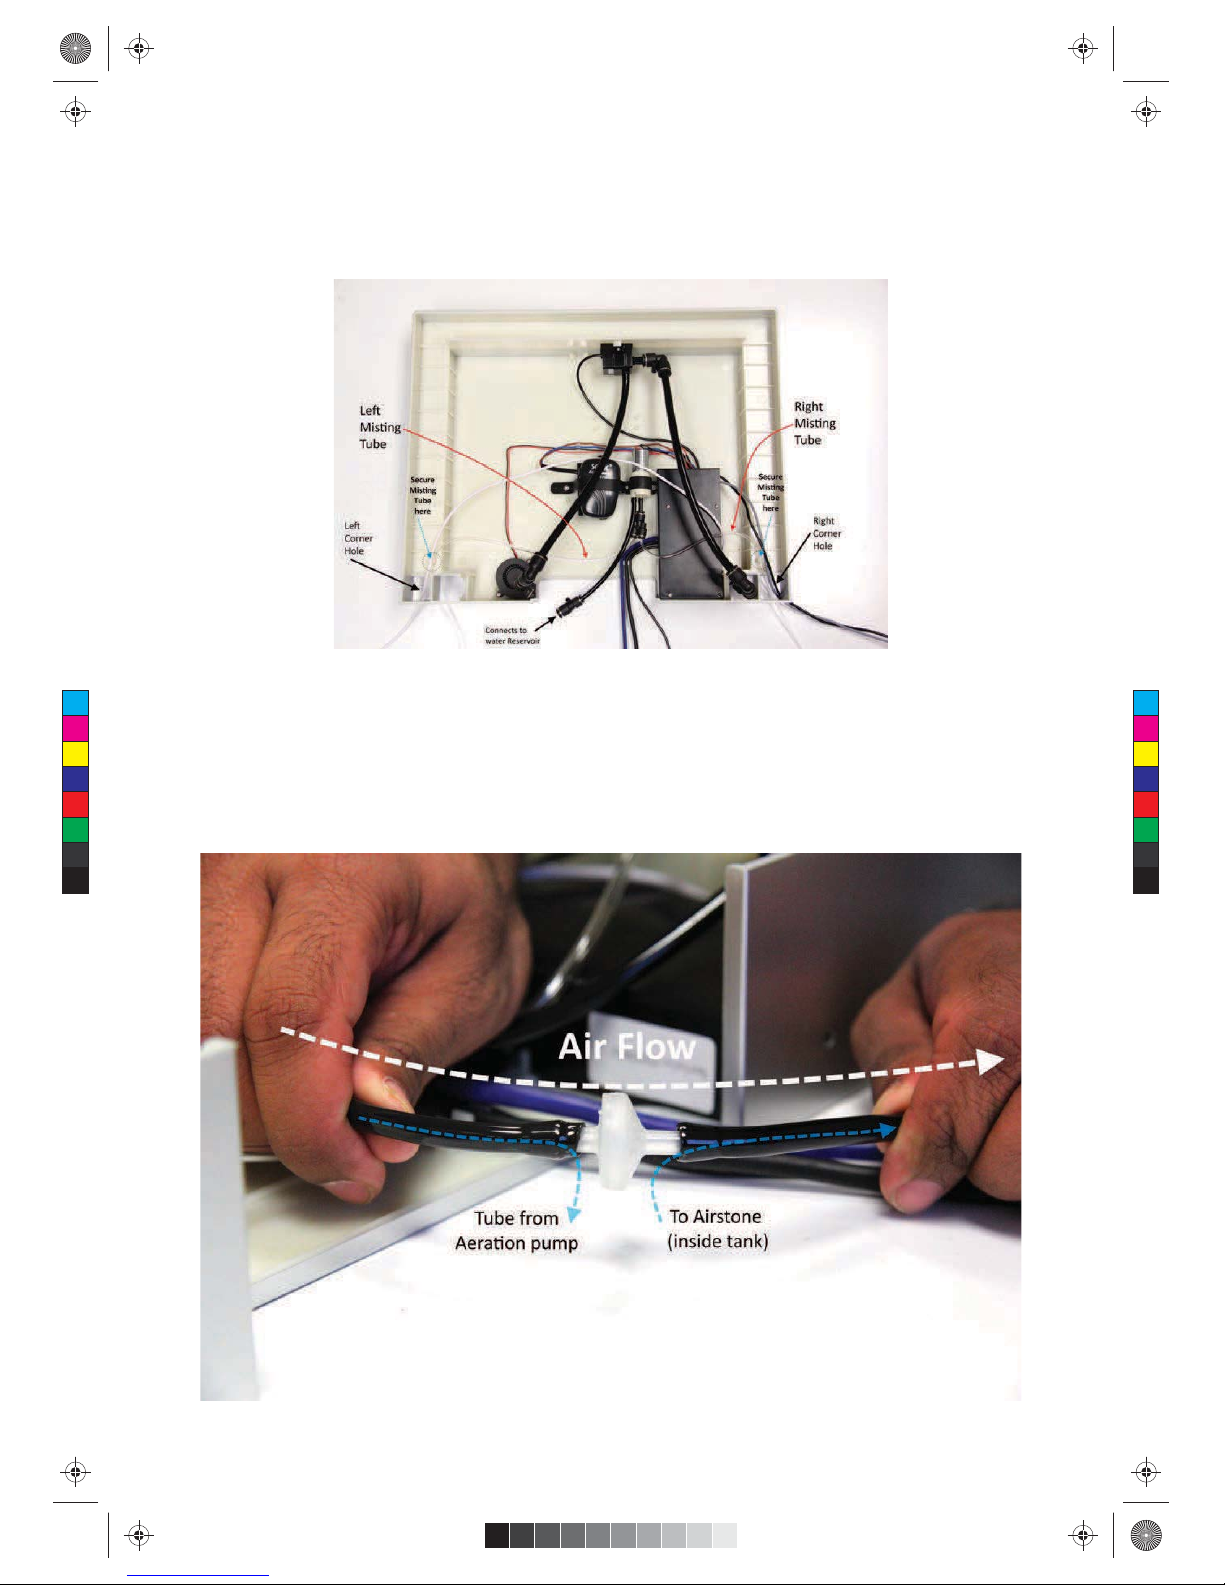
Step 2.
The Light (LED) Cable and the left misting tube must be routed through the bottom left corner of the base. The Temp/Humidity
sensor cable, Camera cable, and right misting tube must be routed through the bottom right of the base.
Heating cables & NTC Cable – The two heating cables (blue and black), and the NTC Cable has stoppers attached. These will
also go inside the Biopod tank, leave them hanging like shown in Fig 3. Below.
Fig3
Fig 4
Section 3 – Misting tubes
Step 1.
Connect the misting pump tubes. Compare the two misting cables in length. Connect the longer tube into the left
connector. You should feel a “click” as you push the tube into the connector.
Fig 5
Step 2.
Connect the shorter tube into the right connector. You should feel a “click” as you push the tube into
the connector.
Page 5
C
M
Y
CM
MY
CY
CMY
K
Biopod Setup Guide Large.pdf 5 2016-12-27 11:46 PM
Step 3.
Ensure the tube is secure by gently pulling on it; the tube should not come out even with great force.
Step 4.
Refer to Fig 3. and Fig 6. on how to route and secure the misting cables. Route the left and right tubes (respective-
ly) into the left and right corner holes of the base. Secure in the misting tubes as shown in the figure below.
Fig 6
Section 4 – Aeration Tubes
Connect the tubes needed to supply aeration to the Biopod.
Step 1.
Locate 2 thin black tubes (A-1, refer to Accessory Bag 2) with a one-way-air valve attached to it inside the accessory
bag with tubes in it. Insert the black tube opposite to the one-way-air-valve into the aeration pump:
Figure 7
Fig 7
Page 6
C
M
Y
CM
MY
CY
CMY
K
Biopod Setup Guide Large.pdf 6 2016-12-27 11:46 PM

PART 3 – CABLE INSERTION AND INNER TANK
The next steps involve some of the inner tank assembly. Many of these parts fit together tightly, and require the tank to be
stabilized and held in place. This part of the assembly will require two people. The assembly is dierent depending on your
Biopod model. The One, Terra and Grand for example are quite similar in this assembly. The Aqua and Aqua II are much dierent.
Section 5 – Insertion of components into tank
In this step, nine components must be inserted into the back of the Biopod glass. Place the Biopod tank on top of the completed
base. The back of the Biopod should face you.
Fig 8
Fig 9
Page 7
C
M
Y
CM
MY
CY
CMY
K
Biopod Setup Guide Large.pdf 7 2016-12-27 11:46 PM
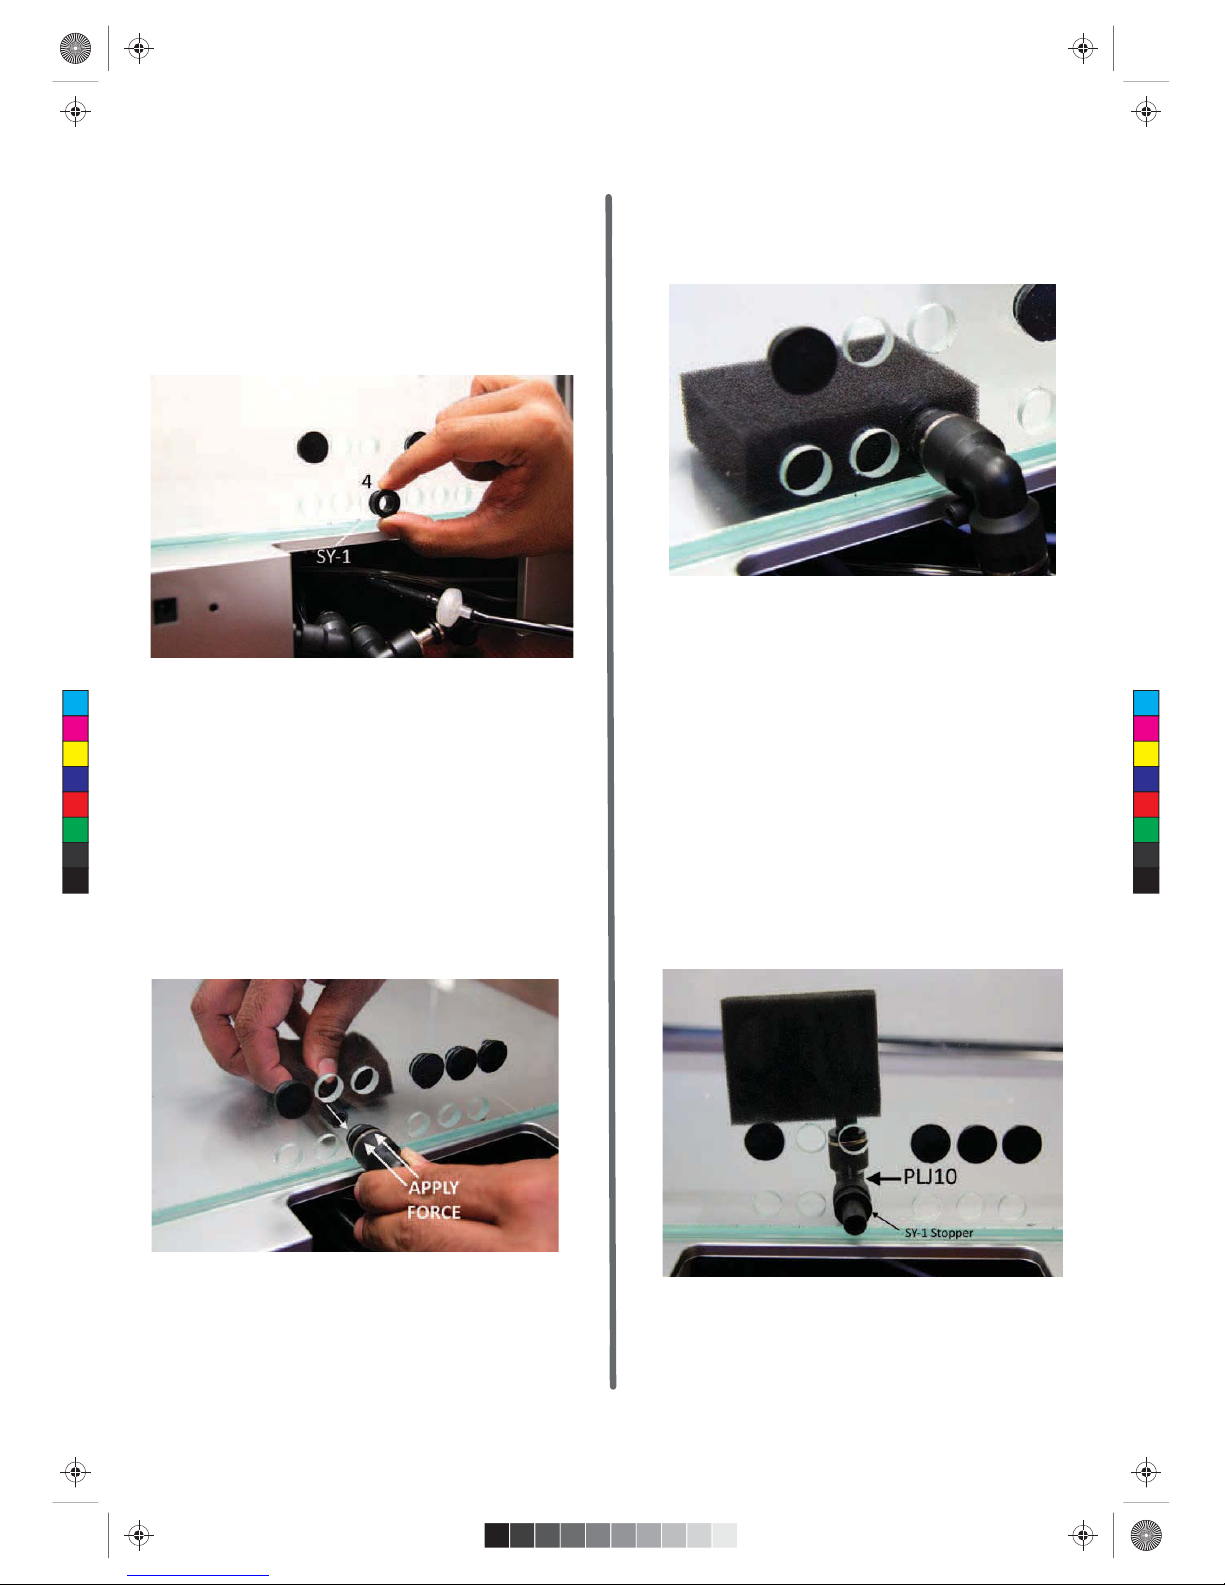
+F7B
79;@4K;@E7DF;@9EFABB7D+0;@FA:A>7,:7
EFABB7DE3D767E;9@76FA4734EA>GF7>KI3F7DF;9:F
;@E7DF;A@A8F:7EBA@97B;B7;@F:7@7JFEF7B?3K47
6;S5G>FBDA5776I;F:53D7
+F7B
!3H738D;7@6BGE:393;@EFF:7EFABB7D8DA?F:7435=
GE;@9F:7N"DD;93F;A@'-,Q7>4AI3EE:AI@;@;9
I:;>7KAG;@E7DFF:7EBA@97B;B78DA?F:78DA@F'@7
,7DD3CG3 D3@6?A67>EA@>K
;9
;9
+F7B
@EGD7F:7D7;E3F;9:FOF
+F7B
)-""%'$+'&$0;@E7DFF:7EBA@97;@FA3@
7JFD37>4AIOFF;@9($#F:7@BGE:F:;E7>4AIOFF;@9
;@FAF:7EFABB7D,:;E;E4753GE7F:7CG3"":3E>7EE
EGD83573D733@6F:77JFD3($#OFF;@95D73F7E3R
FGD@CG3""A@>K
;9
+F7B*.""&(%('%2
"@E7DFF:7EBA@97;@FA3@7JFD37>4AIOFF;@9($#F:7@
BGE:F:;E7>4AIOFF;@9;@FAF:7EFABB7D,:;E;E4753GE7
F:7CG3"":3E>7EEEGD83573D733@6F:77JFD3($#
OFF;@95D73F7E3RFGD@CG3""A@>K
;9)-""'&$0
)397
C
M
Y
CM
MY
CY
CMY
K
Biopod Setup Guide Large.pdf 8 2016-12-27 11:46 PM

;9
;9
;9
;9
+F7B
"@E7DFEFABB7D+0;@FA:A>7
+F7B
-E7F:7E3?7F75:@;CG767E5D;476;@BD7H;AGE>K8ADF:7
EBA@97;@E7DF;A@-E7F:7"DD;93F;A@"&7>4AI3>D736K
3FF35:76PE:AI@;@;9FABGFBD7EEGD7A@F:7
EFABB7DI:;>7F:7($#7>4AI;E;@E7DF768DA?F:7
;@E;67A8F:7F3@=
+F7B
@EGD7F:7D7;E3F;9:FOF
+F7B
"@E7DFEFABB7D+0;@FA:A>7
)397
C
M
Y
CM
MY
CY
CMY
K
Biopod Setup Guide Large.pdf 9 2016-12-27 11:46 PM
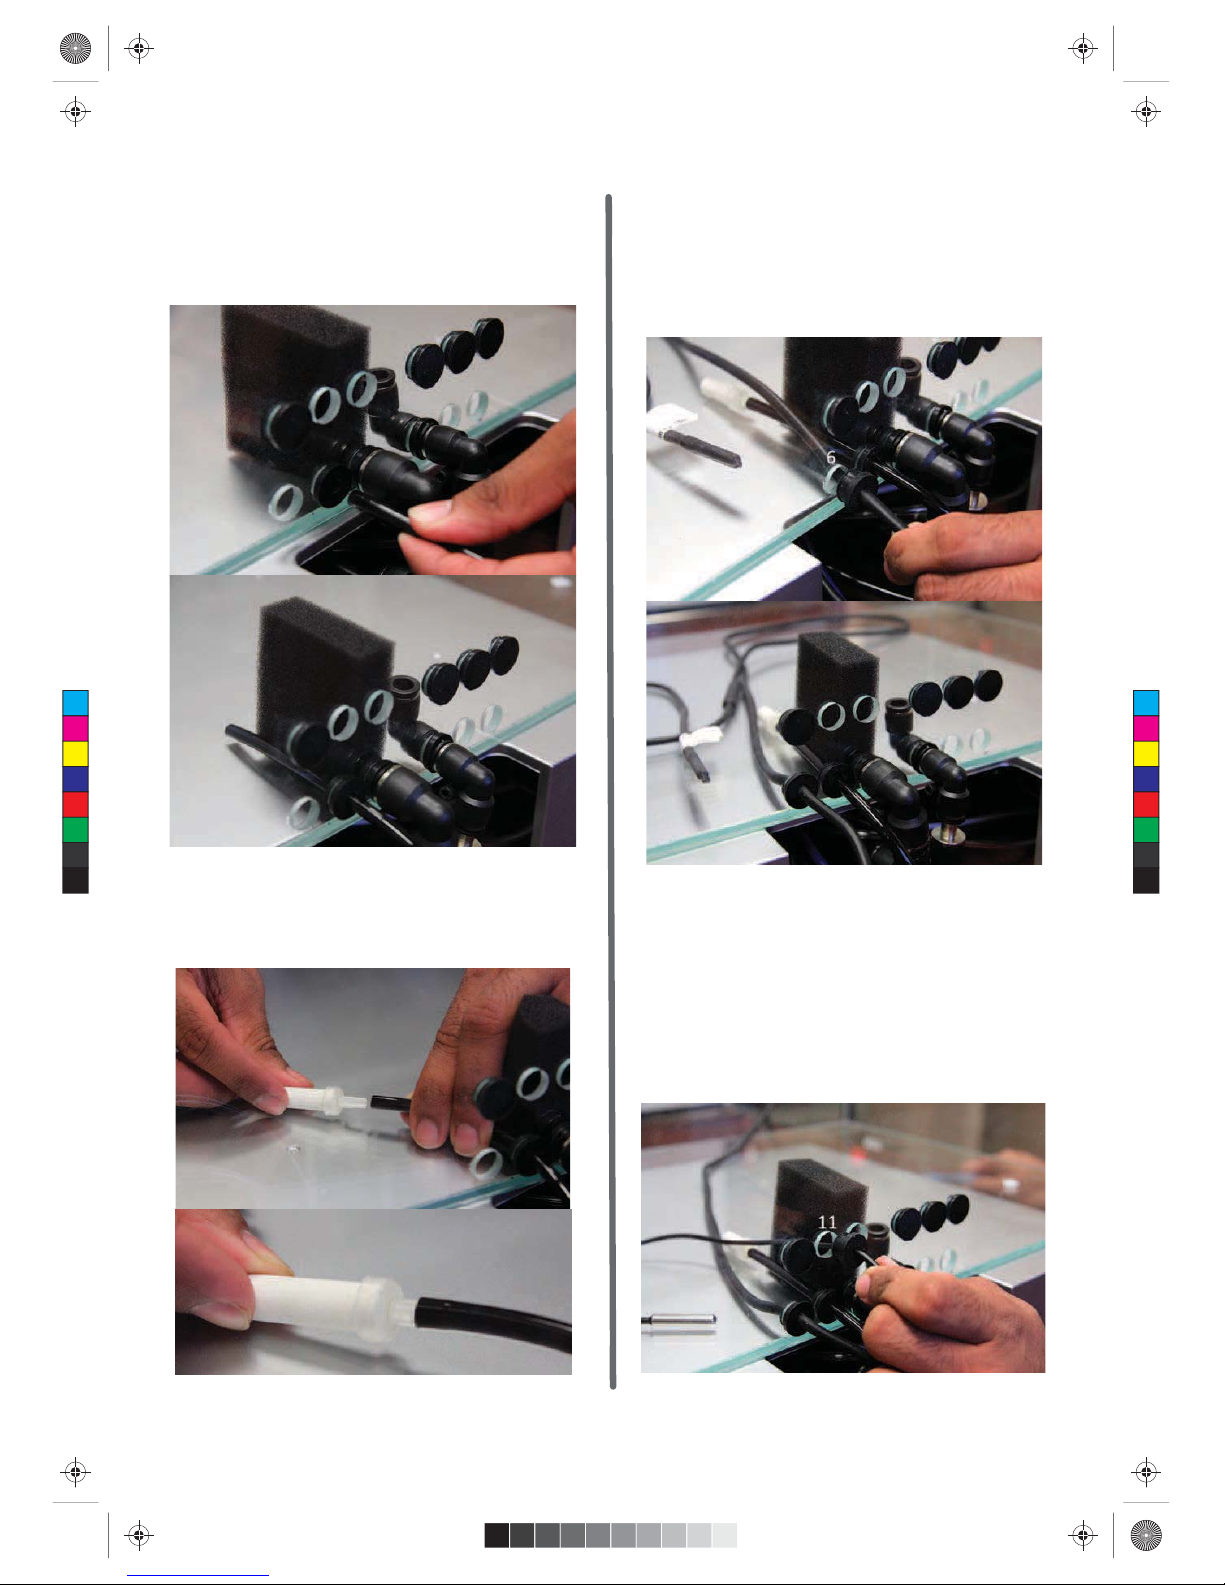
+F7B
(GE:;DEFA@7(;B7F:7>A@97D4>35=FG47;@FAF:7
EFABB7DF:;EFG47E:AG>6475A@@75F76FAF:7
A@7I3K3;DH3>H73E67E5D;476BD7H;AGE>K;@(3DF
+F7B+F7B
;9
+F7B
A@@75FF:7;DEFA@7;@FAF:7;@@7DF3@=E;67A8F:;E
FG47
+F7B
,:7H7@F;>3F;A@:73F;@9534>7;@EF3>>76A@F:743E7
E:AG>63>D736K:3H73EFABB7DA@;F"@EF3>>F:;E534>7
I;F:F:7EFABB7D;@E7DF;A@;@FA:A>7"8KAGD7
:3H;@9FDAG4>797FF;@9F:;EEFABB7D;@KAG53@GE73@
A4<75FI;F:36G>>BA;@F8AD7J3?B>73B7@FABGE:
F:77697EA8F:7EFABB7D;@FAF:79>3EE:A>7
;9
;9
+F7B
,:7&,E7@EAD534>7;@EF3>>76A@F:743E7E:AG>6
3>D736K:3H73EFABB7DA@;F"@EF3>>F:;E534>7I;F:F:7
EFABB7D;@E7DF;A@;@FA:A>7"8KAGD7:3H;@9FDAG4>7
97FF;@9F:;EEFABB7D;@KAG53@GE73@A4<75FI;F:3
6G>>BA;@F8AD7J3?B>7;9GD73B7@FABGE:F:7
7697EA8F:7EFABB7D;@FAF:79>3EE:A>7
;9
)397
C
M
Y
CM
MY
CY
CMY
K
Biopod Setup Guide Large.pdf 10 2016-12-27 11:47 PM

;9
;9
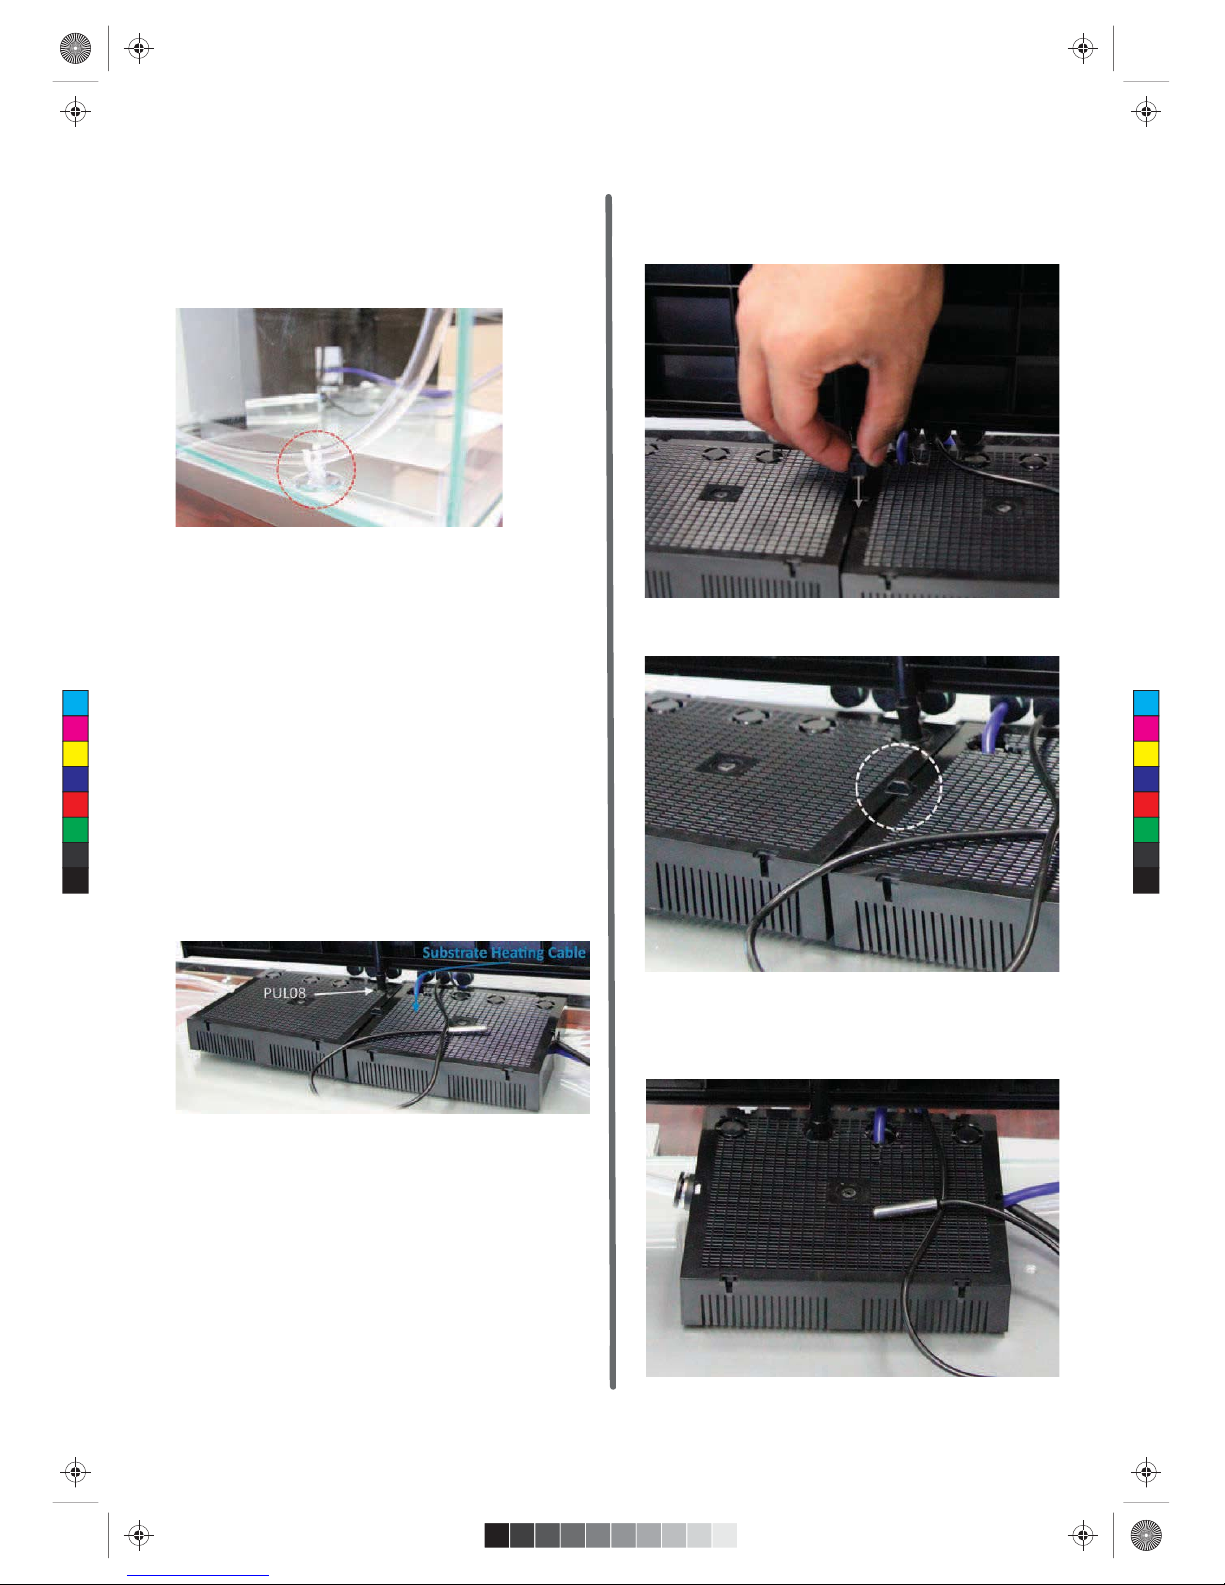
+F7B
,:7EG4EFD3F7:73F;@9534>7;@EF3>>76A@F:743E7
E:AG>63>D736K:3H73EFABB7DA@;F"@EF3>>F:;E534>7
I;F:F:7EFABB7D;@E7DF;A@;@FA:A>7"8KAGD7
:3H;@9FDAG4>797FF;@9F:;EEFABB7D;@KAG53@GE73@
A4<75FI;F:36G>>BA;@F8AD7J3?B>73B7@FABGE:
F:77697EA8F:7EFABB7D;@FAF:79>3EE:A>7
;9
+F7B
"@E7DFEFABB7DE+0;@FA:A>7E3@6
;9
)397
C
M
Y
CM
MY
CY
CMY
K
Biopod Setup Guide Large.pdf 11 2016-12-27 11:47 PM

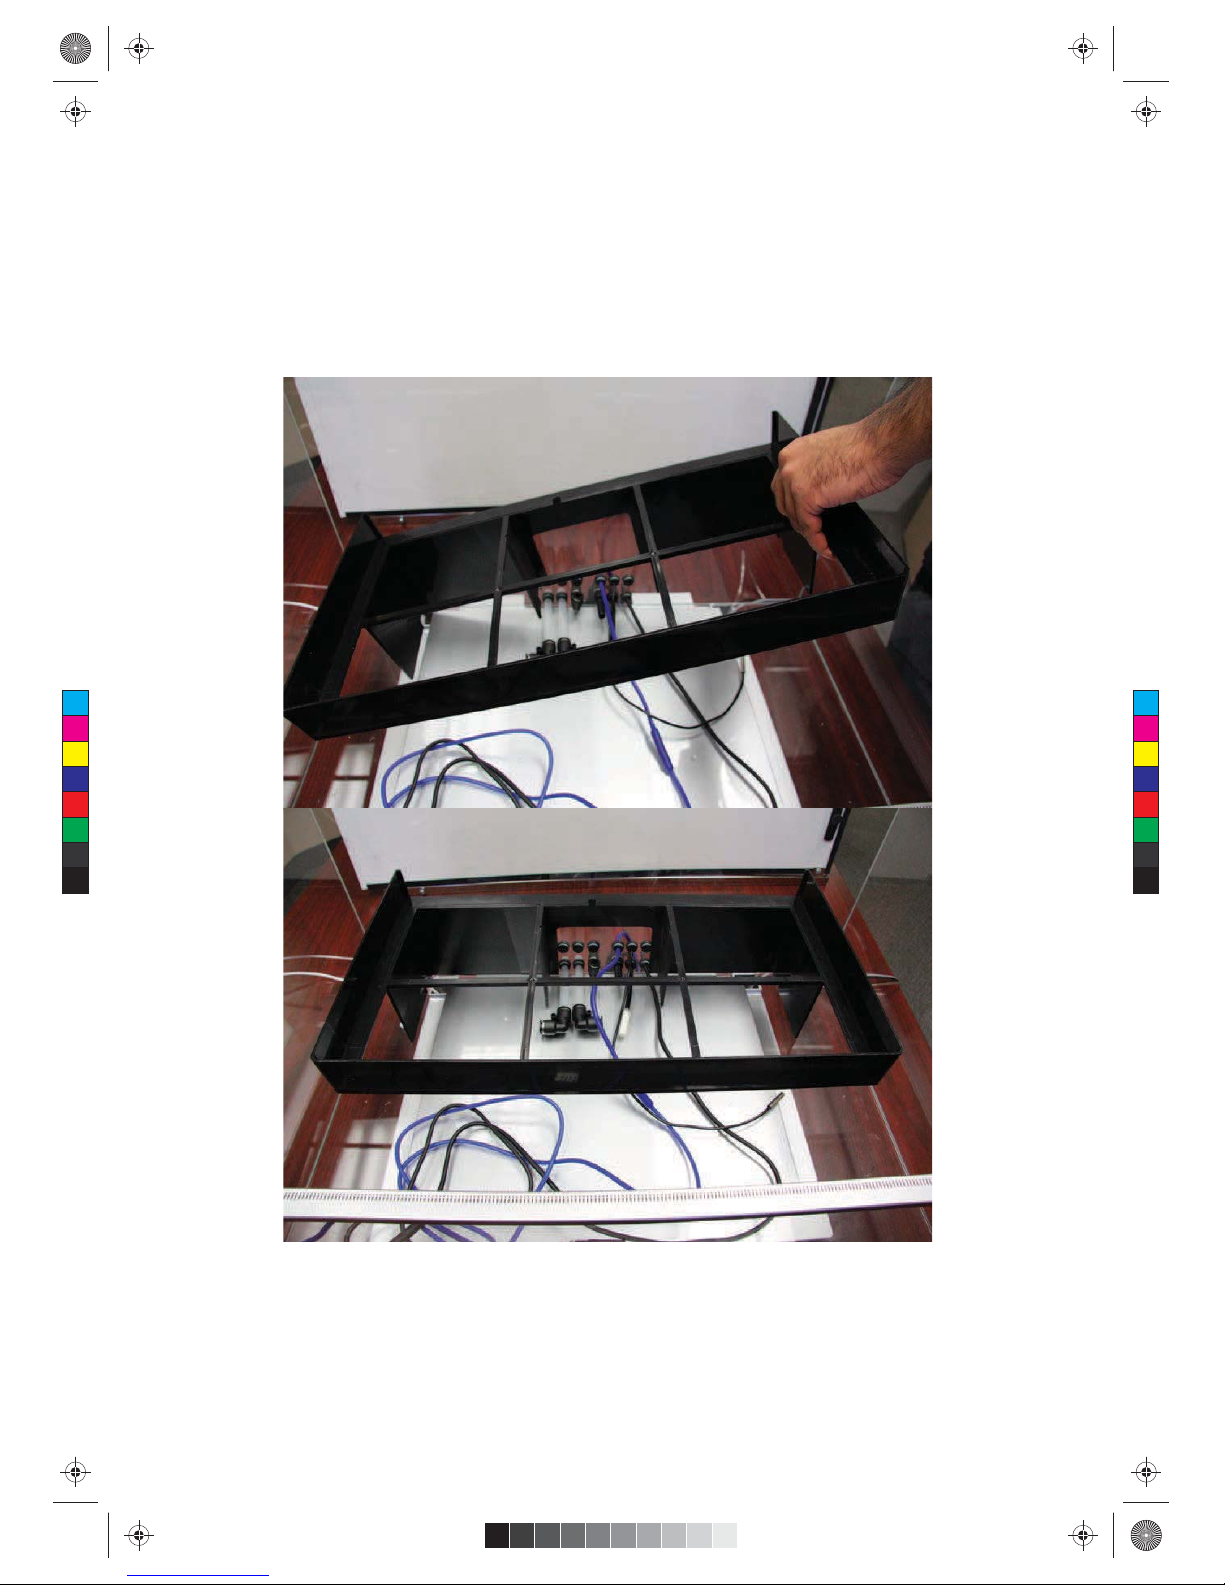
+F7B
,:7?3@;8A>6B;B7EI;>>9A;@FA:A>7E3@6,:7
?3@;8A>6B;B7E3D7E:AI@;@557EEADK394AF:
5A@@75F76;@FAF:7?3@;8A>6,:7E7FIAB;B7E?GEF47
D7?AH768DA?F:7?3@;8A>6,:7@;@E7DF7634;F;@FA
:A>7E3@6I;F:F:7EFABB7DE;@E;67F:7?&7JF
F3=7F:7?3@;8A>63@6GE7;FFABGE:4AF:B;B7E;@FA
F:7F3@=$73H734;FA8F:7B;B7AGFE;67F:7F3@=3E
F:;EI;>>47GE76FA5A@@75F;@FAF:7?3@;8A>6
;9
;9
+F7B
A@@75FF:7FIA(-$7>4AIE;@FAF:7D757@F>K;@E7DF76
?3@;8A>6B;B7E*787DFA557EEAD;7E39FAE77I:3F
(-$>AA=E>;=7A@@75FF:7?3I3K8DA?735:AF:7D3@6
BGE:F:7?;@3>>F:7I3KFA?3=73I3F7DF;9:FE73>
;9
;9
;9
"@E7DF;A@A85A?BA@7@FE;@FAF:7435=9>3EE:A>7E;E
O@;E:76,:75A?B>7F763EE7?4>KE:AG>6>AA=E;?;>3D
FA;9,:7A@>K6;T7D7@57E3?A@9F:7;ABA6
?A67>E47;@9F:7>7@9F:A8F:7?3@;8A>6B;B7EF:7
>7@9F:A8F:7EBA@97B;B7F:7>7@9F:A8F:7:73F;@9
534>7E3@6F:77JFD3($#7>4AI5A@@75F76;@FAF:7
EBA@978ADF:7CG3""
)397
C
M
Y
CM
MY
CY
CMY
K
Biopod Setup Guide Large.pdf 12 2016-12-27 11:47 PM
Now that all the components have been inserted into the Biopod tank, the next step is to install the living wall. There are
separate steps here if you have an Aqua or Aqua II model. The living wall comes pre-assembled, but may come apart
during shipping. Should this happen, carefully re-attach the pieces together as they can have sharp edges.
PART 2 - INSTALLING THE LIVING WALL
[Aqua and Aqua II models only]: If you have an Aqua or Aqua II model, they come with their own base. For the following
example in Fig 31. an Aqua base is shown. The Aqua II base looks much dierent but the concept of installation is the
same. If you have an Aqua or Aqua II model - skip to step 3
Fig 31
Page 13
C
M
Y
CM
MY
CY
CMY
K
Biopod Setup Guide Large.pdf 13 2016-12-27 11:47 PM

+F7B
AD'@7,7DD33@6F:7 D3@6?A67>E"F;E;?B7D3F;H7F:3F
F:7ODEF83>E74AFFA?47;@EF3>>76D;9:F34AH73@6;@FA
($#F:7"DD;93F;A@7>4AI;@E;67F:7F3@=79;@4K
?3=;@9F:73BBDABD;3F7:A>7EKAG53@BG@5:;FF:DAG9:
GE;@93B3;DA8B>;7DEFA4D73=F:75;D5G>3DB>3EF;5BADF;A@
3EE:AI@;@;947>AI
,:7'@7A@>K@776EA@783>E74AFFA?8AD;FE?AEF43E;5
;@;F;3>E7FGB8ADF:7'@7A@>KF:7FIA?;66>7:A>7E3D7
?367A@3E;@9>783>E74AFFA?+77;98AD3@7J3?
B>7A8F:77@6D7EG>F
;9
ADF:7,7DD3FIA83>E74AFFA?E3D7@776768AD;FE?AEF
43E;5;@;F;3>E7FGB'@783>E74AFFA?E:AG>6:3H7A@7
:A>74DA=7@;@A@A@77@63@6F:7AF:7DA@F:7ABBA
E;F77@6+77;98AD3@7J3?B>7A8F:77@6D7EG>F
;9
)397
C
M
Y
CM
MY
CY
CMY
K
Biopod Setup Guide Large.pdf 14 2016-12-27 11:47 PM

+F7B
,DKFAB>357F:74DA=7@E75F;A@A8F:783>E7
4AFFA?AH7D($#;F?3K@AFOFBDAB7D>K
6G7FAAF:7D5A?BA@7@FE47;@9;@F:7I3K
;@F:7@7JFEF7BI7I;>>9AAH7D:AIFAF73D
ATF:74D73=34>7O@EFAOF;F;@B>357
,:78A>>AI;@97J3?B>7;E8ADF:7,7DD3F:7
;@EF3>>3F;A@5A@57BF;EF:7E3?78ADF:7'@7
?A67>4GFF:7:A>7E4DA=7@3D76;T7D7@F
*787DFA;98AD3@7J3?B>7A83
5A?B>7F76'@73EE7?4>K3>E74AFFA?E;@
F:7CG3?A67>6A@AF@776FA474DA=7@;@
F:;EI3K
;9
;9
;9
;9GD7
;9
)397
C
M
Y
CM
MY
CY
CMY
K
Biopod Setup Guide Large.pdf 15 2016-12-27 11:47 PM

+F7B
;@6F:7FIA5>73DH7@F;>3F;A@FG47E3EE:AI@;@
557EEADK39A@@75FF:7>A@97DA@7;@FAF:7
D;9:FH7@F7@63@6F:7E:ADF7DA@7;@FAF:7>78FH7@F
7@63EE:AI@;@F:7@7JF87IO9GD7E,:7H7@F;>3
F;A@FG47EE:AG>647DAGF76EAF:3FF:7K3D73>?AEF
FAG5:;@9F:7E;67EA8F:7F3@=AF:;EEF7B97@F>K
EAF:7FG47E6A@MF=;@=
;9$78F.7@F;>3F;A?,G47
;9*;9:F.7@F;>3F;A@,G47
+F7B
&AI5A@@75FF:7D;9:FH7@F;>3F;A@FG47F:7>A@97D
A@7;@FAF:7D;9:FH7@F7@6AF:;EEF7B97@F>KEA
F:7FG47E6A@MF=;@=
"8KAG:3H73@CG3ADCG3""E=;BFAEF7B
+F7B
'@7,7DD3 D3@65A@@75FF:7H7@F;>3F;A@
FG47E;@FAF:7H7@F;>3F;A@7>4AIE,:7D;9:F
H7@F;>3F;A@FG47;E34;F>A@97DF:3@F:7>78F
+F7B
CG3CG3"",:7H7@F;>3F;A@FG47E8ADF:7
CG33@6CG3""6A@AF9AG@67D@73F:3@K
83>E74AFFA?E4GFF:7K?GEF47BDAB7D>K
DAGF76F:DAG9:F:7;DBDAH;67643E7E478AD7
5A@@75F;A@,:7@7JFO9GD7;9GD7;E3@
7J3?B>7A8H7@F;>3F;A@FG47EDAGF76F:DAG9:
F:7CG343E7,:7D;9:FH7@F;>3F;A@FG47;E
34;F>A@97DF:3@F:7>78F
;9
Fig 40
Fig 43
)397
C
M
Y
CM
MY
CY
CMY
K
Biopod Setup Guide Large.pdf 16 2016-12-27 11:47 PM
+F7B
ADF:7,7DD3DAGF7F:7EG4EFD3F7:73F;@9534>7
4>G7534>7F:DAG9:F:7AF:7D83>E74AFFA?
BD7H;AGE>K4DA=7@E77;9,:77@6D7EG>F
E:AG>6>AA=>;=7F:7;?39747>AI;9;@
I:;5:F:7$;H;@9/3>>;E3>D736K3FF35:76FA
(-$@AFFAIADDKF:;EEF7B;E5A?;@9GB
EAA@
;9
;9
+F7B
+75GD7F:783>E74AFFA?E4KBGE:;@9;@83>E74AFFA?
5A@@75FADE*787DFA557EEADK3947FI77@F:7
83>E74AFFA?E
J3?B>7A835A?B>7F76;@;F;3>83>E74AFFA?3EE7?4>KA8
F:7'@7
;9
;9
Step 7.
Four suction cups with large holders (Refer to
Accessories Bag 2) have been provided to hold
the ventilation tubes in place. Use these to secure
the ventilation tubes onto the glass.
Fig 44
If you have an Aqua or Aqua II - skip to step 10
)397
C
M
Y
CM
MY
CY
CMY
K
Biopod Setup Guide Large.pdf 17 2016-12-27 11:47 PM

+F7B
&AF7F:78A>>AI;@9
30AGI;>>@776FA4D73=?AD7O@EATF:783>E74AFFA?E
FADAGF7F:7D7?3;@;@9534>7EE77;98AD3@7J3?
B>7A84D73=;@9O@E1'@7,7DD3 D3@62
4,:7&,E7@EAD534>7E:AG>64734AH7F:783>E7
4AFFA?E3@63I3K8DA?6;D75F5A@F35FI;F::73F;@9
534>7E1'@7,7DD3 D3@62
5,:7EG4EFD3F7:73F;@9534>7E:AG>69AG@67D@73F:F:7
83>E74AFFA?E3@6E:AG>65AH7D3E?G5:3D733E
BAEE;4>7FA?3J;?;L7EGD83573D73:73F761'@7,7DD3
D3@62
6,:7H7@F;>3F;A@:73F;@9534>7E:AG>647DAGF76
G@67D@73F:F:783>E74AFFA?E1'@7,7DD3 D3@624GF;F
E:AG>6G>F;?3F7>K7@6GB3FF:78DA@FA8F:7;ABA6F3@=
G@67D@73F:F:7H7@F;>3F;A@EFD;B1>>?A67>E2
7,:7AF:7D8AGDEG5F;A@5GBE53>>76F:7E?3>>EG5F;A@
5GBED787DFA557EEAD;7E393D7GE76FA:A>6F:7
EG4EFD3F7:73F;@9534>74>G7:73F;@9534>73@6F:7
H7@F;>3F;A@:73F;@9534>74>35=:73F;@9534>7;@B>357
A@F:79>3EE
8,:783>E74AFFA?O@E3D767E;9@76FA474DA=7@ATEA
F:3F534>7E3@6FG47E53@47DAGF76G@67D@73F:1'@7
,7DD3 D3@62
9,:7D7;E39D73F673>A85GEFA?;L34;>;FK6GD;@9F:7
;@EF3>>3F;A@A8F:783>E74AFFA?E3@6F:7DAGF;@9A8
534>7E,:;E;EE;?B>KI:3FI7D75A??7@68ADF:7
ABF;?3>7JB7D;7@57A8KAGD;ABA6G@;F1>>?A67>E2
Step 10.
Take the end of the substrate heating cable (the
black one) and pressure t it along the bottom of
the ventilation strip. The end of this cable should be
at the very right of the bottom of the vent strip. The
following three gures are an example shown from
the Aqua, but the same method is used for all
models.
Fig 49
Fig 50
Fig 51
'AIKAG?3K5A@F;@G7F:7D7EFA8F:73EE7?4>K
4KB>35;@9F:7D7?3;@;@983>E74AFFA?EDAGF;@9
F:7534>7E3@64D73=;@9F:7O@E3E@757EE3DK
)397
C
M
Y
CM
MY
CY
CMY
K
Biopod Setup Guide Large.pdf 18 2016-12-27 11:47 PM
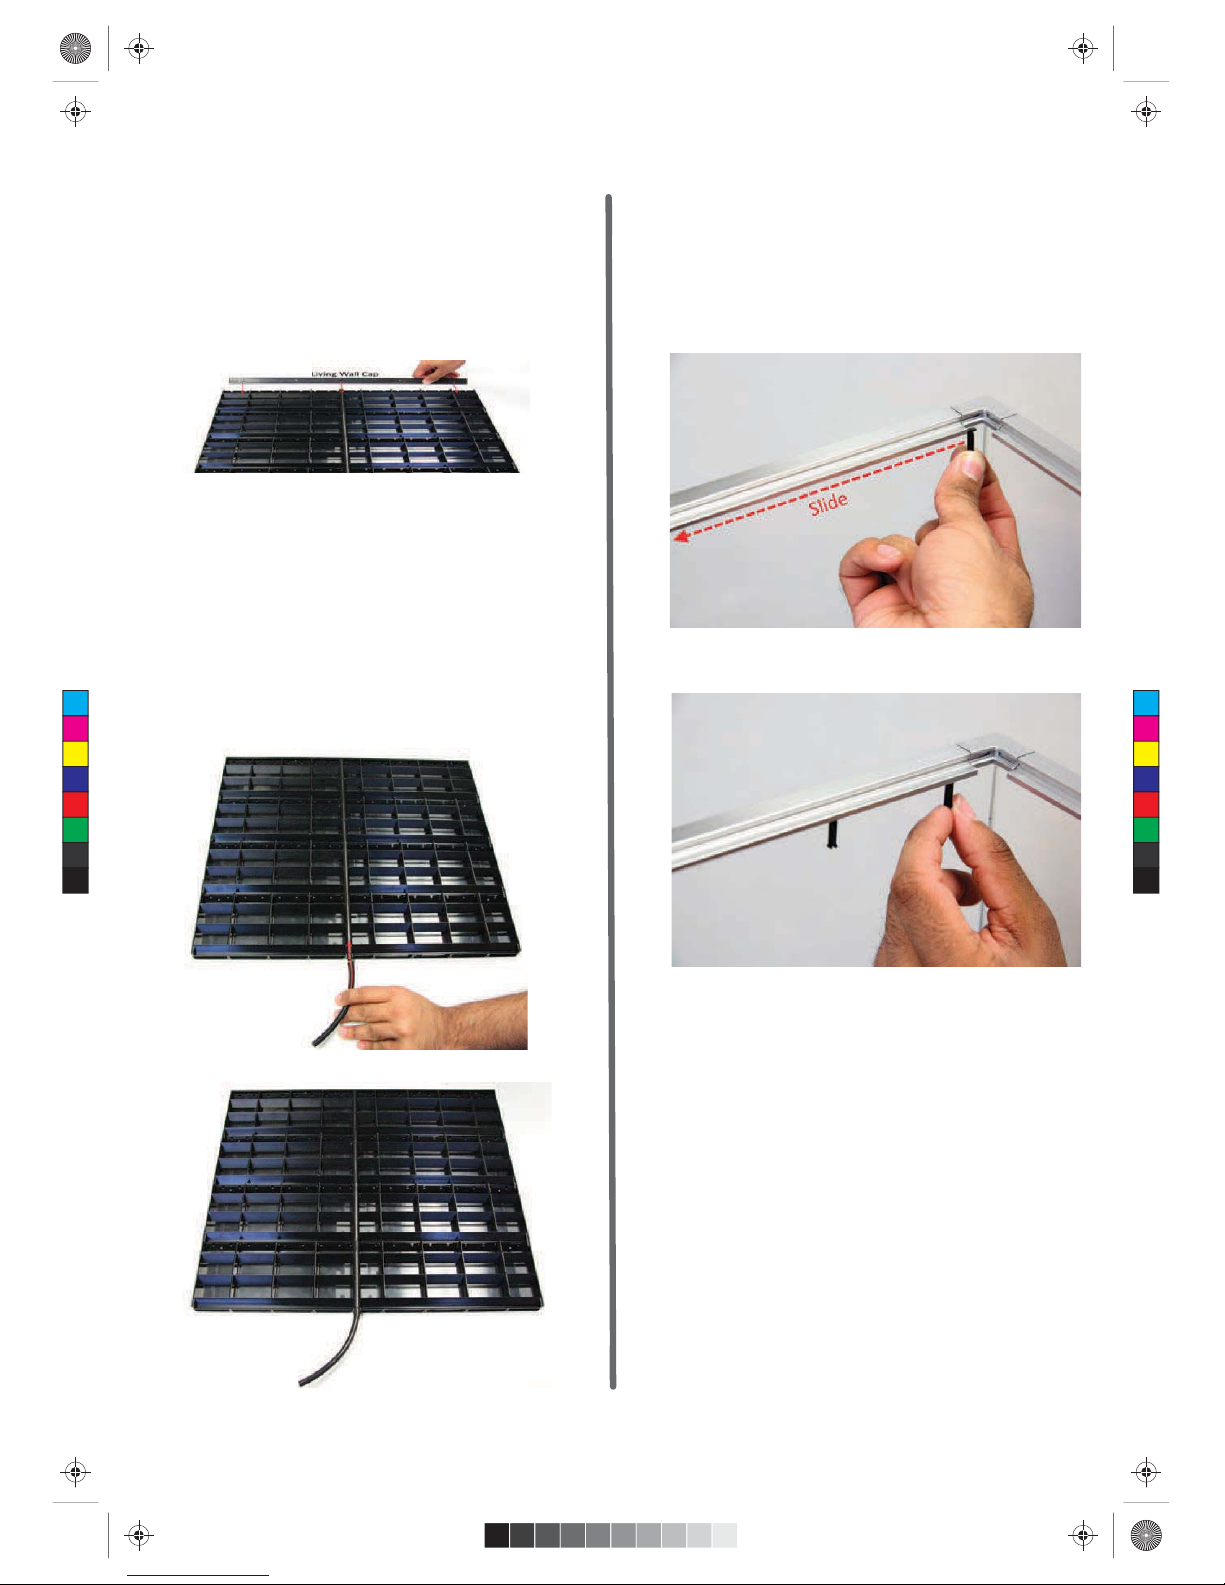
+F7B
&AIF:7>;H;@9I3>>?GEF47;@EF3>>7679;@4K
3FF35:;@9F:7$;H;@9/3>>3B;@FAF:7FABA8F:7
5A?4;@76>;H;@9I3>>B;757E"8F:7>;H;@9I3>>
B;757E:3H75A?73B3DF6GD;@9E:;BB;@9E;?B>K
5A@@75FF:7?435=FA97F:7D&AF7,:7>;H;@9
I3>>;E3:3D6B>3EF;5B;757I;F:A553E;A@3>E:3DB
7697EF3=753D7I:7@IAD=;@9I;F:;F
;9
;9
;9
+F7B
,:7D73D7FIAE?3>>B;757E;@557EEAD;7E39
53>>76$;H;@9/3>>A@@75FADE,:7E73D7GE76FA
=77BF:7>;H;@9I3>>;@B>357+>;67F:7E7;@FAF:7435=
?7F3>8D3?7A8F:7;ABA6F3@=
;9
;9
,F7B
"@E7DFF:7/7DFFG47%;H;@903>>-G47D787D
FA557EEAD;7E39>7@9F:A8FG47
H3D;7E4K?A67>-:;EFG475A@@75FE8DA?
)%#7>4AIF:;E;EI:7D7F:7;DD;93F;A@
I3F7D5A?7EAGF;@FAF:7>;H;@9I3>>79;@
4K;@E7DF;@9F:7FG47F;9:F>K;@FAF:7)%#
7>4AI-3=753GF;A@;@F:;EEF7B3@6
7J75GF7;FE>AI>K-:74AFFA?7697EA8F:7
>;H;@9I3>>53@47E:3DB
)397
C
M
Y
CM
MY
CY
CMY
K
Biopod Setup Guide Large.pdf 19 2016-12-27 11:47 PM
+F7B
(@7-7DD3 D3@6A@>KA@@75FF:7>;H;@9I3>>FG47
;@FA(-$"DD;93F;A@'-,F;9:F>K0AGE:AG>6877>3
5>;5=I:7@;F;E3I3F7DF;9:FE73>0AG53@7;F:7D5A@@75F
F:7>;H;@9I3>>FG473>A@7;@FA(-$F:7@3FF35:F:7
>;H;@9I3>>A@FAF:7AF:7D7@6'DKAG53@5A@@75FF:7
>;H;@9I3>>FG47;@FAF:7>;H;@9I3>>ODEF3@6F:7@;@FA
(-$;9E:AIEF:7>;H;@9I3>>;@E7DF76;@F:7,7DD3
?A67>;9E:AIEF:7>;H;@9I3>>;@E7DF76;@F:7'@7
?A67>
;9
;9
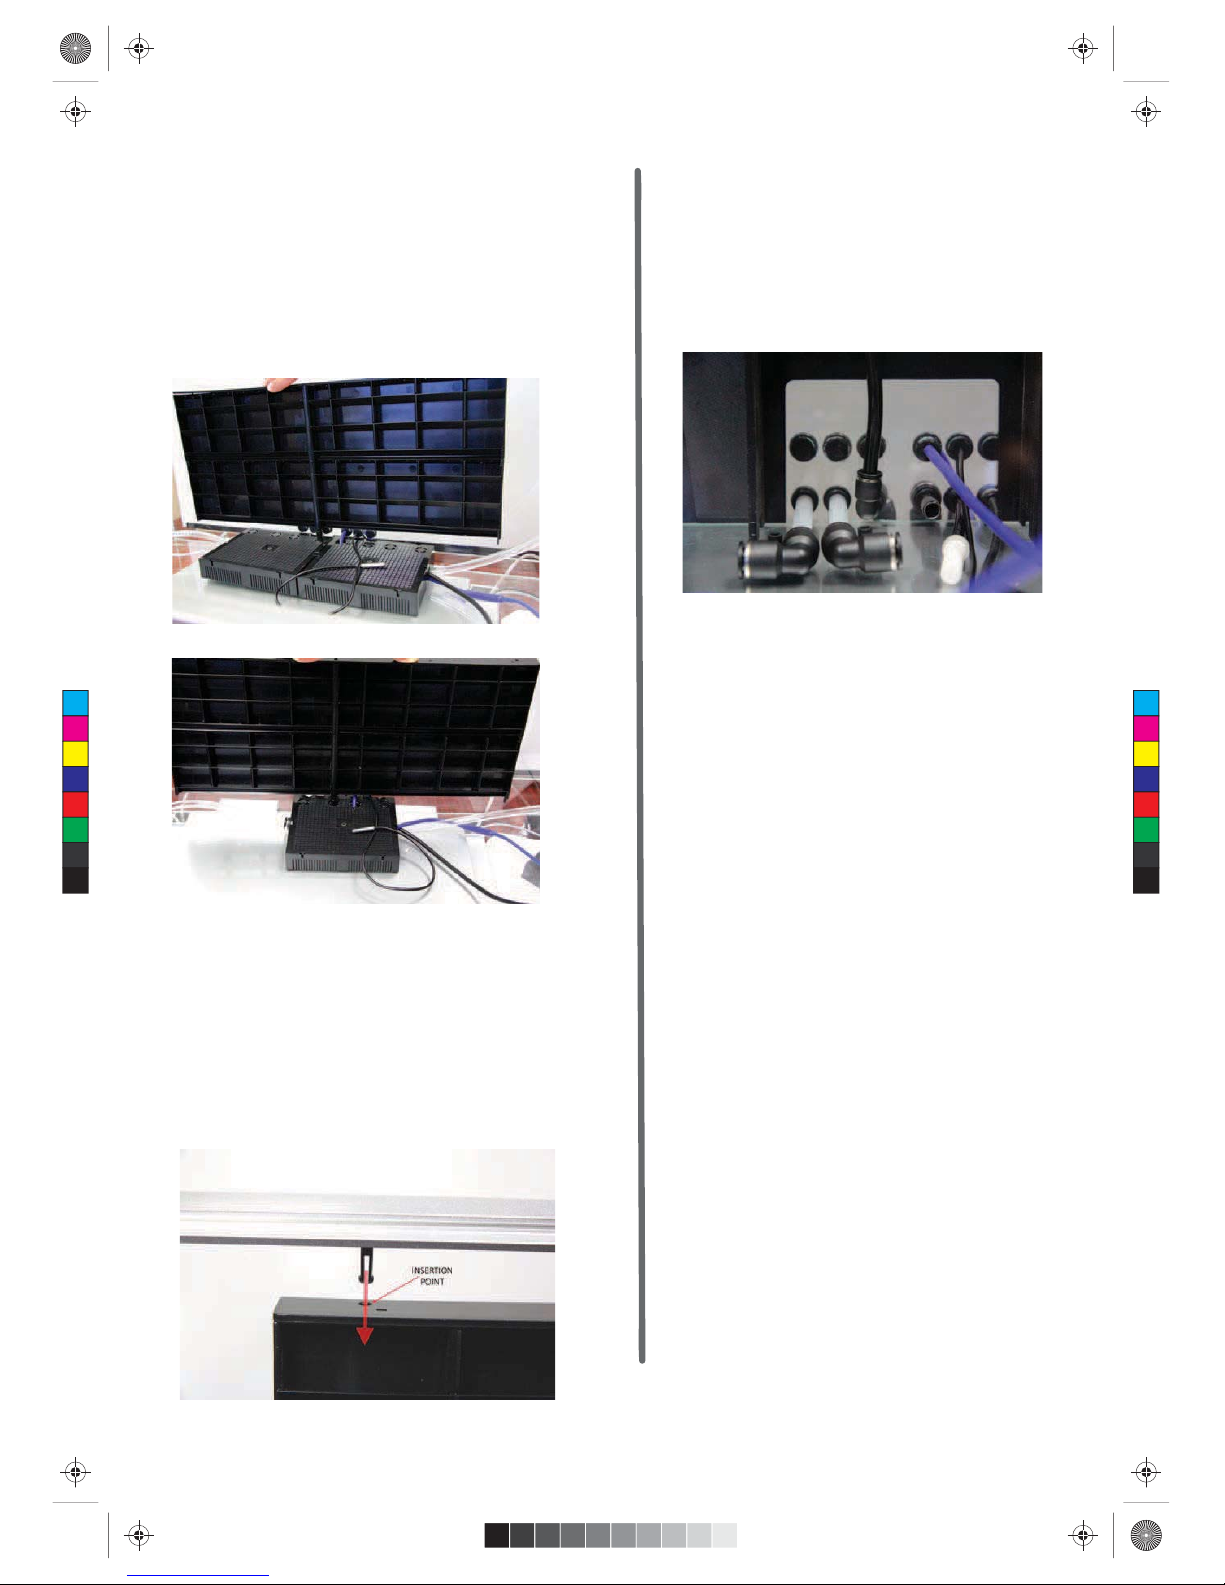
+F7B
"@AD67DFAE75GD7F:7>;H;@9I3>>;@B>357;F?GEF@AI
47BGE:76435=A@FAF:7435=9>3EE3@6;@E7DF76
;@FAF:7>;H;@9I3>>5A@@75FADEBD7H;AGE>K;@EF3>>76;@
EF7B,:;EEF7B;E;DD7H7DE;4>7EA;F?GEF476A@7
BDAB7D>K;@F:7ODEF3FF7?BF7EGD7FA5A@@75F4AF:
E;67E9AA6I3KFA3BBDA35:F:;E;EFA>;9:F>K47@6
F:7>;H;@9I3>>5A@@75FADE8ADI3D6FA?77FF:7AB7@
;@9A8F:7FABA8F:7;@E7DF;A@BA;@F3E;F;EF;BB76
435=
;9
+F7B
CG3CG3""A@>KA@@75F;@9F:7>;H;@9I3>>8AD
F:7CG33@6F:7CG3"";E@73D>K;67@F;53>FAF:7
'@7,7DD3 D3@6,:7?3;@6;T7D7@5747;@9F:3F
F:7>;H;@9I3>>;E:;9:7D3@6;FOFE6;D75F>KA@FABA8
F:743E7EF:3F3D7BDAH;6768ADF:7CG33@6F:7
CG3"",:7@7JFO9GD7E;E3@7J3?B>7A8F:7>;H;@9
I3>>FG475A@@75F76;@F:7CG3
;9CG3>;H;@9I3>>FG475A@@75F76;@FA($#
-:743E;5;@;F;3>;@@7DF3@=E7FGBA8F:7
(@7-7DD3CG3"";E@AI5A?B>7F7
-:7D73D7387I?AD7EF7BE8ADF:7
CG3
)397
C
M
Y
CM
MY
CY
CMY
K
Biopod Setup Guide Large.pdf 20 2016-12-27 11:47 PM
This manual suits for next models
3
Table of contents


