manuals.online logo
Brands
  1. Home
  2. •
  3. Brands
  4. •
  5. Weather Guard
  6. •
  7. Other
  8. •
  9. Weather Guard 350-3-01 User manual

Weather Guard 350-3-01 User manual

ATTENTION: PLEASE READ AND UNDERSTAND ALL INSTRUCTIONS AND WARNINGS
BEFORE ASSEMBLING, INSTALLING OR USING THIS PRODUCT.
TRUCK STORAGE SOLUTIONS
SECURING YOUR REPUTATION®
©2015 KNAACK LLC
INSTALLATION MANUAL
STEEL & ALUMINUM SIDE BOX WITH
PACK RAT®DRAWER UNITS
NOTICE
MODELS
DANGER
Use specic aluminum upt components when installing WEATHER GUARD®
products to aluminum truck beds. Follow additional instructions if mounting
to an aluminum truck bed. There may be left over components depending on
upt.
Any modication or unintended use of this product shall immediately void all
manufacturers warranties. Manufacturer disclaims all liability for injuries to
persons or property resulting from any modication to, or unintended use of
this product.
Danger of explosion. Do not use this product for storing or transporting am-
mables, explosives, hazardous materials, or hazardous waste, such as contain-
ers of gasoline, solvents, gun powder, dynamite, propane tanks, acetylene
tanks and cutting torches. This product is only intended and safe for use in
storing and transporting small tools, equipment and other similar materials.
Any modications made to, or unintended use of this product, could create a
hazardous condition that can cause death, serious personal injury or property
damage.
WARNING
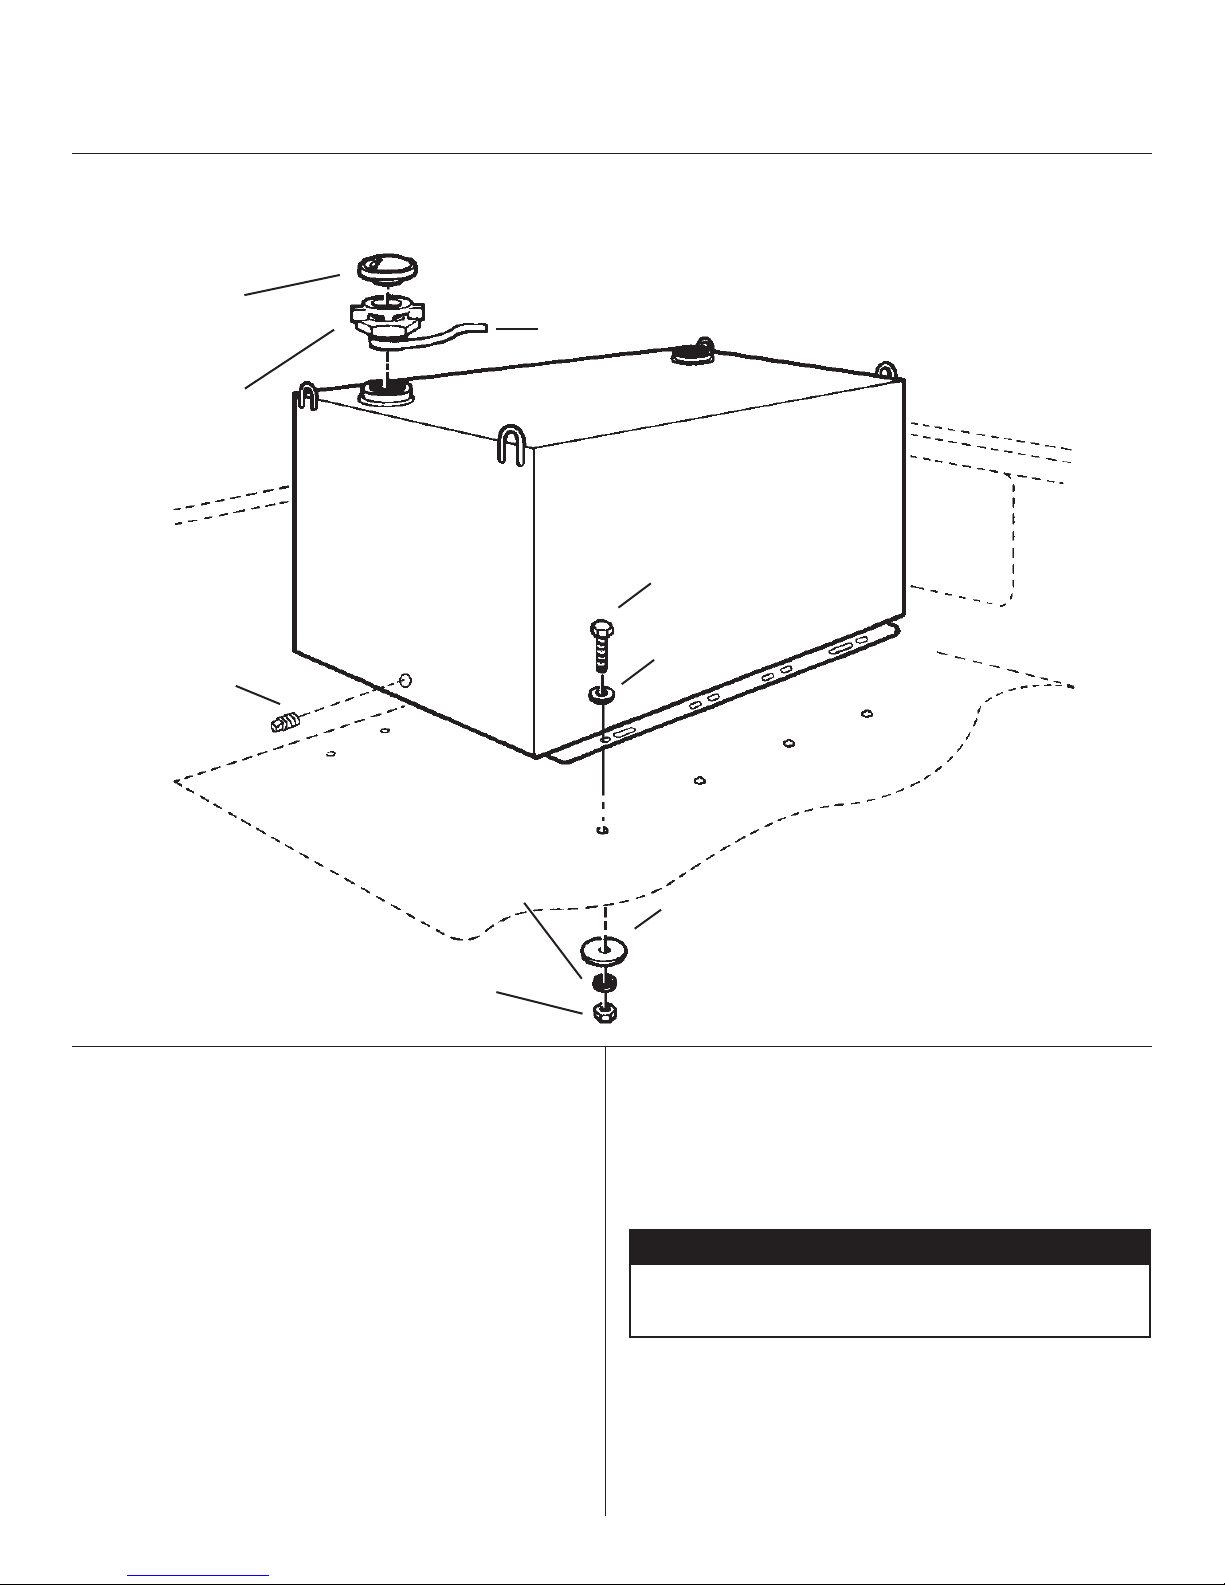
Prior to drilling, so as not to cut or puncture fuel tanks, fuel lines, electric
wires, etc., check under vehicle for locations. All oor mounting bolts near the
gas tank area should be installed from the underside of the vehicle, to guard
against the gas tank being punctured in the event of a collision. This would
mean not using Blind Fastener in this area. Holes drilled in this area should be
3/8".
CAUTION
Transfer tank bottom must be fully supported by the oor of the truck bed so
as not to cause exing of the tank which could cause stress cracks and leak-
age of the tank. To keep debris out of your eyes when checking the underside
of the vehicle, or when drilling, always wear protective eyewear.
TRANSFER TANKS
Note: X represents the color code for your model: 3 = White | 5 = Black
350-X-01, 351-X-01, 352-X-01, 354-X-01, 357-X-01, 358-X-01, 359-X-01, 360-X-01
©2015 KNAACK LLC
2
TOOLS REQUIRED
PARTS LIST
(8) 3/8-16 x 1-1/2"
Hex Head Bolt
(8) 3/8-16
Hex Nut
(8) 3/8"
Flat Washer
(8) 3/8"
Lock Washer
(8) 3/8"
Body Washer
(1) 1/4"
Drain Plug (6) Floor Mounting Spacer (1) Filler Cap (1) Filler Cap Neck
ALUMINUM BED UPFIT KIT PARTS LIST - 32-0245
• Pipe Wrench
• Open or Box End Wrench - (2) 9/16"
• Electric Drill
• Bits: 716"
• Pipe Tape
DANGER
Use of ammables in this transfer tank may cause an explosion,
resulting in serious bodily injury, death, or property damage.
To avoid such risk:
DO NOT use this transfer tank to transport, transfer or store
ammables, such as gasoline.
DO NOT use this transfer tank as an auxiliary fuel tank by connecting it
to an existing fuel system.
DO NOT use this transfer tank for fueling aircraft.
DO NOT modify this transfer tank in any way or use it for any purpose
other than its intended use.
DO use this transfer tank only for the transport, transfer or storage of
diesel fuel only.
DO use this transfer tank only in fueling land-based motor vehicles and
equipment.
DO vent this transfer tank at all times to allow for fuel expansion and to
prevent vacuum during uid or fuel removal.
Note: This transfer tank does not comply with the following specications:
• Title 49 of the Code of Federal Regulations for the interstate transfer of ammables, explosives, hazardous materials and hazardous wastes.
• Underwriters’ Laboratories of Canada C142.13 requirements for transportation of ammables and combustible liquids.
These tanks may also be subject to individual state or province regulations, compliance with which is the responsibility of the owner.
Future Tank Removal: Empty all of the combustible liquid and use all lifting hooks for safe and controlled removal of transfer tank from the vehicle.
Danger of explosion. Do not drill, grind, saw, weld or use a torch on this
product. Doing so could result in serious injury, death or property damage.
(1)
Zinc Rich Primer
(8) 7/16" x 1-1/2"
Plastic Washer
3/8"- 6
Hex Nut
STEP 1
STEP 2 STEP 3
Installing the Transfer Tank
Install drain plug into drain hole.
Mark and Drill the Holes
Center the tank evenly between the bed sides and mark
eight mounting holes. For the “L” shaped tanks, mark
both holes of the side mounting angles, as well as four
evenly spaced holes of the longer front mounting angle.
For the Model 358, mark four holes evenly spaced in
each mounting angle.
Remove the tank and drill the marked hole locations
with a 7/16" drill bit.
• If any drilled holes fall between the ribs on
the lower part of the oor, it will be necessary
to use oor spacers between the tank mount-
ing angle and the oor.
Secure the Tank
1/4"
Drain Plug with
Pipe Tape
Pipe Tape
Vented Fuel Cap
Filler Cap Neck
3/8"
Flat Washer
3/8"
Lock Washer 3/8"
Body Washer
3/8-16 x 1-1/2"
Hex Head Bolt
INSTALLATION INSTRUCTIONS
Note: If your truck bed is constructed of aluminum, use zinc rich primer to coat drilled holes.
Note:
Note:Note:
• When installing model 352 Transfer Tank with a 27" tool
box in a full size short bed pickup, the Tank will need to
be mounted with ller openings toward center of the bed
to avoid tool box hitting wheel wells. Except full size short
wheel base Dodge pickup, where a 27" wide box will not t.
Use one 7/16 x 1-1/2" plastic washer as a barrier between the
heavy at washer and the truck bed.
ALUMINUM TRUCK BED INSTALLATION:
Before installing ller cap neck, wrap threaded end with
pipe tape. Do not use liquid or paste plumber’s pipe dope.
Install the ller cap neck, using a pipe wrench to tighten.
Install vented fuel cap.
Replace tank and bolt securely.
• Use pipe tape when using a manual or electric
transfer pump on the tank. Transfer tank and pump
must be grounded to prevent static charge build-up.

This manual suits for next models

15

Popular Other manuals by other brands

Fagor MZ-80V manual

Fagor

Fagor MZ-80V manual

Sunex HD 4912DAH owner's manual

Sunex HD

Sunex HD 4912DAH owner's manual

Jacuzzi Mynima 80 Sphere TT Instructions for preinstallation

Jacuzzi

Jacuzzi Mynima 80 Sphere TT Instructions for preinstallation

Nokia N70 Music Edition user guide

Nokia

Nokia N70 Music Edition user guide

Skutt Scarab XL operating manual

Skutt

Skutt Scarab XL operating manual

Enerwave ZWN-RSM1S installation instructions

Enerwave

Enerwave ZWN-RSM1S installation instructions

Sicor SG70 Operation and maintenance manual

Sicor

Sicor SG70 Operation and maintenance manual

Logik L16DHW10 instruction manual

Logik

Logik L16DHW10 instruction manual

Tetra AquaArt Explorer Line 60 l operating instructions

Tetra

Tetra AquaArt Explorer Line 60 l operating instructions

Craftwell CUT'N'BOSS user manual

Craftwell

Craftwell CUT'N'BOSS user manual

Tronic ION Refresher KH 217 instructions

Tronic

Tronic ION Refresher KH 217 instructions

Oase FiltoSmart 100 operating instructions

Oase

Oase FiltoSmart 100 operating instructions

Panasonic PVD4742 - DVD/VCR DECK operating instructions

Panasonic

Panasonic PVD4742 - DVD/VCR DECK operating instructions

SKINERA SA-200 Instructions for use

SKINERA

SKINERA SA-200 Instructions for use

PRESIDENT EP1295992 installation instructions

PRESIDENT

PRESIDENT EP1295992 installation instructions

enSkate Fiboard instruction manual

enSkate

enSkate Fiboard instruction manual

Hussmann Remote Alarm install guide

Hussmann

Hussmann Remote Alarm install guide

Marshall Amplification Major III Bluetooth - on ear user manual

Marshall Amplification

Marshall Amplification Major III Bluetooth - on ear user manual

manuals.online logo
manuals.online logoBrands
  • About & Mission
  • Contact us
  • Privacy Policy
  • Terms and Conditions

Copyright 2025 Manuals.Online. All Rights Reserved.