Biosan MPS-1 User manual

MPS-1
High-Speed Multi Plate
Shaker
for version
V.2A01
Operating Manual
Certificate
Medical–Biological
Research & Technologies


Contents
1. Safety Precautions
2. General Information
3. Getting Started
4. Operation
5. Specifications
6. How to choose the right mode for mixing
7. Maintenance
8. Warranty and Claims
9. Declaration of Conformity
Page 3

1. Safety precautions
The following symbol means:
Caution! Make sure you have fully read and understood the present
Manual before using the equipment. Please pay special
attention to sections marked by this symbol.
GENERAL SAFETY
·Use only as specified in the operating manual provided.
·The unit should not be used if dropped or damaged.
·The unit must be stored and transported in a horizontal position (see
package label).
·After transportation or storage keep the unit at room temperature for 2–3 hrs
before connecting it to the electric circuit.
·Use only cleaning and decontamination methods recommended by the
manufacturer.
·Do not make modifications to the design of the unit.
ELECTRICAL SAFETY
·Connect only to a power supply with voltage corresponding to that on the
serial number label.
·Use only the external power supply unit provided with this product.
·Ensure that the power switch and external power supply connector are
easily accessible during use.
·Disconnect the unit from the electric circuit before moving.
·Turn off the unit by disconnecting the external power supply from the power
socket.
·If liquid penetrates into the unit, disconnect it from the external power supply
unit and have it checked by a repair and maintenance technician.
·Do not operate the unit in premises where condensation can form. Operating
conditions of the unit are defined in the Specifications section.
Page 4

DURING OPERATION
·Do not impede the platform motion.
·Do not operate the unit in environments with aggressive or explosive
chemical mixtures. Please contact manufacturer for possibility of operation of
the unit in specific atmosphere.
·Do not operate the unit if it is faulty or has been installed incorrectly.
·Do not use outside laboratory rooms.
·Do not place a load exceeding the maximum load value mentioned in the
Specifications section of this manual.
BIOLOGICAL SAFETY
·It is the user's responsibility to carry out appropriate decontamination if
hazardous material is split on or penetrates into the equipment.
Page 5

2. General Information
MPS-1, High–Speed Multi Plate Shaker for small volumes provides
adjustable mixing of reagents in microplates, PCR plates, deepwell plates and test
tubes from 0.2 to 2 ml. MPS-1, also, features a vortex function – vortex head is
integrated into the platform holder. Vortex function is available for single test tube
from 0.5 to 50 ml.
The Shaker is compact, user-friendly and ideal for personal use. MPS-1 can be
used in a wide range of applications, including DNA/RNA isolation and further sample
preparation, pellet resuspension, ELISA.
MPS-1 High–Speed Multi Plate Shaker has 5 preprogrammed mixing
modes:
1. SOFT 1000 rpm
2. MEDIUM 1800 rpm
3. HARD 2600 rpm
4. TUBE VORTEX 3200 rpm
5. CUSTOM adjustable from 300 to 3200 rpm (increment of 100 rpm)
Please see our recommendations - How to choose the right mode for mixing of
different types of plates, microtubes and strips in Paragraph 6.
MPS-1 High–Speed Multi Plate Shaker provides:
• Pulse mode - featuring a series of 3 second pulses, each increasing linearly in
rpm until the set speed is reached. Activated by a separate key on the front
panel, this motion is repeated until the timer stops. This mode provides a
constant state of resuspension of particles, as the acceleration is constantly
changing.
• Universal platform holder - accommodating microplates, PCR plates (skirted)
and deepwell plates. Four easily interchangeable additional platforms are also
available for semi-/unskirted PCR plates, 0.2ml test tubes and trips and
0.5ml/2ml test tubes.
• Digital timer - can be set from 15 seconds to 60 minutes, unit will stop
automatically after set time has elapsed.
• Multi-function - combines shaking and vortexing function all in one unit!
Page 6
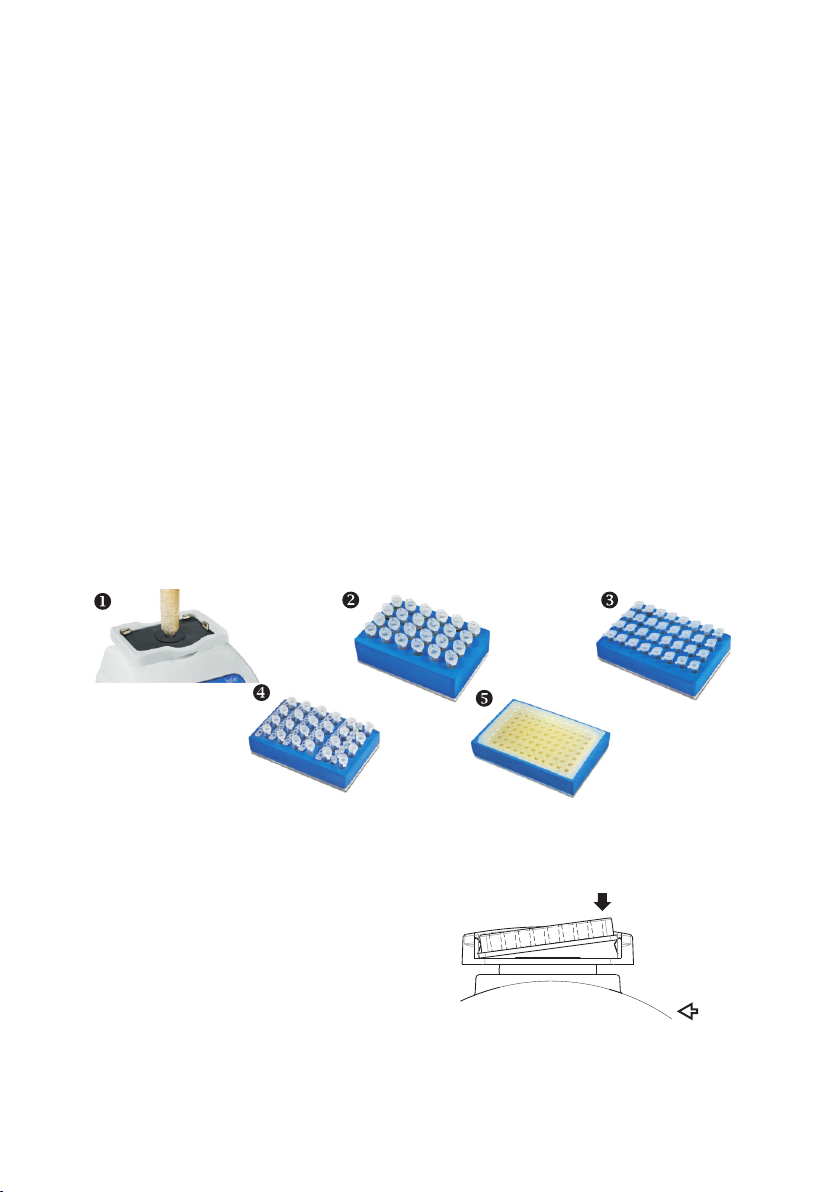
Fig.1 Platform or plate installation
FRONT
3. Getting started
3.1. Unpacking.
Remove packaging materials carefully and retain them for future shipment or
storage of the unit. Examine the unit carefully for any damage incurred during
transit. The warranty does not cover in-transit damage.
3.2. Complete set. Package contents:
Standard set
·MPS-1 High–Speed Multi Plate Shaker
with universal platform/plate holder u.................................................1 piece
·external power supply unit ....................................................................1 piece
·Operating Manual; Certificate ................................................................1 copy
Optional accessories
·platform P-2/24 for 24 tubes 1.5–2 ml v...........................................on request
·platform P-05/32 for 32 tubes 0.5 ml w.............................................on request
·platform P-02/05 for 24 tubes 0.5 ml and 48 tubes 0.2 ml x...............on request
·platform P-02/96 for 96 tubes 0.2 ml
or semi-/unskirted PCR plate y......................................................on request
Page 7
3.3. Set up:
place the unit on the horizontal even working surface;
plug the external power supply unit into the 12 V socket at the rear side of the
unit.
3.4. Platform or plate installation:
Install the platform or plate by
inserting it in the universal
platform/plate holder (Fig.1).
·
·

4. Operation
Recommendations during operation
Caution! Please check the tubes/plates before using, be sure that they
are properly sealed. Unsealed tubes or plates may spill the
contents during operation causing potential health risks when
working with infected material.
It is recommended to fill the test tubes/plate wells up to 75% of the maximum fill
volume for efficient mixing.
4.1. Connect the external power supply unit to electric circuit and turn ON the power
switch located on the rear panel of the unit (position I).
4.2. Place the plate or optional platform on the universal platform/plate holder and
push it inside firmly (Fig. 1). Insert the tubes into the sockets of the optional
platform.
Caution! Before mixing it is recommended to use CUSTOM mode
(adjustable speed) in order to determine the optimum
efficiency. Do not use HARD and TUBE VORTEX modes for
tube platforms/deepwell plates.
4.3. Using the Mode key (Fig. 2/3) set the required working mode (CUSTOM, SOFT,
MEDIUM, HARD, TUBE VORTEX). Operation in SOFT, MEDIUM, HARD,
TUBE VORTEX modes differ from CUSTOM mode with a fixed, non-adjustable
speed value (see point 5.2).
·
Fig. 2 Control panel
MPS-1
STOP CUSTOM 000
3200
00:00
13
Pulse
Mode
Key
2 4 5
Page 8

Operation in CUSTOM, SOFT, MEDIUM, HARD, TUBE VORTEX modes
4.4. Set the required working time interval in minutes and seconds (the increment is
15 s) using the p and q Time keys (Fig. 2/2). Pressing the key for more than 3 s
will increase the increment. The set time is displayed in the upper line of the
display.
4.5. Set the required speed (the increment is 100 rpm) in CUSTOM mode using the
p and q RPM keys (Fig. 2/5). Pressing the key for more than 3 s will increase
the increment. The set speed is displayed in the upper line of the display.
Note: Shaking speed may be adjusted in CUSTOM mode during
platform rotation using the p and q RPM keys.
4.6. Press the Start Stop key (fig. 2/4). The platform will start motion (indication
“RUN”) and the timer indicator will start counting down the time interval in the
upper line of the display.
4.7. After finishing the program (after the set time elapses) the platform motion will
stop and the flashing indication "STOP" will appear in the lower line of the
display, accompanied by one short (set time less than 1 min) or repetitive sound
signal (set time greater than 1 min). Press the Start Stop key to turn off the
signal.
4.8. The unit can be stopped before the set time elapses if necessary by pressing
the Start Stop key. The Time indicator will show the set time interval. Press the
Start Stop key to repeat the operation with the same working time and speed.
4.9. If the working time is set to zero and the display shows “00:00”, pressing the
Start Stop key will start continuous operation of the unit until the Start Stop key
is pressed.
Page 9

Operation in PULSE mode
4.10. Set the required operation parameters, time and mixing mode.
4.11. Set the required speed (the increment is 100 rpm) using the p and q RPM
keys (fig. 2/5). Pressing the key for more than 3 s will increase the increment.
The set speed is displayed in the upper line of the display.
Note: Shaking speed may be adjusted during platform rotation using
the p and q RPM keys.
4.12. Press the Pulse Mode Key (fig. 2/1). The platform will start the following cycle:
acceleration – short mixing (duration 3 s) – slowdown, (“ “ indication) and
the timer indicator will start counting down the time interval in the upper line of
the display.
4.13. After finishing the program (after the set time elapses) the platform motion will
stop and the flashing indication "STOP" will appear in the lower line of the
display, accompanied by one short (set time less than 1 min) or repetitive sound
signal (set time greater than 1 min). Press the Start Stop key to turn off the
signal.
4.14. The unit can be stopped before the set time elapses if necessary by pressing
the Start Stop key, the platform motion will stop and the reading will flash
"STOP" in the lower line of the display.
4.15. If the working time is set to zero and the display shows “00:00”, pressing the
Pulse Mode Key will start continuous pulsating operation of the unit until the
Pulse Mode Key or Start Stop key is pressed.
4.16. After finishing the operation, turn the unit off using the power switch at the rear
panel (position O) and disconnect the external power supply unit from electric
circuit.
Page 10

5.Specifications
The unit is designed for operation in cold rooms, incubators and closed
laboratory rooms at ambient temperature from +4°C to +40°C in a non-condensing
atmosphere and maximum relative humidity 80% for temperatures up to 31°C
decreasing linearly to 50% relative humidity at 40°C.
5.1. Speed control range (CUSTOM) ...........300–3200 rpm (increment of 100 rpm)
5.2. Types of shaking preset modes (fixed speed)
TUBE VORTEX ...............................................................................3200 rpm
HARD ..............................................................................................2600 rpm
MEDIUM ..........................................................................................1800 rpm
SOFT ...............................................................................................1000 rpm
5.3. Pulse mode provides a series of pulses with linear increase of rpm to the set
speed, holds it for 3 seconds and then stops for a moment. This motion is
repeated until the timer stops. This method provides a constant state of
resuspension of particles inside a tube, as the acceleration is always changing.
5.4. Tube volume for vortexing ....................................................from 0.5 to 50 ml
5.5. Maximum mixing tube volume ................................................................30 ml
5.6. Maximum load .......................................................................................0.3 kg
5.7. Orbit .......................................................................................................3 mm
5.8. Acceleration time until max. speed ........................................................5 sec
5.9. Digital time setting .........................0–60 min (increment of 15 s) or non-stop
5.10. Noise level, max ..................................................................................65 dBA
5.11. Maximum continuous operation time ......................................................8 hrs
5.12. Dimensions ........................................................................225x215x150 mm
5.13. Input current/power consumption ...................................12 V, 800 mA / 10 W
5.14. External power supply unit .....input AC 100-240 V 50/60 Hz output DC 12 V
5.15. Weight* .................................................................................................5.1 kg
* Accurate within ±10%.
Page 11

Biosan is committed to a continuous programme of improvement and reserves
the right to alter design and specifications of the equipment without additional notice.
Page 12
DescriptionOptional
platforms
Catalogue
number
platform for 24 tubes 1.5–2 ml
P-2/24 BS-010216-AK
platform for 32 tubes 0.5 ml
P-05/32 BS-010216-AK
platform for 96 tubes 0.2 ml or semi-
/unskirted PCR plate
P-02/96 BS-010216-CK
platform for 24 tubes 0.5 ml and
48 tubes 0.2 ml
P-02/05 BS-010216-DK
DescriptionPlatform
Vortex head with 1,5 mm eccentric, holder for microtest plate
(U, V or flat-bottomed), PCR plate (96-wells, 384-wells, fully-
skirted) or Deep well plate (250, 500,1000, 2000 μl)
Universal platform
holder

6. How to choose the right mode of mixing
6.1. Before mixing it is recommended to use CUSTOM mode (adjustable speed) in
order to determine the optimum efficiency.
Caution! Do not use HARD and TUBE VORTEX modes for tube
platforms/deep well plates.
6.2. The available standard mixing modes for different platform/plate combinations
are given in the table below.
– Efficient mixing
– Not recommended (increased sound level)
– N/A
Page 13
Platforms / Preset mode (1000 rpm) (1800 )rpm (2600 )rpm
Deep well plate (full)
Height 44 mm, 2000 µl
Deep well plate (full)
Height 29 mm, 500 µl
Immunoplates (full)
Height 15 mm, 300 µl
PCR plate skirted (full)
Height 15 mm, 200 µl
Platform Р-2/24
24 x 2 ml (1.5 ml)
Platform Р-05/32
32 x 0.5 ml (full)
Platform Р-02/05
24 x 0.5 and 48 x 0.2 ml (full)
Platform P-02/96+strips/ PCR plate
96 x 0.2 ml (full)
SOFT MEDIUM HARD
Tubes*, ml / Preset
mode
0.5
1.5
2.0
15
50
TUBE VORTEX
(3200 rpm)
* It is recommended that test tubes
are filled up to 75% of the maximum
volume for optimum mixing.

7. Maintenance
7.1. If the unit requires maintenance, disconnect the unit from the mains and contact
Biosan or your local Biosan representative.
7.2. All maintenance and repair operations must be performed only by qualified and
specially trained personnel.
7.3. Standard ethanol (75%) or other cleaning agents recommended for cleaning of
laboratory equipment can be used for cleaning and decontamination of the unit.
8. Warranty and Claims
8.1. The Manufacturer guarantees the compliance of the unit with the requirements
of Specifications, provided the Customer follows the operation, storage and
transportation instructions.
8.2. The warranted service life of the unit from the date of its delivery to the
Customer is 24 months. Contact your local distributor to check availability of
extended warranty.
8.3. If any manufacturing defects are discovered by the Customer, an
unsatisfactory equipment claim shall be compiled, certified and sent to the local
distributor address. Please visit www.biosan.lv, Technical support section to
obtain the claim form.
8.4. The following information will be required in the event that warranty or post-
warranty service comes necessary. Complete and retain for your records.
Page 14
MPS-1 High–Speed Multi Plate Shaker
Model
Serial number
Date of sale

9. Declaration of Conformity
Version 2.01 – July 2014
Page 15

Other manuals for MPS-1
1
Table of contents
Other Biosan Paint Sprayer manuals


