Bitron Video AV2010/34 User manual

TECHNICAL INFORMATION & SUPPORT
CHARACTERISTICS
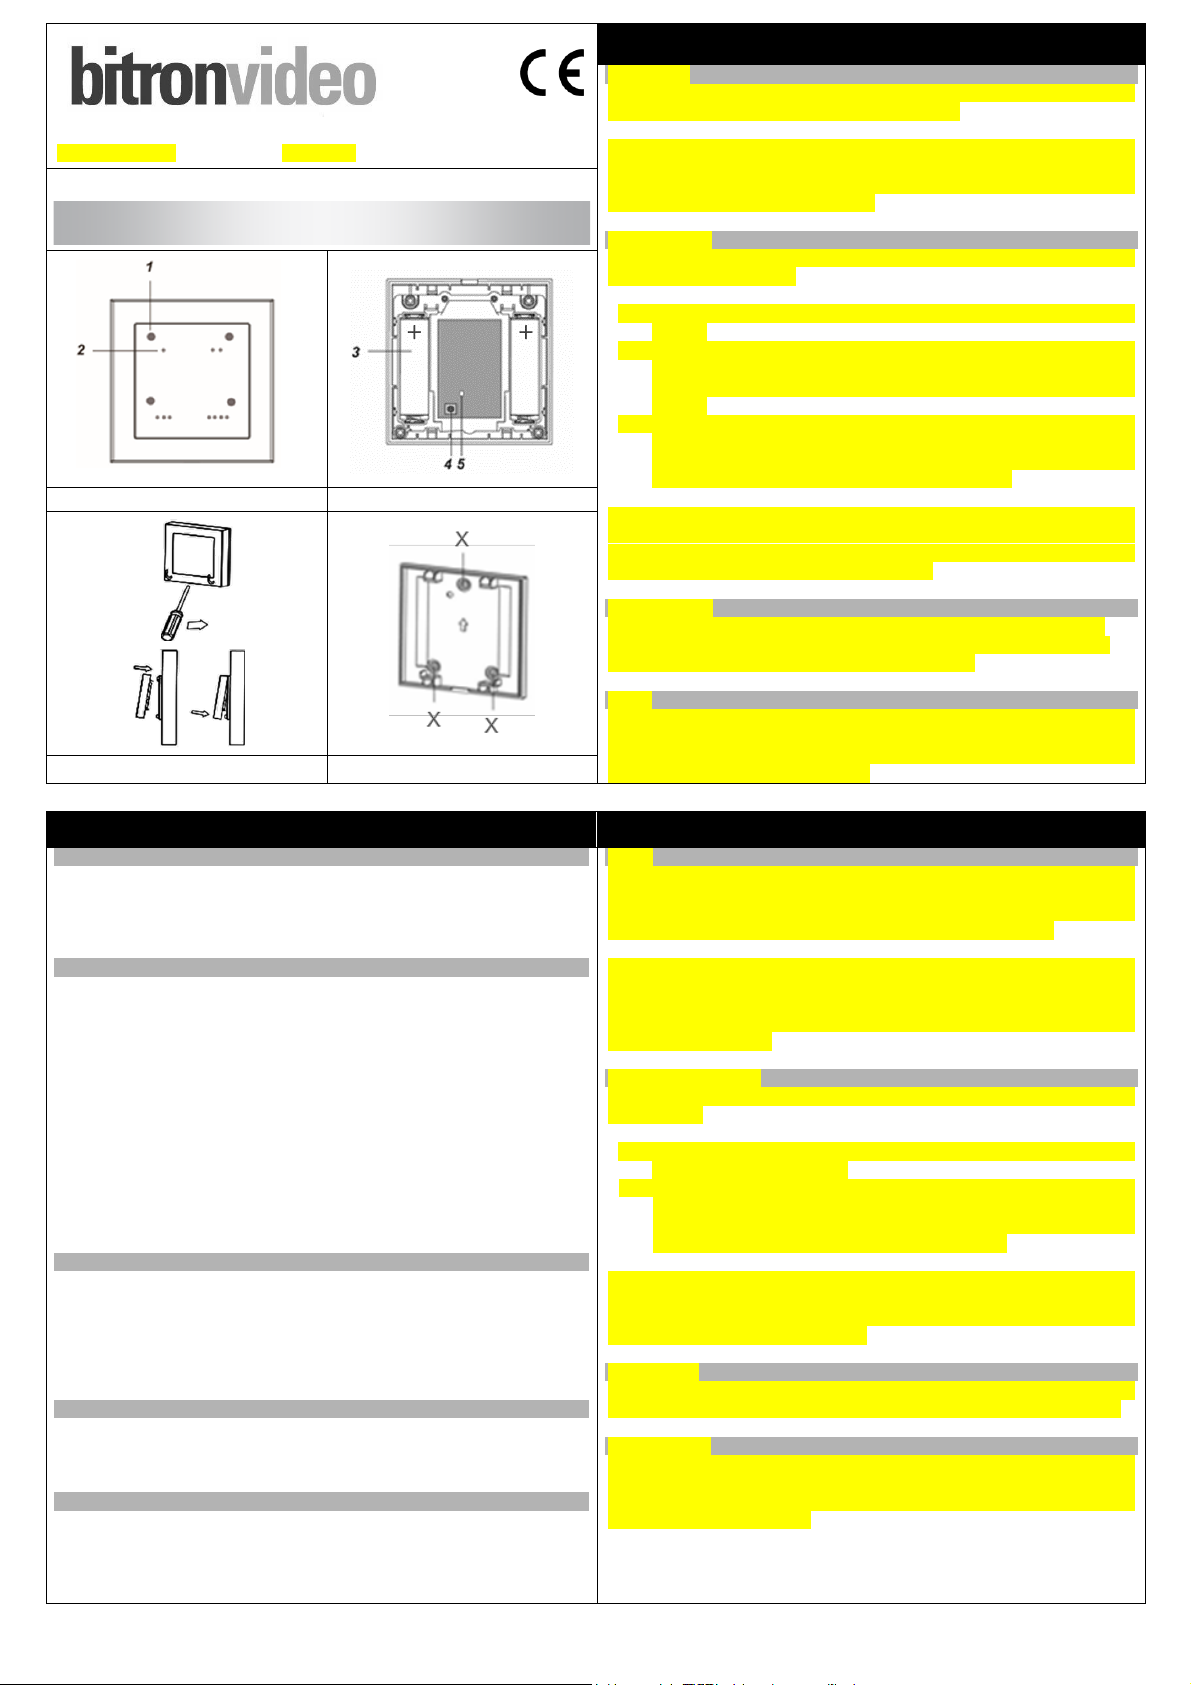
Four button wall switch with optical and acoustic feedback
• Radio system................. ZigBee Home Automation 1.2 - 2.4 GHz
• Encrypted communication, regular connectivity test, battery warning
•Power supply ................. 2x Alkaline type AA batteries
• Battery lifetime............... ca 3 years depending on usage profile
• Operating temperature .. -10 - to 45°C
• Humidity......................... Up to 85% non-condensing
• Dimensions .................... 84 x 84 x 18 mm
In order to use this product with QIVICON, make sure that your home base
supports ZigBee. You may need a QIVICON ZigBee radio dongle.
Für die Verwendung dieses Produkts mit QIVICON überprüfen Sie bitte, ob
Ihre Home Base den ZigBee Funkstandard unterstützt. Möglicherweise
benötigen Sie einen QIVICON ZigBee Funkstick.
SUPPORT
Please visit http://support.bitronvideo.eu
for further information about the product and local support contacts.
DECLARATION OF CONFORMITY TO DIRECTIVE 1999/5/EC
Hereby Bitron Video s.r.l., declares that the Movement Sensor mod.
AV2010/34 is in compliance with the essential requirements and other
relevant provisions of Directive 1999/5/EC. You may download the
declaration of conformity at support.bitronvideo.eu or request a copy
through our support.
MANUFACTURER
BITRON VIDEO
Bitron Video s.r.l.
Via Cimarosa 39 –10154 Torino Italy
www.bitronvideo.eu –info@bitronvideo.eu
Subject to modifications and mistakes.
DS902010-002C
LBT90352
MADE IN TAIWAN
ENGLISH
DEUTSCH
MOUNTING
The wall switch can be installed using the screws or double adhesive tape.
As an alternative, also the mobile use without fixed installation is possible,
e.g. by placing the device on a table. For fixed installation, please use the
bore holes indicated by the “X”in fig. 4.
SET-UP
This step requires that you have a QIVICON Home Base equipped with a
ZigBee radio module.
1. Open the cover as shown in fig. 3a and make sure that batteries are
correctly mounted according to the polarity indicated.
2. Follow the indications for the addition of new devices of the
installation wizard, which can be found in the app or in the web
interface of your QIVICON system. For further information on the
registration process, please consult http://support.bitronvideo.eu.
If you wish to associate the device to a different home base, it is sufficient
to repeat the procedure of your system for the addition of new devices. Once
successfully concluded the installation process, the sensor will not
communicate with the system, to which it has been previously registered,
anymore.
OPERATION
After paring the wall switch with the smart home system, you can activate
the 4 function keys (fig. 1.2) by touching. In case of a successful
transmission of the command to the home base, the LED close to the key
(fig. 1.1) will light up once. In case of error, e.g. no registration or homebase
out of range, it will light up twice. In addition to the optical feedback the
device will also beep either once (OK) or twice (error).
MAINTENANCE
In or install or replace the batteries, open the device cover as shown in fig.
3a using a flat screwdriver. Now insert the type AA 1.5V batteries according
to the indicated polarity (fig. 2). Close the covers as shown in fid. 3b. You
do not need to repeat paring after changing the battery.
SUPPORT
In case of connection problems, we advise to use smart plugs in order to
increase the range of the ZigBee radio network. For further information and
for product support, please consult http://support.bitronvideo.eu.
MONTAGE
Sie können Wandtaster per Schrauben oder doppelseitigem Klebeband
direkt an der Wand befestigen. Alternativ können Sie das Gerät auch ohne
feste Installation verwenden, z.B. indem Sie es auf einen Tisch legen. Zur
festen Installation verwenden Sie bitte die in Abb.4 mit „X“
gekennzeichneten Bohrlöcher.
INBETRIEBNAHME
Dieser Schritt setzt voraus, dass Sie über eine mit einem ZigBee
Funkmodul ausgestattete QIVICON Home Base verfügen.
1. Öffnen Sie die Abdeckung wie in Abb. 3a dargestellt und stellen Sie
sicher, dass die Batterien entsprechen der Polarität eingelegt sind.
2. Folgen Sie den Anweisungen des Verbindungsassistenten zum
Hinzufügen neuer Geräte, der sich in der App oder Weboberfläche
Ihres QIVICON Systems befindet. Weitere Informationen zum
Registrierungsprozess finden Sie unter http://support.bitronvideo.eu.
Zur Verwendung des Wandschalters an einer anderen Home Base ist es
ausreichend, die Prozedur zum Hinzufügen neuer Geräte Ihres Systems zu
befolgen. Sobald der Installationsprozess erfolgreich abgeschlossen
wurde, wird sich der Sensor nicht mehr mit dem System, an dem er zuvor
registriert war, verbinden.
BETRIEB
Nachdem der Wandschalter erfolgreich an Ihrem Smart Home System
angemeldet wurde, können Sie die 4 Funktionstasten (Abb 1.2) durch
Berühren aktivieren. Bei erfolgreicher Übermittlung des Kommandos an die
Home Base leuchtet die LED in der Nähe der Taste (Abb. 1.1) einmal auf,
bei Fehlern, z.B. keine Registrierung oder Home Base außerhalb der
Funkreichweite 2 Mal. Parallel zur optischen Bestätigung werden 1 oder 2
Signaltöne wiedergegeben.
WARTUNG
Zum Einlegen und zum Austausch der Batterien öffnen Sie die Abdeckung
mit in Abb.3a dargestellt mit einem flachen Schraubenzieher. Legen Siedie
Batterien des Typs AA 1,5V entsprechend der Polarität ein (Abb. 2).
Schließen Sie das Gehäuse wie in Abb. 3b dargestellt. Eine
Neuregistrierung des Sensors ist nicht erforderlich.
KUNDENDIENST
Bei Verbindungsproblemen empfehlen wir die Verwendung von Smart
Plugs zur Vergrößerung der Reichweite des ZigBee Funknetzes. Für
weitere Informationen und für Support zum Produkt besuchen Sie bitte
http://support.bitronvideo.eu.
AV2010/34
WALL SWITCH
QUICK START GUIDE
WANDSCHALTER
KURZBEDIENUNGSANLEITUNG
WANDSCHAKELAAR
QUICK START GUIDE
TASTO PARETE
GUIDA RAPIDA
INTERRUPTEUR MURAL
GUIDE DE DÉMARRAGE RAPIDE
DS902010-002C
LBT90352
MADE IN TAIWAN
NEDERLANDS
MONTAGE
Kan de bewegingssensor die zowel vlakke muren als set up bijvoegen.
Schroeven en pluggen bij de levering inbegrepen.
Zorg er voor de positionering van de sensor voor dat de sensor de te
monitoren zone volledig afdekt. Het wordt aanbevolen om dit uit te testen,
alvorens de definitieve montage te verrichten. De sensor heeft een bereik
van 10 meter met een hoek van 120°.
INSTALLATIE
Voor deze stap dient u te beschikken over een QIVICON Home Base met
ZigBee-draadloze module.
1. Verwijder de sensor van de base door te draaien en te trekken uit
(afb. 1).
2. Open het batterijcompartiment (afb. 2) en plaats de meegeleverde
batterij volgens de polariteit.Sluit hetbatterijvakje pas nasuccesvolle
voltooiing van de registratie is de functieknop nodig onder de cover
(afb. 3).
3. Volg de aanwijzingen van de installatiehulp voor het toevoegen van
nieuwe apparaten van de app of in de web-polige van uw QIVICON
systeem. Voor overige informatie over het registratieproces,
raadpleeg de website http://support.bitronvideo.eu.
Herhaal de registratieprocedure op het nieuwe systeem voor het gebruik
van een sensor met een andere Home Base. Als de installatieprocedure
met succes is afgesloten, zal de sensor niet langer communiceren met het
systeem waarin het eerder was geregistreerd.
ONDERHOUD
Open het batterijvak (fig. 1 en 2) voor het vervangen van de batterij en
vervang de batterij door een model van hetzelfde type (lithium CR123A
3V). Een herregistratie van de sensor is niet vereist.
HULP
In het geval van problemen in de verbinding raden we het gebruik aan van
een smartplug om het bereik van de ZigBee-radionetwerk te vergroten.
Voor overige informatie over het product en voor assistentie raadpleeg de
website http://support.bitronvideo.eu.
Fig. 1
Fig. 2
Fig. 3
Fig. 4
ITALIANO
FRANCAIS
MONTAGGIO
Il tasto parete può essere fissato con le viti in dotazione o tramite un
biadesivo. E’ possibile anche l’utilizzo mobile senza un montaggio fisso
appoggiando l’unità ad esempio su un tavolo. Per il montaggio fisso
utilizzate le guide per il trappano (fig. 4 “X”).
MESSA IN FUNZIONE
Per l’installazione è necessario disporre di unaQIVICON Home Base dotata
di un modulo radio ZigBee.
1. Apri il coperchio con un cacciavite a taglio come indicato in fig. 3a e
assicurati che batterie siano inserite rispettando la polarità.
2. Seguire le indicazioni dell’assistente d’installazione per l’aggiunta di
nuovi dispositivi all’interno dell’app o dell’interfaccia web del vostro
sistema QIVICON. Per ulteriori informazioni sul processo di
registrazione consultare il sito http://support.bitronvideo.eu.
Per utilizzare il tasto parete con un'altra Home Base è sufficiente ripetere la
procedura di registrazione sul nuovo sistema. Una volta conclusa con
successo la nuova installazione, il sensore non comunicherà più con il
sistema su cui era stato registrato precedentemente.
UTILIZZO
Dopo la conclusione della procedura di registrazione, potete usare i 4 tasti
funzione (fig. 1.2) con un tocco. Se il commando è stato trasmesso
correttamente alla Home Base, il LED (fig. 1.1) si accende una volta. Nel
caso di errore, ad. es. mancante registrazione o Home Base fuori raggio, il
LED si accende 2 volte. In aggiunta alla conferma ottica, viene riprodotto
anche un segnale acustico.
MANUTENZIONE
Per inserire o sostituire le batterie apri il coperchio con uncacciavite a taglio
(fig. 3a) e inserire la batterie del tipo AA 1,5V secondo la polarità indicata
(fig. 2). Non è necessario ripetere la procedura di registrazione.
ASSISTENZA
Qualora sussistessero problemi di connessione consigliamo l’utilizzo di
smart plug per aumentare il raggio della rete radio ZigBee.
Per ulteriori informazioni e assistenza sul prodotto consultare il sito
http://support.bitronvideo.eu.
POSE
Le capteur de mouvement peut être installé aussi bien sur les parois plates
que dans les angles. Les vis et les chevilles de fixation sont fournies en
dotation. Pour la pose angulaire utilisez l'étrier en dotation. Les trous forés
se trouvent sur l'arrière sans composants électroniques (fig. 2).
Pour le positionnement du capteur faites très attention à ce que le capteur
soit en mesure de couvrir toute la zone à surveiller. Il est conseillé
d'effecteur des tests avant la pose définitive. Monter lecapteur en haut afin
d'assurer une plus grande efficacité. Le rayon du capteur est de 10 mètres
avec un angle de 120°.
MISE EN FUNCTION
Cette étape nécessite d'une QIVICON Home Base équipée avec module
radio ZigBee.
4. Retirez la bande à l'arrière du capteur de protection des batteries
pendant le transport (fig. 1).
5. Suivez les indications de l'assistant d'installation pour ajouter de
nouveaux dispositifs à l'intérieur de l'application de votre système
QIVICON. Pour plus d'informations sur le procédé d'enregistrement
consultez le site web http://support.bitronvideo.eu.
Pour utiliser le capteur avec une autre Home Base il suffit de répéter la
procédure d'enregistrement sur le nouveau système. Une fois la procédure
d'installation réussie,lecapteur ne communiquera plus avec lesystème sur
lequel il a été enregistré auparavant.
ENTRETIEN
Pour remplacer la batterie ouvrez le capteur (fig. 4) et remplacez les
batteries (fig. 3) avec un produit du même modèle (Lithium CR123A 3V).
ASSISTANCE
En cas de problèmes de connexion nous vous conseillons l'utilisation de
smartplug pour augmenter le rayon du réseau radio ZigBee. Pour plus
d'informations et pour l'assistance sur le produit consultez le site
http://support.bitronvideo.eu.
AV2010/34
3b
3a
Other Bitron Video Switch manuals


