Bkool One User manual
BKOOL ONE

Thank you for purchasing a Bkool One trainer. We want your experience with it to be perfect and
for you to be part of the extensive Bkool community.
Index
1- Quick guide
1.1 - Take the trainer out of the box
1.2 - Components
1.3 - Assembly
1.4- Before riding
1.5- The first ride
2 - More information
2.1 - Bkool.com
2.2 - Bkool simulator
2.3 - Pairing devices with the simulator
2.4 - Bkool and mountain bikes
2.5 - Updates
2.6 - What to do if...
2.7 - Safety warnings
2.8 - Waiver of liability
2.9 - Warranty
2.10 - Technical assistance
1.1 - TAKE THE TRAINER OUT OF THE BOX
Place the box upright and open the top. Then, put the box on its side and pull the unit out. Do not
take the unit out with the box upright as it could fall and hurt you.
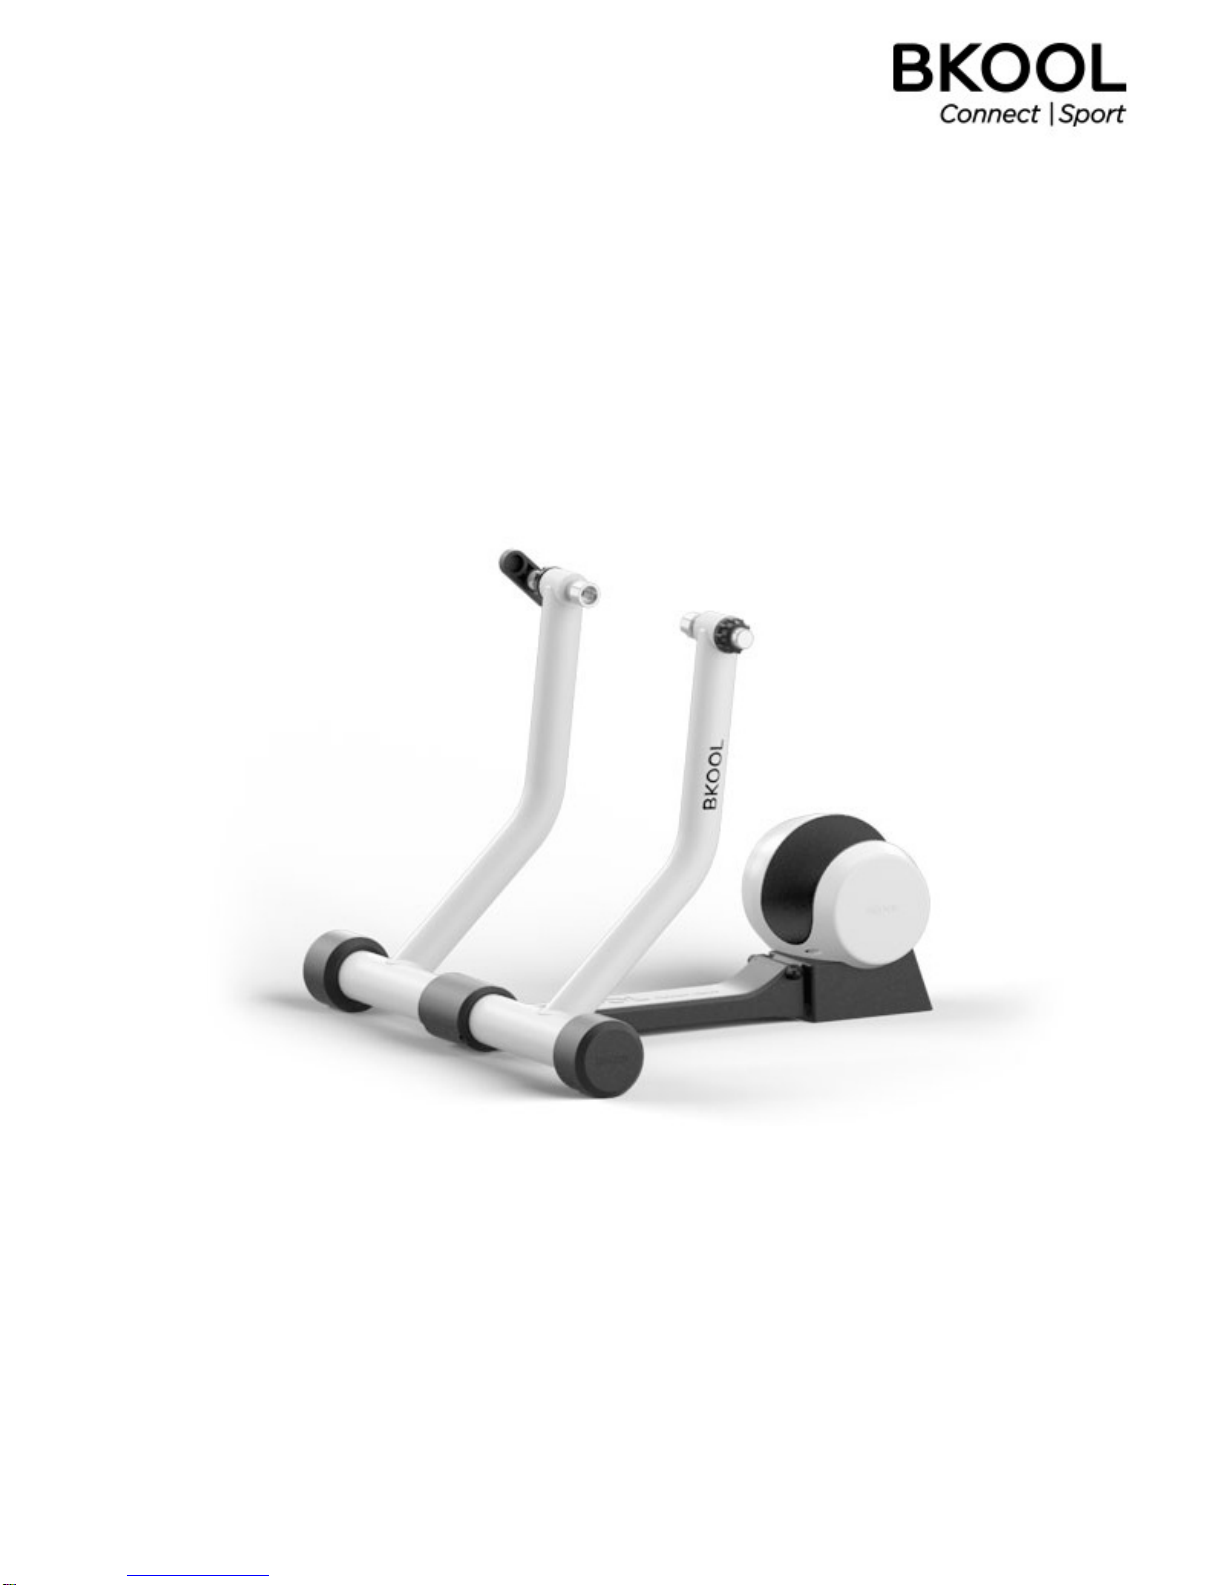
1.2 COMPONENTS
1. Trainer. (Resistance unit with stand)
2. Quick release.

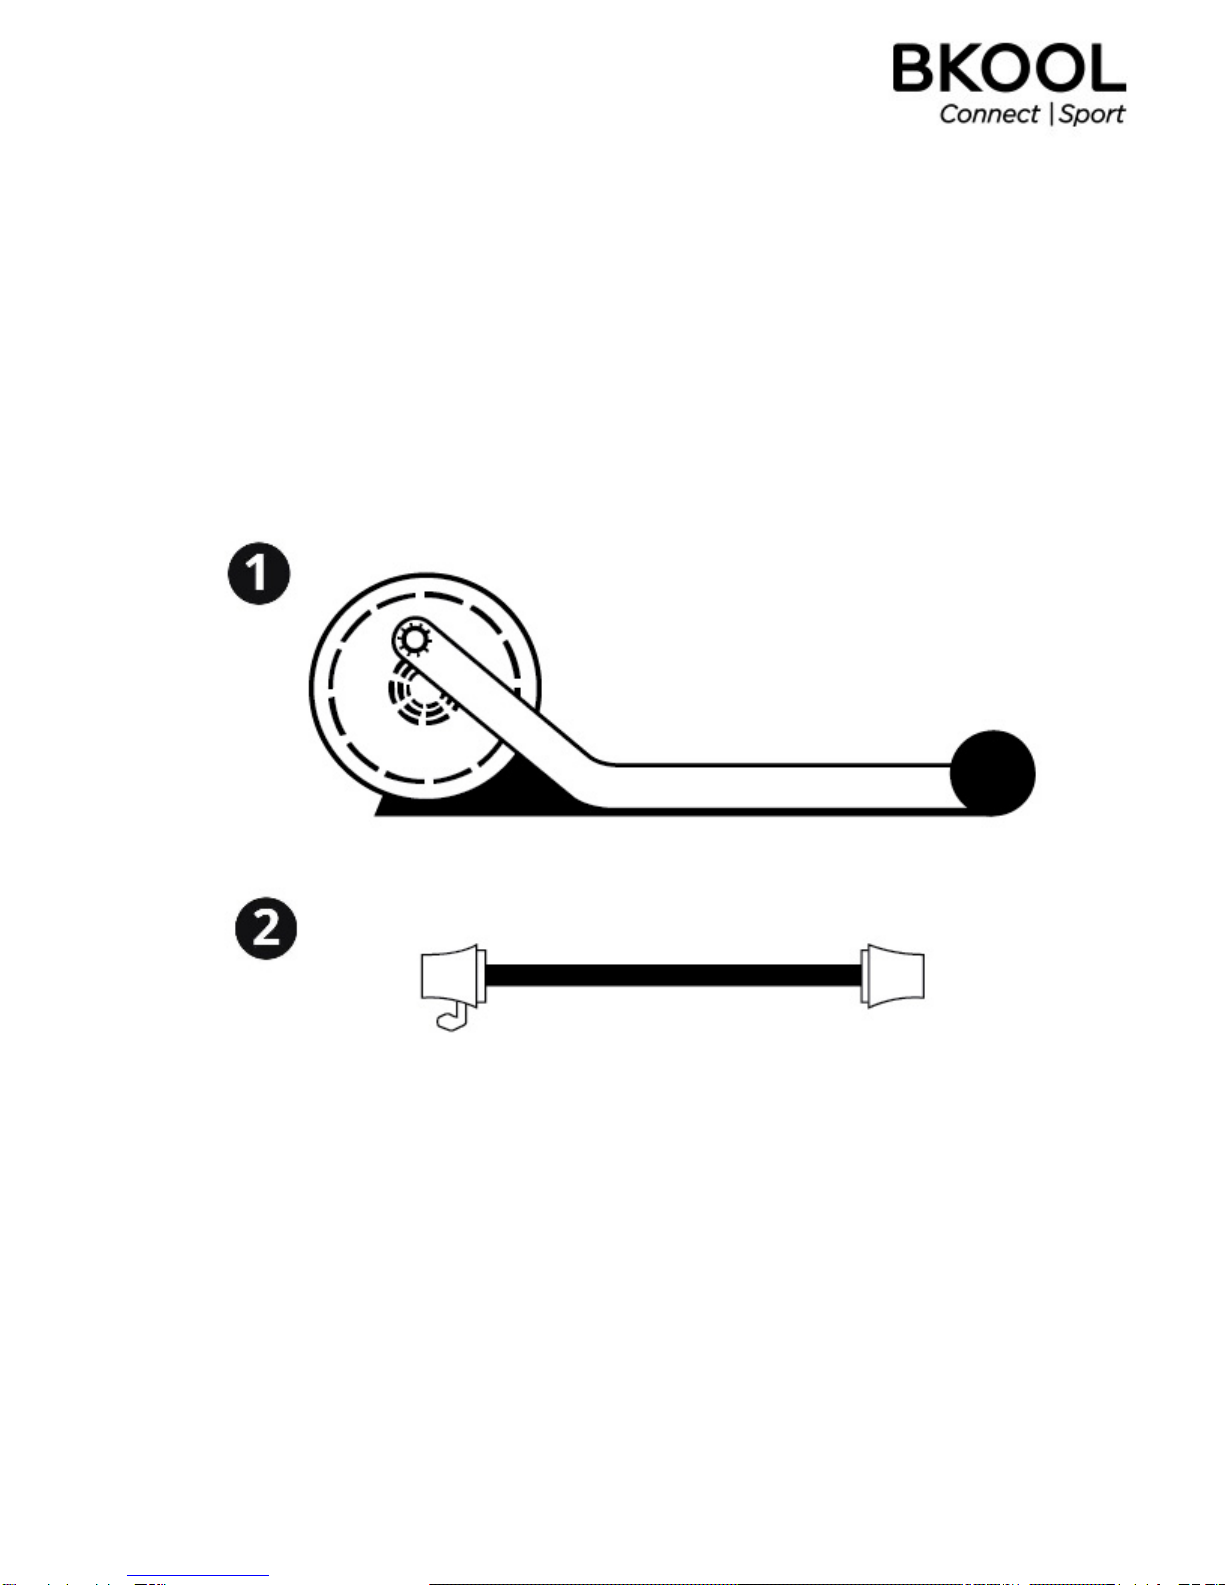
1.3 ASSEMBLY
1. The trainer does not need assembly. The resistance unit is attached to the stand.
2. Change out the quick release on your bicycle's rear wheel with the one provided in the box.
3. Place the rear wheel between the arms on the stand.Adjust the tension on the tensioning knobs
so as to center the wheel on the roller.
4. Tighten the lever so the stand is firmly attached to the quick release on the bicycle.
5. Tighten the locking rings on both sides. This will keep it from coming loose during use, avoiding
falls.
Note: We recommend using a support to lift the frontwheel. (Not included.Available atbkool.com)

1.4- BEFORE RIDING
1.4.1 - Register If you are not registered at bkool.com, do it now. You will need to use the same
registration email and password to log into the Bkool simulator.
1.4.2 - Download the Bkool Indoor simulator. You can do so from the downloads area at
bkool.com. The simulator is compatible with PC, Mac and tablets (iOS and Android).
1.4.3 - Activate your coupon. If you have a discount coupon for Bkool Premium, activate it now.
Enter your code in the store's coupon section.
1.4.4 - Set up your Bkool unit. Do it as shown in the illustrations on this page.
Note: For the best user experience, the simulator requires an ANT+ or Bluetooth antenna. The
antenna is used to communicate wirelessly with the speed, heart rate or cadence sensors and
other devices. If your computer or tablet doesn't have one, you can buy one at bkool.com. Keep
in mind that if you use a tablet you might need an additional adapter. Check the help section on
our website and the instructions for your tablet model.
1.5- THE FIRST RIDE
Log into the simulator with the same email and password you used to sign up at bkool.com. Once
inside, pick a session and start pedaling!
The simulator will display the steps to follow during the session.
2 - MORE INFORMATION
2.1 BKOOL.COM
It is free to use. Since personal information is required, you must register and log in using your
email and password. The Bkool website offers many possibilities. These are just some examples
of what you can find there:
● “Sessions” section: create and program your sessions.
● “My activity” section: check and analyze the sessions you've done.
● “Share”: socialize with the Bkool community, join groups, take part in leagues, check the
rankings.
After finishing a session click on "Save" to upload all your workout data to bkool.com so you can
check it whenever you want.

2.2 - BKOOL SIMULATOR
Our simulator is the most complete on the market. You can ride your own routes or any of the
500,000+ routes offered by Bkool. You can also ride with friends, wherever they may be. The
routes can be in 2D, 3D, real video or on a map. You'll see a constantly updated route map and
readings for distance, time, power, speed and gradient.
Create and take part in teams, leagues and rankings. Compete against real or virtual cyclists. You
set the limits. Keep in mind that many of these features are free, but others might require a
Premium subscription, available at bkool.com.
For more information see the Help section.
2.3 - PAIRING DEVICES WITH THE SIMULATOR
(ANT+ or Bluetooth antenna required, not included)
For the best user experience,the simulatorhas to be synchronized (paired) with your devices. The
simulator needs to know your speed, cadence and heart rate.
Important: In order to pair devices, they must be near the computer or tablet. You also have to
activate them (be wearing the chest strap or turning the pedals to activate the cadence or speed
sensor) so they're shown on the screen.
Devices can be paired manually or automatically.
● Automatic pairing. The simulator is paired automatically with nearby devices. You will
see at the bottom right if the devices are paired: a green icon indicates they're connected.
● Manual pairing. You can also pair the devices manually. To do so, go to the "Settings"
section in the simulator (top right) and turn off automaticpairing. The manualpairing will be shown.
The trainer can be used by several people. However, when they log into the simulator, each
one must enter their own email and password.
2.4 BKOOL AND MOUNTAIN BIKES
While using a MTB is perfectly OK, we recommend replacing the knobby tires with smooth ones.
This will cut down on the noise.

2.5 UPDATES
Keep the simulator updated. For the best user experience, Bkool is constantly updating the
simulator software. These updates are free.
When the simulator is open, it will tell you the steps to follow to update the software.
2.6 - WHAT TO DO IF...
A device isn't detected. Make sure the device is active. To detect a heart rate meter the strap
mustbe firmlyaround the chest. To detect a speed orcadence sensor, the pedals mustbe turning.
The USB ANT+ or Bluetooth receiver must be connected to the computer or tablet if it doesn't
support these communications systems natively.
You can't log into the simulator. Make sure you've entered the same email and password you
used to register at bkool.com. Make sure you have internet access and that your antivirus or
firewall aren't preventing the simulator from connecting to the internet.
Help. If you have other questions, see the help section at bkool.com
2.7 - SAFETY WARNINGS
Good health. Before doing your firstsession, you mustmake sure you are in good physicalhealth.
When the trainer is in use the rear wheel rotates at high speed. Do not allow anyone to touch
it for any reason. Be particularly careful with children and pets.
Do not disassemble the Bkool Trainer if it malfunctions.
Cleanliness. To clean the trainer, use a cloth dipped in water or a mild
cleaning solution.
Maintenance. The trainer is maintenance-free.
Moving the trainer. Be careful when moving the trainer. Its moving parts and resistance unit can
shift and catch a finger, hand or other parts of the body. Fold the trainer before moving it.

2.8 - WAIVER OF LIABILITY
BKOOL does not guarantee that its trainers are compatible with simulators or software that have
not been developed by BKOOL.
BKOOL constantly updates its simulator software, this being the only way to make improvements
to it, offer new services and fix potential bugs. These updates are free for thoseUsers who decide
to install them on their machines, which BKOOL recommends.
Whenever a newupdate is published,BKOOL will no longeroffer technicalsupportfortheprevious
versions.
An update may require that the terminal on which it is to be installed meet certain technical
requirements in order to work properly. The User must carefully read said requirements carefully
before installing a new update.
The User knows and acknowledges that the Bkool simulator requires an Internet connection in
order to work properly and offer all of the features described on the website.
The user acknowledges being in good physical condition to work out with the Bkool trainer and
assumes all responsibility for this workout, absolving Bkool of any liability. The User is the sole
person responsible for their choice of workout, as well as for any physical or psychological
consequences associated with it. Any potentialrecommendations or guidelines given by Bkoolare
based solely on information previously provided by the User, who must always clear them with a
medical professional before putting them into practice.
Users should check with a medical professional before starting any new workout program. The
User must exercise prudence and judgment with Bkool products and immediatelystop using them
if he/she notices any discomfort or pain, in which case a medical professional should be consulted
as quickly as possible.

2.9 WARRANTY
BKOOL S.L. OFFERS A LIMITED TWO-YEAR WARRANTY FROM THE ORIGINAL PURCHASE
DATE. DURING THIS PERIOD, BKOOL S.L. GUARANTEES THAT THE TRAINER WILL BE
FREE FROM MATERIAL AND MANUFACTURING DEFECTS. BKOOL S.L. SHALL NOT BE
LIABLE FOR DAMAGE RESULTING FROM IMPROPER USE OF THIS PRODUCT.
Applicability. This warranty isoffered only to the original owner and to trainerspurchased through
the Bkool website, or its authorized distributors and stores.
Limitations and Voiding of the Warranty. The warranty does not cover any causes not
attributable to the manufacturer. The warranty does not cover normal wear and tear of pieces. It
also does not cover any damage caused by accidents, improper use, improper care or negligence.
The warranty is void if: (1) the trainer is used for a purpose for which it was not designed; (2) the
assembly and maintenance instructions are not followed; (3) the trainer is repaired or attempted
to be repaired by anyone other than the official repair service. Under any of these circumstances,
Bkool S.L. declines all liability for any direct or indirect damage that may occur.
2.10 - TECHNICAL ASSISTANCE
On bkool.com you will find information on how to get personalized technical assistance. You can
also contact us by writing to info@bkool.com. You may be asked to provide proof of purchase
(including the date), so please keep your receipt.
Table of contents
Other Bkool Fitness Equipment manuals


Popular Fitness Equipment manuals by other brands


 IT95 owner's manual")

First Degree Fitness
First Degree Fitness E-520 Fluid Rower owner's manual

Keys Fitness
Keys Fitness CABLE CROSSOVER KPS-CC owner's manual

Domyos
Domyos PA 660 operating instructions

Tunturi
Tunturi Pro Power Rack RC20 Assembly manual

LIFESTYLER
LIFESTYLER Cardio Fit owner's manual

SportsArt Fitness
SportsArt Fitness DF-200 owner's manual