BLACK DECKER YARDMASTER BCASCS60 User manual

final page size: 8.5 x 5.5 in
Please read before returning this product for any reason.
àLIRE avant de retourner ce produit pour quelque raison que ce soit.
LEA EL MANUAL antes de devolver este producto por cualquier motivo.
INSTRUCTION MANUAL
MODE D’EMPLOI
MANUAL DE INSTRUCCIONES
20V MAX* YARDMASTER CHAIN SAW
SCIE À CHAÎNE YARDMASTER 20V MAX*
SIERRA DE CADENA YARDMASTER 20V MAX*
BCASCS60

ENGLISH
English (original instructions) 1
Français (traduction de la notice d’instructions originale) 19
Español (traducido de las instrucciones originales) 39

ENGLISH
1
English (original instructions)
Definitions: Safety Alert Symbols and Words
This instruction manual uses the following safety alert symbols and words to alert you to hazardous situations and your risk
of personal injury or property damage.
DANGER: Indicates an imminently hazardous situation which, if not avoided, will result in death or seriousinjury.
WARNING: Indicates a potentially hazardous situation which, if not avoided, could result in death or seriousinjury.
CAUTION: Indicates a potentially hazardous situation which, if not avoided, may result in minor or moderateinjury.
(Used without word) Indicates a safety related message.
NOTICE: Indicates a practice not related to personal injury which, if not avoided, may result in propertydamage.
WARNING! Read all safety warnings and all
instructions. Failure to follow the warnings and
instructions may result in electric shock, fire and/or
seriousinjury.
WARNING: To reduce the risk of injury, read the
instructionmanual.
Fig. A
1 Base unit
2 Main handle
3 Bail handle
4 On / Off switch
5 Lock off switch
6 Extension pole
7 Pole handle
8 Pole release button
9 Chain saw attachment
10 Chain saw attachment release button
11 Kickback guard
12 Kickback guard release button
13 Guide bar
14 Saw chain
15 Guide bar cover
8
7
6
5
4
2
3
1
9
10
11
12
13
14
15

ENGLISH
2
GENERAL POWER TOOL SAFETY
WARNINGS
WARNING! Read all safety warnings and all
instructions. Failure to follow the warnings and
instructions may result in electric shock, fire and/or
seriousinjury.
SAVE ALL WARNINGS AND
INSTRUCTIONS FOR FUTURE
REFERENCE
The term “power tool” in the warnings refers to your mains-
operated (corded) power tool or battery-operated (cordless)
powertool.
1) Work Area Safety
a ) Keep work area clean and well lit. Cluttered or dark
areas inviteaccidents.
b ) Do not operate power tools in explosive
atmospheres, such as in the presence of
flammable liquids, gases or dust. Power tools
create sparks which may ignite the dust orfumes.
c ) Keep children and bystanders away while
operating a power tool. Distractions can cause you
to losecontrol.
2) Electrical Safety
a ) Power tool plugs must match the outlet. Never
modify the plug in any way. Do not use any
adapter plugs with earthed (grounded) power
tools. Unmodified plugs and matching outlets will
reduce risk of electricshock.
b ) Avoid body contact with earthed or grounded
surfaces such as pipes, radiators, ranges and
refrigerators. There is an increased risk of electric
shock if your body is earthed orgrounded.
c ) Do not expose power tools to rain or wet
conditions. Water entering a power tool will increase
the risk of electricshock.
d ) Do not abuse the cord. Never use the cord for
carrying, pulling or unplugging the power tool.
Keep cord away from heat, oil, sharp edges or
moving parts. Damaged or entangled cords increase
the risk of electricshock.
e ) When operating a power tool outdoors, use an
extension cord suitable for outdoor use. Use of
a cord suitable for outdoor use reduces the risk of
electricshock.
f ) If operating a power tool in a damp location
is unavoidable, use a ground fault circuit
interrupter (GFCI) protected supply. Use of a GFCI
reduces the risk of electricshock.
3) Personal Safety
a ) Stay alert, watch what you are doing and use
common sense when operating a power tool. Do
not use a power tool while you are tired or under
the influence of drugs, alcohol or medication. A
moment of inattention while operating power tools
may result in serious personalinjury.
b ) Use personal protective equipment. Always wear
eye protection. Protective equipment such as dust
mask, non-skid safety shoes, hard hat, or hearing
protection used for appropriate conditions will reduce
personalinjuries.
c ) Prevent unintentional starting. Ensure the
switch is in the off position before connecting to
power source and/or battery pack, picking up or
carrying the tool. Carrying power tools with your
finger on the switch or energizing power tools that
have the switch on invitesaccidents.
d ) Remove any adjusting key or wrench before
turning the power tool on. A wrench or a key left
attached to a rotating part of the power tool may
result in personalinjury.
e ) Do not overreach. Keep proper footing and
balance at all times. This enables better control of
the power tool in unexpectedsituations.
f ) Dress properly. Do not wear loose clothing or
jewelry. Keep your hair, clothing and gloves
away from moving parts. Loose clothes, jewelry or
long hair can be caught in movingparts.
g ) If devices are provided for the connection of dust
extraction and collection facilities, ensure these
are connected and properly used. Use of dust
collection can reduce dust-relatedhazards.
4) Power Tool Use and Care
a ) Do not force the power tool. Use the correct
power tool for your application. The correct power
tool will do the job better and safer at the rate for
which it wasdesigned.
b ) Do not use the power tool if the switch does not
turn it on and off. Any power tool that cannot be
controlled with the switch is dangerous and must
berepaired.
c ) Disconnect the plug from the power source and/
or the battery pack from the power tool before
making any adjustments, changing accessories,
or storing power tools. Such preventive safety
measures reduce the risk of starting the power
toolaccidentally.
d ) Store idle power tools out of the reach of children
and do not allow persons unfamiliar with the
power tool or these instructions to operate the
power tool. Power tools are dangerous in the hands
of untrainedusers.
e ) Maintain power tools. Check for misalignment or
binding of moving parts, breakage of parts and
any other condition that may affect the power
tool’s operation. If damaged, have the power
tool repaired before use. Many accidents are
caused by poorly maintained powertools.
f ) Keep cutting tools sharp and clean. Properly
maintained cutting tools with sharp cutting edges are
less likely to bind and are easier tocontrol.
g ) Use the power tool, accessories and tool bits, etc.
in accordance with these instructions, taking

ENGLISH
3
into account the working conditions and the
work to be performed. Use of the power tool for
operations different from those intended could result
in a hazardoussituation.
5) Battery Tool Use and Care
a ) Recharge only with the charger specified by the
manufacturer. A charger that is suitable for one type
of battery pack may create a risk of fire when used
with another batterypack.
b ) Use power tools only with specifically designated
battery packs. Use of any other battery packs may
create a risk of injury andfire.
c ) When battery pack is not in use, keep it away
from other metal objects, like paper clips, coins,
keys, nails, screws, or other small metal objects,
that can make a connection from one terminal to
another. Shorting the battery terminals together may
cause burns or afire.
d ) Under abusive conditions, liquid may be ejected
from the battery; avoid contact. If contact
accidentally occurs, flush with water. If liquid
contacts eyes, additionally seek medical help.
Liquid ejected from the battery may cause irritation
orburns.
6) Service
a ) Have your power tool serviced by a qualified
repair person using only identical replacement
parts. This will ensure that the safety of the power
tool ismaintained.
Chain Saw Safety Warnings
WARNING: Additional safety warnings for chain
saws.
• Keep all parts of the body away from the saw chain
when the chain saw is operating. Before you start
the chain saw, make sure the saw chain is not
contacting anything. A moment of inattention while
operating chain saws may cause entanglement of your
clothing or body with the sawchain.
• Always hold the chain saw with your right hand
on the rear handle and your left hand on the front
handle. Holding the chain saw with a reversed hand
configuration increases the risk of personal injury and
should never bedone.
• Hold the power tool by insulated gripping surfaces
only, because the saw chain may contact hidden
wiring. Saw chains contacting a "live" wire may make
exposed metal parts of the power tool "live" and could give
the operator an electricshock.
• Wear safety glasses and hearing protection. Further
protective equipment for head, hands, legs and
feet is recommended. Adequate protective clothing
will reduce personal injury by flying debris or accidental
contact with the sawchain.
• Do not operate a chain saw in a tree. Operation of a
chain saw while up in a tree may result in personalinjury.
• Always keep proper footing and operate the chain
saw only when standing on fixed, secure and level
surface. Slippery or unstable surfaces such as ladders may
cause a loss of balance or control of the chainsaw.
• When cutting a limb that is under tension be alert
for spring back. When the tension in the wood fibers is
released the spring loaded limb may strike the operator
and/or throw the chain saw out ofcontrol.
• Use extreme caution when cutting brush and
saplings. The slender material may catch the saw chain
and be whipped toward you or pull you offbalance.
• Carry the chain saw by the front handle with the
chain saw switched off and away from your body.
When transporting or storing the chain saw always
fit the guide bar cover. Proper handling of the chain
saw will reduce the likelihood of accidental contact with
the moving sawchain.
• Follow instructions for lubricating, chain tensioning
and changing accessories. Improperly tensioned or
lubricated chain may either break or increase the chance
forkickback.
• Keep handles dry, clean, and free from oil and
grease. Greasy, oily handles are slippery causing loss
ofcontrol.
• Cut wood only. Do not use chain saw for purposes
not intended. For example: do not use chain saw
for cutting plastic, masonry or non-wood building
materials. Use of the chain saw for operations different
than intended could result in a hazardoussituation.
• Saw chain continues to move after the switch is
turned off.
Causes and Operator Prevention
of Kickback:
Kickback may occur when the nose or tip of the guide bar
touches an object, or when the wood closes in and pinches
the saw chain in thecut.
Tip contact in some cases may cause a sudden reverse
reaction, kicking the guide bar up and back towards
theoperator.
Pinching the saw chain along the top of the guide bar may
push the guide bar rapidly back towards theoperator.
Either of these reactions may cause you to lose control of
the saw which could result in serious personal injury. Do not
rely exclusively upon the safety devices built into your saw.
As a chain saw user, you should take several steps to keep
your cutting jobs free from accident orinjury.
Kickback is the result of tool misuse and/or incorrect
operating procedures or conditions and can be avoided by
taking proper precautions as given below:
• Maintain a firm grip, with thumbs and fingers
encircling the chain saw handles, with both hands
on the saw and position your body and arm to allow
you to resist kickback forces. Kickback forces can be
controlled by the operator, if proper precautions are taken.
Do not let go of the chainsaw.

ENGLISH
4
• Do not overreach and do not cut above shoulder
height. This helps prevent unintended tip contact
and enables better control of the chain saw in
unexpectedsituations.
• Only use replacement bars and chains specified
by the manufacturer. Incorrect replacement bars and
chains may cause chain breakage and/orkickback.
• Follow the manufacturer’s sharpening and
maintenance instructions for the saw chain.
Decreasing the depth gauge height can lead to
increasedkickback.
Kickback Safety Features
WARNING: The following features are included
on your saw to help reduce the hazard of kickback;
however such features will not totally eliminate this
dangerous reaction. As a chain saw user do not rely
only on safety devices. You must follow all safety
precautions, instructions, and maintenance in this
manual to help avoid kickback and other forces which
can result in seriousinjury.
• Reduced-Kickback Guide Bar, designed with a small
radius tip which reduces the size of the kickback
danger zone on bar tip. A reduced - kickback guide
bar is one which has been demonstrated to significantly
reduce the number and seriousness of kickbacks when
tested in accordance with safety requirements for electric
chainsaws.
• Low-Kickback Chain, designed with a contoured depth
gauge and guard link which deflect kickback force
and allow wood to gradually ride into the cutter. A
low-kickback chain is a chain which has met kickback
performance requirements of ANSI B175.1–2012.
Chain saw Names and Terms
• Bucking - The process of cross cutting a felled tree or log
intolengths.
• Motor Brake - A device used to stop the saw chain when
the trigger isreleased.
• Chain Saw Powerhead - A chain saw without the saw
chain and guidebar.
• Drive Sprocket or Sprocket - The toothed part that
drives the sawchain.
• Felling - The process of cutting down atree.
• Felling Back Cut - The final cut in a tree felling operation
made on the opposite side of the tree from the notchingcut.
• Front Handle - The support handle located at or toward
the front of the chainsaw.
• Front Hand Guard - A structural barrier between the
front handle of a chain saw and the guide bar, typically
located close to the hand position on the fronthandle.
• Guide Bar - A solid railed structure that supports and
guides the sawchain.
• Guide Bar Scabbard - Enclosure fitted over guide bar to
prevent tooth contact when saw is not inuse.
• Kickback - The backward or upward motion, or both
of the guide bar occurring when the saw chain near the
nose of the top area of the guide bar contacts any object
such as a log or branch, or when the wood closes in and
pinches the saw chain in thecut.
• Kickback, Pinch - The rapid pushback of the saw
which can occur when the wood closes in and pinches
the moving saw chain in the cut along the top of the
guidebar.
• Kickback, Rotational - The rapid upward and backward
motion of the saw which can occur when the moving saw
chain near the upper portion of the tip of the guide bar
contacts an object, such as a log orbranch.
• Limbing - Removing the branches from a fallen tree
• Low-Kickback Chain - A chain that complies with the
kickback performance requirements of ANSI B175.1–2012
(when tested on a representative sample of chain saws.)
• Normal Cutting Position - Those positions assumed in
performing the bucking and fellingcuts.
• Notching Undercut - A notch cut in a tree that directs
the tree’sfall.
• Rear Handle - The support handle located at or toward
the rear of thesaw.
• Reduced Kickback Guide Bar - A guide bar which has
been demonstrated to reduce kickbacksignificantly.
• Replacement Saw Chain - A chain that complies with
kickback performance requirements of ANSI B175.1–2000
when tested with specific chain saws. It may not meet
the ANSI performance requirements when used with
othersaws.
• Saw Chain - A loop of chain having cutting teeth, that cut
the wood,and that is driven by the motor and is supported
by the guidebar.
• Ribbed Bumper - The ribs used when felling or bucking
to pivot the saw and maintain position whilesawing.
• Switch - A device that when operated will complete or
interrupt an electrical power circuit to the motor of the
chainsaw.
• Switch Linkage - The mechanism that transmits motion
from a trigger to theswitch.
• Lock-off Switch - A movable stop that prevents
the unintentional operation of the switch until
manuallyactuated.
Additional Safety Information
WARNING: ALWAYS use safety glasses. Everyday
eyeglasses are NOT safety glasses. Also use face or
dust mask if cutting operation is dusty. ALWAYS WEAR
CERTIFIED SAFETYEQUIPMENT:
• ANSI Z87.1 eye protection (CAN/CSA Z94.3),
• ANSI S12.6 (S3.19) hearing protection,
• NIOSH/OSHA/MSHA respiratoryprotection.
WARNING: Some dust created by this product
contains chemicals known to the State of California to
cause cancer, birth defects or other reproductive harm.
Some examples of these chemicalsare:
• compounds in fertilizers
• compounds in insecticides, herbicides
andpesticides

ENGLISH
5
• arsenic and chromium from chemically
treatedlumber
Your risk from these exposures varies, depending on how
often you do this type of work. To reduce your exposure to
these chemicals: work in a well ventilated area, and work with
approved safety equipment, such as those dust masks that are
specially designed to filter out microscopicparticles.
• Avoid prolonged contact with dust from power
sanding, sawing, grinding, drilling, and other
construction activities. Wear protective clothing and
wash exposed areas with soap and water. Allowing
dust to get into your mouth, eyes, or lay on the skin may
promote absorption of harmfulchemicals.
WARNING: Use of this tool can generate and/
or disperse dust, which may cause serious and
permanent respiratory or other injury. Always use
NIOSH/OSHA approved respiratory protection
appropriate for the dust exposure. Direct particles
away from face andbody.
WARNING: Always wear proper personal hearing
protection that conforms to ANSI S12.6 (S3.19)
during use. Under some conditions and duration
of use, noise from this product may contribute to
hearingloss.
CAUTION: When not in use, place tool on its side
on a stable surface where it will not cause a
tripping or falling hazard. Some tools with large
battery packs will stand upright on the battery pack
but may be easily knockedover.
• Air vents often cover moving parts and should be
avoided. Loose clothes, jewelry or long hair can be
caught in movingparts.
• Keep the working area free from obstructions such
as other trees, branches, rocks, fences, stumps, etc.
Eliminate or avoid any obstruction that your saw chain could
hit while you are cutting through a particular log orbranch.
• Cut one log at atime.
• Use extreme caution when re-entering a previous
cut. Engage ribbed bumpers into wood and allow chain
to reach full speed before proceeding withcut.
• Do not attempt plunge cuts or borecuts.
• Watch for shifting logs or other forces that could
close a cut and pinch or fall intochain.
• Do not attempt operations beyond your capacity or
experience. Read thoroughly and understand completely
all instructions in thismanual.
• Do not operate a chain saw with one hand! Serious
injury to the operator, helpers, or bystanders may result
from one handed operation. A chain saw is intended for
two-handed useonly.
• Stop the chain saw before setting itdown.
Safety Instructions For Pole Mounted Saws
• Do not use the pole mounted saw in bad weather
conditions, especially when there is a risk of
lightning. This decreases the risk of being struck by
lightning.
• To reduce the risk of electrocution, never use near
any electrical power lines. Contact with or use near
power lines may cause serious injury or electric shock
resulting in death.
• Always use two hands when operating the pole
mounted saw . Hold the pole mounted saw with both
hands to avoid loss of control.
• Always use head protection when operating the pole
mounted saw overhead. Falling debris can result in
serious personal injury.
Before Operating Pole Saw
• For safe operation, read and understand all
instructions before using the Pole Saw. Follow all
safety instructions. Failure to follow all safety instructions
listed below, can result in serious personal injury.
• Watch what you are doing. Use common sense. Do not
operate Pole Saw when you are tired.
• Use Pole Saw for cutting tree branches only. Do not
use Pole Saw for purposes not intended. Do not use for
cutting other items.
• Only well-instructed adults should operate Pole Saw.
Never allow children to operate.
• Do not allow children or untrained individuals to use
this unit.
• Wear the following safety gear when operating Pole Saw:
ʵ heavy-duty gloves
ʵ steel-toed safety footwear with non-skid soles
ʵ safety glasses, goggles or face screen that are marked to
comply with ANSI Z87
ʵ safety hard hat
ʵ ear mufflers or ear plug
ʵ face or dust mask (if working in dusty areas)
• Wear heavy long pants and boots. Do not wear loose
fitting clothing, short pants, jewelry of any kind, or go
barefoot.
• Secure long hair so it is above shoulder level to
prevent entanglement in any moving parts.
• Before cutting, always provide the following:
ʵ clear work area
ʵ secure footing
ʵ planned retreat path from falling limbs
• Inspect tree before trimming. Make allowance for
branches to fall freely to the ground.
• Do not use your Pole Saw to fell saplings.
While Operating Pole Saw
DANGER: To reduce the risk of electric shock do
no use on wet surfaces. Do not expose to rain. Store
indoors.
DANGER: Avoid Unintentional Starting – with
battery installed, don’t carry appliance with with
finger on switch. Be sure switch is off when installing
battery.
• Stay alert. Use common sense while operating the unit.
• Keep work area clean. Cluttered areas invite injuries.

ENGLISH
6
• Always remove battery from pole saw when finished
cutting or when left unattended.
• Keep children, animals and bystanders at least 50 ft.
(15 m) away from Pole Saw. Only Pole Saw user should
be in work area.
• Do not use the Pole Saw to cut down trees.
• Do not grasp the exposed saw chain when picking
up or holding the pole saw.
• Grip Pole Saw securely - one hand on the pole, the other
on the handle.
• Keep finger off trigger until ready to make cut.
• Before starting Pole Saw, make sure chain is not
touching anything.
• Keep all parts of body away from chain when Pole
Saw is running.
• Do not force Pole Saw while cutting. Apply light
pressure. It will do the job better and safer at the rate for
which it was intended.
• Carry Pole Saw from one place to another
ʵ with battery removed
ʵ fingers off/away from trigger
ʵ by holding pole at balance point
ʵ with guide bar and chain to rear and with scabbard
attached
• Do not cut small brush and saplings with the Pole
Saw. Slender matter may catch in the chain and be
whipped toward you. This could also pull you off balance.
• Do not operate in poor lighting.
• Keep firm footing and balance. Do not overreach.
Overreaching can result in loss of balance or exposure to
hot surfaces.
• Keep all parts of your body away from any moving
part.
• Do not, under any circumstance, use any attachment
or accessory on this product, which was not provided
with the product, or identified as appropriate for use
with this product in this Instruction Manual.
• Inspect Pole Saw before each use and after dropping
or other impacts. Ensure there are no significant defects
or damage.
Do not operate Pole Saw
ʵ while under the influence of alcohol, medication, or
drugs.
ʵ in rain or in damp or wet areas.
ʵ where highly flammable liquids or gases are present
ʵ if Pole Saw is damaged, adjusted incorrectly, or not
fully and
securely assembled.
ʵ if trigger does not turn Pole Saw on and off. Chain
must stop
moving when you release trigger. Have faulty switch
replaced by
authorized service center. See “Service Information”.
ʵ while in a hurry.
ʵ while in tree or on a ladder.
ʵ while on aerial booms, buckets or platforms.
ʵ during high wind or storming weather.
GENERAL SAFETY RULES
WARNING: Shock Hazard. To protect yourself
from electrocution, do not operate within 10 feet (3 m)
of overhead electrical lines. Consult local regulations
for safe distances from overhead electric power lines
and ensure that the operating position is safe and
secure before operating the extended reach pole saw.
Failure to do this could result in severe personalinjury.
• Keep the handles dry, clean, and free ofoil.
• Make sure chain has stopped before setting unitdown.
DANGER:RISK OF CUT. Keep hands away from
the chain. Keep both hands on handles when Pole
Saw ison.
• DO NOT ATTEMPT to remove cut material or hold
material to be cut when the chain is moving. Remove
battery when clearing jammed material from chain.
Do not grasp the exposed chain or cutting edges when
picking up or holding the Pole Saw.
• DON’T FORCE POLE SAW - It will do the job better and
with less likelihood of a risk of injury at the rate for which
it wasdesigned.
• DISCONNECT BATTERY from the Pole Saw when not in
use or when servicing orcleaning.
• STORE IDLE POLE SAW INDOORS - When not in use,
Pole Saw should be stored indoors in a dry and high or
locked-up place out of reach ofchildren.
• MAINTAIN POLE SAW WITH CARE - Keep cutters
sharp and clean for best performance and to reduce the
risk of injury. Keep handles dry, clean and free from oil
andgrease.
• CHECK DAMAGED PARTS - Before further use of the Pole
Saw, a guard or other part that is damaged should be
carefully checked to determine that it will operate properly
and perform its intended function. Check for alignment
of moving parts, binding of moving parts, breakage of
parts, mounting and any other condition that may affect
its operation. A guard or other part that is damaged
should be properly repaired or replaced by an authorized
service center unless otherwise indicated elsewhere in
thismanual.
SERVICE
• Tool service must be performed only by qualified
repair personnel. Service or maintenance performed
by unqualified personnel could result in a risk of injury.
SeeRepairs.
• When servicing a tool, use only identical replacement
parts. Follow instructions in the Maintenance section
of this manual. Use of unauthorized parts or failure to
follow Maintenance Instructions may create a risk of
electric shock orinjury.

ENGLISH
7
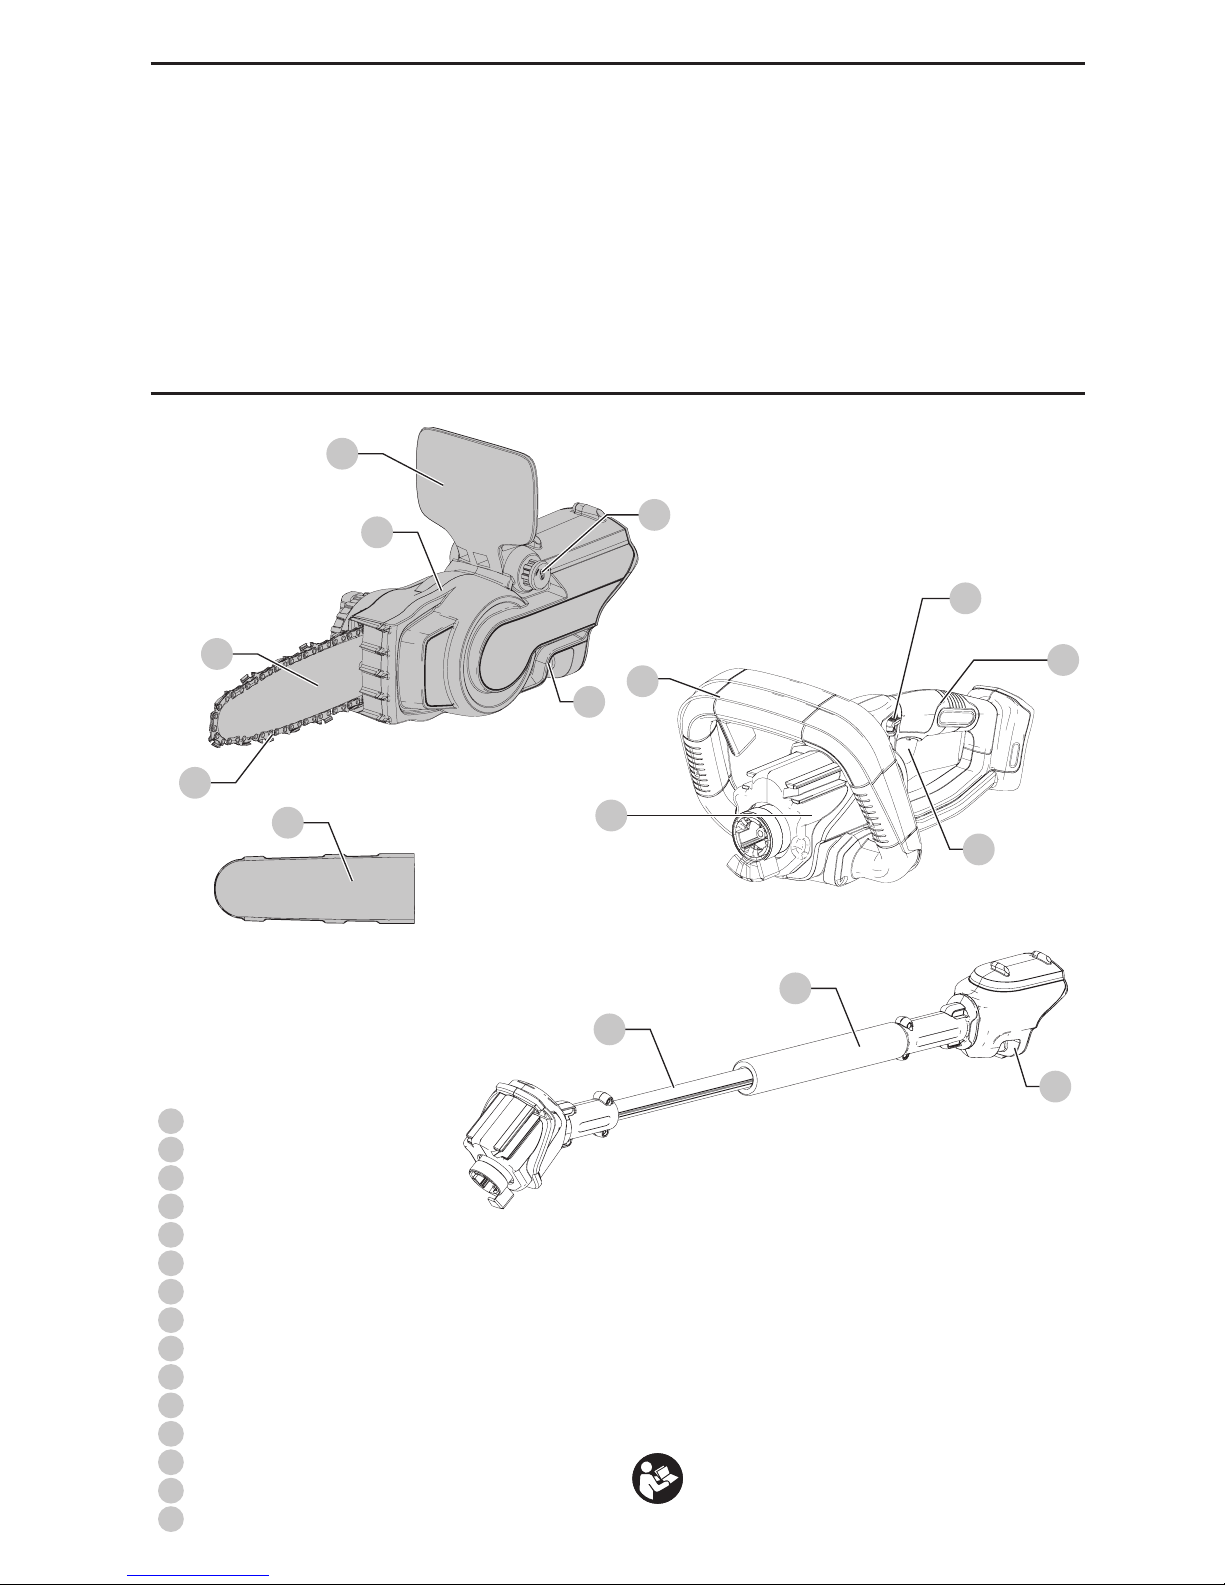
SPECIFIC SAFETY RULES
• Hold tool by insulated gripping surfaces when
performing an operation where the cutting tool
may contact hidden wiring. Contact with a “live” wire
will make exposed metal parts of the tool “live” and shock
theoperator.
The label on your tool may include the following symbols. The
symbols and their definitions are asfollows:
V.........................volts
Hz .......................hertz
min..................... minutes
or DC......direct current
......................Class I Construction
(grounded)
…/min..............per minute
BPM....................beats per minute
IPM.....................impacts per minute
RPM....................revolutions per
minute
sfpm ...................surface feet per
minute
SPM....................strokes per minute
A.........................amperes
W........................watts
or AC...........alternating current
or AC/DC.... alternating or
direct current
......................Class II
Construction
(double insulated)
no.......................no load speed
n.........................rated speed
......................earthing terminal
.....................safety alert symbol
.....................visible radiation
.....................wear respiratory
protection
.....................use proper eye
protection
.....................wear hearing
protection
.....................read all
documentation
CSPM..................Cut strokes per
minute
.....................Do not leave in
rain
.....................Tip contact can
cause the guide
bar to move
suddenly upward
and backward,
which can cause
serious injury
....................Contact of the
guide bar tip with
any object should
be avoided
..................Rotational direction
of the saw chain
..............Always use two
hands when
operating the
chain saw
BATTERIES AND CHARGERS
The battery pack is not fully charged out of the carton.
Before using the battery pack and charger, read the
safety instructions below and then follow charging
proceduresoutlined. When ordering replacement battery
packs, be sure to include the catalog number andvoltage.
Your tool uses a BLACK+DECKER charger. Be sure to read all
safety instructions before using your charger. Consult the
chart at the end of this manual for compatibility of chargers
and batterypacks.
READ ALL INSTRUCTIONS
Important Safety Instructions for All
Battery Packs
WARNING: Read all safety warnings and all
instructions for the battery pack, charger and
power tool. Failure to follow the warnings and
instructions may result in electric shock, fire and/
or serious injury.
• Do not charge or use the battery pack in explosive
atmospheres, such as in the presence of flammable
liquids, gases or dust. Inserting or removing the battery
pack from the charger may ignite the dust orfumes.
• NEVER force the battery pack into the charger. DO
NOT modify the battery pack in any way to fit into
a non-compatible charger as battery pack may
rupture causing serious personal injury. Consult
the chart at the end of this manual for compatibility of
batteries andchargers.
• Charge the battery packs only in designated
BLACK+DECKERchargers.
• DO NOT splash or immerse in water or otherliquids.
• Do not store or use the tool and battery pack in
locations where the temperature may reach or
exceed 104°F (40°C) (such as outside sheds or metal
buildings in summer). For best life store battery packs in
a cool, drylocation.
NOTE: Do not store the battery packs in a tool with
the trigger switch locked on. Never tape the trigger
switch in the ONposition.
• Do not incinerate the battery pack even if it is
severely damaged or is completely worn out. The
battery pack can explode in a fire. Toxic fumes and
materials are created when lithium ion battery packs
areburned.
• If battery contents come into contact with the skin,
immediately wash area with mild soap and water. If
battery liquid gets into the eye, rinse water over the open
eye for 15 minutes or until irritation ceases. If medical
attention is needed, the battery electrolyte is composed of
a mixture of liquid organic carbonates and lithiumsalts.
• Contents of opened battery cells may cause
respiratory irritation. Provide fresh air. If symptoms
persist, seek medicalattention.
WARNING: Burn hazard. Battery liquid may be
flammable if exposed to spark orflame.
WARNING: Fire hazard. Never attempt to open the
battery pack for any reason. If the battery pack case
is cracked or damaged, do not insert into the charger.
Do not crush, drop or damage the battery pack. Do
not use a battery pack or charger that has received a
sharp blow, been dropped, run over or damaged in
any way (e.g., pierced with a nail, hit with a hammer,
stepped on). Damaged battery packs should be
returned to the service center forrecycling.
Transportation
WARNING: Fire hazard. Do not store or carry the
battery pack so that metal objects can contact
exposed battery terminals. For example, do
not place the battery pack in aprons, pockets, tool
boxes, product kit boxes, drawers, etc., with loose
nails, screws, keys, etc. Transporting batteries
can possibly cause fires if the battery terminals
inadvertently come in contact with conductive

ENGLISH
8
materials such as keys, coins, hand tools and the
like. The US Department of Transportation Hazardous
Material Regulations (HMR) actually prohibit
transporting batteries in commerce or on airplanes in
carry-on baggage UNLESS they are properly protected
from short circuits. So when transporting individual
battery packs, make sure that the battery terminals
are protected and well insulated from materials that
could contact them and cause a short circuit.
The RBRC® Seal
The RBRC® (Rechargeable Battery
Recycling Corporation) Seal on the nickel
cadmium, nickel metal hydride or lithium-
ion batteries (or battery packs) indicates
that the costs to recycle these batteries
(or battery packs) at the end of their useful life have already
been paid by BLACK+DECKER. In some areas, it is illegal
to place spent nickel cadmium, nickel metal hydride or
lithium-ion batteries in the trash or municipal solid waste
stream and the Call2Recycle® program provides an
environmentally consciousalternative.
Call 2 Recycle, Inc., in cooperation with BLACK+DECKER
and other battery users, has established the program in
the United States and Canada to facilitate the collection
of spent nickel cadmium, nickel metal hydride or
lithium-ion batteries. Help protect our environment and
conserve natural resources by returning the spent nickel
cadmium, nickel metal hydride or lithium-ion batteries to
an authorized BLACK+DECKER service center or to your
local retailer for recycling. You may also contact your local
recycling center for information on where to drop off the
spent battery. RBRC® is a registered trademark of Call 2
Recycle,Inc.
Important Safety Instructions for All
Battery Chargers
WARNING: Read all safety warnings and all
instructions for the battery pack, charger and
power tool. Failure to follow the warnings and
instructions may result in electric shock, fire and/
or serious injury.
• DO NOT attempt to charge the battery pack with
any chargers other than the ones in this manual.
The charger and battery pack are specifically designed to
worktogether.
• These chargers are not intended for any uses other
than charging BLACK+DECKER rechargeable
batteries. Any other uses may result in risk of fire, electric
shock orelectrocution.
• Do not expose the charger to rain orsnow.
• Pull by the plug rather than the cord when
disconnecting the charger. This will reduce the risk of
damage to the electric plug andcord.
• Make sure that the cord is located so that it will not
be stepped on, tripped over or otherwise subjected
to damage orstress.
• Do not use an extension cord unless it is absolutely
necessary. Use of improper extension cord could result in
risk of fire, electric shock orelectrocution.
• When operating a charger outdoors, always provide
a dry location and use an extension cord suitable
for outdoor use. Use of a cord suitable for outdoor use
reduces the risk of electricshock.
• An extension cord must have adequate wire size
(AWG or American Wire Gauge) for safety. The smaller
the gauge number of the wire, the greater the capacity
of the cable, that is, 16 gauge has more capacity than 18
gauge. An undersized cord will cause a drop in line voltage
resulting in loss of power and overheating. When using
more than one extension to make up the total length,
be sure each individual extension contains at least the
minimum wire size. The following table shows the correct
size to use depending on cord length and nameplate
ampere rating. If in doubt, use the next heavier gauge. The
lower the gauge number, the heavier thecord.
Minimum Gauge for Cord Sets
Volts Total Length of Cord in Feet
(meters)
120 V 25 (7.6) 50 (15.2) 100 (30.5) 150 (45.7)
240 V 50 (15.2) 100 (30.5) 200 (61.0) 300 (91.4)
Ampere Rating
American Wire Gauge
More
Than
Not
More
Than
0 6 18 16 16 14
610 18 16 14 12
10 12 16 16 14 12
12 16 14 12 Not Recommended
• Do not place any object on top of the charger or
place the charger on a soft surface that might block
the ventilation slots and result in excessive internal
heat. Place the charger in a position away from any heat
source. The charger is ventilated through slots in the top
and the bottom of thehousing.
• Do not operate the charger with a damaged cord
orplug.
• Do not operate the charger if it has received a sharp
blow, been dropped or otherwise damaged in any
way. Take it to an authorized servicecenter.
• Do not disassemble the charger; take it to an
authorized service center when service or repair
is required. Incorrect reassembly may result in a risk of
electric shock, electrocution orfire.
• Disconnect the charger from the outlet before
attempting any cleaning. This will reduce the risk of
electric shock. Removing the battery pack will not reduce
thisrisk.
• NEVER attempt to connect 2 chargerstogether.
• The charger is designed to operate on standard
120V household electrical power. Do not attempt to
use it on any other voltage. This does not apply to the
vehicularcharger.
WARNING: Shock hazard. Do not allow any liquid to
get inside the charger. Electric shock mayresult.

ENGLISH
9
WARNING:Burn hazard. Do not submerge the
battery pack in any liquid or allow any liquid to
enter the battery pack. Never attempt to open the
battery pack for any reason. If the plastic housing of
the battery pack breaks or cracks, return to a service
center for recycling.
CAUTION: Burn hazard. To reduce the risk of injury,
charge only BLACK+DECKER rechargeable battery
packs. Other types of batteries may overheat and burst
resulting in personal injury and propertydamage.
NOTICE: Under certain conditions, with the charger
plugged into the power supply, the charger can
be shorted by foreign material. Foreign materials
of a conductive nature, such as, but not limited to,
grinding dust, metal chips, steel wool, aluminum
foil or any buildup of metallic particles should be
kept away from the charger cavities. Always unplug
the charger from the power supply when there is no
battery pack in the cavity. Unplug the charger before
attempting toclean.
Wireless Certifications and Safety
Information
• This device is CAN ICES-3(B)/NMB-3(B)compliant.
• This device complies with Part 15 of the FCC rules and
Industry Canada License-exempt RSS standard(s).
Operation is subject to the following two conditions:
ʵ This device may not cause harmful interference, and
ʵ This device must accept any interference
received, including interference that may cause
undesiredoperation.
This equipment has been tested and found to comply
with the limits for a Class B digital device, pursuant to Part
15 of the FCC Rules. These limits are designed to provide
reasonable protection against harmful interference in a
residential installation. This equipment generates, uses and
can radiate radio frequency energy and, if not installed and
used in accordance with the instructions, may cause harmful
interference to radio communications. However, there is no
guarantee that interference will not occur in a particular
installation. If this equipment does cause harmful interference
to radio or television reception, which can be determined by
turning the equipment off and on, the user is encouraged
to try to correct the interference by one or more of the
followingmeasures:
ʵ Reorient or relocate the receivingantenna.
ʵ Increase the separation between the equipment
andadaptor.
ʵ Connect the equipment into an outlet on a circuit
different from that to which the adaptor isconnected.
ʵ Consult the dealer or an experienced radio/TV
technician forhelp.
• Changes or modifications to this equipment not expressly
approved by the manufacturer could void the user’s
authority to operate the device. This Class B digital
apparatus complies with Canadian ICES-003.
• Under Industry Canada regulations, this radio transmitter
may only operate using an antenna of a type and
maximum (or lesser) gain approved for the transmitter by
Industry Canada. To reduce potential radio interference
to other users, the antenna type and its gain should
be so chosen that the equivalent isotropically radiated
power (e.i.r.p.) is not more than that necessary for
successfulcommunication.
• To comply with FCC and Industry Canada RF radiation
exposure limits for general population, the antenna used
for this device must not be co-located or operating in
conjunction with any other antenna ortransmitter.
For Bluetooth®Products
• When traveling on airlines, be sure to comply with the
airline restrictions on usage of personal electronic devices
and Bluetooth®.
• The out of range alert feature has been designed to act
as an aid to warn against products getting misplaced or
stolen. It is not a securitysystem.
• The connectivity range is up to 100 feet (30.5 meters)
depending on environment andlocation.
• The shortwave radio frequency signals of a Bluetooth®
device may impair the operation of other electronic and
medical devices (such as pacemakers or hearing aids).
NOTE: The Bluetooth® word mark and logos are registered
trademarks owned by the Bluetooth®, SIG, Inc. and any
use of such marks by BLACK+DECKER is under license.
Other trademarks and trade names are those of their
respectiveowners.
This product complies with these standards when operated
with a 6 foot (1.8 meters) or shorter extensioncord.
Charging a Battery
BLACK+DECKER chargers are designed to charge
BLACK+DECKER battery packs.
NOTE: To ensure maximum performance and life of lithium
ion battery packs:
• Charge the battery pack fully before first use.
• Recharge discharged batteries as soon as possible
after every use.
• Do not discharge batteries fully.
1. Plug the charger into an appropriate outlet before
inserting the battery pack.
2. Insert the battery pack into the charger.
3. The green LED will flash indicating that the battery is
being charged.
4. The completion of charge is indicated by the green LED
remaining on continuously. The pack is fully charged
and may be used at this time or left on the charger.
Leaving the battery in the charger
The charger and battery pack can be left connected with
the green LED glowing indefinitely. The charger will keep
the battery pack fresh and fully charged.
Charger Cleaning Instructions
WARNING: Shock hazard. Disconnect the charger
from the AC outlet before cleaning. Dirt and grease
may be removed from the exterior of the charger using

ENGLISH
10
a cloth or soft non-metallic brush. Do not use water or
any cleaning solutions.
Important Charging Notes
1. Longest life and best performance can be obtained if
the battery pack is charged when the air temperature is
between 65°F and 75°F (18°–24°C). DO NOT charge
the battery pack in an air temperature below +40°F
(+4.5°C), or above +104°F (+40°C). This is important
and will prevent serious damage to the battery pack.
2. The charger and battery pack may become warm to the
touch while charging. This is a normal condition, and
does not indicate a problem. To facilitate the cooling of
the battery pack after use, avoid placing the charger or
battery pack in a warm environment such as in a metal
shed or an uninsulated trailer.
3. If the battery pack does not charge properly:
a. Check operation of receptacle by plugging in a lamp
or other appliance;
b. Check to see if receptacle is connected to a light
switch which turns power off when you turn out the
lights;
c. Move the charger and battery pack to a location
where the surrounding air temperature is
approximately 65°F–75°F (18°–24°C);
d. If charging problems persist, take the tool, battery
pack and charger to your local service center.
4. The battery pack should be recharged when it fails to
produce sufficient power on jobs which were easily
done previously. DO NOT CONTINUE to use under these
conditions. Follow the charging procedure. You may
also charge a partially used pack whenever you desire
with no adverse effect on the battery pack.
5. Foreign materials of a conductive nature such as, but
not limited to, grinding dust, metal chips, steel wool,
aluminum foil, or any buildup of metallic particles
should be kept away from charger cavities. Always
unplug the charger from the power supply when there
is no battery pack in the cavity. Unplug the charger
before attempting to clean.
6. Do not freeze or immerse the charger in water or any
other liquid.
Storage Recommendations
1. The best storage place is one that is cool and dry, away
from direct sunlight and excess heat or cold.
2. For long storage, it is recommended to store a fully
charged battery pack in a cool dry place out of the
charger for optimal results.
NOTE: Battery packs should not be stored completely
depleted of charge. The battery pack will need to be
recharged before use.
SAVE THESE INSTRUCTIONS FOR
FUTURE USE
COMPONENTS FIG. A
WARNING: Never modify the power tool or any part
of it. Damage or personal injury couldresult.
Refer to Figure A at the beginning of this manual for a
complete list ofcomponents.
INTENDED USE
Your BLACK+DECKER chain saw is ideal for residential
pruning applications and cutting logs up to 8" (203 mm)
indiameter.
DO NOT use under wet conditions or in presence of
flammable liquids orgases.
DO NOT let children come into contact with the tool.
Supervision is required when inexperienced operators use
thistool.
ASSEMBLY
Installing the Guide Bar and Saw Chain
(Fig.A, B–D, E)
CAUTION: Sharp chain. Always wear protective
gloves when handling the chain. The chain is sharp
and can cut you when it is notrunning.
WARNING: Sharp moving chain. To prevent
accidental operation, ensure that battery is removed
from the tool before performing the following
operations. Failure to do this could result in serious
personalinjury.
If the saw chain 14 and guide bar 13 are packed
separately in the carton, the chain has to be attached to the
bar, and both must be attached to the body of thetool.
• Place the saw on a flat, firmsurface.
• Rotate the bar adjust locking knob 16 counterclockwise
as shown in Figure B to remove sprocket cover 17 .
• Wearing protective gloves, grasp the saw chain 14 and
wrap it around the guide bar 13 , ensuring the teeth are
facing the correct direction (see figure H)
• Ensure the chain is properly set in the slot around the
entire guide bar.
• Place the saw chain around the sprocket 18 while
lining up the slot on the guide bar with the bolt 19 in
the base of the tool as shown in Figure C.
• The tensioning knob must be rotated counterclockwise
to its stop. Arrows on the sprocket cover and tensioning
knob must align before the cover is replaced. Once in
place, hold the bar still, replace sprocket cover 17 .
• Make sure tool-free tension assembly bolt hole on the
cover lines up with the bolt 19 in the main housing as
shown in Figure D.
• Rotate the bar adjust locking knob 16 clockwise until
snug, then loosen knob one full turn, so the saw chain
can be properly tensioned.
NOTE: If the cover does not fit correctly, check that the
tab for the tool free tensioner on the bar aligns with the
slot on the inside of the sprocket cover.
• While holding the bar adjust locking knob 16 , rotate
the chain tensioning knob 20 clockwise to increase

ENGLISH
11
tension as shown in Figure E. Make sure the saw chain
14 is snug around the guide bar 13 .
Fig. B
16
17
18
19 14
13
Fig. C
Fig. D
16
20
Adjusting Chain Tension (Fig.A, E )
CAUTION: Sharp chain. Always wear protective
gloves when handling the chain. The chain is sharp
and can cut you when it is notrunning.
WARNING: Sharp moving chain. To prevent
accidental operation, ensure that battery is removed
from the tool before performing the following
operations. Failure to do this could result in serious
personalinjury.
• With the saw on a flat, firm surface, check the saw chain
14 tension. The tension is correct when the chain snaps
back after being pulled 1/8" (3mm) away from the
guide bar 13 with light force from the index finger and
thumb as shown in FigureI. There should be no “sag”
between the guide bar and the chain on the underside
as shown in FigureE.
• To adjust saw chain tension, loosen bar adjust locking
knob 16 one full turn and follow instructions for
“Installing the Guide Bar and Saw Chain.”
• Do not over-tension the chain as this will lead to
excessive wear and will reduce the life of the bar and
chain.
• Once chain tension is correct, securely tighten bar adjust
locking knob.
• When the chain is new, check the tension frequently
(after removing battery) during the first 2 hours of use as
a new chain stretchesslightly.
Fig. E
1/8” (3mm)
Replacing the Saw Chain (Fig.A, F)
CAUTION: Sharp chain. Always wear protective
gloves when handling the chain. The chain is sharp
and can cut you when it is notrunning.
WARNING: Sharp moving chain. To prevent
accidental operation, ensure that battery is removed
from the tool before performing the following
operations. Failure to do this could result in serious
personalinjury.
• Rotate the bar adjust locking knob 16 counterclockwise
to release chain tension.
• Remove sprocket cover 17 as described in “Installing
the Guide Bar and Saw Chain” section.
• Lift the worn saw chain 14 out of the groove in the
guide bar 13 .
• Place the new chain in the slot of the guide bar, making
sure the saw teeth are facing the correct direction by
matching the arrow on the chain with the graphic on
the sprocket cover 17 shown in figure F.
• Follow instructions for “Installing the Guide Bar and Saw
Chain.”
• Replacement chain and bar are available from your
nearest BLACK+DECKER service center.
• BCASCS60 requires replacement chain # RC1000, service
part number 90586161. Replacement 10” bar, service
part number 90586759 .
Fig. F

ENGLISH
12
Transporting Saw (Fig.A,G)
• Always remove the battery from the tool and cover
the guide bar 13 with the guide bar cover 15 (see
FigureG) when transporting thesaw.
Fig. G
Installing and Removing Attachments
(FIG. H, I)
WARNING: Shock hazard. Under no circumstances
should this product be used near water.
WARNING: Burn hazard. Moving parts within the
base unit become hot during use. Avoid contact with
moving parts within base unit when removing and
installing accessories or
attachments
.
WARNING:
Before assembly, remove the battery
from the base unit. Remove any accessory from
the attachment before removing or installing the
attachment.
WARNING: To reduce the risk of injury, do not place
fingers or other objects inside the base unit, other than
the attachments designed to work with the base unit.
1. To fit an attachment or the extension pole to the base unit
1 , align the attachment/pole base with the base unit as
shown in Fig. H and Fig. I.
2. Firmly push the attachment or extension pole onto the
base unit until it snaps into place and an audible click is
heard.
NOTE: Attachments fit onto the extension pole in the same
manner as the base unit.
NOTE: Base mode, requires the guard 11 to be
upright. Press the guard lock button 12 and lift the
guard into position as shown in Fig. J.
Pole mode, requires the kickback guard 11 to be in
the stored position. Press the kickback guard release
button 12 and lower the guard into position as shown
in Fig. J.
3. Ensure attachment is securely attached to the base
unit or extension pole by gently pulling it away. The
attachment should remain in place.
4. To remove an attachment or extension pole, depress
the release button 8 or 10 located on the side of the
attachment or extension pole and pull the attachment
or extension pole away from the base unit or extension
pole.
NOTE: Only use attachments that are specifically designed
for and are compatible with the base unit.
Fig. H
1
9
10
11
Fig. I
1
6
8
Fig. J
10
11
Proper Hand Position (Fig. K, L)
WARNING: To reduce the risk of serious personal injury,
ALWAYS use proper hand position as shown.
WARNING:
To reduce the risk of serious personal
injury, ALWAYS hold securely in anticipation of a
suddenreaction.
Base mode, proper hand position requires the left hand on
the bail handle 3, with the right hand on the main handle
2.
Pole mode, operate with the right hand on the main
handle 2 and the left hand on the pole handle 7.

ENGLISH
13
Fig. K
32
Fig. L
7
Installing and Removing the Battery Pack
WARNING: Make certain the lock-off switch is
engaged to prevent switch actuation before removing
or installing battery.
NOTE: For best results, make sure your battery pack is
fullycharged.
To install battery pack: Insert battery pack 20 into battery
housing 22 as shown in FIG. M until fully seated and an
audible click is heard.
Make sure battery pack is fully seated and fully latched into
position.
To remove battery pack: Depress the battery release
button21 on the battery and pull battery pack out of
appliance.
Fig. M
20 21
22
OPERATION
WARNING: Read and understand all instructions.
Failure to follow all instructions listed below
may result in electric shock, fire and/or serious
personalinjury.
• Guard Against Kickback which can result in severe
injury or death. See Important Safety Instructions
Guard Against Kickback, to avoid the risk
ofkickback.
• Do not overreach. Do not cut above chest height.
Make sure your footing is firm. Keep feet apart.
Divide your weight evenly on bothfeet.
• Use a firm grip with your left hand on the bail
handle 3 and your right hand on the main
handle 2 so that your body is to the left of the
guidebar.
• Do not hold chain saw by kickback guard 11.
Keep elbow of left arm locked so that left arm is
straight to withstand akickback.
WARNING: Never use a cross-handed grip (left
hand on the rear handle and right hand on the
fronthandle).
WARNING: Never allow any part of your body to be
in line with the guide bar 13 when operating the
chain saw.
• Never operate while in a tree, in any awkward
position or on a ladder or other unstable surface.
You may lose control of saw causing severeinjury.
• Keep the chain saw running at full speed the entire
time you arecutting.
• Allow the chain to cut for you. Exert only light
pressure. Do not put pressure on chain saw at
end ofcut.
WARNING: When not in use always have the
batteryremoved.
WARNING: To reduce the risk of serious personal
injury, turn unit off and remove the battery pack
before making any adjustments or removing/
installing attachments or accessories. An
accidental start-up can causeinjury.
WARNING: Shock hazard. Under no circumstances
should this product be used near water.
WARNING: Burn hazard. Moving parts within the
base unit become hot during use. Avoid contact with
moving parts within base unit when removing and
installing accessories.
WARNING: Always use proper eye protection that
conforms to ANSI Z87.1 (CAN/CSA Z94.3) while
operating thisappliance.
CAUTION: Wear a filter mask if the operation is
dusty. Use of gloves, long pants and substantial
footwear is recommended. Keep long hair and loose
clothing away from openings and moving parts.

ENGLISH
14
Switching On (FIG. N, N1)
Always be sure of your footing and grip the chain saw firmly
with both hands with the thumb and fingers encircling
bothhandles.
Base mode
1. With your right hand, push the lock off switch5 down.
With your left hand squeeze the bail handle 3 and then
squeeze the ON/OFF switch 2 with your right hand.
Once the unit is running, you may release the lock off
switch. The more the ON/OFF is depressed, the higher
the speed of the base unit.
2. In order to keep the unit running you must continue to
squeeze both the bail handle and the ON/OFF. To turn the
unit off, release the ON/OFF switch or bail handle.
Pole mode
1. With your right hand, push the lock off switch5 down.
With your left hand grip the pole handle 7 and then
squeeze the ON/OFF switch 2 with your right hand.
2. Once the unit is running, you may release the lock off
switch. The more the ON/OFF is depressed, the higher
the speed of the base unit.
3. In order to keep the unit running you must continue to
squeeze the ON/OFF switch. To turn the unit off, release
the ON/OFF switch.
Fig. N
34
5
Fig. N1
5
4
NOTE: If too much force is applied while making a cut the
saw will turn off. To restart saw, you must release the ON/
OFF switch 1 before the saw will restart. Begin your cut
again this time with less force. Allow the saw to cut at its
ownpace.
Operation
Base mode Trimming / Pruning
Common Cutting Techniques
(Fig.O, P, Q, R, S, T)
Felling
The process of cutting down a tree. Be sure battery is fully
charged before felling a tree so you can finish on a single
charge. Do not fell trees in high windconditions.
WARNING: Felling can result in injury. It should only
be performed by a trainedperson.
• A retreat path should be planned and cleared as
necessary before cuts are started. The retreat path
should extend back and diagonally to the rear of the
expected line of fall (see FigureP).
DIRECTION
OF
FALL
RETREAT
45°
TREE
Fig. O
45°
RETREAT
• Before felling is started, consider the natural lean of
the tree, the location of larger branches and the wind
direction to judge which way the tree will fall. Have
wedges (wood, plastic or aluminum) and a heavy mallet
handy. Remove dirt, stones, loose bark, nails, staples,
and wire from the tree where the felling cuts are to
bemade.
• Notching Undercut - Make the notch 1/3 of the
diameter of the tree, perpendicular to the direction of
the fall. Make the lower horizontal notching cut first.
This will help to avoid pinching of either the saw chain
or the guide bar when the second notch cut is being
made (see FigureP).
• Felling Back Cut - Make the felling back cut at least 2"
(51mm) higher than the horizontal notching cut. Keep
the felling back cut parallel to the horizontal notching
cut. Make the felling back cut so enough wood is left
to act as a hinge. The hinge wood keeps the tree from
twisting and falling in the wrong direction. Do not cut
through the hinge (see FigureP).
• As the felling cut gets close to the hinge the tree should
begin to fall. If there is any chance that the tree may
not fall in the desired direction or it may rock back and
bind the saw chain, stop cutting before the felling cut
is complete and use wedges to open the cut and drop
the tree along the desired line of fall. When the tree
begins to fall remove the chain saw from the cut, stop
the motor, put the chain saw down, then use the retreat
path planned. Be alert for overhead limbs falling and
watch yourfooting.

ENGLISH
15
2" (51 mm)
DIRECTION OF FALL
2" (51 mm)
HINGE
NOTCH
FELLING BACK CUT
Fig. P
Limbing
Removing the branches from a fallen tree. When limbing,
leave larger lower limbs to support the log off the ground.
Remove the small limbs in one cut. Branches under tension
should be cut from the bottom of the branch towards the
top to avoid binding the chain saw as shown in FigureQ.
Trim limbs from opposite side keeping tree stem between
you and saw. Never make cuts with saw between your legs
or straddle the limb to becut.
Fig. Q
Bucking
WARNING: Recommend that first time users should
practice cutting on a sawhorse.
Cutting a felled tree or log into lengths. How you should cut
depends on how the log is supported. Use a saw horse (see
FigureR) wheneverpossible.
Fig. R
• Always start a cut with the chain running at fullspeed.
• Place the bottom spike 23 of the chain saw behind the
area of the initial cut as shown in FigureS.
• Turn the chain saw on then rotate the chain and bar
down into the tree, using the spike as ahinge.
• Once the chain saw gets to a 45 degree angle, level
the chain saw again and repeat steps until you cut
fullythrough.
• When the tree is supported along its entire length, make
a cut from the top (overbuck), but avoid cutting the
earth as this will dull your sawquickly.
CUT FROM TOP (OVERBUCK)
AVOID CUTTING EARTH
Fig. S
23
• FigureT- When supported at one end
First, cut 1/3 the diameter from the underside
(underbuck). Then make the finishing cut by
overbucking to meet the firstcut.
1
1
2
2nd CUT OVERBUCK
(2/3DIAMETER)
TO MEET 1st CUT
(TO AVOID PINCHING)
1st CUT UNDERBUCK
(1/3 DIAMETER)
AVOID SPLINTERING
Fig. T
• FigureU- When supported at bothends.
First, cut 1/3 down from the top overbuck. Then make
the finished cut by underbucking the lower 2/3 to meet
the firstcut.
2nd CUT UNDERBUCK
(2/3 DIAMETER)
TO MEET 1st CUT
(TO AVOID PINCHING)
1st CUT OVERBUCK
(1/3 DIAMETER)
TO AVOID SPLINTERING
Fig. U
• When on a slope always stand on the uphill side of the
log. When “cutting through”, to maintain complete
control reduce the cutting pressure near the end of the
cut without relaxing your grip on the chain saw handles.
Don’t let the chain contact the ground. After completing
the cut, wait for the saw chain to stop before you move
the chain saw. Always stop the motor before moving
from cut tocut.
Operation
Pole Saw Trimming / Pruning
WARNINGS:
• Never stand directly under the limb you are cutting.
Always position yourself out of the path of falling debris.

ENGLISH
16
• Always wear head, eye, foot and body protection.
Wearing body protection helps reduce the risk of injury
when operating this unit.
• Never stand on a ladder or other unstable support while
using the Pole Saw. Always avoid any position which
can cause you to lose your balance and cause severe
injury.
• Keep other persons at least 50 feet (15m) from the work
area. Distractions can cause you to lose control.
• Electrocution Hazard. To prevent shock, do not operate
within 50 feet (15m) of overhead electrical lines. Always
check surrounding area for hidden electrical lines.
• Do not extend Pole Saw switch handle above shoulder
height.
Always Wear:
Head Protection
Eye Protection
Work Gloves
Long Pants
Steel Toed Shoes
Operating Position
WARNING: Let the tool work at its own pace. Do not
overload.
WARNING: When pruning trees:
1 . Guard Against Kickback which can result in severe
injury or death. See “KICKBACK”, section to avoid the risk
of kickback.
2 . Do not overreach. Make sure your footing is firm.
Keep feet apart. Divide your weight evenly on both
feet.
3 . Use both hands to grip Pole Saw as shown in figure
L. Use a firm grip. Thumbs and fingers must wrap
around Pole Saw handle and pole.
4 . Never operate while in a tree, in any awkward position,
on a ladder or any other unstable surface. You may lose
control of the Pole Saw causing severe injury.
Follow directions below to trim a tree.
1. Make sure Pole Saw is running at full speed before
making a cut. When starting a cut, place moving chain
against limb. Hold Pole Saw firmly in place to avoid
possible bouncing or skating (sideways movement) of
the Pole Saw.
2. Make the first cut six inches away from tree trunk
on underside of a limb or branch. Use the top of the
guide bar to make this cut. Guide the Pole Saw using
light pressure to make a cut that is 1/3 of the diameter
of limb. Then make the finishing cut from the top as
shown in figure L. Do not force Pole Saw. The motor will
overload and can burn out. It will do the job better and
safer at the rate for which it was intended.
NOTE: If you try to cut off thick branches from the
bottom, the branch will close in and pinch the saw
chain in the cut. If you try to cut off thick branches from
the top, without a shallow undercut, the branch will
splinter and pull bark from the tree.
3. Remove Pole Saw from cut while it is running at full
speed. Stop Pole Saw by releasing ON/OFF switch. Make
sure chain has stopped before setting Pole Saw down.
Fig. V
Chain and Bar
After every few hours of use, remove the sprocket cover,
guide bar and chain and clean thoroughly using a soft
bristle brush. Ensure oiling hole on bar is clear of debris.
When replacing dull chains with sharp chains it is good
practice to flip the chain bar from bottom totop.
Saw Chain Sharpening
CAUTION: Sharp chain. Always wear protective
gloves when handling the chain. The chain is sharp
and can cut you when it is notrunning.
WARNING: Sharp moving chain. To prevent
accidental operation, ensure that battery is removed
from the tool before performing the following
operations. Failure to do this could result in serious
personalinjury.
NOTE: The cutters will dull immediately if they touch the
ground or a nail whilecutting.

ENGLISH
17
To get the best possible performance from your chain saw
it is important to keep the teeth of the chain sharp. Follow
these helpful tips for proper saw chain sharpening:
1. For best results use a 4.5mm file and a file holder or
filing guide to sharpen your chain. This will ensure you
always get the correct sharpeningangles.
2. Place the file holder flat on the top plate and depth
gauge of thecutter.
3. FigureW- Keep the correct top plate 24 filing angle
line of 30° on your file guide parallel with your chain (file
at 60° from chain viewed from the side).
4. Sharpen cutters on one side of the chain first. File from
the inside of each cutter to the outside. Then turn your
saw around and repeat the processes (2, 3, 4) for cutters
on the other side of thechain.
NOTE: Use a flat file to file the tops of the rakers (portion
of chain link in front of the cutter) so they are about
.025" (.635 mm) below the tips of the cutters as shown
in FigureX.
5. FigureY- Keep all cutter lengthsequal.
6. If damage is present on the chrome surface of the
top plates or side plates, file back until such damage
isremoved.
CAUTION: After filing, the cutter will be sharp, use
extra caution during thisprocess.
NOTE: Each time the chain is sharpened, it loses some of
the low kickback qualities and extra caution should be used.
It is recommended that a chain be sharpened no more than
fourtimes.
60°
Fig. W
24
.025"
(0.635mm)
Fig. X
Fig. Y
MAINTENANCE
WARNING: To reduce the risk of serious personal
injury, turn unit off and remove the battery pack
before making any adjustments or removing/
installing attachments or accessories. An
accidental start-up can causeinjury.
Cleaning
WARNING: Blow dirt and dust out of all air vents with
clean, dry air at least once a week. To minimize the risk
of eye injury, always wear ANSI Z87.1 approved eye
protection when performingthis.
WARNING: Never use solvents or other harsh
chemicals for cleaning the non-metallic parts of
the tool. These chemicals may weaken the plastic
materials used in these parts. Use a cloth dampened
only with water and mild soap. Never let any liquid
get inside the tool; never immerse any part of the tool
into aliquid.
Accessories
WARNING: Since accessories, other than those
offered by BLACK+DECKER, have not been tested with
this product, use of such accessories with this tool
could be hazardous. To reduce the risk of injury, only
BLACK+DECKER recommended accessories should be
used with thisproduct.
Recommended accessories for use with your tool are
available at extra cost from your local dealer or authorized
service center. If you need assistance in locating any
accessory, please contact BLACK+DECKER., 701East Joppa
Road, Towson, MD 21286, call 1-800-4-BLACK+DECKER
(1-800-544-6986) or visit our website: www.BLACK+DECKER.
com.
• BCASCS60 requires replacement chain # RC1000, service
part number 90586161. Replacement 10” bar, service
part number 90586759 .
The use of accessories not recommended in this manual
may be hazardous.
Repairs
The charger and battery pack are notserviceable.
WARNING: To assure product SAFETY and
RELIABILITY, repairs, maintenance and adjustment
(including brush inspection and replacement, when
applicable) should be performed by a BLACK+DECKER
factory service center or a BLACK+DECKER authorized
service center. Always use identical replacementparts.
Register Online
Thank you for your purchase. Register your product nowfor:
• WARRANTY SERVICE: Registering your product will
help you obtain more efficient warranty service in case
there is a problem with yourproduct.
• CONFIRMATION OF OWNERSHIP: In case of
an insurance loss, such as fire, flood or theft, your
registration of ownership will serve as your proof
ofpurchase.
• FOR YOUR SAFETY: Registering your product will
allow us to contact you in the unlikely event a safety
notification is required under the Federal Consumer
SafetyAct.

ENGLISH
18
Register online at www.BLACK+DECKER.com/register.
TWOYEAR LIMITED WARRANTY
Black & Decker (U.S.) Inc. warranties this product to be free
from defects in material or workmanship for a period of
two (2) years following the date of purchase, provided that
the product is used in a home environment. This limited
warranty does not cover failures due to abuse, accidental
damage or when repairs have been made or attempted
by anyone other than BLACK+DECKER and its Authorized
Service Centers. A defective product meeting the warranty
conditions set forth herein will be replaced or repaired at no
charge in either of two ways:
The first, which will result in exchanges only, is to return
the product to the retailer from whom it was purchased
(provided that the store is a participating retailer). Returns
should be made within the time period of the retailer’s
policy for exchanges. Proof of purchase may be required.
Please check with the retailer for its specific return policy
regarding time limits for returns or exchanges. The
second option is to take or send the product (prepaid) to
a BLACK+DECKER owned or authorized Service Center
for repair or replacement at BLACK+DECKER’s option.
Proof of purchase may be required. BLACK+DECKER
owned and authorized service centers are listed online
at www.blackanddecker.com. This warranty does not
apply to accessories. This warranty gives you specific
legal rights aand you may have other rights which vary
from state to state or province to province. Should
you have any questions, contact the manager of your
nearest BLACK+DECKER Service Center. This product is
not intended for commercial use, and accordingly, such
commercial use of this product will void this warranty.
All other guarantees, express or implied, are hereby
disclaimed. LATIN AMERICA: This warranty does not
apply to products sold in Latin America. For products
sold in Latin America, check country specific warranty
information contained in the packaging, call the local
company or see the website for such information.
Imported by Black & Decker (U.S.) Inc.,
701 E. Joppa Rd.
Towson, MD 21286
BlackandDecker.com
1-800-544-6986
Troubleshooting Guide
BE SURE TO FOLLOW SAFETY RULES AND INSTRUCTIONS
For assistance with your product, visit our website www.blackanddecker.com for the location of the service center nearest
you or call the BLACK+DECKER help line at 1-800-544-6986.
PROBLEM POSSIBLE CAUSE POSSIBLE SOLUTION
-Unit will not start. -Battery pack not installed properly
-Battery pack not charged.
-Internal componets too hot.
-Attachment or pole not attached to the
base unit..
-Check battery pack installation
-Check battery pack charging
requirements.
-Allow tool to cool down.
-Ensure attachemnt is properly seated
and locked into position on the base
unit or extension pole.
-Battery pack will not charge. -Battery pack not inserted into charger.
-Charger not plugged in.
-Surrounding air temperature too hot
or too cold.
-Insert battery pack into charger until
LED illuminates.
-Plug charger into a working outlet.
Refer to "Important charging notes" for
more details.
-Move charger and battery pack to a
surrounding air temperature of above
40 degrees F (4,5°C) or below 105
degrees F (+40,5°C).
-Unit shuts off abruptly. -Battery pack has reached its maximum
thermal limit.
-Out of charge. (To maximize the life of
the battery pack it is designed to shut off
abruptly when the charge is depleted.)
-Allow battery pack to cool down.
-Place on charger and allow to charge.
Table of contents
Languages:
Other BLACK DECKER Chainsaw manuals

BLACK DECKER
BLACK DECKER LCS1020 User manual

BLACK DECKER
BLACK DECKER GKC3630L20 User manual

BLACK DECKER
BLACK DECKER GKC1820ST1 User manual

BLACK DECKER
BLACK DECKER CS1840 User manual

BLACK DECKER
BLACK DECKER GKC1820L1 User manual

BLACK DECKER
BLACK DECKER CS2040 User manual

BLACK DECKER
BLACK DECKER BCASCS61B User manual

BLACK DECKER
BLACK DECKER CS1825ST1 User manual

BLACK DECKER
BLACK DECKER GKC1825L20 User manual