BLACK DECKER BEGAS5800 User manual

www.blackanddecker.co.uk BEGAS5800
1
5
6
2
7
3
48

2
ENGLISH (Original instructions)
3
ENGLISH
(Original instructions)
23
9121315
14
10
11
16
17
1
2
3
6
8
5
18
A
B C
D E

2
ENGLISH (Original instructions)
3
ENGLISH
(Original instructions)
23
7
F
Intended use
Your BLACK+DECKERTM garden shredder BEGAS5800 has
been designed for shredding most kitchen and garden waste,
including prunings, hedge trimmings, twigs and other organic
garden waste as well as paper and cardboard. The shredded
waste is ideal for composting purposes or to obtain a smaller
volume of waste for easy disposal.
This garden shredder is intended for consumer use only. It is
intended for intermittent use: the recommended material feed
time is 40% of the total run time of the shredder. Selecting
and picking up the material will normally provide a sufcient
idle time.
Safety instructions
Warning! When using mains-powered
appliances, basic safety precautions,
including the following, should always be
followed to reduce the risk of re, electric
shock, personal injury.
uRead all of this manual carefully before
using the appliance and material
damage.
uThe intended use is described in this
manual. The use of any accessory
or attachment or the performance
of any operation with this appliance
other than those recommended in this
instruction manual may present a risk
of personal injury.
uRetain this manual for future
reference.
Training
uRead the instructions carefully. Be
familiar with the controls and the
proper use of the appliance.
uNever allow children or people
unfamiliar with these instructions to
use the machine. Local regulations
can restrict the age of the operator.
uNever operate the machine while
people, especially children, or pets are
nearby.
uKeep in mind that the operator or user
is responsible for accidents or hazards
occurring to other people or their
property.
Preparation
uDo not operate this equipment in the
vicinity of bystanders.
uOnly operate the appliance in open
space (e.g. not close to a wall or other
xed objects) and on a rm, level
surface.
uAvoid using the machine in bad
weather conditions especially when
there is a risk of lightning
uWear safety glasses at all times while
operating the appliance.
uHearing protection should be worn
whenever the sound level seems
uncomfortable.
uDo not wear loose clothing or
jewellery, as these can be caught in
moving parts.

4
ENGLISH (Original instructions)
5
ENGLISH
(Original instructions)
Preferably wear rubber gloves and
non-slip footwear when working
outdoors. Wear protective hair
covering to keep long hair out of the
way.
uAlways wear long trousers when using
this equipment.
uDo not expose the appliance to rain.
Do not use the appliance where there
is a risk of causing re or explosion,
e.g. in the presence of ammable
liquids and gases.
uDo not operate the appliance on a
paved or gravel surface where ejected
material could cause injury.
uTo prevent damage to the cutting
gear, remove earth from roots. Do not
attempt to shred bones, stone, glass,
metal, plastics or rags.
uBefore use, carefully check the
appliance and mains cable for
damage. Check for misalignment and
seizure of moving parts, breakage of
parts, damage to guards and switches
and any other conditions that may
affect its operation. Ensure that the
appliance will operate properly and
perform its intended function. Do
not use the appliance if any part is
damaged or defective. Do not use the
appliance if the switch does not turn it
on and off.
uHave any damaged or defective parts
repaired or replaced by an authorised
repair agent. Never attempt any
repairs yourself.
uIf the supply cord is damaged, it must
be replaced by the manufacturer or its
service agent or a similarly qualied
person in order to avoid a hazard.
Replace damaged or unreadable
labels.
Safety of others
uThis appliance can be used by
children aged from 8 years and above
and persons with reduced physical,
sensory or mental capabilities or
lack of experience and knowledge
if they have been given supervision
or instruction concerning use of
the appliance in a safe way and
understand the hazards involved.
uChildren shall not play with the
appliance. Cleaning and user
maintenance shall not be made by
children without supervision.
Residual risks
Additional residual risks may arise when
using the tool which may not be included
in the enclosed safety warnings. These
risks can arise from misuse, prolonged
use etc. Even with the application of
the relevant safety regulations and the
implementation of safety devices, certain
residual risks can not be avoided. These
include:
uInjuries caused by touching any
moving parts.
uInjuries caused by touching any hot
parts.
uInjuries caused when changing any
parts or accessories.

4
ENGLISH (Original instructions)
5
ENGLISH
(Original instructions)
uInjuries caused by prolonged use
of the appliance. When using any
appliance for prolonged periods
ensure you take regular breaks.
uImpairment of hearing.
uHealth hazards caused by breathing
dust developed when using your
tool (example:- working with wood,
especially oak, beech and MDF.)
uIf operating the mower in a damp
location is unavoidable, use a residual
current device (RCD) with a tripping
current of not more than 30 mA.
Use of an RCD reduces the risk of
electric shock.
uNever pick up or carry an appliance
while the motor is running.
Guard against electric shock
uThe appliance must be connected to
a socket or extension cable containing
an earth connection.
uElectric safety can be further improved
by using a high-sensitivity (30 mA /
30 mS) residual current device (RCD).
uYour appliance is designed for use on
AC (mains) electrical supplies only.
Do not attempt to use it on any other
supply.
Extension cables
uWhen using the appliance outdoors,
only use extension cables intended for
outdoor use.
uUp to 25 m 1.5 mm2 3-core extension
cable can be used without loss of
power.
uAlways keep extension cords away
from moving hazardous parts to avoid
damages to the cords which can lead
to contact with live parts.
Operation
uBefore starting the appliance, look into
the feeding chamber to make certain
that it is empty.
uKeep your face and body away from
the feed intake opening, long branches
may lash out when being pulled in by
the cutting gear. Do not allow hands or
any other part of the body or clothing
inside the feeding chamber, discharge
chute, or near any moving part.
uKeep proper balance and footing at all
times. Do not overreach. Never stand
at a higher level than the base of the
appliance when feeding material into it.
uAlways stand clear of the discharge
zone when operating this appliance.
uWhen feeding material into the
appliance be extremely careful that
pieces of metal, rocks, bottles, cans or
other foreign objects are not included.
uIf the cutting mechanism strikes any
foreign objects or if the appliance
starts making any unusual noise
or vibration, turn the appliance off,
remove the plug from the mains and
allow the appliance to stop.
uInspect the appliance for damage.
uCheck for and tighten any loose
parts.
uHave any damaged parts replaced
or repaired with original parts by an
authorised repair agent.

6
ENGLISH (Original instructions)
7
ENGLISH
(Original instructions)
Make sure that all
moving parts have come to a complete
stop before making any inspections,
adjustments, etc.
uStore the appliance in a dry and locked
location. Children should not have
access to stored appliances.
Labels on appliance
The following pictograms are shown on
the tool along with the date code:
Warning! Read the manual prior
to operation.
Danger - rotating blades. Keep
hands and feet out of openings.
Do not use the tool in wet
conditions or expose it to rain.
Wear safety glasses or goggles
when operating this appliance.
Wear suitable ear protectors
when operating this appliance.
Always remove the plug from
the socket before cleaning or
maintenance. Be careful not to
use your appliance if the cable is
damaged.
Disconnect the mains plug if
the cord becomes damaged or
entangled.
Wait until completely stopped
before touching.
Beware of ying objects. Keep
bystanders away from the
cutting area.
uDo not allow processed material to
build up in the discharge zone; this
may prevent proper discharge and can
result in kickback of material through
the feed intake opening.
uIf the appliance becomes clogged, turn
the appliance off, remove the plug from
the mains and allow the appliance to
stop before clearing debris.
uKeep all guards and deectors in place
and in good working condition.
uDo not transport or tilt the appliance
whilst in operation.
uDo not leave the appliance
unattended. Whenever you leave
the work area, turn the appliance off,
remove the plug from the mains and
allow the appliance to stop. Children
must be supervised to ensure they do
not play with the appliance.
uDo not tilt the appliance while the
power source is running.
uAlways disconnect the supply:
ubefore clearing a blockage;
ubefore checking, cleaning or working
on the machine;
uafter striking a foreign object to
inspect the machine for damage;
u
if the machine starts to vibrate
abnormally;
Maintenance and storage
uWhen the appliance is stopped for
servicing, inspection, or storage, or
to change an accessory, turn the
appliance off and remove the plug
from the mains.
>

6
ENGLISH (Original instructions)
7
ENGLISH
(Original instructions)
Wear gloves when operating this
tool.
Do not use as a step.
Directive 2000/14/EC guaran-
teed sound power.
Electrical safety
Warning! This tool is double
insulated; therefore no earth wire
is required.
Always check that the power supply
corresponds to the voltage on the rating
plate.
uIf the supply cord is damaged, it must
be replaced by the manufacturer or an
authorised BLACK+DECKER Service
Centre in order to avoid a hazard.
uElectric safety can be further improved
by using a high sensitivity 30 mA
Residual Current Device (RCD).
Features
This appliance includes some or all of the following features.
1. On/off switch
2. Direction selector
3. Overload protection button
4. Funnel
5. Stand
6. Collection bin
7. Adjustment knob
8. Plunger
Assembly
Warning! Before assembly, make sure that the appliance is
switched off and unplugged.
Attaching the wheels to the stand
(Fig. A)
u Slide the sleeve (13) into the wheel (12).
u Slide the wheel shaft (11) into the sleeve (13) and wheel
(12).
u Slide the wheel shaft (11) into the washer (14) and insert
into the stand (5).
u Secure the wheel shaft (11) into the stand with the screw
(15).
u Secure the wheel (12) onto the wheel shaft with the spring
clip (10).
u Secure the foot (16) onto the stand (5) using the screws
(17).
uRepeat the above assembly on the revese side.
Attaching the motor unit to the stand (Fig. B)
uAlign the holes on the motor unit with the corresponding
holes on the stand (5).
u Insert the screws (18) through motor unit and into the
stand.
Fitting the collection bin (Fig. C)
u Slide the collection bin (6) into the stand (5) ensuring that
the safety switch locks securely.
Note: The unit will not operate unless the safety switch is
engaged.
Use
Warning! Let the tool work at its own pace. Do not overload.
uDo not switch the appliance off before it is completely
empty, as it may clog and be difcult to restart.
uRemove soil and stones from plant roots before shredding.
uFirmly hold branches when feeding them into the
shredder.
u Use the plunger (8) when required to feed material into the
shredder as shown in gure E.
Switching on and off (Fig. D)
Switching on
u Set the direction selector (2) to left position.
uPress the I button of the on/off switch.
Switching off
uPress the O button of the on/off switch.
Warning! Do not operate the direction selector/switches
in sequence using abrupt motions. Sudden switching may
generate current spikes potentially damaging the shredder.
Clearing a blockage
If the appliance becomes jammed by branches which are too
thick or hard, or foreign bodies, the shredder will most of the
time release itself automatically. The rotating direction will
automatically reverse thereby releasing the material back
through the top. To return the rotation back to normal, proceed
as follows:
uSwitch off and wait until the cutting blade has stopped
completely.
uSwitch on again with the appliance set to forward rotation.

8
ENGLISH (Original instructions)
9
ENGLISH
(Original instructions)
When the material is jammed:
uSwitch the appliance off.
u Set the direction selector (2) to the right position.
uPress the I button until the blockage is removed.
Warning! Branches may be ejected from the inlet funnel when
the appliance is running in reverse.
If the blockage has not cleared:
uSwitch off and unplug the appliance.
u Use a piece of wood or the plunger (8) to loosen the
debris within the cutting chamber.
uReplace the plug in the mains socket and operate the
appliance as described above to remove any debris.
Warning! Always switch off and unplug the appliance when
removing a blockage. Do not attempt to remove blockages
by hand through the inlet funnel or outlet opening. Keep your
hands clear of the cutting chamber.
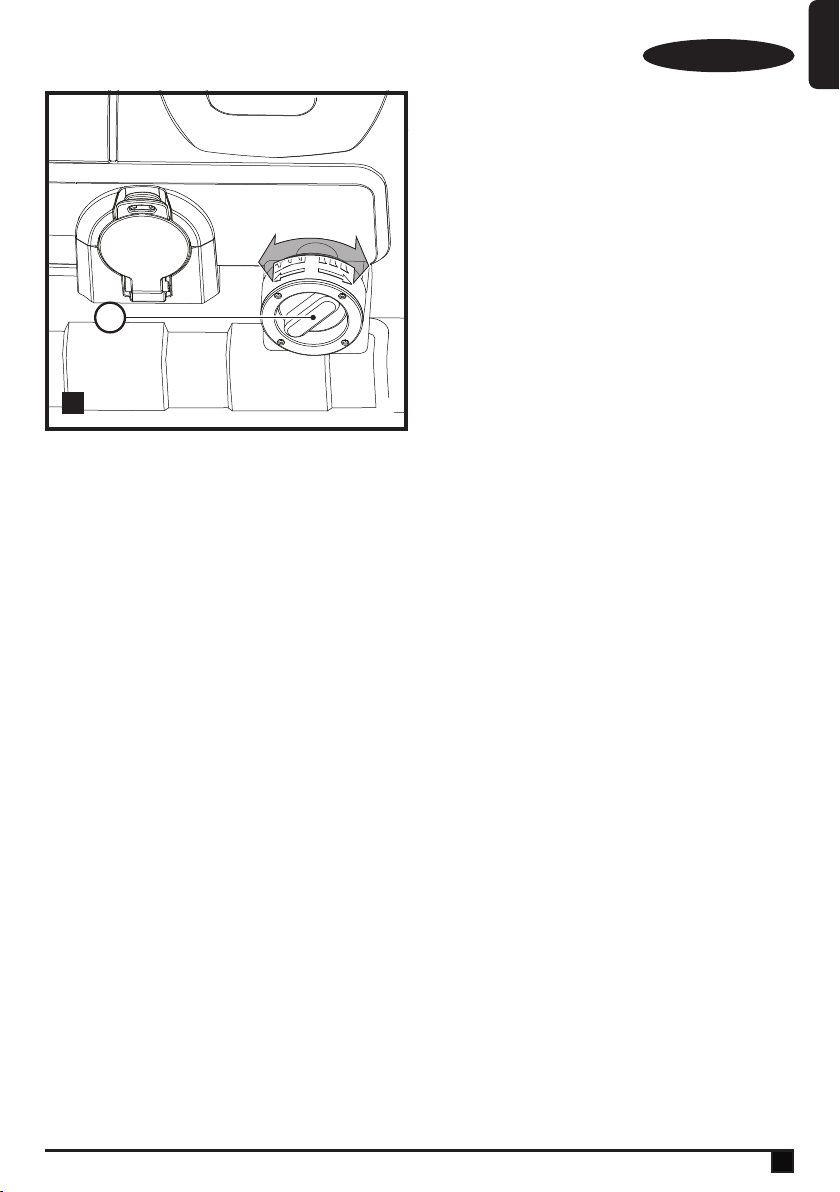
Adjusting the cutter plate (Fig. F)
The cutter plate needs to be adjusted if the appliance fails to
shred material.
u Turn the adjustment knob (7) clockwise half a turn into the
cutting position to cut through light material completely.
uTurn the adjustment knob counter-clockwise half a turn
into the crushing position to shred heavy materials.
The materials may need to be put through the appliance
twice to crush the material before cutting it completely.
uMake sure the cutting blade does not touch the anvil blade
to avoid damage to the appliance.
When the shredded material starts to hang like a chain, adjust
as follows:
uSwitch the appliance on.
u Turn very slowly and slightly the adjustment knob (7)
clockwise until you hear a light grinding sound or a small
amount of aluminium shavings will fall out of the discharge
chute. The shredded material will now be separated.
Warning! Ensure the appliance is switched on and working in
normal forward direction. Adjusting the cutter plate while the
appliance is switched off can lead to serious damage of the
appliance.
Overload protection
This appliance has an overload protection. If the appliance
becomes blocked and the motor stalls, the power will
automatically be switched off.
uWait for about 5 minutes for the protection to reset.
uDisconnect the appliance from the mains supply.
uClear the blockage as described above.
uConnect the appliance to the mains supply.
u Press the overload protection button (3).
uSwitch the appliance on.
Hints for optimum use
uShred dry materials last, as this will help to clear moist
material from the shredder.
uDo not allow material to pile up and compost prior to
shredding.
uYou may feed shreddings into the shredder for a second
time to further reduce their volume.
u Refer to the chart at the end of this text.
Maintenance
Your BLACK+DECKER corded/cordless appliance/tool has
been designed to operate over a long period of time with a
minimum of maintenance. Continuous satisfactory operation
depends upon proper tool/appliance care and regular
cleaning.
Warning! Before performing any maintenance on corded/
cordless power tools:
uSwitch off and unplug the appliance/tool.
uRegularly clean the ventilation slots in your tool/appliance
and charger using a soft brush or dry cloth.
uRegularly clean the motor housing using a damp cloth. Do
not use any abrasive or solvent-based cleaner.
Mains plug replacement (U.K. & Ireland only)
If a new mains plug needs to be tted:
uSafely dispose of the old plug.
uConnect the brown lead to the live terminal in the new
plug.
uConnect the blue lead to the neutral terminal.
Warning! No connection is to be made to the earth terminal.
Follow the tting instructions supplied with good quality plugs.
Recommended fuse: 5 A.
Protecting the environment
ZSeparate collection. Products and batteries
marked with this symbol must not be disposed of
with normal household waste.
Products and batteries contain materials that can be
recovered or recycled, reducing demand for raw materials.
Please recycle electrical products and batteries according to
local provisions. Further information is available at
www.2helpU.com
Technical data
BEGAS5800
Voltage
V 230 - 240
Frequency
Hz 50
Power input
W 2800
No-load speed (blade) /min
46
No-load speed (motor) /min
2850
Max cutting diameter mm
45
Weight Kg
29.6

8
ENGLISH (Original instructions)
9
ENGLISH
(Original instructions)
EC declaration of conformity
MACHINERY DIRECTIVE
OUTDOOR NOISE DIRECTIVE
%
BEGAS5800 Shredder
Black & Decker declares that these products described under
"technical data" are in compliance with:
2006/42/EC, EN 60335-1:2012 + A11:2014,
EN 50434:2014
2000/14/EC, Shredder, Annex V,
Level of sound power according to 2000/14/EC
(Article 13):
Sound power level: LWA: 93,0 dB(A), K=1,7 dB(A)
The guaranteed sound power level, LWA: 95 dB(A).
These products also comply with directive 2014/30/EU,
2011/65/EU.
For more information, please contact Black & Decker at the
following address or refer to the back of the manual.
The undersigned is responsible for compilation of the technical
le and makes this declaration on behalf of Black & Decker.
R. Laverick
Director of Engineering
Black & Decker Europe, 210 Bath Road, Slough,
Berkshire, SL1 3YD
United Kingdom
24/09/2018
Guarantee
Black & Decker is condent of the quality of its products
and offers consumers a 24 month guarantee from the date
of purchase. This guarantee is in addition to and in no way
prejudices your statutory rights. The guarantee is valid within
the territories of the Member States of the European Union
and the European Free Trade Area.
To claim on the guarantee, the claim must be in accordance
with Black & Decker Terms and Conditions and you will need
to submit proof of purchase to the seller or an authorised
repair agent. Terms and conditions of the Black & Decker 2
year guarantee and the location of your nearest authorised
repair agent can be obtained on the Internet at www.2helpU.
com, or by contacting your local Black & Decker ofce at the
address indicated in this manual.
Please visit our website www.blackanddecker.co.uk to register
your new Black & Decker product and receive updates on new
products and special offers.

10 11

10 11

N642596REV-0
11/2018
Australia Black & Decker (Australia) Pty. Ltd. Tel. 03-8720 5100
20 Fletcher Road, Mooroolbark, Fax 03-9727 5940
Victoria, 3138
New Zealand Black & Decker Tel. +64 9 259 1133
5 Te Apunga Place Fax +64 9 259 1122
Mt Wellington
Aukland 1060
United Kingdom & Black & Decker Tel. 01753 511234
Republic Of Ireland 210 Bath Road Fax 01753 512365
www.blackanddecker.co.uk Slough, Berkshire SL1 3YD
Table of contents
Popular Paper Shredder manuals by other brands

ATIKA
ATIKA AMA 2300 Original and safety instructions

Formax
Formax FD 8802 series instruction manual

UNITED OFFICE
UNITED OFFICE UAV 220 A2 operating instructions

IDEAL
IDEAL IDEAL 4605 operating instructions

SEMSHRED
SEMSHRED 1201ccaf operating instructions

Aurora
Aurora JamFree ShredSafe AU1040XA user manual