Black BL-009 User manual

T O A S T E R T W O
Gebrauchsanweisung
Mode d'emploi
Direzioni per uso
Operating instructions
2
Deutsch
Toaster BL-009/BL-010
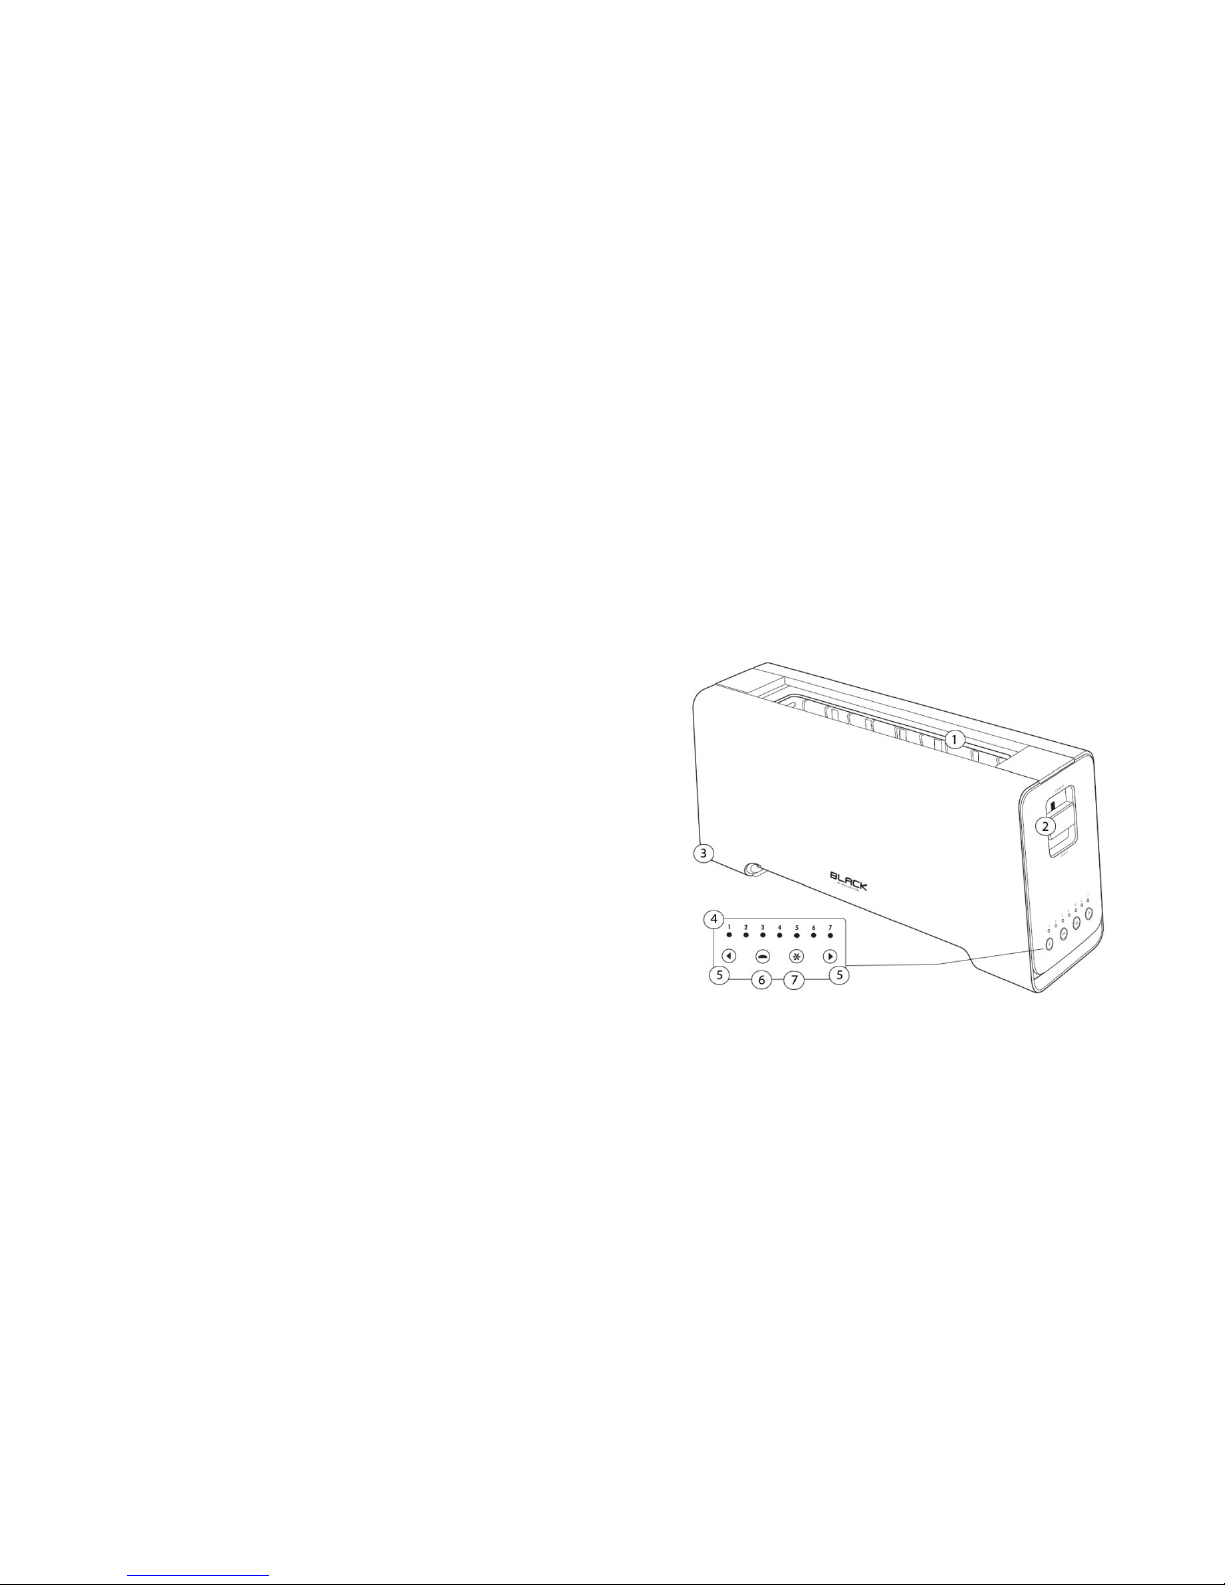
Das Gerät besteht aus den folgenden Komponenten
1. Automatische Selbstzentrierung
2. Automatischer Brotlift (Brot runter, Brot rauf)
3. Krümelschublade
4. Indikator für Toast-Status
5. Tasten für den Bräunungsgrad
6. Taste für die Hefeküchlein-Funktion
7. Taste für die Auftau-Funktion
Technische Daten
Nennspannung AC 220-240V
~
50/60Hz
Nennleistung 750-900W
Abmessungen (Breite x Höhe x Tiefe)
400 x 185 x 110 mm
Gewicht ca. 2.550 kg
Erfüllt EU-Vorschrift CB/CE

3
Wichtige Sicherheitshinweise
•Prüfen Sie vor dem Anschließen des Gerätes, ob die Span-
nungsangabe auf der Unterseite des Gerätes mit der örtli-
chen Netzspannung übereinstimmt.
•Wenn das Netzkabel defekt oder beschädigt ist, darf es nur
von Stadler Form oder einer von autorisierten Werkstatt
ausgetauscht werden, um Gefährdungen zu vermeiden.
•Tauchen Sie das Gerät und das Netzkabel nicht in Wasser
oder andere Flüssigkeiten.
•Ziehen Sie nach dem Gebrauch stets den Netzstecker aus
der Steckdose.
•Halten Sie das Gerät ausser Reichweite von Kindern.
•Lassen Sie das Netzkabel nicht über den Rand der Tisch-
oder Arbeitsplatte hängen, auf der das Gerät steht, und hal-
ten Sie das Kabel fern von heißen Oberflächen.
•Lassen Sie das eingeschaltete Gerät nicht unbeaufsichtigt.
Betreiben sie es nicht unter Wandschränken oder in der
Nähe von Gardinen oder anderen leicht brennbaren Materi-
alien, da Brot in Brand geraten kann.
•Vermeiden Sie jede Berührung mit den Metallteilen des
Geräts, da diese beim Toasten sehr heiß werden. Berühren
Sie nur die Tasten.
•Der Toaster ist ausschließlich für den häuslichen Gebrauch
vorgesehen und darf nur drinnen betrieben werden.
•Um das Risiko eines Brandes zu vermeiden, sollten Sie die
Brotkrümel regelmässig aus der Krümelschublade entfer-
nen. Achten Sie darauf, die Krümelschublade wieder richtig
in das Gerät zu schieben.
•Ziehen Sie sofort den Netzstecker aus der Steckdose,
wenn Sie Rauch oder Feuer bemerken.
•Wenn eine Scheibe Brot im Toaster klemmt, ziehen Sie den
Netzstecker aus der Steckdose und lassen Sie das Gerät
abkühlen, bevor Sie das Brot entnehmen. Verwenden Sie
hierzu kein Messer oder spitzen Gegenstand, um die Heiz-
elemente des Toasters nicht zu beschädigen.
•Dieses Gerät ist nur für den häuslichen Gebrauch vorgese-
hen. Es ist nicht für gewerbliche oder industrielle Verwen-
dung bestimmt.
4
•Übergroße Brotscheiben und Verpackungen aus Metallfolie
dürfen nicht in den Toaster eingeführt werden, da dies zu
Bränden und Stromschlägen führen kann.
•Stellen Sie den Toaster nicht auf heiße Flächen.
Vor der ersten Benutzung
•Reinigen Sie das Gehäuse des Toasters mit einem feuch-
ten Tuch.
•Vor dem ersten Gebrauch des Geräts empfiehlt es sich,
den Toaster in einem gut belüfteten Raum mehrmals ohne
Brot auf der höchsten Röststufe zu betreiben. Dadurch
werden Staubpartikel verbrannt, die sich möglicherweise
auf den Heizelementen angesammelt haben und einen un-
angenehmen Geruch beim Toasten verursachen können.
Bedienung des Toasters
Ein Brot toasten
•Brot auf dem Träger im Toaster positionieren.
•Den gewünschten Bräunungsgrad (1-7) durch drücken der
Tasten für den Bräunungsgrad (5) einstellen.
•Den Brotlift (2, Toast) leicht nach unten drücken und somit
den Toastvorgang starten. Die Toastscheiben werden nun
langsam heruntergefahren. Die aktivierte Stufe beginnt zu
blinken.
•Wenn der eingestellte Bräunungsgrad erreicht wurde, fährt
der Brotträger automatisch wieder rauf und ein "Beep" er-
tönt.
•Der Toastvorgang kann auch durch leichtes nach oben
Drücken des Brotlifts (2, Cancel) vorzeitig abgebrochen
werden.
Die Auftau-Funktion
Dieses Feature erlaubt Ihnen, Toastbrot direkt aus dem Gefrier-
fach ohne vorheriges Auftauen zu toasten.
•Gefrorenes Brot auf dem Träger im Toaster positionieren.
5
•Den gewünschten Bräunungsgrad (1-7) durch drücken der
Tasten für den Bräunungsgrad (5) einstellen.
•Die Taste für die Auftau-Funktion (7) drücken. Die Lampe
hinter der Taste wird dabei aufleuchten und erst wieder
auslöschen, wenn Sie die Taste erneut drücken. Die Toast-
zeit wird durch das vorgängige Auftauen etwas verlängert.
•Den Toastvorgang können Sie nun durch Drücken des
Brotlifts (2) starten.
•Wenn der eingestellte Bräunungsgrad erreicht wurde, fährt
der Brotträger automatisch wieder rauf und ein "Beep" er-
tönt.
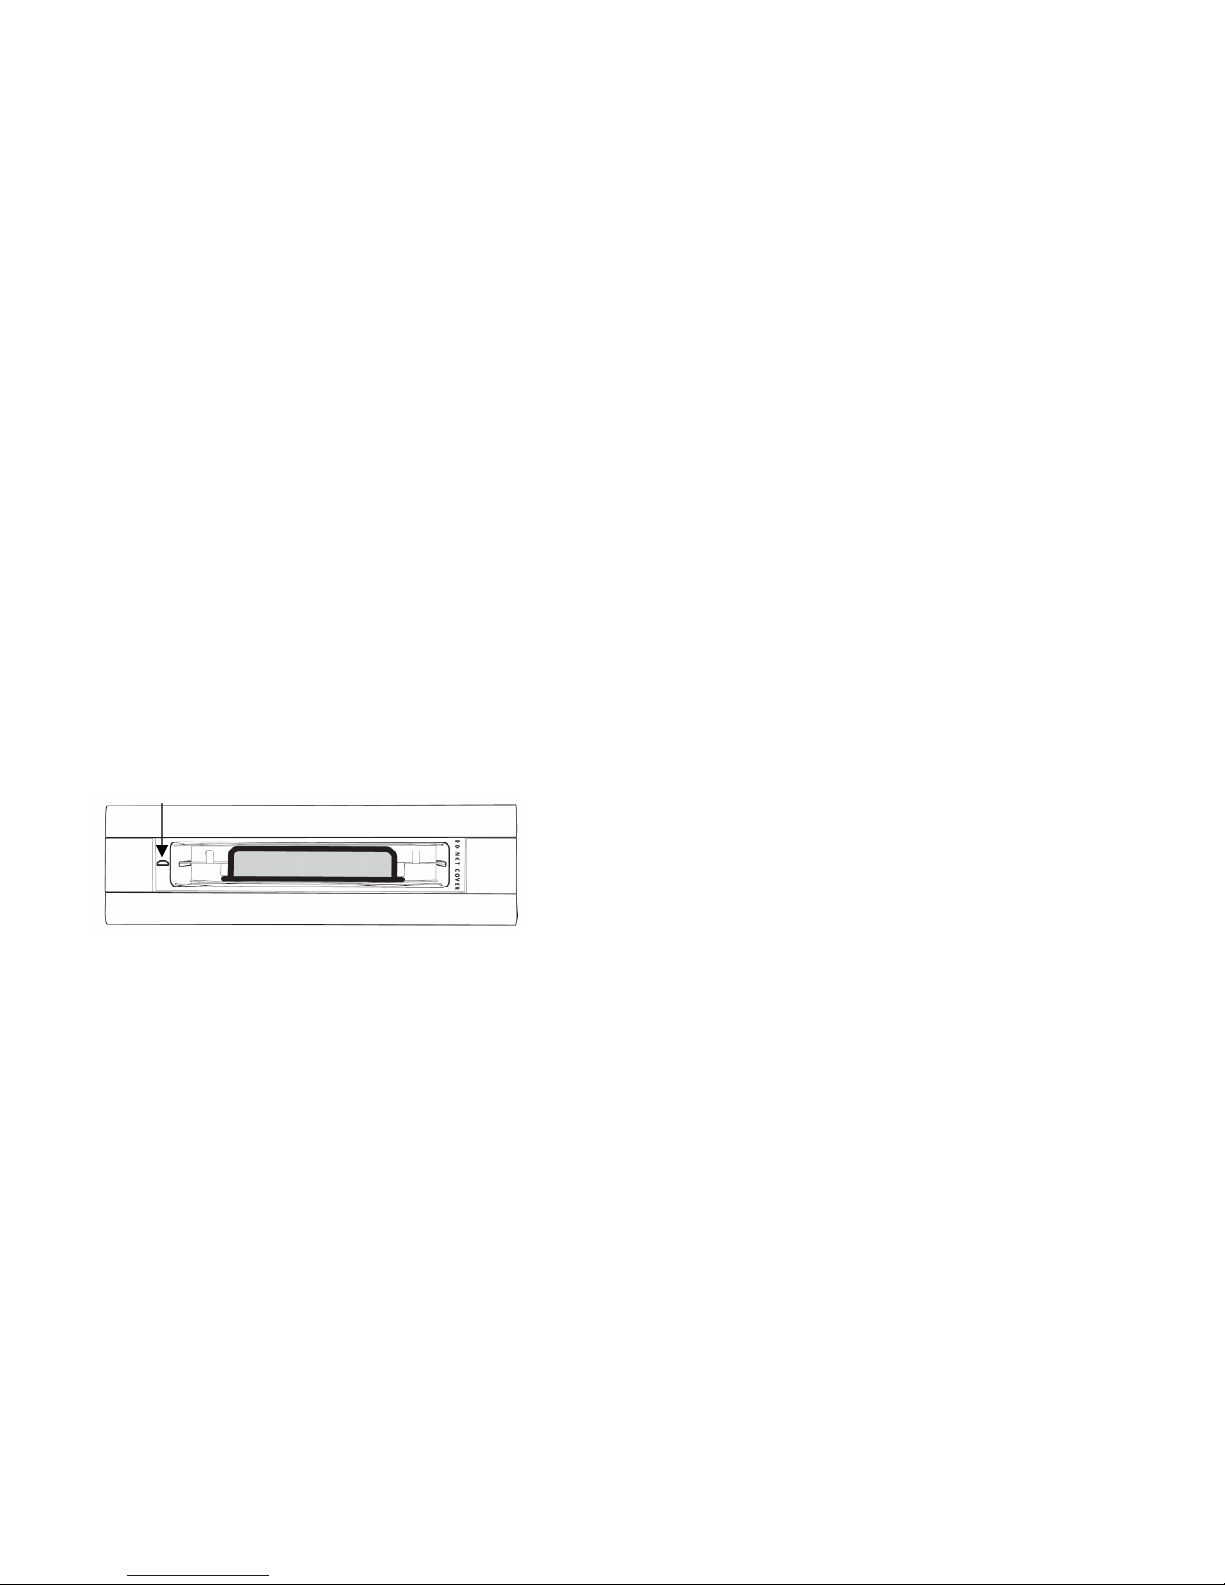
Die Hefeküchlein-Funktion
Dieses Feature erlaubt Ihnen, sogenannte „Crumpets“ und
„Muffins“ zu toasten.
•Die abgebildete Grafik zeigt Ihnen, wie das Küchlein in den
Toaster eingeführt werden soll. Bitte beachten die dazu
auch die Grafik auf der Oberseite des Toasters
•Den gewünschten Bräunungsgrad (1-7) durch drücken der
Tasten für den Bräunungsgrad (5) einstellen.
•Die Taste für die Hefeküchlein-Funktion (6) drücken. Die
Lampe hinter der Taste wird dabei aufleuchten und erst
wieder auslöschen, wenn Sie die Taste erneut drücken.
•Den Toastvorgang können Sie nun durch Drücken des
Brotlifts starten.
•Wenn der eingestellte Bräunungsgrad erreicht wurde, fährt
der Brotträger automatisch wieder rauf und ein "Beep" er-
tönt.
6
Reinigung des Toasters
•Vor dem Reinigen den Netzstecker ziehen und den Toaster
abkühlen lassen.
•Die Krümelschublade (3) herausziehen, reinigen und wie-
der einsetzen. Dies sollten Sie regelmässig tun, denn Krü-
mel können rauchen oder sogar brennen.
•Den Toaster aussen mit einem feuchten Tuch abwischen
und trocken reiben.
•Um die Innenseite zu reinigen, drehen Sie den Toaster auf
den Kopf und schütteln Sie diesen damit im Gerät verblei-
bende Brotkrümel entfernt werden können.

7
Francais
Toasteur BL-009/BL-010
L’appareil est composé des éléments principaux suivants
1. Centrage automatique
2. Ascenseur à pain (en bas, en haut)
3. Tiroir ramasse-miettes
4. Voyant d’état du toast
5. Touche d’intensité du brunissage
6. Touche pour pâtisserie à la levure
7. Touche de décongélation
Caractéristiques techniques
Tension nominale AC 220-240V
~
50/60Hz
Puissance nominale 750-900W
Dimensions (largeur x hauter x profondeur)
400 x 185 x 110 mm
Poids ca. 2.550 kg
Conforme à la réglementation UE : CB/CE
8
Conseils de sécurité importants
•Avant de brancher votre appareil, vérifiez que la tension
indiquée sur le fond de l'appareil correspond bien à la ten-
sion de votre secteur.
•Branchez l'appareil uniquement sur une prise équipée
d'une mise à la terre.
•Si le cordon d'alimentation est endommagé, il doit être
remplacé par Stadler Form ou par un Centre Service Agréé,
pour éviter tout accident.
•Ne plongez jamais l'appareil ou le cordon d'alimentation
dans l'eau ou dans tout autre liquide.
•Débranchez toujours l'appareil après utilisation.
•Tenez l'appareil hors de portée des enfants.
•Ne laissez pas le cordon d'alimentation pendre de la table
et tenez-le à l'écart des surfaces très chaudes.
•Ne laissez jamais le toasteur en marche sans surveillance.
N'utilisez pas le toasteur s'il touche ou est recouvert par
des matériaux inflammables tels que les rideaux.
•Ne faites pas fonctionner l'appareil sous des placards
suspendus, car le pain peut s'enflammer.
•Ne touchez pas les patries métalliques sur le toasteur car
elles deviennent très chaudes pendant le grillage et vous
pourriez vous brûler.Touchez uniquement les commandes.
•Ce toasteur est destiné à un usage domestique unique-
ment.
•Pour éviter tout risque d'incendie, retirez fréquemment les
miettes du ramasse-miettes. Replacez correctement le ra-
masse-miettes.
•Débranchez immédiatement le toasteur si vous observez
de la fumée ou des flammes.
•Si une tranche de pain reste coincée, débranchez le toas-
teur et laissez-le refroidir complètement avant de retirer le
pain. N'insérez jamais un couteau ou objets pointus car il y
a risque d'endommager les éléments chauffants.
•Ce toasteur est destiné à un usage domestique unique-
ment. Il n'est pas destiné à un usage commercial ou indus-
triel.

9
•N'introduisez pas des tranches de pain trop grandes ou de
la nourriture avec du papier en aluminium dans le toasteur
car il y a risque d'incendie ou d'électrocution.
•Ne placez jamais le toasteur sur une surface chaude.
Avant la première utilisation
•Essuyez le grille-pain à l'aide d'un chiffon humide.
•Lors de la première utilisation, faites fonctionner l'appareil
plusieurs fois au réglage maximum, sans introduire de tran-
ches de pain, dans une pièce bien aérée. Vous devez sui-
vre cette procédure pour chauffer les éléments chauffants
et brûler les particules de poussière qui se sont accumu-
lées. Vous éviterez ainsi les odeurs désagréables pendant
le grillage.
Utilisation du toasteur
Griller du pain
•Placez du pain sur le support dans le toasteur.
•Réglez le degré de brunissage souhaité (1-7) en appuyant
sur la touche (5) prévue à cet effet.
•Abaissez l’ascenseur à pain pour démarrer le grillage (2,
Toast). Les tranches de pains sont légèrement abaissées.
L’étape activée commence à clignoter.
•Lorsque le degré de brunissage souhaité est atteint, le
support à pain remonte automatiquement et le toasteur
émet un « bip ».
•Le grillage peut également être interrompu avant la fin en
remontant légèrement l’ascenseur à pain (2, Cancel).
Fonction décongélation
Cette fonction vous permet de toaster du pain directement sorti
du congélateur sans le décongeler au préalable.
•Placez du pain congelé sur le support dans le toasteur.
•Réglez le degré de brunissage souhaité (1-7) en appuyant
sur la touche (5) prévue à cet effet.
•Appuyez sur la touche de décongélation (7). Le voyant
derrière la touche s’allume et ne s’éteindra que lorsque
10
vous rappuyez sur la touche. La durée de grillage sera pro-
longée du temps de décongélation.
•Vous pouvez à présent démarrer le grillage en appuyant
sur l’ascenseur à pain.
•Lorsque le degré de brunissage souhaité est atteint, le
support à pain remonte automatiquement et le toasteur
émet un « bip ».
Fonction pour pâtisseries à la levure
Cette fonction permet de toaster des muffins ou des crumpets.
•Le schéma vous indique comment placer la pâtisserie dans
le toasteur. Veuillez noter le schéma sur la face supérieure
du toaster.
•Réglez le degré de brunissage souhaité (1-7) en appuyant
sur la touche (5) prévue à cet effet.
•Appuyez sur la touche pour pâtisseries à la levure (6). Le
voyant derrière la touche s’allume et ne s’éteindra que lors-
que vous réappuyez sur la touche.
•Vous pouvez à présent démarrer le grillage en appuyant
sur l’ascenseur à pain.
•Lorsque le degré de brunissage souhaité est atteint, le
support à pain remonte automatiquement et le toasteur
émet un « bip ».
11
Nettoyage du toasteur
•Eteignez, débranchez et laissez refroidir votre grille-pain
avant de le nettoyer.
•Retirez votre tiroir à miettes (3) en glissant. Nettoyez-le et
replacez-le. Faites-le régulièrement: les miettes peuvent
fumer ou brûler.
•Essuyez l’extérieur du grille-pain avec un chiffon humide et
séchez.
•Pour nettoyer l’intérieur, retournez le toasteur et secouez-le
afin d’éliminer les miettes de pain restées dans l’appareil.
12
Italiano
Tostapane
BL-009/BL-010
L’apparecchio è composto dai seguenti componenti principali:
1. Centramento automatico
2. Elevatore per il pane (pane in basso, pane in alto)
3. Vassoio raccoglibriciole
4. Indicatore stato di tostatura
5. Tasto selezione grado di tostatura
6. Tasto tostatura dolci con lievito
7. Tasto funzione scongelamento
Dati tecnici
Tensione nominale AC 220-240V
~
50/60Hz
Potenza nominale 750-900W
Dimensioni (larghezza x altezza x profondità)
400 x 185 x 110 mm
Peso ca. 2.550 kg
Conforme alle norme generali UE : CB,CE

13
Norme di sicurezza
•Prima di collegare l'apparecchio, controllate che la tensione
indicata sulla parte inferiore dell'apparecchio corrisponda a
quella locale.
•Collegate l'apparecchio solo ed esclusivamente ad una
presa dotata di messa a terra.
•Nel caso il cavo fosse danneggiato, dovrà essere sostituito
presso un Stadler Form o comunque da personale debita-
mente autorizzato, per evitare situazioni a rischio.
•Non immergete l'apparecchio o il cavo nell'acqua o in ltri
liquidi.
•Dopo l'uso, togliete sempre la spina dalla presa.
•Tenete l'apparecchio lontano dalla portata dei bambini.
•Non lasciate penzolare il cavo dal bordo del tavolo o del
piano d'appoggio sul quale si trova l'apparecchio e tenete il
cavo lontano dalle superfici bollenti.
•Non lasciate mai incustodito l'apparecchio mentre è in
funzione. Non usatelo sotto o vicino a tende o altri materiali
infiammabili e neppure sotto i pensili della cucina, perché il
pane potrebbe prendere fuoco.
•Evitate di toccare le parti metalliche sulla parte anteriore del
tostafette, perché durante la tostatura diventeranno bollen-
ti,Toccate solo gli appositi pulsanti.
•Il tostafette è destinato esclusivamente a uso domestico e
deve essere usato all'interno.
•Per evitare il rischio di incendi, togliete spesso le briciole
dal vassoio raccoglibriciole.
•Controllate anche che il vassoio sia posizionato in modo
corretto.
•Nel caso notaste fumo o fiamme, togliete immediatamente
la spina dalla presa di corrente.
•Nel caso una fetta di pane si incastrasse all'interno del
tosta fette, togliete la spina dalla presa e lasciate raffredda-
re l'apparecchio prima di rimuovere la fetta. Non usate col-
telli o utensili a punta per evitare di danneggiare la
serpentina.
•Questo apparecchio è destinato ESCLUSIVAMENTE a uso
domestico e non può essere utilizzato per uso commerciale
o industriale.
14
•Non inserite cibi troppo voluminosi o carta d'alluminio nel-
l'apparecchio, per evitare il rischio di scintille o scariche
elettriche.
•Non appoggiate il tosta fette su una superficie calda.
Prima del primo utilizzo
•Pulite la parte esterna dell'apparecchio con un panno umi-
do.
•Prima di usare l'apparecchio per la prima volta, vi consi-
gliamo di far compiere al tostafette alcuni cicli completi di
tostatura senza inserire il pane, impostano il livello di tosta-
tura massimo, in un locale debitamente ventilato.
•In questo modo verrà eliminata l'eventuale polvere accumu-
latasi sulla serpentina e si eviteranno gli odori sgradevoli
durante la tostatura del pane.
Uso del tostapane
Come tostare il pane
•Mettere il pane sul ripiano del tostapane.
•Impostare il grado di tostatura desiderato (1-7) premendo
l’apposito tasto (5).
•Premere leggermente verso il basso l’elevatore per avviare
la tostatura (2, Toast). Le fette di toast vengono portate in
basso solo lentamente. Quando il tostapane è attivo la spia
lampeggia.
•Raggiunto il grado di tostatura desiderato, il ripiano torna
automaticamente verso l’alto e l’apparecchio emette un
"beep".
•Si può interrompere la tostatura prima del tempo premendo
leggermente l’elevatore verso l’alto (2, Cancel).
Funzione di scongelamento
Questa funzione consente di scongelare il pane da toast diret-
tamente dallo scomparto del congelatore senza scongelare il
pane in precedenza.
•Mettere il pane congelato sul ripiano del tostapane.

15
•Impostare il grado di tostatura desiderato (1-7) premendo
l’apposito tasto (5).
•Premere il tasto per la funzione di scongelamento (7). La
spia dietro il tasto si accenderà e poi si spegnerà al mo-
mento in cui premerete nuovamente il tasto. Il tempo di tos-
tatura viene prolungato leggermente dal precedente
scongelamento.
•Potete avviare la tostatura premendo l’elevatore.
•Raggiunto il grado di tostatura desiderato, il ripiano torna
automaticamente verso l’alto e l’apparecchio emette un
"beep".
Funzione tostatura dolci con lievito
Questa funzione consente di tostare i cosiddetti „Crumpets“ e
„Muffins“.
•Il seguente disegno indica come introdurre il dolce nel
tostapane. Si prega di controllare anche il disegno riportato
sulla parte superiore del tostapane
•Impostare il grado di tostatura desiderato (1-7) premendo
l’apposito tasto (5).
•Premere il tasto per la funzione dolci (6). La spia dietro il
tasto si accenderà e poi si spegnerà al momento in cui
premerete nuovamente il tasto.
•Potete avviare la tostatura premendo l’elevatore.
•Raggiunto il grado di tostatura desiderato, il ripiano ritorna
automaticamente verso l’alto e l’apparecchio emette un
"beep".
16
Per pulire il tostapane
•Prima di pulire l’apparecchio, staccare la spina e lasciarlo
raffreddare.
•Estrarre il vassoio di raccolta delle briciole (3), pulirlo e
rimetterlo a posto. Eseguire questa operazione regolarmen-
te, in quanto le briciole potrebbero provocare fumo e anche
prendere fuoco.
•Pulire la parte esterna del tostapane con un panno umido e
poi asciugare.
•Per pulire la parte interna, capovolgere il tostapane e scuo-
terlo bene, in modo da rimuovere le briciole di pane riama-
ste nell’apparecchio.

17
English
Toaster BL-009/BL-010
The appliance consists of the following main components
1. Automatic self-centering
2. Bread lift (Toast up, Toast down)
3. Crumb tray
4. Indicator for toast status
5. Button for the browning degree
6. Button for the crumpet function
7. Button for the thaw function
Technical data
Voltage AC 220-240V
~
50/60Hz
Output 750-900W
Dimensions (width x height x depth)
400 x 185 x 110 mm
Weight ca. 2.550 kg
Complies with CB/CE
18
Important safety instructions
•Always operate this electrical appliance from a power
source of the same voltage as indicated on the identification
plate.
•This electrical appliance is not intended for use by young
children or infirm persons without supervision.
•Young children should be supervised to ensure that they do
not play with this electrical appliance.
•Bread may burn. Therefore the toaster MUST NOT be used
near or below curtains and other combustible or flammable
materials.
•Do not leave the toaster unattended when in use.
•Do not attempt to dislodge food when the toaster is plugged
in. Unplug the power cord and allow the toaster to cool.
Turn the toaster upside down and shake the food from the
toaster. Never place metal utensils inside the toaster.
•Regularly clean the crumb tray.
•The toaster should not be covered while in use as a fire
may occur.
•Always “unplug the electrical appliance” immediately after
use.
•Under no circumstances should this electrical appliance be
placed in water or other liquid.
•Do not use this electrical appliance with wet or moist hands.
•If this electrical appliance falls into water, “unplug it” imme-
diately. Do not reach into the water.
•Do not operate this electrical appliance with a damaged
cord or plug.
•Do not operate this electrical appliance if it is not working
properly; if it has been damaged or dropped or dropped into
water or any other liquid.
•This electrical appliance must only be used for its intended
use as indicated in the instruction manual. This electrical
appliance is only for domestic household use.
•Do not operate this electrical appliance outdoors.
•Ensure that the cord is kept away from surfaces which are
heated.

19
•Switch off and remove the plug from the power outlet before
cleaning and when not in use. To unplug, grasp the plug
and pull from the power outlet.
•Do not carry this appliance by the cord.
•Do not place or store this electrical appliance in a position
where it may fall into a bathtub, hand basin, toilet, sink or
vessel containing water or any other liquid.
•Allow to cool before cleaning.
•Do not use this electrical appliance in a confined space.
•The toaster’s surface turns very hot during use. Use knobs
and handles.
•Always use this electrical appliance on a dry and level
surface.
•Do not allow the power cord to hang over the edge of a
table or working surface.
•Do not place this electrical appliance near a gas flame,
electric element or in a heated oven.
•Do not operate this electrical appliance where aerosol
products are being used or where oxygen is being adminis-
tered.
Before using the first time
•Remove all of the various packaging from inside and out-
side of the toaster.
•Prior to the first use we recommend to use the toaster
without bread on the highest level. This will burn the dust
particles that might be on the heating element from the
transport. This procedure could cause some unpleasant
odours.
Operating the toaster
To toast bread:
•Position bread inside the toaster.
•Set the desired degree of browning (1-7) by pressing the
button for the browning degree (5).
20
•Lightly push the bread lift (2, Toast) downwards and start
the toasting process. The toast slices will now move down-
wards slowly. The activated degree will start to blink.
•When the desired browning degree has been reached, the
bread plate will move upwards automatically and a “beep”
will sound.
•The toasting process can also be stopped ahead of time by
lightly lifting the bread lift (2, Cancel) upwards.
The thaw function
This feature enables you to toast bread which has come directly
from the freezer without having to thaw it beforehand.
•Position frozen bread inside the toaster.
•Set the desired browning degree (1-7) by pressing the
button for the browning degree (5).
•Press the button for the thaw function(7). The lamp behind
the button will light up and turn off again if you press the
button once more. The toasting time will be extended a bit
longer by the advance thawing process.
•You can now start the toasting process by pressing the
bread lift downwards.
•When the desired browning degree has been reached, the
bread plate will move upwards automatically and a “beep”
will sound.
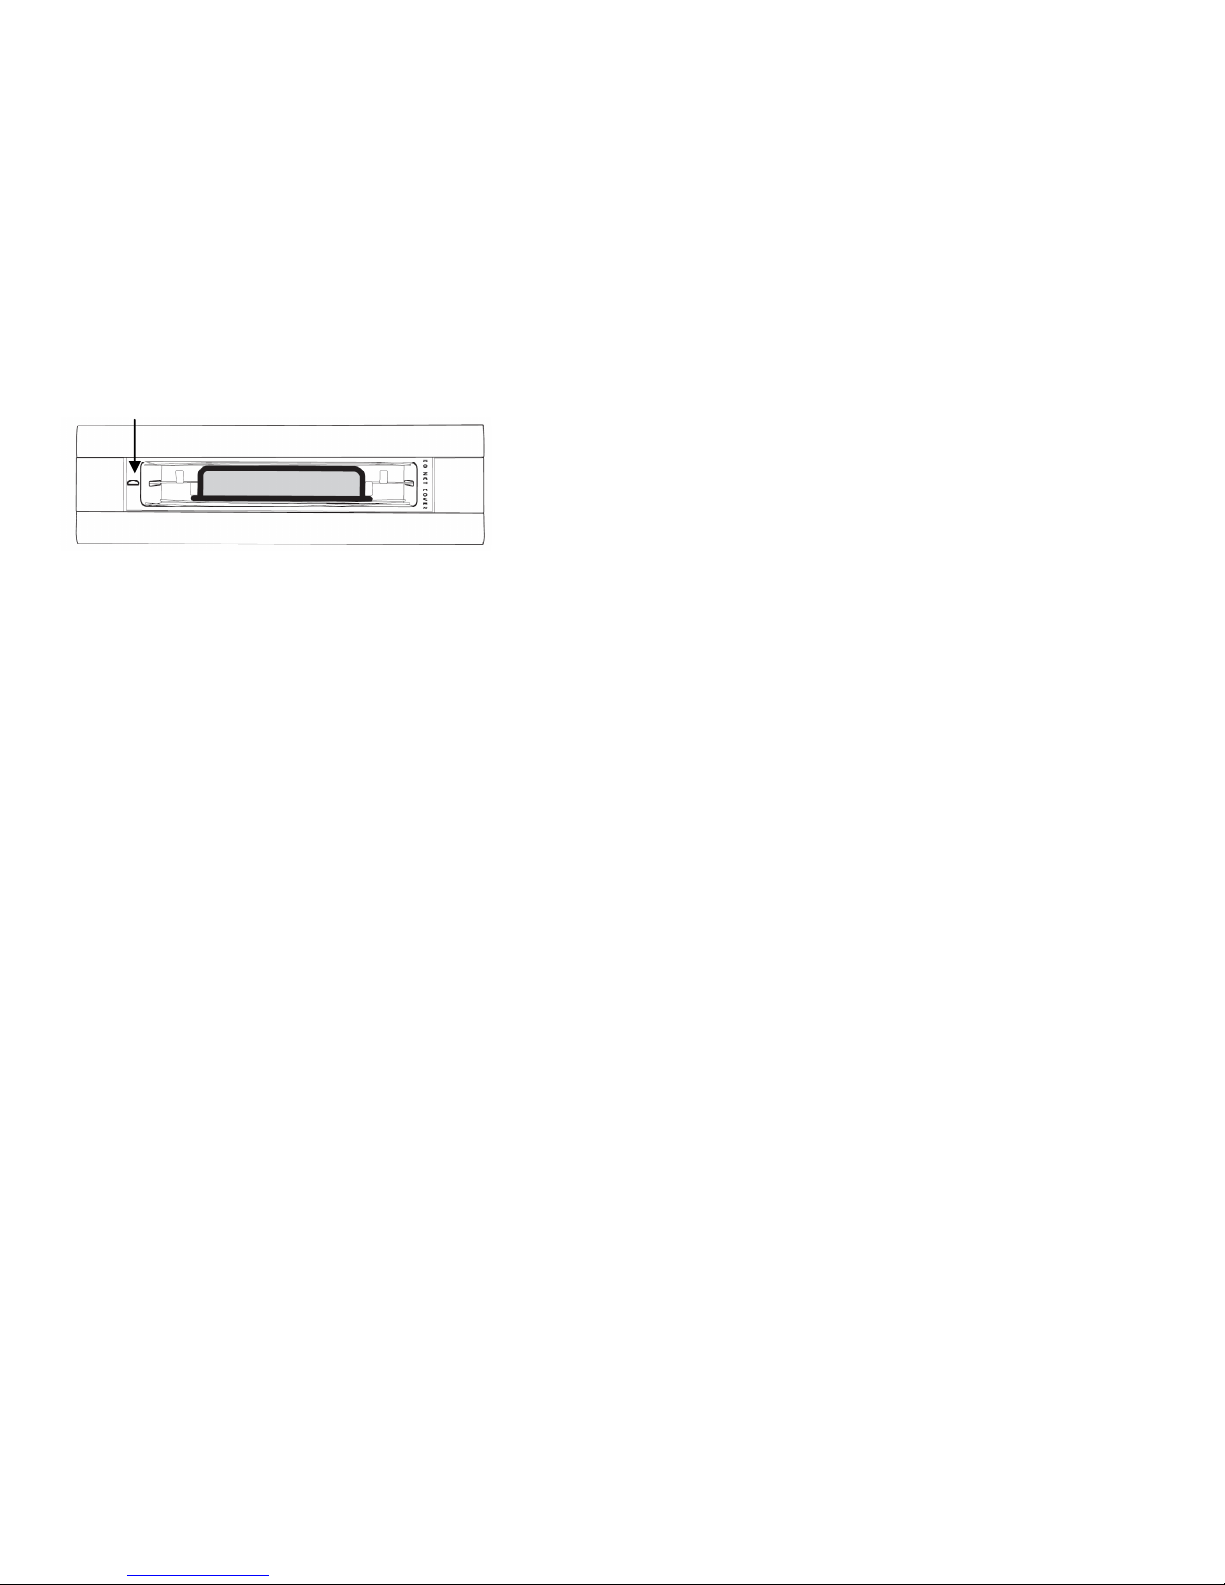
The crumpet function
This feature allows you to toast crumpets and muffins.
•The image below shows you how the crumpet should be
positioned in the toaster. Make sure you are also aware of
the image on the top of the toaster.
21
•Set the desired browning degree (1-7) by pressing the
button for the browning degree (5).
•Press the button for the crumpet function(6). The light
behind the button will light up and turn off if you press the
button once more.
•You can now start the toasting process by pressing the
bread lift downwards.
•When the desired browning degree has been reached, the
bread plate will move upwards automatically and a “beep”
will sound.
Cleaning the toaster
•Before cleaning the toaster please unplug the appliance
and let it cool.
•Please remove the crumb tray (3), clean it and put it back to
position. You should do this regularly to avoid the crumbs to
scorch.
•Clean the toaster from outside with a slightly wet cloth and
dry it afterwards.
•To clean the inside of the toaster; turn it and shake with
caution. The crumbs will fall out off the toaster.
22
Reparaturen/Entsorgung
•Reparaturen an Elektrogeräten (Wechseln des Netzkabels)
dürfen nur von instruierten Fachkräften durchgeführt werden.
Bei unsachgemässen Reparaturen erlischt die Garantie und
jegliche Haftung wird abgelehnt.
•Nehmen Sie das Gerät nie in Betrieb, wenn ein Kabel oder
Stecker beschädigt ist, nach Fehlfunktionen des Gerätes,
wenn dieses heruntergefallen ist oder auf eine andere Art
beschädigt wurde (Risse/Brüche am Gehäuse).
•Nicht mit irgendwelchen Gegenständen in das Gerät eindrin-
gen.
•Ausgedientes Gerät sofort unbrauchbar machen (Netzkabel
durchtrennen) und bei der dafür vorgesehenen Sammelstelle
abgeben.
•Entsorgen Sie elektrische Geräte nicht im Hausmüll, nutzen
Sie die Sammelstellen der Gemeinde.
•Fragen Sie ihre Gemeindeverwaltung nach den Standorten
der Sammelstellen.
•Wenn elektrische Geräte unkontrolliert entsorgt werden,
können während der Verwitterung gefährliche Stoffe ins
Grundwasser und damit in die Nahrungskette gelangen, oder
die Flora und Fauna auf Jahre vergiftet werden.
•Wenn Sie das Gerät durch ein neues ersetzen, ist der Ver-
käufer gesetzlich verpflichtet, das alte mindestens kostenlos
zur Entsorgung entgegenzunehmen.
Réparations/élimination
•Les réparations sur les appareils électriques ne doivent être
effectuées que par des électriciens qualifiés. La garantie
s’éteint et toute responsabilité est exclue en cas de répara-
tions non conformes aux règles de l‘art .
•Ne mettez jamais l‘appareil en service en cas
d’endommagement d’un cordon ou d’une fiche, après un
dysfonctionnement de l’appareil causé par une chute ou par
une autre détérioration de l’appareil (boîtier fissuré/ cassé).
•Ne pas pénétrer avec des objets quelconques dans
l’appareil.
•Arrivé au bout de sa durée de vie, l’appareil doit immédiate-
ment être rendu inutilisable (sectionner le cordon

23
d’alimentation) et être déposé dans une déchetterie prévue à
cet effet.
•Ne jetez pas vos appareils électriques avec les ordures
ménagères, utilisez les points de collecte municipaux.
•Veuillez consulter vos services municipaux pour connaître
les points de collecte.
•La mise au rebut incontrôlée des appareils électriques peut
entraîner, lors de précipitations, la filtration de matières dan-
gereuses dans les eaux souterraines pouvant contaminer la
chaîne alimentaire ou intoxiquer durablement la flore et la
faune.
•Si vous remplacez un vieil appareil par un neuf, le vendeur a
l‘obligation légale de reprendre votre vieil appareil, au mieux
gratuitement.
Smaltimento
•Smaltire gli apparecchi elettrici separatamente dai rifiuti
domestici, utilizzando i centri di raccolta predisposti dal pro-
prio comune.
•Informarsi presso l’amministrazione locale sulla dislocazione
dei centri di raccolta.
•Se gli apparecchi elettrici vengono smaltiti in modo incontrol-
lato, durante la meteorizzazione sostanze pericolose posso-
no raggiungere le falde freatiche e quindi la catena
alimentare, oppure possono avvelenare la flora e la fauna
per anni.
•Se si sostituisce un apparecchio usato con uno nuovo, il
venditore è tenuto per legge a trattenere quello vecchio per
smaltirlo almeno a titolo gratuito.
Repairs/disposal
•Repairs to electrical appliances must only be carried out by a
qualified electrical technician. If improper repairs are carried
out, the guarantee lapses and all liability is refused.
•Never operate the appliance if the adaptor or plug is dam-
aged, after it has malfunctioned, if it has been dropped or
has been damaged in any other way (cracks/breaks in the
casing).
24
•Do not push any object into the appliance. Do not disassem-
ble the fan.
•If the appliance is beyond repair, make it unusable imme-
diately and hand it in at the collection point provided for the
purpose.
•Do not dispose of electrical appliances in the domestic
waste. Please use the communal collection points.
•Ask your local authority if you do not know where the com-
munal collection points are located.
•If electrical appliances are disposed of thoughtlessly, expo-
sure to the elements may cause hazardous substances to
find their way into the groundwater and from there into the
food chain, or to poison the flora and fauna for many years to
come.
•If you are replacing the appliance with a new one, the seller
is legally obliged to take back the old one at least free of
charge for disposal.
25
2 Jahre Garantie
Diese umfasst Konstruktions-, Produktions-, sowie Materialfeh-
ler. Ausgenommen sind sämtliche Verschleissteile und unsach-
gemässe Benutzung oder Pflege.
Garantie 2 ans
Cette garantie couvre les défauts de construction, de fabrication
et de matériaux. En sont exclues toutes les pièces d’usure et
d’utilisation pas correcte ou mauvaise entretien.
2 anni di garanzia
La garanzia comprende difetti di costruzione, produzione e
materiale. Ne sono escluse tutte le parti soggette a usura e i
difetti provocati da un uso o una manutenzione inappropriati.
2 Years warranty
This warranty covers defects of construction, production and
material. All abrasion parts are excluced and also inapropriate
usage or maintenance.
Stempel Verkaufsstelle
Cachet du point de vente
Timbro di punto di vendita
Retailer’s stamp
This manual suits for next models
1
Table of contents
Languages:
Popular Toaster manuals by other brands

MIA
MIA TA 0081 Instruction manual/safety cautions

ARENDO
ARENDO 304530 user manual

Nostalgia Electrics
Nostalgia Electrics HDT series instruction manual

Russell Hobbs
Russell Hobbs 14307 Instructions and guarantee

Cuisinart
Cuisinart CPT-340C Series Instruction booklet

Spectra
Spectra Hello Kitty KT5211 owner's manual


