Blackmagicdesign BLACKMAGIC CAMERAS User manual


Welcome
Thank you for purchasing your Blackmagic Camera!
We have worked hard to produce three cameras that have
been designed from the ground up to fit any kind of workflow.
Our new Pocket Cinema Camera is a Super 16 digital film
camera with 13 stops of dynamic range that is small enough
to take anywhere. The Cinema Camera records uncompressed
CinemaDNG RAW files for pristine images and our new
Production Camera 4K is a Super 35 Ultra HD 4K camera
with a global shutter and 6G-SDI output.
Our cameras are designed to produce files that are "flat",
which means they preserve the wide dynamic range from the
sensor, as well as standard file formats that work with all video
software. This allows you to make creative decisions by using
the included DaVinci color correction software!
We think this means you get a cinema style shooting
experience where you capture and preserve more of the
image so you have as many creative options as possible.
We have also included large screens on our cameras for
easy focus and metadata entry. We hope you connect to our
cameras in creative ways and produce some amazing looking
images! We are extremely excited to see what creative work
you produce!
Grant Petty
CEO Blackmagic Design

Contents
Blackmagic Cameras
5 Getting Started
Introducing Blackmagic Cameras 5
Attaching a Lens 7
Turning Your Camera On 7
Inserting an SD Card 9
Inserting an SSD 9
Recording 10
Playing Back Clips 11
12 About SSDs
Choosing a Fast SSD 12
Preparing SSDs for Recording 13
15 About SD Cards
Preparing SD Cards for Recording 15
Choosing a Fast SD Card 15
16 Connections
Blackmagic Pocket Cinema Camera 16
Blackmagic Cinema Camera and Production Camera 4K 17
18 Settings
Camera Settings 18
Audio Settings 20
Recording Settings 21
File Naming Convention 23
Display settings 24
On Screen Metering 25
Adjusting Settings 26
Status Strip 27
28 Entering Metadata
What is the Slate? 28
29 Camera Video Output
Waveform Monitoring using Thunderbolt 29
Using Blackmagic UltraScope 30
Monitoring using SDI 33
34 Post Production Workflow
Working with Files from SSDs 34
Working with Files from SD Cards 34
Editing your Clips 35
Using Final Cut Pro X 36
Using Avid Media Composer 37
Using Adobe Premiere Pro CC 37
Using Autodesk Smoke 2013 38
39 Blackmagic Camera Utility
40 Attaching Accessories
42 Help
44 Warranty
Getting Started
5
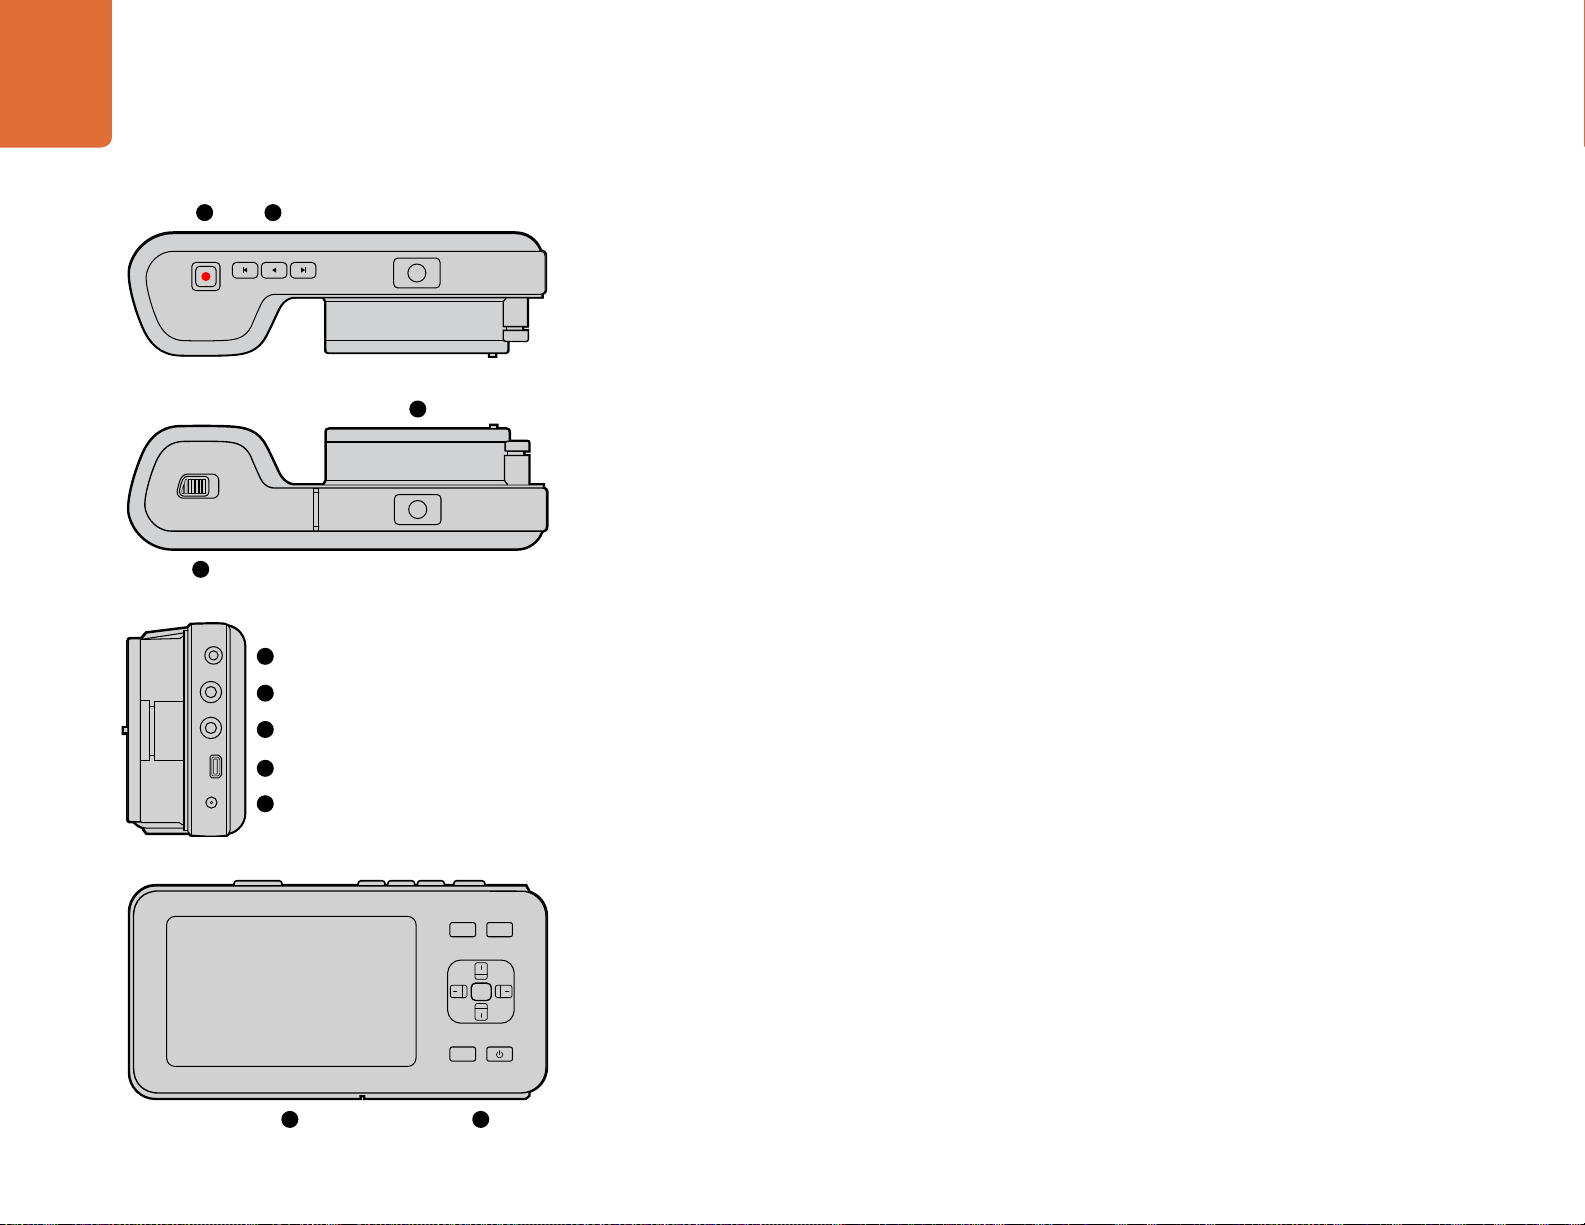
Introducing Blackmagic Cameras
Blackmagic Pocket Cinema Camera Features
1. RECORD BUTTON
Press this button to record clips to your SD card. See page 10.
2. TRANSPORT CONTROL
Use these buttons to play, skip or shuttle clips. See page 11.
3. LENS MOUNT
Micro Four Thirds lens mount for a wide selection of lenses. See page 7.
4. BATTERY TERMINAL
Open the battery door via the release button to:
Insert and remove the rechargeable Lithium Ion battery. See page 7.
Insert a SDHC or SDXC card for recording. See page 9.
Access the USB Mini-B port for software configuration and updates. See page 38.
5. LANC REMOTE
The 2.5mm stereo jack for LANC remote control supports record start and stop, iris control, and manual focus.
See page 16.
6. HEADPHONES
3.5 mm stereo headphone jack connection. See page 16.
7. AUDIO IN
3.5mm stereo jack for mic or line level audio. See pages 16 and 20.
8. HDMI OUT
Micro HDMI port for monitoring or outputting video to a switcher. See page 16.
9. POWER
0.7mm 12 – 20V power input for power and battery charging. See page 16.
10. LCD
Watch the LCD while recording or playing back a clip. See page 26.
11. CONTROL BUTTONS
Use these buttons for power, menu navigation, iris control, focus peaking, auto focus, LCD zoom and
additional on screen displays. Use the up and down buttons for opening and closing the on screen displays
and the left and right buttons to manually nudge the iris open and closed on the lens by a small amount.
Getting Started
OK
MENU
IRIS FOCUS
OK
MENU
IRIS FOCUS
OK
MENU
IRIS FOCUS
OK
MENU
IRIS FOCUS
4
10 11
1 2
3
5
6
7
8
9

Getting Started
6
Blackmagic Cinema Camera and Production Camera 4K Features
1. RECORD BUTTON
Record clips to your SSD. See page 10.
2. IRIS BUTTON
The Iris button activates electronic iris control on the EF Cinema Camera and the Production Camera 4K. Adjust
the aperture of your lens by pressing the forward and reverse skip/shuttle playback buttons. See page 25.
3. TOUCHSCREEN LCD
Watch the LCD monitor while recording or playing back a clip, or when using the menu. Use the touchscreen
to activate additional on screen displays while shooting. See page 27.
4. FOCUS BUTTON
Press the Focus button for focus peaking on the LCD. See page 25.
5. TRANSPORT CONTROLS
Press these buttons to stop, skip/shuttle, or play your clips. See page 11.
6. MENU BUTTON
Access the menu on the LCD.
7. POWER BUTTON
Press the power button to turn on the Blackmagic Cinema Camera. Press and hold the button to turn
the camera off. See page 8.
8. LANC REMOTE
The 2.5mm stereo jack for LANC remote control supports record start and stop, iris control and manual
focus. See page 17.
9. HEADPHONES
3.5 mm stereo headphone jack connection. See page 17.
10. AUDIO IN
2 x 1/4 inch balanced TRS phono jacks for mic or line level audio. See pages 17 and 20.
11. SDI OUT
SDI output for connecting to a switcher or to DaVinci Resolve via capture device for live grading. See
pages 17 and 34.
12. THUNDERBOLT CONNECTION
Blackmagic Cinema Camera outputs 10-bit uncompressed 1080p HD. Production Camera 4K also outputs
compressed Ultra HD 4K. Use the Thunderbolt connection for HD UltraScope waveform monitoring and
streaming video to a Thunderbolt compatible computer. See pages 17 and 28.
13. POWER
12 – 30V power input for power supply and battery charging. See pages 8 and 17.
1
2 4
1 5 6 7
8
10
11
12
13
9
3
Getting Started
7
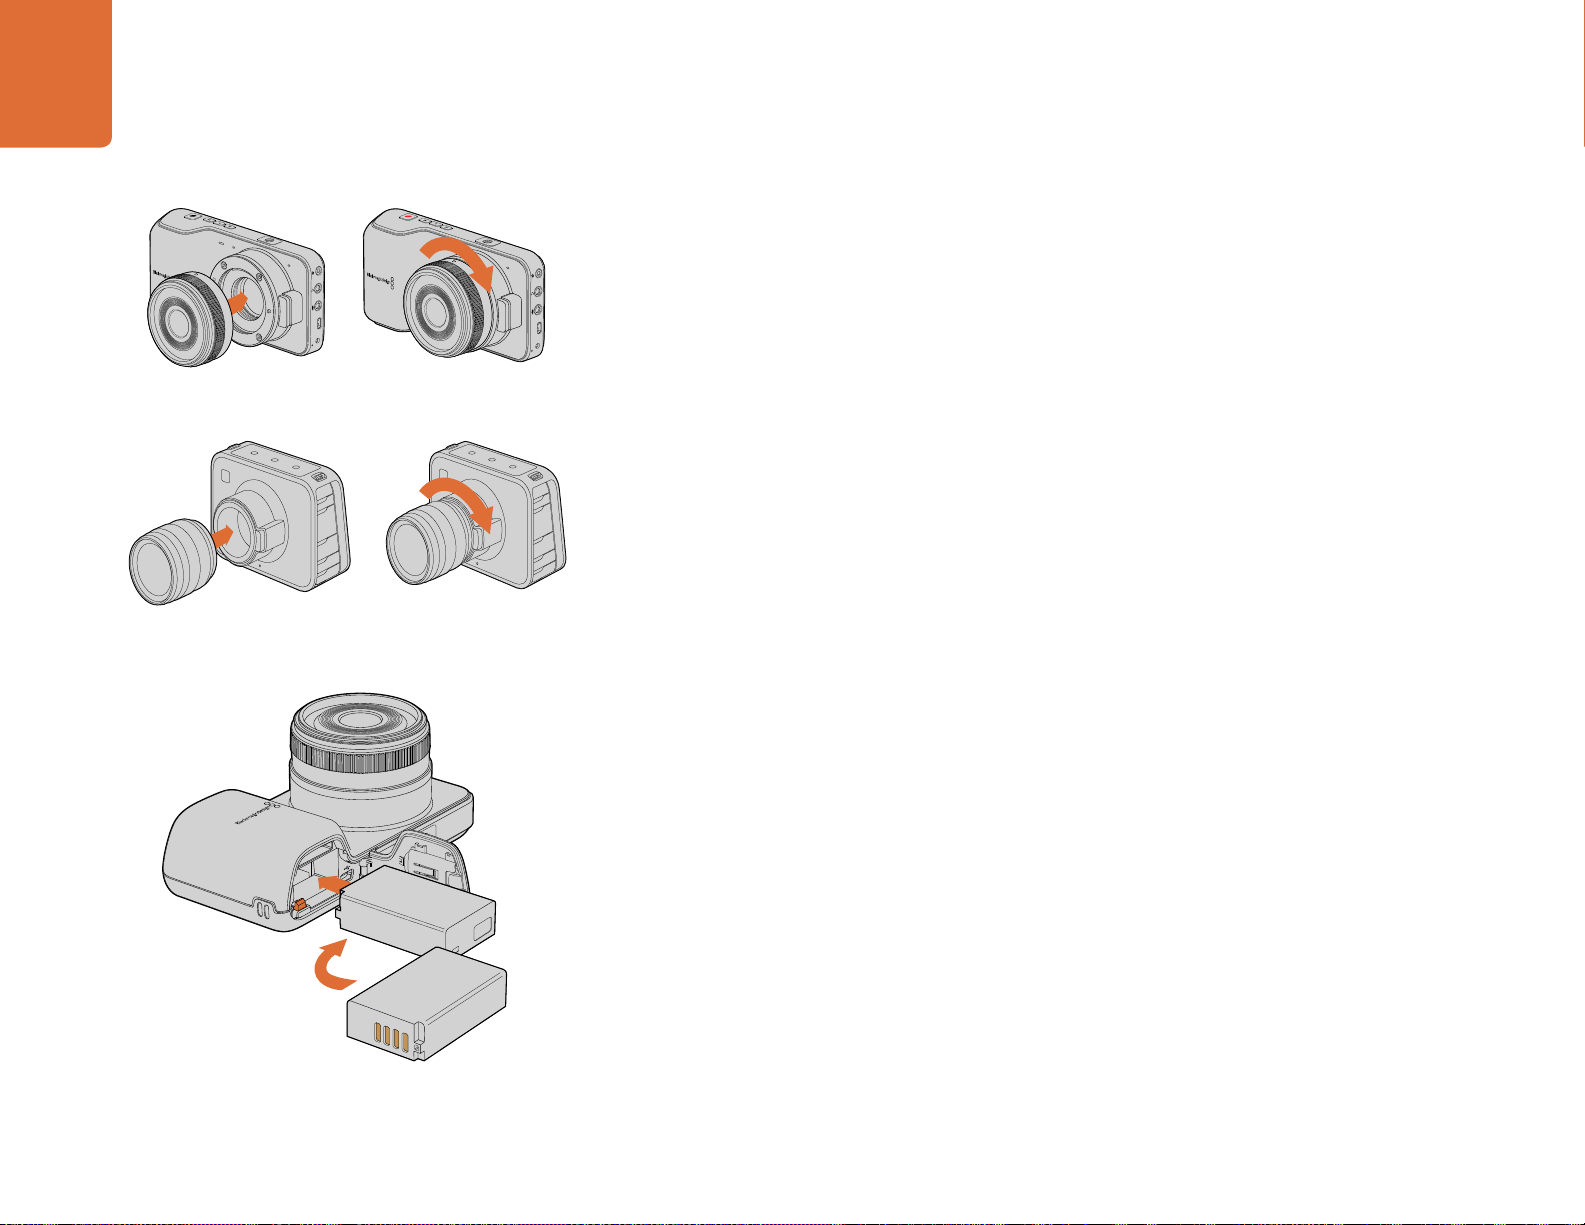
Attaching a Lens
Getting started with your Blackmagic Camera is as simple as attaching a lens and turning the camera
on. To remove the protective dust cap from the lens mount, hold down the locking button and rotate
the cap counterclockwise until it is released. We recommended you always turn off your Blackmagic
Camera prior to attaching or removing a lens.
To attach a lens:
Step 1. Align the dot on your lens with the dot on the camera mount. Many lenses have either a blue,
red or white dot or some other indicator.
Step 2. Twist the lens clockwise until it locks into place.
Step 3. To remove the lens, hold down the locking button, rotate the lens counterclockwise until its
dot or indicator reaches the 12 o’clock position and gently remove.
When no lens is attached to the camera, the sensor is exposed to dust and other debris so you'll want
to keep the dustcap on whenever possible.
Turning Your Camera On
Pocket Cinema Camera
Before you can operate Pocket Cinema Camera, you need to insert the battery.
Step 1. On the under side of the camera, push the door release towards the lens to access the battery
terminal.
Step 2. With the gold contacts facing into the terminal and the white arrow facing the lens, hook the
lip of the battery under the orange tab and insert the battery until you feel it press into place.
Push the orange tab to release the battery.
Step 3. Close the door to the battery terminal and slide the door release to the right to lock it.
Step 4. Press the power button on the bottom right of the back panel. The status strip will appear
along the top of the LCD.
Step 5. Press and hold the power button to switch off the camera.
Congratulations! You are now ready to insert an SD card and start recording!
Attaching and removing a lens on Cinema Camera and
Production Camera 4K
Inserting the battery into Pocket Cinema Camera
Attaching and removing a lens on Pocket Cinema Camera
HDMI
12V
HDMI
12V

Getting Started
8
Cinema Camera & Production Camera 4K
Cinema Camera and Production Camera 4K have internal batteries that can be charged using the supplied
power adapter. The camera can be charged and operated while connected via external power and will
switch between power sources without any interruption.
You can also charge the camera via a powered USB connection, however it takes longer to charge so
we recommend using the power adapter when possible.
Step 1. Press the power button below the touchscreen. The status strip will appear along the top of
the LCD.
Step 2. Press and hold the power button to switch off the camera.
Congratulations! You are now ready to insert an SSD and start recording!
Press and hold the power button to turn the camera on or off.
Use the supplied power adapter to charge the internal battery
and power the camera.

Getting Started
9
Inserting an SD Card
You can insert an SDXC or SDHC card into Blackmagic Pocket Cinema Camera:
Step 1. On the under side of the camera, push the door release towards the lens to access the
battery terminal.
Step 2. With the gold contacts on the SD card facing towards the lens, insert the SD card until you
feel it lock into place. Push on the SD card to release it.
Step 3. Close the door to the battery terminal and slide the door release to the right to lock it.
Step 4. Power on the camera. The status strip will display a moving dot while the camera checks the
SD card and then it will say READY.
The supplied SD card is for software installation only and not suitable for video recording. You'll find a
list of recommended SD cards on page 15.
Inserting an SSD
You can insert a 2.5" 9.5 mm SSD formatted in either the HFS+ or exFAT file systems into Cinema Camera
and Production Camera 4K:
Step 1. Open the SSD door on the right hand side of the camera.
Step 2. With the gold SATA contacts facing towards the camera door, insert the SSD until you feel it
press into place. Close the SSD door.
Step 3. Power on the camera. The status strip will display a moving dot while the camera checks the
SSD and then it will say READY.
You'll find a list of recommended SSDs on page 12.
Inserting an SSD into the Cinema Camera and the Production
Camera 4K.
Inserting an SD card into the Pocket Cinema Camera.
Getting Started
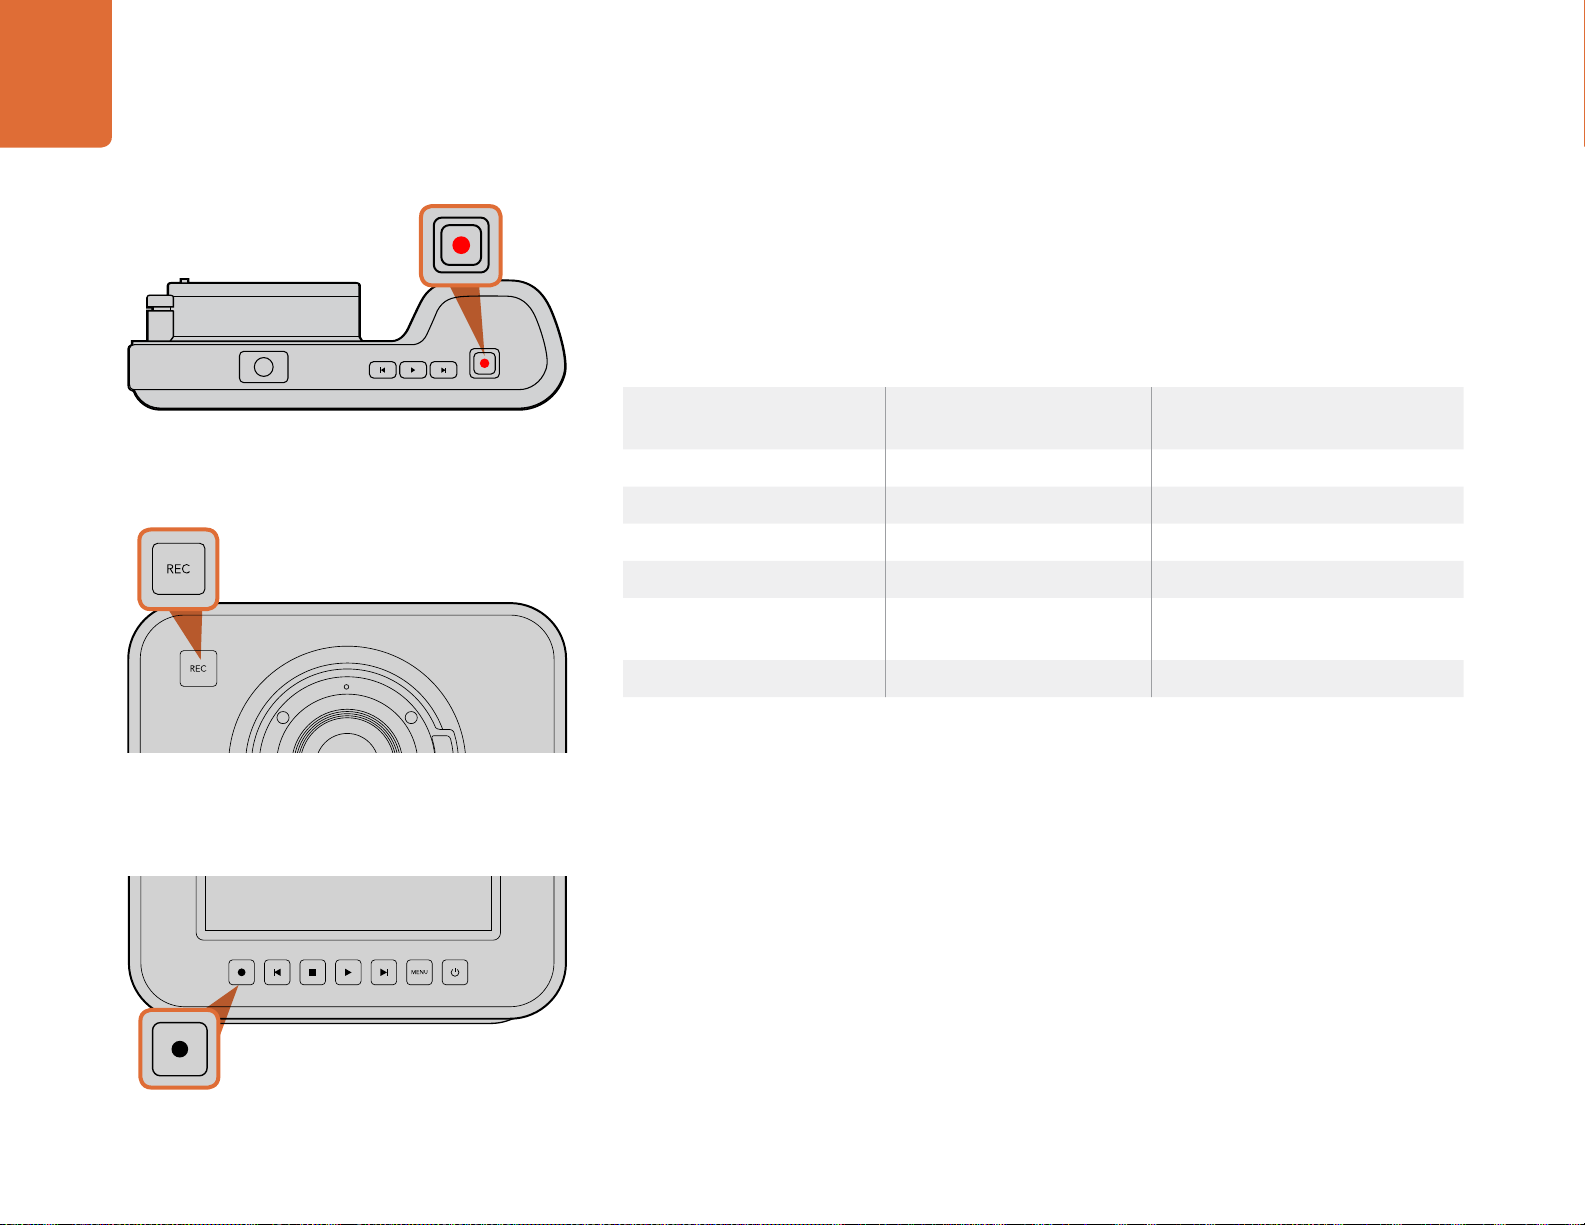
10
Press the REC button on the front face
or
on the transport control on the back of Cinema Camera and
Production Camera 4K.
Press the REC button on the top of Pocket Cinema Camera.
OK
MENU
IRIS FOCUS
OK
MENU
IRIS FOCUS
Recording
Press the REC button on your camera to begin recording immediately. Press REC again to stop recording.
Choosing the Recording Format
Blackmagic cameras record to several different formats, depending on which model you are using.
You may decide to experiment to see which format best suits your workflow.
You can choose from 4 different Apple ProRes formats. This lets you fit more video on your SSD or SD
card. ProRes 422 (HQ) provides the highest quality video with the lowest compression. Alternatively,
ProRes 422 Proxy gives you far more recording time with greater compression.
To select your desired video format:
Step 1. Press the MENU button.
Step 2. Select the RECORDING menu and use the selection arrows to set the desired recording format.
Step 3. Press the MENU button to exit.
Your camera is now ready to record in the video format you have selected. The current recording format
is shown on the left of the status strip on the LCD.
Blackmagic Pocket
Cinema Camera
Blackmagic Cinema Camera Blackmagic Production
Camera 4K
Apple ProRes 422 (HQ) Apple ProRes 422 (HQ) Apple ProRes 422 (HQ)
Apple ProRes 422 Apple ProRes 422 Apple ProRes 422
Apple ProRes 422 LT Apple ProRes 422 LT Apple ProRes 422 LT
Apple ProRes 422 Proxy Apple ProRes 422 Proxy Apple ProRes 422 Proxy
Lossless compressed
CinemaDNG RAW
CinemaDNG RAW 2.5K Lossless compressed
CinemaDNG RAW
Avid DNxHD
Getting Started
11
Blackmagic Cameras Supported Video Formats
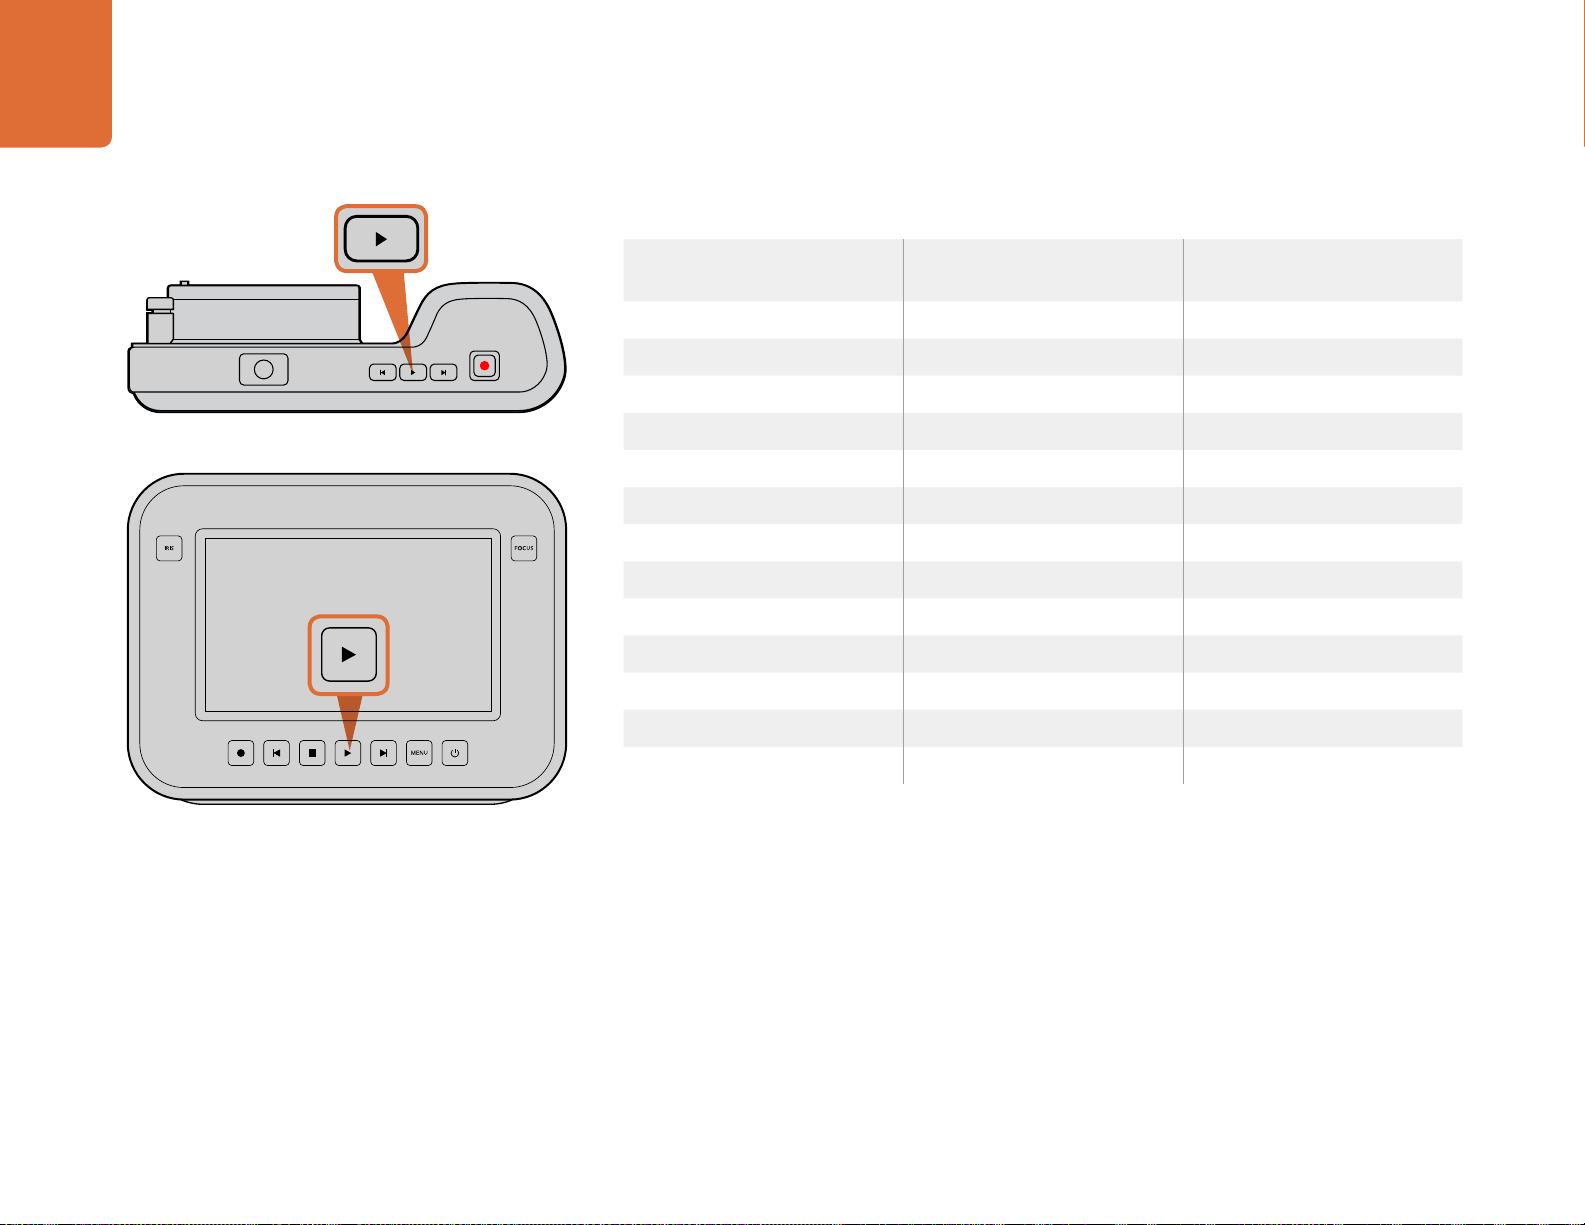
Playing Back Clips
Once you have recorded your video, you can use the transport control buttons to play back your video
on the LCD.
Press the play button once for instant playback and you'll see your video on the LCD and on any display
connected to the HDMI or SDI output. Hold down the forward or reverse buttons to fast forward or
reverse through the clip. Playback will finish when the end of the current clip is reached.
The controls of your camera work just like a CD player, so pressing the forward button will skip to the
start of the next clip. Press the reverse button once to go to the start of the current clip or press twice
to skip back to the start of the previous clip.
OK
MENU
IRIS FOCUS
To immediately view your recorded clip on a Blackmagic
Camera simply press the Play button on the transport
controls.
OK
MENU
IRIS FOCUS
Blackmagic Pocket
Cinema Camera
Blackmagic Cinema Camera Blackmagic Production
Camera 4K
1920 x 1080p23.98 2400 x 1350 12-bit 2.5K RAW 4000 x 2160 12-bit RAW
1920 x 1080p24 1920 x 1080p23.98 3840 x 2160p23.98
1920 x 1080p25 1920 x 1080p24 3840 x 2160p24
1920 x 1080p29.97 1920 x 1080p25 3840 x 2160p25
1920 x 1080p30 1920 x 1080p29.97 3840 x 2160p29.97
1920 x 1080p30 3840 x 2160p30
1920 x 1080i50 (output) 1920 x 1080p23.98
1920 x 1080i59.94 (output) 1920 x 1080p24
1920 x 1080p25
1920 x 1080p29.97
1920 x 1080p30
1920 x 1080i50 (output)
1920 x 1080i59.94 (output)
About SSDs
12
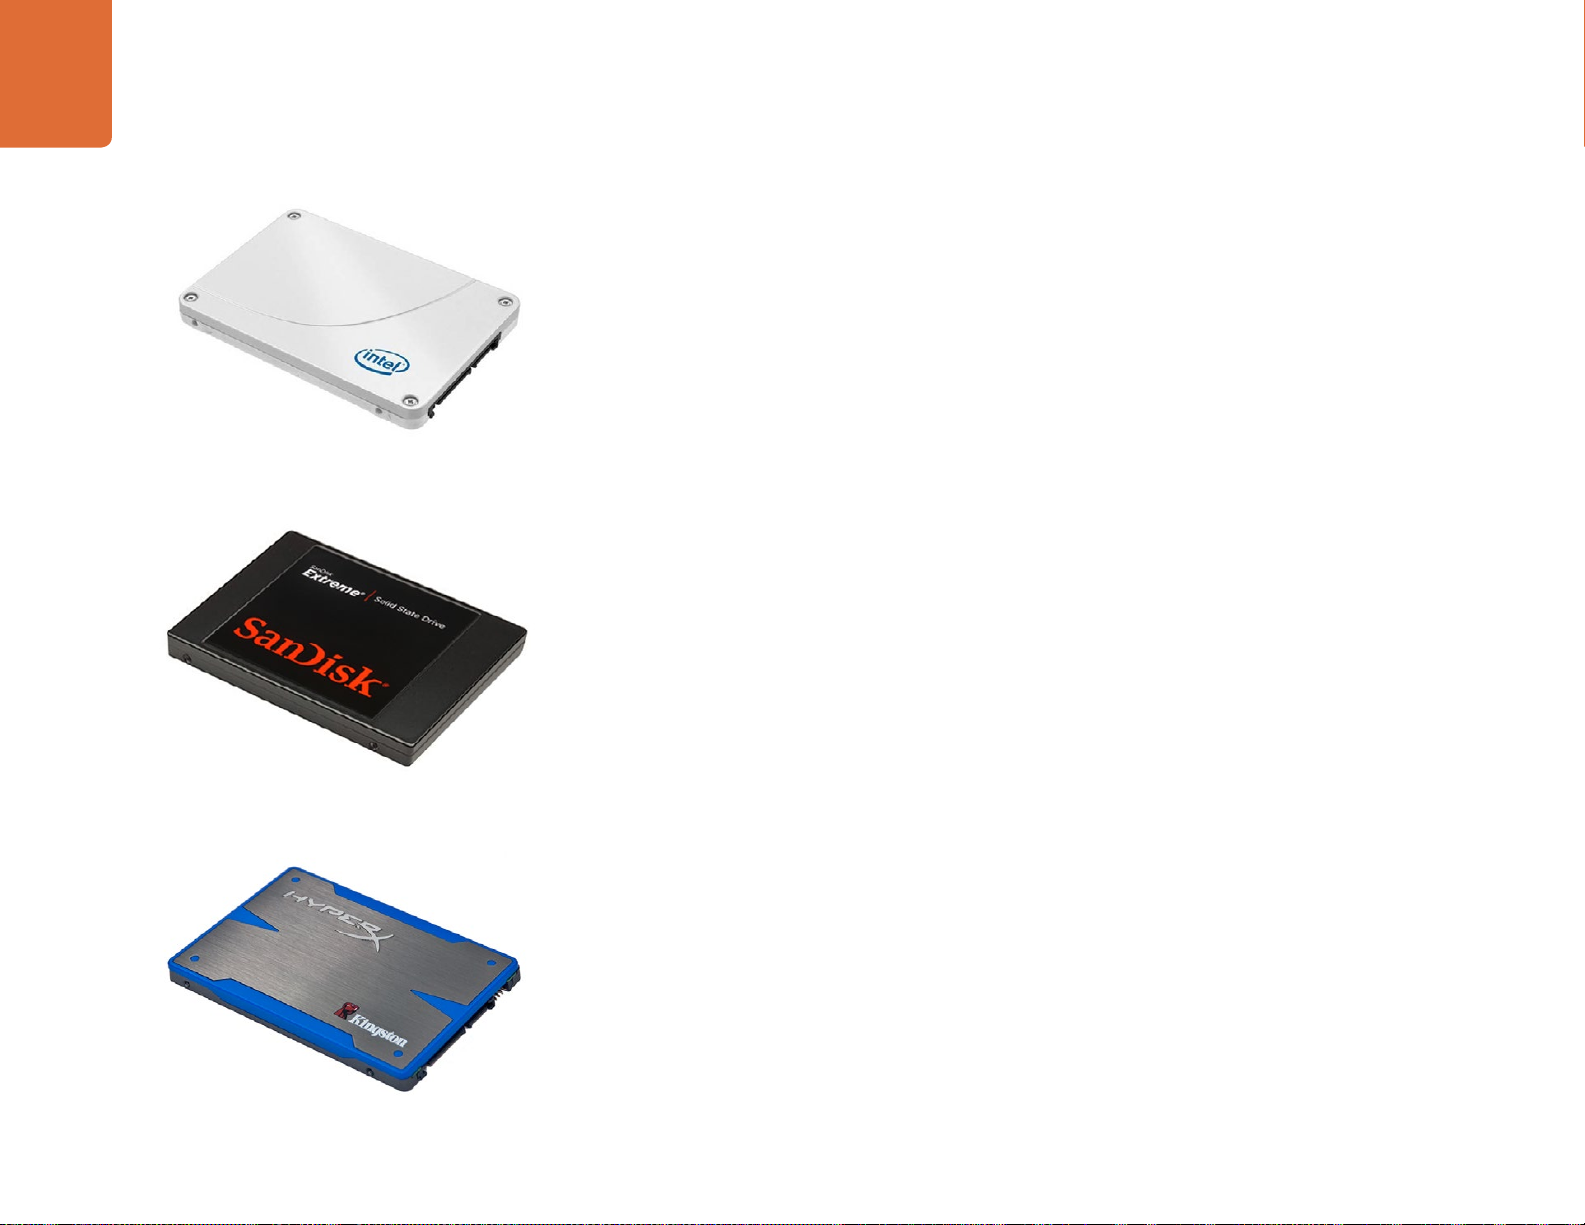
Choosing a Fast SSD
When working with high data rate video it's important to carefully check the SSD you would like to use.
This is because some SSDs can have up to 50% lower write speed than the manufacturer’s claimed speed,
so even though the disk specifications claim an SSD is fast enough to handle video, in reality the disk is
not fast enough for real time video recording.
The following SSDs are recommended for 4K RAW and ProRes captures:
The following SSDs are recommended for 2.5K RAW CinemaDNG capture or compressed video capture:
In addition to the above, these SSDs work ONLY for compressed video capture:
If your SSD is dropping frames, try a different SSD or use a compressed HD recording format such as
ProRes or DNxHD for lower data rates. Check the Blackmagic Design website for the latest information.
Kingston HyperX 240GB SSD
Intel 335 Series 240GB SSD
About SSDs
Sandisk Extreme 480GB SSD
Intel 335 Series 240GB SSD
Intel 520 Series 240GB SSD
Intel 520 Series 480GB SSD
Intel 530 Series 180GB SSD
Intel 530 Series 240GB SSD
Kingston 240 GB HyperX 3K
Kingston 480 GB HyperX 3K
Kingston 240 GB SSDNow KC300
Kingston 480 GB SSDNow KC300
Sandisk Extreme 240GB
Sandisk Extreme 480GB
PNY 240GB Prevail SSD (firmware 5.0.2)
OWC 120GB Mercury Extreme Pro 6G
(Firmware Rev 5.0.7)
OWC 240GB Mercury Extreme Pro 6G
(Firmware Rev 5.0.6)
OWC 480GB Mercury Extreme Pro 6G
(Firmware Rev 5.0.6)
Digistor 128GB SSD Professional Video
Extreme (pre-formatted ExFat)
Digistor 240GB SSD Professional Video
Series (pre-formatted ExFat)
Digistor 480GB SSD Professional Video
Series (pre-formatted ExFat)
Angelbird 240GB AV Pro (Firmware 2.54)
ADATA XPG SX900 256GB
Sandisk Extreme Pro 240GB
(SDSSDXPS-240G-G25)
Sandisk Extreme Pro 480GB
(SDSSDXPS-480G-G25)
Sandisk Extreme Pro 960GB
(SDSSDXPS-960G-G25)
Crucial 256GB M4 (firmware 000F)
OCZ Agility 3 240GB
Sandisk Extreme 120GB

About SSDs
13
Preparing SSDs for Recording
SSDs used by Cinema Camera and Production Camera 4K must be formatted as either HFS+ or exFAT.
These disk formats allow long clips to be recorded as single files.
HFS+ is also known as Mac OS Extended. It is the recommended format as it supports "journaling".
In the event of a hardware or software malfunction, data on a journaled SSD is more quickly recovered
and less likely to be corrupted. HFS+ is natively supported by Mac OS X.
ExFAT is supported natively by Mac OS X and Windows without needing to purchase any additional
software. However exFAT does not support journaling which means data is less protected against
corruption, and less likely to be recovered in the rare event of a hardware or software malfunction.
Preparing SSDs on a Mac OS X computer
Use the Disk Utility application included with Mac OS X to format your drive in the HFS+ or exFAT formats.
Remember to back up anything important from your SSD as all data will be lost when it is formatted.
Step 1. Connect the SSD to your computer with an external dock or cable adapter and dismiss any
message offering to use your SSD for Time Machine backups.
Step 2. Go to Applications/Utilities and launch Disk Utility.
Step 3. Click on the disk icon of your SSD and then click the Erase tab.
Step 4. Set the Format to "Mac OS Extended (Journaled)" or "exFAT".
Step 5. Type a Name for the new volume and then click Erase. Your SSD will quickly be formatted and
made ready for use.
Preparing SSDs on a Windows computer
The Format dialog box can format a drive in the exFAT format on a Windows PC. Remember to back up
anything important from your SSD as all data will be lost when it is formatted.
Step 1. Connect the SSD to your computer.
Step 2. Open the Start Menu or Start Screen and choose Computer. Right-click on your SSD.
Step 3. From the contextual menu, choose Format.
Step 4. Set the file system to "exFAT" and the allocation unit size to 128 kilobytes.
Step 5. Type a volume label, select "Quick Format" and click "Start".
Step 6. Your SSD will quickly be formatted and made ready for use.
Use Disk Utility on Mac OS X to erase your SSD in the
Mac OS Extended (Journaled) or exFAT format.
Use the Format dialog box feature in Windows to format your
SSD in the exFAT format.

About SSDs
14
Checking Disk Speed
Blackmagic Disk Speed Test is a fun application that measures the read and write performance of storage
media, then displays the results using video formats.
If you have ever wondered whether your hard drive is suitable for recording ("write") or playback (“read”)
of a particular video format, you can use Disk Speed Test to find out. Test the performance of your media
drives with a single click of the Start button! Disk Speed Test will even show you how many streams of
video your storage is capable of handling.
Disk Speed Test is included free in the Blackmagic Camera Software Utility supplied with your Blackmagic
Cinema Camera and Production Camera 4K. The Blackmagic Camera Software Utility can also be
downloaded from our website free of charge.
Use Disk Speed Test to find out the performance of your
media drives.
Disk Speed Test interface.

About SD Cards
15
Preparing SD Cards for Recording
SD cards used by Blackmagic Pocket Cinema Camera must be formatted as HFS+ or exFAT. These disk
formats allow long clips to be recorded as single files. ExFAT is supported by both Windows and Mac
OS X computers.
Preparing SD Cards on a Mac OS X computer
Use the Disk Utility application included with Mac OS X to format your SD card in the HFS+ or exFAT format.
Remember to back up anything important from your SD card as all data will be lost when it is formatted.
Step 1. Plug your SD card into your computer's SD card slot or SD card reader.
Step 2. Go to Applications/Utilities and launch Disk Utility.
Step 3. Click on the disk icon of your SD card and then click the Erase tab.
Step 4. Set the Format to "Mac OS Extended (Journaled)" or "exFAT".
Step 5. Type a Name for the new volume and then click Erase. Your SD card will quickly be formatted
and made ready for use.
Preparing SD Cards on a Windows computer
The Format dialog box can format a drive in the exFAT format on a Windows PC.
Step 1. Plug your SD card into your computer's SD card slot or SD card reader.
Step 2. Open the Start Menu or Start Screen and choose Computer. Right-click on your SD card.
Step 3. From the contextual menu, choose Format.
Step 4. Set the file system to "exFAT" and the allocation unit size to 128 kilobytes.
Step 5. Type a volume label, select "Quick Format" and click "Start".
Step 6. Your SD card will quickly be formatted and made ready for use.
Choosing a Fast SD Card
It's important to use SDHC and SDXC cards with Blackmagic Pocket Cinema Camera. These cards are
rated for fast data speeds and support larger storage sizes.
Recommended SDHC and SDXC cards include:
Delkin Devices 16GB Elite SDHC UHS-I Sandisk 64GB Extreme SDXC UHS-I Sandisk 16GB Extreme Pro SDHC UHS-I
Delkin Devices 32GB Elite SDHC UHS-I Sandisk 128GB Extreme SDXC UHS-I Sandisk 64GB Extreme Pro SDHC UHS-I
Please check the tech notes on the Blackmagic Design website for the latest information.
About SD Cards
Connections
16
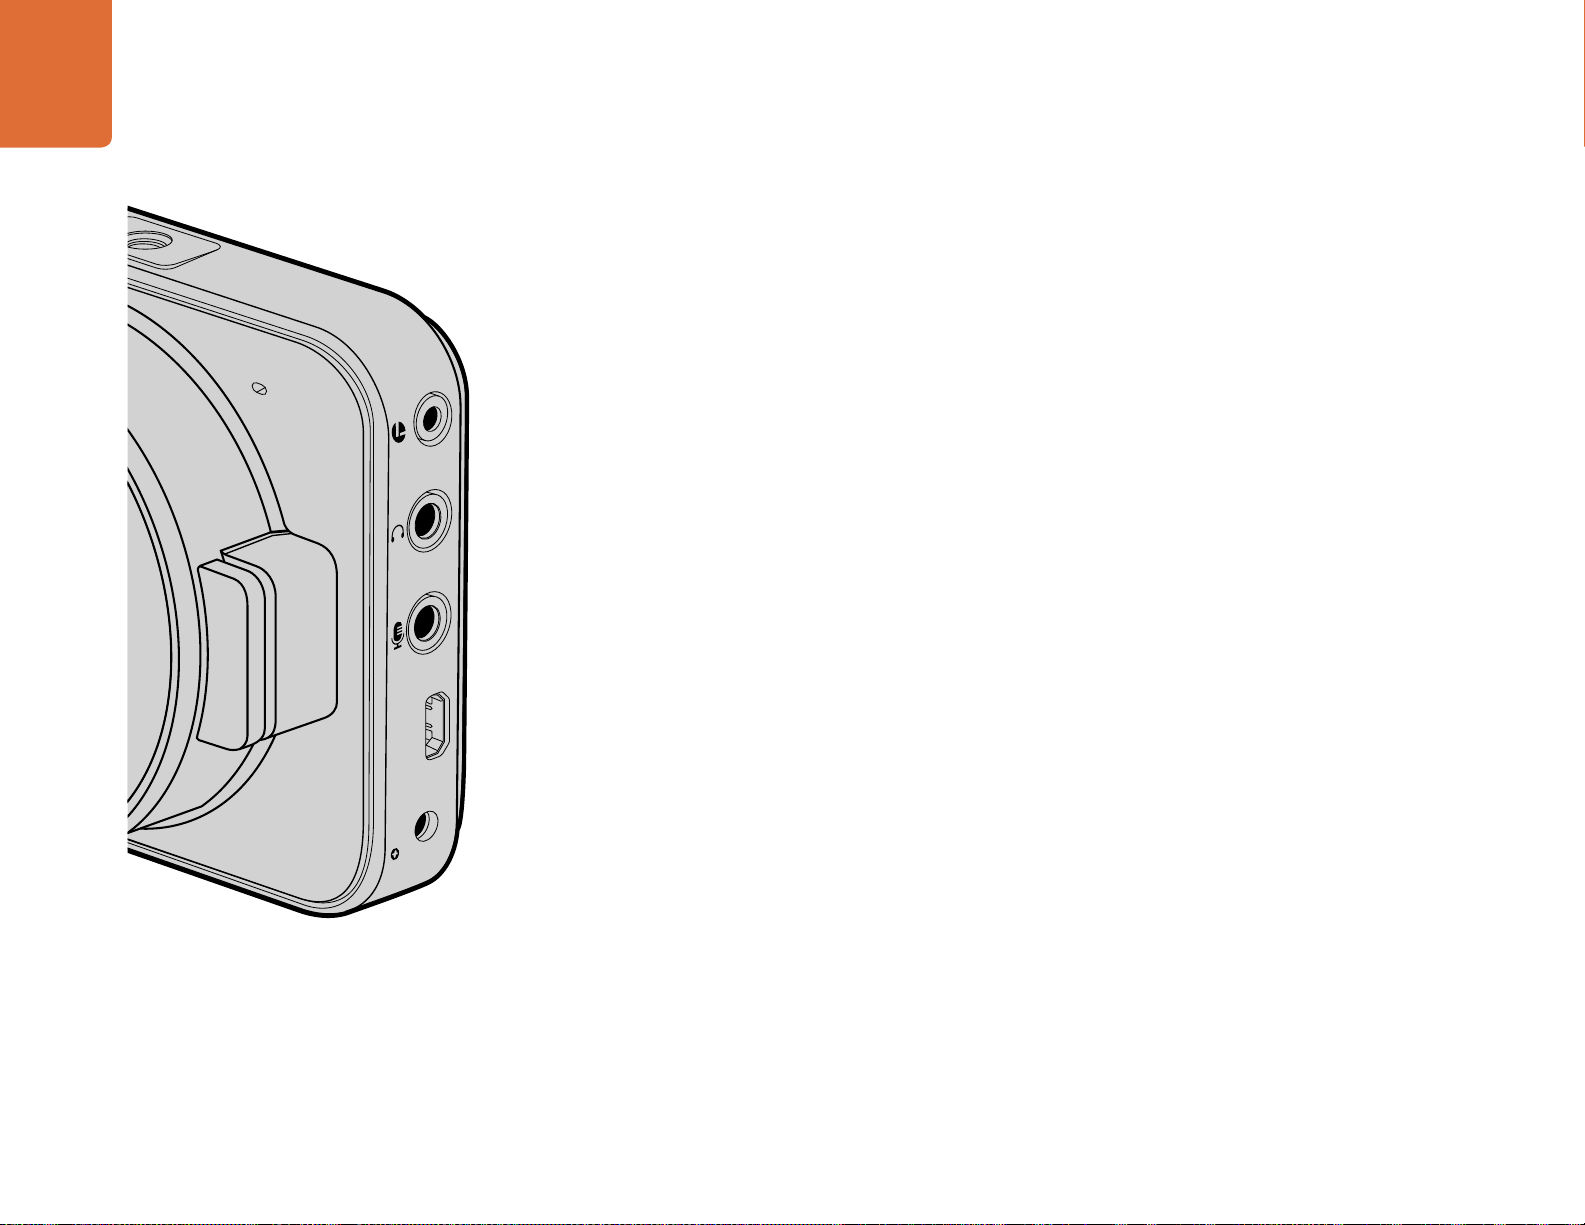
Blackmagic Pocket Cinema Camera
LANC Remote Control
The remote port on your camera is used to remotely control record starting and stopping, iris adjustments
and manual focus adjustments when using a compatible lens.
The port is a 2.5 mm stereo jack using the standard LANC protocol.
Headphones
Monitor audio while recording or playing back clips by plugging your headphones into the 3.5mm stereo
headphones jack.
Audio In
The 3.5mm stereo audio connector accepts microphone or line level audio. It's important to select the
appropriate setting or your audio may sound too quiet or too loud. The camera automatically switches
to line level if the audio is too loud for a sustained period.
HDMI Out
The micro HDMI port outputs 10-bit uncompressed HD1080p video, even while recording. It can be
used to output video to routers, monitors, capture devices, broadcast switchers and other HDMI devices.
Power
Use the 0.7mm 12 – 20V power input for connecting your power supply and to charge the battery.
USB
Use the USB port to connect your Blackmagic Pocket Cinema Camera to your computer and update the
internal software. The USB port can be found inside the battery compartment.
Connections
HDMI
12V
Connections
17
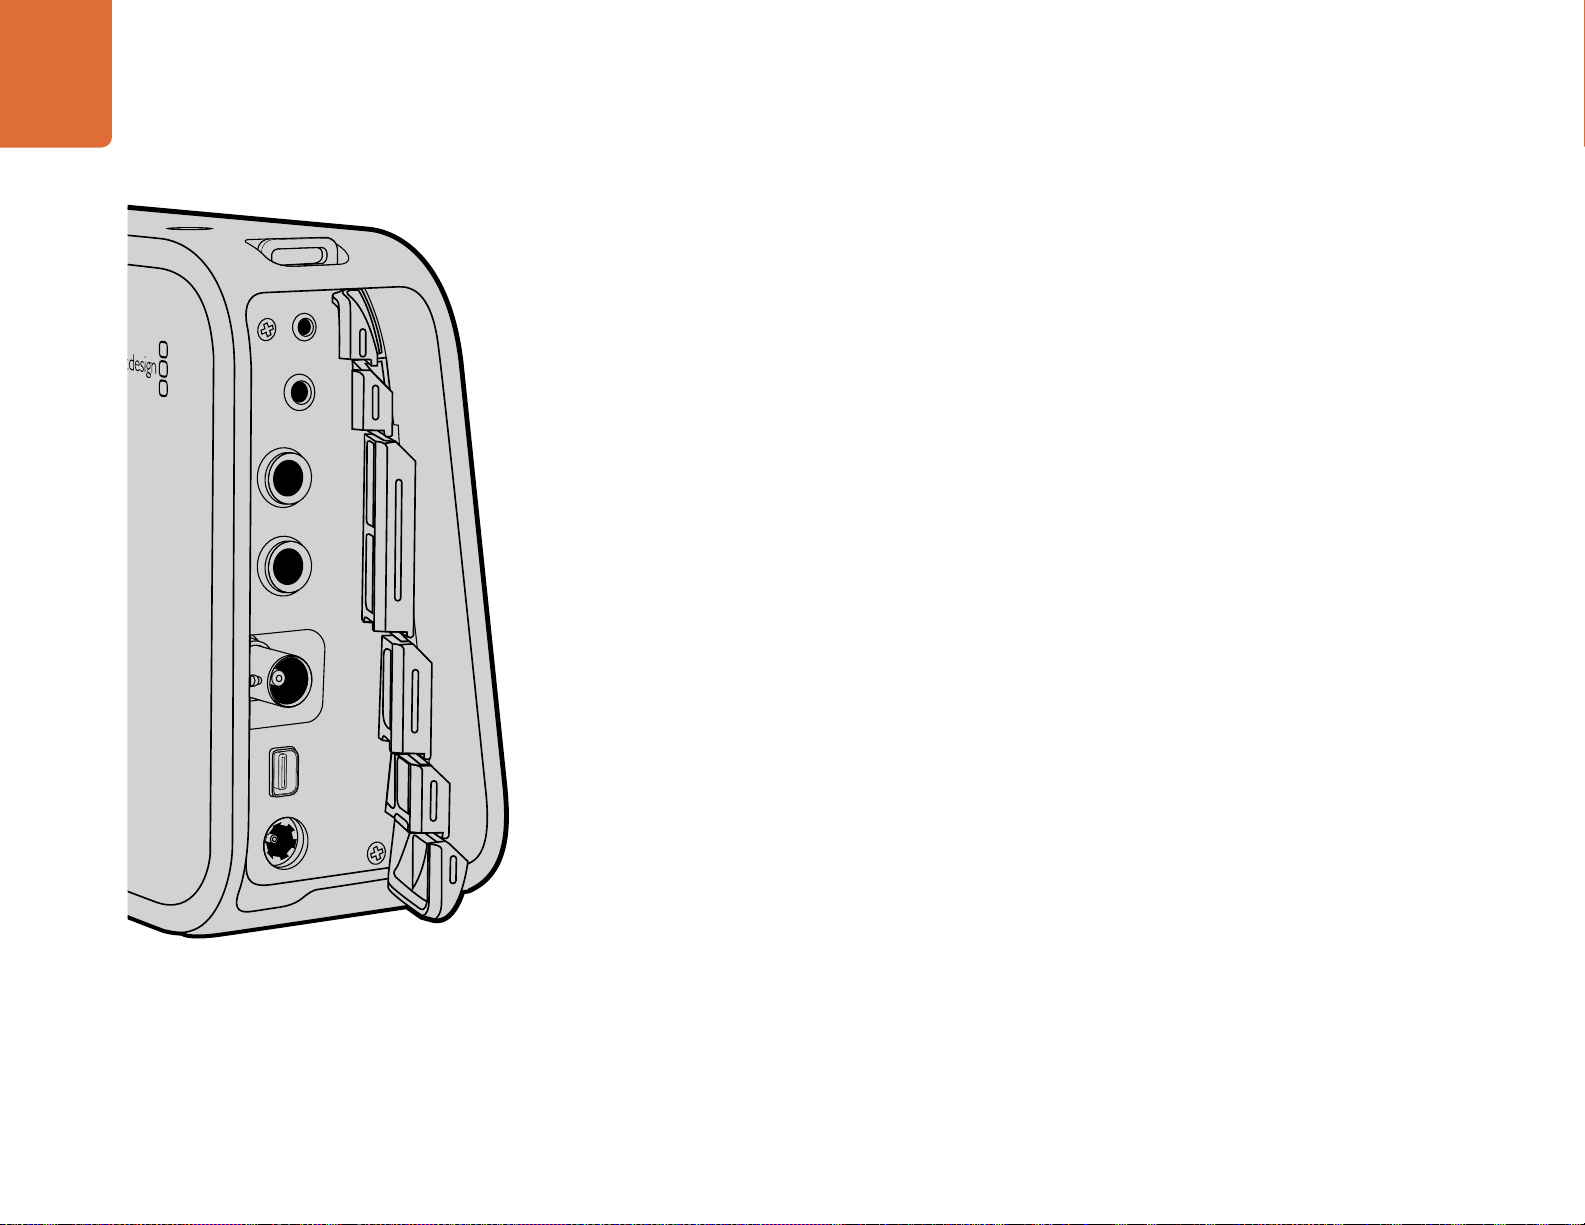
Blackmagic Cinema Camera and Production Camera 4K
LANC Remote Control
The remote port on your camera is used to remotely control record starting and stopping, iris adjustments
and manual focus adjustments when using a compatible lens.
The port is a 2.5 mm stereo jack using the standard LANC protocol.
Headphones
Monitor audio while recording or playing back clips by plugging your headphones into the 3.5mm stereo
headphones jack.
Audio In
The 1/4 inch TRS Phone audio connectors accept microphone or line level audio. It's important to select
the appropriate setting or your audio may sound too quiet or too loud. The camera automatically switches
to line level if the audio is too loud for a sustained period.
SDI Out
Blackmagic Cinema Camera supports 3G-SDI so it can be used to output uncompressed 10-bit 4:2:2
video to routers, monitors, SDI capture devices, broadcast switchers and any other SDI devices.
Production Camera 4K supports 6G-SDI, so it can be used to connect to any SDI monitor as well as 4K
switchers such as ATEM Production Studio 4K.
Thunderbolt
When connected to a Mac OS X or Windows computer with Thunderbolt technology, your Cinema
Camera or Production Camera 4K can be used as a powerful solution for waveform monitoring and
color correction. Blackmagic Cinema Camera's Thunderbolt port always outputs 10-bit uncompressed
HD1080p video. Production Camera 4K's Thunderbolt port matches the SDI output, which can be 10-bit
uncompressed HD1080p or Ultra HD 4K.
Power
Use the 12 – 30V power input for connecting your power supply and to charge the internal battery.
USB
Use the USB port to connect your Blackmagic Cinema Camera or Production Camera 4K to your computer
and update the internal software. Open the SSD door to access the USB port.
Settings
18
Camera Settings
To configure settings on your Blackmagic camera, press the MENU button.
Pocket Cinema Camera
Press the up and down buttons to highlight each settings menu. Press OK to enter a settings
menu. Use the left and right directional arrows to adjust values and the up and down arrows to
move between settings. Press Menu again to return to selecting between main settings pages.
Press Menu again to exit.
Cinema Camera & Production Camera 4K
Tap or slide the relevant arrows and icons on the touchscreen to change values or switch between
settings menus.
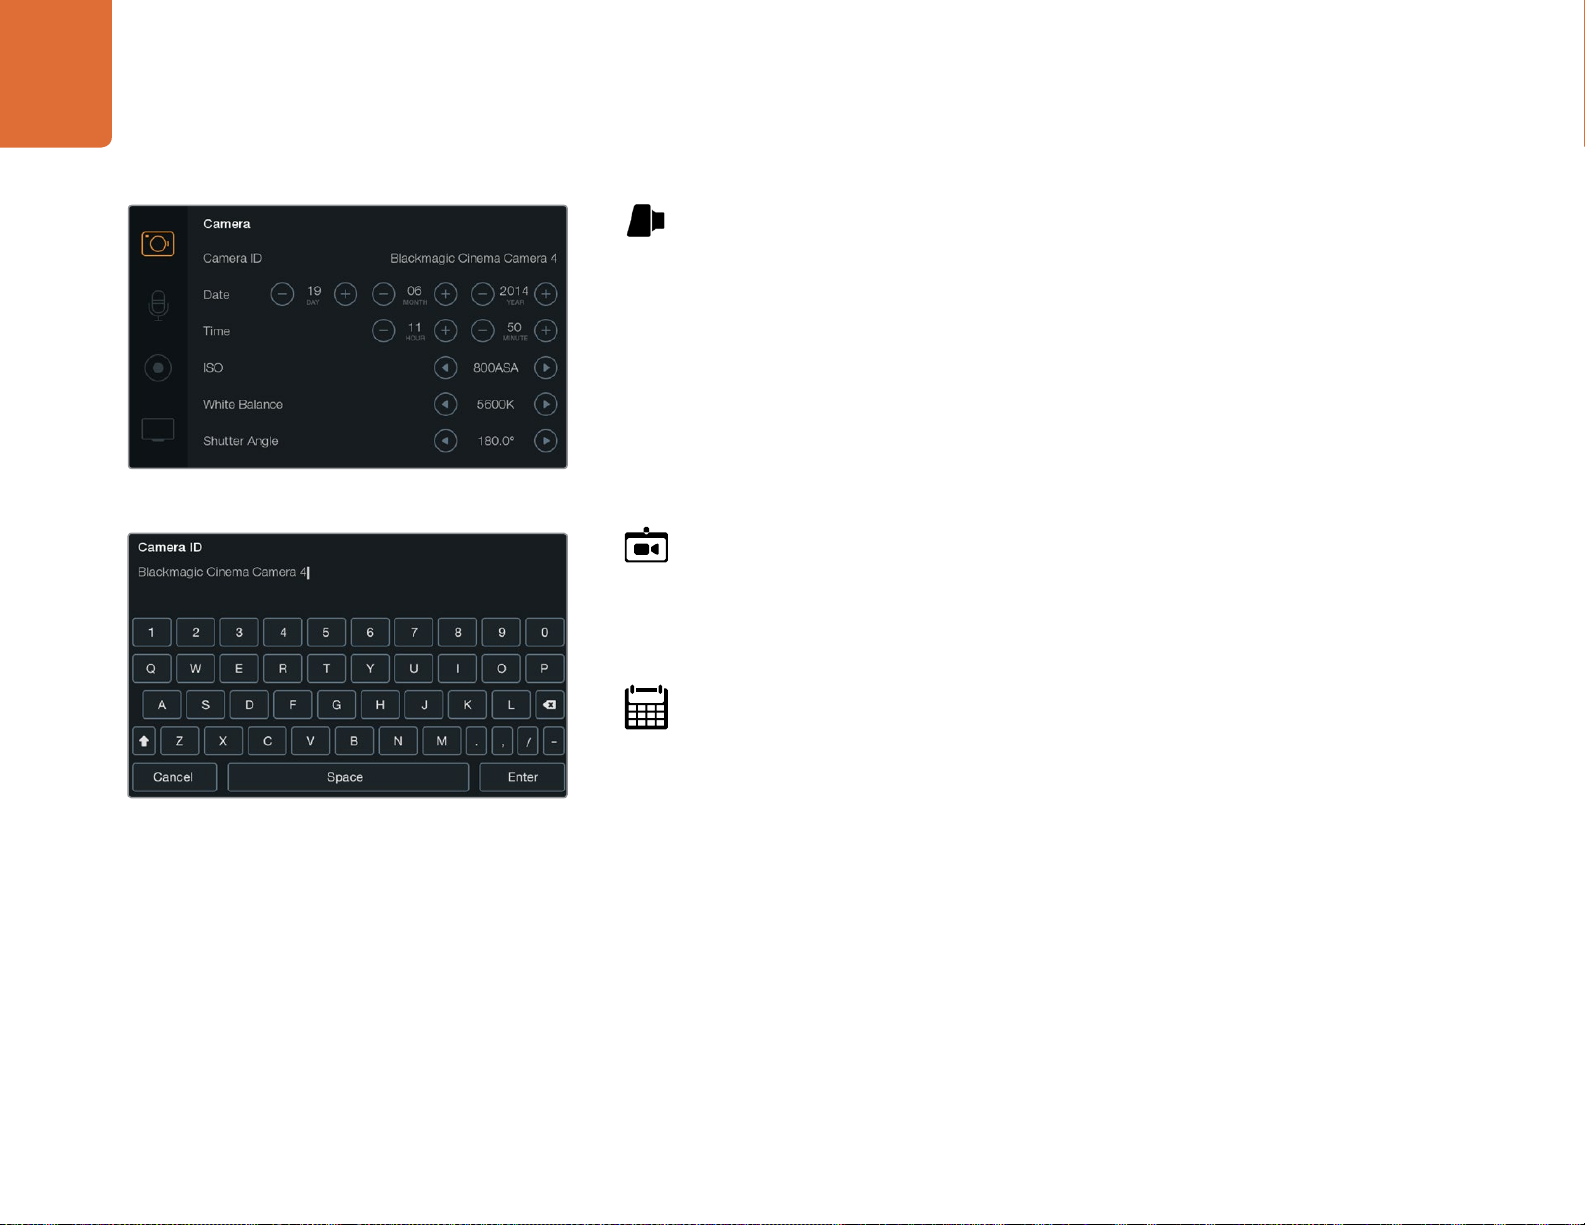
Camera ID
If using more than one Blackmagic Camera, it's helpful to set each camera's ID which will be
included with any metadata recorded with your clips. Set the camera ID with the onscreen
keyboard. When you have finished entering a new camera ID, select the Enter button to save, or
select Cancel to discard any changes.
Setting Date and Time
To set date and time on your Pocket Cinema Camera, select the + or - buttons to change the
year, month and day settings.
Time is set to 24 hour format on Blackmagic Cameras. To set the time, select the + and - keys to
make adjustments to the time. If traveling with your Blackmagic Camera, remember to change
the date and time to local time zones.
If you have your Blackmagic Camera stored for long periods, the time may need to be reset.
It is always a good idea to check the time and date prior to recording. When connecting your
camera to your computer via USB and launching Blackmagic Camera Utility, your computer's
time is synced to your camera.
You can change the camera ID with the onscreen keyboard
The Camera Settings screen
Settings

Settings
19
ISO
ISO settings are helpful when you are shooting in a variety of light conditions. The optimum ISO
setting for the Pocket Cinema Camera and Cinema Camera is 800ASA with a maximum ISO of
1600ASA. For Production Camera 4K the optimum setting is 400ASA with a maximum ISO of 800ASA.
Depending on your situation, however, you may choose a lower or higher ISO setting. For example,
in low light conditions 1600ASA would be suitable, or 800ASA for Production Camera 4K, but may
introduce some visible noise. In bright conditions 400ASA, or 200ASA on Production Camera
4K, would be best to record richer colors.
Adjust the ISO settings using the arrow icons in the menu.
White Balance
Blackmagic Cameras include white balance presets for a variety of color temperature conditions.
Each light source emits a warm or cool color. Warm appears red and cool appears blue, so the
white balance setting adds opposing red or blue to compensate. This makes sure white stays
white in your image. Color temperature also changes depending on the position of the sun and
the cloud conditions. For example, light is warm at sunrise, cools down until midday, then warms
up again as the sun sets. Shady areas in your picture, including overcast conditions, will generally
appear blue. Use the following guide to set your white balance to compensate for the changing
light conditions:
2500, 2800, 3000, 3200, 3400, 3600, 4000, 4500 and 4800K for various conditions
under tungsten, incandescent or fluorescent light, or under dull natural light including
candle light, sunrise/sunset, morning, and after noon light.
5000, 5200, 5400 and 5600K for outdoors on a clear, sunny day.
6000, 6500K, 7000, 7500 and 8000K for a variety of daylight conditions.
Adjust the White Balance settings using the arrow icons in the menu.
Shutter Angle
Shutter angle complements the ISO setting by regulating the amount of light on the sensor. 180
degrees is the optimum shutter angle, however as lighting conditions change you may need to
adjust accordingly. For example, 360 degrees is considered 'wide open' and allows maximum
light onto the sensor. This is useful for low light conditions. If you notice lights are flickering, 172.8
degrees will minimize this effect when shooting 24p in countries with 50 hertz power supplies.
Adjust the Shutter Angle settings using the arrow icons in the menu.
The Camera Settings screen

Settings
20
Audio Settings
To adjust audio input and audio monitoring settings on your Blackmagic Camera, press the MENU
button and select the microphone icon to the left of the display.
Microphone Input
Microphone input adjusts the recording levels of the built in microphone. Move the audio slider
left or right to increase or decrease levels. Pocket Cinema Camera has a built in stereo microphone
and Cinema Camera and Production Camera 4K have built in mono microphones. The built in
microphones record to audio channels 1 and 2 when no external audio source is connected.
Channel 1 and 2 Input Levels
External audio connectors accept audio at microphone level or line level. It's important to select
Mic or Line level audio as appropriate to avoid your external audio sounding almost inaudible
or too hot and distorted.
Set the external audio input levels by using the left and right arrows. To prevent damage, the
camera will automatically switch to line level input if the input levels are over the limit for a
sustained period of time.
Channel 1 Input Level
Move the audio slider icon left or right to increase or decrease levels for channel 1. The external
audio input overrides the built in microphone and is recorded to audio channel 1.
Channel 2 uses Channel 1 Input
Select Yes if you only have channel 1 input and want to record the same external audio to channels
1 and 2. You can leave this set to No if you only want to record one channel of audio.
Channel 2 Input Level
Move the audio slider icon left or right to increase or decrease levels for channel 2. The external
audio input overrides the built in microphone and is recorded to audio channel 2.
Headphone and Speaker Volume
When headphones are connected, a headphone icon will be displayed. When no headphones
are detected, a speaker icon will be displayed. Headphones will always be active when recording
or playing back, however speakers will only work when playing back. Move the volume slider left
or right to increase or decrease audio monitoring levels.
The Audio Settings screen
Other manuals for BLACKMAGIC CAMERAS
1
Table of contents
Languages:
Other Blackmagicdesign Film Camera manuals

Blackmagicdesign
Blackmagicdesign URSA Mini Pro User manual

Blackmagicdesign
Blackmagicdesign URSA Mini Owner's manual

Blackmagicdesign
Blackmagicdesign BLACKMAGIC CAMERAS User manual

Blackmagicdesign
Blackmagicdesign Blackmagic Cinema Camera User manual

Blackmagicdesign
Blackmagicdesign Blackmagic URSA Mini User manual


