Blackspot Interactive ROAD ANGEL User manual

USER GUIDE
Blackspot Interactive Limited
Unit 5, New Rookery Farm, Little London
Silverstone, Northants NN12 8UP
Email: [email protected]m
eb: www.blackspot.com

Thank you for buying your new ROAD ANGEL Navigator
As our roads become busier, more congested and more regulated, staying
alert to road and traffic conditions is a challenge to everyone. Even the most
conscientious driver can have a momentary lapse of concentration that
could easily lead to an accident or a fine and points.
ROAD ANGEL Navigator is specially designed to be a simple-to-use
addition to any vehicle, to alert and warn you in advance of known danger
areas. In the comprehensive ROAD ANGEL Navigator database are stored
Police, Local Authority and Ministry of Transport designated danger spots,
including accident black spots and safety camera locations.
Using the latest Global Positioning Satellite (GPS) technology, ROAD
ANGEL Navigator compares your position with the known danger spot
locations and gives you an audible and visual warning as you approach
them. An accurate GPS speedometer in the display gives you time to adjust
your driving to the approaching danger.
The safety of you and your passengers is our prime consideration, and we
trust that for all the miles you drive, your ROAD ANGEL Navigator will
enhance the safety and enjoyment of your journey. Join other ROAD
ANGEL Navigator users in guarding your life and livelihood.
e are pleased to have you as a valued customer and hope you will be
delighted with your fully integrated ROAD ANGEL Navigator. Having
listened to our customers we think the new features will make this product
your perfect driving companion.
Dave Clark, Managing Director
Blackspot Interactive Ltd.
The directors of Blacks ot Interactive Ltd. sell ROAD ANGEL
Navigator as a road safety enhancement device. Driving within
the s eed limits at all times and within the limitations of the
road condition and your abilities is aramount. The directors of
Blacks ot Interactive Ltd. take no res onsibility for the use of
ROAD ANGEL Navigator for other ur oses than those
sti ulated.

Table of Contents
1. Introduction........................................................................1
Front View.......................................................................................... 2
Back View.......................................................................................... 3
Left Side View.................................................................................... 4
Lower Side View................................................................................. 4
Cradle – Front View............................................................................ 5
Cradle – Back View............................................................................ 5
Cradle Mounting Arm......................................................................... 6
Register Now!..................................................................................... 7
Subscriptions........................................................................................ 8
Warrant ................................................................................................. 8
Securit .................................................................................................. 8
2. Installation..........................................................................9
Unpacking.............................................................................................. 9
Mounting the Unit.................................................................................. 9
Installing ROAD ANGEL Navigator................................................... 10
Hardwiring........................................................................................ 12
Getting Started.................................................................................... 13
3. Basic Operation................................................................15
Understanding the Displa ................................................................. 15
Safety Mode..................................................................................... 15
Alert Mode........................................................................................ 16
Muting Audio and Speech arnings................................................ 16
Alert Types....................................................................................... 17
Getting There....................................................................................... 18
The Safety Screen............................................................................ 20
Navigation Screens.......................................................................... 21
Night Mode....................................................................................... 22
i

4. Advanced Operation.........................................................23
Multiple Stops...................................................................................... 23
Rearranging Stops........................................................................... 23
Optimizing Stops.............................................................................. 23
Picking Stops from the Map............................................................. 23
Alternative Navigation Methods......................................................... 24
Getting to a POI............................................................................... 24
Getting to a Road Junction............................................................... 24
Navigating to a Latitude/Longitude Point.......................................... 25
Making a Detour.................................................................................. 25
Automatic Detour............................................................................. 25
Manual Route Editing....................................................................... 26
Using aypoints.............................................................................. 26
Changing Guidance Modes................................................................ 27
5. Customizing ROAD ANGEL Navigator............................28
Navigation Settings............................................................................. 28
Routing............................................................................................. 29
Guidance.......................................................................................... 30
Map.................................................................................................. 31
Favourites........................................................................................ 32
POI Alerts......................................................................................... 33
Road Hazard Settings......................................................................... 34
Alerts................................................................................................ 35
Distances......................................................................................... 36
System Settings............................................................................... 36
Adding and Deleting Danger Zones................................................... 37
Deleting zones.................................................................................. 37
Adding new locations....................................................................... 37
Adding an Average Speed monitoring section (SPECS zone)..........38
Protecting and Cleaning..................................................................... 38
Cleaning the case............................................................................. 38
Cleaning the screen......................................................................... 38
General precautions......................................................................... 38

6. Updating the Database....................................................39
System requirements....................................................................... 39
Updating........................................................................................... 40
7. Troubleshooting...............................................................41
8. Background Information..................................................44
About Global Positioning Satellites (GPS)........................................ 44
GPS Status........................................................................................... 44
ROAD ANGEL Navigator's Database............................................... 45
Using ROAD ANGEL Navigator Abroad........................................... 45
Speed Cameras and Blackspots........................................................ 46
9. Accessories......................................................................48
10. End User License Agreements......................................49
NAVTEQ European Data for Portable Navigation Device
Applications......................................................................................... 49
Software............................................................................................... 51
iii


1. Introduction
ROAD ANGEL Navigator uses the latest global positioning satellite (GPS –
see page 44) technology to give you step-by-step navigation information
combined with audible and visible alerts as you approach hazardous
sections of road:
•Accident black spots (as designated by the Police and Local Authorities)
•Safety camera locations
•Average speed measurement areas
•Primary Schools
•Congestion charging zones
ROAD ANGEL Navigator displays a constantly updated and accurate speed
reading. Should you break down, ROAD ANGEL Navigator allows you to
pinpoint your location and direct rescue services to your vehicle.
IMPORTANT SAFETY INFORMATION!
Never attem t to alter settings while you are driving; ask a
assenger to make any changes or find a suitable and safe
lace to ull over and ark your vehicle.
ROAD ANGEL Navigator is designed as an aid to safe driving
and route navigation; always drive within the s eed limits and
traffic regulations, taking account of the road conditions and
your own abilities.
ROAD ANGEL Navigator should not be used in any way that
may interfere with the safe o eration of your vehicle. Ensure
that your ROAD ANGEL Navigator and its associated equi ment
and cables are securely and correctly mounted within the
vehicle.
Blacks ot Interactive Ltd assumes no res onsibility for any
damage or injury resulting from the use of this roduct.
1

Front View
2
Zoom In/Out
Use to change
map magnification.
Power LEDOn/
Suspend
Store Button
Press to enter new zones
(see page 37)
Delete Button
Press to remove alert
zone from database
(see page 37).
Displa
Shows speed, satellite
reception and indicates
type of hazard (see
page 16).
▲ Volume UP
▼ Volume DOWN
◄ Night Mode
► Da Mode
■ Menu

Back View
3
Internal Speaker
Used by ROAD
ANGEL Navigator
when the unit is not in
its cradle.
Registration
information
See page 7)
Mounting catch
Locates and secures
ROAD ANGEL
Navigator in its cradle.
Reset button
GPS Receiver
Before use, raise the antennae and ensure it
has a clear view of the sky. Note: The Unit
cannot be inserted into its cradle unless
the antennae is raised.
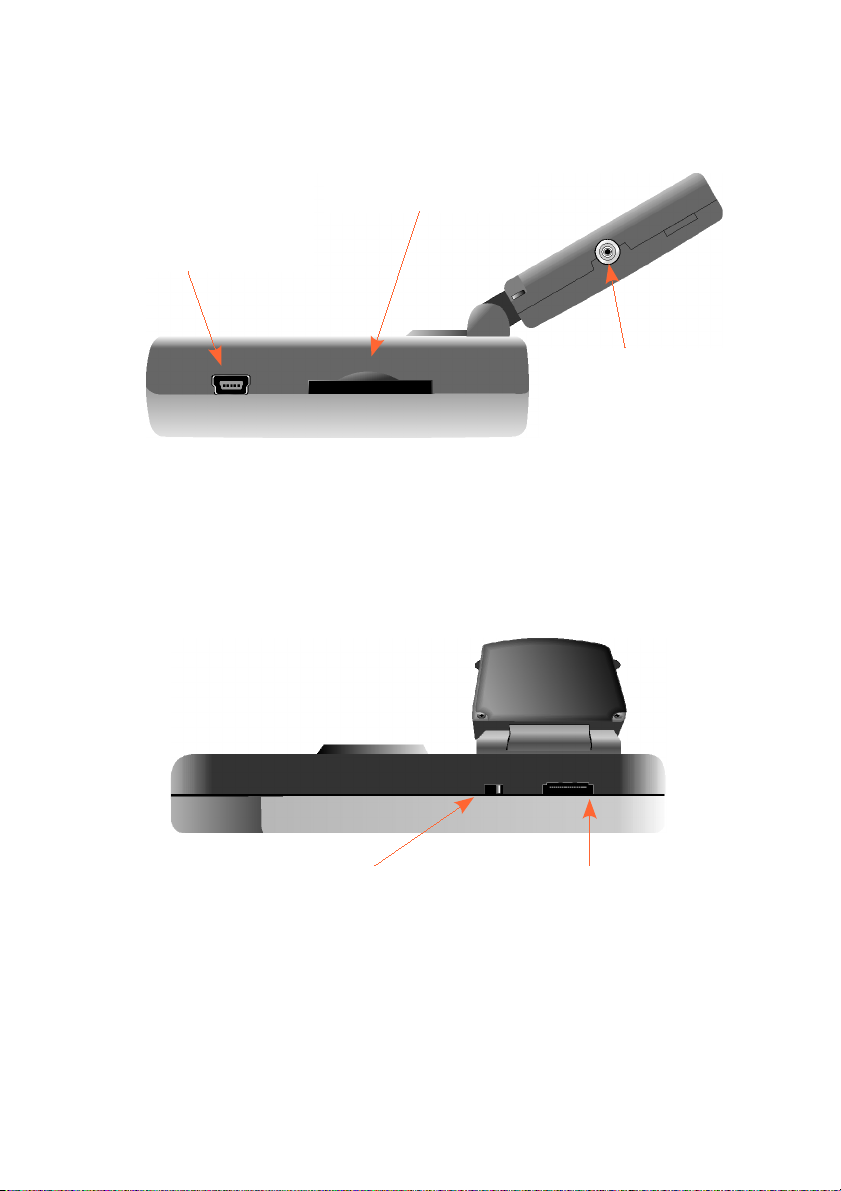
Left Side View
Lower Side View
4
USB Port
Used by ROAD ANGEL
Navigator when the unit
is not in its cradle.
GPS Antennae socket
Use to connect external
GPS antennae –
required in vehicles with
UV windscreens.
SD Card Slot
Contains all software -
do not remove.
Power switch
Slide switch to turn unit On/Off.
Note: Unit is supplied with
power switched off.
Cradle connector
Extends sound and
power connectivity to
cradle.

Cradle – Front View
Cradle – Back View
5
Power indicator
Blue LED indicates
power on.
Release Lock
Press, and hold down,
to release ROAD Angel
Navigator from the
cradle.
Volume
Adjusts volume of
sound from cradle's
internal speaker.
Power Connector
Connects to cigar
lighter socket using
supplied cable.
Mounting Arm Connector
Speaker
Used by unit when in
cradle.

Cradle Mounting Arm
6
Suction Cup
Press against windscreen then lift
Suction Lever to fasten arm in place.
Suction Lever
Applies or releases
suction to fix to
windscreen.
Vertical Adjuster
Use to adjust angle of
cradle to windscreen and
dashboard.
Horizontal Adjuster
Use to adjust
horizontal position of
cradle: e.g. to face
driver or passenger.
Cradle Flange
Slides into slot on
rear of cradle.

Register Now!
Register your ROAD ANGEL Navigator immediately after purchase. This is
important for two reasons:
•You cannot update the unit until it has been registered. Database
information will be significantly out-of-date at the time of purchase and
should be updated as soon as possible (see page 39).
•ithout registration, we cannot resolve warranty issues, log queries or
solve problems with your ROAD ANGEL Navigator.
REGISTER your unit online:
1. Go to www.blackspot.com
2. Click on the Product Registration link. The Product Registration form is
displayed.
3. Enter your ROAD ANGEL Navigator's serial number. You can find this
on the base of the unit.
4. Click on the Next button. Once your details have been entered, you will
be prompted to download the update software directly to your PC. The
registration process normally takes one full working day – you can then
use the software to update your ROAD ANGEL Navigator (see page 39).
If online registration is not possible, please call the Registration helpline
(recorded) on: 0870 084 7439. Leave your name, address and telephone
number and we will forward a registration form to you the same working day
(Mon – Fri).
7

Subscri tions
Your ROAD ANGEL Navigator comes with a free subscription for six
months of database updates and product support. It is critical to the
operation of your ROAD ANGEL Navigator that you update the unit regularly
and so continued subscription is essential. ith constant additions to the
ROAD ANGEL Navigator database (1000+ sites per year), the benefit of
your ROAD ANGEL Navigator and the protection it provides will be
dramatically reduced if you fail to maintain your database.
You can also subscribe online at http://www.blackspot.com/subscriptions/.
Warranty
Your ROAD ANGEL Navigator is guaranteed for one year from the date of
purchase from all defects that occur with normal use. If your unit fails to
perform as specified in these instructions, please visit:
http://www.blackspot.com/warranty
Security
Owing to the high number of thefts, we strongly suggest you remove your
ROAD ANGEL Navigator and its bracket from view when you leave your
vehicle.
Please contact Blackspot Interactive Ltd if your unit is stolen or lost. Each
ROAD ANGEL Navigator is identified by a unique serial number on the
base. e can disable a unit through our security systems and detect any
attempt to re-register it. This has frequently resulted in the safe return of a
ROAD ANGEL Navigator to its rightful owner.
8

2. Installation
This section shows you how to install ROAD ANGEL Navigator in your
vehicle. ROAD ANGEL Navigator can also be used as a free-standing unit
for GPS navigation whilst walking or for route planning prior to your journey
(see page 27).
Un acking
Empty all the parts out of the box and familiarise yourself with each item.
Each pack contains:
•The ROAD ANGEL Navigator unit (SD card is pre-installed)
•A mounting cradle
•A windscreen mounting arm
•User manual
•Anti-glare screen protector
•Cables:
•1 x Straight power lead
•1 x Sprung power lead
•1 x USB cable
Mounting the Unit
ROAD ANGEL Navigator has a high sensitivity GPS antenna and requires a
clear view of the sky to receive information from GPS satellites. e highly
recommend that ROAD ANGEL Navigator is positioned in the centre of the
front windscreen, low down, just above the dashboard. If screen glare is a
problem in this position, try installing the unit beside the driver's “A-pillar”.
Check that the GPS reception operates correctly in this position.
If you want to install ROAD ANGEL Navigator anywhere else within your
vehicle, you may require an external GPS antenna. Please contact
Blackspot Interactive Ltd or visit www.blackspot.com for details.
Use with UV and Heated screens
UV screens block GPS signals from entering the vehicle, stopping ROAD
ANGEL Navigator from acquiring its position. This can be a problem with
certain models of vehicle, i.e. BM , Mercedes, Renault, Peugeot & Citroen.
9

Heated screens can also affect GPS signal strength.
If your vehicle has a UV or heated screen, you may need an external
antennae (please contact Blackspot Interactive Ltd or visit
www.blackspot.com for details). Most vehicles fitted with a UV screen have
a defined section behind the rear view mirror where you can fit the
antennae.
Installing ROAD ANGEL Navigator
The following instructions describe the installation of ROAD ANGEL
Navigator:
1. Adjust the mounting arm as follows:
a) Unfasten the vertical adjustment knob, and change the angle of the
central joint so that the connecting flange is vertical when the suction
cup is held against your vehicle's windscreen. Tighten the knob to
lock in place.
b) Unfasten the horizontal adjustment knob, and change the horizontal
angle of the connecting flange so that it is facing in the required
direction: in line with the vehicle, towards the driver, or towards the
passenger. Tighten the knob to lock in place.
2. Hold the suction cup against the windscreen. Rotate the lever clockwise
to apply suction. For maximum adhesion, it may help to dampen the
suction cup beforehand.
3. Take the power lead, and plug it into the socket on the rear of the cradle.
Don't connect the other end to the cigar lighter socket yet.
4. Slide the cradle onto the mounting arm's connecting flange.
5. Take your ROAD ANGEL Navigator, and lift up the GPS Receiver panel.
6. Slide the ROAD ANGEL Navigator's power switch to the On position
(towards the navigation buttons – see page 4). The device will start to
load up.
7. Slide the unit into the cradle and press firmly into place (support the
cradle underneath whilst you do this).
8. Route the power cable to the cigar socket. Ensure that it does not
interfere with any of the vehicle's controls or airbag modules. If you use
your cigar socket for any other devices, a dual adaptor may be used.
You are now ready to use the unit for the first time (see page 13).
10

11
23
45
67
1(a) 1(b)

Hardwiring
ROAD ANGEL Navigator has a 5V regulator built into its power cable. If the
cable is cut and used to hardwire the unit into the vehicle, you will damage
the ROAD ANGEL Navigator.
To hardwire ROAD ANGEL Navigator into your vehicle, purchase a cigar
socket, wire this into the power system and use with the supplied cable.
Consult an auto electrician if you are unsure how to carry out
this rocedure as incorrect hardwiring may affect the validity of
vehicle and roduct warranty. Consult vehicle manufacturer if
in doubt.
12

Getting Started
1. Find a location outside with a clear view of the sky (away from obstacles
such as tall buildings and over-hanging trees – these may delay or
prevent satellite acquisition).
2. Plug the power lead into the cigar lighter socket. If your socket is
ignition-switched you will need the ignition to be on.
3. Press the On/Off switch in the top right corner (see page 2).
ROAD ANGEL Navigator displays the following screen.
If you have not updated your ROAD ANGEL Navigator, the display
illuminates red and prompts you to ‘Please register your ROAD ANGEL
Navigator and execute an u date. Any key to continue’. Press any
button to clear this screen. hen you have updated ROAD ANGEL
Navigator, this message will not appear again.
4. The display illuminates blue and shows a satellite symbol:
The first time the unit is switched on, it must acquire data from a
minimum of 4 satellites to establish its position. THIS MAY TAKE UP TO
13

45 MINS. After approximately 4 hours use, ROAD ANGEL Navigator's
internal battery will be charged sufficiently for it to be able to memorise
its position. Subsequent starts will acquire satellites within 1-2 minutes.
5. hen ROAD ANGEL Navigator has established its position, the display
shows your speed (0 if you are stationary).Your unit is now ready for
use.
14
Other manuals for ROAD ANGEL
4
Table of contents


