Blade Trigo User manual

Thank you for purchasing a Blade Kite. We hope you will enjoy
kiteboarding with our improved, high-quality 2011 kites. Kiteboarding
should be approached in an educated and safe manner. In the following
manual you will find safety guidelines, precautions, and information on
assembling and caring for your new kite. Please make sure you read
this manual in its entirety and understand all aspects of using this
p
product. This manual does not replace proper kiteboarding instruction
and we encourage you to seek professional guidance from professional
instructors and experienced kiteboarders before attempting to operate
this product.
IMPORTANT:
For persons under the age of 18, a parent or guardian should review
this manual and statements. This product should not be used unless
und
under the close supervision of an adult who has read and
understood all aspects of this manual. Once again, no actual
kiteboarding should take place without proper tuition from a
licensed instructor.
WARNING:
KITEBOARDING IS DANGEROUS
Always use extreme caution when using this product.
Misuse of this product can cause serious injury and/or death.
Only use this product if you are in good physical health.
Always act responsibly when using this product.
You are responsible for your own safety and the safety of others
around you when using this product.

04...RELEASE AND LIABILITY
05...SAFETY
06...WIND RANGE / KITE OVERVIEW
07...BAR OVERVIEW
08...PREPARING THE CONTROL SYSTEM AND LINES
12...MAD SYSTEM- INFLATING THE KITE
14...
14...ATTACHING THE CONTROL SYSTEM TO THE KITE
15...KITE TUNING
16...KITE CARE
17...REPAIRS
19...RELAUNCHING
03
The purchaser/user and the parents
/guardians of users under the age of
18 are agreeing to be bound to the
terms set forth below and require
anyone using this product to be
bound by such terms. Anyone who
does not agree with these terms and
does not agree with these terms and
is not willing to abide by them should
return the product immediately
before use.
The use of a Blade Kite and any of its
components exposes the user to
certain inherent risks, dangers, and
hazards which can result in property
hazards which can result in property
loss or damage and significant
personal injury including permanent
paralysis or death. The purchaser/
user freely assumes and accepts any
and all such risks, both unknown and
known, while using this equipment.
The risks inherent in the sport can be
The risks inherent in the sport can be
greatly reduced by abiding by the
Warnings and Guidelines listed in the
User's Manual. It is also
recommended that the purchaser/user
seeks professional instruction before
attempting to use this equipment.
By purchasing and using this
product, the purchaser/user
hereby releases Blade, its
principals, directors, officers,
agents, distributors,
representatives, employees,
volunteers, and their insurance
volunteers, and their insurance
from any and all liability, claims,
and demands of any nature for any
and all injury or damage as a
result of using this product, to the
fullest extent permitted by law.
This agreement shall be effective
and binding upon all heirs, next of
and binding upon all heirs, next of
kin, executors, administrators,
assigns, and representatives in
the event of the incapacity or
death of the purchaser/user.
In entering this Agreement the
purchaser/user shall not rely on
any oral or written representations
any oral or written representations
or statements other than what is
set forth in this Agreement.
Get information on wind, tidal,
and sea current conditions at your
kiting location.
Be careful of wave conditions.
Do not use this product in severe
weather such as thunderstorms or
lightning.
lightning.
Never use this product with winds
stronger than your ability level.
Be aware of changing and
unpredictable winds.
Location Related Safety:
Do not use this kite near power
lines, telephone poles, airports,
lines, telephone poles, airports,
and streets
Keep your kite fly lines away from
people and obstacles
Always fly in open and clear area.
Make sure all spectators and
obstacles are upwind from you.
F
Flying Lines Related
Safety:
Never allow anyone to get in
between you and the kite while
flying the kite.
Check your flying lines for knots
before attempting to connect to
the canop
the canopy.
Do not make any additional knots
in the flying lines, all necessary
line adjustments should be made
to the leading lines.
Take time to familiarize yourself with the
operation of your kite and remember that
you are responsible for its safe operation
and the safety of those around you.
General Safety:
Be familiar with your gear and safety
mechanisms. Make sure to test them
mechanisms. Make sure to test them
often in non-emergency situations.
Always check gear before going in the
water. Never fly your kite with worn
lines or a torn canopy.
Make sure the kite is used with
compatible gear.
Never permanently attach yourself to
the kite, control bar or lines.
Never hold the kite by the Flying or
Bridle Lines.
Always secure an inflated kite when
not in use.
Make sure all users of this gear have
proper training.
proper training.
Always use protective wear and
equipment when using this product:
helmet, gloves, shoes, floatation
device, wet suit, eye protection, safety
knife, and sunscreen.
Never use this product if you are not a
good swimmer
good swimmer
Weather Related Safety:
Learn to use this kite in light
weather conditions.
Avoid offshore winds
Use extreme caution in
onshore winds.
05
SAFETY
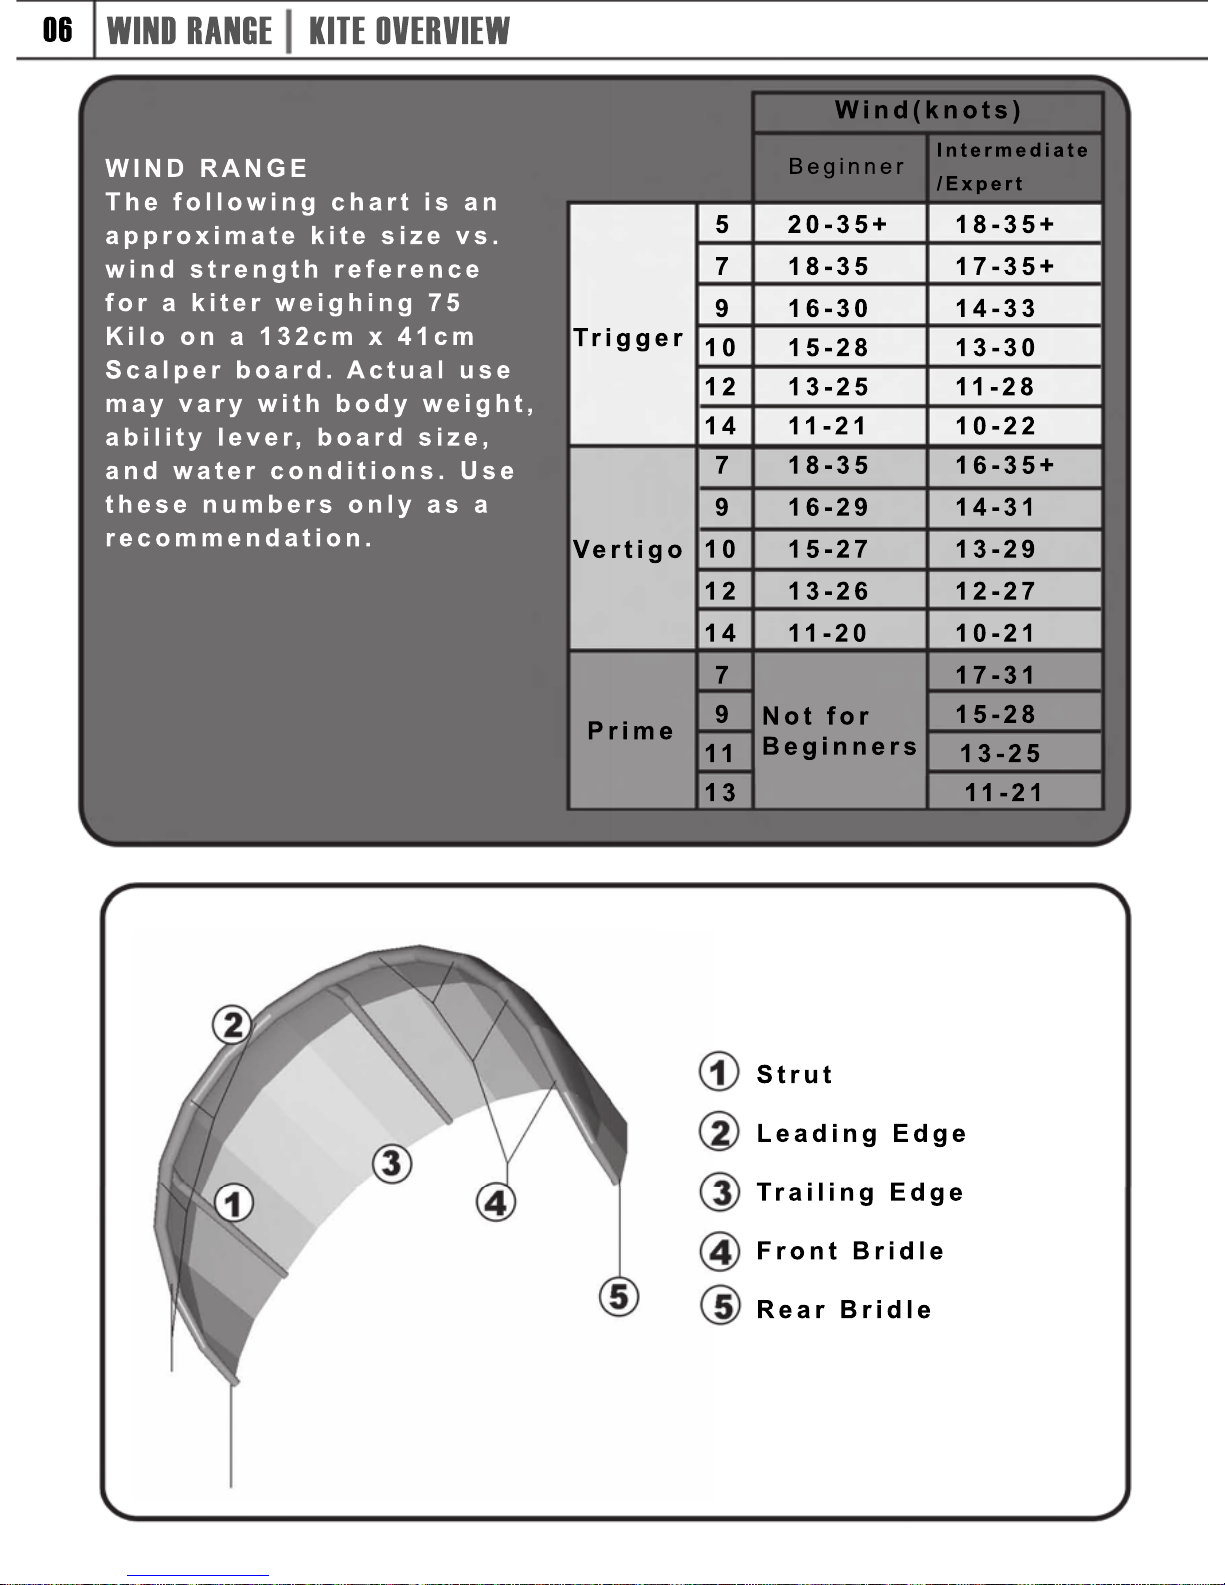
WIND RANGE
The following chart is an
approximate kite size vs.
wind strength reference
for a kiter weighing 75
Kilo on a 132cm x 41cm
S
Scalper board. Actual use
may vary with body weight,
ability lever, board size,
and water conditions. Use
these numbers only as a
recommendation.
5 20-35+ 18-35+
7 18-35 17-35+
9 16-30 14-33
10 15-28 13-30
12 13-25 11-28
14 11-21 10-22
7 18-35 16-35+
9 16-29 14-31
10 15-27 13-29
12 13-26 12-27
14 11-20 10-21
7 17-31
9 15-28
11 13-25
13 11-21
Not for
Beginners
06
WIND RANGE KITE OVERVIEW
Intermediate
/Expert
Beginner
Wind(knots)
Trigger
Strut
Leading Edge
Trailing Edge
Front Bridle
Rear Bridle
Vertigo
Prime

1
1
2
2
3
3
4
4
5
5
6
6
7
7
8
8
9
9
10
10
12
12
17
17
18
18
13
13
14
14 15
15
16
16
Color Coded Bar
Swivel Dome Chickenloop
Swivel Dome Lock
Safety Ring
Swivel
Release Cap
DePower Line
L Square (Line Lock)
Red Handle (Depower Strap)
Black Handle (Power Up Strap)
Front Leader Line Knots
Line Fastener
Foam
Rear Leader Line
Rear Leader Line Knot
Leash Stopper Ball
Leash Ring
www.bladekites.com
1. Lay out your control bar and lines, make sure
that the lines are not tangled or crossed.
2. Take a small rod and, using lark's head knots,
attach all four lines to the rod.
3. With the DePower strap fully extended (pull
on the black handle if not) grab the control bar.
4. Having a partner holding the rod taut, stand
4. Having a partner holding the rod taut, stand
directly in line with the rod and pull on the
control bar with even force on both sides,
straightening the lines. Make sure that the bar
is parallel with your shoulders.
5. If there is even tension on all four lines and the
bar stays parallel with your shoulders, the lines
are even and the kite is ready for inflation.
are even and the kite is ready for inflation.
6. If the tension is not even in all four lines and the
bar is tilted in even the slightest bit, the lines
need to be adjusted.
The Swivel Dome Chicken
Loop System
The Swivel Dome is important for releasing
power in an uncontrolled kite and emergency
situations. The newly designed system is
especially designed from composite plastic for
longer lasting, corrosion free, and simple
longer lasting, corrosion free, and simple
functionality. When activated while the leash is
connected to the safety ring, the kite will lose
all power and drop, remaining attached by one
of thr front lines. Always check the
mechanism before attempting to launch.
This device has a limited lifetime, and it is
recommended to change the mechanism after
recommended to change the mechanism after
300 hours of kiting.Rinse the Swivel Dome in
fresh water after every session.
08
PREPARING THE CONTROL SYSTEM AND LINES
7. Do not adjust the flying lines! Make the
lines shorter by making knots in the leading
lines only!
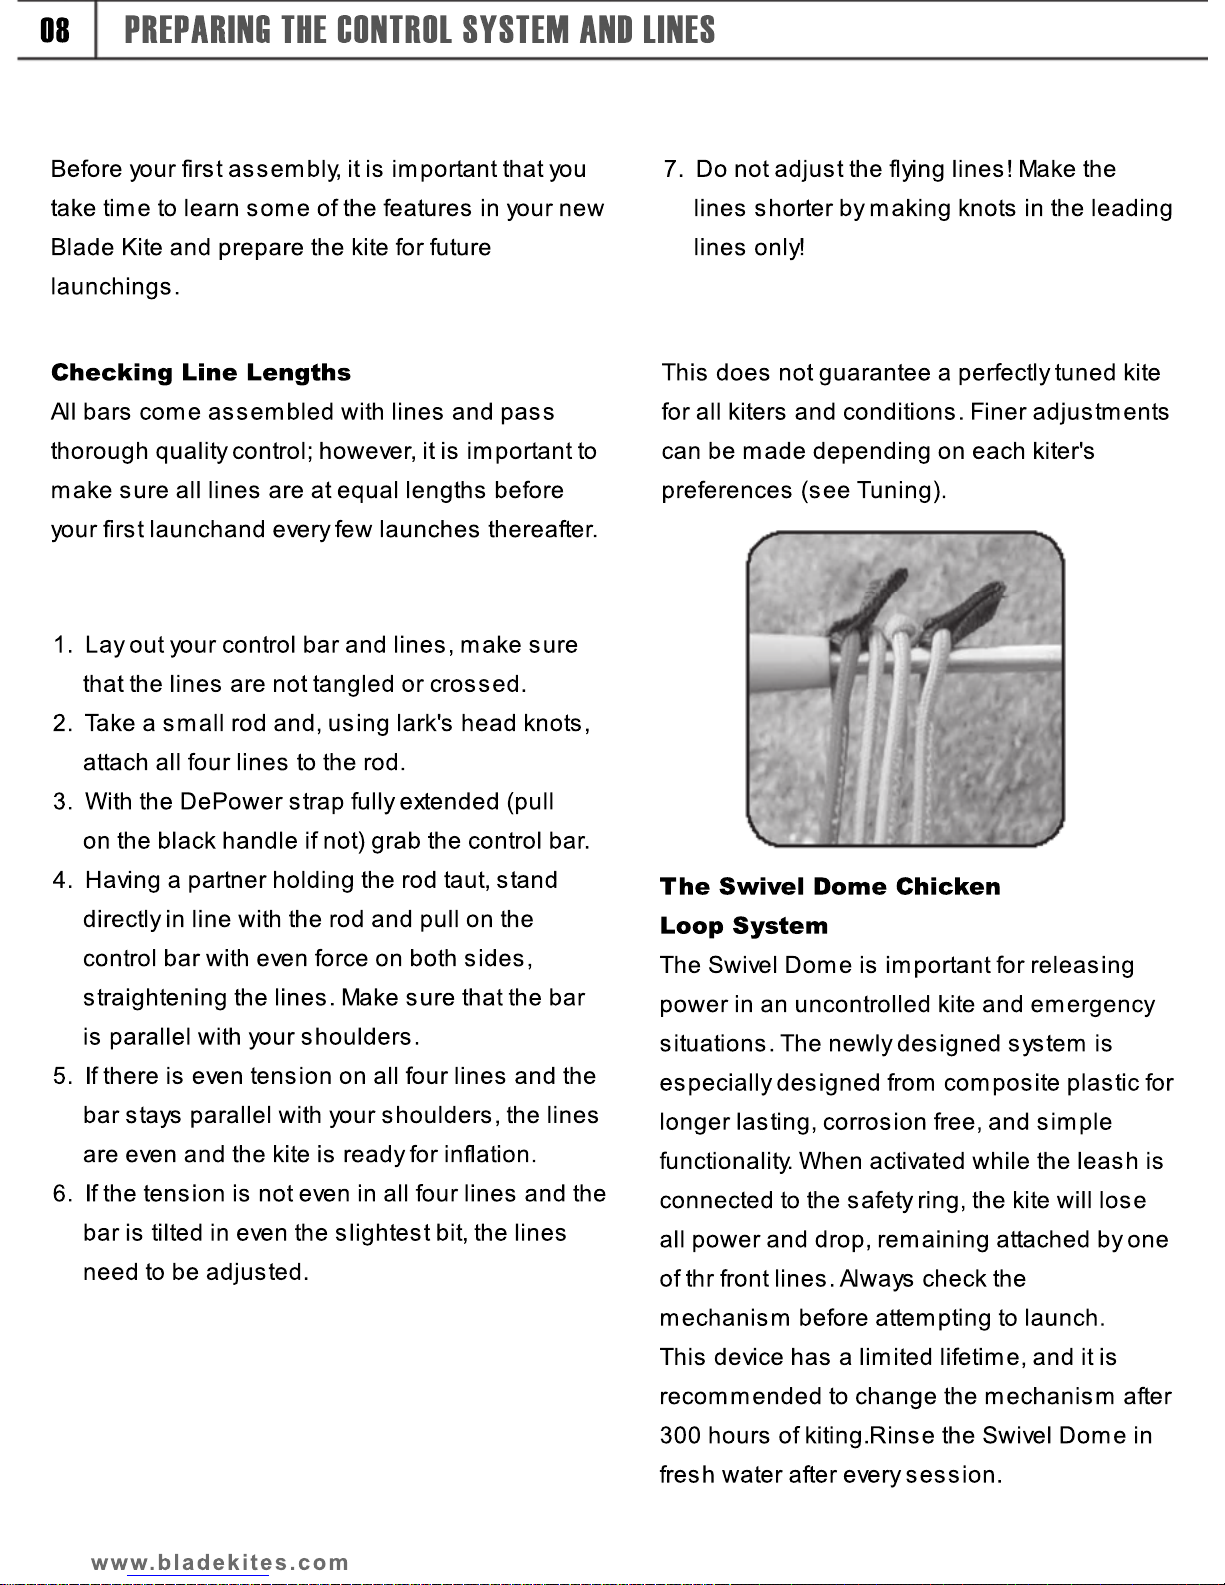
This does not guarantee a perfectly tuned kite
for all kiters and conditions. Finer adjustments
can be made depending on each kiter's
preferences (see Tuning).
Checking Line Lengths
All bars come assembled with lines and pass
thorough quality control; however, it is important to
make sure all lines are at equal lengths before
your first launchand every few launches thereafter.
Before your first assembly, it is important that you
take time to learn some of the features in your new
Blade Kite and prepare the kite for future
launchings.
09
PREPARING THE CONTROL SYSTEM AND LINES
2
24
3
3
.
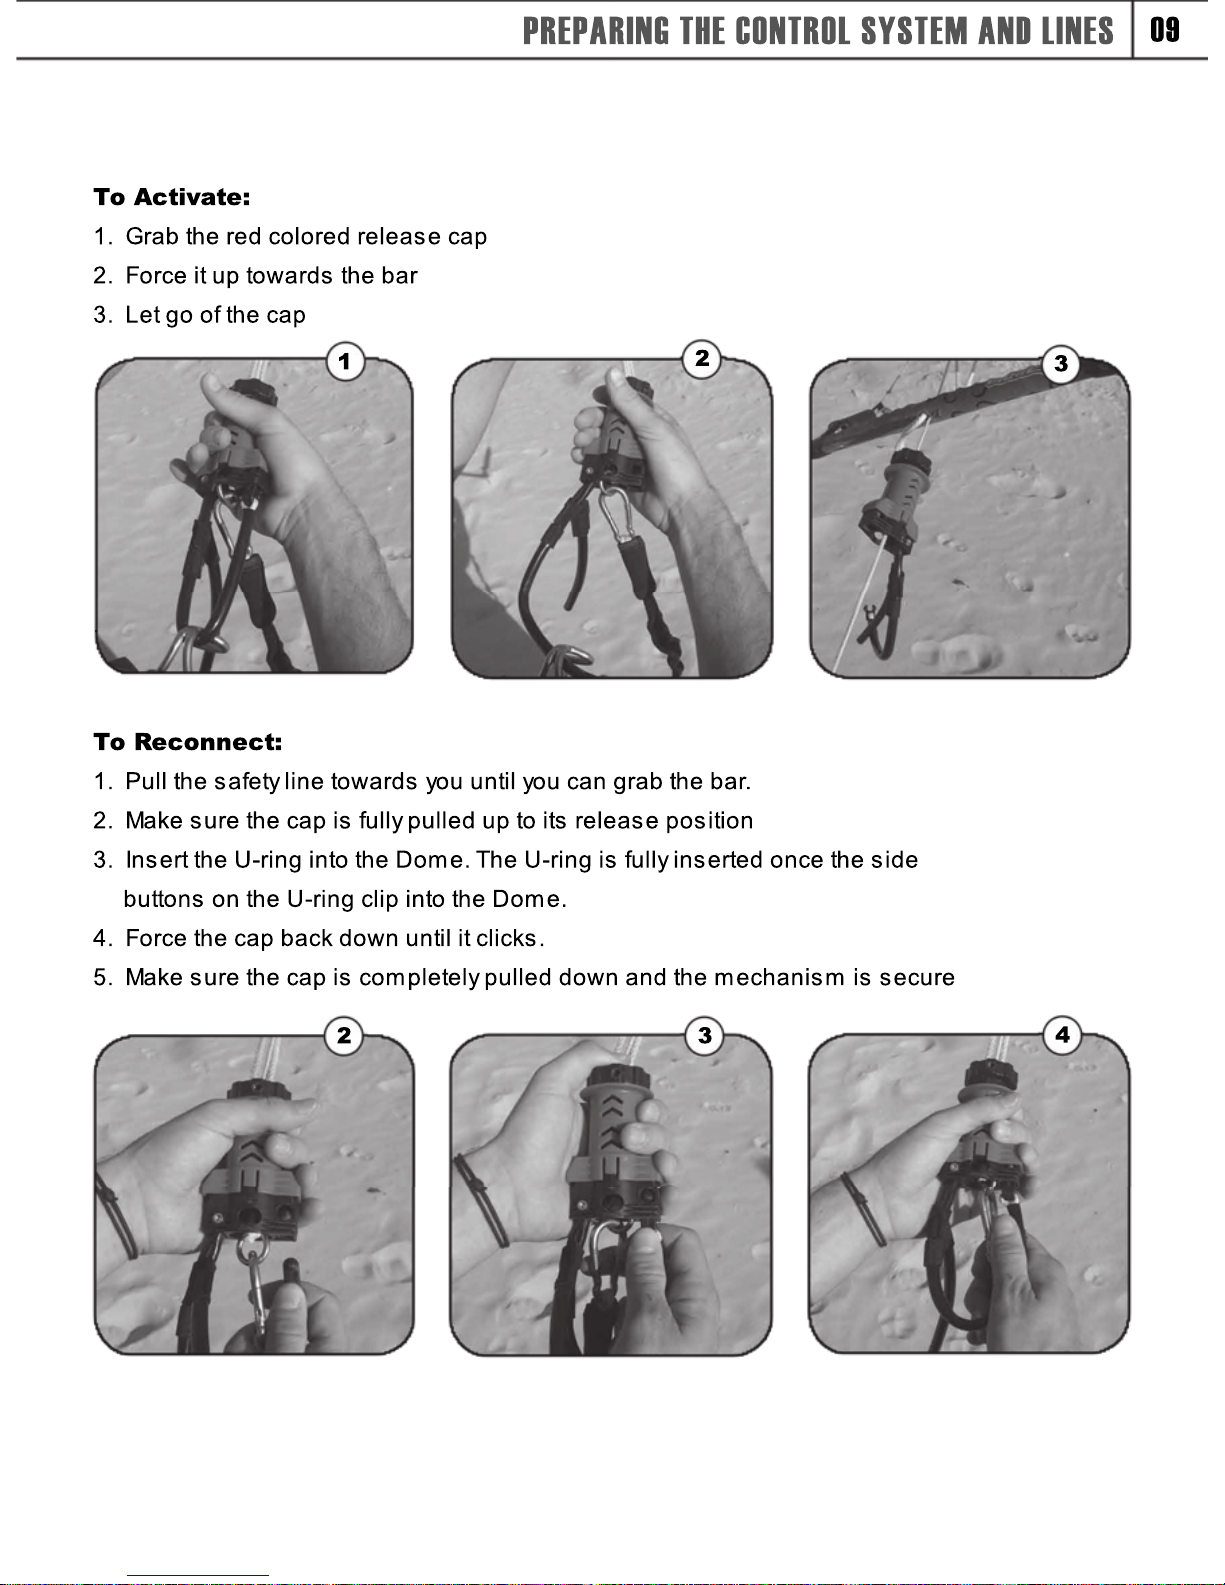
To Reconnect:
1. Pull the safety line towards you until you can grab the bar.
2. Make sure the cap is fully pulled up to its release position
3. Insert the U-ring into the Dome. The U-ring is fully inserted once the side
buttons on the U-ring clip into the Dome.
buttons on the U-ring clip into the Dome.
4. Force the cap back down until it clicks.
5. Make sure the cap is completely pulled down and the mechanism is secure
1
To Activate:
1. Grab the red colored release cap
2. Force it up towards the bar
3. Let go of the cap

www.bladekites.com
Swivel Dome Lock
The control system is designed with a finger that
helps keep you locked into the kite. Before
attempting to connect the loop and finger to your
harness, make sure you have properly set your
lines and attached them to
the kite without any
the kite without any
tangles or twists.
1. Hook the loop into the
harness hook.
2. Place the finger in the
center of the harness
hook.
3. Straighten out the
3. Straighten out the
finger.
The DePower
Mechanism
The DePower Mechanism
allows you to control the
kite's power when kiting.
T
To release power from
your kite, shorten the
strap by pulling on the
red handle. To add
power to your kite,
lengthen the strap by
pulling on the black loop;
for safety reasons,
for safety reasons,
the red handle pulls in
one long segment,
and the black loop
releases in short segments. To gain maximum
power you will need to pull several times on the
black loop.
Once you let go of the lock the lock will stay
and not move. If you let go of the bar, the bar
will not pass past the lock.
Once you have lowered the Line Lock, you
can fully de-power the kite by pushing the bar
firmly up against the lock.
The lock will release to access more de-powe
The lock will release to access more de-power.
This will help in emergency situations when
the wind picks up dramatically.
10
PREPARING THE CONTROL SYSTEM AND LINES
De-Power Line Lock
The De –Power Line Lock helps customize the
length of the de-power line to enjoy different
riding styles and kiting conditions. The default
position, when the lock is at the highest
position, allows maximum de-power. This
position is intended for beginners, gusty
position is intended for beginners, gusty
weather conditions and wave riding. Once the
kiter has familiarized himself with the kite, The
lock can be adjusted to a lower position.
Never place the Lock in the bottom 2/3 of the
de power line.
To Adjust Lock:
1. Place two fingers on each side of the lock.
1. Place two fingers on each side of the lock.
2. Slide the lock on the de-power line and let
go at the desired place

11
PREPARING THE CONTROL SYSTEM AND LINES
WARNING:
By lowering the lock on the de-power line you are
taking away the big de-powering capabilities of the
kite. Use this only with caution.
The Kite Leash
The leash should be connected to secure the kite
to the ride
to the rider. Connect the harness clip to the
harness and the ring clip to the safety ring.
This leash secures the kite to the rider when the
chicken loop is unhooked as well as when the
Swivel Dome System is activated.

MAD2 (Multi-valve Airflow
Distribution) System
The MAD2 system is the Blade’s second
generation inflation system. This system allows
inflation of all the bladders through the LE valve.
The MAD2 units connect each strut to the LE
bladde
bladder. The new molded valves come out in a
90 degree angle out of the bladder. This helps
keep the kite’s aerodynamics flows to the
maximum. The new valves are smaller and more
durable to crashes.
Kite Inflation Using the MAD2 system
1. Unroll the kite and turn the kite with its
Leading Edge (LE) facing the wind and struts
Leading Edge (LE) facing the wind and struts
facing upwards. Make sure you lay the kite on
an even surface clear of any sharp or hard
objects.
The first time you unroll your kite you will see
that all Bridle Lines are secured to a strut valve
by Velcro. Release the Bridle Lines.
2. Secure the wingtips with sand, it is suggested
2. Secure the wingtips with sand, it is suggested
to use more sand than less as an unsecured
kite can become very dangerous.
3. Before attempting to inflate check proper
connection on all MAD2 units. In addition, make
sure all MAD2 clips are open.
4. Face the kite with your back to the wind, so you
are closest to the Leading Edge.
are closest to the Leading Edge.
5. With both feet securing the pump, attach the
pump tip securely to the inflate valve on the LE
strut valve and begin pumping air into the
bladders. As you inflate make sure all struts
are inflating as well. If they are not, make sure
the MAD2 clip is open and the MAD2 hose is
not twisted.
not twisted.
6. Once all bladders are inflated and firm,
remove the pump tip from the valve, close
the cap on the air valve and secure the
Velcro cover on top.
7. Close all MAD2 clips by firmly pressing
until clip clicks.
8.
8. At no point should the valve be pushed
inside the bladder, if the valve is pushed
into the bladder, release the air (see Kite
Deflation), pull the valve to the correct
position, and re-inflate.
www.bladekites.com
12
MAD SYSTEM - INFLATING THE KITE
Warning:
Do not over inflate; this may cause
damage to the interntal bladder.
Do not under inflate; this will cause
poor kite performance.
Securing an Inflated Kite
Once the kite has been properly inflated,
Once the kite has been properly inflated,
turn the kite around as shown in the
illustration. Make sure the Leading Edge is
still pointing upwind and secure the kite by
a weight. This weight should be sufficient
to insure the kite does not fly away and
becomes hasardous to the surroundings.
Never leave an inflated kite unattended.
Never leave an inflated kite unattended.
Kite Deflation
Make sure all MAD2 clips are open, then
open the main deflate valve located on the
LE. The entire kite will defalte.
13
MAD SYSTEM - INFLATING THE KITE
Attaching the control system to the
kite
1. Unwind the lines and the control bar so that
the ends of the lines are downwind from the
bar.
If you are facing the control system with your
back to the wind and the bar at your feet, the
back to the wind and the bar at your feet, the
red side of the bar should be on your left and
the black side of the bar should be on your
right.
2. Make sure that there are no knots in the lines
and the lines are not tangled or crossed.
3. Layout the DePower Strap and the Quick-
Release Mechanism.
Release Mechanism.
4. Make sure all Bridle Lines on the kite are
untangled and that their pulleys are turning
freely.
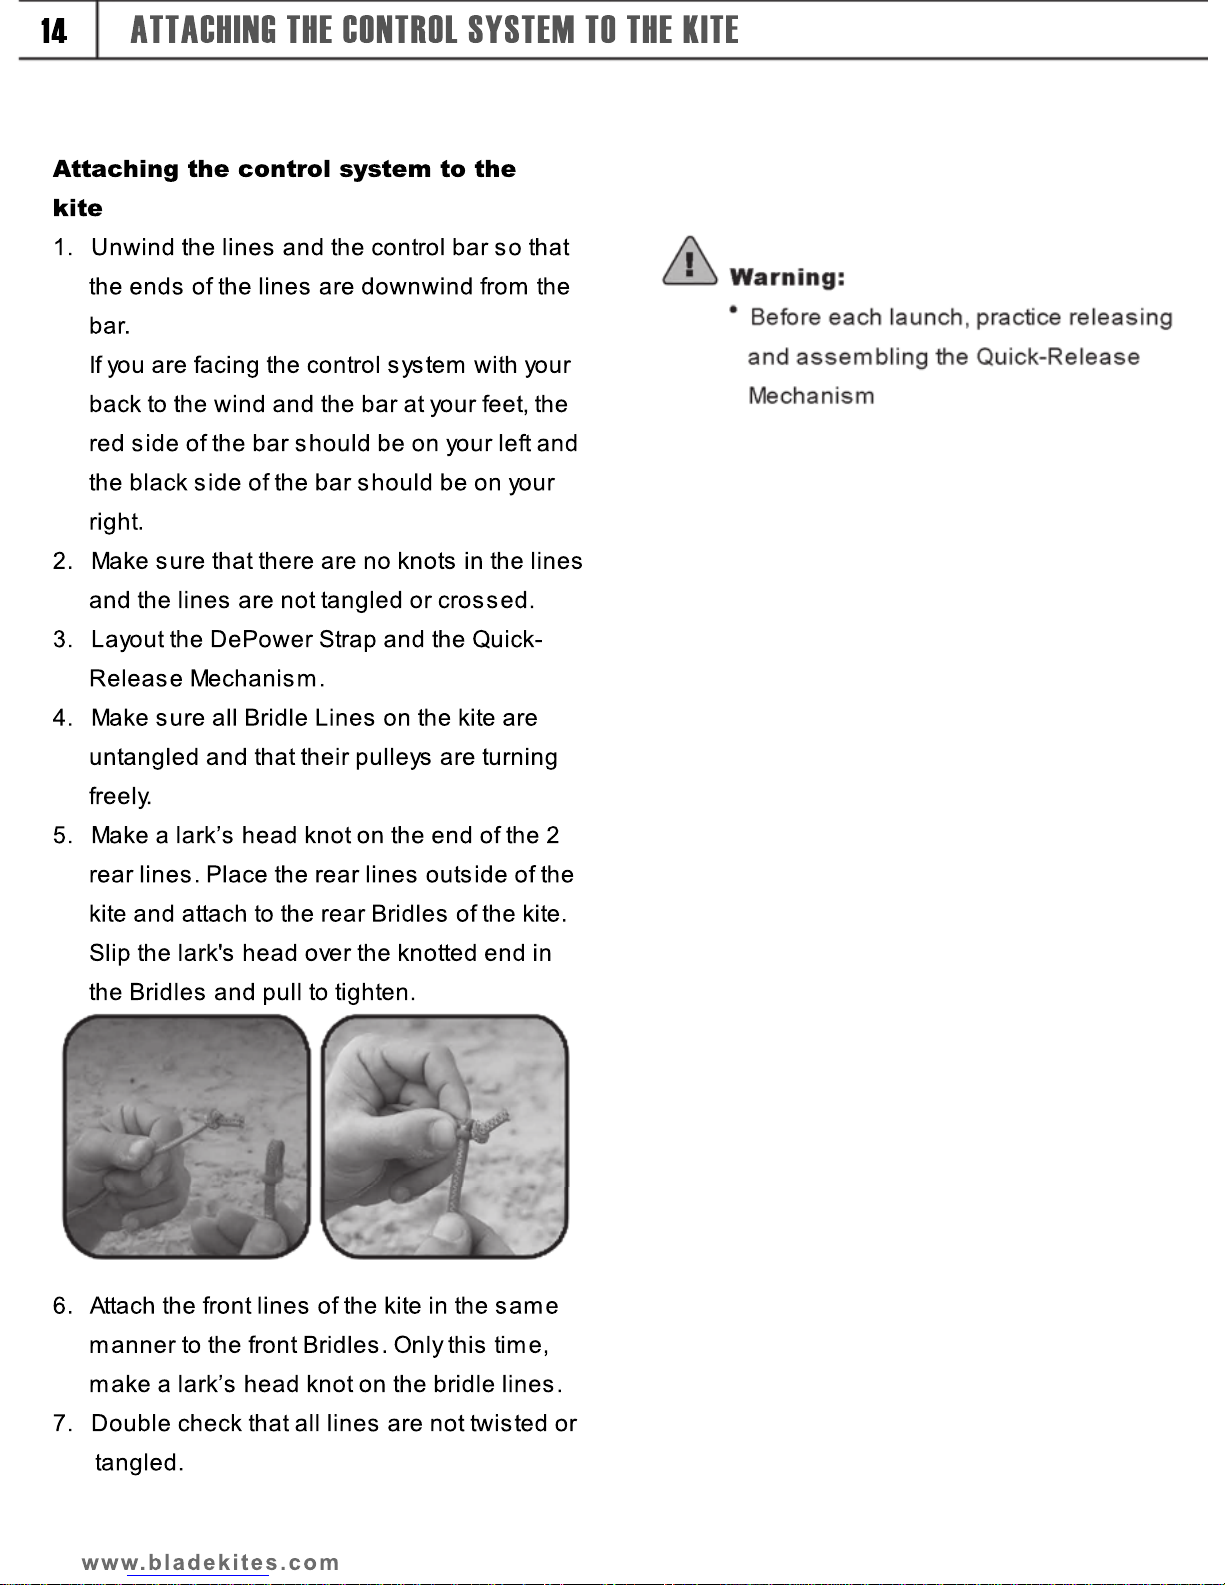
5. Make a lark’s head knot on the end of the 2
rear lines. Place the rear lines outside of the
kite and attach to the rear Bridles of the kite.
Slip the lark's head over the knotted end in
Slip the lark's head over the knotted end in
the Bridles and pull to tighten.
6. Attach the front lines of the kite in the same
manner to the front Bridles. Only this time,
make a lark’s head knot on the bridle lines.
7. Double check that all lines are not twisted or
tangled.
www.bladekites.com
14
ATTACHING THE CONTROL SYSTEM TO THE KITE
Kite tuning
In the directions above, we suggest general
tuning for the kite and control system. But since
kite performance depends on the kiter's skill and
preference, several combinations can be made to
suit the individual's personal style. Adjusting line
length helps tune the kite in terms of turning
length helps tune the kite in terms of turning
ability and DePowering qualities. Before we
begin with the various adjustments, you should
feel the power of the kite.
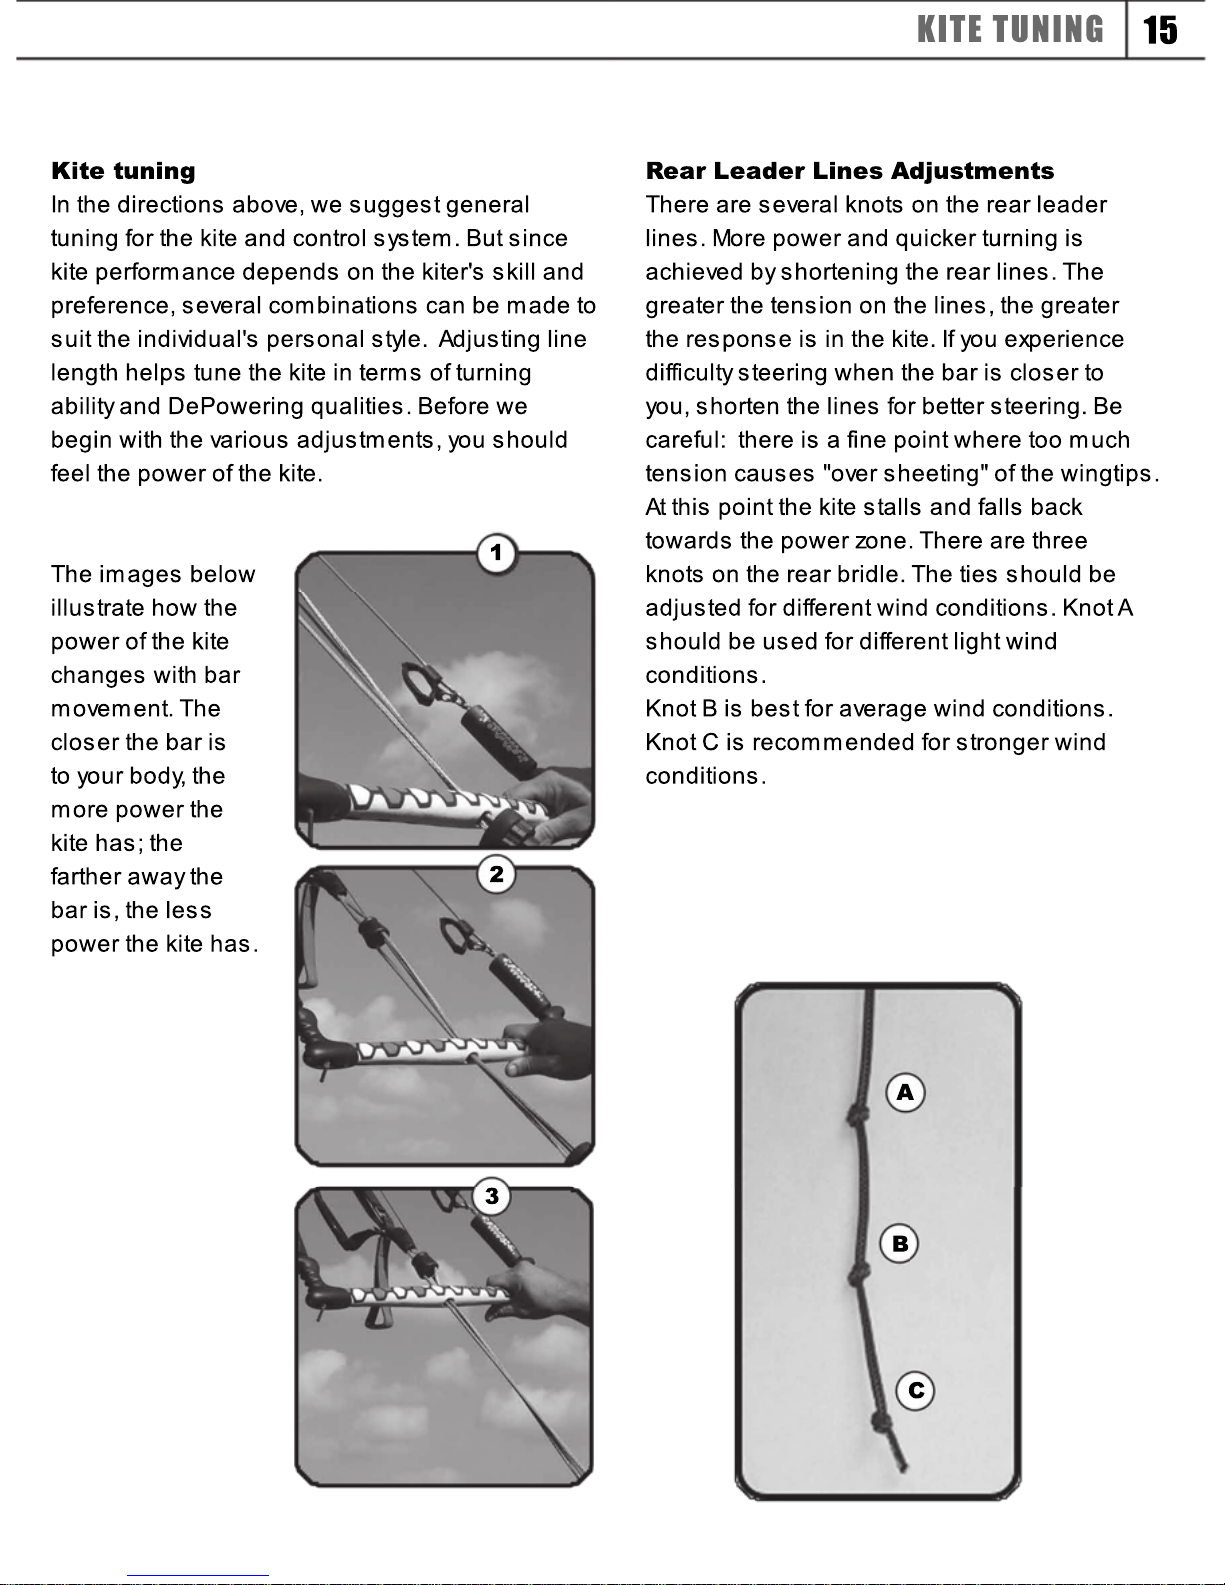
The images below
illustrate how the
power of the kite
changes with bar
changes with bar
movement. The
closer the bar is
to your body, the
more power the
kite has; the
farther away the
bar is, the less
bar is, the less
power the kite has.
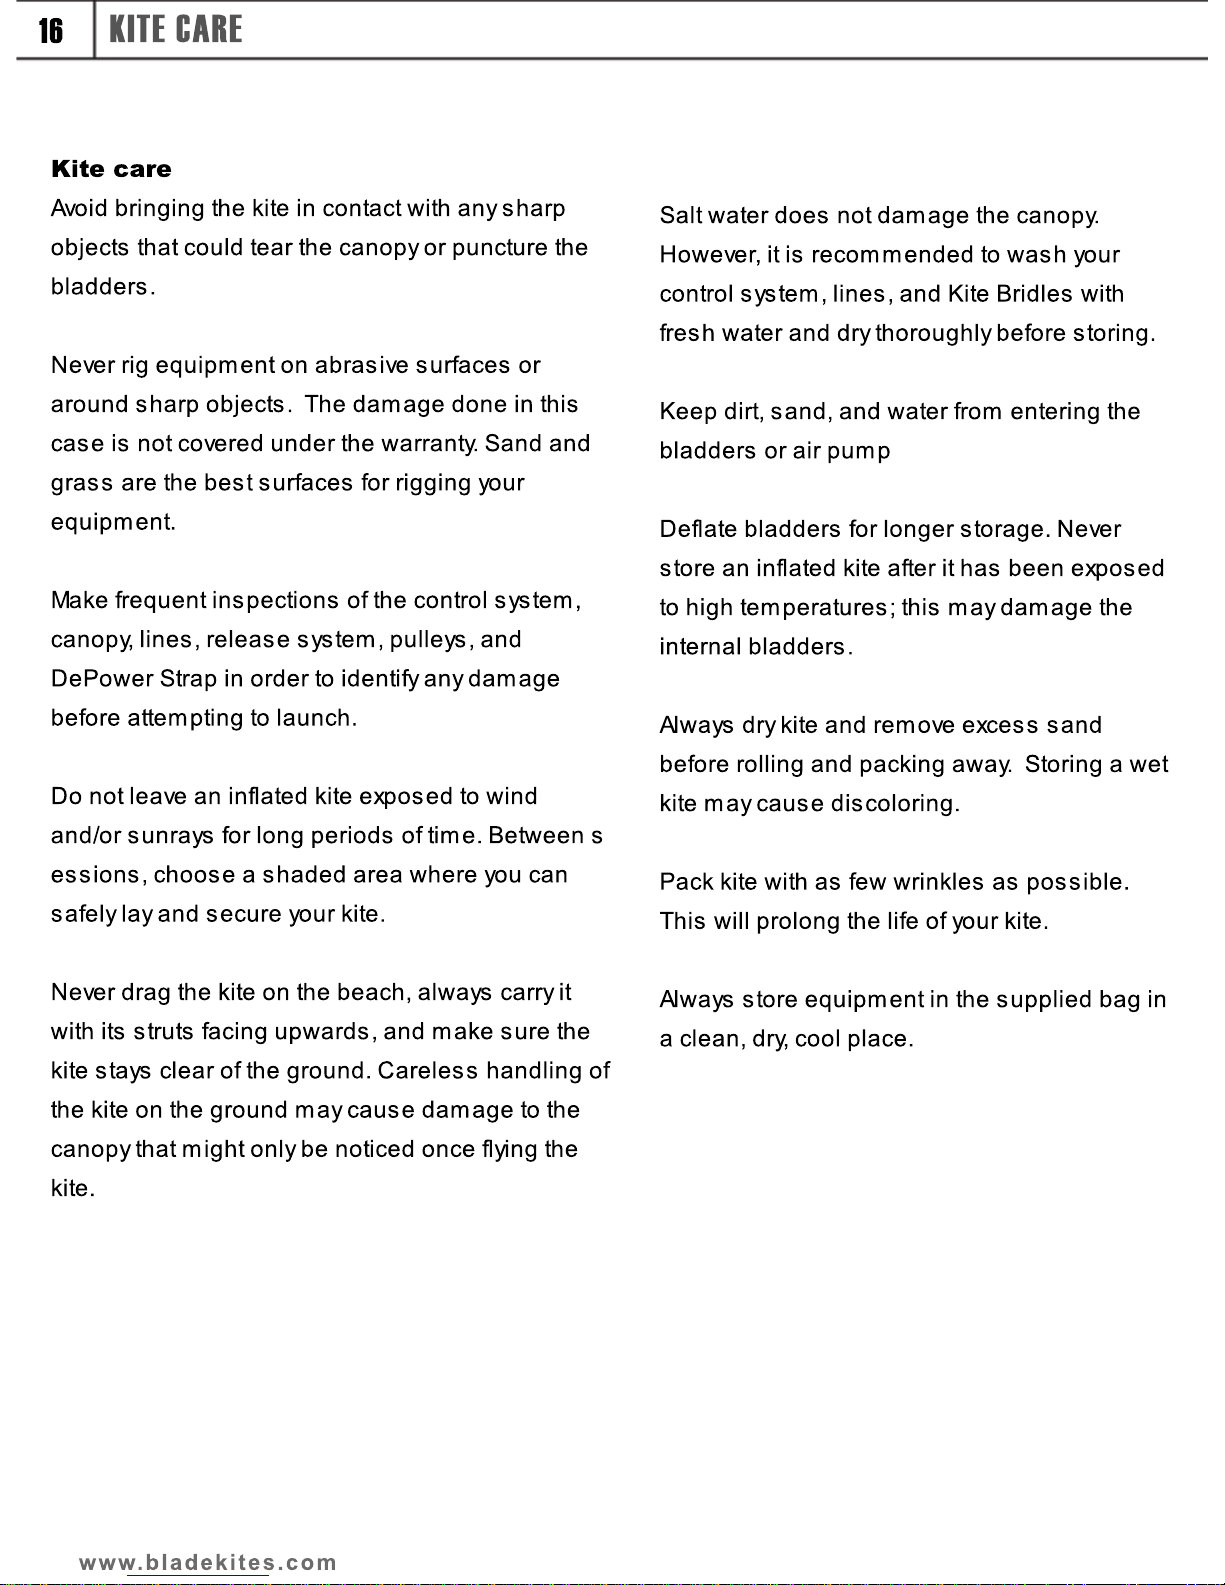
Rear Leader Lines Adjustments
There are several knots on the rear leader
lines. More power and quicker turning is
achieved by shortening the rear lines. The
greater the tension on the lines, the greater
the response is in the kite. If you experience
di
difficulty steering when the bar is closer to
you, shorten the lines for better steering. Be
careful: there is a fine point where too much
tension causes "over sheeting" of the wingtips.
At this point the kite stalls and falls back
towards the power zone. There are three
knots on the rear bridle. The ties should be
adjusted for di
adjusted for different wind conditions. Knot A
should be used for different light wind
conditions.
Knot B is best for average wind conditions.
Knot C is recommended for stronger wind
conditions.
1
A
B
C
15
KITE TUNING
2
3
Kite care
Avoid bringing the kite in contact with any sharp
objects that could tear the canopy or puncture the
bladders.
Never rig equipment on abrasive surfaces or
around sharp objects. The damage done in this
case is not covered under the warrant
case is not covered under the warranty. Sand and
grass are the best surfaces for rigging your
equipment.
Make frequent inspections of the control system,
canopy, lines, release system, pulleys, and
DePower Strap in order to identify any damage
before attempting to launch.
Do not leave an inflated kite exposed to wind
Do not leave an inflated kite exposed to wind
and/or sunrays for long periods of time. Between s
essions, choose a shaded area where you can
safely lay and secure your kite.
Never drag the kite on the beach, always carry it
with its struts facing upwards, and make sure the
kite stays clear of the ground. Careless handling of
the kite on the ground may cause damage to the
the kite on the ground may cause damage to the
canopy that might only be noticed once flying the
kite.
Salt water does not damage the canopy.
However, it is recommended to wash your
control system, lines, and Kite Bridles with
fresh water and dry thoroughly before storing.
Keep dirt, sand, and water from entering the
bladders or air pump
Deflate bladders for longer storage. Never
Deflate bladders for longer storage. Never
store an inflated kite after it has been exposed
to high temperatures; this may damage the
internal bladders.
Always dry kite and remove excess sand
before rolling and packing away. Storing a wet
kite may cause discoloring.
kite may cause discoloring.
Pack kite with as few wrinkles as possible.
This will prolong the life of your kite.
Always store equipment in the supplied bag in
a clean, dry, cool place.
www.bladekites.com
16
KITE CARE
Bladder Repair
If you experience air loss in your struts or
Leading Edge, check the bladders for punctures.
Avoid repairing bladders on the beach or in dirty,
windy, dusty conditions:
1. Lay the kite with its struts facing up. Make
sure all struts and Leading Edge are deflated.
sure all struts and Leading Edge are deflated.
2. In order to remove the damaged bladder,
acquire a strong line roughly double the length
of the bladder.
3. Remove the MAD2 tube from the valve by
cutting off the cable tie (be sure not to
damage the valve and the tube). Disassemble
the tube from the valve.
the tube from the valve.
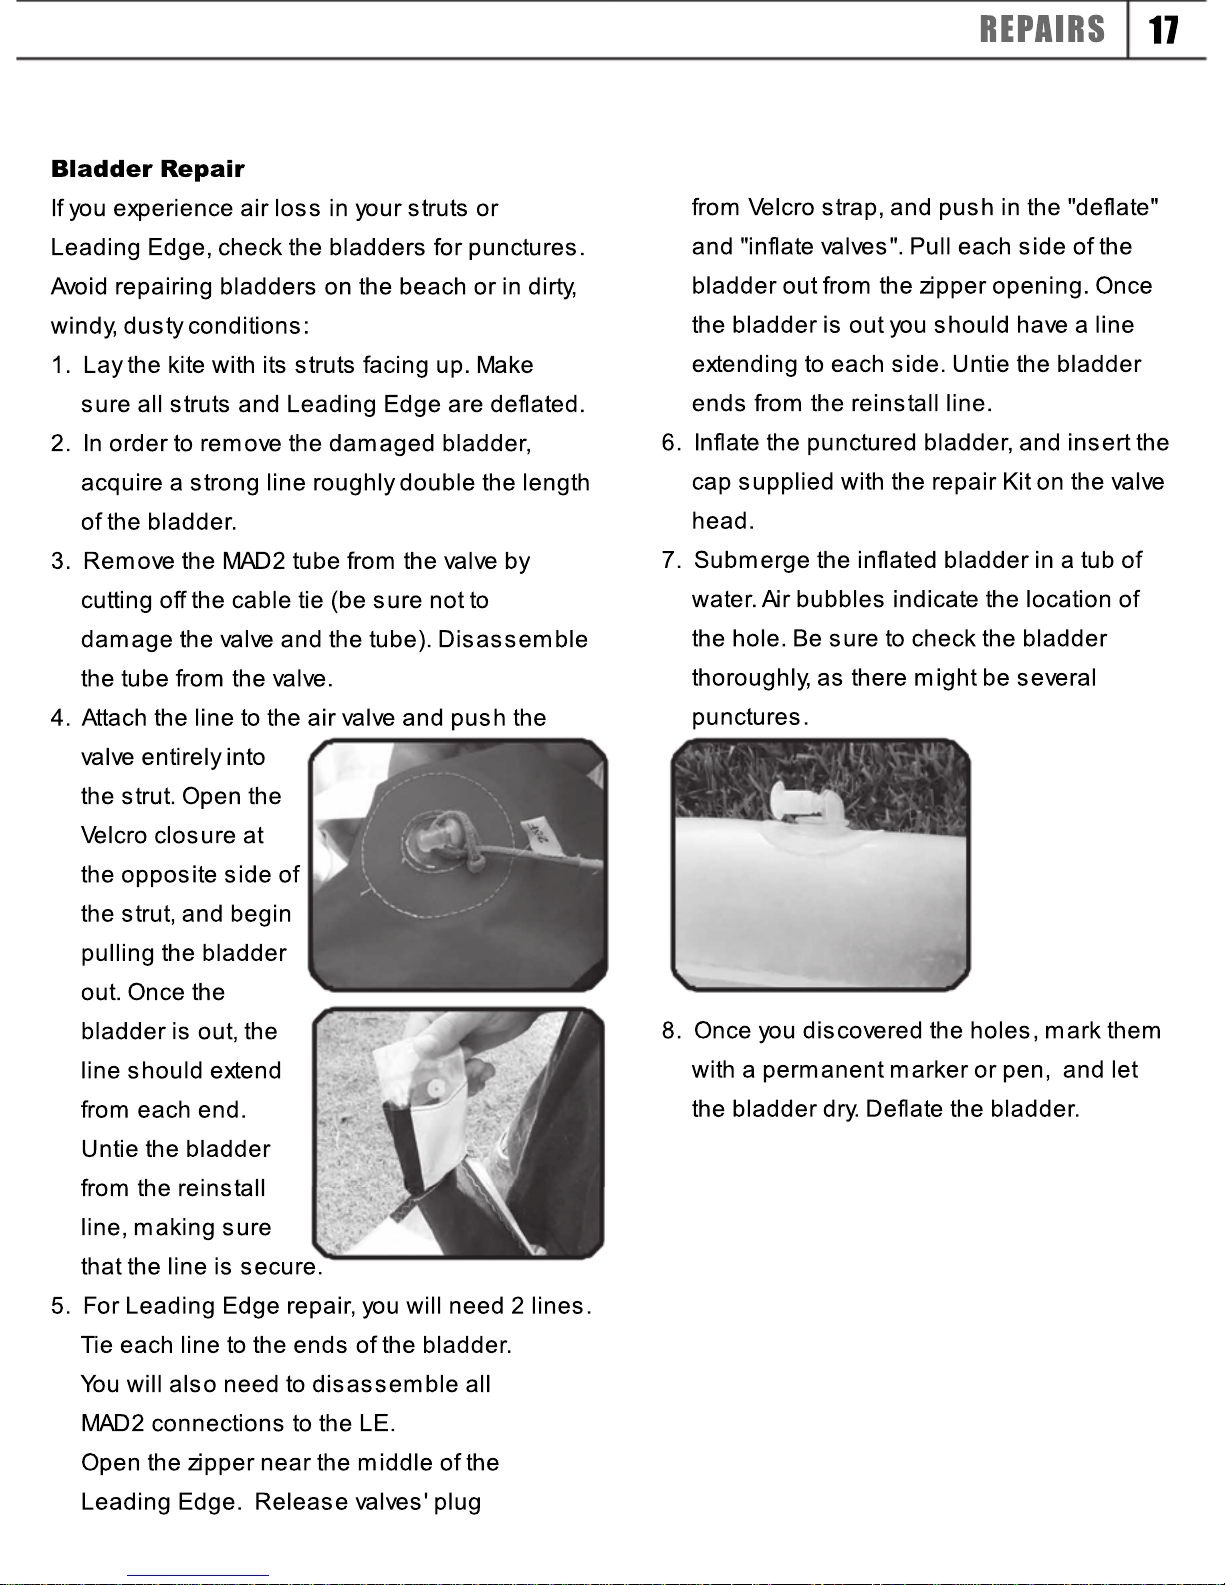
4. Attach the line to the air valve and push the
valve entirely into
the strut. Open the
Velcro closure at
the opposite side of
the strut, and begin
pulling the bladder
pulling the bladder
out. Once the
bladder is out, the
line should extend
from each end.
Untie the bladder
from the reinstall
line, making sure
line, making sure
that the line is secure.
5. For Leading Edge repair, you will need 2 lines.
Tie each line to the ends of the bladder.
You will also need to disassemble all
MAD2 connections to the LE.
Open the zipper near the middle of the
Leading Edge. Release valves' plug
Leading Edge. Release valves' plug
from Velcro strap, and push in the "deflate"
and "inflate valves". Pull each side of the
bladder out from the zipper opening. Once
the bladder is out you should have a line
extending to each side. Untie the bladder
ends from the reinstall line.
6. Inflate the punctured bladde
6. Inflate the punctured bladder, and insert the
cap supplied with the repair Kit on the valve
head.
7. Submerge the inflated bladder in a tub of
water. Air bubbles indicate the location of
the hole. Be sure to check the bladder
thoroughly, as there might be several
punctures.
punctures.
8. Once you discovered the holes, mark them
with a permanent marker or pen, and let
the bladder dry. Deflate the bladder.
17
REPAIRS
9. Lightly roughen the area of the puncture with
sand paper from the repair kit.
10. Peel off the backing from the patch, and place
on the puncture.
11. Again inflate the bladder, and let it sit to make
sure air does not escape.
12. Coat the entire bladder in talcum powde
12. Coat the entire bladder in talcum powder.
13. To being the insertion process for struts, lay
the bladder flat at the end of the strut and tie
back the insertion line to the valve. For the L
eading Edge you will need to lay bladder in the
middle and tie the insertion lines to the end of
the bladder. Insert each side at a time
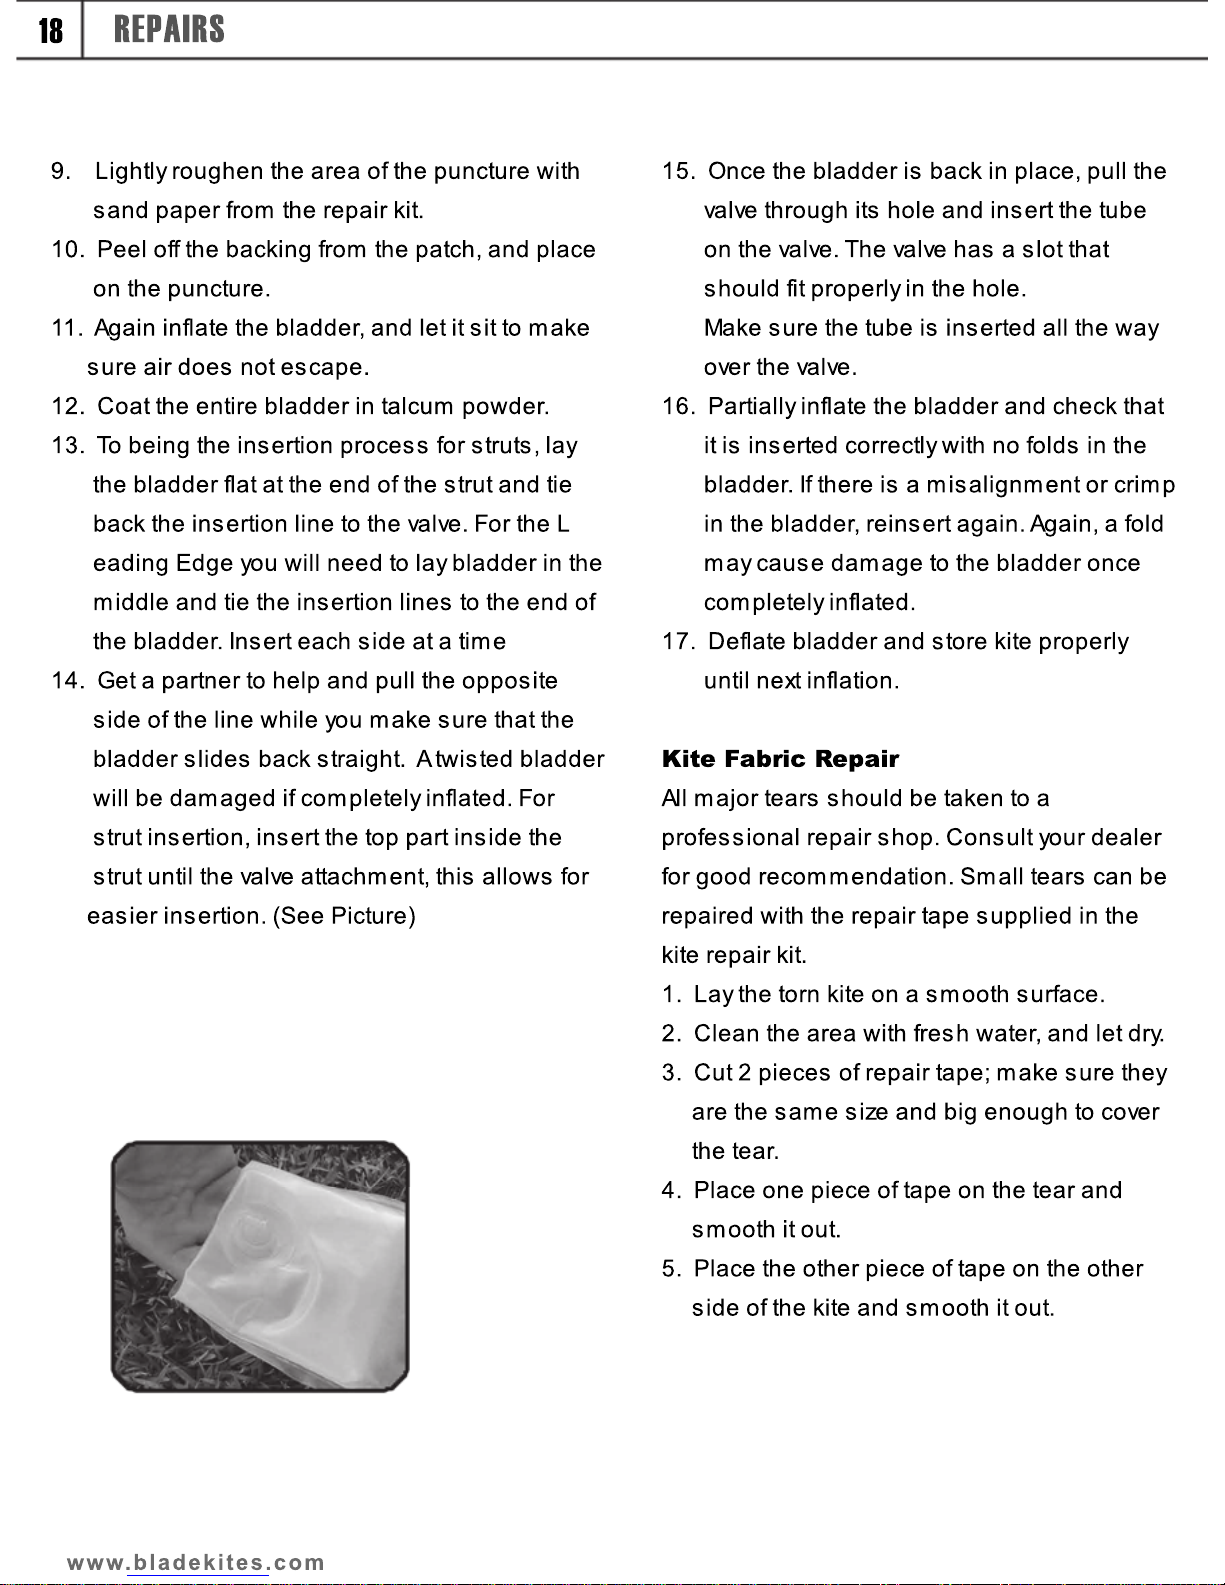
14. Get a partner to help and pull the opposite
14. Get a partner to help and pull the opposite
side of the line while you make sure that the
bladder slides back straight. A twisted bladder
will be damaged if completely inflated. For
strut insertion, insert the top part inside the
strut until the valve attachment, this allows for
easier insertion. (See Picture)
15. Once the bladder is back in place, pull the
valve through its hole and insert the tube
on the valve. The valve has a slot that
should fit properly in the hole.
Make sure the tube is inserted all the way
over the valve.
16. Partially inflate the bladder and check that
16. Partially inflate the bladder and check that
it is inserted correctly with no folds in the
bladder. If there is a misalignment or crimp
in the bladder, reinsert again. Again, a fold
may cause damage to the bladder once
completely inflated.
17. Deflate bladder and store kite properly
until next inflation.
until next inflation.
Kite Fabric Repair
All major tears should be taken to a
professional repair shop. Consult your dealer
for good recommendation. Small tears can be
repaired with the repair tape supplied in the
kite repair kit.
1. Lay the torn kite on a smooth surface.
1. Lay the torn kite on a smooth surface.
2. Clean the area with fresh water, and let dry.
3. Cut 2 pieces of repair tape; make sure they
are the same size and big enough to cover
the tear.
4. Place one piece of tape on the tear and
smooth it out.
5. Place the other piece of tape on the other
5. Place the other piece of tape on the other
side of the kite and smooth it out.
www.bladekites.com
18
REPAIRS
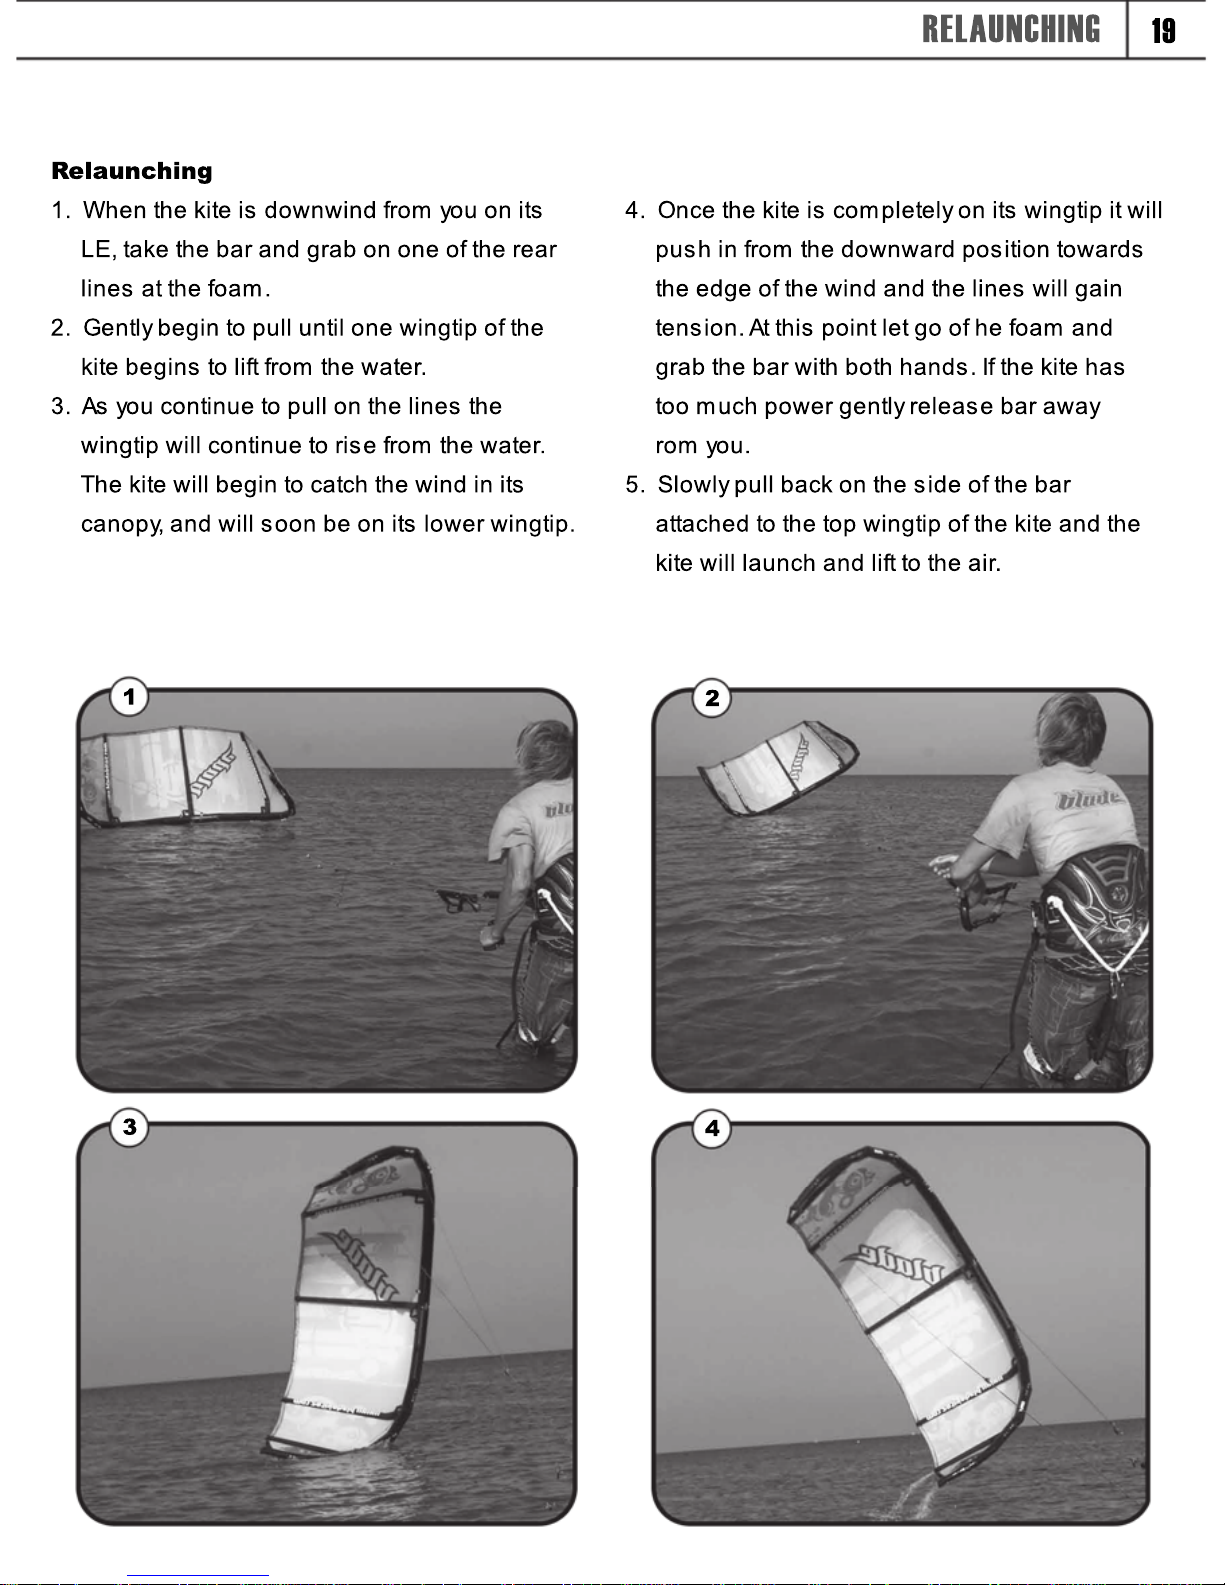
Relaunching
1. When the kite is downwind from you on its
LE, take the bar and grab on one of the rear
lines at the foam.
2. Gently begin to pull until one wingtip of the
kite begins to lift from the water.
3.
3. As you continue to pull on the lines the
wingtip will continue to rise from the water.
The kite will begin to catch the wind in its
canopy, and will soon be on its lower wingtip.
4. Once the kite is completely on its wingtip it will
push in from the downward position towards
the edge of the wind and the lines will gain
tension. At this point let go of he foam and
grab the bar with both hands. If the kite has
too much power gently release bar away
rom you.
rom you.
5. Slowly pull back on the side of the bar
attached to the top wingtip of the kite and the
kite will launch and lift to the air.
19
RELAUNCHING
12
34
Blade warrants its products to be free of major
defects in material or workmanship to the original
purchase, for a period of 1 year from the date
of purchase.
This warranty is subject to the following limitations:
The warranty is valid only when product is used for
kiteboarding on wate
kiteboarding on water, and does not cover
products used in rental or teaching operations.
This warranty does not cover damage caused by
misuse, abuse, neglect or normal wear and tear
including, but not limited to, punctures, rigging with
other than Blade components, damage due to
excessive sun exposure, or damage due to over
inflation of the bladders, damage caused by
inflation of the bladders, damage caused by
improper handling and storage, damage caused
by use in waves or shore break, and damage
caused by high speed crash or damage caused by
anything other than defects in the material and
workmanship.
This warranty is void if any unauthorized repair,
change, or modification has been made to any part
change, or modification has been made to any part
of the equipment.
The warranty for any repaired or replacement
equipment is good from the date of the original
purchase only.
WARRANTY POLICY
Blade will make the final warranty
determination, which may require inspections
and/or photos of the equipment, which clearly
show the defect(s). If necessary, this
information must be sent to Blade costumer
service, postage prepaid.
If a product is deemed to be defective by
If a product is deemed to be defective by
Blade, the warranty covers the repair of
replacement of the defective product only.
Blade will not be responsible for any costs,
losses, or damages incurred as a result of loss
of use of the Blade products.
This is the only warranty we make to you and
is in lieu of all other warranties, express or
is in lieu of all other warranties, express or
implied. We expressly disclaim any and all
liability for bodily injury or death and for
incidental and consequential damages to the
maximum extent permitted by law.
This warranty extends only to the original
purchaser of the Blade product covered by the
warranty; it does not extend to subsequent
warranty; it does not extend to subsequent
purchasers or third parties.
There are no warranties, which extend beyond
the warranty specified herein.
Warranty claims must be processed and
issued a return authorization prior to shipping
to Blade. Please call or write for claims
processing to Blade Costumer
processing to Blade Costumer
Service Department at: 972-50-5703-123
or email: support@bladekites.com
www.bladekites.com
This manual suits for next models
2
Popular Aircraft manuals by other brands

Air Creation
Air Creation FUN 450 Instruction and maintenance handbook

Carl Goldberg Models
Carl Goldberg Models Tiger 2 ARF manual

ROBBE
ROBBE SAPPHIRE 2678 Instruction and user's manual

Pipistrel
Pipistrel Virus 912 S-LSA Glider operating instructions

Gradient
Gradient BRIGHT III user manual

Nervures
Nervures Estive 22 manual


