PRO-DESIGN B-SAFE 140 User manual


page 2 of 15
PRO-DESIGN version 1.1 04.08
TABLE OF CONTENTS
1-6 GENERAL INSTRUCTIONS
1. General guidelines
2. Use with hanggliders
3. Use with paragliders
4. Limitations
5. Duration of use
6. Technical data
7-8 OPERATING INSTRUCTIONS
7. Deployment instructions
8. Packing instructions
Photo instructions
9. MAINTENANCE
Disclaimer and
Safety Notice
Warranty

page 3 of 15
PRO-DESIGN version 1.1 04.08
1. GENERAL GUIDELINES
The reserve parachute B-SAFE 140 was developed for the use with Paragliders or
Hanggliders. Our first principle when developing this chute was to make a rescue
device with quick deployment time, low sink rate and high loading capacity of the
canopy. Because of the high shock loads during deployment only materials with high
elasticity and stability are used.
The special packing method, which was tested in different trials, guarantees a fast
deployment. Immediately after the opening of the inner container the opening of the
chute starts, which means the basis starts to fill with air. The special packing ensures
a fast and symmetrical opening. DHV certification test: The B-SAFE 140 was
dropped from an altitude of 60 meters at zero acceleration with a load of 70 kg. After
two thirds of the dropping distance the rescue chute was fully deployed already. In
normal use the deployment will be even faster, because pilots in most cases throw
the chute away and accelerate the deployment this way.
The comparatively big area of the canopy reduces the sink rate. Because of the long
lines the B-SAFE 140 is much more stable than normal rescue systems. This also
reduces the pendulum effect and the touch down speed of the pilot on ground is
lower.
The construction of the inner container supports the fast deployment. A pilot chute is
attached to the container. This small chute ensures that the rescue chute moves
away from the pilot immediately even if the container has not been thrown away
powerfully and helps to pull away the inner container from the folded canopy. The
container's four-leaf-system guarantees a fast deployment and makes packing easy.
B-SAFE 140
Flat round canopy (annular) with 2 center lines and big skirt opening. Because of that
the projected area is bigger at the same normal area, wich means lower sink rate and
faster opening. Also the canopy is made of two different materials: The upper
material has more porosity than the lower material. That means a more reduced
pendulum effect.
2. USE WITH HANGGLIDERS
Not described in this manual.
3. USE WITH PARAGLIDERS
The B-SAFE 140 is equipped with a dampening part sewn in S-loops, where seams
brake during a hard deployment and dampens the shock load. It is important that the
pilot after the opening of the rescue chute pulls down the Paraglider with one of the
rear risers. This avoids a V-position of the two canopies and the pilot to move into a
horizontal position. It is also important that the rescue chute is correctly attached with
a V- attachment bridle at two points, either at both carbines or at the shoulder straps.

page 4 of 15
PRO-DESIGN version 1.1 04.08
4. LIMITATIONS
The B-SAFE 140 may only be used as a rescue system with Paragliders or
Hanggliders. It is not permitted to use this rescue device as a skydiving chute or as a
normal flying chute.
5. DURATION OF USE
The permissible duration of use is 10 years with an inspection by the manufacturer
every two years. If it is packed you are allowed to use it for 4 months then it is
recommended to re-pack (DHV recommendation).
6. TECHNICAL DATA
model: B-SAFE 140
number of panels: 22
layout area m2: 41
load with 6,8m/s in kg: 143
type: round annular canopy
recomm. load in kg: 140
max. load in kg: 140
load with 5,5m/s in kg: 115
weight in grams: 2600
7. DEPLOYMENT INSTRUCTIONS
Explanation:
If you decide to use the rescue system, follow the below described
sequence:
1. Look for the handle.
2. Grab the handle.
3. Wait for an appropriate moment and throw the container
into the free airspace powerfully.
4.The releasing power which the container needs for opening has a range
between 5 and 7 kg due to the break link (knotted thread), and depending on
the harness/handle design
Explanation:
Not much power is necessary to release the rescue package and to throw it away.
Even if you have to react very quickly in a dangerous situation, you should grab the
handle and then make sure that the opening of the rescue chute is not obstructed by
your glider. Wait for an appropriate moment and throw the container into the free
airspace powerfully.
Simulate the worst case on the ground by grabbing the handle until you are sure you
can find it even with your eyes closed. If you are trained well your action in a
dangerous situation will be safer and more efficient.

page 5 of 15
PRO-DESIGN version 1.1 04.08
WARNING
Manufacturer and seller of the rescue system B-SAFE 140 do not take any liability
for risks in Para- and Hanggliding. Also accidents, loss, improper handling, improper
maintenance, direct and indirect damages, which occur through the use of the rescue
system are in the responsibility of the pilot. It has to be clear to every pilot that this is
a rescue system, which was built to be used as the last chance if you are in an
emergency situation during flight. The rescue chute reduces the sink rate of pilot and
glider (Para- or Hangglider) and makes an emergency landing possible. The use of
the rescue chute has to be seen as a rescue opportunity but does not guarantee a
safe rescue. If the rescue chute is opened for no reason, serious injury for pilot and
damage for the glider can occur, especially at low altitudes.
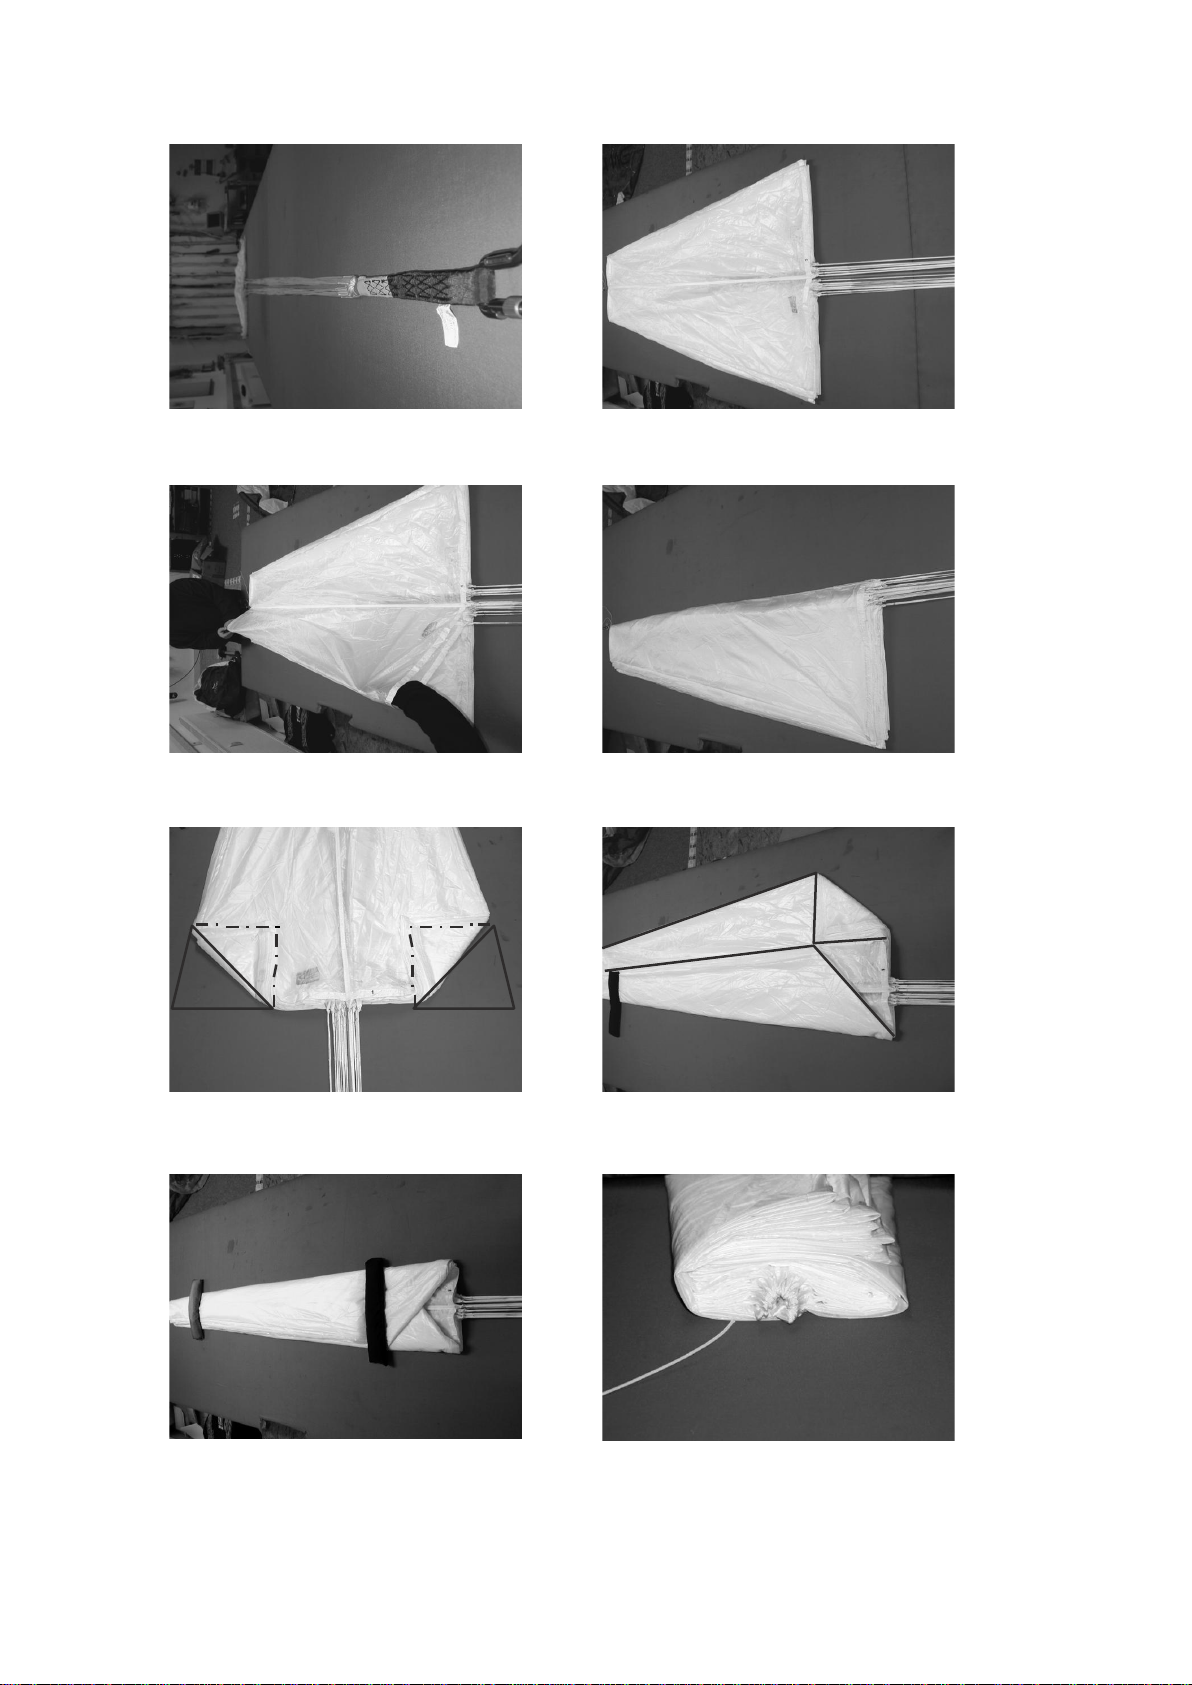
8. PACKING INSTRUCTIONS
1. The rescue chute B-SAFE 140 is easy to pack but deviates a little bit from normal
rescue systems. Accuracy is the most important thing packing the chute. The right
sequence of the opening is the most important requirement for a fast and faultless
deployment of the rescue system. This fact was one of the important guidelines
during construction. Our experience is that a simple construction is more functional
and faultless.
Only the right way of packing ensures a fast and save opening. Keep on hold to the
instructions very accurate. Pilots, who are less experienced in packing rescue
systems are recommended to have the rescue chute packed by a professional.
2. To pack the chute in the right way, you need two persons. Moreover you need an
approx 50cm cord, two carbines and tension belts. The rest you are working on
should be clean, dry and should be an even place. The surface should not bring
static charge onto the chute because this could prevent the chute from opening.
3. First make sure that all top skirt lines have the same length and the top forms one
base (Photo 1). The middle lines have to be in the center that the top is pulled
symmetrically during the opening. Make sure that the middle lines are connected with
the top lines correctly (Photo 2). Photo 3 shows the wrong connection, which can
lead to a damage of the lines.
4. Now make sure that the bottom lines are also connected to the chute correctly.
The loops of the bottom lines have to be over the loops of the chute (Photo 4). The
B-SAFE 140 has lines, wich are sewn to the canopy. For the next step you need a
spare line, which has another color than the chute. This line has to be removed later
on. The spare-line has to be put through the packing loops (Photo 5). All together the
spare line should catch as many packing loops as the chute has panels. (B-SAFE
140, 22 panels). Count the packing loops that you do not forget one of them. Only
then the two ends of the spare line are tied together (Photo 6).
5. With the colored middle line the top has now to be towed through the canopy.
6. Attach a carbine to the spare line which runs through the packing loops as a
connection. With the tension belt fix the chute to the area you are working on. Make
sure that the middle lines are as long as the bottom lines. Use this as control for the
top to be towed far enough through the canopy. Make sure that two following bottom
lines are clear over the whole length, from the main bridle to the canopy. If so then all
other lines are also clear (Photo 7). As the next step make sure that the inner bottom
lines lie on the right and left side of the middle-line (Photo 8). Lay down the canopy
so that the panel NR. 1 is on the top of the right side and the last panel (B-SAFE 140:

page 6 of 15
PRO-DESIGN version 1.1 04.08
No 22) is on the top of the left side. Now connect the main bridle in the same way
you did with the other end at the top and tension it (Photo 9).
7. Make sure the bottom of the canopy forms one base (Photo 10). Now lay the
panels very neat and check them. With one hand you hold the bottom-lines together
to keep the bottom of the canopy in one base. With the other hand you take always
one panel, sleek it and count it to the other side. The helping person stands at the
other side at the top and takes the same panel, sleeks it and same time takes care
for a correct position (Photo 11). First count all panels to one side and then back to
the other side (Photo 12). Only then you make two halfs that there are half of the
panels on each side (Photo 10).
8. Now you fold about one third of each side in an angle of 45 degrees (Photo 13).
Then divide the canopy into three thirds. First lay the left part to the inside by one
third (Photo 14). After that you fold the right over it (Photo 15). The bottom-lines
should be in the middle of the base (bottom-edge of the canopy). Now the base
should be as wide as the inner container, in which the chute is packed later on.
9. Release the tension by releasing the tension belt at the packing-loops. Pull the
spare-line out of the packing-loops (Photo 16).
Do not forget to remove the spare-line; otherwise the chute will not open!
10. Now the bottom-lines are put in S-loops. The S-loops have to be as wide as the
base. With special packing-rubbers (15 x 1 x 1 mm) fix the five ends of the loops
(Photo 17). It is important that the bottom-lines keep the same length and lie flat. The
free part of the lines remains for the closure of the container.
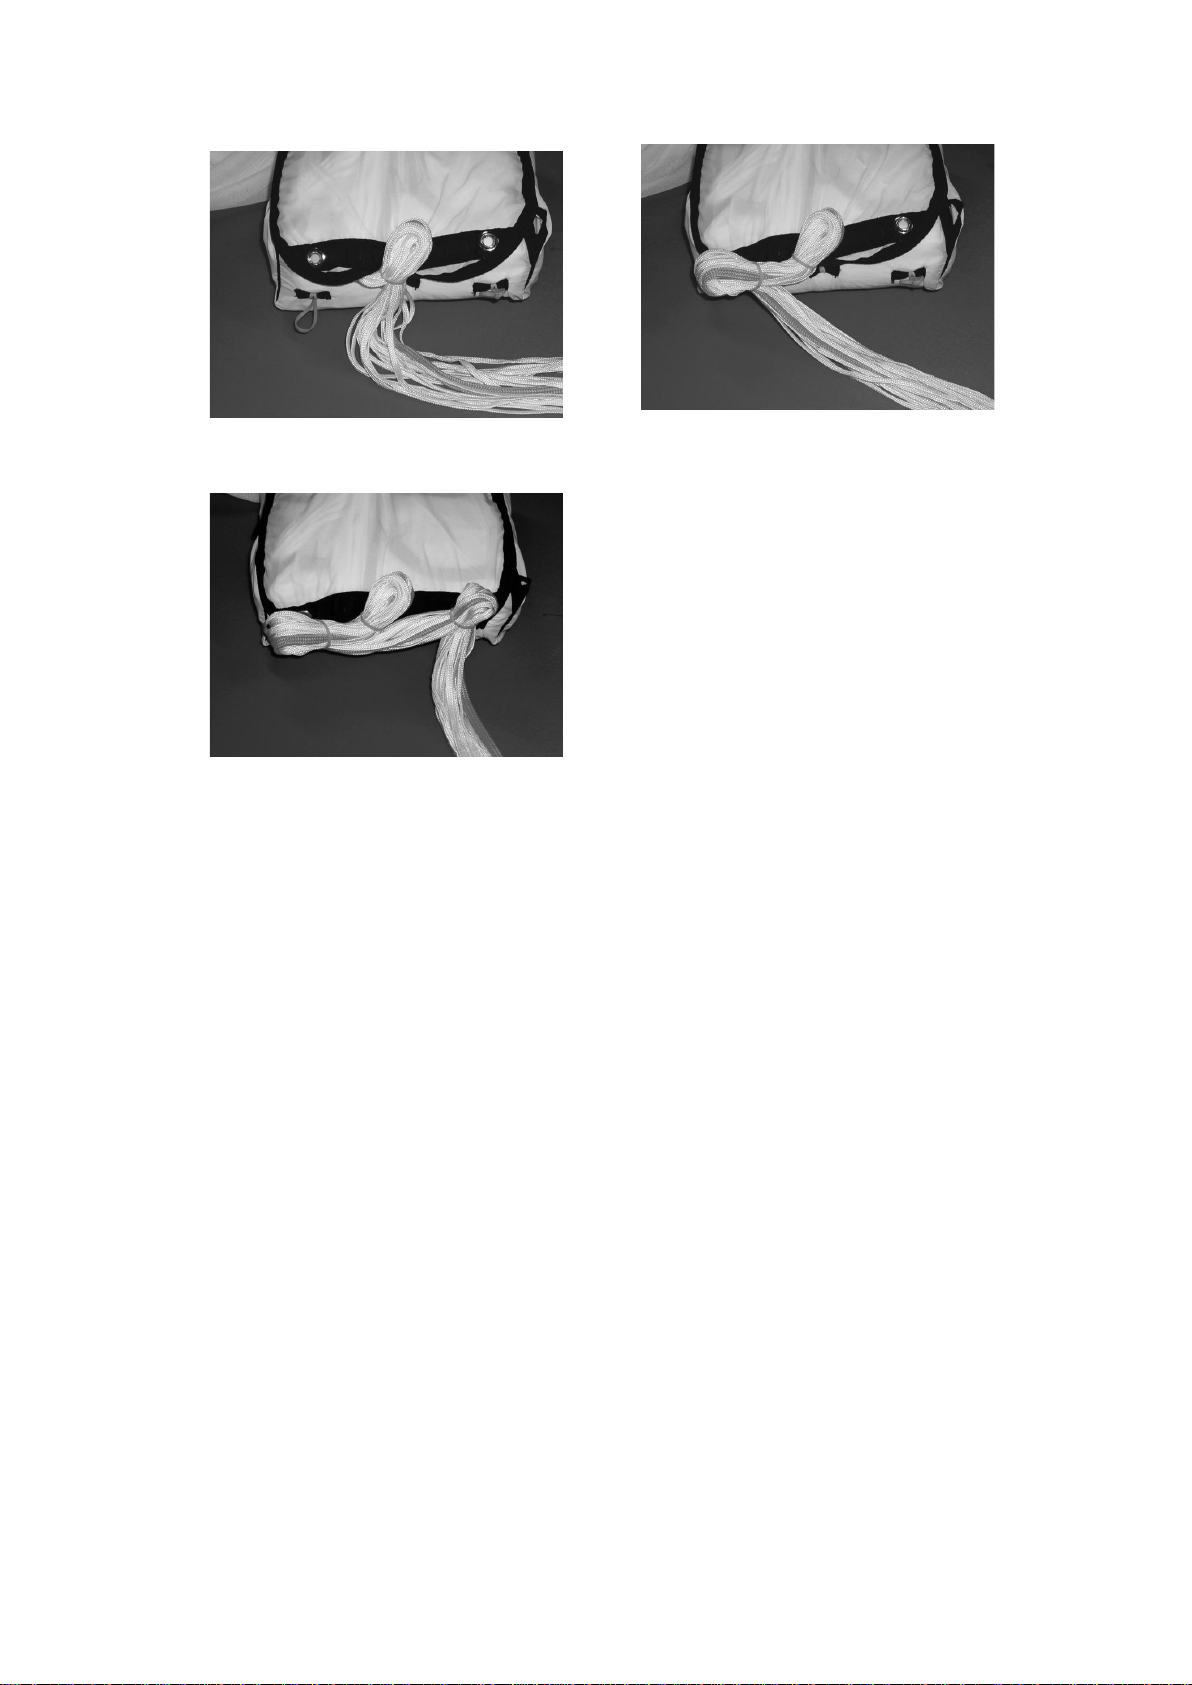
11. Then put the inner container into a position to the chute that the double-leaf faces
the base (Photo 18). Now you can start to pack the inner container (Photos 19/20).
12. Fold the chute in S-loops; the first S-loop should include the base and the
bundled lines and should have the same width like the other S-loops (Photo 19/20).
13. Turn around the chute by 180° (turn it that it lies on the top) and put it into the
inner container that the lines are on top (Photo 21).
14. Now start to close the container. First you close the leaf with the smaller eye. The
rubber band is pulled through the eye from the inside. Make sure that the rubber knot
has enough size that it cannot move through the eye even if you pull it. Maybe you
have to strengthen the knot with a washer. Now close the opposite leaf and pull the
rubber band through the eye by using a spare-line (Photo 22).
15. Then the leaf has to be closed on which the lines run out of the container (Photo
23). It is important that you hold on to this sequence because nothing should work
against the pulling direction during the opening.
16. After you have closed the container with the fourth leaf, bolt it by blocking the
rubber band by the lines (Photo 24). Test the tension of the rubber band. If it is too
loose it is too easy to open the bolt; if it is too strong it will be too hard to open.
17. Now close the second part of the double leaf. First pull the packing rubber in the
middle through the middle eye. (Photo 25). The packing rubbers on the right and left
side are now pulled through the eyes in the cover and each has to be fixed with a S-
loop of the bottom-lines (about 3cm) (Photo 26/27).

page 7 of 15
PRO-DESIGN version 1.1 04.08
1. same length?
5. spare line...Attention! Dont forget
to remove afterwards!
4. control the bottom lines...
6. dont forget one of them.
and fix it.
2. correctly connected
7. inner bottom lines left and right... 8. ...are free.
3. wrong connection..take care of
damage..
page 8 of 15
PRO-DESIGN version 1.1 04.08
9. ...and tighten it. 10. all in one base?
11. Count every panel 12. until one half is on the right
one on the left.
13. fold about one third in 45° 14. fold left side inside (one
third)...
15...after the right side. Fix it 16.! Remove the spare line!

page 9 of 15
PRO-DESIGN version 1.1 04.08
17. S-loops. 5 packs.
19
18. Fold canopy the same width
like the container...
20
21. turn 180° and put it in the
container. 22. pull the rubber through the
middle eye...
23. ...leaf by leaf... 24. ...and fix it.
page 10 of 15
PRO-DESIGN version 1.1 04.08
25. close the container... 26. in the right order!
27. ready!
18. There is also the opportunity to put a swivel-joint in between, which avoids
twisting of the rescue chute if you get into a rotation (Hanggliders).
19. Put the main connecting cord into the outer container so that everything can open
one after the other. Put the rescue container into the outer container like it is
mentioned in the owners manual of your harness!
DO NOT FORGET TO REMOVE THE SPARE-LINES.
20. Check the function by a test opening!

page 11 of 15
PRO-DESIGN version 1.1 04.08
9. MAINTENANCE
To keep the rescue system in good condition, keep hold on to the following advices:
- Store the rescue system in a dry room with normal temperature. If the
humidity is too high the canopy will stick together what could prevent an
opening.
- Every four months you should open the chute check and pack it. The
periodical packing makes sure that the rescue system is always ready to use
and you get more confident with packing.
- Every two years you should bring your rescue system to PRO-DESIGN or to
a proffessional packer to have it checked.
- After each rescue opening the rescue chute has to be checked by the
manufacturer.
- Under no circumstances you should try to repair the chute yourself. Even
small damages have to be repaired by the manufacturer.
- Oils, fats and paints may not get close to the rescue system because this stuff
could damage the material.
- Protect the rescue system against direct sunshine because Nylon can get
damaged by UV-radiation.
- If the canopy or the lines are soiled clean them only with water and give them
enough time to dry before you pack again. Do not use detergents. Hang up
the chute in a dry room in which the air can circulate (Not in the garage or in
the basement!) Do wait until the chute is dry before you pack it.
- If the chute gets in contact with salt water it has to be swept with normal
water.
- Make sure that there are no grass, insects or other items between the widths
before you pack the chute.
- The surface you are packing on should not damage the rescue system and
should not charge it statically.
- On the last page of the included packing proof you find the checking proof in
which all repairs and checks have to be recorded.
DISCLAIMER AND SAFETY NOTICE
By the purchase of our equipment, you are responsible for being a certified
paraglider pilot and you accept all risks inherent with paragliding activities including
injury and death. Improper use or misuse of equipment greatly increases these risks.
Neither PRO-DESIGN nor the seller of equipment shall be held liable for personal
or third party injuries or damages under any circumstances. The pilot is in charge for
the start-up of the product. The operating licence and warranty expires, if any
inappropriate repairs or technical changes are being done.
The airworthiness is to be controlled before each flight. Launching is only allowed
with a flightworthy equipment. Moreover the pilot must catch up on the present
weather conditions before each start and constantly observe weather development.
Launch should only be proceeded, if the further weather development allows for a
safe flight operation.
This product was developed for Paragliding and is not suitable for Free-fall and
therefore not suitable for sky diving.
Moreover we disclaim liability, if one or several of the following points apply:

page 12 of 15
PRO-DESIGN version 1.1 04.08
- Launching beyond permitted weight range
- wind velocities more than 15 km/h and/or turbulent weather conditions
- Launching into lee sides
- Launching in rain, fog or snow fall
- Flying in clouds
- Aerobatics
- Extreme flying manoeuvre with angles over 30°
- Less experience or training of the pilot
- Incomplete, not certified or damaged equipment (helmet, emergency chute,
etc..)
- Winch towing with non-certified winch or non-certified Pilot and/or winch
operator
- Non-certified changes on harness
Please note:
If any aspect of the use of our equipment remains unclear, please contact your local
paragliding instructor, reseller or the importer in your country.
WARRANTY
Extent of the Guarantee
1. PRO-DESIGN guarantees for every product which has been delivered after
01.01.2008 for the period of 1 year. This guarantee covers failures caused by
material or production problems for which PRO-DESIGN should be responsible.
2. This Guarantee is valid for all DHV-certified products from PRO-DESIGN, that are
used for leisure flights. The guarantee does not include products which are used for
educational or professional purposes.
The following points are also excluded from the guarantee:
a) Color fading from the fabric
b) Damage by solvents, fuel, chemicals, sand or sea water.
c) Accidental damage before, during and after the flight caused by accidents and
emergency situations
d) Damage caused by negligence
e) Damage caused by force majeure
Terms of Guarantee
1. The product is to be used and maintained in accordance with the instructions that
are part of the manual and other documents. This includes in particular careful
drying, cleaning and storage of the product.
2. All prescripted checks and repairs are to be carrried out exclusively by
PRO-DESIGN or by technical aviation companies that have been explicitly charged
with such repairing or checking by PRO-DESIGN. Every modification or repair has to
be documented completely and correctly according the guidelines issued by PRO-
DESIGN.
Warranty
Any claim under the warranty which is accepted will be handled as follows:
1. If a warranty claim is accepted for a product which is not more than 6 months old, it
will be repaired at no charge.
2. If a warranty claim is accepted for a chute which is more than 6 months old or
which has had more use, it will be replaced by a used product which is either at least
equal in value to, or better than, the original product.

page 13 of 15
PRO-DESIGN version 1.1 04.08
3. The customer also has the option of acquiring a new product if an appropriate
amount is paid to make up the difference in value.
Good faith
PRO-DESIGN is under no obligation beyond those described above. It is possible,
however, that it will make a good faith settlement.
PRO-DESIGN
Hofbauer GmbH., PRO-DESIGN & SUNFLIGHTCRAFT
Zimmeterweg 4
A-6020 Innsbruck
Tel: +43 (0)512 546444
Fax: +43 (0)512 546445
www.pro-design.at

page 14 of 15
PRO-DESIGN version 1.1 04.08
PACKING- AND CHECKING BOOKLET
RESERVE SYSTEM B-SAFE 140
Type: B-SAFE 140
Manufacturer: PRO-DESIGN
Zimmeterweg 4
A-6020 Innsbruck, Austria
page 15 of 15
PRO-DESIGN version 1.1 04.08
Date of manufacture: ........................
Serial number: ........................
Certification number: ........................
Recommended max. load: 140 kg
Max. permissibe load: 140 kg
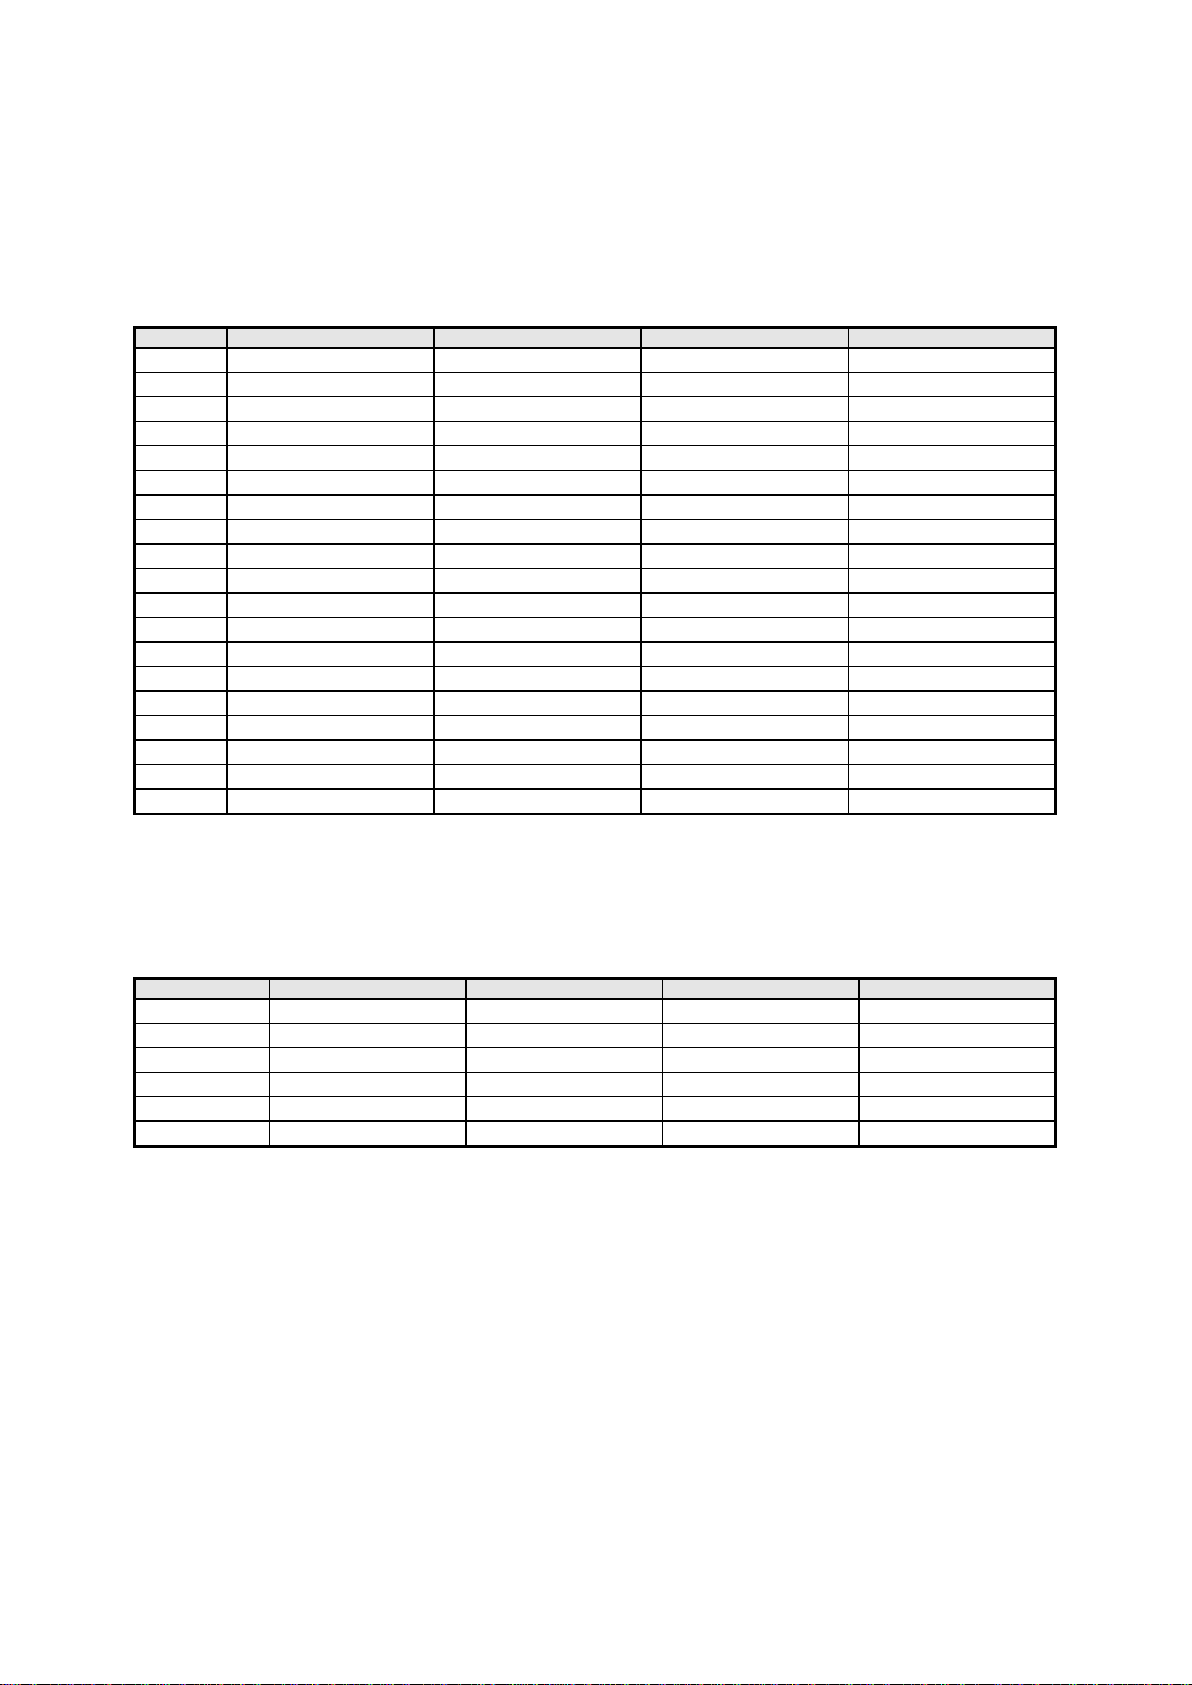
SUMMARY OF PACKING- AND CHECKING PERIODS
DATE
WORK DONE
DEPLOYMENTS
RESULTS
SIGNATURE
It is recommended to have the reserve system re-packed and checked every 4 months. If you do not
follow this advice, slow opening or even failure of the operation may result.
CHECKS
NUMBER
WORK DONE
RESULTS
NEXT CHECK
DATE, SIGNATURE
1
First general check
To be re-checked every two years.
Changes reserved.
Table of contents
Other PRO-DESIGN Aircraft manuals


