Blair Digital Chanter User manual


Table of Contents
Safety & Care……………….………………………..…….3
Cleaning ……………………………………………3
Battery ……………………………………………3
Warranty ……………………………………………3
Disclaimer ………………………………………….3
Copyright………………………….………………..3
Important notes …….…………………………………….4
Learning about the Sensors.……………………..4
Before we get started - Registration.………………….5
How to Power On/ Off & Navigation switch.….…5
Navigating the menu system …………………….5
Connecting the Audio output……………………..5
Selecting an Instrument ……………………………….6
Great Highland Bagpipe………………………….7
Scottish Smallpipe………………………………..7
Practice Chanter………………………………….7
Metronome……..…………………………………….……7!
!
Using MIDI.…….……………………………………….….8
#
Calibrating the sensors…………………………………9#
How to navigate the sensor menu…………………….9#
Calibrating the sensors to your fingers.……………..9
Advanced settings………………………………………10
Sensors …………………………………………..10
Ambient Light Regulator (ALR) ………………..10
Dsp Int (Display intensity) ………………………10
Dsp T/O (Display time-out) ……………………..10
Pwr T/O (Power time-out) ………………………10
Updater (Software update) ……………………..10
Fact Rst (Factory reset)…………………………10
Serial No. ………………………………………..10
!
About Pan…………………………………………………11!
!
Reverb…..…………………………………………………12!
!
Installing additional Instruments and software…….12
#
Charging the battery…………………………………….13#
Specifications…………………………………………….14!
!
Menu Map…………………………………………………15
The parts to your Chanter include:
1. Chanter body 2. Mouthpiece (removable, blowing not required) 3. USB lead 4. Case
2
www.blairbagpipes.com/support

Safety & Care
- Handle your Digital Chanter as you would a traditional Bagpipe, with lots of care!
- There are no user serviceable parts to the Blair™ Digital Chanter.
-Do not disassemble the chanter. This will void the warranty.
- The only removable part is the mouthpiece which can be unscrewed for storage.
- Always check the volume setting before connecting headphones or speakers.
-Do not insert headphones or connect any sound amplification when the volume is high.
-Depending on the power source, connecting both USB and audio input may cause distortion.
!
Some don’ts for optimal care of your chanter
- Do not bend or twist, apply excessive force to the switch, body, audio input or USB port.
- Do not leave the chanter in extreme heat, sunlight or cold.
- Do not expose the chanter to rain, wet or moist environments.
- Do not let dust or dirt cover the sensors. Always keep in the case provided.
- Do not let liquids near your chanter.
Do not use the chanter in the following environments which can result in malfunction:
- Direct and or extreme sunlight.
- Locations of extreme humidity or temperature.
- Excessively dusty or dirty environments.
- Locations of excessive vibrations.
- Locations with excessive magnetic fields.
!
Cleaning
- Clean only with a dry, lint and dust-free cloth
- Blow any dust out of finger holes with clean dry air (do not use any hard objects to clean the finger holes).
!
Battery
The Blair™ Digital Chanter is powered by a lithium-ion battery, charged via the USB port (100mA). In normal use, the battery
may provide up to 6hrs playing depending on your chanter’s settings.
To increase the power time of your chanter, turn off the OLED, Metronome, EQ and reduce the volume.
Do not expose the battery to excessive heat or use any lead unspecified for charging.
Battery Certification ICR14500 & IEC62133 Rep. NCT17036083I1-1
- To re-charge the battery, use the supplied or a fully compliant USB lead.
- The Battery in this product should only be repaired/ replaced by the manufacturer.
- There may be the risk of explosion if a battery is incorrectly installed.
- Do not expose the internal battery to excessive heat or fire.
When the battery is low, the chanter may malfunction and become unresponsive.
!
Warranty
Murray Blair Pty Ltd warrants that your Blair™ Digital Chanter will operate as described free of material defect for a period of
two years from the date of purchase, when used and operated in accordance with this User Manual.
This warranty is void if:
• Your Blair™Digital Chanter has been disassembled, or repaired other than by Murray Blair Pty Ltd or by a
technician authorised by Murray Blair Pty Ltd;
• The safety and care instructions in this User Manual have not been followed;
• Any objects or materials have been inserted into the finger holes;
• Any alterations, modifications or add-ons have been made;
• Damage has been caused by mistreatment or accident;
• The battery has not been correctly stored or recharged in accordance with this User Manual;
• The chanter has been used in unsuitable environments (see above) and this has caused the defect.
If you need to make a warranty claim, follow the procedure below:
In the first instance contact your place of purchase, and also email (sales@murrayblair.com) as the defect may be resolved by
a software update or similar on-line intervention.
If the defect cannot be resolved on-line, return the chanter freight-paid to Murray Blair Pty Ltd at (16 Davison St, Richmond
3121 Victoria Australia) with a legible copy of your original sales receipt showing the date and location of purchase and your
return address. Your chanter will be repaired or replaced and sent to your return address. However, any import duty or related
charges are the sole responsibility of the recipient. Murray Blair Pty Ltd is not responsible for any customs or handling fees
that maybe charged by your local authorities.
!
Limitation of Liability
The liability of Murray Blair Pty Ltd under this warranty is limited, to the extent permitted by law, to the repair or replacement of
the chanter, or the refund of the purchase price. #
#
Disclaimer
When in close proximity to electrical devices, the Blair™ Digital Chanter may malfunction or cause interference. When in
direct sunlight, the Blair™ Digital Chanter sensors may malfunction.
Copyright
Copyright in the sound samples in the Blair™ Digital Chanter is owned by Murray Blair Pty Ltd; the sound samples may not be
copied or reproduced in any musical instrument without prior written consent of the copyright owner.#
Trademark
Blair™ is a trademark of Murray Blair Pty Ltd.!
3
www.blairbagpipes.com/support

Important!
!
* Always store the Digital Chanter inside the case when not in use.
*Do not attempt to seperate or open the sections of the Chanter
(top and bottom section). It does not seperate.!
*Do not bend, twist or apply force to the chanter body.!
*The only removable part on the Digital Chanter is the mouthpiece
!
•First, learn about the sensors.!
!
The unique feature of the Digital chanter is the ability to adjust each individual sensor to suit your fingers. The
chanter emulates how a traditional chanter performs by lifting the fingers. #
#
The Blair Digital Chanter™ finger sensors react to positioning, height and skin reflections and the chanter
needs to be tuned into your own fingers. Adjusting the sensor value allows precise tuning of the chanter to
the way you play, and can even be set to assist in training the fingers to perform more efficiently.
The easiest way to learn how the sensors work is to do the following.
1. Set the value of Sensor Hole HA to ‘+80’!
2. Using only your thumb, place the finger over the High A hole. You will notice that even with the thumb on the hole,
HG cannot be sounded. This indicates the sensor is too sensitive, and we need to set a detection point nearer to the
chanter hole for the sensor to sound the note. #
#
This adjustment is required for each finger hole, and will depend on how you lift your individual fingers. If the note
above the sensor isn’t correctly calibrated the proceeding notes may not sound correctly. (similar to not covering a
hole on the traditional pipes).#
#
The process to set each sensor is quick, easy, and once set, requires only minimal tweaking.#
#
Start with the High A hole. Navigate to the Sensor menu, select Hole HA. #
Place your thumb on the hole and play a High A grace note. Adjust the Hole HA sensor value until both the High A
and High G can be heard, lifting your fingers as you would normally play. #
Once satisfied, press switch (Enter) and navigate to Hole HG. Continue the process for each sensor.#
#
* To make a hole more sensitive, increase the sensor value. To make it less sensitive, decrease the value.!
!
For example if High G is not heard and the finger is on the hole, it’s too sensitive therefore decrease the value until it
sounds. This makes the sensor less sensitive.!
!
Tip: Once in the detection range, small increments are best!
!
4
www.blairbagpipes.com/support
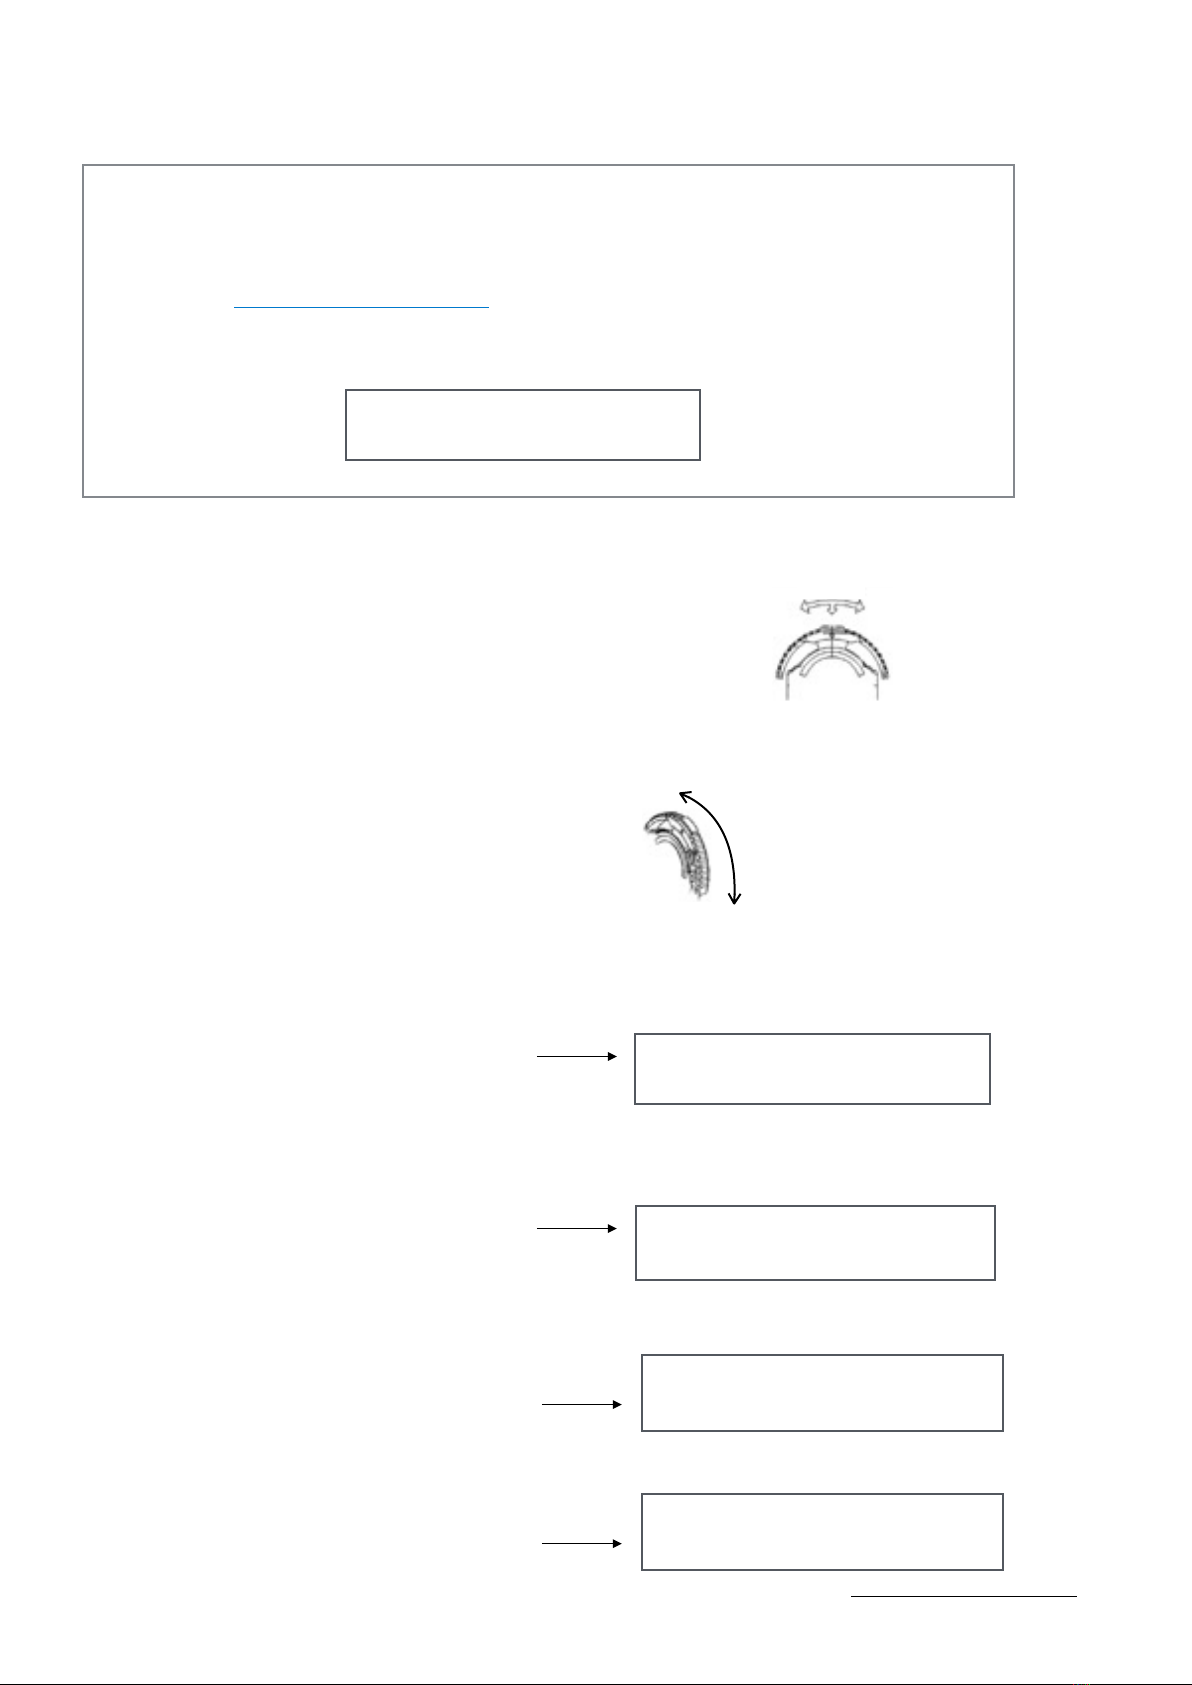
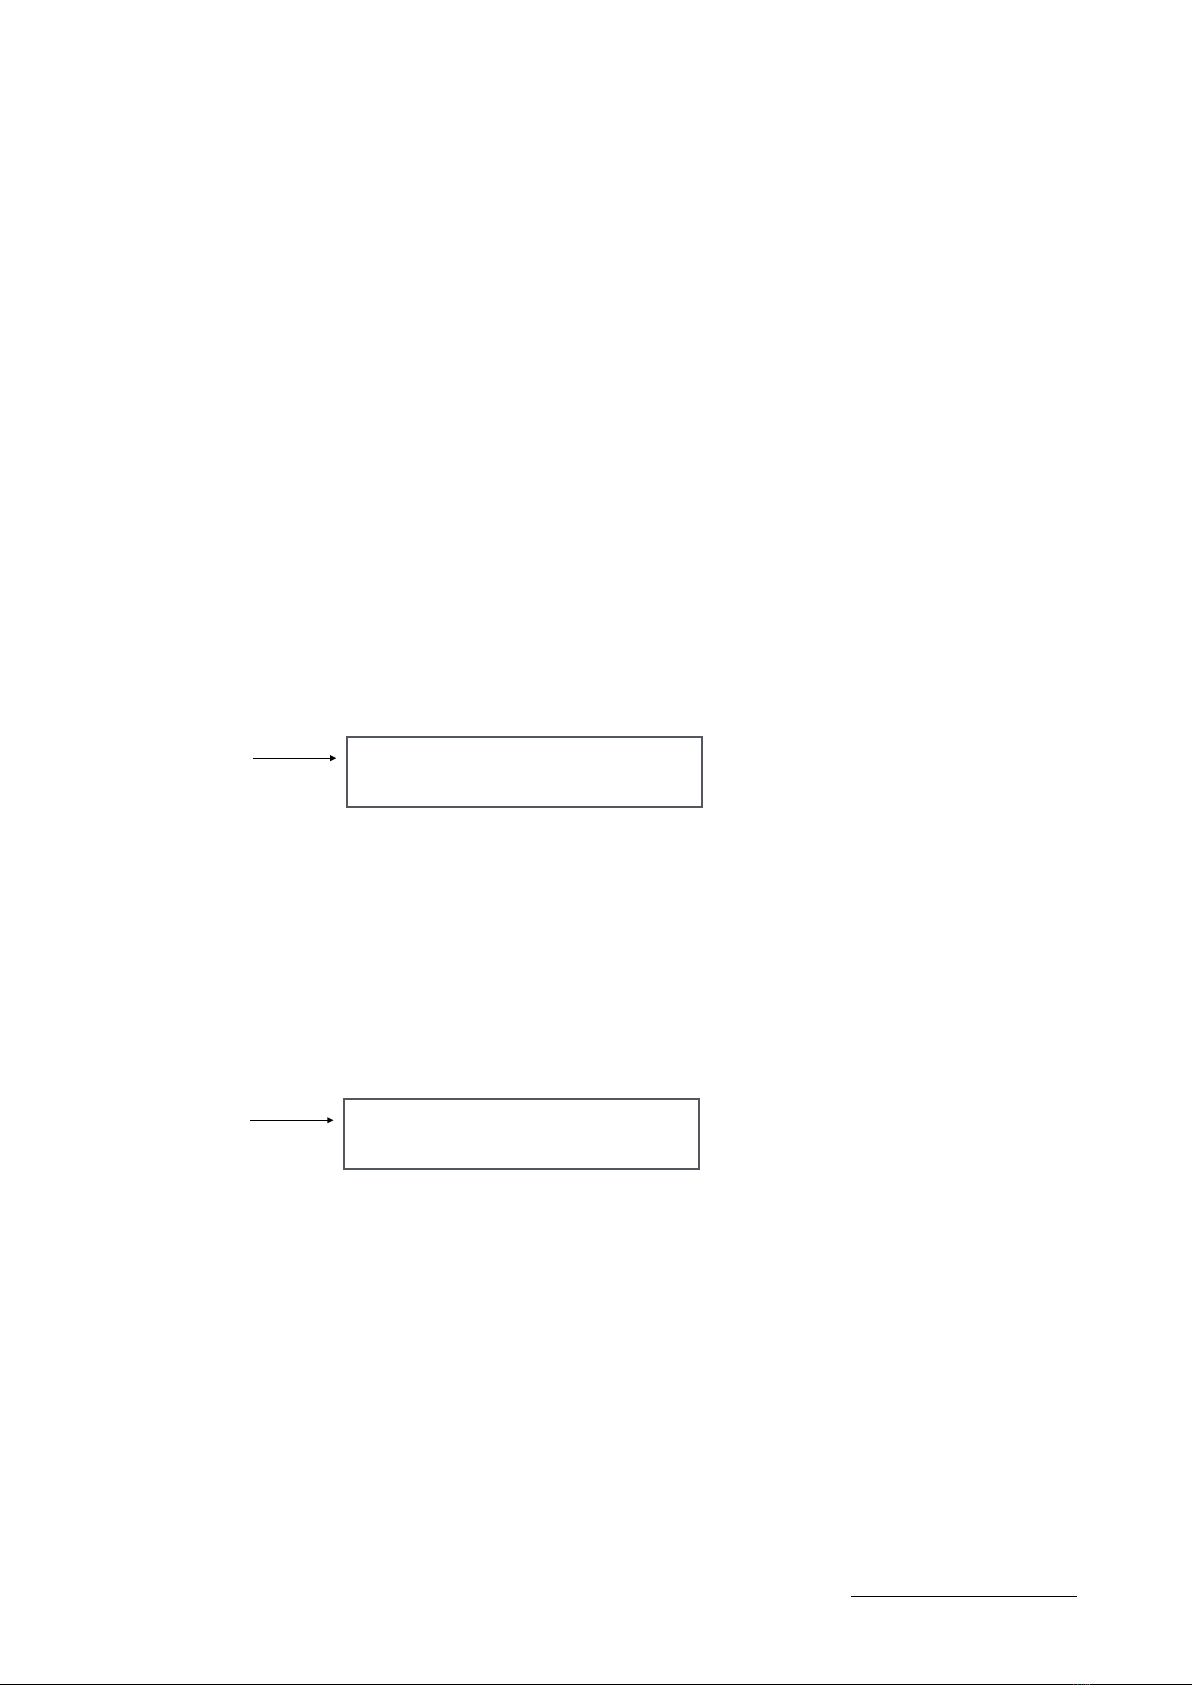
Hole is less sensitive, fingers can be higher
away from hole for note to sound.
0
+100
-100
Hole is more sensitive, finger needs to be
closer to hole to sound.
-10
-10
Before we get started - Registration
If you register your chanter you will have access to supportive materials, educational videos and updates to the
software and manual.
a. Go to www.blairbagpipes.com/register
b. You will need your date of purchase and serial number
Find your serial number (SN) by scrolling to the > Advanced menu, then to >Serial no.
!
•How to turn on/ off.
Power ON the chanter, by gently pressing the navigation switch in and releasing . #
#
#
This switch is referred to as the navigation switch and is used for changing settings and selecting a menu
items.
#
The navigation switch has 3 positions. !
Up, Down & In. !
When pressed in, it is referred to as ‘Enter’.#
#
On the display, the current location of the navigation switch is shown with an arrow ‘>’!
To select the current position of the navigation switch, press Enter.
Pressing in the navigation switch, Enter, is also used for adjusting settings. When a setting is being edited, the
screen shows an asterix (*) beside the parameter that is being changed (see below).
To return to a previous menu, navigate to ‘back’ and press Enter.
To Shutdown, or power off the Chanter, navigate to the main menu and press > Shutdown.
5
www.blairbagpipes.com/support
>Serial No. 00000!
Press
Dow
Up
In (Enter)
Navigation switch position
>Instr!
Advanced
*Instr <Ghb>!
Highland!
Low A -30!
>back
Return to previous menu
Reverb!
>Shutdown
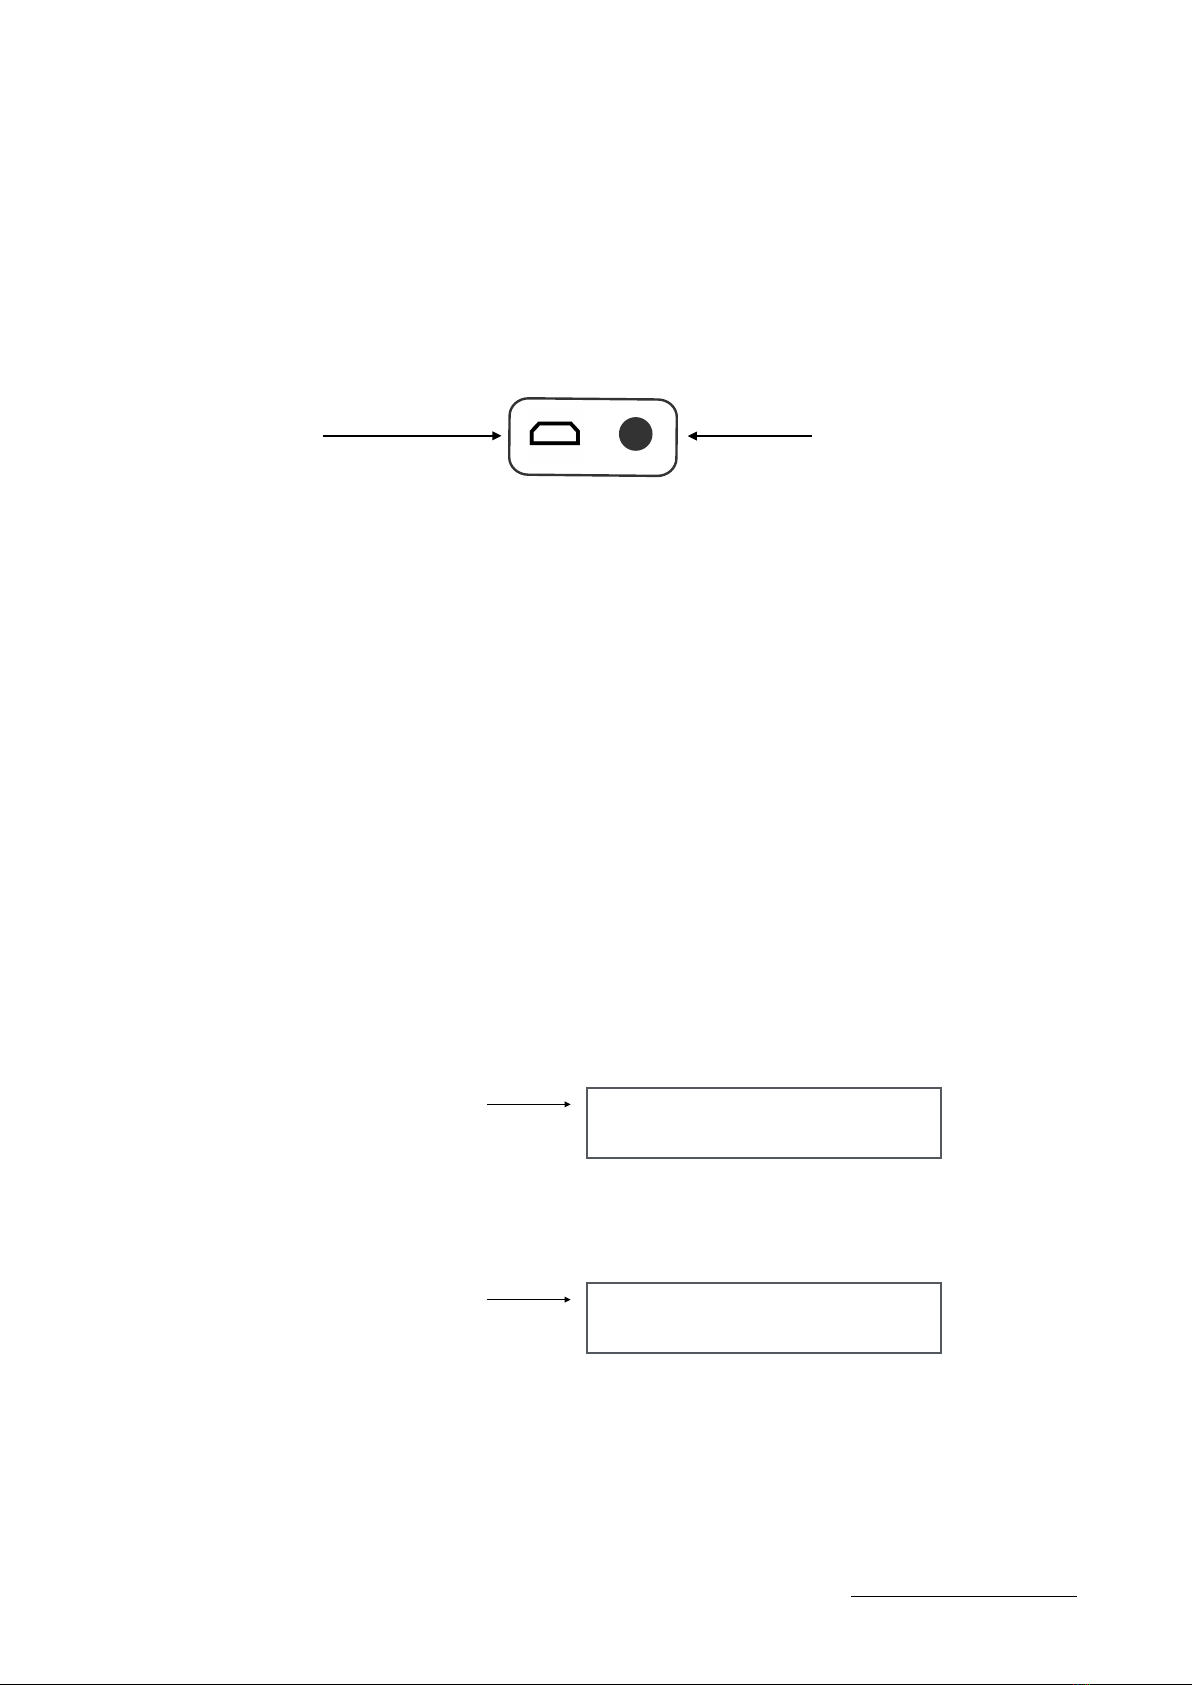
• Connecting the Audio output!
!
The Blair Digital Chanter™ sound is sent via the Stereo 3.5mm audio jack. This can be connected to
headphones, speakers or any device that accepts an audio input. (Live sound PA, studio recording software).
It’s a stereo output therefore the Chanter and drones can be sent to either the left or right side speaker/
headphone, or mixed to your preference. It’s recommended to use high quality speaker or headphones as the
sound generated by the Blair Digital Chanter is professional high definition audio of studio quality.#
To play the Blair™ Digital Chanter, Power On and check the volume level. Always check volume settings before
connecting headphones, speakers to avoid potential hearing and equipment damage.#
The USB port is used for data transfer, updating the chanter and re-charging the internal battery. #
The USB does not transmit audio. #
#
The USB can also be connected to a PC, iPad to transmit MIDI. Always use the supplied USB cable
!
•Selecting an Instrument
#
The chanter has three internal instruments which are selectable from the Main menu;#
• Ghb Great Highland Bagpipe
• Sml Scottish Smallpipes#
• Ptc Practice Chanter#
#
The chanter also has up to 6 memory banks available labelled ‘Usr’ in the menu. !
!
By connecting to the Blair Bagpipes App lets you transfer additional instruments into the chanter. !
This is a free download available from www.blairbagpipes.com
To select an instrument;
Press the navigation switch and scroll to >Instr.
#
Press Enter (Navigation switch) #
An asterix (*) will appear next to >Instr, and the Instrument name will have arrows either side.
#
Toggle the navigation switch up or down to change instrument.#
Once a new instrument is selected, press the Enter (navigation switch). The arrow will move to the right side of
the screen to confirm the new instrument has been selected.#
#
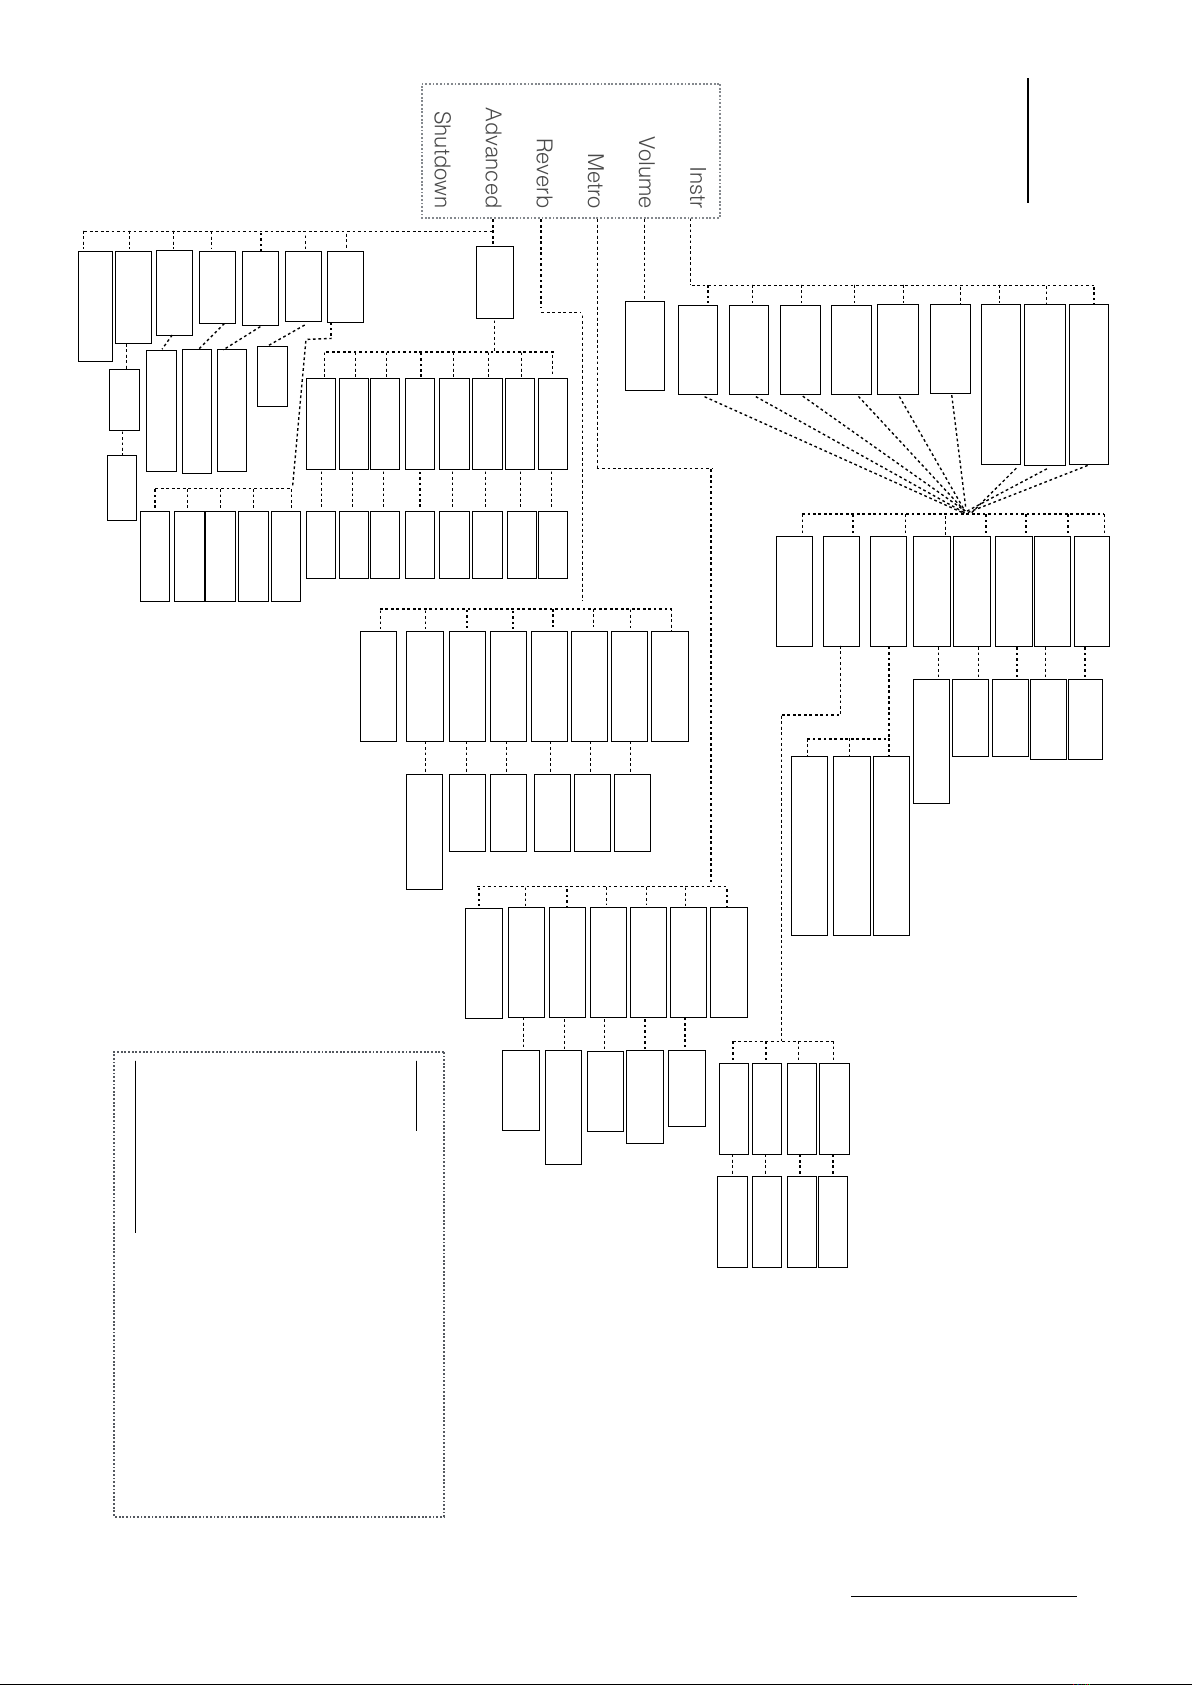
Please refer to the full menu map for layout and navigation.!
6
www.blairbagpipes.com/support
Stereo 3.5mm AUDIO output
USB port
>Instr Ghb!
Highland
* Instr <Ghb>!
Highland
About the internal Instruments!
!
Great Highland Bagpipe
The Great Highland Bagpipe, a full rich tone of an actual bagpipe with the default pitch in the Blair™ Digital
Chanter at 480 Hz.The following parameters can be configured.#
• Bass drone volume (Off-30)
• Tenor drone volume (Off-30)
• Treble (+/-8) this is an EQ for the overall sound of the instrument
• Bass (+/-8) this is an EQ for the overall sound of the instrument
• Pitch change (440-486Hz)#
• Pan (Chanter, Bass Dr, Tenor Dr)
•Vibrato > D, E, Fnat, F Vib On/Off#
#
Scottish Smallpipe in the Key of A#
The Scottish Smallpipe in the Key of A, a real small pipe tuned to 440 Hz.The following parameters can be
adjusted for the Scottish Smallpipe.!
• Drone volume (Off-30)
• Treble (+/-8)
• Bass (+/-8)
• Pitch change (440-486hz)#
• Pan (Chanter, Drones)#
Practice Chanter!
The unique sound of the Practise Chanter has a default pitch of 450 Hz.#
The following parameters can be adjusted:
• Treble (+/-8)
• Bass (+/-8)
• Pitch change (440-486hz)#
• Pan
What are the Treble and Bass options in the menu? Answer - EQ.!
In addition to being able to adjust each volume component of the Digital Chanter, for example loud drones, soft
drones, more bass drone, less tenor drone etc. an overall EQ is available for adjust the complete instruments
table and bass. This is useful if your speakers or headphones aren’t producing a good tone. The EQ is a shelf
type, and can boost the range +/-8dB either in the treble and bass range.
Metronome
#
The Blair™ Digital Chanter features an metronome with the ability to mix individual volumes of both the
metronome and the instruments audio. This feature allows full control of the metronome volume in the final
audio output. The metronome features 2 distinct percussive sounds, with the option of 8 beat patterns to select
the accented beat.
Adjustable parameters
• Metronome On/ Off#
• Volume 1-30#
• Tempo range 1-300bpm#
• Beats 1-8 #
• Pan (select this to pan the metronome in one speaker or headphone)#
• Reverb On/ Off#
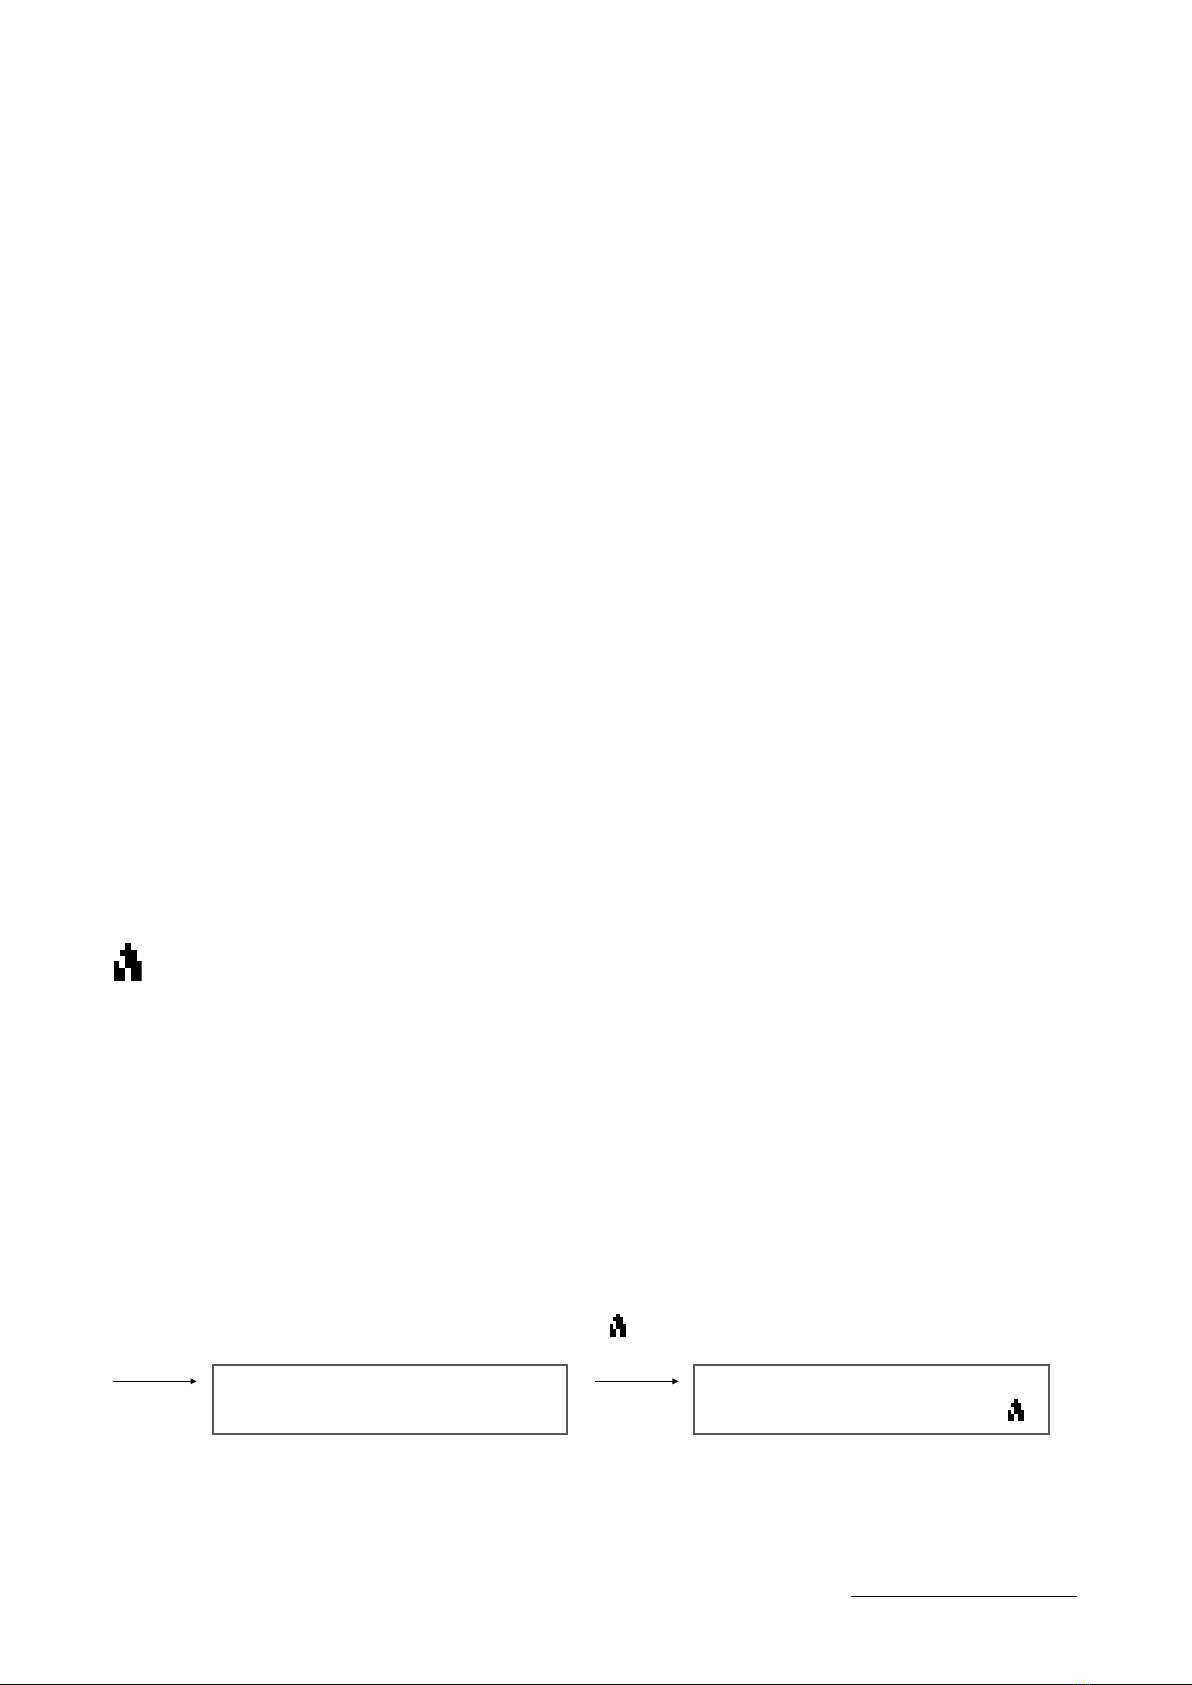
Turn on the metronome via the main menu scroll to Metro, and press Enter, then select ‘ON’. The
metronome icon will appear on the screen when it is ON.#
Toggle the navigation switch up/ down to select parameters, then press Enter to confirm the new setting.#
When the Metronome is ON, the metronome icon appears on the screen.
7
www.blairbagpipes.com/support
>Metro !
Reverb!
*Metro < ON>!
Volume 20
•Using MIDI!
MIDI is a digital protocol that allows instruments to communicate with each other, and PC’s. #
#
The Blair™ Digital Chanter is MIDI enabled and includes a builtin interface. This sends note information, not
sound, from one device to another via the USB port. By using MIDI it is possible to record your note information
into a PC or Tablet, and play regular Highland Bagpipe fingering but generate the sound of another instrument,
such as piano or guitar.
#
The Blair™ Digital Chanter sends MIDI information via the USB port. This needs to be connected to another
device enabled to receive MIDI data, such as a PC, iPad or digital tablet and a corresponding app like
Garageband to produce the sounds.
The default note settings for the Blair™ Digital Chanters 3 installed instruments are mapped to the following
MIDI notes, which correspond to what will be received in your app to produce the MIDI sounds. #
However, when loading new instruments into the Blair Digital Chanter memory, the notes are mapped according
to the key of the instrument.
#
#
• Calibrating the Sensors!
The Blair Digital Chanter™ has the unique ability to be customised to the way your fingers move. Like a traditional
bagpipe the Blair Digital Chanter™ requires the fingers to be lifted off the hole.#
#
The finger sensors react to react to positioning, height and skin reflections and the chanter needs to be tuned into your
own fingers. Adjusting their value allows for precise tuning of the chanter to the way you play.
As the sensors are exclusive to your finger characteristics it’s unlikely another persons settings will reflect the correct
calibration for your fingers.
The process of calibrating the sensors can be compared to a traditional chanter. If a note is not sounding below what the
fingers are playing, then one of the sensors (likely the sensor one note higher) needs adjusting.
The sensors can be calibrated to be more sensitive and less sensitive.
Increasing a sensor value = more sensitive, and not requiring to lift the finger very high off the hole. It lowers the
sensors detection height.#
Decreasing a sensor value = less sensitive, this means the sensor is detecting your finger movement higher above the
hole. When the sensor value is in the negative range it is a higher detection height (see below). !
8
www.blairbagpipes.com/support
Chanter
Low G
Low
A
B
C
nat
C
D
E
F
nat
F
HG
HA
Tenor
Bass
MIDI note
number
56
58
60
61
62
63
65
66
67
68
70
58
46
• numbers are for example only
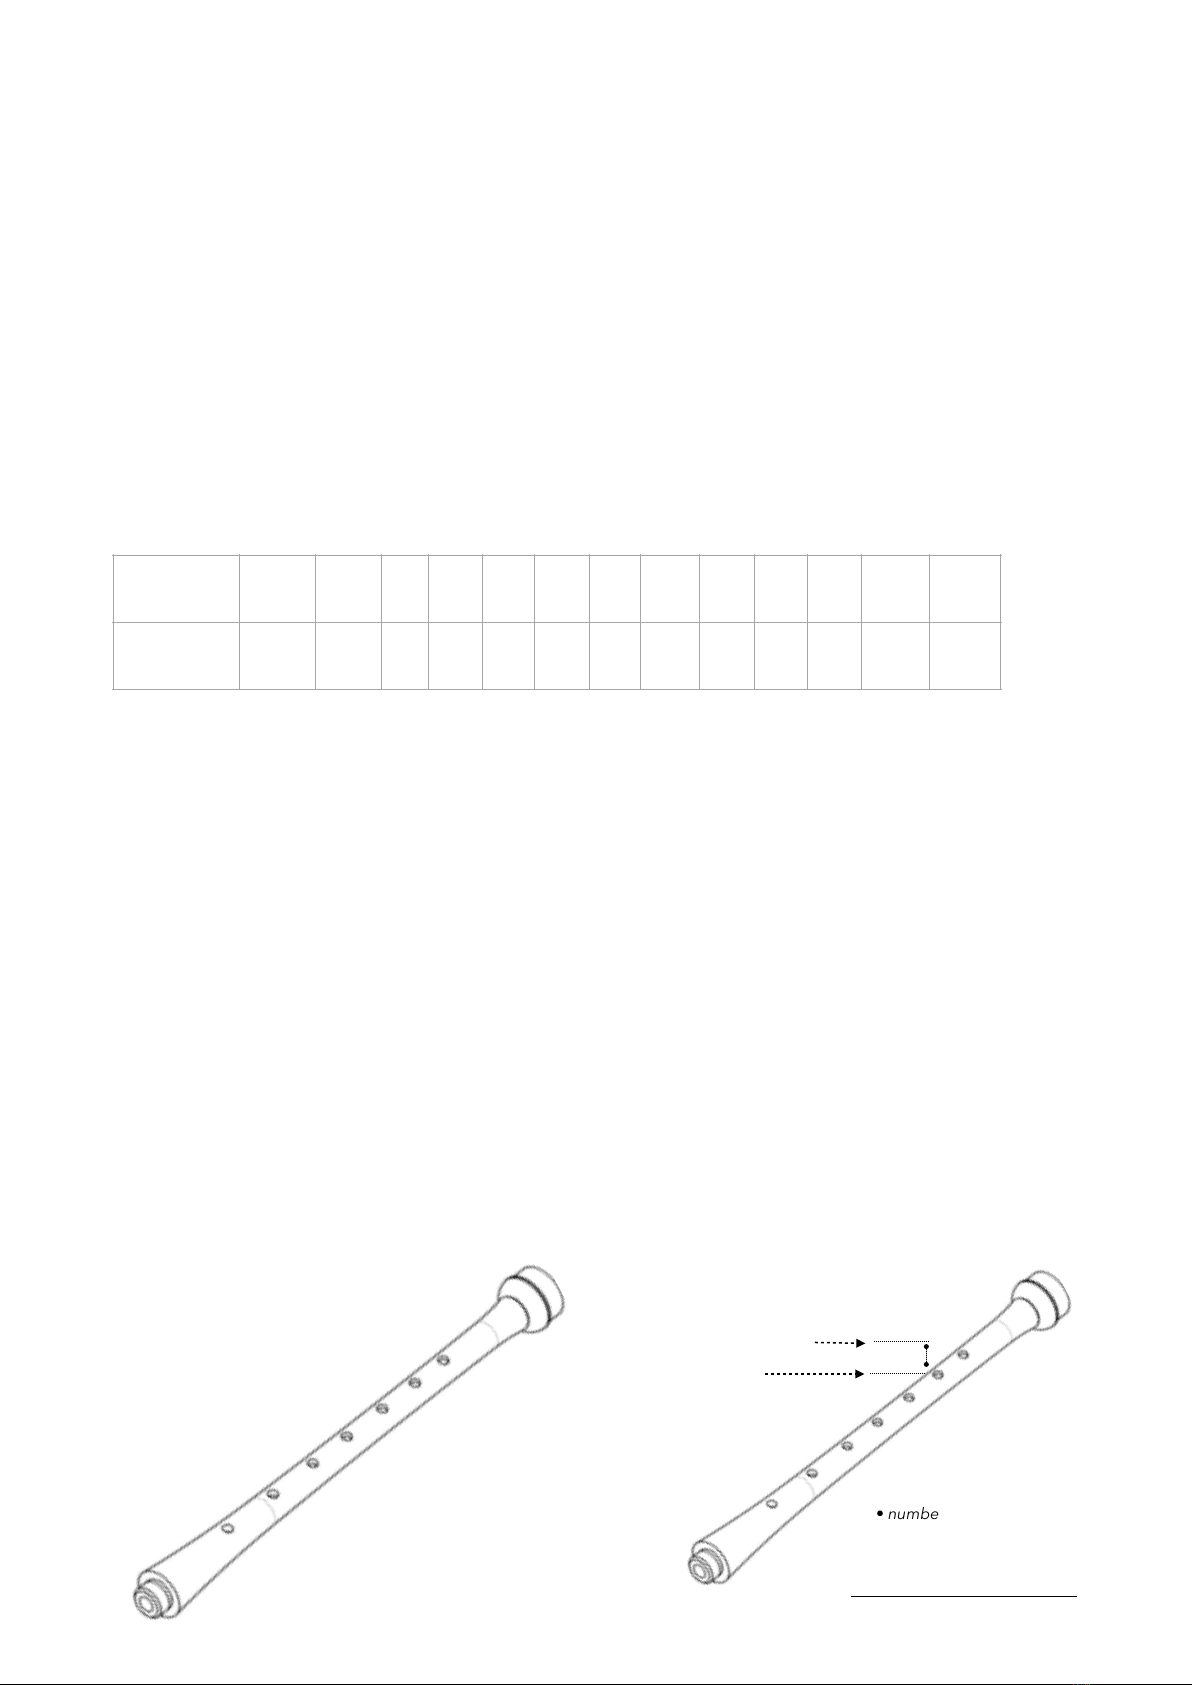
Hole HA
Hole HG
Hole F
Hole E
Hole D
Hole C
Hole B
Hole Low A
Sensor value = -40!
The detection height is higher!
Sensor hole names
Sensor value = +10!
The detection height is lower!

• How to navigate to the Sensor menu
• Main menu > Advanced > Sensors!
The first item in the Sensors menu is >Hole HA (numbers for example only.).
To adjust the sensor, press the navigation switch (Enter). An asterix appears next to the selected hole, and the value has
an arrow on each side. For example <0>. This value can be increased or decreased using the navigation switch.
#
The chanter automatically stores the new setting when it is altered, pressing Enter leaves the current sensor so you can
proceed to the next.
Adjust the sensor value until the correct note is heard as you would normally lift the fingers on a bagpipe. Once the
correct value has been reached, press the switch (Enter). The new value is stored.
To return to the main menu, continue to navigate to > back and press Enter.
•Calibrating the Sensors to your fingers.!
The sensors can be calibrated to your fingers, and it’s possible to set a sensor detection point which will sound the note
either high above the hole, exactly on the hole or below the edge of the hole.
This is referred to as adjusting the sensitivity of the sensor.
•Increasing a sensor value makes it more sensitive. This also means you will not need to lift the finger very high off
the hole for a note to sound. If the sensors value it too high, then the proceeding note won’t sound.#
#
• Decreasing a sensor value makes less sensitive, this means the sensor is detecting your finger movement higher
above the hole.
Common errors
• When a sensor value is set too high, the proceeding note won’t sound.
#
• One of the higher notes has a sensor set with high sensitivity which generates a ‘gurgling’ sound. This sound can be
identified as the sensor to adjust. For example when playing ‘C’, hearing a bubbling or gurgling sound. We can determine
that it will be a sensor with a finger over the hole, either High A, High G, F, E, or D. To correct reduce the sensor which is
sounding the note.
•The note sounds however the finger is still above the hole. This identifies as a sensor not sensitive enough and we
need to lower the detection point closer to the hole. To do this, increase the sensors value, making it more sensitive.
For example if set to -34, increase it’s value closer to the ‘+’ range such as ‘-20, -10, 0. +5’ until it sounds correctly.
9
www.blairbagpipes.com/support
>Advanced !
Shutdown !
>Sensors!
ALR
>Hole HA -10!
Hole HG 0
Low A +6!
>back
Calibrating the sensors (continued)#
#
To best learn how the sensors are adjusted set the value of Sensor Hole HA to ‘-50’ and notice the High A finger doesn’t
need to cover the hole for the High G note to sound.#
#
Alternatively, set the Sensor Hole HA to ‘+ 80’ and notice that even with the the High A finger covering the hole, it
doesn’t sound the High G note. This tells us the sensor is too sensitive to detect our fingers.#
#
Here’s the general process to set each Sensor which is quick, easy, and once set, requires only minimal ‘tweaking’.#
** Please note our skin changes as does the ability to consistently lift the finger the same height, therefore if a sensor is
set too sensitive and our playing has changed, then adjustment will be needed. #
#
Start with the High A hole. Navigate to the Sensor menu, select Hole HA. #
Place your thumb on the hole and play a High A grace note. Adjust the Hole HA sensor value until both the High A and
High G can be heard. Once satisfied, press switch (Enter) and navigate to Hole HG.#
Repeat the process for each note hole, keeping in mind how you would normally lift your fingers while playing.
!
• Advanced settings
The Advanced settings menu allow further customisation of overall settings.
To enter the Advanced menu, go > Main menu, then scroll to Advanced and press Enter.
The following menu items are available in Advanced.#
Sensors !
Menu for adjusting the individual sensors. Refer to How to navigate to the Sensor menu.!
Ambient Light Regulator (ALR)
The ALR controls the amount of high level sunlight and extreme temperature that may affect the Chanter when
playing outdoors. If the sunlight is high, finger sensors maybe triggered and notes sounded without actually
playing. The regulator has four levels of control; Low, Med, High & Extreme.
Unless outside in direct sunlight this should always be set to OFF. If activated step up the ALR from low to
extreme until the ambient light is restricted from interfering with the sensors. For playing indoors, the ALR
should be set to OFF.#
Dsp Int: Display Intensity, this controls the brightness level of the OLED screen.#
Dsp T/O: Display time-out specifies the time for when the screen turns OFF, however the Chanter remains on
and functioning. This can be used to save battery power, or when performing. ‘Enter’ can be pressed to activate
the display if it has timed-out.#
Pwr T/O sets the time for when the unit is not being played to shutdown. This is commonly referred to as a
power-save function. The settings are 2min, 5min, 10min and Off.#
Updater Select when connecting to a PC and installing software updates. Also when determining which
firmware version the chanter has installed.#
10
www.blairbagpipes.com/support
>ALR <Off> !
Dsp Int !
>Advanced !
Shutdown !

Advanced settings continued!
Fact Rst Restores the chanter to the original settings. All previous settings will not be saved.#
Serial Number: Your chanter’s unique serial number, which should registered to receive software updates,
online user manuals and support.#
#
•About Pan
Each instrument includes a Pan function to enhance use of the stereo output by spreading the sound across 2 speakers
or your headphones. By using Pan it’s possible to emulate the characteristics of playing an actual set of bagpipes with
the drones spread across the stereo image, like if they were also on your shoulder.#
All elements of the Highland Bagpipe (Chanter, Bass Drone, Tenor Drone) can be individually positioned in the stereo
mix. By using Pan, this widens the stereo image similar to the acoustic instrument.
#
For example, to widen the Great Highland Bagpipe sound Pan;
Chanter ‘0’#
Bass Drone 3 steps to the left (3L)
Tenor Drone 2 steps to the right (3R)
#
The stereo sound will now appear wider.
#
The Pan function can also be used to send individual elements to either stereo channel and useful for studio recording
and live performance.
#
For example: #
Pan the Chanter to the Right side (10R), and Bass & Tenor Drones to the left side (10L). This separates both sounds in
the mix whereby the Chanter can be routed to a Reverb, and the Drones to a Chorus, or individually tracked when
recording.
#
Pan has also been added to the Metronome
•Reverb #
#
Reverb is an echoing effect that adds space, depth and warmth to a sound and can enrich the harmonics of an
instrument. Almost every bagpipe recording uses Reverb and it helps replicate how a Bagpipe sounds in real-life. #
#
The reverb included in the Blair Digital Chanter™ is of world-class studio quality and can replicate many environments
from small rooms, concert halls to sporting stadiums. It’s an exceptionally low noise reverb that doesn’t add artefacts to
the sound.
By default the Reverb settings are ready to go. However if you're keen to experiment and create your own 'space' here
are the available parameters.
• Reverb On/ Off
• Volume 1-30
This sets how much of the original 'dry' sound (your Bagpipe) is sent to the Reverb to become 'wet'. A small subtle
amount is often used in recordings to add space/ warmth and the setting allows all the sound to be 'Wet'. When there is
to much Reverb it can sound 'muddy'.
• Rm Size (Room Size) 1-30
Rm Size adjusts the size of the room you would like to create. The larger the Rm Size the larger the space, be it a Hall or
Stadium effect.
• HF Damp (High frequency dampening) 1-30
On certain frequencies and settings a Reverb can produce a high frequency 'ring'. This occurs when the volume and
room size are set high, therefore to compensate a high-frequency dampening filter is used.
11
www.blairbagpipes.com/support

Reverb continued
• Pre-Dly (Pre-delay) 1-500
Pre-delay is the amount of time between your original 'dry' sound and when the Reverb effect can be heard. By adjusting
the amount Pre-delay it's possible to create a delay style effect, similar to shouting across a large valley to hear your own
echo!
• St Wdth (Stereo Wdth) 0-10
Stereo width spreads the Reverb sound across both speakers/ headphones. It creates a widening effect and can fill out a
sound. When the St Wdth is set to 0 it's noticeable that the Reverb is placed in the middle of the stereo image, with a
spread of '10' spaced across both outputs.
• Pan (Left-Right)
Pan allows you to position the Reverb in either the Left or Right speaker (or headphone). This is useful when recording
or performing live by sending a 'Wet' signal to one output and a 'Dry' signal to the other.
PAN can also be used in conjunction with the PAN in the Instrument menu by routing the Chanter to one side (for
example Left) and the Drones to the other (for example Right). In this configuration different amounts of Reverb can be
individually sent to either the Chanter or Drones.
• Installing additional instruments and software!
The Blair Digital Chanter™ has the capacity to store an addition 6 instruments. All software is free of charge.#
A selection of instruments are available for download from www.blairbagpipes.com, along with the Blair Bagpipes App
which connects a PC to the Chanter for transferring the files.
To install additional instruments and firmware;#
1. Download and install the Blair Bagpipes App for Mac or Windows www.blairbagpipes.com
2. Download the Instrument or firmware file, prefixed ‘.bdc’ and load into the Blair Bagpipes App.
3. Connect the supplied USB cable to the chanter and PC, launch the PC app.
4. On the Chanter, go to the Updater menu and press enter. Advanced > Updater > Enter
5. The app window displays your chanters serial number and the bdc files about to be loaded.
6. Press ‘Update Chanter’ and wait for confirmation. #
#
The picture below displays 5 instruments loaded, noting that the Bb Ptc Jt file requires 2 memory slots."
12
www.blairbagpipes.com/support

!
•Charging the battery!
Always use the supplied USB cable when charging the batter and updating the software. Charging may take
4-6hrs to receive full capacity depending on the charging source.
When the battery is fully charging the icon is solid. !
The battery can provide up to 6 hours playing time, depending on the chanters settings. The display intensity,
pitch change all effect the length of battery power. To recharge the chanter, insert the USB cable into a USB
socket (100mA preferred), and for maximum charge leave for 3-4 hours. Do not leave the battery fully
discharged for a period of time, it may effect the battery life.
The Chanter can also be powered from portable battery packs, as used by smartphones.
• Specifications!
Sound library (up to 9 instruments) All genuine high definition Bagpipe sounds.
Default
- Highland Bagpipes
- Scottish Smallpipes
- Practice Chanter#
+ Up to 6 memory slots for additional instruments. !
- EQ: Bass & Treble
- Pitch range: 440 - 486 Hz
-Metronome x 8 beat patterns
-Pan (all instruments)
-Reverb
- MIDI connectivity: inbuilt USB-MIDI interface
- Input: 1x USB, used for both MIDI and recharging
- USB output: 1x USB
-Audio output: 1x 3.5mm Stereo (male)
-Power: Rechargeable lithium-ion battery charged via USB port.
#
Dimensions: 54.3cm x 4.5cm, 204 grams#
The Blair™ Digital Chanter complies to FCC and CE Class B regulations.
• Accessories!
!
• Stereo Cut-off Pedal - a stereo foot pedal which cuts of the chanters sound. No hands required, easy to
connect for total control of when to start and stop. #
#
• Bagpipe adapter - converts your own bagpipe into a digital instrument. It includes an inverted stock which
can be inserted into a regular pipe bag, a spigot which replaces the BDC mouthpiece.
•Pipe Bag - inflatable via a valve embedded into the bag, this adds the realistic look and feel of playing a
small pipe or bagpipe. When not in use the bag also fits into the Digital Chanter case. Includes the Bagpipe
adapter, pipe bag and bag cover.
•Pipe Bag form fitting - Ergonomically designed moulded foam for comfort on the side of your body, the
ultimate BDC pipe bag for comfort and playability. Includes the Bagpipe adapter, pipe bag and bag cover.#
13
www.blairbagpipes.com/support
14
www.blairbagpipes.com/support
Instr
!
Volume
!
Metro!
!
Reverb
!
Advanced!
!
Shutdown
Sml ‘Smallpipe’
Ghb ‘Highland’
Usr1
Usr 2
Usr 3
Usr 4
Usr 5
Usr 6
Bass (EQ)
Tenor Dr (Vol)
Treble (EQ)
Pitch
Bass Dr (Vol)
Pan
Vibrato*
>back
+/-8
440-486Hz ***
+/-8
Off-1-30
Off-1-30
Chanter 10L < 0> 10 R
Bass Dr 10L < 0> 10 R
Tenor Dr 10L < 0> 10 R
Glossary!
!
Instr - Instrument!
Ghb - Great Highland Bagpipe
Sml - Key of A Scottish Smallpipe
Ptc - Practice Chanter
Usr - Memory slots for loading additional instruments!
Metro - Metronome!
Vibrato - only available on specified instruments !
Pitch - editable on all instruments!
ALR - Should be set to OFF unless outdoors!
Dsp - Display
Pwr - Power
www.blairbagpipes.com©
Vibr F
Vibr Fnat
Vibr E
Vibr D
Off/ On
Off/ On
Off/ On
Off/ On
0-100
Volume
1-8
Metro On/ Off
30-300bpm
Tempo
1-30
Beats
Pan
Reverb
> back
10L < 0> 10 R
ON/ OFF
Volume
On/ Off
Rm Size
HF Damp
Pre-Dly
St Wdth
Pan
> back
1-30
1-30
1-30
1-500
1-10
10L < 0> 10 R
+/- 100
Note Hole D
+/- 100
+/- 100
Note Hole C
Note Hole B
+/- 100
Note Hole HA
Note Hole E
Sensors
+/- 100
Note Hole F
Note Hole HG
+/- 100
Note Hole LA
+/- 100
+/- 100
Off
Pwr T/O
Ext
Med
Dsp Int
SN:0000
Off, 2m,1m,30s,10s
High
Firmware Version
Fact Rst
1-10
Dsp T/O
Low
ALR
Confirm
Off, 10m,5m,2m,1m
Updater
Yes/ No
Menu Map
Ptc ‘Practice Chanter
Main Menu
Table of contents


