manuals.online logo
Brands
  1. Home
  2. •
  3. Brands
  4. •
  5. Blaupunkt
  6. •
  7. Amplifier
  8. •
  9. Blaupunkt GTA 460 User manual

Blaupunkt GTA 460 User manual

Other Blaupunkt Amplifier manuals

Blaupunkt Velocity VA 1004 User manual

Blaupunkt

Blaupunkt Velocity VA 1004 User manual

Blaupunkt BGA 250 User manual

Blaupunkt

Blaupunkt BGA 250 User manual

Blaupunkt 7 607 792 007 User manual

Blaupunkt

Blaupunkt 7 607 792 007 User manual

Blaupunkt MPA 4 User manual

Blaupunkt

Blaupunkt MPA 4 User manual

Blaupunkt THA 555 PnP User manual

Blaupunkt

Blaupunkt THA 555 PnP User manual

Blaupunkt THA 475 PnP User manual

Blaupunkt

Blaupunkt THA 475 PnP User manual

Blaupunkt MPA 400 User manual

Blaupunkt

Blaupunkt MPA 400 User manual

Blaupunkt GTA 270 SF User manual

Blaupunkt

Blaupunkt GTA 270 SF User manual

Blaupunkt Velocity V7000 User manual

Blaupunkt

Blaupunkt Velocity V7000 User manual

Blaupunkt BMX 240 User manual

Blaupunkt

Blaupunkt BMX 240 User manual

Blaupunkt GTA 41200 HP User manual

Blaupunkt

Blaupunkt GTA 41200 HP User manual

Blaupunkt THA 1250 PnP User manual

Blaupunkt

Blaupunkt THA 1250 PnP User manual

Blaupunkt MPA 400 User manual

Blaupunkt

Blaupunkt MPA 400 User manual

Blaupunkt GTA 200 Flash User manual

Blaupunkt

Blaupunkt GTA 200 Flash User manual

Blaupunkt BSA 160 User manual

Blaupunkt

Blaupunkt BSA 160 User manual

Blaupunkt MPD 48A User manual

Blaupunkt

Blaupunkt MPD 48A User manual

Blaupunkt 7 607 792 118 User manual

Blaupunkt

Blaupunkt 7 607 792 118 User manual

Blaupunkt GTA 2600 HP User manual

Blaupunkt

Blaupunkt GTA 2600 HP User manual

Blaupunkt GTA 400 Flash User manual

Blaupunkt

Blaupunkt GTA 400 Flash User manual

Blaupunkt GTA 4 SPEZIAL Specification sheet

Blaupunkt

Blaupunkt GTA 4 SPEZIAL Specification sheet

Blaupunkt THA 275 PnP User manual

Blaupunkt

Blaupunkt THA 275 PnP User manual

Blaupunkt THA 275 PnP User manual

Blaupunkt

Blaupunkt THA 275 PnP User manual

Blaupunkt THA1350 User manual

Blaupunkt

Blaupunkt THA1350 User manual

Blaupunkt GTA 270 DSP User manual

Blaupunkt

Blaupunkt GTA 270 DSP User manual

Popular Amplifier manuals by other brands

Magnat Audio EDITION FOUR Owner's manual/warranty document

Magnat Audio

Magnat Audio EDITION FOUR Owner's manual/warranty document

Inter-m PA-2000A Operation manual

Inter-m

Inter-m PA-2000A Operation manual

Yamaha TX6n owner's manual

Yamaha

Yamaha TX6n owner's manual

Peavey TNT 150 user guide

Peavey

Peavey TNT 150 user guide

Bosch LBB 1903/10 Installation and user instructions

Bosch

Bosch LBB 1903/10 Installation and user instructions

Avocent Emerge DA1200D Installer/user guide

Avocent

Avocent Emerge DA1200D Installer/user guide

Redgum RGi35 operating instructions

Redgum

Redgum RGi35 operating instructions

Cambridge Audio AXA25 user manual

Cambridge Audio

Cambridge Audio AXA25 user manual

Alpine MRP-M200 owner's manual

Alpine

Alpine MRP-M200 owner's manual

Technical Pro H1502UrBT user manual

Technical Pro

Technical Pro H1502UrBT user manual

FMS EMGZ307 operating manual

FMS

FMS EMGZ307 operating manual

Racal Instruments 5601 user manual

Racal Instruments

Racal Instruments 5601 user manual

Valcom V-1094A Technical specifications

Valcom

Valcom V-1094A Technical specifications

Cambridge Audio 851D user manual

Cambridge Audio

Cambridge Audio 851D user manual

QSC 3800 Specifications

QSC

QSC 3800 Specifications

NAD C300 owner's manual

NAD

NAD C300 owner's manual

Rotel RMB-1077 owner's manual

Rotel

Rotel RMB-1077 owner's manual

Peavey Monitor 300 Series operating guide

Peavey

Peavey Monitor 300 Series operating guide

manuals.online logo
manuals.online logoBrands
  • About & Mission
  • Contact us
  • Privacy Policy
  • Terms and Conditions

Copyright 2025 Manuals.Online. All Rights Reserved.

GTA 460
4 Channel Amplifier
1051810460 001
8 906086 050392
Blaupunkt India Private Limited
47, Atlanta Society, Nariman Point
Mumbai‐ 400 021. Maharashtra. India.
Toll Free: 1800 209 6820
[email protected]
www.blaupunkt.com
Audio inputs (see Fig. 3)
You can select between 2 different audio inputs;
- Cinch (RCA)
- Hi level (loudspeaker connections)
Use only one of the audio inputs; otherwise, it may lead
to audio interference.
The preamplier outputs are connected to the cinch
(RCA) socketsj) via a shielded sound cable.
With control via the loudspeaker outputs, the input
connections of pos. k/l are fed to the closest
loudspeaker cables (front or rear) on the left and right.
They are separated and connected to the input
connections. The polarity of the +or - connections must
be observed. Bridge output stages (BTL) can also be
connected directly without an additional adapter.
Positive / Negative connection
- We recommend a minimum cross section of 10 AWG
- Route commercially available positive cables to the
battery and connect via fuse holder.
- Use cable glands for holes with sharp edges.
Warranty
We provide manufacturer's warranty for 12 months
from the date of sale for products purchased within
India.
Recommendation
The performance of an amplier can only be as good as
its installation. Correct installation increases the overall
performance of your car sound system. The GTA
amplier should be installed by a trained person. If you
would like to install it yourself, please read these
installation instructions very carefully and allow yourself
sufficient time for the installation.
In conclusion, allow us a few words about the topic of
health protection:
During the playback of music in your vehicle, please
consider that continuous sound-pressure levels above
100 dB can lead to permanent damages to the human
ear and even to loss of hearing. Using today's high-
performance systems and loudspeaker congurations
allows for reaching sound pressure levels above 130 dB.
Safety notes
Please observe the following safety notes during the
installation and connection.
- Disconnect the negative terminal of the battery!
Observe the safety notes of the vehicle manufacturer.
- When you drill holes, ensure that you do not damage
any vehicle components.
- Please use minimum 10AWG power & ground cable
with a fuse located within 18 inches of the battery.
- Use cable glands for holes with sharp edges.
- An incorrect installation can result in malfunctions of
the electronic vehicle systems or sound system.
Installation & connection instructions
With respect to accident safety, the GTA 460 must be
secured in a professional way.
When selecting the installation location, select a dry
location that offers sufficient air circulation for cooling
the amplier.
The GTA 460 must not be installed on rear shelves, rear
seats or other locations that are open to the front.
The installation location must be suitable to accept the
accompanying screws and provide a rm support.
The amplier power cable must be tted with a fuse no
more than 30 cm from the battery to protect the vehicle
battery in case of a short circuit between power
amplier and battery. The fuse of the amplier protects
only the amplier, not the vehicle battery.
Use loudspeakers with 2 - 4 Ohms impedance (see table
or installation drawing). Do not connect loudspeakers to
ground, use only the referenced terminals.
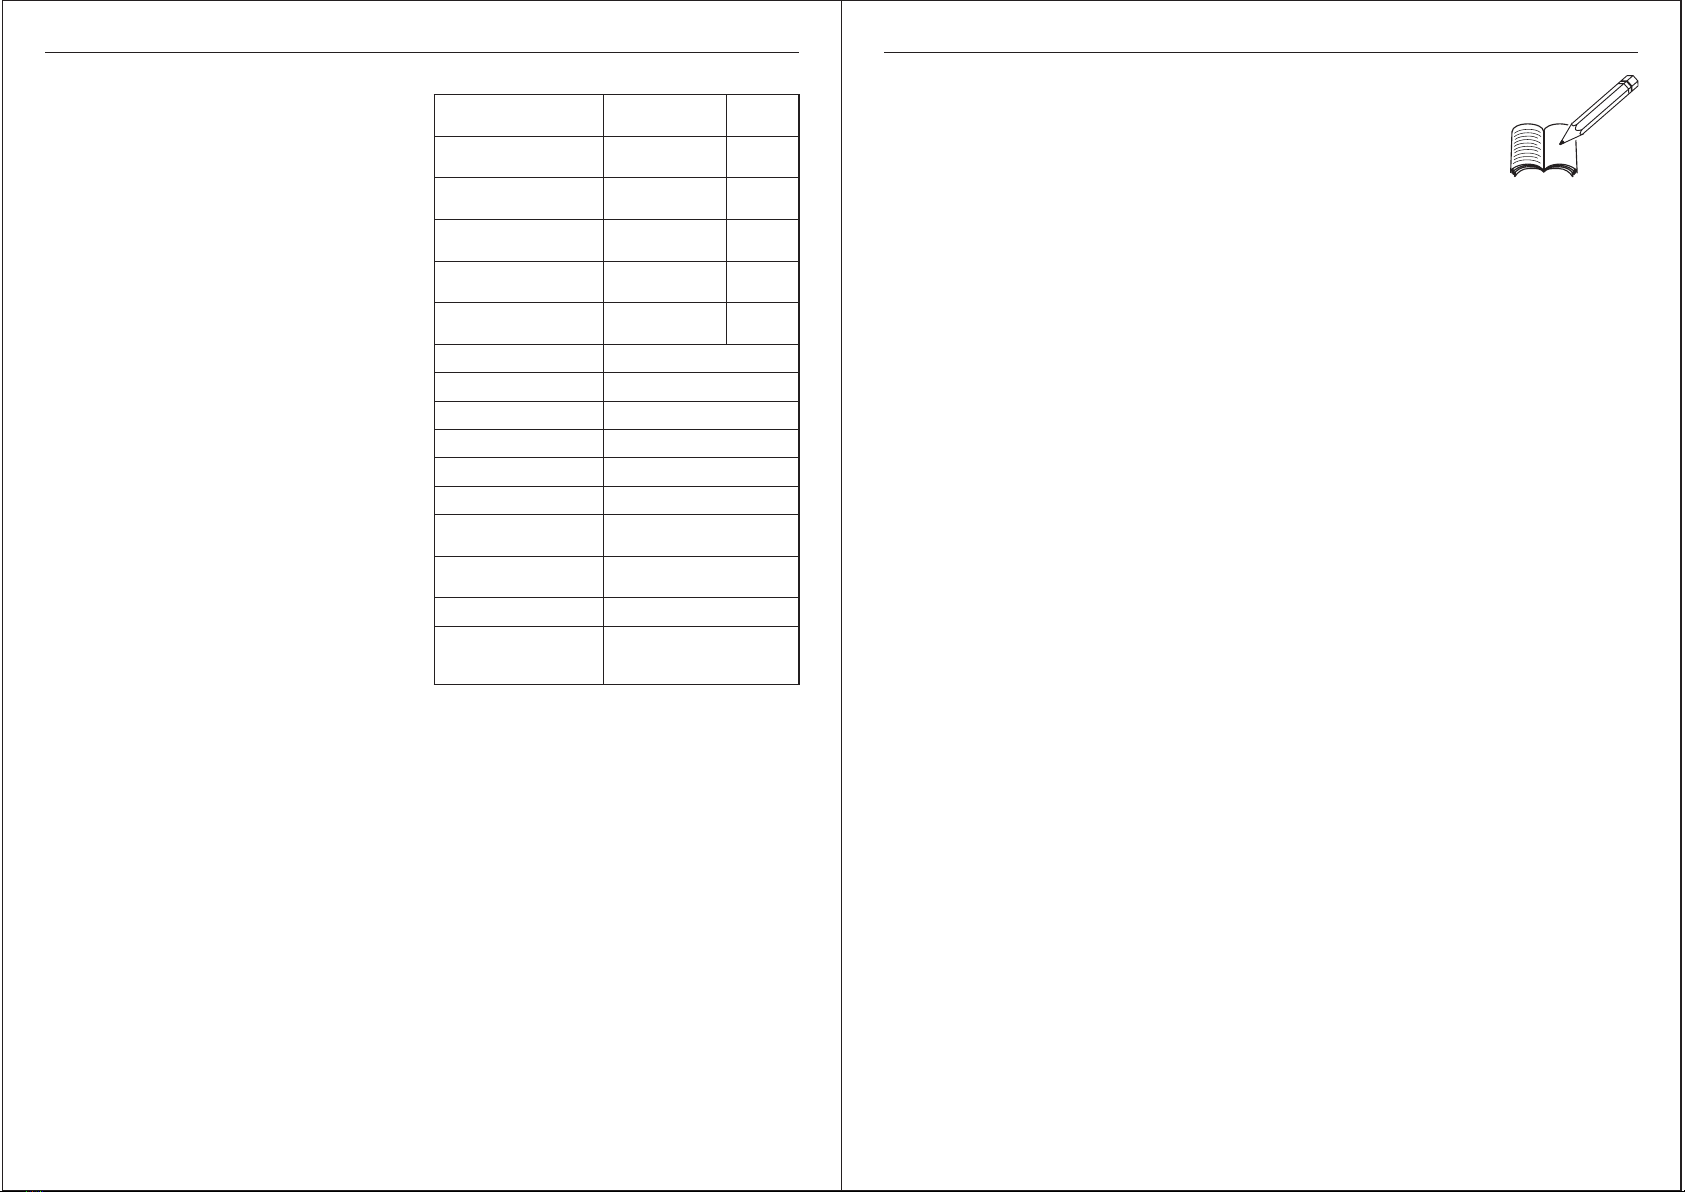
GTA 460
Application options and loudspeaker connection
4 Channel mode
Max power 4 x 180 W / 4 Ω Fig. 4, 5
Stereo mode
Max power 2 x 360 W / 4 Ω Fig. 6
4 Channel mode
RMS power 4 x 60 W / 4 Ω Fig. 4, 5
3 Channel mode
RMS power 1 x 180 W / 4 Ω
Frequency response 10 Hz - 30,000 Hz
Signal-to-noise ratio > 85 dB @ RMS power
Signal-to-noise ratio > 75 dB @ 1 W / 1 kHz
Distortion factor (RMS) < 0.08 %
Stability 2 Ω (4 Ω in bridge mode)
Input sensitivity 0.2 - 8 V
Low-pass  lter
(Low Pass) 50 - 250 Hz
High-pass  lter
(High Pass) 80 Hz
Bass boost 0 dB / 6 dB / 12 dB
Dimensions
W x H x D (mm)
W x H x D (")
185 x 53 x 284.5
7.3 x 2.1 x 11.2
Stereo mode
RMS power 2 x 180 W / 4 Ω Fig. 6
4 Channel mode
RMS power 4 x 90 W / 2 Ω Fig. 4, 5
2 x 60 W / 4 Ω Fig. 5
_____________________________________________________________________________
_____________________________________________________________________________
_____________________________________________________________________________
____________________________________________________________________________________________________
____________________________________________________________________________________________________
____________________________________________________________________________________________________
____________________________________________________________________________________________________
____________________________________________________________________________________________________
____________________________________________________________________________________________________
____________________________________________________________________________________________________
____________________________________________________________________________________________________
____________________________________________________________________________________________________
____________________________________________________________________________________________________
____________________________________________________________________________________________________
____________________________________________________________________________________________________
____________________________________________________________________________________________________
____________________________________________________________________________________________________
____________________________________________________________________________________________________
____________________________________________________________________________________________________
____________________________________________________________________________________________________
____________________________________________________________________________________________________
____________________________________________________________________________________________________
____________________________________________________________________________________________________
____________________________________________________________________________________________________
____________________________________________________________________________________________________
____________________________________________________________________________________________________
GTA 460
Bridged loudspeaker connections
The GTA amplier can also be bridged for a mono
conguration. In bridge mode, the amplier combines
the right and left channel to a single-channel output
(mono output).
Caution:
In a bridge circuit, the amplier load must be 4 ohm or
higher. A lower load leads to overheating and cause the
amplier to switch off & can cause permanent damage.
Adjusting the type & range of the
frequency crossovers
With the GTA 460, the type of frequency crossover (i.e.
"Low Pass" or "Hi-Pass") and the desired frequency can
be adjusted. For example, if a subwoofer is to be
connected, the low-pass settings shown are required
(Fig. 3). The frequency is dependent upon the frequency
range of the loudspeakers (see recommended
frequency range of the loudspeakers).
High-Pass - 80 Hz
At a setting of 80 Hz, the amplier has a frequency range
of 80 Hz to 30,000 Hz.
Low-pass frequency control
This control is active if the switch is in the position "Low-
Pass", and allows for setting the desired entry frequency.
Example: At a setting of 120 Hz, the amplier has a
frequency range of 10 Hz to 120 Hz.
Bass boost
The bass boost control is used to adjust the bass
response of the amplier.
The setting options are: 0 dB / +6 dB / +12 dB.
Power-on indicator (PWR / PRO)
Green LED: Output stage on, regular operating status.
Red LED: Output stage is electronically switched off due
to an error.
Recycling & Disposal
Please use the return and collection systems
available to dispose of the product.
Subject to changes
- Securely fasten commercially available negative
cables to a noise-free ground point (chassis screw,
chassis metal) not to the negative pole of the battery.
- Scrape the contact surfaces of the ground point until
they are bright and grease with graphite grease.
Integrated fuses (Fuse)
The fuses integrated in the amplier (Fuse) protect the
power amplier and the entire electrical system in case
of an error. If a replacement fuse is used, never bridge
fuses or replace them with a type with higher current.
Connection examples
Connection of the voltage supply............Fig. 2
Audio inputs....................................................Fig. 3
Loudspeaker connections..........................Fig. 4/5
Remote connection of the amplier with switchable
+12V voltage source.
This allows the amplier to be switched on and off using
the on/off-switch of the radio device.
Level control
The Level control is used to adjust the input sensitivity of
the power amplier to the output voltage of your car
sound system preamplier output.
The adjustment range is from 0.2 V to 10V.
If a car sound system of a third party manufacturer is
connected, the input sensitivity must be adjusted
corresponding to the manufacturer data.
An important explanations in this context:
By turning the control clockwise, the input sensitivity of
the amplier and, therefore, also the volume increases.
However, this is not a volume control; no further
amplier output can be achieved in the full position,
even if it may sound like that at the beginning. The
system merely increases the volume faster if the volume
control of the car sound system is turned up.
DC Offset - 4
When connecting to an OE radio, it may not be possible
to connect the remote turn on lead on the amplier,
please use the high level input available on the side
panel & turn on DC Offset to automatically turn on/off
the amplier when the OE radio is turned on / off.
Loudspeaker connections
As with every audio component, the correct polarity of
amplier and loudspeakers is important for a good bass
response. For this reason, ensure that the positive (+)
connection of the amplier is connected with the
positive connection (+) of the loudspeaker; the same
applies to the negative (-) connections. In addition, the
left amplier channel must be connected with the left
loudspeaker and the right amplier channel with the
right loudspeaker.
+12V
GTA 460