Blaupunkt TV-MONITOR wide vision TravelPilot DX User manual

Navigation
TV-MONITOR wide vision
Operating instructions
K7/VKD 8 622 402 815 - 02/2001

2
Contents
Contents ........................................................... 2
Safety Precautions .......................................... 4
Loading and Replacing the Batteries
for the Remote .............................................. 4
Monitor Control Function ............................... 5
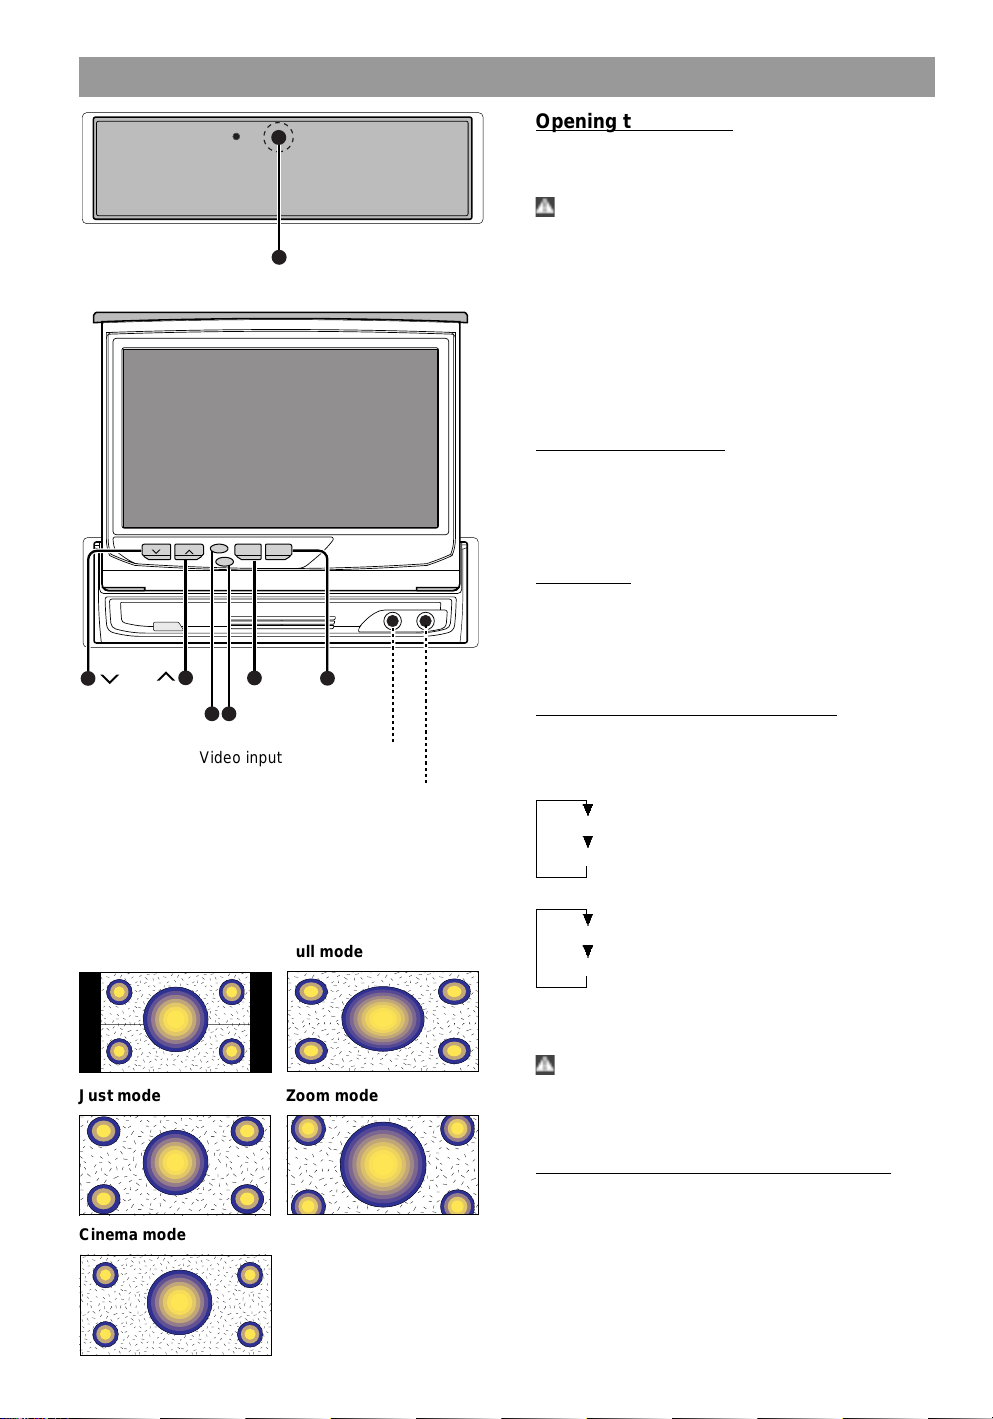
Opening the Monitor ..................................... 5
CIosing the Monitor....................................... 5
Power on/off .................................................. 5
Switching the Monitor’s Picture..................... 5
Switching the TV/Video Picture Mode .......... 5
Switching the AV Output Picture................... 6
Switching to the Angle/
Screen Control Screen.................................. 6
Turning the Monitor Picture Off..................... 6
Switching to the Source Control Screen....... 6
Changing the Background of the
Source Control Screen Picture ..................... 6
Adjusting the Volume .................................... 6
Monitor Control Function ............................... 7
Angle Control Screen.................................... 7
Turning the Automatic Open/Close ................
Function On/Off [AUTO OPEN-CLOSE]....... 7
Switching to the Screen Control Screen....... 7
Ending the Angle Control Screen ................. 7
Adjusting the Picture Quality......................... 7
Turning the Dimmer Function On/Off ........... 7
Switching to the Angle Control Screen ......... 7
Ending the Screen Control Screen ............... 7
System Setup Function................................... 8
Menu Screen ................................................. 8
Switching to the Menu Screen ...................... 8
Switching to the Setup Menu Screen ........... 8
Switching to the Audio Control Screen ......... 8
Switching to the Source Control Screen....... 8
Canceling the Menu Screen ......................... 8
Setup Menu Screen ...................................... 8
Switching to the System Setting Screen....... 8
Switching to the TV Area Set........................ 8
Switching to the RDS Setting........................ 8
Switching to the Clock Adjustment Screen... 8
Switching to the Touch Panel
Adjustment Screen........................................ 8
Switching to the Code Security..................... 8
Canceling the Setup Menu Screen ............... 8
System Setting Screen-1 .............................. 9
Setting the AV Input [AV-IN] ......................... 9
Setting the AV Output [AV-OUT] .................. 9
Setting the Built-ln Speaker Mode
[SP MODE].................................................... 9
Setting the Built-In Speaker Level
[SP LEVEL] ................................................... 9
Switching to the Setting Screen-2 ................ 9
Ending the System Setting Screen ............... 9
System Setting Screen-2 .............................. 9
Setting the Auto Scroll Display Function
[SCROLL] ...................................................... 9
Setting the Touch Sensor Tone [BEEP] ....... 9
Setting the On Screen Display Function
[ON SCREEN] ............................................... 9
Returning to the Setting Screen-1 ................ 9
Ending the System Setting Screen ............... 9
TV-Area Setting Screen .............................. 10
Selecting the Preset Bands ........................ 10
Selecting the Television Area ..................... 10
Ending the TV Area Setting Screen............ 10
Clock Adjustment Screen............................ 10
Turning the Automatic Time
Adjustment On/Off [SYNC] ......................... 10
Adjusting the Time Manually [CLOCK] ....... 10
Ending the Clock Adjustment Screen ......... 10
Code Security Screen ................................. 11
Mask Key..................................................... 11
Ending the Code Security Screen............... 11
Touch Panel Adjustment Screen ................ 12
Adjusting the Touch Position ...................... 12
RDS Setting Screen.................................... 12
News Bulletin Function with PTY
News Timeout Setting [NEWS]................... 12
Alternative Frequency Function [AF] .......... 13
Restricting RDS Region (Region Restrict
Function) [REG] .......................................... 13
Auto TP Seek Function [ATPS] .................. 13
Ending the RDS Setting Screen ................. 13
Audio Control Function ................................ 14
Audio Control Screen-1............................... 14
Adjusting the Balance and Fader Levels
[BAL/FAD] ................................................... 14
Adjusting the Bass Level [BASS]................ 14
Adjusting the Treble Level [TREBLE] ......... 14
Switching to the Audio Control Screen-2.... 14
Audio Control Screen-2............................... 14
Turning the Loudness On/Off [LOUD] ........ 14
Setting the Preout [PREOUT] ..................... 14
Setting the High-Pass Filter for
Front and Rear Output [HP-F] [HP-R] ........ 14
Adjusting the Non-Fading Preout Level
[NF-LV] ........................................................ 14
Returning to the Audio Control Screen-1 ... 14
Ending the Audio Control Screen ............... 14
TV Control Function ...................................... 15
TV Control Screen (Main) ........................... 15
Selecting the Bands .................................... 15
Selecting the Video Inputs .......................... 15
Selecting the Channels ............................... 15
Station Preset Memory ............................... 15
Recalling a Preset Station .......................... 15
Switching to the TV Control Screen............ 15
Switching to the Next Source Mode ........... 15
Switching to the Previous Source Mode..... 15
Switching to the Menu Screen .................... 15
TV Control Screen (Shift)............................ 16
Auto Memory Entry ..................................... 16

3
The control screens shown in this manual are for explanation purposes only.
The actual screens and design differ.
Contents
Selecting the Tuning Mode ......................... 16
Switching to the TV List Screen.................. 16
Switching to the Name Set Screen ............. 16
Returning to the TV Control Screen ........... 16
TV List Screen............................................. 16
Selecting the Band List ............................... 16
Selecting the Station ................................... 16
Returning to the Source Control Screen..... 16
Selecting the Channels
on the TV Picture Screen............................ 17
FM/AM Tuner Control Function.................... 18
Tuner Control Screen (Main) ...................... 18
Selecting the Bands .................................... 18
Tuning ......................................................... 18
Station Preset Memory ............................... 18
Recalling a Preset Station .......................... 18
Switching to the PTY Search Screen ......... 18
Switching to the Tuner Control Screen....... 18
Switching to the Next Source Mode ........... 18
Switching to the Previous Source Mode..... 18
Switching to the Menu Screen .................... 18
Tuner Control Screen (Shift)....................... 19
Auto Memory Entry ..................................... 19
Turning the Monaural Reception On/Off..... 19
Selecting theTuning Mode .......................... 19
Turning the Local Seek Function On/Off .... 19
Traffic Information Function ........................ 20
Presetting the Volume for Traffic Information .. 20
PTY Search Screen .................................... 21
Changing the Display Language................. 21
Selecting the Type of
Programme to be Received ........................ 21
Seeking the Selected Programme Type..... 21
Cancelling the PTY Search Screen ............ 21
Disc Changer Control Function ................... 22
Disc Changer Control Screen (Main).......... 22
Pausing and Restarting CD Play ................ 22
Track Search............................................... 22
Fast Forwarding and Reversing Disc Play.. 22
Disc Search ................................................. 22
Track Repeat Function................................ 22
Disc Repeat Function.................................. 22
Track Scan Function ................................... 22
Disc Scan Function ..................................... 23
Track Random Play Function ..................... 23
Magazine Random Play Function............... 23
Switching to the Disc Changer
Control Screen (Shift) ................................. 23
Switching to the Next Source Mode ........... 23
Switching to the Previous Source Mode..... 23
Switching to the Menu Screen .................... 23
Disc Changer Control Screen (Shift) .......... 24
Selecting the Name
or Title Display for Discs ............................. 24
To Scroll Manually....................................... 24
Selecting the Time Display for CDs............ 24
Switching to the Disc List Screen ............... 24
Switching to the Name Set Screen ............. 24
Switching to the Disc Changer
Control Screen (Main)................................. 24
Changing to the Disc List............................ 24
Disc List Screen .......................................... 25
Selecting the Disc ....................................... 25
Switching the Display for Discs................... 25
Returning to the Source Control Screen..... 25
Name Set Function ........................................ 25
Name Set Screen........................................ 25
Station Name Preset (SNPS) /
Disc Name Preset (DNPS).......................... 25
Remote Control Function ............................. 26
Basic Source Control Function ................... 26
Visual Function............................................ 26
TV Control Function .................................... 27
Tuner Control Function ............................... 27
Disc Changer Control Function................... 27
Installation...................................................... 28
Accessories ................................................. 28
Installation of Monitor Unit .......................... 29
Removing Unit............................................. 30
Connections ................................................ 31
Connection and Install Antenna Units ........ 32
Troubleshooting Guide ................................. 33
Specifications ................................................ 35

4
Reset button
Safety Precautions
Warning!
To prevent injury and/or fire, take the following pre-
cautions:
• Ensure that the unit is securely installed. Otherwise
it may fly out of place during collisions and other
jolts.
• When extending the ignition, battery or ground ca-
bles, make sure to use automotive-grade cables or
other cables with an area of 0.75mm2(AWG18) or
more to prevent cable deterioration and damage to
the cable coating.
• To prevent short circuits, never put or leave any
metallic objects (e.g., coins or metal tools) inside
the unit.
• If the unit starts to emit smoke or strange smells,
turn off the power immediately and consult your
Blaupunkt dealer.
• Do not touch the liquid crystal fluid if the LCD is
damaged or broken due to shock.
• The liquid crystal fluid may be dangerous to your
health or even fatal. If the liquid crystal fluid from
the LCD contacts your body or clothing, wash it off
with soap immediately.
Caution!
To prevent damage to the machine, take the follo-
wing precautions:
• Make sure to ground the unit to a negative 12V DC
power supply.
• Do not open the top or bottom covers of the unit.
• Do not install the unit in a spot exposed to direct
sunlight or excessive heat or humidity. Also avoid
places with too much dust or the possibility of wa-
ter splashing.
• Do not subject the faceplate to excessive shock, as
it is a piece of precision equipment.
• When replacing a fuse only use a new one with the
prescribed rating. Using a fuse with the wrong ra-
ting may cause your unit to malfunction.
• To prevent short circuits when replacing a fuse,
first disconnect the wiring harness.
• Do not use any screws except for the ones provi-
ded. The use of improper screws might result in
damage to the main unit.
• You cannot view video pictures whilst the vehicle is
moving. To enjoy TV/video pictures, find a safe
place to park and engage the parking brake.
Note
• If you experience problems during installation, con-
sult your Blaupunkt dealer.
• If the unit does not seem to be working right, try
pressing the reset button first. If that does not sol-
ve the problem, consult your Blaupunkt dealer.
Mask key
If you have transmitted the Mask Key’s signal once to
the unit in advance, you will have to transmit it once
again if the unit has been removed from the battery.
If this procedure is not carried out, the control panel of
the unit will re-open even with your vehicle’s ignition
turned off.
Caution!
Do not loose the “Mask Key’’!
If power is disconnected from the unit, correct operati-
on can only be restored by the “Mask Key’s signal”.
The “Mask Key” will also be required for service repair.
Note
If you send products in for repair that include a mask
key, make sure to present the unit together with the
mask key.
Cleaning the Unit
If the front panel gets dirty, turn off the power and wipe
the panel with a dry silicon cloth or soft cloth.
Caution!
Do not wipe the panel with a stiff cloth or a cloth dam-
pened by volatile solvents such as paint thinner and
alcohol. They can scratch the surface and/or remove
the indicator letters.
Screen brightness during low temperatures
When the temperature of the unit falls such as during
winter, the liquid crystal panel’s screen will become
darker than usual. Normal brightness will using the mo-
nitor for a whilst.
Loading and Replacing the Batteries
for the Remote
Caution!
Do not set the remote on hot places such as above the
dashboard.
Loading and Replacing the Batteries
1Use two “AAA’’ batteries.
Slide the cover while pressing downwards to
remove it as illustrated.
2Insert the batteries with the + and - poles aligned
properly following the illustration inside the case.
Caution!
Store unused batteries out of the reach of children.
Contact a doctor immediately if the battery accidentally
swallowed.
Note
• The provided batteries are intended for use in ope-
ration checking, and their service life may be short.
• When the remote controllable distance becomes
short, replace both of the batteries with new ones.

5
AUDIOVIDEO - IN -
MODE
SCRN
MENU V.SRC TV-MONITOR WIDE VISION
MODE SCRN
MENU V.SRC
,,,
,,,
yyy
yyy
Video input terminal (AV-IN 2)
(3,5ø-Mono)
Audio input terminal (AV-IN 2)
(3,5ø-Stereo)
Monitor Control Function
OPEN/CLOSE
,,,
,,,
yyy
yyy
,,,,
,,,,
yyyy
yyyy
,,,
,,,
,,,
,,,
yyy
yyy
Normal mode Full mode
Just mode Zoom mode
Cinema mode
Opening the Monitor
1Set the vehicle’s parking brake.
2Press the OPEN/CLOSE button. The monitor will
open.
Caution!
The gearshift lever or other parts may interfere with the
monitor when it opens. If so, move the gearshift lever
(being sure to do so safely) before operating the set.
(The monitor is drawn back in automatically if it
cannot be opened normally due to an obstacle.)
Note
• The monitor cannot be opened unless the parking
brake is set.
• The position to which the monitor slides or angle
when the power is turned on can be set (Refer to
the angle control screen on (Page 7).
CIosing the Monitor
Press the OPEN/CLOSE button. The monitor will
close.
Note
• The monitor cannot be opened unless the parking
brake is set.
Power Off
Hold down the OPEN/CLOSE button for one second or
more to turn the set’s power off.
Press the OPEN/CLOSE button to turn the power on.
Note
• The monitor will not retract.
Switching the Monitor’s Picture
Each time you press the V.SRC button, the monitor’s
picture switches as follows:
AV IN setting during “VD” (Page 9)
Television or Video 1 or Video 2
Navigation (RGB pictures)
AV IN setting during “NAV” (Page 9)
Television or Video 1 or Video 2
Navigation (Video 1 pictures)
Note
The video 1 will not select when the, “IN-OUT’’ switch
is set to “OUT” (Page 31).
Caution!
You cannot view television and video pictures whilst
the vehicle is moving. To enjoy television and video
pictures, find a safe place to park and engage the par-
king brake.
Switching the TV/Video Picture Mode
Each time you press the MODE button, the picture
mode switches between full (FULL), zoom (ZOOM),
just (JUST), cinema (CINEMA) and normal (NORMAL).

6
AUDIOVIDEO - IN -
MODE
SCRN
MENU V.SRC TV-MONITOR WIDE VISION
MODE SCRN
MENU V.SRC
Switching the AV Output Picture
Each time you press the V.SRC button for one second
or more, AV output picture switches as follows:
NORMAL: Picture selected from the TV
control screen
TV: Picture of television
VD2: Picture input from the front
AV-IN terminal
Note
The unit will not operate when the “IN-OUT” switch is
set to “IN” (Page 31).
Switching to the Angle/Screen Control
Screen
Pressing the SCRN button will cause the angle control
screen (monitor angle adjustment mode) or screen
control screen (screen adjustment mode) to be display-
ed on the TV or video picture.
Turning the Monitor Picture Off
Hold down the SCRN button for two seconds or more
to turn the monitor’s picture off.
Note
The picture reappears when the one of the SCRN,
MENU, MODE or V.SRC buttons is pressed.
Switching to the Source Control Screen
Press the MENU button to switch to the source control
screen.
Changing the Background of the Source
Control Screen Picture
Each time you press the MENU button, you can select
the background between 5 different patterns for the
source control screen and menu screen.
Adjusting the Volume
When the FM-AM TUNER wide vision is not connected
to the system:
Press the button to increase the volume of the built-
in speaker.
Press the button to decrease the volume of the built-
in speaker.
When the FM-AM TUNER wide vision is connected:
Press the button to increase the volume of the FM-
AM TUNER wide vision.
Press the button to decrease the volume of the FM-
AM TUNER wide vision.
Video input terminal (AV-IN 2)
(3,5ø-Mono)
Audio input terminal (AV-IN 2)
(3,5ø-Stereo)
Monitor Control Function

7
BRT
TIN
COL
OK
SCREEN CTRL ANGLE
BLK
CONT
DIM
ON
OFF
Angle Control Screen Adjusting the Picture Quality
OK
ANGLE CTRL SCREEN
AUTO
OPEN-CLOSE
ANGLE
SLIDE
ON OFF
Monitor Control Function
Adjusting the Angle Position [ANGLE]
Each time you touch [ ], the monitor slants back one
step.
Each time you touch [ ], the monitor slants forward
one step.
Note
The angle can be adjusted in 9 steps.
Adjusting the Slide Position [SLIDE]
Touch [ ] to slide the monitor one step to the front.
Touch [ ] to slide the monitor one step to the back.
Note
This slide position can be adjusted in 3 steps.
Turning the Automatic Open/Close
Function On/Off [AUTO OPEN-CLOSE]
Touch [ ON ] or [ OFF ] to switch the function on and
off.
■ON: Switch the ACC ON/OFF to open/close the
monitor.
■OFF: Use the OPEN/CLOSE button to open/close
the monitor.
Note
If the shift lever or other parts of the vehicle interfere
with the monitor when it opens, select “OFF”.
Switching to the Screen Control Screen
Touch [ SCREEN ] to switch to the screen control
screen.
Ending the Angle Control Screen
Touch [ OK ].
Brightness [BRT]
Touch [ ] for a brighter screen.
Touch [ ] for a darker screen.
Red / Green Level [TIN]
Touch [ ] for a stronger green level.
Touch [ ] for a stronger red level.
Color [COL]
Touch [ ] for a deeper color.
Touch [ ] for a paler color.
Contrast [CONT]
Touch [ ] for less contrast.
Touch [ ] for stronger contrast.
Blackness [BLK]
Touch [ ] for less blackness.
Touch [ ] for a stronger black level.
Note
• The [ COL ] and [ TIN ] cannot be adjusted for the
navigation screen or the graphic screens (Audio
source control, etc.).
• The [ TIN ] cannot be adjusted for the picture of
PAL/SECAM.
• Separate picture quality settings can be stored for
the television, video 1, video 2, graphic screens
and navigation screens and for day and night use.
Turning the Dimmer Function On/Off
Touch [ ON ] or [ OFF ] to switch the function on and
off.
■ON: Switch head light [ ON ], and switch to
nighttime viewing screen picture.
■OFF: Leave the set in nighttime viewing screen
picture.
Note
When adjusting nighttime picture quality, switch this
function ON and switch head lights [ ON ].
Switching to the Angle Control Screen
Touch [ ANGLE ] to switch to the angle control screen.
Ending the Screen Control Screen
Touch [ OK ].

8
Switching to the Menu Screen
1Press the MENU button on the monitor. The source
control screen is displayed.
2Touch [ MENU ] to switch to the menu screen.
Switching to the Setup Menu Screen
Touch [ Setup ] to switch to the setup menu screen.
Switching to the Audio Control Screen
(Only with FM-AM TUNER wide vision)
Touch [ Audio ] to switch to the audio control screen
(Page 14).
Switching to the Source Control Screen
Touch the marks to switch to the source control screen
as follows:
Touch this mark to switch to the Tuner con-
trol screen (Page 18).
Touch this mark to switch to the DAB control
screen (Page 22).
Touch this mark to switch to the T\/ control
screen (Page 15).
Touch this mark to switch to the standby
mode screen.
The mark for the currently selected source is displayed
in light pink.
Note
Up to two disc changers can be operated.
Canceling the Menu Screen
Touch [ RTN ] to switch to the source control screen
for the current source.
Menu Screen
System Setup Function
RTN
SETUP
SYSTEM
CLOCK TOUCH
SECUR I TY
RDS
TV AREA
Switching to the System Setting Screen
Touch [ SYSTEM ] to switch to the system setting
screen.
Switching to the TV Area Set
Touch [ TV AREA ] to switch to the TV area setting
screen (Page 10).
Switching to the RDS Setting
Touch [ RDS ] to switch to the RDS setting screen
(Page 12).
Switching to the Clock Adjustment
Screen
Touch [ CLOCK ] to switch to the clock adjustment
screen (Page 10).
Switching to the Touch Panel Adjustment
Screen
Touch [ TOUCH ] to switch to the panel screen
(Page 12).
Switching to the Code Security
Keep touching [ SECURITY ] for two seconds or more
to switch to the code security screen (page 11).
Canceling the Setup Menu Screen
Touch [ RTN ] to switch to the menu screen.
Setup Menu Screen

9
RTN
NAV
NORM VD2
AV- IN
AV-OUT
SP MODE
NORM NAV
SYS EMT
SP LEVEL
10
OFF
VD
TV
System Setting Screen-2System Setting Screen-1
System Setup Function
RTN
BEEP
SYS EMT
SCROLL
MANUAUTO
MANUAUTO
ON SCREEN
OFFON
Setting the AV Input [AV-IN]
Touch [ VD ] or [ NAV ] to switch the AV IN 1 terminal’s
input setting between Video and Navigation mode.
■V D: Set the video mode
■NAV: Set the navigation mode
Note
• There is no display when the unit’s “IN-OUT”
switch is set to “OUT” (Page 31).
• If a navigation unit is connected to AV IN, be sure
to set it to [ NAV ].
Setting the AV Output [AV-OUT]
Touch [ NORM ], [ TV ] or [ VD2 ]. The video of the AV
output terminal will be switched as follows:
■NORM: Picture selected from the TV control screen
■T V: Picture of the television
■VD2: Picture input from the front AV-IN terminal
Note
There is no display when the unit’s “IN-OUT’’ switch is
set to “IN” (Page 31).
Setting the Built-ln Speaker Mode
[SP MODE]
■NORM: Sound with monitor picture
■NAV: Sound with navigation
■OFF: Switch off the built-in speakers
Setting the Built-In Speaker Level
[SP LEVEL]
Touch [ ] to increase the volume.
Touch [ ] to decrease the volume.
No display when the “SP MODE’’ is set to “OFF”.
Switching to the Setting Screen-2
Touch [ ] to switch to the setting screen-2.
Ending the System Setting Screen
Touch [ RTN ] to return to the setup menu screen.
Setting the Auto Scroll Display Function
[SCROLL]
This function permits the text to be scrolled and
the entire text to be displayed. Switching between
manual scrolling and automatic scrolling is permit-
ted.
Touch [ AUTO ] or [ MANU ] to switch the function au-
tomatic and manual scrolling.
■AUTO: Automatic scrolling
■MANU: Manual scrolling
Setting the Touch Sensor Tone [BEEP]
Touch [ ON ] or [ OFF ] to switch the function on and
off.
■O N: Touch sensor tone is turned on
■OFF: Touch sensor tone is turned off
Setting the On Screen Display Function
[ON SCREEN]
Touch [ AUTO ] or [ MANU ] to switch the function bet-
ween automatic and manual.
■AUTO: When a button on the main unit or remote
control unit is pressed, or the disc track is
changed, the audio source control informati-
on is temporarily superimposed on the pic-
ture.
■MANU: When the lower centre of the screen is tou-
ched whilst a TV/video picture is displayed,
the audio source control information is tem-
porarily superimposed on the picture.
Returning to the Setting Screen-1
Touch [ ] to return to the setting screen-1.
Ending the System Setting Screen
Touch [ RTN ] to return to the setup menu screen.

10
TV-Area Setting Screen
RTN
TV ARE SAET
12 3
456
TV1
Austria Belgium
Finland
Gemany
Netherland
•
•
•
•
Norway Por tugal••
Iceland Sweden••
Sw i t ze r d•lan
Yugos la •Spain•via
•
krmneD•
TV2
Germany
Iceland
Portugal
Netherlands
Belgium
Switzerland
Sweden
Austria
Norway
Denmark
Finland
Yugoslavia
Spain
Italy
Albania
United Kingdom
Ireland
France
Russia
Poland
Hungary
Czech
Slovakia
Bulgaria
Roumania
Greece
Ending the TV Area Setting Screen
Touch [ RTN ] to return to the setup menu screen.
System Setup Function
PAL-B/G
PAL-I
SECAM-L
SECAM-D/K
SECAM-B/G
■1 (A1)
■2 (A2)
■3 (A3)
■4 (A4)
■5 (A5)
■6 (A6)
Clock Adjustment Screen
RTN
SYNC
12:00 PM
RESET
CLO KC ADJUST
CLOCK
ON OFF
12:00
CLOCK
Touch [ ] to advance
the hours.
Touch [ ] to make the
hours go back.
Touch [ ] to advance
the minutes.
Touch [ ] to make the
minutes go back.
Setting the Minutes to “00”:
Touch [ RESET ] to set the minutes to “00”.
Note
• Touch [ RESET ] whilst the minute is below “30”
rounds it off, and whilst the minute is “30” or more
rounds it up.
• No display when the “SYNC“ is set to “ON’’.
Ending the Clock Adjustment Screen
Touch [ RTN ] to return to the setup menu screen.
Selecting the Preset Bands
Touch [ TV 1 ] or [ TV 2 ]. The band switches between
the TV1 and TV2.
Selecting the Television Area
Select the area for video broadcast viewing.
Touch [ 1 ] - [ 6 ] to select the channel setting for your
country as follows:
Turning the Automatic Time Adjustment
On/Off [SYNC]
With automatic time adjustment, you can set clock
time automatically according to time data sent
from RDS stations (after receiving RDS signals for
several minutes). You can also set the time manu-
ally if the automatic time adjustment function is tu-
ned off. The factory default is automatic time adju-
stment.
Touch [ ON ] or [ OFF ] to switch the function on and
off.
■ON: Tune into an RDS station for 3 or 4 minutes.
The time adjusts automatically to the correct
local time.
■OFF: Manual adjusting.
Note
The time is not adjusted when the RDS station you are
tuned to be not transmitting a time signal. Choose an
other RDS station in such a case.
Adjusting the Time Manually
[CLOCK]

11
Code Security Screen 2Hold down the transmit button on the Mask Key
again until the full transmit level indicator lights up
in the display.
“Code APPROVED” will appear in the display, with
the Mask Key function turning on.
RTN
COD SE ECUR I TY
System ow
ng for
signal code.
ik d
ci
el
ha
cv
n
R
TN
COD SE ECUR I TY
The sys em is now
gforyour
EY signal .
input now.
n
K
e
i
s
t
K
a
i
S
e
a
A
l
w
M
P
t
R
TN
COD SE ECUR I TY
System ow
ng for
signal code.
ik d
ci
el
ha
cv
n
If you press the RESET button or remove the
battery:
The first time you turn the unit on again, “The system
in now waiting for your MASK KEY signal. Please input
now.” will appear in the display, indicating the setting
mode has been entered. Repeat steps 1 and 2 above,
and transmit the signal.
You can start operating the unit again when “Code AP-
PROVED’’ appears in the display.
Ending the Code Security Screen
Touch [ RTN ] to return to the setup menu screen.
System Setup Function
Note
• Keep the Mask Key close to the signal sensor
when you transmit the Mask Key signal.
• If the Mask Key signal does not be received cor-
rectly, the display will return to “Code rejected.
Please check MASK KEY” In this case, repeat the
procedure in step 1.
Transmission part
Transmit button
Mask Key
If you have transmitted the Mask Key’s signal once
to the unit in advance, you will have to transmit it
once again if the unit has been removed from the
battery. This function helps prevent theft.
When using the unit for the first time:
If this procedure is not carried out the control panel of
the unit will re-open even with your vehicle’s ignition
turned off.
1Hold down the transmit button on the Mask Key
until the half transmit level indicator lights up in the
display. “System now checking for valid signal
code” will be displayed.

12
Touch Panel Adjustment Screen
RESETCANCEL
TOUCH PANEL ADJUST
Please Touch
the Ce ter of
the Bu ton in
Left-Bottom Corner
n
tthe
RDS Setting Screen
RTN
RDS SETUP
NEWS 10min
AF
REG
ATPS
ON OFF
ON OFF
ON OFF
System Setup Function
Adjusting the Touch Position
The touch panel can be adjusted if the position tou-
ched and the operation performed do not match.
1 Accurately touch the mark at the lower left and the
mark at the upper right, following the instructions in
the messages.
2. When the mark at the upper right is touched the
adjustment is completed and the system setup
menu screen reappears.
Note
• If [ CANCEL ] is touched without touching the but-
ton at the lower left, the adjustment is cancelled
and the screen that was set before switching to the
system setup menu reappears.
• If [ CANCEL ] is touched after touching the button
at the lower left, the button at the lower left reap-
pears.
• If [ RESET ] is touched, the settings are reset to
the factory defaults and the setup menu screen
reappears.
RDS (Radio Data System)
RDS is a digital information system that lets you
receive signals besides those of regular radio pro-
grammes, such as network information being
transmitted from radio stations. When listening to
an RDS station (i.e., a station with RDS capability),
the programme service name of the station is dis-
played along with the frequency advising you
quickly which station is being received.
RDS (Radio Data System) stations also transmit
frequency data for the same station. When you are
making long trips, this function automatically swit-
ches to the particular frequency with the best re-
ception for the particular network of stations that
you want to listen to. The data is automatically
stored allowing you to switch quickly to the RDS
stations, broadcasting the same programme that
has better reception. These include stations stored
in the station preset memory that you often listen
to.
EON (Enhanced Other Network)
Stations that offer EON also transmit information
about other RDS station that have traffic informati-
on. When you are tuned to a station that is not
transmitting traffic information, but another RDS
station starts transmitting a traffic bulletin, the tu-
ner automatically switches to the other station for
the duration of the bulletin.
Alarm
When an emergency transmission (announcing di-
sasters, etc.) is sent, all current functions are inter-
rupted to allow the warning to be received.
News Bulletin Function with PTY News
Timeout Setting [NEWS]
You can arrange to have news bulletin interrupt
your current listening source, including other radio
stations. When the News Bulletin function is on the
PTY News Timeout setting allows you to set the in-
terval during which further news interruption
cannot take place. You can adjust the minutes from
10 to 90 minutes for each journey.

13
Changing the Function Setting:
Touch [ ] or [ ] repeatedly until the desired setting
is displayed.
Touch [ ] to increase the interval, and the [ ] to de-
crease it.
OFF ÷00 min. ÷10 min. ÷20 min. ÷30 min. ÷
40 min. ÷50 min. ÷60 min. ÷70 min. ÷80 min. ÷
90 min
(min = minutes)
When you select the news interruption timeout interval,
the News function turns on and the NEWS indicator is
displayed.
When a news bulletin is received, the NEWS indicator
will blink and reception will begin at the preset volume.
Note
• If you choose the “20min” setting, further news
bulletins will not be received for 20 minutes once
the first news bulletin is received.
Setting the interval at the “OFF” factory default in-
dicates no News Timeout will be made, meaning
that additional news bulletins will continue to be
searched for.
• This function is only available if the desired station
sends PTY-code for news bulletin or belongs to
EON-Network sending PTY-code for news bulletin.
Alternative Frequency Function [AF]
When poor reception is experienced automatically
switch to another frequencybroadcasting the same
programme in the same RDS network with better
reception.
The AF indicator is displayed when the AF function
is turned on.
Turning AF Function On/Off:
Touch [ ON ] or [ OFF ] to switch the function on and
off.
■ON: AF function is turned on.
■OFF: AF function is turned off.
When no other stations with stronger reception are
available for the same programme in the RDS network,
you may hear the incoming broadcast in bits and snat-
ches. Turn off the AF function in such a case.
Restricting RDS Region (Region Restrict
Function) [REG]
You can choose whether or not to restrict the RDS
channels, received with the AF function for a parti-
cular network, to a specific region. When the Regi-
on Restrict Function is on, the region is restricted
and the REG indicator is displayed.
Turning Region Restrict Function On/Off:
Touch [ ON ] or [ OFF ] to switch the function on and
off.
■ON: Region restrict function is turned on.
■OFF: Region restrict function is turned off.
Note
Sometimes stations in the same network broadcast dif-
ferent programmes or use different programmes ser-
vice names.
Auto TP Seek Function [ATPS]
When the Tl function is on and poor reception conditi-
ons are experienced when listening to a traffic informa-
tion station another traffic information station with bet-
ter reception will be searched for automatically. This
function is on, when unit is first powered on.
Touch [ ON ] or [ OFF ] to switch the function on and
off.
■ON: Auto TP seek function is turned on.
■OFF: Auto TP seek function is turned off.
Ending the RDS Setting Screen
Touch [ RTN ] to return to the setup menu screen.
System Setup Function

14
BASS
LR
R
F
TREBLE
AUDIO
BAL / FAD
R
TN
Audio Control Function
Audio Control Screen-1 Audio Control Screen-2
AUDIO
REA NF
LOUD
PREOUT
R
HP - F
HP-R
R
TN
150
220
-10NF - LV
ON OFF
Adjusting the Balance and Fader Levels
[BAL/FAD]
Each time you touch [ ] (L), the sound in the left
channel is emphasized.
Each time you touch [ ] (R), the sound in the right
channel is emphasized.
Each time you touch [ ] (F), the sound in the front
channel is emphasized.
Each time you touch [ ] (R), the sound in the rear
channel is emphasized.
Adjusting the Bass Level [BASS]
Each time you touch [ ], the bass level is increased.
Each time you touch [ ], the bass level is decreased.
Adjusting the Treble Level [TREBLE]
Each time you touch [ ], the treble level is increased.
Each time you touch [ ], the treble level is de-
creased.
Switching to the Audio Control Screen-2
Touch
[ ]
to switch to the audio control screen-2.
Turning the Loudness On/Off [LOUD]
This function amplifies low and high tones when
the volume is turned down.
The LOUD indicator is displayed on the source
control screen, when the loudness function is on.
Touch [ ON ] or [ OFF ] to switch the function on and
off.
■ON: Loudness function is turned on
■OFF: Loudness function is turned off
Setting the Preout [PREOUT]
Touch [ REAR ] or [ NF ] to switch the non-fading pre-
out and rear preout.
■REAR: Set the rear preout.
■NF: Set the non-fading preout.
Setting the High-Pass Filter for Front and
Rear Output [HP-F] [HP-R]
Each time you touch [ ] or [ ], you can select the
frequency to be cut, as follows:
OFF ÷40 Hz ÷60 Hz ÷80 Hz ÷100 Hz ÷
220 Hz ÷180 Hz ÷150 Hz ÷120 Hz ÷
Adjusting the Non-Fading Preout Level
[NF-LV]
Each time you touch [ ], the non-fading sound
increased.
Each time you touch [ ], the non-fading sound de-
creased.
Returning to the Audio Control Screen-1
Touch [ ] to return to the audio control screen-1.
Ending the Audio Control Screen
Touch [ RTN ] to return to the menu screen.

15
TV Control Function
TV Control Screen (Main)
MENU
TV
TV1 A1 P1 12ch
NO NAME
TV
LOUD
MANU
VD
12:00
6P5P4P3P2P1P
TI
Switching to the TV Control Screen
Touch [ ] to switch the TV control screen (Shift).
Switching to the Next Source Mode
Touch the mark located at the lower side of to
switch to the next source control screen.
Switching to the Previous Source Mode
Touch the mark located at the upper side of to
switch to the previous source control screen.
Switching to the Menu Screen
Touch [ MENU ] to switch to the menu screen.
Selecting the Bands
Touch of [ TV ] to select the band.
Each time you touch [ TV ], the band switches between
the TV1 and TV2.
Selecting the Video Inputs
Each time you touch [ VD ], the video input switches
between the video 1 and video 2.
Note
The video 1 will not select when the “IN-OUT” switch is
set to “OUT” (Page 32)
.
Selecting the Channels
Auto Seek Tuning (AUTO1)
Touch [ ] to seek for channels up the band.
Touch [ ] to seek for channels down the band.
Preset station Seek Tuning (AUTO2)
Touch [ ] to move to the next preset station (i.e.,
the one with the next highest number).
Touch [ ] to move to the last preset station (i.e.,
the one with the next lowest number).
Manual Tuning (MANU)
Touch [ ] to increase the channel by one step.
Touch [ ] to decrease the channel by one step.
Station Preset Memory
Store the channel of the station currently being li-
stened to. You can then recall that station with a
single touch of a button.
1Select the band/ station that you want to store.
2Hold down preset station number [ P1 ] – [ P6 ] on
which you want to store the station, for two secon-
ds or more.
Note
You can store 6 stations in each of the TV1 and TV2
bands.
Recalling a Preset Station
Touch the preset station number [ P1 ]- [ P6 ] for the
desired station. The number of the recalled station is
displayed.

16
MENU
TV1 P1 12ch
1
2
3
4
5
6
CTRL
TV- JAPAN
5ch
7ch
8ch
10ch VD
TV
12:00TI
INFO-TV
TV Control Function
MENU
TV
TV1 A1 P1 12ch
NO NAME
TV
MANU
VD
12:00TI
AME
SEEK
LIST
NAME
TV Control Screen (Shift) Note
You cannot operate unless the parking brake is set.
Returning to the TV Control Screen
Touch [ ] to return to the TV control screen (Main).
TV List Screen
Auto Memory Entry
You can automatically store all the receivable
channels in the band currently being listened to
and then recall them with the touch of a button la-
ter. This function is especially useful when you are
travelling and do not know what stations are
available. Up to 6 stations can be stored this way.
1Select the band for auto memory entry.
2Touch [ AME ].
[ ] and [ ] blink
3Touch [ ] or [ ] to start auto memory
entry.
The preset station numbers [ P1 ] - [ P6 ] are
shown in order.
When all the stations on a certain band have been
stored in the preset memory, the auto memory ent-
ry stops. The tuner then plays the last station recei-
ved.
Selecting the Tuning Mode
You can choose from three tuning modes: auto
seek, preset station seek, and manual. The
“AUT01” indicator is displayed when auto seek tu-
ning is selected, and the “AUT02” indicator is dis-
played when preset station seek tuning is selected.
Each time you touch [ SEEK ], the mode switches as
follows:
AUTO 1 (Auto Seek Tuning)
AUTO 2 (Preset Station Seek Tuning)
MANU (Manual Tuning)
Switching to the TV List Screen
Touch [ LIST ] to switch to the TV list screen.
Switching to the Name Set Screen
Touch [ NAME ] to switch to the name set screen
(Page 25).
Selecting the Band List
Each time you touch [ TV ], the list switches between
the TV1 and TV2.
Selecting the Station
Touch station number or name in the list for the desi-
red station. The number of the recalled station is dis-
played.
Returning to the Source Control Screen
Touch [ CTRL ] to return to the source control screen
(Shift).

17
AUDIOVIDEO - IN -
MODE
SCRN
MENU V.SRC
TV-MONITOR WIDE VISION
FM 97.5 M
EURO I NFO
Hz
AUTO2 TV1
CINEM VIDEOA
WIDE AV OUT
10ch
TV Control Function
Touch the upper centre to switch between the TV1 and TV2 bands.
Touch the left part to decrease the
channel. Touch the right part to increase the
channel.
The lower centre of the screen is touched whilst a TV/video picture is displayed the audio source pic-
ture settings, video out settings, etc., are superimposed on the picture (On Screen Display). The dis-
play turns off when the lower centre of the screen is pressed again.
Tuning mode
Audio source control information
TV band
Channel
AV output
picture mode
Screen mode
Selecting the Channels on the TV Picture Screen

18
Tuner Control Screen (Main)
MENU
FM
FM1 P1 108.0 M
FM- I NFO
Hz
TUNER
PTY
NEWS
REG
AF TIMANUST
AM
12:00
ALM
6P
1P 2P3P4P5P
TI
Switching to the Tuner Control Screen
Touch [ ] to switch to the tuner control screen (Shift).
Switching to the Next Source Mode
Touch the mark located at the lower side of to switch
to the next source control screen.
Switching to the Previous Source Mode
Touch the mark located at the upper side of to
switch to the previous source control screen.
Switching to the Menu Screen
Touch [ MENU ] to switch to the menu screen.
FM/AMTuner Control Function
Selecting the Bands
Touch either [ FM ] or [ AM ] to select the band. Each
time you touch [ FM ], the band switches between the
FM1, FM2 and the FM3.
Touch [ AM ] to select the MW and LW bands.
Tuning
Auto Seek Tuning (AUTO1)
Touch [ ] to seek increasing frequencies.
Touch [ ] to seek decreasing frequencies.
Preset Station Seek Tuning (AUTO2)
Touch [ ] to move to the next preset station (i.e.,
the one with the next highest number), and [ ] to
move to the last preset station (i.e., the one with the
next lowest number).
Manual Tuning (MANU)
Touch [ ] to increase the frequency by one step.
Touch [ ] to decrease the frequency by one step.
Note
The ST indicator is displayed when stereo broadcasts
are being received.
Station Preset Memory
Store the Frequency of the station currently being a
listened to. You can then recall that station with a
single touch of button.
1Select the band/station that you want to have
stored.
2Hold down preset station number [ P1 ]- [ P6 ] that
you want to use for the station, for two seconds or
more.
Note
You can store 6 stations in each of the FM1, FM2, FM3
and AM (MW and LW) bands.
Recalling a Preset Station
Touch the preset station number [ P1 ] – [ P6 ] for the
desired station. The number of the recalled station is
displayed.
Switching to the PTY Search Screen
Touch [PTY] to switch the PTY search screen (Page 21).

19
Tuner Control Screen (Shift)
MENU
FM
FM1 P1 108.0 M
FM- I NFO
Hz
TUNER
PTY
NEWS
REG
AF TI
ST
AM
12:00
ALM
TI
AME
MONO SEEK
LO.S
TI VOL
MANU
Selecting theTuning Mode
You can choose from three tuning modes: auto
seek, preset station seek, and manual. The
“AUTO1” indicator is displayed when auto seek tu-
ning is selected, and the “AUTO2” indicator is dis-
played when preset station seek tuning is selected.
Each time you touch [ SEEK ], the mode switches as
follows:
AUTO 1 (Auto Seek Tuning)
AUTO 2 (Preset Station Seek Tuning)
MANU (Manual Tuning)
Turning the Local Seek Function On/Off
With the local seek function turned on, auto seek
tuning skips stations with relatively poor reception.
Touch [ LO.S ] to switch the local seek function on and
off.
The LO.S indicator is displayed when the local seek
function is on.
FM/AMTuner Control Function
Auto Memory Entry
You can automatically store all the receivable fre-
quencies in the band currently being listened to,
and then recall them with the touch of a button la-
ter. This function is especially useful when you are
travelling and do not know what station are availa-
ble. Up to 6 frequencies can be stored this way.
1Select the band for auto memory entry.
2Touch [ AME].
[ ] and [ ] blink.
3
Touch [ ] or [ ] to start auto memory entry.
The preset station numbers [ P1 ]- [ P6 ] are shown
in order.
When all the stations in a certain band are stored
in the preset memory, the auto memory entry stops.
The tuner then plays the last station received.
Note
• When the AF function is turned on whilst auto me-
mory entry takes place, only RDS stations (i.e.,
stations with RDS capability) are stored. RDS stati-
ons that have been preset for FM1 cannot also be
preset in FM2 or FM3.
• When the local seek function is turned whilst auto
memory entry takes place, stations with poor re-
ception are not stored.
• When the Traffic Information function is on, only
the local traffic information station frequency will be
stored.
Turning the Monaural Reception On/Off
When poor stereo reception is experienced, this
function will reduce noise and improve listening
conditions.
Touch [ MONO ] to switch the monaural reception on
and off.
The MONO indicator is displayed when monaural re-
ception is on.

20
Traffic Information Function
You can listen to traffic information. If you are listening
to discs, they will continue playing until a traffic bulletin
is broadcast.
Turning Tl function On/Off:
Touch [ Tl ] on the control screen to turn the function
on and off.
When the function is on, the Tl indicator is turned on.
When a traffic information station is received, the Tl
indicator blinks. If you are listening to a disc when a
traffic bulletin begins, playback will be interrupted.
When the bulletin ends or poor reception causes signal
losses, the disc will continue to play again.
Switching to a Different Traffic Information Station:
Use [ ] / [ ] to make an auto seek of the Tl
stations in a certain band.
Note
• When you are listening to a disc, you cannot chan-
ge to another Tl station.
• When the auto TP seek function is turned on and
reception starts to weaken, the tuner automatically
seeks stations with better reception.
• If you are tuned to a station that is not a traffic in-
formation station itself but which provides EON
services, you can still have traffic information recei-
ved.
Presetting the Volume for Traffic Informa-
tion
News Preset the volume to be used when traffic infor-
mation/news starts to be broadcast.
1Tune into the station for which you want to set the
volume.
2Adjust the volume to the desired level.
3Keep touching [ Tl VOL ] for two seconds or more.
The volume level that the data has been stored.
Future traffic information broadcasts are heard at the
preset level.
Note
• The volume cannot be lowered by this function du-
ring tuner reception. The volume is only set when it
is louder than the listening volume of the tuner.
•
You can arrange only to listen to traffic information
/
news bulletins with at preset volume with the volu-
me set at minimum.
FM/AMTuner Control Function
Table of contents
Other Blaupunkt Monitor manuals