Bliss BHC-412F-3 User manual

ITM. / ART. 1654437
Form No. SJ-BHC-412F-3-880E-M
COLLAPSIBLE HAMMOCK CHAIR
MODEL: BHC-412F-3
READ BEFORE INSTALLING COLLAPSIBLE HAMMOCK CHAIR
m CAUTION: If you are not familiar with construction, hardware or the
use of tools, please use a qualied general contractor to install. Improper
installation may cause injury.
SAFETY FIRST: Before entering a hammock chair, inspect your hammock
chair, hardware, installation points and objects supporting your hammock
chair for wear or weakness. Proceed carefully and take your time getting
into and out of your hammock chair. Any hammock chair may tip if your
weight isn’t centered. A hammock chair is not a playground swing or a
trampoline. Excessive swinging and other rough play may result in falls
and may wear out your hammock chair and hardware prematurely. Small
children should not play unsupervised in your hammock chair.
m CAUTION: Falling and Strangulation Hazard! Hammock Chairs can be
unstable. Be careful entering and exiting your hammock chair, as injury
may result. Children can become entangled in hammock strings. Do not
leave children unattended in the hammock chair.
WEIGHT CAPACITY: 113 kg (250 lb)
CONDITIONS FOR USE OF THE PRODUCT: Camping or outdoor use.
CARE AND MAINTENANCE:
• Hammock Care and Maintenance: To prevent mildew and increase
the life of your hammock chair, store it in a dry location during
seasons and time periods when it is not in use. Avoid keeping in
direct sunlight and rain for long durations, as some fading may occur.
• Cleaning: Your hammock chair is hand washable with cold water
and a mild detergent or soap. Do not use harsh chemical cleaners
or bleach. Rinse well and let it dry thoroughly before storing. Keep
rope and loops away from fabric while cleaning.
• Wood Finish: To extend the life of the wood spreader bar, we
recommend you varnish or oil it regularly; at least once per year.
• Storage: Make sure the hammock chair is completely dry before
storing in a dry location.
INCLUDED HARDWARE:
NOTE: Before use, check for excessive rusting or twisting in hardware.
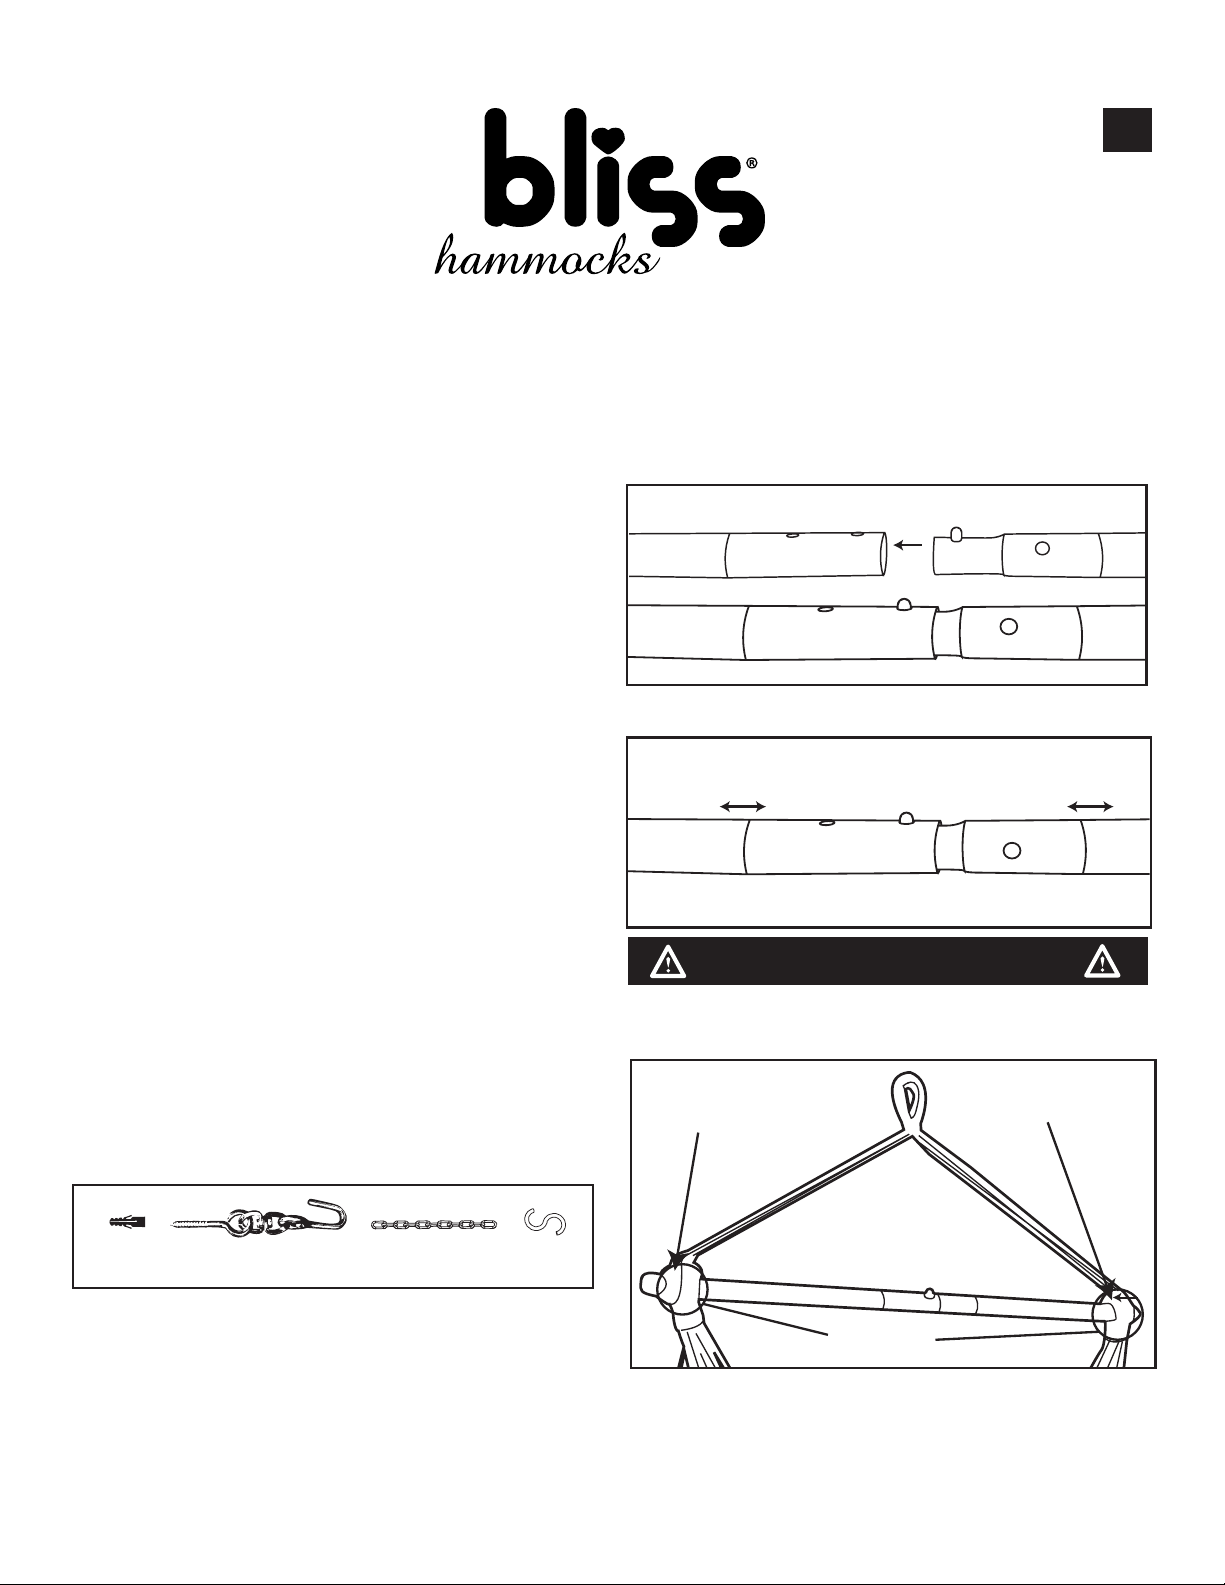
CONNECT SPREADER BAR:
1. To securely connect the spreader bar, slide one half into the other
half until you hear a click or snap (Fig. 1).
2. Make sure the spreader bar is secure before hanging the hammock
chair by pulling back and forth on both halves (Fig. 2).
1. Please make
sure rope loops are securely in the grooves that are at the
ends of the spreader bar prior to entering your hammock chair (Fig. 3).
HANGING INSTRUCTIONS:
Since most hammock chairs are handcrafted, you should measure the
overall height of your hammock chair to determine the best hanging
option for use (Fig. 4).
Approx. 60 cm / 2 ft
Molly Twisting eye screw
and hook
Chain S-hook
Fig. 1
Grooves
Fig. 2
Rope Loops Rope Loops
Fig. 3
Fig. 4
EN
IMPORTANT! RETAIN FOR FUTURE REFERENCE: READ CAREFULLY

• Tree Mounting: A hardwood tree with a branch a minimum of
30 cm / 12 in in diameter is needed. Appropriate hardware like an eye
screw and hook, or a tree strap and S-hook are needed for support
and attachment to tree. Chains and S-hooks are recommended but
may not be necessary for adjusting height of chair.
IMPORTANT: WHEN USING EYE SCREWS, MAKE
SURE TO TIGHTLY SCREW EACH EYE SCREW ALL THE
WAY INTO THE TREE.
1.
Pre-drill 5 cm / 2 in deep pilot hole using a 8 mm / 5/16" straight bit into
the bottom of a hardwood tree branch that is at least 1.8 m / 6 ft above
the ground. Hardwood tree branch should have at least a 30 cm / 12 in
diameter (or circumference that is greater than 95 cm / 37.5 in) (Fig. 5).
2. Fully insert molly into pilot hole and then hand-tighten eye screw
into the molly. To facilitate, use a screwdriver to rotate eye screw
clockwise by threading it through the eye screw's hole (Fig. 6).
3. Make sure to tighten eye screw enough to cover all threads (Fig. 7).
4. Attach the hammock chair loop to the hook. With use, your
hammock chair might stretch and may need further adjusting.
• Hammock Chair Stand: When trees and posts are not available,
the simplest way to use your hammock chair is on a hammock chair
stand. The overall height of the stand should be about 60 cm / 2 ft
taller than the overall height of your chair.
Any issues? Our customer service team is ready to help!
1-800-695-2626
Original instructions.
© 2022 Snow Joe, LLC. All rights reserved. SAVE THESE INSTRUCTIONS
Fig. 5
5 cm / 2 in
deep pilot hole
under tree branch
30 cm / 12 in
or thicker branch
Fig. 6
Fig. 7

品項/商品編號
1654437 表格編號SJ-BHC-412F-3-
880E-M
折疊式吊床椅
型號:BHC-412F-3
在組裝折疊式吊床椅前請詳細閱讀
m 注意: 若您對建築、五金器具或工具的使用並不熟悉,請由合格的總承
包商來進行安裝。若安裝不當可能會造成人員傷害。
安全第一: 在進到吊床椅上之前,請檢查您的吊床椅、硬件設備、安裝點
和吊床椅支撐物是否有磨損或結構弱點。在進出吊床椅時請放慢動作、小
心謹慎地進行。若您未將體重置於椅子中心,可能會造成任何吊床椅翻
倒。吊床椅並非遊樂場鞦韆或彈簧床。過度擺動和其他過於粗魯的動作可
能會造成摔倒,並可能過快地磨損您的吊床椅與硬體設備。不應讓幼童在
未監督的情形下於您的吊床椅上玩耍。
m 注意 : 有跌落或窒息的危險!吊床椅可能會不太穩固。進出吊床椅時
請小心謹慎,以免造成傷害。孩童可能會被吊床繩索纏住。請勿將孩童留
於吊床椅上無人看顧。
重量: 113公斤(250磅)
產品使用條件:供露營或戶外使用。
保養及維護
•吊床保養及維護: 為防止發霉並延長吊床椅壽命,在不會使用的季節
和時間段內,請將其存放於乾燥處。避免其長時間受陽光直射和雨水
沖刷,以免有褪色的可能性。
•清潔: 您可以用清水以及溫和清潔劑或肥皂手洗您的吊床椅請勿使
用刺激性的化學清潔劑或漂白劑。請將其沖洗乾淨並徹底乾燥後再收
納。清潔時,請將繩索及繩環遠離織品布料。
•木質表面處理: 為了延長木質吊桿的使用壽命,我們建議您定期
為其上清漆或塗油;每年至少進行一次。
•收納: 在您將吊床椅存放在乾燥處之前,請確保其已完全乾燥。
本產品中包含的五金零件:
注意:使用前,請檢查硬體設備是否有嚴重生鏽或變形的情形。
連接吊桿:
1. 為能安全牢固地連接吊桿,請將其中一半的吊桿滑入另外一半,直到
2. 在吊起吊床椅前,請前後拉動吊桿兩側以確保其安全穩固(圖2)。
1.
在進入吊床椅前,請確保繩環已牢牢固定在吊桿末端的凹槽中(圖3)
懸掛說明:
由於大多數吊床椅都是手工製作的,您應該測量吊床椅的
整體高度,以確定使用上的最佳懸掛方案(圖4)。
約60公分 / 2英尺
莫莉螺栓 扭轉相合的
環首螺釘與掛鉤
鍊條 S形掛鉤
您聽到「咔嗒」或「啪」的一聲(圖1)。.
圖1
凹槽
圖2
繩環 繩環
圖3
圖4
中文
重要事項 !請保留以供日後參考:請詳閱
進入吊床椅前

•懸掛用樹木:需選擇一 顆硬植木,其樹枝直徑至少須達30公分 / 12英
吋。須達30公分 / 12英吋。需要以適當五金零件如環首螺釘與掛鉤,或
是樹木懸吊帶和S形掛鉤來支撐吊床椅並將其固定於樹上。調整椅子高
度時建議可使用鍊條和S形掛鉤(但並不一定要使用)。
重要提醒:使用環首螺釘時,請確保將每個環首螺釘整根
緊緊地擰進樹上。
1.
請於離地面至少1.8公尺 / 6英尺的硬木樹枝底部,使用8毫米 / 5/16英寸的
一字型鑽頭預先鑽出5公分 / 2英寸深的定位孔。硬木樹枝的直徑應至少達
到30 公分 / 12英吋 (或周長大於95公分 / 37.5英寸)(圖5 )。
2. 請將莫莉螺栓完全插入定位孔後,手動將環首螺釘緊緊擰入莫莉螺
栓。為了方便起見,請使用螺絲刀穿過環首螺釘的孔洞中(圖6),
以順時針旋轉環首螺釘。
3. 請確保擰緊所有環首螺釘直至所有螺紋沒入(圖7)。
4. 請將吊床椅裝至掛鉤上。隨著您的使用,您的吊床椅可能會有
拉伸的情形,而可能需要進一步調整。
•吊床椅架: 當沒有合適的樹木或柱子時,使用吊床椅的最簡單方式是
用吊床椅架來支撐。支架的整體高度應比椅子的整體高度還要高約60
公分 / 2英尺。
遇到任何問題了嗎?我們的客服團隊隨時準備好為您提供協助!
1-800-695-2626
原始說明。
© 2022 Snow Joe, LLC. 保留所有權利。 請妥善保存本說明
圖5
在樹枝底部鑽出
5公分 / 2英寸深的
定位孔
直徑達
30 公分 / 12英吋
或以上的樹枝
圖6
圖7
Form No. SJ-BHC-412F-3-880S-M
SILLA-HAMACA PLEGABLE
MODÈLE: BHC-412F-3
LEA ANTES DE INSTALAR SU SILLA-HAMACA PLEGABLE
m PRECAUCIÓN: Si no tiene familiaridad con la construcción,
hardware, o el uso de herramientas, comuníquese con un contratista
general calicado para la instalación. Una instalación incorrecta puede
causar lesiones.
LA SEGURIDAD ES LO PRIMERO: Antes de sentarse en una silla-
hamaca, inspecciónela. Inspeccione además el hardware, puntos
de instalación y objetos que soportan su silla-hamaca en busca de
desgaste o puntos débiles. Proceda cuidadosamente y tómese su
tiempo al sentarse y pararse de su silla-hamaca. Cualquier silla-hamaca
puede voltearse si su peso no está centrado. Una silla-hamaca no es
un columpio o trampolín. Un balanceo excesivo y otros juegos bruscos
pueden causar caídas y desgastar prematuramente su silla-hamaca y
hardware. Los niños pequeños no deberán jugar en su silla-hamaca sin
ser supervisados.
m PRECAUCIÓ: ¡Peligro de caída y estrangulamiento! Las hamacas
pueden ser inestables. Tenga cuidad al sentarse y pararse de su hamaca
ya que puede lesionarse. Los niños pueden enredarse con las cuerdas de
la hamaca. No deje a los niños en la hamaca sin supervisión.
MÁXIMA CAPACIDAD DE PESO: 113 kg (250 lb)
CONDICIONES DE USO DEL PRODUCTO: Camping o uso al aire libre.
CUIDADO Y MANTENIMIENTO:
• Cuidado y Mantenimiento de su silla-hamaca: Su silla hamaca
se lava a mano con agua fría y un detergente o jabón suaves. No
use limpiadores agresivos o lejía. Enjuague bien y deje secar por
completo antes de guardar la silla-hamaca. Mantenga las sogas y
aros alejados de la tela durante la limpieza.
• Limpieza: Votre balancelle hamac est lavable à la main à l’eau
froide et un détergent doux ou du savon. N’utilisez ni nettoyants
chimiques corrosifs ni eau de Javel. Rincez bien et laissez sécher
complètement avant de ranger. Maintenez la corde et les boucles à
l’écart du tissu pendant le nettoyage.
• Acabado de madera: Para extender el ciclo de vida útil de la barra
separadora, le recomendamos barnizarla o aceitarla regularmente,
por lo menos una vez al año.
• Almacenamiento: Asegúrese de que la silla hamaca esté
completamente seca antes de guardarla en un lugar seco.
HARDWARE INCLUIDO:
NOTE: Antes del uso, inspeccione el hardware en busca de óxido
excesivo o torceduras anormales.
CONEXIÓN DE LA BARRA SEPARADORA: :
1. Para conectar de forma segura la barra separadora, conecte una
mitad a la otra hasta que se oiga un “clic” y ambas partes estén
trabadas (Fig. 1).
2. Inspeccione la barra separadora para garantizar de que sea segura
antes de colgar la silla hamaca jalándola varias veces (Fig. 2).
1. Asegúrese de que los bucles de las cuerdas estén asegurados en las
ranuras de los extremos de la barra separadora antes de sentarse
en su silla hamaca (Fig. 3).
Fig. 1
Ranuras
Fig. 2
Bucle Bucle
Fig. 3
cheville
à expansion
Tornillo de ojo
cerrado y gancho
Cadena Gancho
en S
ANTES DE SENTARSE
EN SU SILLA-HAMACA
ES
¡IMPORTANTE! À CONSERVER POUR FUTURE RÉFÉRENCE: LIRE ATENTIVEMENT

INSTRUCCIONES PARA EL COLGADO:
Ya que la mayoría de sillas hamacas son hechas a mano, usted debe
medir la altura total de su silla hamaca para determinar la mejor opción
de colgado para su uso. (Fig. 4).
Aproximadamente
60 cm / 2 pies
• Montura en árbol: se necesita un árbol con una rama de un mínimo
de 30 cm / 12 pulg de diámetro. Un hardware apropiado como un
tornillo de ojo cerrado y gancho, o una correa para árbol y gancho
en “S”, será necesario para la instalación de esta silla-hamaca en
un árbol. Las cadenas y ganchos en “S” son recomendados, pero
pueden no ser necesarios para ajustar la altura de la silla-hamaca.
IMPORTANTE: AL USAR TORNILLOS DE OJO CERRADO,
ASEGÚRESE DE ATORNILLAR FUERTEMENTE CADA TORNILLO
POR COMPLETO EN EL ÁRBOL. USE UN MOLLY PARA
ASEGURAR AÚN MÁS EL TORNILLO DENTRO DEL ÁRBOL.
1.
Pre-perfore un oricio guía de 5 cm / 2 pulg de profundidad usando una
broca recta de 8 mm / 5/16 pulg dentro de la parte inferior de la rama
de un árbol de madera noble al menos a 1.8 m / 6 pies sobre el suelo. La
rama de árbol de madera noble debe tener al menos un diámetro de 30
cm / 12 pulg (o una circunferencia mayor de 95 cm / 37.5 pulg) (Fig. 6).
2. Inserte por completo el molly en el agujero guía, luego ajuste con
la mano el tornillo de ojo cerrado dentro del molly. Para facilitar el
ajuste, use un destornillador para rotar el tornillo de ojo cerrado en
sentido horario, enroscándolo a través del oricio del tornillo de ojo
cerrado.
3. Asegúrese de ajustar el tornillo de ojo cerrado lo suciente como
para cubrir toda la rosca (Fig. 7).
4. Fije el lazo de la silla hamaca al gancho. Con el uso, su hamaca
puede estirarse y puede necesitar más ajustes.
• Soporte de la silla hamaca: Si no hay árboles o postes, la forma
más simple de usar su silla hamaca es con un soporte. La altura total
del soporte debe ser aproximadamente 0.6 m / 2 pies mayor que la
altura total de su silla.
¿Tiene problemas?
¡En nuestra central de servicio al cliente estamos listos para ayudarle!
1-800-695-2626
Instrucciones originales.
© 2022 Snow Joe, LLC. Derechos reservados. GUARDE ESTAS INSTRUCCIONES
Fig. 4
Agujero guía de
5 cm / 2 pulg de profundidad
debajo de la rama
Rama de más de
30 cm / 12 pulg
de diámetro
Fig. 5
Fig. 6
Fig. 7

ITM. / ART. 1654437
様式番号 SJ-BHC-412F-3-880E-M
折 り 畳 み ハ ン モック チェア
モデル:BHC-412F-3
Jp
重要!将来の参照のための保持:注意深く読む
重
重
要
要
:
:
内
内
容
容
を
を
よ
よ
く
く
読
読
み
み
、
、
後
後
で
で
参
参
照
照
で
で
き
き
る
る
よ
よ
う
う
に
に
保
保
管
管
し
し
て
て
く
く
だ
だ
さ
さ
い
い
ITM. / ART. 1654437
様式番号 SJ-BHC-412F-3-880E-M
JP
折折りり畳畳みみハハンンモモッッククチチェェアア
モモデデルル::BHC-412F-3
折
折
り
り
畳
畳
み
み
ハ
ハ
ン
ン
モ
モ
ッ
ッ
ク
ク
チ
チ
ェ
ェ
ア
ア
を
を
設
設
置
置
す
す
る
る
前
前
に
に
お
お
読
読
み
み
く
く
だ
だ
さ
さ
い
い
。
。
△
△
!注
注
意
意
:
:
組み立て、金具類、工具の使用に慣れていない方は、資格の
ある一括請負業者に設置を依頼してください。正しく設置されていない
と負傷する原因になります。
安
安
全
全
を
を
最
最
優
優
先
先
す
す
る
る
た
た
め
め
に
に
:
:
ハンモックチェアに乗る前に、ハンモック
チェア、金具類、取り付け位置、ハンモックチェアを支える物体に摩耗
がないか点検してください。ハンモックチェアへの乗り降りは注意して
ゆっくり行ってください。体重が中心にかかっていないとハンモックチ
ェアが転倒することがあります。ハンモックチェアはブランコやトラン
ポリンではありません。揺らし過ぎや乱暴な動きをすると転落し、ハン
モックチェアや金具類が早く摩耗することがあります。大人の監督がな
い状態で小さなお子様にハンモックチェアを使用させないでください。
△
△
!注
注
意
意
:
:
転落や窒息の危険!ハンモックチェアは不安定になることが
あります。負傷するおそれがあるため、ハンモックチェアへの乗り降り
の際は注意してください。お子様がハンモックの紐に巻き込まれるおそ
れがあります。ハンモックチェアにお子様がいるときは、そばを離れな
いでください。
最
最
大
大
許
許
容
容
重
重
量
量
:
:
113 kg
製
製
品
品
の
の
使
使
用
用
条
条
件
件
:
:
キャンプまたは屋外での使用。
お
お
手
手
入
入
れ
れ
と
と
メ
メ
ン
ン
テ
テ
ナ
ナ
ン
ン
ス
ス
:
:
•ハ
ハ
ン
ン
モ
モ
ッ
ッ
ク
ク
の
の
お
お
手
手
入
入
れ
れ
と
と
メ
メ
ン
ン
テ
テ
ナ
ナ
ン
ン
ス
ス
:
:
白カビの発生を防ぎ、製
品寿命を延ばすために、シーズン中や製品を使用しないときは乾
燥した場所で保管してください。退色の原因になるため、直射日
光や雨に長期間さらさないでください。
•ク
ク
リ
リ
ー
ー
ニ
ニ
ン
ン
グ
グ
:
:
ハンモックチェアは冷水とマイルドな洗剤または
石鹸で手洗いできます。刺激の強い化学洗剤や漂白剤は使用しな
いでください。よくすすぎ、完全に乾かしてから保管してくださ
い。洗うときはロープとループが布地に触れないようにしてくだ
さい。
•木
木
材
材
表
表
面
面
仕
仕
上
上
げ
げ
:
:
木製スプレッダーバーを長くお使いただくため
年1回以上、定期的にニスやオイルを塗ることをお勧めします。
•保
保
管
管
:
:
保管する前に必ずハンモックチェアを完全に乾かしてくだ
さい。乾燥した場所で保管してください。
付
付
属
属
し
し
て
て
い
い
る
る
金
金
具
具
類
類
:
:
備
備
考
考
:
:
使用する前に、金具にひどいさびやねじれがないか点検してくだ
さい。
ス
ス
プ
プ
レ
レ
ッ
ッ
ダ
ダ
ー
ー
バ
バ
ー
ー
を
を
接
接
続
続
す
す
る
る
:
:
1. スプレッダーバーをしっかり接続します。カチッと音が鳴るか、
パチンとはまるまで、一方のバーをもう一方にはめます(図 1)。
2. ハンモックチェアを吊るす前に両方のバーを前後に引き、スプレ
ッダーバーが固定されていることを確認してください(図 2)。
1. ハンモックチェアに乗る前に、スプレッダーバーの両端にある溝
にロープループがしっかり固定されていることを確認してくださ
い(図 3)。
吊
吊
り
り
下
下
げ
げ
か
か
た
た
:
:
ほとんどのハンモックチェアは手作りなので、ハンモックチェアの全高
を計測し、使用に最も適した吊り下げ位置を決める必要があります(図
4)。
図図2
図図1
図図4
約
約60cm
図図3
ロロ
ー
ー
プ
プ
ル
ル
ー
ー
プ
プ
溝
溝
ロロ
ー
ー
プ
プ
ル
ル
ー
ー
プ
プ
ハ
ハ
ン
ン
モ
モ
ッ
ッ
ク
ク
チ
チ
ェ
ェ
ア
ア
に
に
乗
乗
る
る
前
前
に
に
モリー
ツイスティングアイ
スクリュー・フック
チェーン
S
字フック

説明書
© 2022 Snow Joe, LLC.全著作権所有。 この説明書を保管してください。
•木
木
へ
へ
の
の
取
取
り
り
付
付
け
け
:
:
広葉樹の枝で直径が 30cm 以上あることが必要
です。ハンモックチェアを木に取り付けて支えるには、アイスク
リューとフック、またはツリーストラップと S字フックのよう
な、適切な金具類が必要です。チェーンと S字フックをお勧めし
ますが、チェアの高さを調節するために必要ない場合もありま
す。
重
重
要
要
:
:
ア
ア
イ
イ
ス
ス
ク
ク
リ
リ
ュ
ュ
ー
ー
を
を
使
使
う
う
と
と
き
き
は
は
、
、
必
必
ず
ず
そ
そ
れ
れ
ぞ
ぞ
れ
れ
の
の
ア
ア
イ
イ
ス
ス
ク
ク
リ
リ
ュ
ュ
ー
ー
を
を
完
完
全
全
に
に
き
き
つ
つ
く
く
木
木
に
に
ね
ね
じ
じ
込
込
ん
ん
で
で
く
く
だ
だ
さ
さ
い
い
。
。
1. 8mm のストレートビットを使い、地面からの高さが 1.8m以上あ
る広葉樹の枝の底面に深さ 5cm の下穴をあらかじめ開けておきま
す。広葉樹の枝は直径が 30cm 以上(または、周囲の長さが 95cm
以上)あることが必要です(図 5)。
2. モリーを下穴に完全に差し込み、次にアイスクリューをモリーに
手で締めます。ドライバーをアイスクリューの穴に通して時計回
りに回転させると、スムーズに作業できます(図 6)。
3. アイスクリューは必ず、ネジ溝が完全に隠れるまで締めてくださ
い(図 7)。
4. ハンモックチェアのループをフックに取り付けます。使用に伴っ
てハンモックチェアが伸び、さらに調節が必要になることがあり
ます。
•ハ
ハ
ン
ン
モ
モ
ッ
ッ
ク
ク
チ
チ
ェ
ェ
ア
ア
ス
ス
タ
タ
ン
ン
ド
ド
:
:
木や支柱を利用できない場合、ハン
モックチェアスタンドで使うのが最も簡単です。スタンドは、全
高がハンモックチェアの全高より 60cm 程度高いものをご使用く
ださい。
説明書原本
© 2022 Snow Joe, LLC. 無断転載禁止
説説明明書書をを保保管管ししててくくだだささいい
図図5
木
木
の
の
枝
枝
の
の
底
底
面
面
に
に
深
深
さ
さ
5cm の
の
下
下
穴
穴
を
を
開
開
け
け
る
る
太
太
さ
さ30cm
以
以
上
上
の
の
枝
枝
図図7
図図6

Distributed by:
Costco Wholesale Corporation
P.O. Box 34535
Seattle, WA 98124-1535
USA
1-800-774-2678
www.costco.com
Costco Wholesale UK Ltd /
Costco Online UK Ltd
Hartspring Lane
Watford, Herts
WD25 8JS
United Kingdom
01923 213113
www.costco.co.uk
Costco Wholesale Japan Ltd.
2 Kakuchi, 2 Gaiku, Kaneda-Nishi
361 Urikura, Kisarazu shi
Chiba, 292-0007 Japan
0570-200-800
www.costco.co.jp
Costco Wholesale Sweden AB
Box 614
114 11 Stockholm
Sweden
www.costco.se
Costco Wholesale Canada Ltd.*
415 W. Hunt Club Road
Ottawa, Ontario
K2E 1C5, Canada
1-800-463-3783
www.costco.ca
* faisant affaire au Québec sous
le nom les Entrepôts Costco
Costco Wholesale Spain S.L.U.
Polígono Empresarial Los Gavilanes
C/ Agustín de Betancourt, 17
28906 Getafe (Madrid) España
NIF: B86509460
900 111 155
www.costco.es
Costco Wholesale Korea, Ltd.
40, Iljik-ro
Gwangmyeong-si
Gyeonggi-do, 14347, Korea
1899-9900
www.costco.co.kr
Importado por:
Importadora Primex S.A. de C.V.
Blvd. Magnocentro No. 4
San Fernando La Herradura
Huixquilucan, Estado de México
C.P. 52765
RFC: IPR-930907-S70
(55)-5246-5500
www.costco.com.mx
Costco Wholesale Iceland ehf.
Kauptún 3-7, 210 Gardabaer
Iceland
www.costco.is
Costco Wholesale New Zealand Limite
d
2 Gunton Drive
Westgate
Auckland 0814
New Zealand
www.costco.co.nz
Costco Wholesale Australia Pty Ltd
17-21 Parramatta Road
Lidcombe NSW 2141
Australia
www.costco.com.au
Costco France
1 avenue de Bréhat
91140 Villebon-sur-Yvette
France
01 80 45 01 10
www.costco.fr
Costco (China) Investment Co., Ltd.
Room 1003, Block 2, 2388 Xiupu Road,
Pudong New Area, Shanghai
China 201315
+86-21-6257-7065
MADE IN CHINA | FABRIQUÉ EN CHINE | HECHO EN CHINA | 中国製

blisshammocks.com
Table of contents
Languages:
Popular Indoor Furnishing manuals by other brands


Sauder
Sauder North Avenue 422097 manual

Radius
Radius 700 manual

Southern Enterprises
Southern Enterprises Blakelyn JS785900TX Assembly instructions

Safavieh Furniture
Safavieh Furniture Areli ACH4004 quick start guide

LuxaFlex
LuxaFlex Roller Blinds XL Mounting instructions

HAUTAU
HAUTAU ATRIUM quick start guide


