Blockaudio LINE BLOCK User manual


2
CONTENTS
PREFACE..................................................................................................................................................................3
IMPORTANT SAFETY INSTRUCTIONS ......................................................................................................................4
TRANSPORT ............................................................................................................................................................6
UNPACKING ............................................................................................................................................................6
PACKAGE CONTENT ................................................................................................................................................6
FRONT PANELS FEATURES ......................................................................................................................................7
BACK PANELS FEATURES.........................................................................................................................................8
BLOCK REMOTE ......................................................................................................................................................9
Functions ............................................................................................................................................................9
Pairing / Unpairing..............................................................................................................................................9
Battery Replacement..........................................................................................................................................9
DISPLAY CONTENT ............................................................................................................................................... 10
Content FULL ................................................................................................................................................... 10
Content SMART ............................................................................................................................................... 10
INSTALLATION...................................................................................................................................................... 11
Placement........................................................................................................................................................ 11
Adjusting feet .................................................................................................................................................. 11
Connecting the DC Supply and Control cables ................................................................................................ 11
Connecting the Line Input / Output Cables..................................................................................................... 11
Connecting Turntable (Phono Input)............................................................................................................... 11
System Remote Control (REM)........................................................................................................................ 12
Connecting AC mains Cable............................................................................................................................. 12
OPERATION.......................................................................................................................................................... 13
Turning On/Off ................................................................................................................................................ 13
Power Supply................................................................................................................................................... 13
Select Input...................................................................................................................................................... 13
Volume Control................................................................................................................................................ 13
Mute ................................................................................................................................................................ 13
Setup Menu ..................................................................................................................................................... 13
GND LIFT switches ........................................................................................................................................... 13
SETTINGS ............................................................................................................................................................. 14
GENERAL CONTROL / NAVIGATION................................................................................................................. 14
SETUP MENU Base-Level ................................................................................................................................. 14
SETTINGS Menu............................................................................................................................................... 15
ADVANCED SETTING Menu ............................................................................................................................. 15
INPUT SETUP Menu ......................................................................................................................................... 16
DISPLAY SETUP Menu ...................................................................................................................................... 18
VOLUME CONTROL SETUP Menu .................................................................................................................... 19
SURFACE CLEANING............................................................................................................................................. 20
TROUBLESHOOTING ............................................................................................................................................ 20
SPECIFICATIONS................................................................................................................................................... 21
NOTES .................................................................................................................................................................. 21

3
PREFACE
The BLOCKAUDIO team congratulates you on your purchase of this device.
But before you start listening to your new LINE & POWER BLOCK, please read this
manual carefully so you are able to use and enjoy all functions of this unique
equipment without drawback on music quality.

4
IMPORTANT SAFETY INSTRUCTIONS
READ ALL INSTRUCTIONS: All the safety and operating instructions of your Block Audio device should be read
before power is applied to the equipment.
RETAIN THIS OWNER'S MANUAL: This safety and operating instructions should be retained for future reference.
HEED WARNINGS: All warnings on the unit and in the operating instructions should be adhered to.
FOLLOW INSTRUCTIONS: All operating and use instructions should be followed.
CLEANING: Unplug the unit from the wall outlet before cleaning.
GROUNDING: Do not defeat the safety purpose of the grounding-type plug. A grounding-type plug has two
blades and a third grounding prong. The third prong is provided for your safety. If the provided plug does not
fit into your outlet, consult an electrician for replacement of the obsolete outlet.
MAINS CABLES: Ensure that the mains cables (power supply cables) are not damaged. Never use the device if
the mains cable is damaged. Protect the mains cables from being walked on or pinched particularly at plugs,
convenience receptacles and the point where they exit from the apparatus.
LIGHTNING: Unplug this apparatus during lightning storms or when unused for long periods of time.
REPAIR: Any repairs or adjustment may only be performed by qualified personnel. The warranty will become
void if the user attempts to open and repair the apparatus. Improper intervention may interfere with the
electrical safety of the unit.
The manufacture assumes no liability for any accidents suffered by the user if the unit has been opened.
SERVICING: There are no user serviceable components inside this product. Servicing is required when the
apparatus has been damaged in any way, such as if the power-supply cord or plug is damaged, liquid has been
spilled inside the appliance or it has been exposed to moisture, the appliance does not operate normally, or
has been dropped.
To reduce the risk of fire or electric shock, DO NOT expose this apparatus to rain or moisture.
Never push anything into holes or slots in the case - this could result in an electric shock and could
cause damage of the set.
DO NOT connect any grounds (Input/Output) together, or to the chassis.
DO NOT connect the input of this preamplifier to a power amplifiers output.
5

6
TRANSPORT
Please transport the product only in the included package. Always use the provided foamed foil protection to
prevent scratches on the housing.
Please allow the equipment to adapt to the climatic conditions in your listening room before you switch on the
unit for the first time after transport.
UNPACKING
All Block Audio shipping boxes have been specially designed to protect their contents and special care has been
taken to prevent damage under normal shipping conditions. Mishandling should be evident upon inspection of
the shipping box.
We strongly recommend that you keep all original packaging in order to protect your components from damage
should you later wish to store or ship them.
PACKAGE CONTENT
Enclosed you will find the following items:
The Control Unit LINE BLOCK
The Supply Unit POWER BLOCK
The Owner’s Manual (that you are currently reading)
3 Detachable IEC Power Cords (with V-Lock)
2 Multi-pin “DC VOLT. INPUT / OUTPUT”Cables
Multi-pin “SUPPLY / CONTROL” Cable
2 “REM”Cables (System Remote Control)
Block Remote Unit
One small bubble level
Cotton gloves
Dispatch Form & Final Test Certificate

7
FRONT PANELS FEATURES
Rotary/Push Button: Turn this knob to adjust the volume level. Also used to put the Line Block into and out of
the Standby mode, for Input selection and Setup Menu navigation.
Display: Displays the selected input and the main volume level, as well as the settings menus.
IR Receiver: The IR receiver receives commands from the included remote control.
Light Sensor: This sensor receives ambient light to automatically dim Display and Status LED.
Status LED: Shows current operation mode:
•Steady light indicates - White: Battery operation, Orange: AC Mains operation (Battery Off)
•Red illuminates dimly: Standby mode
•Flashes during battery operation: Battery status Weak
•Flashes Orange: Battery Charging
•Flashes Red: Error
Adjustable feet: For accurate setup of horizontal position. Only front two feet are adjustable! See INSTALLATION
section for details.
PHONES: Headphones Output –3 pole XLR receptacle and 6.35 mm / ¼" stereo jack.
Inserting a headphone jack into this socket automatically switches off the outputs and turns off the Mono
Blocks. Other options are in the Setup Menu.
Status LED
Adjustable feet
Rotary/Push Button
Display
IR Receiver & Light Sensor
8
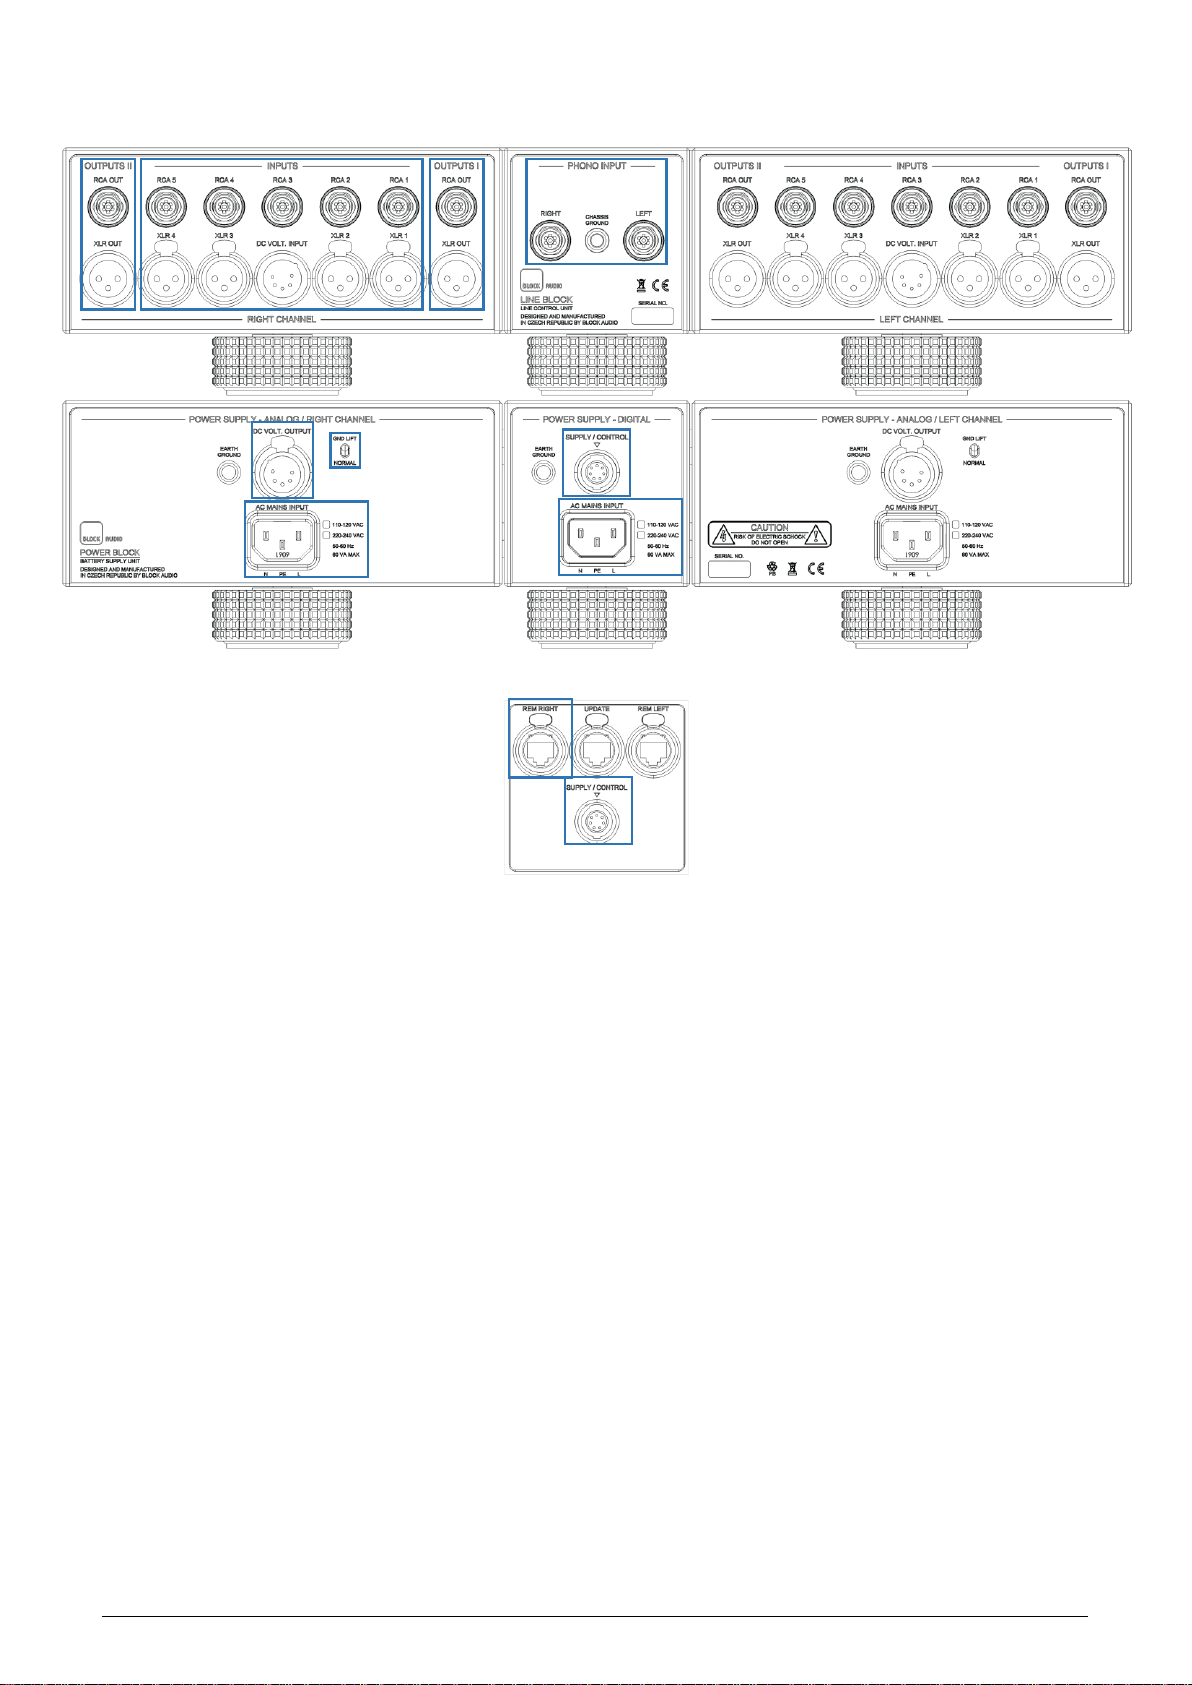
BACK PANELS FEATURES
RCA INPUTS: Unbalanced (single-ended) Input Connectors, white for left channel, red for right.
XLR INPUTS: Balanced (symmetrical) Input Connectors.
PHONO INPUT: Phono Input Connectors, white for left channel, red for right. and Phono/Chassis Ground Conn.
DC VOLT. INPUT: Power Supply Input Connector.
OUTPUTS I / II (“I” and “II” are identical):
RCA OUT: Unbalanced (single-ended) Output Connectors, white for left channel, red for right.
XLR OUT: Balanced (symmetrical) Output Connectors.
DC VOLT. OUTPUT: Power Supply Output Connectors.
SUPPLY / CONTROL: Control Interface and Power Supply for none-audio circuits.
AC MAINS INPUT: Mains supply inputs / 15 A power socket with V-Lock notch. Marking of the AC mains version.
REM LEFT / RIGHT: RJ45 connectors for system remote control.
GND LIFT / NORMAL: Ground lift switches. See OPERATION section for details.

9
BLOCK REMOTE
Functions
UP/DOWN: Press these buttons to adjust the volume level. Use also to move the cursor, or to change values in
the Settings.
LEFT/RIGHT: Press these buttons to select the desired input. Use also to move the cursor, or to change values
in the Settings.
SELECT: This button can be used to put the Line Block, or system into and out of the Standby mode. Use also to
select/enter menu item in the Settings.
MENU: Press this button to display and escape the Setup Menu.
PLAY/PAUSE: This button allows you to mute and unmute the audio signal.
Pairing / Unpairing
Open Setup Menu, choose SETTINGS > ADVANCED > PAIR REMOTE: Instructions for the Pair / Unpair of the
Block Remote with the Line Block will be displayed.
Battery Replacement
•Find the battery component on the back of your Remote.
•Use a coin to turn the battery door counterclockwise until the door opens.
•Remove the old battery.
•With the positive side facing up toward you, put in the new CR2032 or BR2032 lithium 3V coin battery
(available at most electronic and drug stores).
10
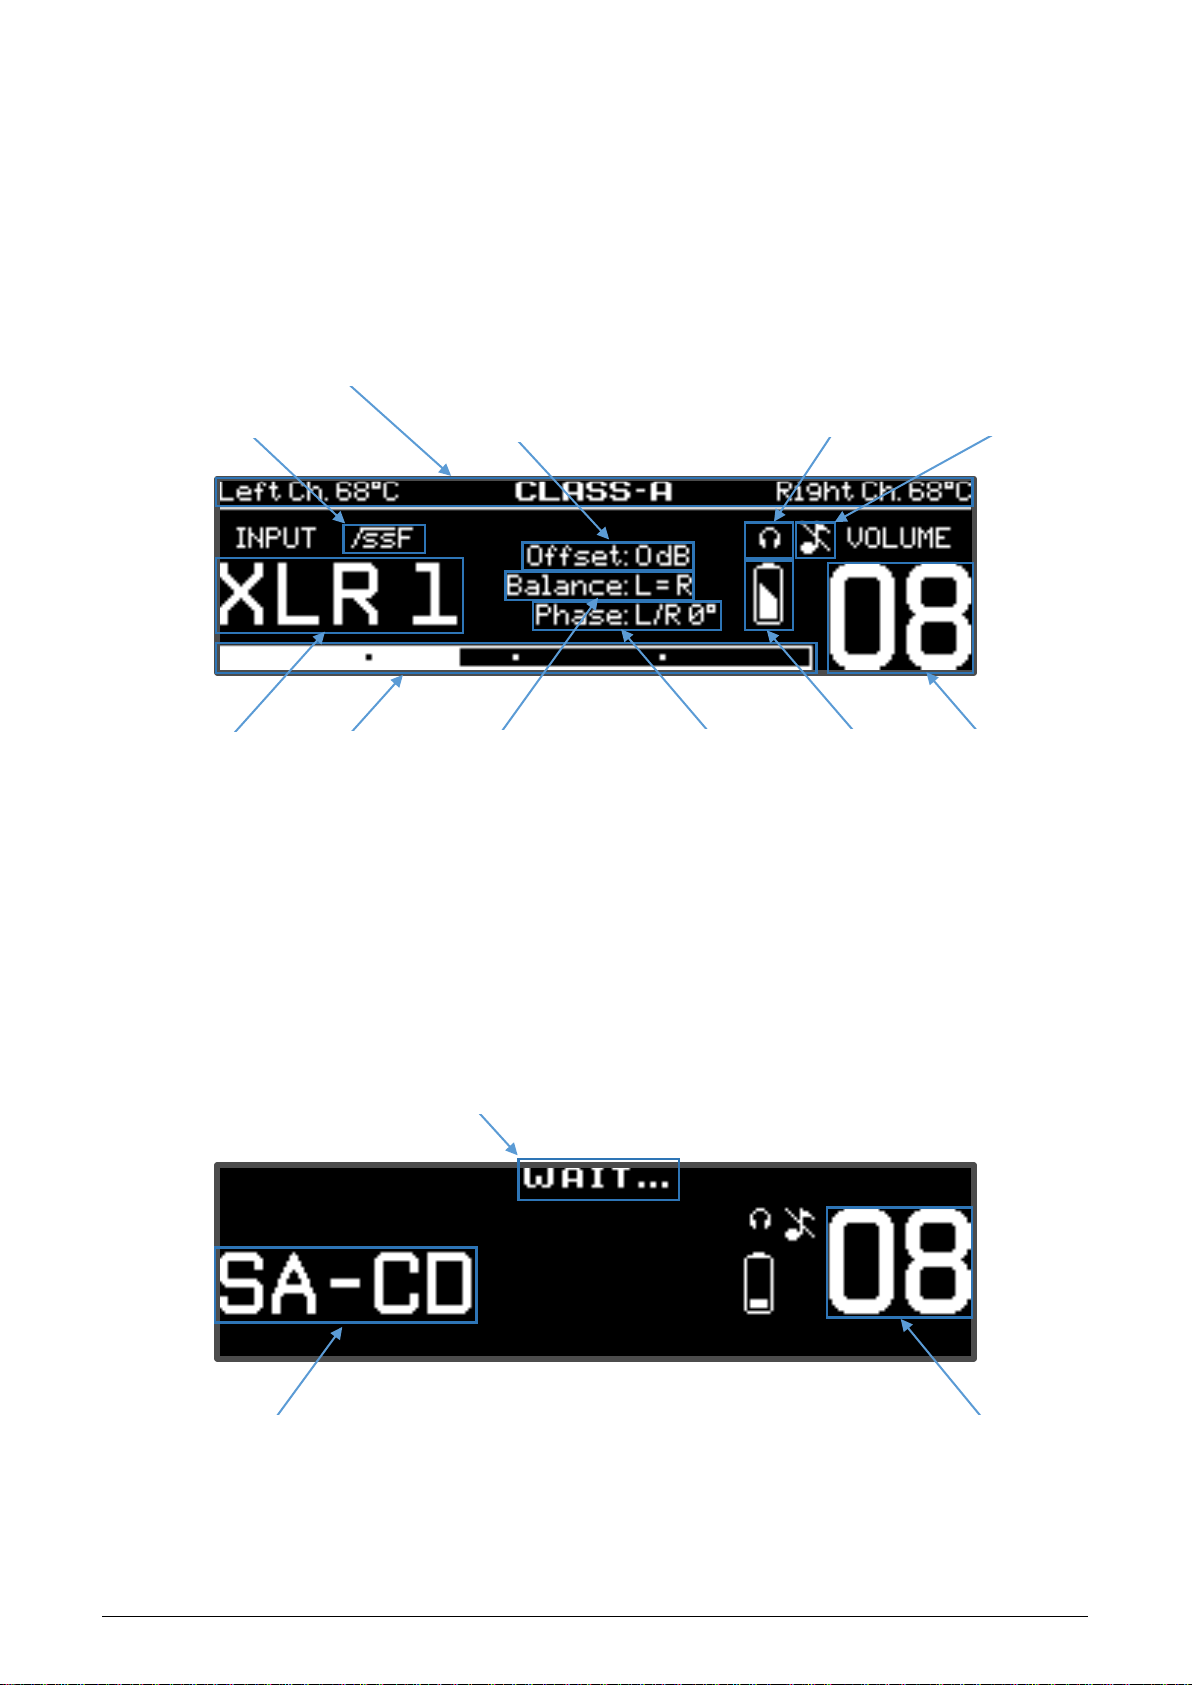
DISPLAY CONTENT
Content FULL
Content SMART
Supply Mode /
Battery Status
Volume Level
System Balance
Output Phase
Selected
Input / Source
Status-Line for Mono Block:
Power transistors temperature
and Operation Mode
Subsonic Filter Symbol
Headphones Symbol
Mute Symbol
Input Gain Offset
Volume Level
Selected Input / Source
(Customized Input Name)
Volume Bar
Temporary message while
system turns On/Off
This manual suits for next models
1
Table of contents
Other Blockaudio Amplifier manuals


