Blodgett Combi BCP User manual

GB
Service Manual
For Electric BCP Oven
“Programmable Control”

- 2 -
Table of Contents
Installation and connection Page
-Data plate & Drain connection 3
-Water connection & Electrical connection/survey of supply lines 4
Start menu 5
Main menu 6
Set-up menu 7
-Select language 8
-Setting sound 9
-Setting clock 10
-Oven set-up 11
Service menu 12
-Select USB key service 13
Restore backup 14
Select backup menu 15
Restore From Backup Menu 16
USB key service menu 17
-Energy counters 18
-Reading counters 19
Error log 20
Error statistics 3-21 21
Service counters 22
-Lime-scale diagnosis 23
-Software updating menu 24
-ClimaOptima calibration 29
-Door sensor calibration 30-31
-Technical service 32
Test function 33-39
Oven number 40
Display oven set-up 41
Edit oven set-up 42-47
Logo 49-50
Language update 51
Enter Code 52
Access Codes 52
Error Codes 53-55

- 3 -
Installation and Connections
Data Plate
When communicating with BLODGETT, we kindly ask
you inform us of the serial number of the oven that is
stated on the approval plate. The approval plate is
located on the right-hand corner post of the oven
cabinet, as shown below.
The BLODGETT Technical Support, whose experience
and expert knowledge are at your disposal, can be
contacted at tel. # 800-331-5842 and fax # 802-652-2814.
Drain connection
From the factory, the BLODGETT ovens are equipped with
a drain system that removes surplus water from the oven
chamber. This water may be condensed water from the
products, or it may occur when the oven chamber is cooled
down with cold water, or when the oven chamber is cleaned.
Connection must be carried out by an
authorised plumber, to an open or to a
closed drain.
It is recommended that a water outlet
is available/established in the floor of
the room where the oven is located.
The drain must never end directly beneath
the oven.
The drain must be of copper or an equally temperature
-resistant material, have a diameter of at least 2” (50mm)
and a fall of at least 3° or 5%.

- 4 -
Water connections
BLODGETT ovens have one or two water connections. Two is most common.
To facilitate cleaning and service, the oven should be connected with an approved flexible ¾”
hose and the permanent installations should be fitted with a stop-tap and a non-return valve.
Before connecting the oven to water, flush the tubes thoroughly. Connect the oven.
Hardness of the water: 80-100 PPM
pH level 7.0-8.0
Total Dissolvable Solids: 100 PPM
Chloride: max. 0 PPM
Sulfate: max. 40 PPM/Gal
Conductivity: min. 75 microsiemens
Water pressure: min. 36 PSI (2.5 bar) dynamic pressure (when CombiClean activated.
When CombiWash not activated: min. 22 PSI (1.5 bar), max. 87 PSI (6
bar).
Water temperature: max. 70°F (20°C)
If the water temperature exceeds 70°F (20°C), problems with regard to
ClimaOptima calibration and cooling of the oven may occur.
The water connection must be carried out by an authorised plumber in accordance
with existing rules and regulations
To ensure that the water quality is in conformity with the above requirements, the
installation of a water filter in front of the water connection to the oven is
recommended.
1) 1 connection for raw water for the condensation jet (cold water). Located at the back.
2) The installation of a particle filter (0.25mm) is also recommended.
3) 1 connection for the steam generator and the jet in the oven chamber. Must meet the
requirements applying to water supplied to household appliances; however, hot water with a
temperature not exceeding 125°F (50°C) can be used. Located at the front.
Electrical connections
When you connect the oven, you should:
Comply with federal, state and local rules and regulations.
The electrical connection must be carried out by an authorised electrician in accordance with
existing rules and regulations.
An approved plug outlet or a safety cut-out must be located close to the oven so that
the oven can be disconnected during installation and repair. The safety cut-out must be able
to cut off all poles with a total distance of break of at least 3 mm. Each of the two units in a
stacked arrangement (CombiPlus) must have its own plug outlet or safety cut-out.
The warranty does not cover incorrect connection.

- 5 -
Start Menu
For further information on the modes shown on this page, see user’s manuals
Access to main menu (see
p. 15)
Chooses next function to
the left (see user’s
manual)
Temperature down
Time down (for operation
without time setting, press
key until "-:--" appears)
Access to fan and exhaust
functions (see user’s
manual)
Not active
Not active in HOT AIR
Chooses next function to
the right (see user’s
manual)
Temperature up
Time up
Access to core
temperature mode
(see user’s manual)
Not active in HOT AIR
Access to preset programs
Start/Stop
Power switch

- 6 -
Main Menu
Please note that prior to delivery, the oven’s computer has been thoroughly tested and
correctly set up and we therefore recommend that all users, with or without a code, navigate
in the engineering with the utmost care. Incorrect handling may result in inappropriate
changes to the computer set-up.
Changing the computer set-up requires extended knowledge as to the design and structure of
the oven. If in doubt, please contact your oven supplier.
Return to start screen
See user’s manual
See user’s manual
See user’s manual
See user’s manual
Not active
Not active
Access to oven set-up
menu (see p. 16)
Access to service menu
(see p. 23)
Not active
Not active
Access to type in code (see
p. 61)
Power switch

- 7 -
Set-up Menu
Access to various settings. Avoid changing the settings inappropriately (contact your oven
supplier for further information).
Not active
Access to SETTING CLOCK
(see p. 21)
Access to OVEN SET-UP
(see p. 22)
Not active
Return to main menu
Access to SETTING
CONTRAST in display (see
p. 23)
Access to SELECTING
LANGUAGE (see p. 17)
Access to NETWORK (see p.
18-19)
Not active
Not active
Access to SETTING ALARM
(see p. 20)
Not active
Power switch

- 8 -
Select Language
Showing the languages available. The red square indicates which language has been
selected.
Return to SET-UP MENU
Selecting Danish
Selecting English
Selecting Swedish
Selecting Italian
Selecting French
Access to more languages
Selecting Icelandic
Selecting Estonian
Selecting German
Selecting Spanish
Selecting Finnish
Power switch

- 9 -
Setting Sound
Return to SET-UP MENU
Volume down
Sound frequency down
Testing sound
Not active
Not active
Confirmation of setting and
return to SET-UP MENU
Volume up
Sound frequency up
Not active
Not active
Not active
Power switch

- 10 -
Setting Clock
Return to SET-UP MENU
Not active
Not active
Move cursor to the left
Day/month/year/hours/
minutes down
Not active
Power switch
Confirmation of setting and
return to SET-UP MENU
Not active
Not active
Move cursor to the right
Day/month/year/hours/
minutes up
Not active

- 11 -
Oven Set-up
With a code for the computer, the service engineer has the option of many settings. Changing
the set-up requires extended knowledge of the BLODGETT ovens. Unnecessary or incorrect
changes to the settings may change the computer set-up inappropriately.
See Appendix 3, pp. 66 –67 for a survey of the oven set-up.
Return to SET-UP MENU
Not active
Not active
Not active
Not active
Changing status
Confirm setting, oven
starts automatically
Moving one menu up
Moving one line up
Moving one line down
Moving one menu down
Changing status
Power switch
- 12 -
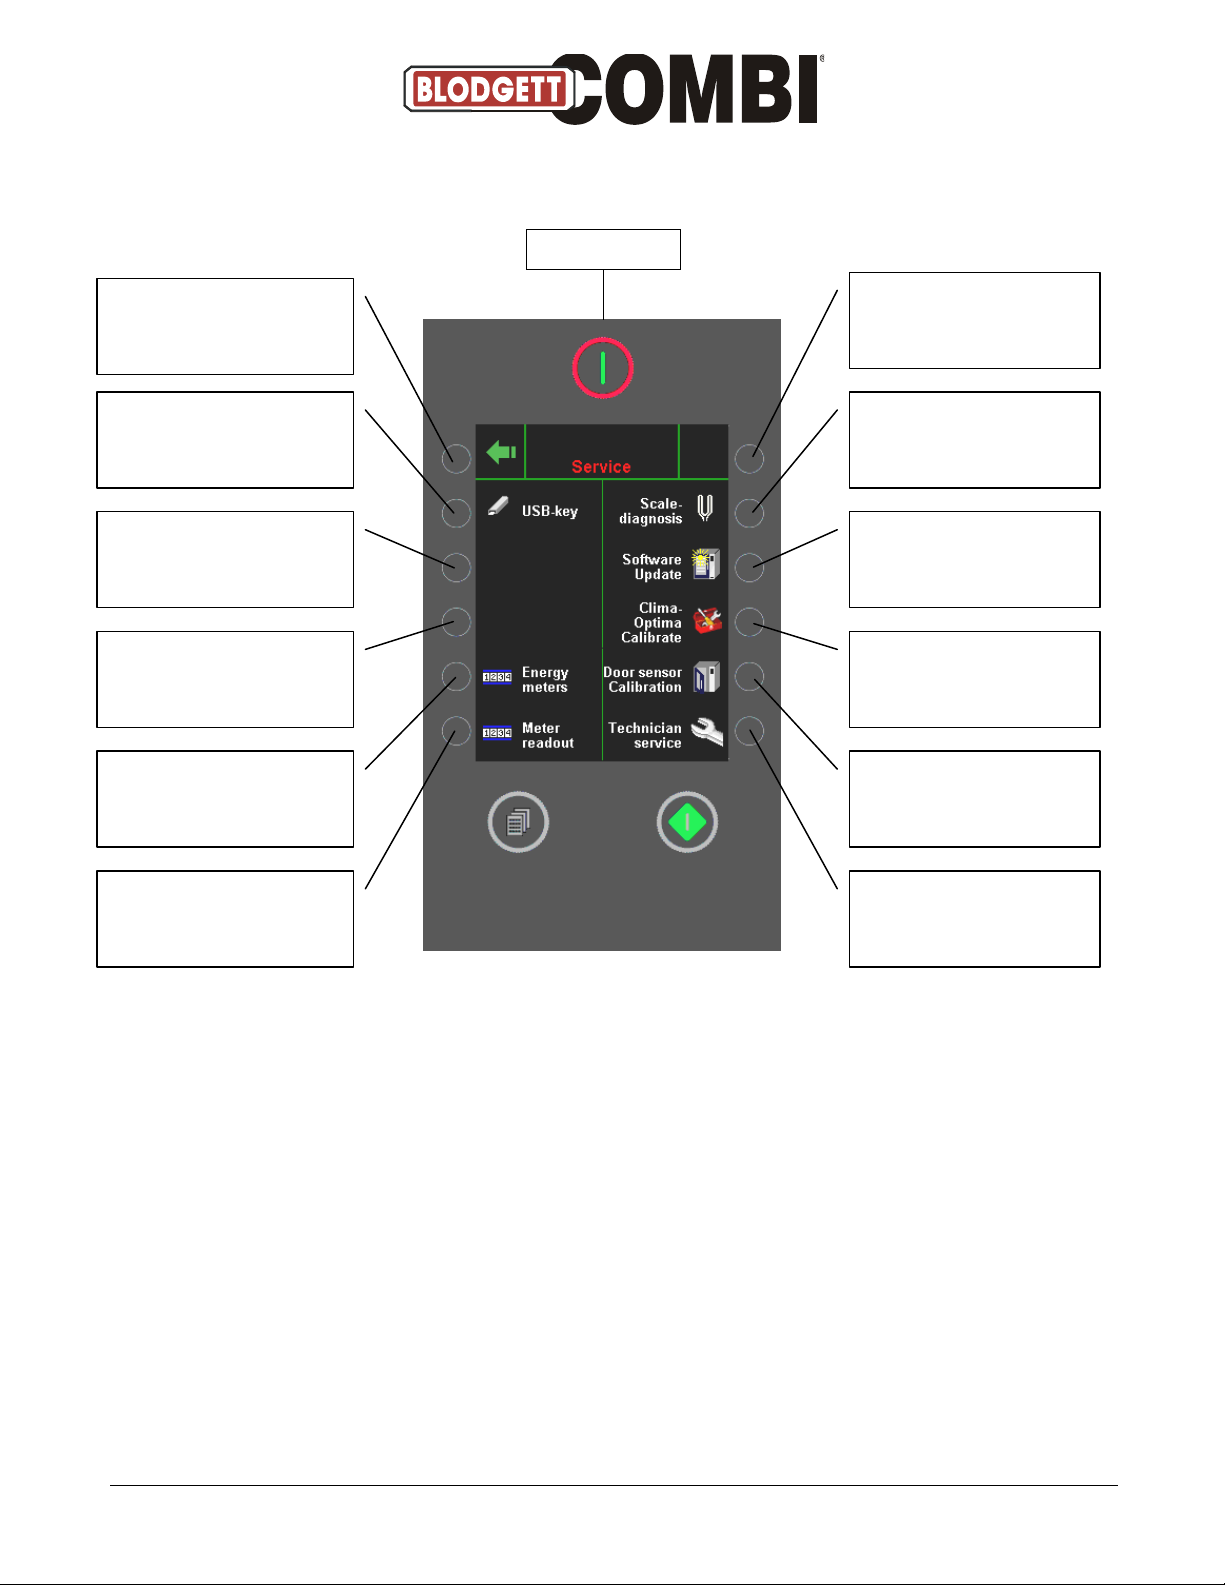
Service Menu
Access to various service functions.
USB key is only active if a USB key is inserted. If the controller does not find a USB key, the
text “USB key” will be grey.
Return to MAIN MENU
Access to USB key (see p.
24-28)
Not active
Not active
Energy counter (see p. 29)
Reading counter (see p.
30-33)
Not active
Lime-scale diagnosis (see
p. 34-35)
Software update(see p.
36-39)
ClimaOptima calibration
(see p. 40)
Door-sensor calibration
(see p. 41-42)
Access to TECHNICAL
SERVICE (see p. 43)
Power switch

- 13 -
Select USB Key Service
In this menu, you can take a backup and restore data from the backup of the oven set-up and
of the programs.
Return to SERVICE MENU
Take backup
Access to restore from
backup (see p. 27)
Access to USB key service
(see p. 28)
Not active
Not active
Not active
Retrieve recipes from USB
(see user’s manual)
Send recipes to USB (see
user’s manual)
Not active
Not active
Not active
Power switch

- 14 -
Restore Backup
In this menu, you select the oven backup to restore from.
This oven XXXXXXXXX(A/B) (ex. this oven 010755667): Shows the number of the oven in
question.
Return to SERVICE MENU
Not active
Not active
Not active
Not active
Ej aktiv
Select Oven backup and
proceed to SELECT
BACKUP MENU (see p. 26)
One line up
Not active
Not active
Not active
One line down
Power switch

- 15 -
Select Backup Menu
In this menu, you select the backup to restore from.
Format: Backup ÅÅMMDDTTMM.
Return to OVEN MENU
Not active
Not active
Not active
Not active
Not active
Select backup and proceed
to RESTORE FROM
BACKUP (see p. 27)
One line up
Not active
Not active
Not active
One line down
Power switch

- 16 -
Restore from Backup Menu
In this menu, you select the features to be restored from the backup.
Start restoring features
selected and restart when
completed.
Not active
Not active
Not active
Not active
Not active
Power switch
Return to SELECT BACKUP
MENU
Select recipes when
restoring from backup
Select counters when
restoring from backup
Select error log when
restoring from backup
Not active
Select set-up when
restoring from backup
Select ClimaOptima
calibration when restoring
from backup

- 17 -
USB Key Service Menu
This menu is a survey of the contents of the USB memory key.
With this menu, it is possible to test the USB memory key.
NOTE that when pressing Delete key, the entire contents of the key are deleted.
Return to SERVICE MENU
Not active
Not active
Not active
Not active
Select Test key
Not active
Not active
Not active
Not active
Not active
Select Delete key
Power switch

- 18 -
Energy Counters
Shows consumption of electricity –in total and since last resetting (trip).
Return to SERVICE MENU
Not active
INFO: Shows oven’s total
power consumption since
last resetting (counter
total)
Not active
INFO: Shows time of last
resetting of counter total
Not active
Not active
Not active
INFO: Shows oven’s total
power consumption since
last resetting (trip counter)
Not active
INFO: Shows time of last
resetting of trip counter.
Resetting of trip counter
Power switch

- 19 -
Reading Counters
Reading of various counters (units, consumption, errors).
Return to SERVICE MENU
Access to error log
(see p. 31)
Access to error statistics
(see p. 32)
Access to service counters
(see p. 33)
Not activ
Not active
Not active
Not active
Not active
Not active
Not active
Not active
Power switch

- 20 -
Error Log
This menu shows the last 30 errors that have occurred, the most recent one at the top.
Return to READING
COUNTERS
Not active
Not active
Not active
Ej aktiv
Ej aktiv
Move to next page
Not active
Not active
Not active
Not active
Not active
Power switch
Table of contents
Other Blodgett Combi Oven manuals

Blodgett Combi
Blodgett Combi Invoq Combi User manual

Blodgett Combi
Blodgett Combi Manual Control BCM User manual

Blodgett Combi
Blodgett Combi COS-5H User manual

Blodgett Combi
Blodgett Combi BCT Owner's manual

Blodgett Combi
Blodgett Combi COS-5H User manual

Blodgett Combi
Blodgett Combi Invoq Combi User manual

Blodgett Combi
Blodgett Combi BC14G Installation and operating manual


