Blue Horizon Profono User manual

Creators of exceptional audio accessories, inspired by our commitment to maximise
your musical enjoyment – today, tomorrow and in the future.
www.bluehorizonideas.com
profono
Profono-Instructions-Languages_La out 1 27/02/2012 15:17 Page 1

n this package you should receive:
1). Blue Horizon Profono Preamplifier
2). Power supply for Profono
3). Shunt resistors for setting your cartridge impedance
4). Blue Horizon protection & cleaning cloth
f you do not have the above or have questions please do
not hesitate to contact us at:
nhalt der Verpackung:
1). Blue Horizon Profono Vorverstärker
2). Profono Netzteil
3). Shunt-Filter zur Einstellung der Tonabnehmerimpedanz
4). Blue Horizon Schutz- und Reinigungstuch
Wenden Sie sich an uns, falls Teile fehlen sollten oder Sie
Fragen haben:
BOX CONTENTS
En esta caja usted debería recibir:
1). Preamplificador Blue Horizon Profono
2). Fuente de alimentación para Profono
3). Conmutadores para adecuarse a la impedancia
de su cápsula
4). Paño de limpieza y protección Blue Horizon
Si le faltara cualquiera de estos elementos o si tiene
cualquier pregunta, no dude en ponerse en contacto
con nosotros en: [email protected]
GB
LIEFERUMFANG
DE
CONTENIDO DEL EMBALAJE
ES
Vous devriez trouver dans ce coffret:
1). Préamplificateur phono Blue Horizon Profono
2). Alimentation pour Profono
3). Filtres shunt pour régler l'impédance en fonction
de votre cellule
4). Protection Blue Horizon & chiffon de nettoyage
S'il vous manque quelque chose ou si vous avez des
questions, veuillez nous contacter:
CONTENU DU COFFRET
FR
Profono-Instructions-Languages_La out 1 27/02/2012 15:17 Page 2

(Fig.1)
100 Ohm
470 Ohm
1000 Ohm
x3
Profono-Instructions-Languages_La out 1 27/02/2012 15:17 Page 3

Congratulations on purchasing the Blue Horizon
Profono phono preamplifier. t has been designed
and engineered to give you a natural, realistic and detailed
sound from your turntable, delivering the best quality sound
for your budget.
Profono is a high-performance phono stage offering both
Moving Magnet and Moving Coil cartridge step-up
capabilities.
Profono comes with an external power supply to minimise
noise and distortion. Power supply upgrade options will
also become available, for those who wish to attain an even
higher level of performance – please consult your local
dealer for details.
NOTE Do not connect your Profono to the mains supply
until all cables are connected, including the earth line from
your tonearm cable, as well as the impedance shunt
resistors, if required.
1). Unpack your Profono and save all packaging materials.
2). Make sure you have all of the items shown below (Fig.1).
PRODUCT INTRODUCTION
Herzlichen Glückwunsch: Sie sind nun Eigentümer
eines Blue Horizon Profone Phono-Vorverstärkers.
Wir haben den Profono mit dem Ziel entwickelt, hnen
natürlichen, realistischen und detailgetreuen Plattenspielerklang
zu ermöglichen – kurz: hochwertigen Sound zu einem
angemessenen Preis.
Die Hochleistungs-Phonostufe Profono kann mit MM- und MC-
Tonabnehmern (MM = Moving Magnet, MC = Moving Coil)
verwendet werden.
Der Lieferumfang des Profono enthält ein externes Netzteil, das
Rauschen und Verzerrungen minimiert. Wenn Sie die
Klangleistung hres Systems in Zukunft noch erhöhen möchten,
können Sie aus einer Reihe weiterer Netzteile auswählen. Bitte
wenden Sie sich dazu an hren Fachhändler vor Ort.
HINWEIS: Verbinden Sie den Profono erst mit dem Stromnetz,
wenn Sie alle Kabel, auch den Erdleiter des
Tonabnehmerarmkabels, und die mpedanz-Shunt-
Widerstände angeschlossen haben.
1). Nehmen Sie den Profono aus der Verpackung.
Bewahren Sie sämtliche Verpackungsmaterialien auf.
2). Prüfen Sie, dass alle unten abgebildeten Teile
vorhanden sind (Abb. 1).
PRODUKTBESCHREIBUNG
DEGB
Profono-Instructions-Languages_La out 1 27/02/2012 15:17 Page 4
Enhorabuena por la compra del preamplificador
de phono Profono de Blue Horizon. Ha sido
diseñado y fabricado para ofrecerle un sonido natural,
realista y detallado desde su giradiscos y obtener la mayor
calidad de sonido de acuerdo a su presupuesto.
Profono es un previo de phono de alto rendimiento que
puede trabajar con bobinas de imán y de bobina móvil.
Profono viene con un alimentador externo para minimizar
ruido y distorsión.
En un futuro también ofreceremos otras fuentes de
alimentación que le permitirán alcanzar un mejor
rendimiento – contacte con su distribuidor local para más
detalles.
ADVERTENCIA
No conecte el Profono a la red eléctrica hasta que no haya
conectado el resto de cables, incluyendo la toma de tierra
del cable del brazo, así como los conmutadores de
impedancia.
1). Desembale su Profono y guarde el material de embalaje.
2). Asegúrese de que tiene los elementos que mostramos
a continuación (Fig.1).
INTRODUCCIÓN AL PRODUCTO
ES Nous vous félicitons d'avoir choisi le
préamplificateur phono Blue Horizon Profono. l
a été conçu et construit pour donner à partir de votre
platine tourne-disque le son le plus naturel, le plus détaillé
et le plus réaliste, bref, le meilleur rapport son/prix possible.
Le Profono est une entrée phono qui accepte les cellules
à aimant mobile (MM) et à bobine mobile (MC)
Le Profono est livré avec une alimentation externe afin de
minimiser les bruits parasites et les distorsions. Pour ceux
qui cherchent des performances encore plus élevées, des
alimentations plus perfectionnées seront disponibles plus
tard.
NOTA Ne branchez pas votre Profono sur le secteur avant
d'avoir effectué toutes les connexions y compris le fil de
masse de votre bras et les filtres shunt.
1). Déballez votre Profono et conservez les
éléments d'emballage.
2). Assurez-vous d'avoir toutes les
pièces ci-dessous (Fig.1).
PRESENTATION DU PRODUIT
FR
Profono-Instructions-Languages_La out 1 27/02/2012 15:17 Page 5
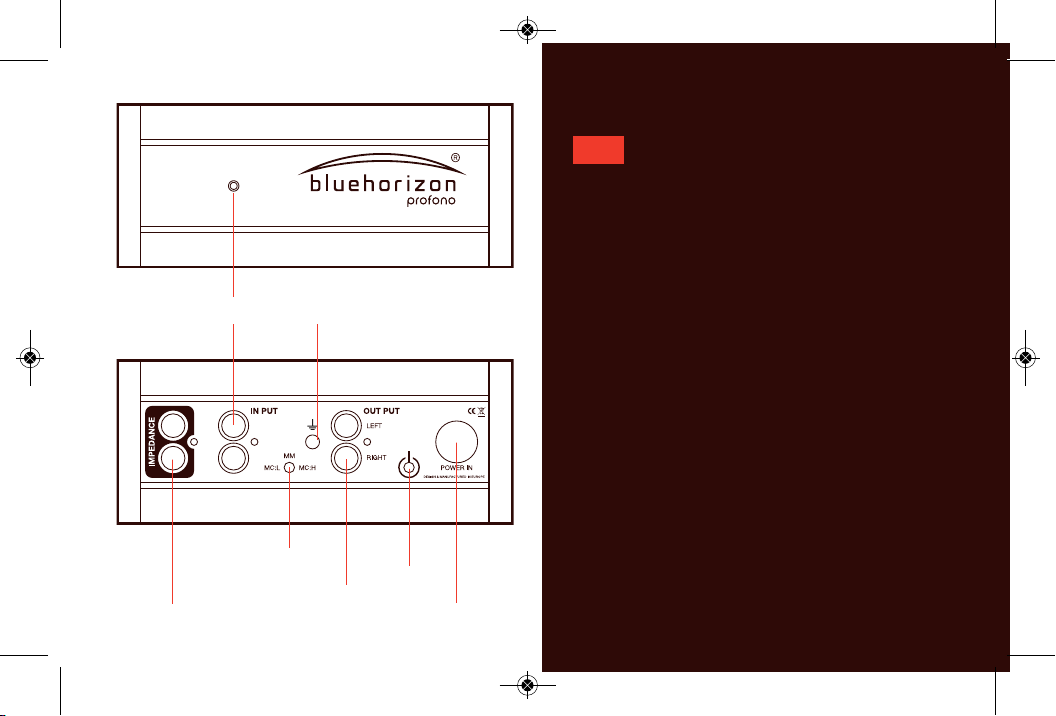
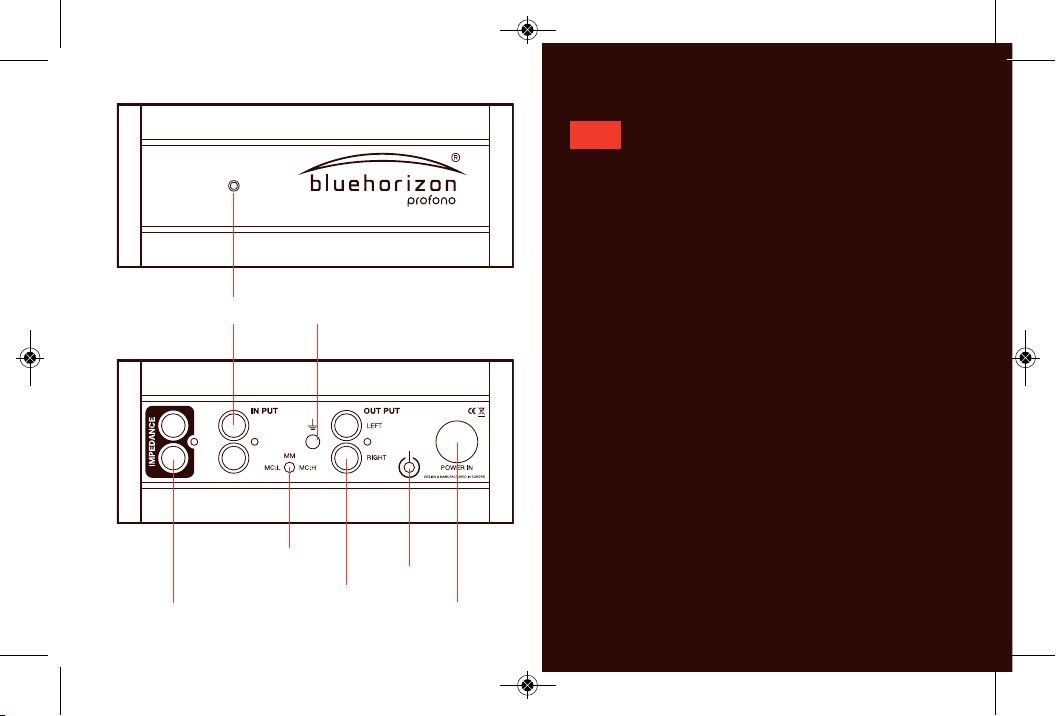
LED (Power On) ndicator
Earth PointRCA nput
MC:L / MM / MC:H
Switch On
Power Supply nputRCA mpedance Setting
RCA Output
Your Profono high-performance phono stage
uses a series of shunt resistors to set your
cartridge impedance. The input resistance is factory
set to 47kOhms. To set an alternative impedance to
suit your cartridge, simply plug the supplied shunt
resistors into the RCA sockets marked ‘ mpedance’
on the left side of the back panel – this automatically
re-calibrates the Profono. This approach is far superior
to capacitance loading switches, which tend to be
cheap and affect the purity of the signal, in addition
to being an entrance point of RF (Radio Frequency
nterference).
Between the ‘ nput’ and ‘Output’ RCA sockets are the
settings for MM and MC. There are three options for
setting cartridge gain: left is MC:L low (50dB), right is
MC:H high (61dB) and centre is MM (41dB).
The power input socket is positioned to the far right
of the back panel and slightly to the left is the power
on/off switch.
FEATURES
GB
Profono-Instructions-Languages_La out 1 27/02/2012 15:17 Page 6

Für die Einstellung der
Tonabnehmerimpedanz nutzt die Profono
Hochleistungs-Phonostufe eine Reihe von Shunt-
Widerständen. Der Eingangswiderstand ist ab Werk
auf 47 kOhm eingestellt. Um die mpedanz an hren
Tonabnehmer anzupassen, stecken Sie einfach die
mitgelieferten Shunt-Widerstände in die mit
‘ mpedance’ ( mpedanz) gekennzeichneten RCA-
Buchsen auf der linken Seite der Gehäuserückwand.
Dies kalibriert den Profono automatisch neu. Dieser
Ansatz ist Schaltern zur Anpassung verschiedener
kapazitiver Lasten deutlich überlegen. Letztere sind
in der Regel von geringer Qualität, beeinträchtigen die
Reinheit des Signals und stellen überdies einen
Eingangspunkt für RF (Funkstörung) dar.
Zwischen den RCA-Buchsen Eingang (‚ nput') und
Ausgang (‚Output’) befindet sich der MM/MC-
Umschalter. Für die Einstellung der Verstärkung des
Tonabnehmers stehen drei Optionen zur Auswahl:
links MC:L niedrig (50 dB), rechts MC:H hoch (61 dB),
Mitte MM (41 dB).
Die Netzanschlussbuchse befindet sich auf der
Gehäuserückwand ganz rechts. Links daneben ist der
Netz-Ein-/Aus-Schalter angebracht.
MERKMALE
DE
LED (Ein/ Aus - ndikator)
ErdungRCA Eingang
MC:L / MM / MC:H
Einschalten
StromeingangRCA mpedanz
RCA Ausgang
Profono-Instructions-Languages_La out 1 27/02/2012 15:17 Page 7
ndicador LED (encendido)
toma de tierraEntrada RCA
MC:L / MM / MC:H
conmutador
de encendido
Entrada de fuente
de alimentación
Configuración de la impedancia RCA
Salida RCA
Su previo de phono de alto rendimiento Profono
emplea una serie de conmutadores que le
permiten determinar la impedancia de la cápsula. La
resistencia de entrada viene determinada de fábrica en 47
kOhmios. Para seleccionar otra impedancia y adaptarse
así a su cápsula, no tiene más que conectar las resistencias
de conmutación en los terminales RCA marcados con la
palabra “ mpedance” en la parte izquierda del panel trasero
– esto automáticamente recalibra el Profono. Esta forma
de hacerlo es muy superior en resultados a los
conmutadores de capacitancia que suelen ser baratos y
afectan a la pureza de la señal, además de ser un punto
de entrada de RF (interferencias de radiofrecuencia).
Entre los terminales RCA “ nput” y “Output” está la
configuración para MM y MC. Existen tres opciones para
determinar la ganancia de la cápsula: la izquierda es MC:L
(baja, 50dB), derecha es MC:H (alta, 61dB) y el centro es
MM (41dB).
El conmutador de entrada está situado en la parte derecha
del panel trasero y un poco más a la izquierda se encuentra
el de encendido/apagado.
CARACTERÍSTICAS
ES
Profono-Instructions-Languages_La out 1 27/02/2012 15:17 Page 8

Ce préampli phono de haute qualité utilise
une série de résistances shunt pour régler
l'impédance à celle de votre cellule. La résistance
d'entrée est réglée en usine à 47 KOhms. Pour
changer celle-ci, il suffit de connecter les résistances
fournies aux prises RCA marquées " mpedance" qui
se trouvent sur le côté gauche de la face arrière. Selon
nous, cette solution est plus efficace que celle qui fait
appel à des switchs qui sont souvent de qualité
médiocre, qui nuisent à l'intégrité du signal et qui
représentent une porte grande ouverte pour les RF
(Radio Frequency nterference).
Entre les prises RCA " nput" et "Output" se trouvent
le dispositif de réglage du gain. l y a trois options : A
gauche : MC(L) Bas (50dB), Au milieu : MC(H) Haut
(61dB), A droite : MM (41dB).
La prise d'entrée secteur se trouve sur la droite de la
face arrière et un peu à gauche de celle-ci se trouve
l'interrupteur.
PARTICUARITES
FR
LED (Power On) ndicateur
Terre pointentrée RCA
MC:L / MM / MC:H
Activer
Entrée d'alimentationRCA mpédance Cadre
sortie RCA
Profono-Instructions-Languages_La out 1 27/02/2012 15:17 Page 9

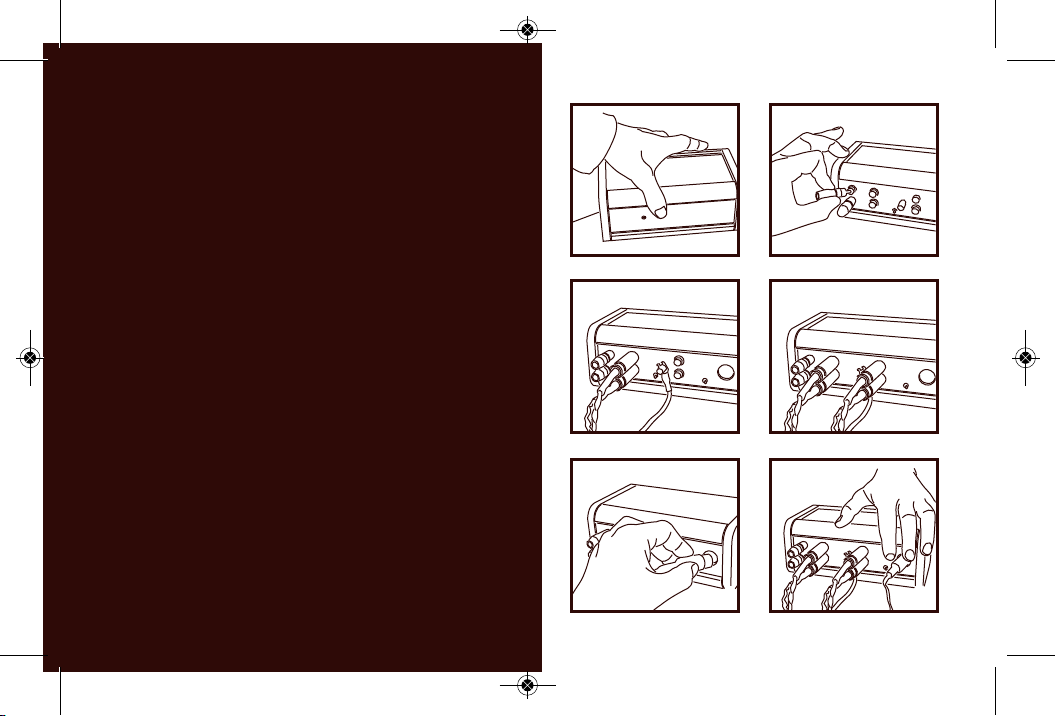
Place Profono on a flat surface, well away from water,
liquids or moisture. Should liquid make contact,
unplug and return to an authorised dealer. Positioning on a
dedicated audio rack is preferable.
Firstly, select your cartridge gain setting (MC:L, MC:H or MM)
using the small toggle switch. Then, select the correct
impedance for your cartridge by either leaving the Profono at
its factory default setting (47kOhms) or plugging in one of the
supplied shunt resistors. f you need specific impedance that
is not catered for as standard, we can supply you with shunt
resistors custom-made to your requirements. For details,
please contact us at:
Connect the cable from your tonearm to the input RCA sockets,
ensuring that the right and left channels are correctly
connected. Make sure that the earth wire is also securely
connected to the earth point on the Profono. f your earth line
has a spade connector, use the screw down facility.
Now connect an RCA interconnect cable from the Profono’s
output to a line-level input on your preamplifier or integrated
amplifier. Use the volume control of your preamplifier to control
the sound level.
Connect the power supply unit and plug it into your wall socket.
Ensure that your amplifier(s) are properly muted to prevent
possible damage to your loudspeakers.
You can now switch on the Profono. However, please wait a
further minute to allow the power supply to stabilise before un-
muting your preamp.
Before switching off the Profono, turn down your volume
control, mute your amplifier(s) and then switch off.
INSTALLATION & OPERATION
Stellen Sie den Profono auf eine ebene Oberfläche,
wo er vor Wasser, Flüssigkeiten und Feuchtigkeit
geschützt ist. Sollte der Profono mit einer Flüssigkeit in Kontakt
kommen, trennen Sie das Gerät vom Netz und bringen Sie es
zu einem autorisierten Fachhändler. Wir empfehlen die
Montage auf einem passenden Audiorack.
Wählen Sie zuerst über den kleinen Umschalter die
gewünschte Einstellung für die Tonabnehmerverstärkung
(MC:L, MC:H oder MM). Stellen Sie nun die passende
mpedanz für hren Tonabnehmer ein, indem Sie den Profono
entweder auf der Werkseinstellung (47 kOhm) belassen oder
einen der mitgelieferten Shunt-Widerstände einstecken. Wenn
Sie eine spezielle mpedanz benötigen, die nicht als Standard
vorgesehen ist, können wir speziell für hren Bedarf Shunt-
Widerstände fertigen. Wenn Sie weitere nformationen dazu
benötigen, wenden Sie sich an uns unter
INSTALLATION UND BETRIEB
DE
GB
Profono-Instructions-Languages_La out 1 27/02/2012 15:17 Page 10
Verbinden Sie das Kabel hres Tonabnehmerarms mit der RCA-
Buchse Eingang und prüfen Sie, dass der rechte und der linke
Kanal richtig angeschlossen sind. Stellen Sie sicher, dass der
Erdleiter fest mit dem Massepunkt am Profono verbunden ist.
Wenn der Erdleiter mit einem Flachstecker ausgestattet ist,
verwenden Sie die Verschraubung; wenn der Erdleiter über
einen Bananenstecker verfügt, können Sie ihn direkt einstecken.
Verbinden Sie nun den Ausgang des Profono über ein RCA-
Verbindungskabel mit einem Line-Level-Eingang am
Vorverstärker oder einem integrierten Verstärker. Die Einstellung
der Lautstärke erfolgt über den Lautstärkeregler des
Vorverstärkers.
Schließen Sie das Netzgerät an und verbinden Sie es mit der
Wandsteckdose.
Prüfen Sie, dass der (die) Verstärker stummgeschaltet ist (sind),
um möglichen Schaden an den Lautsprechern zu vermeiden.
Sie können den Profono jetzt einschalten. Sie sollten jedoch
eine weitere Minute warten, damit sich das Netzgerät
stabilisiert, bevor Sie die Stummschaltung des Vorverstärkers
deaktivieren.
Bevor Sie den Profono ausschalten, verringern Sie die
Lautstärke und schalten Sie den (die) Verstärker stumm. Jetzt
können Sie den Profono sicher ausschalten.
Profono-Instructions-Languages_La out 1 27/02/2012 15:17 Page 11
Sitúe el Profono sobre una superficie plana, bien
alejado de agua, cualquier líquido o humedad. Si por
accidente el aparato se pusiera en contacto con algún líquido,
desenchúfelo y devuélvalo a un distribuidor autorizado.
Es preferible situarlo en un rack.
Primero seleccione la ganancia adecuada para su cápsula
(MC:L, MC:H o MM) usando el pequeño conmutador. Después
seleccione la impedancia correcta para su cápsula dejando el
previo como viene de fábrica (47 kOhmios) o conectando uno
de los conmutadores suministrados. Si necesita una
impedancia específica no provista como estándar, le podemos
fabricar un conmutador que se adapte a sus necesidades. Por
favor, póngase en contacto con nosotros en
[email protected] para más detalles.
Conecte el cable de su brazo a los terminales de entrada RCA,
asegurándose de que los canales derecho e izquierdo estén
correctamente conectados. Asegúrese de que el cable de tierra
esté bien conectado a la toma de tierra del Profono. Si la línea
de tierra tiene un conector en U, use la herramienta para
desatornillar; si tiene conector banana, puede conectarlo
directamente.
Conecte ahora el cable de interconexión RCA de la salida del
Profono a la entrada de nivel de línea de su preamplificador o
amplificador integrado. Use el control de volumen de su
preamplificador para controlar el volumen del sonido.
Conecte ahora la fuente de alimentación y conéctela a la red
eléctrica.
Asegúrese de haber cancelado el sonido de su amplificador
para evitar posibles daños a sus cajas acústicas.
Ahora puede encender el Profono. Sin embargo, deberá
esperarse otro minuto para permitir que la fuente de
alimentación se estabilice antes de activar el sonido del
preamplificador.
Antes de apagar el Profono, baje el volumen, cancele la salida
de su amplificador y después apáguelo.
INSTALACIÓN Y FUNCIONAMIENTO
nstallez le Profono sur une surface plate, loin de toute
source d'humidité. En cas de contact avec un liquide,
débranchez l'appareil et retournez-le à un revendeur agréé. l
est préférable de l'installer sur un meuble hifi dédié.
Pour commencer, réglez le gain de l'appareil en fonction de
votre cellule (MC:L, MC:H, MM) à l'aide de l'interrupteur 3
positions. Ensuite sélectionnez la bonne résistance d'entrée soit
en laissant le réglage usine (47kOhms), soit en branchant l'une
des résistances shunt. Si votre cellule a besoin d'une
INSTALLATION & OPERATION
FR
ES
Profono-Instructions-Languages_La out 1 27/02/2012 15:17 Page 12

impédance particulière qui n'est pas proposée dans ce coffret,
nous pouvons fabriquer des résistances spécifiques. Dans ce
cas, contactez-nous à
Branchez le cordon de modulation de votre bras aux prises
RCA " nput" en respectant les connexions gauche/droite. Veillez
aussi à ce que le fil de masse soit connecté : si votre fil de
masse est muni d'un connecteur à fourche, utiliser le point de
masse à vis sur le Profono. Si votre fil de masse est muni d'un
connecteur "banane", utilisez la prise appropriée.
Branchez un cordon de modulation des prises RCA "Output"
du Profono vers l'une des entrées ligne de votre
préamplificateur ou amplificateur intégré. C'est le contrôle de
volume de celui-ci qui ajuste le niveau du son.
Branchez l'alimentation sur le Profono et ensuite sur votre prise
secteur.
Mettez votre amplificateur sur "mute" pour éviter
d'endommager vos enceintes.
Mettez votre Profono sous tension. Attendez une petite minute
afin que l'alimentation se stabilise avant d'enlever le "mute" de
votre ampli.
Avant d'éteindre le Profono, mettez le contrôle de volume de
votre ampli à 0, remettez-le sur "mute" et éteignez-le.
Profono-Instructions-Languages_La out 1 27/02/2012 15:17 Page 13

PRODUCT REGISTRATION
As part of our ongoing commitment to the
highest standards of customer service, Blue
Horizon offers you the opportunity to extend the standard
one-year product warranty to three years, free of charge.
Simply visit www.bluehorizonideas.com and complete the
product registration form.
Blue Horizon will not share your personal details with any
third parties without your permission.
f you do not have internet access, please forward a copy
of your invoice together with the product serial number and
your address to:
Blue Horizon deas Ltd,
4 Mozzetta,
Kings Head Yard,
Winchester,
SO23 9HN
England.
PRODUKTREGISTRIERUNG
m Rahmen unserer fortdauernden Bemühungen,
höchsten Kundendienststandards zu genügen,
bieten wir hnen bei Blue Horizon die Möglichkeit, die
Standardproduktgarantie kostenlos von zwei auf drei Jahre
zu verlängern.
Besuchen Sie einfach www.bluehorizonideas.com und
füllen Sie dort das Formular zur Produktregistrierung aus.
Blue Horizon verpflichtet sich hiermit, hre persönlichen
Daten ohne hr vorheriges Einverständnis nicht an Dritte
weiterzugeben.
Wenn Sie über keinen nternetzugang verfügen, senden
Sie einfach eine Kopie hrer Rechnung mit der
Seriennummer des Produkts und hrer Adresse an
folgende Anschrift:
Blue Horizon deas Ltd,
4 Mozzetta,
Kings Head Yard,
Winchester,
SO23 9HN
Großbritannien.
GB DE
Profono-Instructions-Languages_La out 1 27/02/2012 15:17 Page 14
REGISTRO DEL PRODUCTO
Como parte de nuestro compromiso actual
con rendir un mejor servicio al cliente, Blue
Horizon le ofrece la oportunidad de ampliar la garantía
de un año de este producto a tres años, sin coste
alguno.
Sólo tiene que visitar nuestra página web
www.bluehorizonideas.com y rellenar el formulario de
registro del producto.
Blue Horizon no compartirá sus datos personales con
nadie sin su permiso.
Si no tiene acceso a nternet, envíenos una copia de su
factura junto con el número de serie del aparato y su
dirección a:
Blue Horizon deas Ltd,
4 Mozzetta,
Kings Head Yard,
Winchester,
SO23 9HN
( nglaterra)
ES
GARANTIE & ENREGISTREMENT DU PRODUIT
Nous tenons beaucoup au service clients.
C'est pourquoi Blue Horizon vous propose
une extension gracieuse de la garantie de 1 an à 3 ans.
l suffit de visiter le site www.bluehorizonideas.com et
de compléter la fiche d'enregistrement produit.
Blue Horizon vous assure de sa discrétion absolue : vos
détails personnels ne seront pas partagés avec
d'autres organismes.
Si vous n'avez pas d'accès internet, veuillez nous faire
parvenir votre facture d'achat ainsi que le numéro de
série de l'appareil à l'adresse suivante:
Blue Horizon deas Ltd,
4 Mozzetta,
Kings Head Yard,
Winchester,
SO23 9HN
England
FR
Profono-Instructions-Languages_La out 1 27/02/2012 15:17 Page 15

© 2012 Blue Hori on Ideas Ltd, all rights reserved.
Unauthorised copy or reproduction of any part of this manual is prohibited and subject to prosecution.
TECHNICAL SPECIFICATIONS
Power Supply:
AC values min: . . . . . . . . . . . . . . . . . . . .15VAC/250mA
max: . . . . . . . . . . . . . . . . . . . . . . . . . . . . . . . . . .10VAC
DC values min: . . . . . . . . . . . . . . . . .+/- 15VDC/250mA
max: . . . . . . . . . . . . . . . . . . . . . . . . . . . . . . .+/- 24VDC
Gain:
MM: . . . . . . . . . . . . . . . . . . . . . . . . . . . . . . . .Vu: 41 dB
MC: (low) . . . . . . . . . . . . . . . . . . . . . . . . . . . .Vu: 50 dB
MC: (high) . . . . . . . . . . . . . . . . . . . . . . . . . . . .Vu: 61 dB
Input resistance: . . . . . . . . . . . . . . . . . . . . . . . . . . . . .
Default value: 47KOhm (Impedance socket open), all other
values (for MC) can e set with shunt resistors. Most
common values supplied. Exact loading upon request.
Input capacitance: . . . . . . . . . . . . . . . . . . . . . . . .47pF
Case/Housin : . . . . . . . . . . . . . . . . . . .Solid aluminium
Dimensions: . . . . . . . . .170 x 70 x 105mm (L x H x W)
Wei ht: . . . . . . . . . . . . . . . . . . . . . . . . . . . . . . . . . .1Kg
Blue Horizon is a manufacturer of professional-grade audio accessories
ased in Winchester, England.
Blue Horizon’s sound-enhancing accessories deliver class-leading
performance through innovative technology and meticulous design.
These unique products are engineered to the highest possi le standard and
designed y an award-winning team with over 100 years com ined
experience in specialist audio.
Profono-Instructions-Languages_La out 1 27/02/2012 15:17 Page 16
Table of contents


