BLUE JOY BJ48-200 User manual

BLUE JOY LITHIUM ION BATTERY BANK
USER MANUAL
51.2V 200AH
BJ48-200 BJ48-200U
After-sale service hotline:
Service Department contacts:
After-sales Service Email:[email protected]

We provide safe, well-designed and high performance standard BLUE JOY battery pack for you.
The battery Pack is compact, easy to install free of maintenance and used as the building block
of energy storage system by assembling in parallel. Battery packs are suitable for commercial
use, industrial and domestic power supply, agricultural power needs, and more.
This manual contains all the information necessary to install,use and maintain the BLUE JOY
battery. We kindly ask you to read this manual carefully before using the product.
This manual is meant for the installer and the user of the BLUE JOY battery. Only trained and
qualified staff may install and perform maintenance on the BLUE JOY battery.The BLUE JOY
battery may not be used for any purposes other than described in this manual. Using the BLUE
JOY battery for any other purpose will be considered improper use and will void the warranty of
the product. We cannot be held responsible for any damage caused by improper, incorrect or
unwise use of the product.Read and understand this manual completely before using the
product. During the use of the product, user safety should always be ensured, so installers,
users, service personnel and third parties can safely use the BLUE JOY battery.
48V 200AH LITHIUM ION BATTERY BANK
1. Technical Parameters
Model: BJ48-200(U)
Rated voltage: 51.2V
Standard capacity: 200Ah
Continuously use input current: 100A
Continuously use output current: 100A
Charging voltage: 57.6V-60V
Cut-off: 2.5V single cell
Self-Discharge( 25℃): <3%/month
Depth of discharge: Up to 95%
Charge method ( CC/CV ): Operation: -20℃—70℃; Recommendation: 10℃—45℃
Cycle life: 6000times
Warranty: 5years
Size : 1215*475*167mm
Weight:136KG
1

2
BMS is an electronic system that manages lithium ion batteries such as by protecting the battery
from operating outside its safe operating area, monitoring its state, calculating secondary data,
reporting that data, controlling its environment, authenticating it and balancing it. The high
performance of BMS is guaranteed by adopting Automotive-level chips and self-developed
sophisticated BMS software.
1)Various protection functions for charging and discharging
2)Hardware discharge over - current, short - circuit protection function processing
3)Reserve discharge control switch and discharge temperature protection position
4)Very low static consumption current
5)Smart : communication interface RS485, UART, CAN
2. Interface and protection functions
No.
2
3
4
5
6
Label
UART
CAN
RS485
+-
Functions Description
Communication with the upper computer
Communication with external devices
Communication with external devices
Meter the battery capacity,voltage,current
Name
UART communication port
External CAN communication port
External RS-485 communication port
Coulometer
Positive Pole and Negative Pole
Power button, when switched to “ON”,
the system can be activated by external
power supply;when switched to “OFF”,
the system is off.
Power button1
2.1 Battery front panel
2.2 Components
2.3.Battery Management System (BMS)
Power Button Coulometer
Bottom View
BMS
一 +
RJ45

3
Charge method ( CC/CV ): Operation: -20℃—70℃; Recommendation: 10℃—45℃
Site environment requirements: Keep away from heat source, avoid direct sunlight, no corrosive
gas, no explosive gas, no insulating gas, no insulating conductive dust.
Always check all applicable local, national, and international regulations before transporting
the BLUE JOY battery.During the transportation, protected the battery from severe vibration,
shock or squeezing during transportation, as well as to prevent sun and rain. During the loading
and unloading process, the battery should be handled lightly and protected against falling,
rolling and heavy pressure.
Follow the storage instructions in this manual to optimize the lifespan of the BLUE JOY battery during
storage. If these instructions are not followed and the BLUE JOY battery has no charge remaining
when it is checked,consider it to be damaged. Do not attempt to recharge or use it. Replace it
with a new BLUE JOY battery.
According to the characteristics of the cells, it is necessary to create a suitable environment for
the transportation of lithium iron phosphate battery packs to protect the batteries. The battery
should be stored in a dry, clean and well-ventilated warehouse at -20℃-45℃.The self-discharge
( 25°C) of the BLUE JOY battery is 3% per month.
1. Store the battery in a cool and dry place without direct sunshine.
2. Keep the battery away from corrosive substances, inflammable and explosive material as well as
hazardous gases.
3.Operating Environment
4.Transportation, storage requirements.
4.1 Transportation
4.2 Storage
5.Installation
Only those who have been trained in the power system and have a good knowledge of the power
system are allowed to install the device.Always observe local safety regulations.
Before installing or removing the device, make sure that the power system is not powered and
that the battery device is turned off. Distribution cabling should be reasonable and with protective
measures to avoid being touched during operation.
5.1.1 Installation preparation

4
The operating environment should meet the requirements described in Chapter 4, “Operating
Environment”. Otherwise, it needs to be adjusted and re-examined.
5.1.2 Checking the operating environment
Fire-fighting equipment such as portable dry powder fire extinguishers should be available near
the equipment. Do not place dangerous materials such as flammable or explosive ones near the
battery.
5.1.3 Security check:
The battery pack can only be square or wall mounted vertically. When installing the battery, be
careful not to fall or tip over. All equipment must be steady during installation.
5.3 Installation
● When the battery arrives at the installation site, it must be loaded and unloaded properly and
prevented from the direct sunshine and rain. Before installation, check if there is any component
missing according to packing list attached in the packing box and check whether the box
appearance is intact;
● Carefully handling during the unpacking. Protect the insulated coating on the case surface;
● Check the BLUE JOY battery for damage after unpacking. If there is any damage, contact your
reseller.
5.2 Unpacking
1) Four persons who lift battery out of carton, using black ribbon.
BJ48-200

5
Internal Structure
_+
BJ48-200
battery1
battery2
BMS
_
+
BJ48-200U
battery1
battery2
BMS
3)raise the front panel about 10cm and take the coulometer and switch from it .
4) It is recommended that four persons make the battery stand up.
recommended setting height:
50cm (from bottom)
2) Unscrew the screw at the grounding hole on the front panel of the battery
BJ48-200
battery1
battery2
BMS
battery1
battery2
BMS

6
a. Put the battery on the lift or chair,desk . For setting height(from bottom),It is not less than
20cm ,and the recommended setting height is 50 cm.
b. Fix the battery to the wall with four expansion screws, then put the coulometer and switch
back the front panel of the battery, and screw down fairly tight.
c. Turn on the switch, and It shows 50volt of the coulometer, that’s good product.
Before connecting the power cable, connect and disconnect the cable to identify the positive and
negative terminal, then make a mark respectively. After the cable is connected, measure whether
there is a short line or reverse connection.
Note: When the cable is inserted into the positive and negative terminals of the battery and
“Click”, the cable is firmly connected. Before pulling out the cable, press the small button next to
the terminal. When multiple batteries are connected in parallel, in order to reduce the influence of
the circular current, the overall positive and negative output cables can be connected from
different batteries.
5.4.Activation
Before activation, check again if all cables are properly and firmly connected, also make sure there
is no short circuit and reverse connection.
When the battery power is too low to be turned on, charge the battery by connecting the battery to
inverter.
●This product is a professional coulomb meter that based on battery status measurement. It
detects battery datas such as voltage, amperage, power, realtime capacity, remaining use time,
etc. With this product, you can check the exact working status of your battery anytime.
●Through scientific method and unique algorithm, it is able to measure the battery capacity
6.Column meter
6.1 Product Introduction
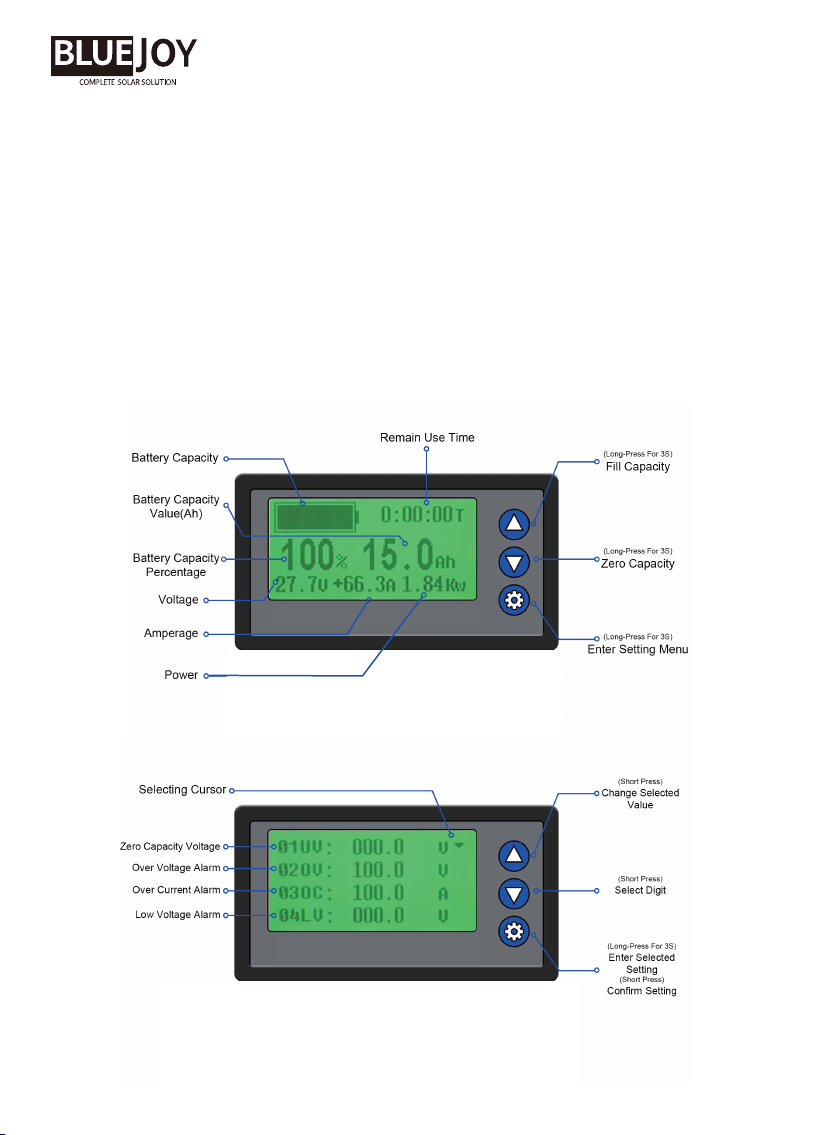
There are 14 setting objects in the setting menu. Read the setting detail chart below for details.
7
6.2 Display & Buttons
6.3 Setting Overview
accurately. The calculation is done entirely by the meter itself. No need to set the meter manually.
●Two-direction current detect. Automatically identify and detect charge and discharge current, no
need to change the wiring direction.
●Complete warning alarm. The meter has multiple settable warning alarm such as over voltage
alarm, over current alarm, low voltage alarm, low capacity alarm, high temperature alarm, etc.
●Cut-off memory. Auto-memorizing the battery capacity value and percentage before the power
cuts off.
●Visualized setting menu. Easy setting voltage, amperage, temperature or reset the meter through
the LCD monitor.

8
6.4 Setting Detail Chart
Object Setting
Range Default Notes
LOCK/
UNLOCK
NO/YES
0
LOCK
NO
0.0-100V
0.0-100V 100V
0-Range
maximum
0.0V
Range maxi
mum
0.0-99.9V 0.0V
01ZV
(Zero Capacity
voltage)
02OV
(Over Voltage
Alarm)
Alarm)
Alarm)
Alarm)
03OC
(Over Amperage
04LV
(Low Voltage
05LB
(Low Capacity
06HT(High
Temperature
Alarm)
07VC
(Voltage
Fine-tuning)
08CC
(Amperage
Fine-tuning)
09CZ
(Zero Amperage
Adjust)
10TC
(Temperature
Fine-tuning)
11CA
(Battery Actual
Capacity)
12FV
(Full Capacity
Voltage)
13LK
(Menu Lock)
14DF
(Reset Default
Setting)
0-100%
-9 - 99℃
0%
99℃
When the battery voltage is lower than this value,
the capacity would be set to 0%.
When the battery voltage is higher than this value and the
voltage number flashes, the beeper rings every 0.5s.
When the battery amperage is higher than this value and the
amperage number flashes, the beeper rings every 0.5s.
When the battery voltage is lower than this value and the
voltage number flashes, the beeper rings every 0.5s.
When the battery capacity is lower than this value and the capacity
percentage and the battery icon flashes, the beeper rings every 0.5s.
When the battery temperature is higher than this value and the
temperature number flashes, the beeper rings every 0.5s.
(This model does not equipped with this function).
When the displayed voltage does not fit the actual voltage,
it can be fine-tuned within certain range.
When the displayed amperage does not fit the actual amperage,
it can be fine-tuned within certain range.
When the battery is empty but the amperage is not at “0”,
it needs to be adjusted.
When the displayed temperature does not fit the actual
temperature, it can be fine-tuned within certain range.
(This model does not equipped with this function).
Object 01-12 can only be adjusted when the menu lock is on.
Choose “YES” to reset all the setting to default.
Battery’s actual capacity.
When the battery voltage is higher than this value, the capacity
percentage would be set to 100%. (Only works in “Manual-mode”).
Auto-mode (simple, suggested mode)
This mode is easy for everyone, we suggest customers use the monitor in this mode.
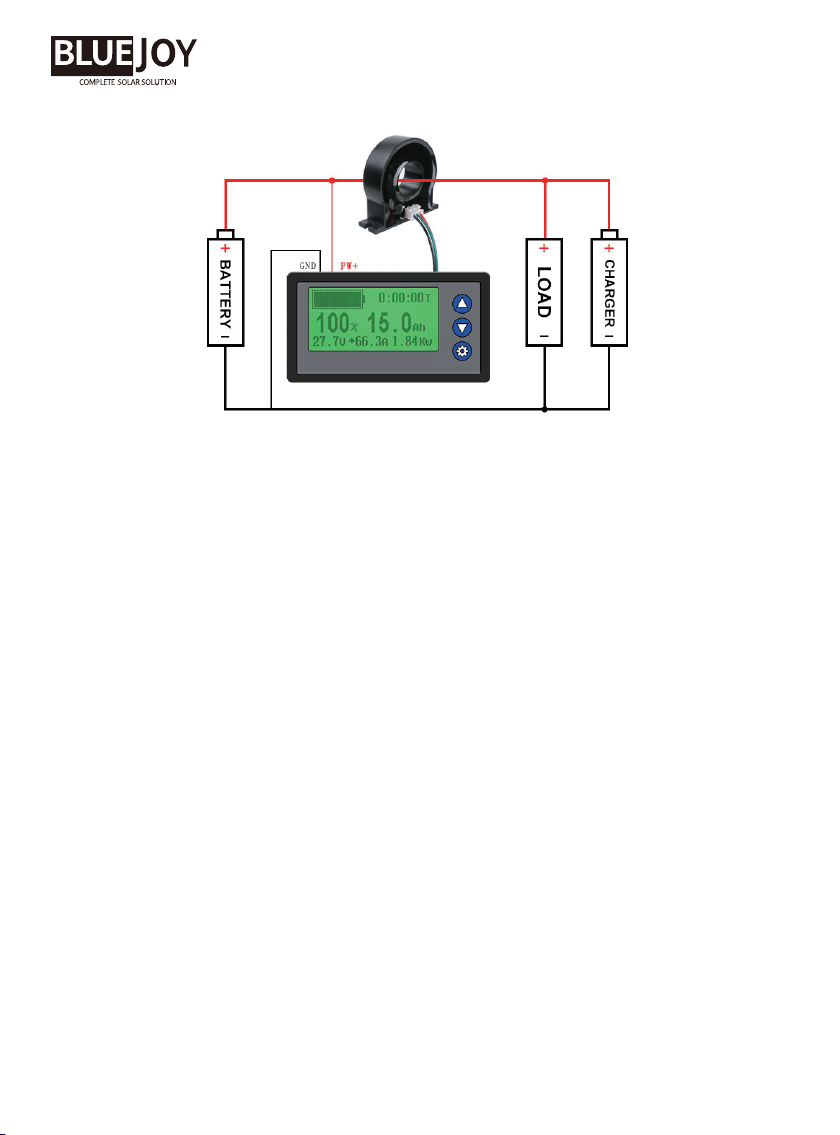
1.Wire and check the current
Thread all the wires from the battery’s positive (or negative) pole through the sensor ring (check
the wiring diagram below) and check the amperage on the monitor. When the wirings are correctly
done, the amperage should be positive when charging and negative when discharging. If the
monitor shows the opposite, turn the sensor ring front side back.
2.Zero the battery capacity
The battery capacity shown on the monitor is not the real capacity when you first use this meter. To
measure the battery accurately, the capacity needs to be zeroed. Discharge your battery till empty
and press the “▼” button for 3s to zero the capacity. Then charge you battery till it’s full.
Normally when the batteries are full, the capacity should be 100% on the monitor. If not, press the
“▲” button for 3s to fill the capacity (with the battery charger attaching).
Manual-mode (complex, for professional)
This mode is for people who know their batteries very well and need to monitor the battery status
at the best accuracy. This mode involves accurate value setting, only for professional.
1.Wire and check the current
Thread all the wires from the battery’s positive (or negative) pole through the sensor ring (check
the wiring diagram below) and check the amperage on the monitor. When the wirings are correctly
done, the amperage should be positive when charging and negative when discharging. If the
monitor shows the opposite, turn the sensor ring front side back.
9
6.5 Wiring Diagram
6.6 Operations

10
2.Value setting
In manual-mode, the “11CA (Battery Actual Capacity)” and “12FV (Full Capacity Voltage)” must
be set to a accurate value. The setting method is as below:
Press the “ ”button for 3s to enter setting menu. Press “▼” or “▲” to move the cursor to
“11CA” and “12FV”for battery capacity setting. Press “ ” to select and press “▼” or
“▲” to change the values. When the values are set, press “ ” again to confirm.
Notice: “12FV (Full Capacity Voltage)” is suggested to set to the voltage when the battery is full
and the battery charger is still attached on the battery.
3.Charge the battery to full
After the wiring and setting values, the monitor will not show the battery’s capacity immediately.
The battery needs to be charged to full for the monitor to work as setting.
6.7 Parameter Chart
6.8 FAQ
Compatible Battery Type
Test Voltage Range
Test Current Range
Test Capacity Range
Test Power Range
Time Recording
Temperature Display
Working Current
Accuracy
Voltage dpi
Current dpi
Voltage Display
Capacity Display
Power Display
0-999mAH-1.00AH-9.99AH-10.0AH-99.9AH-100AH-999AH
-1.00KAH-9.99KAH-10.0KAH-99.9KAH
0.0-99.9W-100W-999W-1.00KW-9.99KW-10.0KW-99.9KW -100KW-999KW
Lead-acid; Lithium-iron; Lithium iron phosphate;Ni-MH
9-100V
0-150A(optional)
0-99.9KAH
0-999999W
00:00:00-999:59:59
-7~99
Backlight on≈10mA Backlight off≈5mA
0.5%
0.1V
0.1A
0.0-99.9-100V
Q: Do i need to set anything before using this battery monitor?
A: Normally you don’t. For the first time you use it, all you need to do is to correct all the wirings,
empty your battery and then recharge to full again. All the calculation would be done by the monitor

6.9 Precautions
11
itself. But you can adjust the settings if you are professional.
Q: Does it requires an on/off switch?
A: No, it doesn’t. When there is no charge or discharge current, the backlight of the monitor would
turn off itself.
Q: Do i need to place the sensor to a right direction?
A: Yes, if the monitor is no showing positive current when charging and negative current when
discharging, it means the sensor is wired in the wring direction. Turn the sensor front side back if so.
Q: The capacity drops when discharging but not rises when charging, what’s wrong?
A: In this case, it means you didn’t thread the main positive or negative wire through the sensor
ring. Both charge and discharge circuits should go through the sensor.
Q: Why is there a little amps when the battery is not charging and discharging?
A: It could be the components got aged or effected by temperature. If the amperage is not at 0 when
the battery is empty, you need to adjust that manually. (Check “09CZ”in the setting detail chart).
Q: My battery has been used for a long time and i don’t know its actual capacity. What should i do?
A: Empty your battery and zero the monitor by pressing the “▼”button for 3s. Then recharge the
battery till full and press the “▲” button for 3s to fill the capacity if it’s not filled automatically.
Q: Can i set the battery capacity manually?
A: Yes, you can set it at “11CA” in the setting menu. But normally we don’t suggest customer to
do so.
The monitor CAN NOT be exposed in strong sunlight or extreme environment where the tempera-
ture is below -10℃ (14℉). Otherwise the lifespan of the monitor would be greatly decreased.
The monitor and the sensor ring are strictly matched. Do not change any of them in order to remain
high accuracy.
The monitor is covered by a 1-year-warranty by Blue Joy Contact us for any question or technical
support.
Blue Joy reserve the right to change the product or this user manual without prior notice.
Seals Tel:+86-191-5326-8325 Email:[email protected]
This manual suits for next models
1
Table of contents


