Blue Sea BatteryLink 7604 User manual

BATTERYLINK®
10A CHARGER
User Manual
7604
Read and understand the contents of this User Manual. It contains important safety, handling, and operational instructions for the
BatteryLink®Chargers. This User Manual describes the product mentioned herein at the time of its publication. Specifications and
performance are subject to change at the discretion of Blue Sea Systems. To view the most current revision of this publication visit
bluesea.com/products/7604.
Scan for
additional
product
information
YEAR
WARRANTY

1
IMPORTANT SAFETY INSTRUCTIONS
1. SAVE THESE INSTRUCTIONS
This manual contains important safety and operating instructions for the BatteryLink®
Charger model 7604.
2. WARNING RISK OF EXPLOSIVE GASES. Working in the vicinity of a lead-acid battery is
dangerous. Batteries generate explosive gases during normal battery operation.
For this reason it is of the utmost importance that each time before using your charger,
you read and follow the instructions provided exactly.
3. To reduce risk of battery explosion, follow these instructions and those marked on the battery.
4. This appliance can be used by children aged from 8 years and above and persons with
reduced physical, sensory or mental capabilities or lack of experience and knowledge if they
have been given supervision or instruction concerning use of the appliance in a safe way and
understand the hazards involved.
5. Children should be supervised to ensure they do not play with the appliance.
6. WARNING AVOID SERIOUS INJURY OR DEATH FROM FIRE, EXPLOSION, OR ELECTRICAL
SHOCK. The BatteryLink® Charger is marked as “ignition protected” for operation in a small
craft gasoline engine space. HOWEVER: Connection or disconnection of any electrical cables
may cause sparks, which could ignite flammable gasses and cause explosion.
a. Never connect or disconnect electrical cables when explosive gasses may be present.
b. Always disconnect AC power sources before connecting or disconnecting the charger AC cord.
c. Connect AC plug only to an outlet protected by a Residual Current Device (RCD) suitable for
personal shock protection, and make AC connection in a secure manner that will avoid
contact with water.
7. To reduce risk of damage to electric plug and cord, pull by plug rather than cord when
disconnecting charger.
8. Do not operate charger if it has a damaged cord or plug, has received a sharp blow, been
dropped, or otherwise damaged in any way. The supply cord cannot be replaced.
If the cord is damaged, the appliance should be scrapped.
9. Use charger for charging only these 12V battery types: Flooded lead-acid, AGM, or TPPL.
Do not use your marine battery charger to charge non-rechargeable or dry-cell batteries
that are commonly used with home appliances. These batteries may burst and cause injury
to persons and damage to property.

2
10. Be sure area around battery is well ventilated while battery is being charged.
Keep open flames and sparks away from batteries, as these may cause explosion.
11. Make or break DC output cable connections to battery only after making and verifying DC
connections on the charger, and removing AC cord from electric outlet.
12. Do not make or break electrical connections to batteries while charging or for up to 30
minutes after charging.
13. If a battery switch is installed, ensure battery switch is in the OFF position before making
or breaking any connections to the battery. If no battery switch is installed, ensure all
accessories are OFF.
14. Charger should be grounded to reduce risk of electric shock. Charger is equipped with an
electric cord having an equipment-grounding conductor and a grounding plug. The plug
must be plugged into an outlet that is properly installed and grounded in accordance
with all local codes and ordinances.
15. For compliance with electromagnetic compatibility standard EN 55014-1:2006, DC out
put cables must be a fixed installation using non-extendable connectors such as ring
terminals, and with maximum length of 2 meters.

Specifications are subject to change. See bluesea.com/products/7604 for current information.
3
BATTERYLINK® CHARGER OVERVIEW
Scan for
additional
information
Charging
and ACR
status LEDs
DC Output
Battery Negative
Battery
Temperature
Sensor
Remote LED
Start Isolation
Mounting holes (3)
Clearance for #10 or
M5 mounting hardware.
Hex recesses accept
#10 (3/8" socket size)
nuts.
NOTE: Mounting holes
are not symmetrical,
please see dimensioned
drawing.
DC output battery positive connections
1/4"-20 studs accept 1/4" or M6 ring
terminals. Use 7/16" socket wrench.
Tighten to 60 in-lb (6.78 Nm).
Do not overtighten.
AC input 6' [1.8m]
power cord with
CEE 7/7 plug
Terminations cover
snaps in place to
insulate battery
positive terminations
NOTE: All side
terminations
1/4" x 0.032"
male
quick release
Remote LED included Battery temperature
sensor included

Specifications are subject to change. See bluesea.com/products/7604 for current information.
4
BatteryLink®Charger Features
The BatteryLink® Charger is a 120VAC/230VAC nominal input, 12VDC nominal output, 10A battery charger
with integral battery combiner (ACR) providing a second battery connection, as well as standard ACR function
when AC power is not present.
• AC plug-in at the dock, provides 10 Amps of charge current
• Integrated ACR automatically combines batteries during charging, isolates batteries when discharging and
when starting engines
• Start isolation protects sensitive electronics from voltage sags and spikes
• Battery temperature compensation prolongs battery life
• Supports alternators up to 65 Amps
• One-piece stainless flange nuts ensure safe and secure connections
• Ignition protected—safe for installation aboard gasoline powered boats
• LED light is ON when batteries are combined
• Includes a remote indicator LED with mounting bezel
• Snap-on insulating cover
Automatic Three Stage Charging
The BatteryLink® Charger uses a three stage automatic charging profile. The three stages are referred to as bulk,
absorption, and rest/float. The charger will move between these stages automatically, with no user intervention. When the
charger starts, it goes first to the bulk stage. This is where the first 75% – 80% of charging takes place. It is a constant
current mode, in which the charger outputs as much current as it can to drive the voltage of the battery up to the
absorption voltage. Once the absorption voltage is reached, the charger enters absorption mode. This is a constant
voltage mode, in which the battery is held at the absorption voltage to complete the last 20% – 25% of charging. In
the absorption stage, current will decrease according to the Batteries’ needs plus any additional current required for
active loads. The length of time spent in the absorption stage will vary based on battery type, battery capacity, and the
presence of loads, but will be a minimum of 1 hour up to a maximum of 5 hours. After the absorption stage, the charger
will move to the rest/float stage. The float stage is a constant voltage mode intended to maintain fully charged batteries
while supplying current for loads as necessary. The rest mode is included as an energy saving mode, and for compliance
with California Energy Commission (CEC) requirements. In the rest stage, the charger output and ACR are turned off to
conserve energy, and the battery voltages are monitored. If loads or self-discharge on either battery cause the voltage
to drop to 12.9V, the charger enters float mode for 4 hours in order to maintain the battery and supply current to loads.
After seven days of continuous rest/float mode, the charger will repeat the normal charge cycle to assure good
battery health.
Battery Temperature Compensation
Battery temperature compensation is output voltage regulation based on battery temperature variances. Since batteries
can see extreme temperature differences, it is important to regulate output voltage with temperature to maximize battery
life. A battery in a cold environment should not be charged at the same voltage as a battery in a hot environment. The
BatteryLink® Charger is set at a baseline of 25°C. If the included battery temperature sensor is installed, then every
5°C variance from this baseline will result in a change in output voltage. Voltage will decrease at higher temperatures,
and increase at lower temperatures. The temperature sensor also allows the charger to react to extreme hot or cold
temperatures (below 0°C or above 45°C) by reducing output or shutting down to preserve the battery. Reference the
Installation Instructions on page 6 and the Full Installation Diagram on page 8 for details on how to install the battery
temperature sensor.
Automatic Charging Relay (ACR)
The BatteryLink® Charger includes an integrated 65A Automatic Charging Relay (ACR). The purpose of an ACR is to
combine batteries for charging, but leave them isolated for discharge. This works well with dual battery systems, where
non-starting loads are isolated from the engine starting battery to reduce the risk of being stranded on the water without
enough power to start your engine. The ACR in the BatteryLink® Charger will combine the auxiliary and start batteries at
or away from the dock. This means both batteries will be charged during AC powered charging, or when AC power is not
available and a secondary charging source is active, such as your engine’s alternator. The ACR includes an optional Start
Isolation feature, which can be used to prevent engine starting current being drawn from the auxiliary battery. Start
Isolation protects sensitive electronics wired to the auxiliary battery from being affected by voltage sags or spikes caused
by engine starting. Reference the Installation Instructions on page 6 and the Full Installation Diagram on page 8 for
details on how to wire the Start Isolation feature.

Specifications are subject to change. See bluesea.com/products/7604 for current information.
5
Supplies Needed
1. DC Wire: Black or yellow for negative, red for each positive. NOTE: All wiring should be of sufficient length to allow
proper routing, support, drip loops, service loops, and termination.
2. Fuse holders for connection to each battery, for charger negative, and for optional Start Isolation and Remote LED
wiring if used (see Full Installation Diagram, page 8).
3. Fuses for fuse holders (see table below and Full Installation Diagram, page 8).
4. Screwdriver: Phillips #2 for mounting screws.
5. Socket wrench (torque wrench preferred): 7/16"socket for DC battery positive connections. Other socket sizes as
needed for connection to battery and fuse holder terminals.
6. Terminals: 1/4” or M6 ring terminals for charger side DC battery positive connections. 1/4” x 0.032” female quick
disconnect terminals for DC battery negative and accessory connections. Other ring terminals sized for connection
to battery and fuse holder terminals.
7. Appropriately sized butt connectors for extending remote LED and battery temperature sensor wires.
8. Crimping tool or obtain wires that are pre-terminated.
9. Appropriate heat shrink if pre-terminated wires were not acquired.
LED Status Indicators
Name States
AC POWER Green solid AC power present
Off No AC power
BATTERY
Green solid Charging complete – Float/rest stage
Amber solid Charging in progress - Bulk or absorption stage
Red single blink Battery hot - Charger shutdown (>=50°C)
Red double blink Battery hot – Output reduction (>=45°C and <50°C)
Red triple blink Battery cold – Charger shutdown (<= 0°C)
Red solid Battery polarity reversed
Off No AC power
ACR STATUS
Green solid Combined – ACR closed
Double-blink SI present – ACR open
Off Battery voltages below threshold – ACR open
REMOTE LED
CHARGE
STATUS
DC Power Solid Combined – ACR closed
Off Separated – ACR open
AC Power Solid Charging complete – Float/rest stage
Flash Charging in progress - Bulk or absorption stage
Wire Size and Fuse Rating Table*
Conductor Length
in feet (meters)
Positive Wire (sized for maximum alternator output) Negative Wire
(sized for 10A
charger output)
Alternator up to 30A Alternator up to 50A Alternator up to 65A
6 ft (1.83 meters) 10 AWG (6 mm²) 6 AWG (16 mm²) 6 AWG (16 mm²) 14 AWG (2.5 mm²)
10 ft (3.05 meters) 6 AWG (16 mm²) 4 AWG (25mm²) 4 AWG (25mm²) 12 AWG (4 mm²)
15 ft (4.57 meters) 6 AWG (16 mm²) 2 AWG (35 mm²) 2 AWG (35 mm²) 10 AWG (6 mm²)
20 ft (6.09 meters) 4 AWG (25mm²) 2 AWG (35 mm²) 1 AWG (50 mm²) 8 AWG (10 mm²) **
25 ft (7.62 meters) 2 AWG (35 mm²) 1 AWG (50 mm²) 1/0 AWG (70 mm²) 8 AWG (10 mm²) **
Recommended Fuse Rating *** 40A 60A 90A-100A 30A (see next row)
Fuse Required For Negative? YES, if negative wire is
< 12 AWG (4 mm²)
YES, if negative wire is
< 8 AWG (10 mm²) YES -
Fuse Type Fuse Holder PN Recommended Blue Sea Systems Fuse PN
MRBF Fuse 5191 5176 (40A) 5178 (60A) 5182 (90A) Not Recommended
AMI®/MIDI® Fuse 7720 5251 (40A) 5253 (60A) 5256 (100A) 5250 (30A)
ATO®/ATC® Fuse 5065 Not Recommended Not Recommended Not Recommended 5245 (30A)
* Based on 3% voltage drop. If fast charge recovery is important, use larger wire.
** If marine grade 8 AWG (10 mm²) 1/4" quick connect terminals are not readily available, it is recommended to make a short 10 AWG (6 mm²) jumper to a
terminal block or PowerPost, and then continue from that point with 8 AWG (10 mm²) cable.
*** Fuses in positive wires should be located as close as possible to the battery positive terminal. If required, the fuse in the negative wire should be located
as close as possible to the charger.
For more information please use the Circuit Wizard at circuitwizard.bluesea.com

Specifications are subject to change. See bluesea.com/products/7604 for current information.
6
INSTALLATION INSTRUCTIONS
1. Before beginning electrical installation, disconnect all positive and negative AC and DC power sources.
2. For optimal performance, mount the charger vertically, in a well ventilated location.
NOTE: The charger should be located near the batteries to minimize wire length and its associated voltage drop to
maximize charging efficiency. If the batteries are not close together, place the charger near the battery connected to
the Start Battery stud. All DC charging sources must be attached to the Start Battery (ie. alternator or solar panel)
3. Remove the DC termination cover by lifting the tab on the right hand side.
4. Route DC wires from each charger output to battery fuse holder. See Installation Diagrams on pages 7 and 8.
All wiring should be of sufficient length to allow proper routing, support, drip loops, service loops, and termination.
Strain relief for wiring should be installed near the charger to prevent loosening of connections with vibration or
shock. Fuses should be installed at the battery positive connections to prevent battery power from feeding back
into a fault in the wiring, or in the battery charger. See Wire Size And Fuse Rating Table on page 5 for recommended
fuse values. Best practices dictate that every positive wire on the boat, outside the engine starting circuit, must
have circuit protection. Please follow all local and national electrical standards, codes, and regulations for
installation and wiring.
5. Recommended Connection [Battery Temperature Sensor]: Attach the battery temperature sensor to the largest
battery using the supplied adhesive pad. If both batteries are the same size, attach to the battery with the most
loads. Attach the sensor in the center of the long side of the battery. If multiple batteries are in a battery bank,
attach the sensor in the center between multiple batteries. When external circumstances could create a significant
difference in temperature on one side of a battery versus another, always attach the sensor on the warmest side.
NEVER pierce the battery casing with a screw or other fastener. Extend sensor wires as necessary to reach the
charger using appropriate fully insulated butt connectors or a terminal block with insulating cover.
6. Optional Installation [Remote LED Bezel]: Drill a 7/16" [11mm] hole through a flat mounting surface in a
visible location. Clean and dry the surface around the drilled hole for best adhesion of the bezel. Remove the
adhesive backing liner from the bezel, thread the LED wires through the hole, and push the bezel securely into place
against the mounting surface. Extend the LED wires as necessary using appropriate fully insulated butt connectors
or a terminal block with insulating cover. Connect the positive (red) wire from the LED to your battery positive
terminal through a 2A fuse at the battery. Place this connection on top of all current carrying conductors. Connect
the negative (yellow) wire from the LED to the charger Remote LED terminal.
7. Optional Connection [Start Isolation-protects sensitive electronics from voltage drops and spikes during
engine start]: Connect the Start Isolation terminal of the charger to the “start” position of your engine’s ignition
switch, or another connection point that has positive voltage applied only when actively cranking your engine. Install
a 2A fuse at the point of connection to positive voltage.
8. Install appropriate DC fuses (see Wire Size And Fuse Rating Table on page 5).
9. Confirm all connections are correctly installed per Installation Diagrams.
10. Secure the termination cover back over the connected wires.
11. Make AC plug connection to an appropriate outlet.
12. Restore AC power.
DC AC
Specifications are subject to change. See bluesea.com/products/7604 for current information.
7
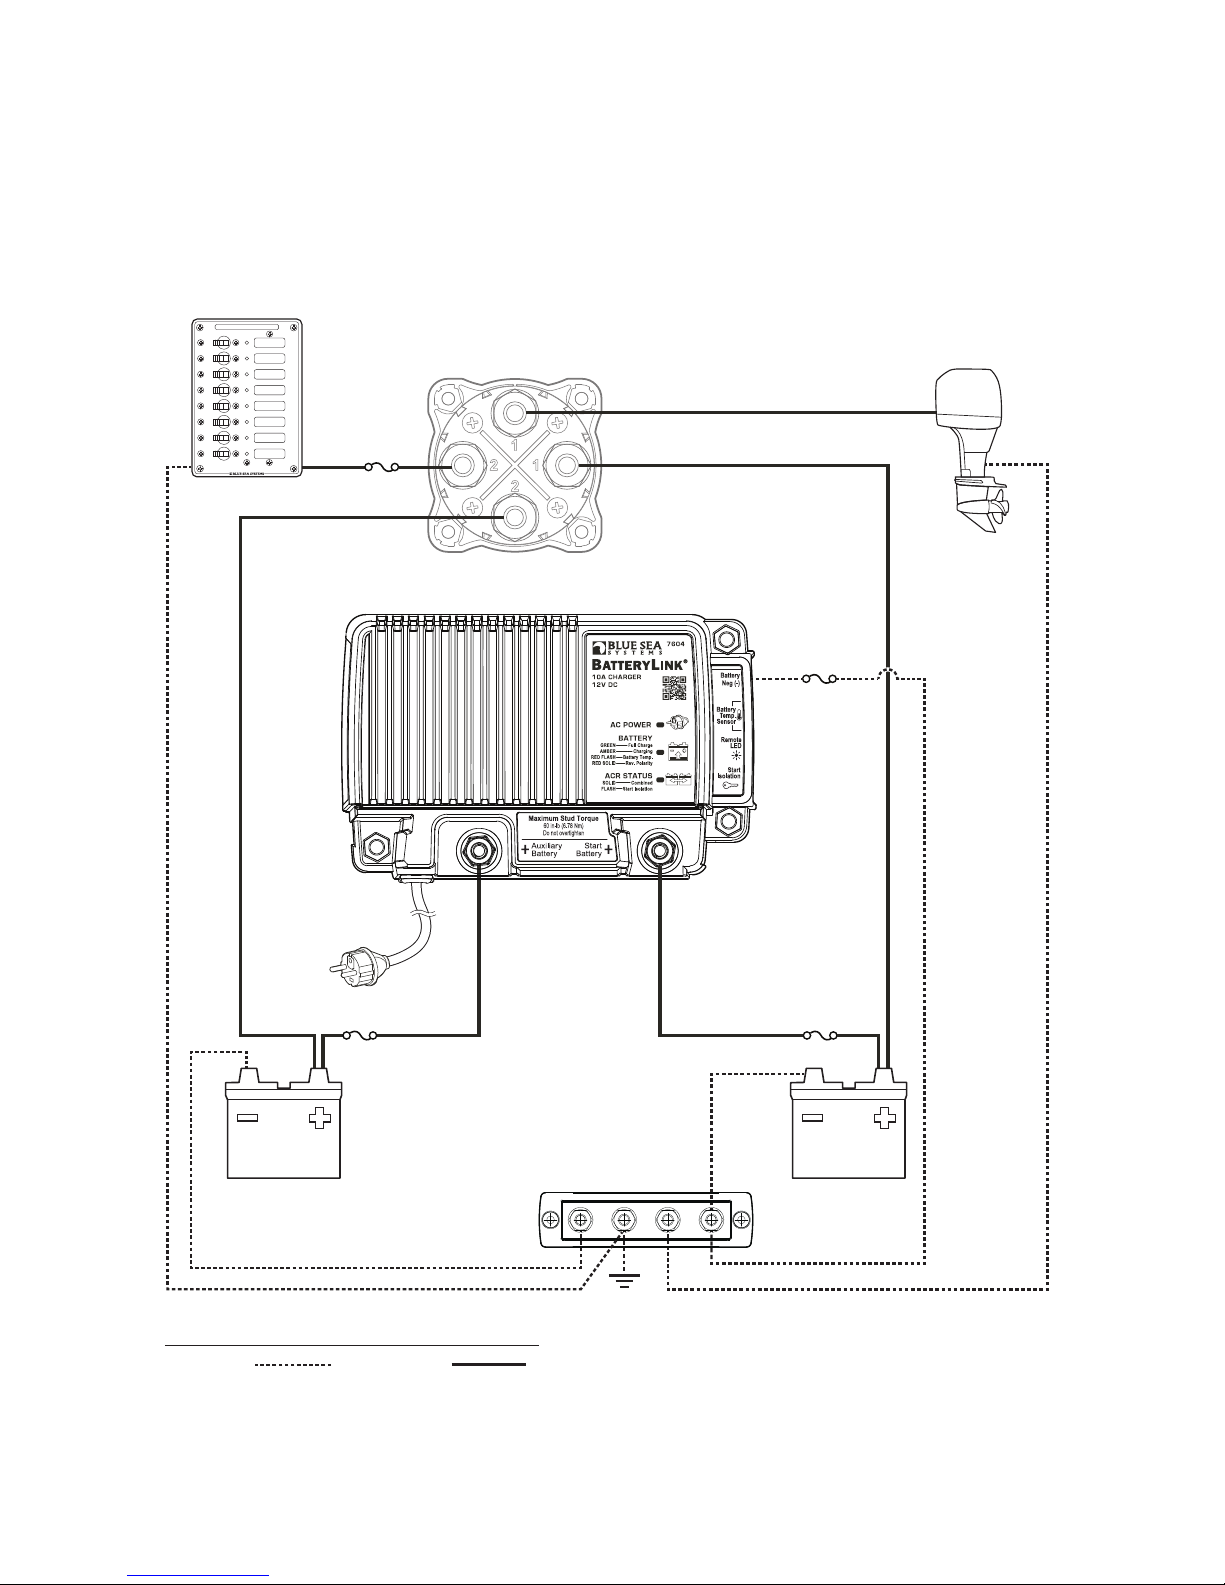
QUICK INSTALLATION DIAGRAM
Engines with
combined alternator
and starter wires
- typical of outboard motors
FUSE*
Accessories
Legend
Negative Bus Bar
GROUND
Battery
Tem p
Sensor
Start
Isolation
Remote
LED
NEG.NEG.
BAT TERYBAT TERY
BUSBUS
DC Negative DC Positive
Start
Battery
Auxiliary
Battery
INPUT
230V AC
BatteryLink® Charger
Dual Circuit Plus™ Battery Switch 6011
recommended for 7604 BatteryLink® Charger
FUSE**
FUSE* FUSE*
* See Wire Size and Fuse Rating Table, page 5.
** Wire size and fuse rating based on house loads. For more information, use the Circuit Wizard at
circuitwizard.bluesea.com.

Specifications are subject to change. See bluesea.com/products/7604 for current information.
8
FULL INSTALLATION DIAGRAM
start
runaccessory
off
START KEY SWITCH
Engines with
combined alternator
and starter wires
- typical of outboard motors
FUSE*
OPTIONAL
START ISOLATION
(SI) WIRE
OPTIONAL
BATTERY TEMPERATURE
SENSOR
2A FUSE
Accessories
Legend
Negative Bus Bar
GROUND
Battery
Tem p
Sensor
Start
Isolation
Remote
LED
NEG.NEG.
BAT TERYBAT TERY
BUSBUS
OPTIONAL
REMOTE
INDICATOR
2A FUSE
OptionalDC Negative DC Positive
Start
Battery
Auxiliary
Battery
INPUT
230V AC
BatteryLink® Charger
Dual Circuit Plus™ Battery Switch 6011
recommended for 7604 BatteryLink™ Charger
16 AWG (1.5mm²)
16 AWG (1.5mm²)
FUSE* FUSE*
FUSE**
* See Wire Size and Fuse Rating Table, page 5.
** Wire size and fuse rating based on house loads. For more information, use the Circuit Wizard at
circuitwizard.bluesea.com.
All DC charging sources must
be attached to the Start Battery
(ie. alternator or solar panel)

Specifications are subject to change. See bluesea.com/products/7604 for current information.
9
Specifications
Nominal Output Voltage 12V DC
Total Output Current (0-25°C) 10A
Total Output Current (0-50°C) 9A
Output Connections 2 positive, 1 negative
Universal AC Input Voltage 100V-240V AC
Input Frequency Range 50/60 Hz
AC Input Current 3.25A @ 100V
1.75A @ 200V
Typical Float Voltage (25°C) 13.5V DC
Typical Absorption Voltage (25°C) 14.4V DC
Battery Temperature Compensation Coefficient -30 mV/°C
ACR Continuous Rating 65A
ACR Continuous Rating (during AC charging) 40A
ACR Intermittent Rating (5 min.) 115A
ACR Combine Voltage 13.0V (2 min.)
13.5V (30 sec.)
ACR Open Voltage 12.35V (10 sec.)
12.75V (30 sec.)
Operating Current (no AC power) 10mA (ACR open)
60mA (ACR closed)
Maximum Cable Size 1/0 AWG (50mm²)
Terminal Stud Size 1/4"-20 (accepts M6 ring terminal)
Maximum Terminal Stud Torque 60 in-lb (6.8 Nm)
Quick Connect Terminal Size 1/4" x 0.032"
Operating Temperature Range 0°C – 50°C
Storage Temperature Range -30°C – 80°C
Warranty 5 Year
Battery Types Flooded, AGM, TPPL
Battery Number of Cells 6 cells
Maximum Battery CCA 850 CCA
Maximum Battery Capacity 120Ah (20 hour rate)
Regulatory
Designed and constructed for compliance to EN 60335-2-29
Ignition protection per ISO 8846, and SAE J1171
IP67 - protected against immersion up to 1 meter for 30 minutes

Specifications are subject to change. See bluesea.com/products/7604 for current information.
11.1mm
.44in
STUD
HEIGHT
TYP. 2X
169.1mm
6.66in
26.5mm
1.04in
TERMINAL HEIGHT
TYP. 2X
54.0mm
2.13in
SERRATED
FLANGE NUTS
THIS VIEW SHOWN WITH COVER REMOVED
0.0mm
0in
142.8mm
5.62in
143.7mm
5.66in
0.0mm
0in
10.6mm
.42in
84.7mm
3.34in
THIS VIEW SHOWN WITH COVER REMOVED
FOR OPTIMAL PERFORMANCE, MOUNT
VERTICALLY AS SHOWN, IN A WELL VENTILATED
AREA. RECOMMENDED MOUNTING CLEARANCE
50mm MINIMUM ON ALL SIDES.
9.1mm
.36in
3.1mm
.12in
152.4±0.635
6.00±.025
SIDE
26 AWG WIRE LEADS
BACK
MOUNTS IN
Ø7/16in
OR 11mm
HOLE
ADHESIVE
PAD
FRONT
36.3mm
Ø1.43in
110.8mm
4.36in
DIMENSIONED DRAWINGS
10

980022770 Rev.003
www.bluesea.com
For the following equipment:
Product type: Battery charger
Type designation: BatteryLink Charger: 7603, 7604
Manufacturer: Blue Sea Systems, Inc.
Address: 425 Sequoia Drive
Bellingham, WA
98226 USA
Phone: 001.360.738.8230
Herewith it is conrmed to comply with the requirements set out in the council directive, 2006/95/EC for
electrical equipment used within certain voltage limits, the EMC directive 2004/108/EC , and the Recre-
ational Craft Directive 2013/53/EU.
Safety: IEC60335-1:2010+A1
IEC60335-2-29:2002+A1+A2
EN60335-1:2010+A1
EN60335-2-29:2002+A1+A2
EMC: Emission: EN 55014-1:2006/A1:209, /A2:2011
Radiated emission
Conducted emission
EN61000-3-2 Harmonics
EN61000-3-3 Voltage uctuations and icker
Immunity: EN 55014-2:1997/A1:2002, /A2:2008
EN61000-4-2 Electrostatic discharge
EN61000-4-3 RF electromagnetic eld
EN61000-4-4 Fast transient
EN61000-4-5 Surges
EN61000-4-6 RF conducted disturbances
EN61000-4-11 Voltage dips and interruptions
Ignition Protection:
ISO 8846 (ed. 1)
The notied body HPi Verication Services Ltd (NB 1521) performed type examination to verify
compliance with the above ignition protection standard, and issued the certicate
HPiVS/R1168-001-l-01.
The undersigned hereby declare that the equipment specied above conforms to the above directives
and standards
Bellingham 2016-04-1
Blue Sea Systems, Inc.
........................................................
David Johnson, Senior Vice President of Marine and Mobile
EC DECLARATION OF CONFORMITY
This manual suits for next models
1
Table of contents


