Enel X JUICEBOX PRO User manual
JuiceBox Pro
User Manual

2
Table of contents
Welcome to JuiceBox Pro 3
Package Contents 3
Required Tools 3
Installation 4
Installation Prerequisites 4
Installation 5
Load Balancing 8
Locking Your JuiceBox 9
Wi-Fi Setup 9
JuiceBox Conguration 11
Congure JuiceBox Using Bluetooth Connectivity 11
Congure JuiceBox Using Wi-Fi Connectivity 16
Specications 21
Characteristics 21
Connectivity 21
Dimensions 22
LED Indicator 24
Using the Dashboard 25
Enterprise Dashboard Manual 25
Business Dashboard Manual 25
RFID Cards 25
RFID Reader 25
Activating And Managing 25
Impoant Safety Information 26
FCC Compliance 26

3
Welcome to JuiceBox Pro
Package Contents
>JuiceBox
NOTE
In some markets, JuiceBox arrives secured to a cable holder that includes keys.
>Wall bracket
>2 wall bracket screws (#10 self-tapping Phillips head wood screws)
>2 screws to hang JuiceBox onto wall bracket (#10-32 Phillips head machine screws)
>1 RFID card (except 80A)
Required Tools
>Phillips Screwdriver (No. 2 drive size)
>Stud sensor
>Stripper
>Wire nut or wire coupler
>Allen key
>Electrical tape
>Wrench or torque wrench

4
Installation
Installation Prerequisites
OVERVIEW
JuiceBox requires either a hardwired electrical connection or a NEMA 14-50 outlet.
The JuiceBox power supply must be connected to a non-GFI circuit breaker that is rated for
at least 125% of the device's continuous load.
NOTE
Ensure that all power connection wiring conforms to the rules and regulations of any
national and local codes.
>The JuiceBox may require a disconnecting means if:
> Not within line of sight of the Electrical Panel
> Required by local code
>Hardwire Version: Only the pre-installed, hard wire whip shall be used to connect to a
junction box or disconnect. It is not long enough, nor is it meant to go directly into the
electrical panel.
CAUTION
Do NOT drill any additional holes into the JuiceBox enclosure as it can cause damage
to the PCB and/or electronics inside.
LOCATION
When selecting a location to install the hardwire connection or outlet, keep in mind that
JuiceBox should be positioned:
>Within reach of the vehicle's charge po
>18 inches above the oor or ground
>If applicable, within range of a cellular connection or the local WiFi network

5
32A 40A 48A 80A
CIRCUIT
REQUIREMENTS
40 Amp
2 pole breaker
50 Amp
2 pole breaker
60 Amp
2 pole breaker
100 Amp
2 pole breaker
RECOMMEND
WIRING
#8AWG or
larger gauge
copper
wires for the
conductors
(NEC 625.17(A)
(2)
#6AWG or
larger gauge
copper
wires for the
conductors
(NEC 625.17(A)
(2)
#4AWG or
larger gauge
copper
wires for the
conductors
(NEC 625.17(A)
(2)
#2 or 3AWG
or larger
gauge copper
wires for the
conductors
(NEC 625.17(A)
(2)
#10AWG
Green or bare
copper for
the ground
conductor (no
NEU)
#10AWG
Green or bare
copper for
the ground
conductor (no
NEUTRAL is
used)
#8AWG Green
or bare copper
for the ground
conductor (no
NEU)
#6AWG Green
or bare copper
for the ground
conductor (no
NEU)
WARNING
Do not continue this installation until the circuit breaker is turned o.
WIRING AND CIRCUIT REQUIREMENTS
For additional specications, refer to the Specications section.
Installation
Fully read and understand the directions before installation. Refer to impoant safety
information at the end of this document.
This section describes installing the JuiceBox Pro onto a wall mount. If installing onto a
JuiceStand, refer to the JuiceStand Manual.
1. Turn o the circuit breaker to the NEMA 14-50 outlet, NEMA 6-50 outlet, or hardwired
electrical connection.
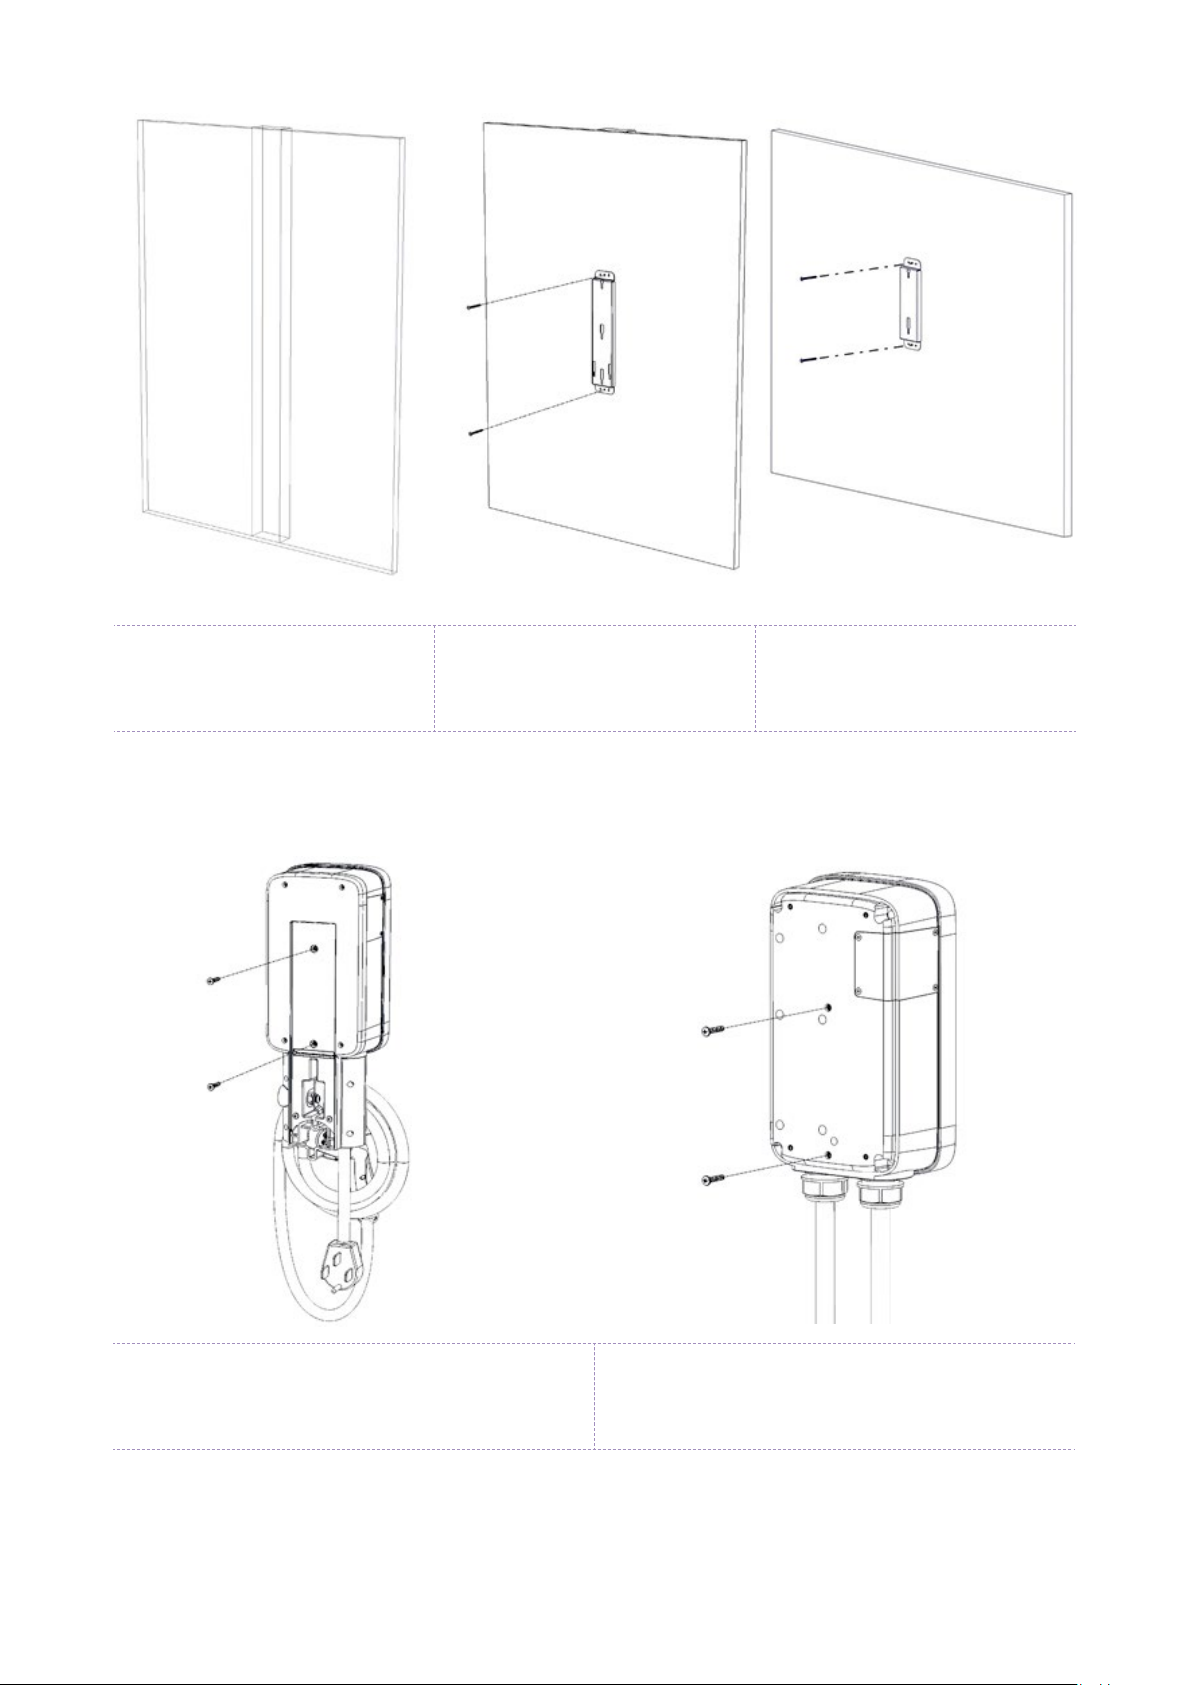
2. Use a stud sensor to determine an appropriate mounting location, then use the 2 screws
to secure the wall bracket.
6
Version with cable holder Version without cable
holder
Version with cable holder Version without cable holder
3. Inse the enclosure screws into the enclosure, as shown. Tighten the screws until
approximately 2 mm of thread are visible.
7
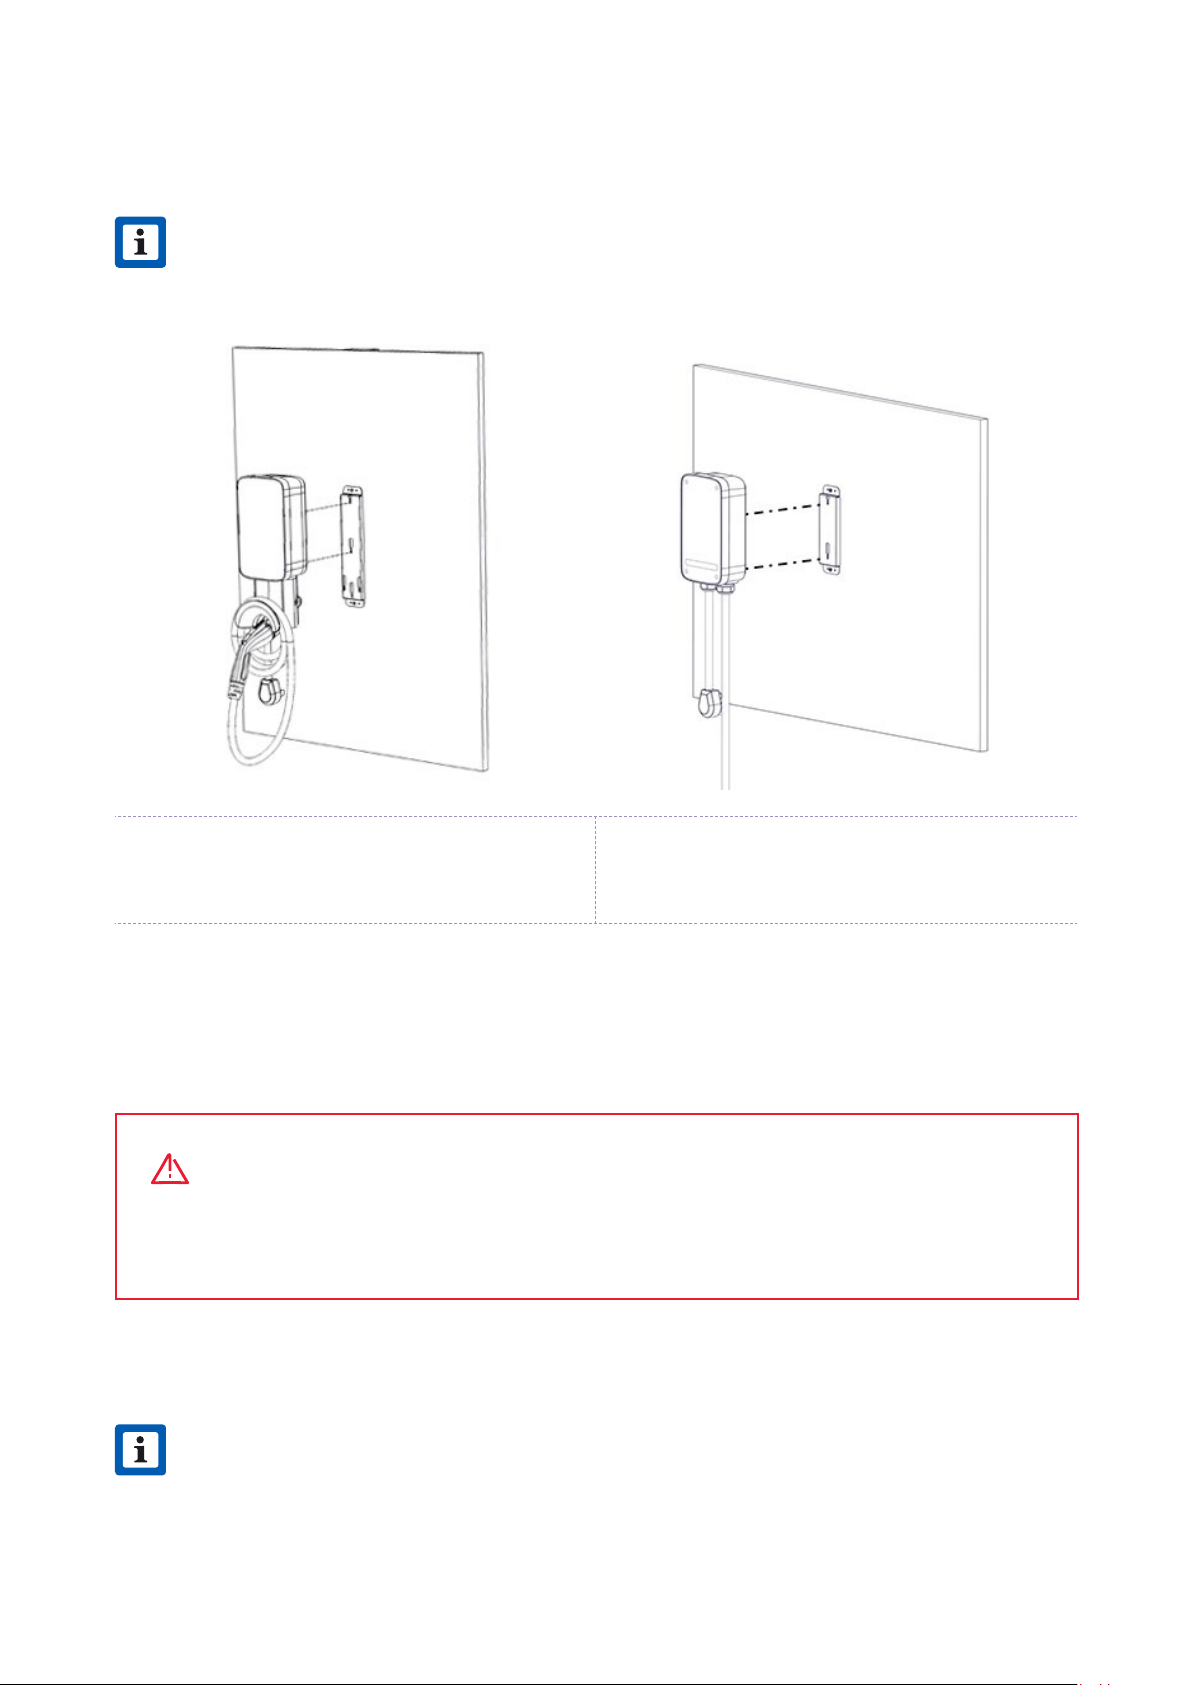
Version with cable holder Version without cable holder
4. Hang the JuiceBox onto the wall bracket.
NOTE
If the JuiceBox does not hang securely, adjust the screws that were installed in step
3. The 48 and 80 amp are hardwire only and do not have a plug as shown.
NOTE
The hardwire versions of the JuiceBox are shipped with appropriate wires that
meet the National Electric Code (NEC) NFPA 70 and require a nearby junction box
connection. Any alteration of the supplied wiring will invalidate the warranty and may
not conform to NEC.
5. Connect the JuiceBox:
>Plug-In Version: Plug the JuiceBox into the NEMA 14-50 outlet or NEMA 6-50 outlet.
>1-Phase Hardwired Version: Connect the harness to the wiring terminal.
WARNING
It is the installers responsibility to ensure that the JuiceBox is wired in accordance
with the local electrical code.

8
32A/40A 48A 80A
L1 (Black) 8 AWG 6 AWG 3 AWG
L2 (Red) 8 AWG 6 AWG 3 AWG
Ground
(Green) 8 AWG (THHN) 8 AWG (THHN) 6 AWG (THHN)
6. Turn on the circuit breaker that supplies power to the NEMA 14-50 outlet, NEMA 6-50
outlet, or hardwired electrical connection.
Load Balancing
>Load balance to Circuit only.
>Load balance to panel is NOT recommended.
NOTE
Balancing to the panel or location can be done on a system that would otherwise
work safely on its own. This can reduce usage during peak hours, saving cost to both
the user and the owner of the stations.
>Can only balance stations with the same specications.
>Balancing specications cannot exceed the rated continuous load of the circuit. (50
amp circuit = 40 amp continuous load allowed) (NEC 625.41 & 42) 2017 code.
>Per NEC 625.42 additional outlets per circuit can be added due to the JuiceNet Automated
Load Management System.
>Recommend no more than 3 per circuit. The maximum number of stations per circuit is
determined by dividing the number of continuous load amps allowed based on circuit
size by 8. (e.g. 40 amps / 8 amps = 5 stations maximum). Note this may result in a slower
charge per car.

9
Locking Your JuiceBox
After installing your JuiceBox, use the included keys to lock the JuiceBox to the wall frame.
Wi-Fi Setup
1. Reset the circuit breaker that supplies power to the JuiceBox.
NOTE
The following steps must be completed within 2 minutes of reconnecting power to
the JuiceBox. The JuiceBox will remain in setup mode for 4 minutes.
NOTE
The actual name of the network varies by device, such as “JuiceBox-123”.
NOTE
If there are problems connecting, ensure that the following addresses are not
blocked:
2. Open Wi-Fi seings on your personal device. Connect to the "JuiceBox-###" or
"JuiceNet-###" WiFi network. If the network requires a password, use the password
"GoElectric" (case-sensitive).
3. In a web browser, navigate to 10.10.10.1 or to setup.com to view a list of available Wi-Fi
networks.
IP ADDRESS PROTOCOL PORTS FQDN
dynamic HTTPS 443 directory-api.emotorwerks.com
dynamic HTTPS 443 ota.zentri.com
dynamic HTTPS 443 dms.zentri.com

10
138.91.137.23 UDP 8042 jbv1.emotorwerks.com
40.118.171.20 UDP 8042 emwjuicebox.emotorwerks.com
dynamic HTTPS 443 device-backend.juice.net
4. Select the desired Wi-Fi network. Enter the Wi-Fi network password, if necessary. Click
Connect.
Verify that the JuiceBox is connected by checking that the LED indicator turns white.

11
JuiceBox Conguration
For best results, peorm this procedure while standing within 5 ft (1.6m) of the JuiceBox.
Congure JuiceBox Using Bluetooth Connectivity
*REQUIRES FIRMWARE 1.0.46 OR LATER
1. Download and install the “JuiceCongure” app onto your mobile device.
Video walkthrough of this section
2. Open the JuiceCongure app.
NOTE
Make sure your phone and JuiceBox’s Bluetooth connection is enabled before staing
to be able to congure Wi-Fi for your charger.

12
3. Select START CONFIGURATION.
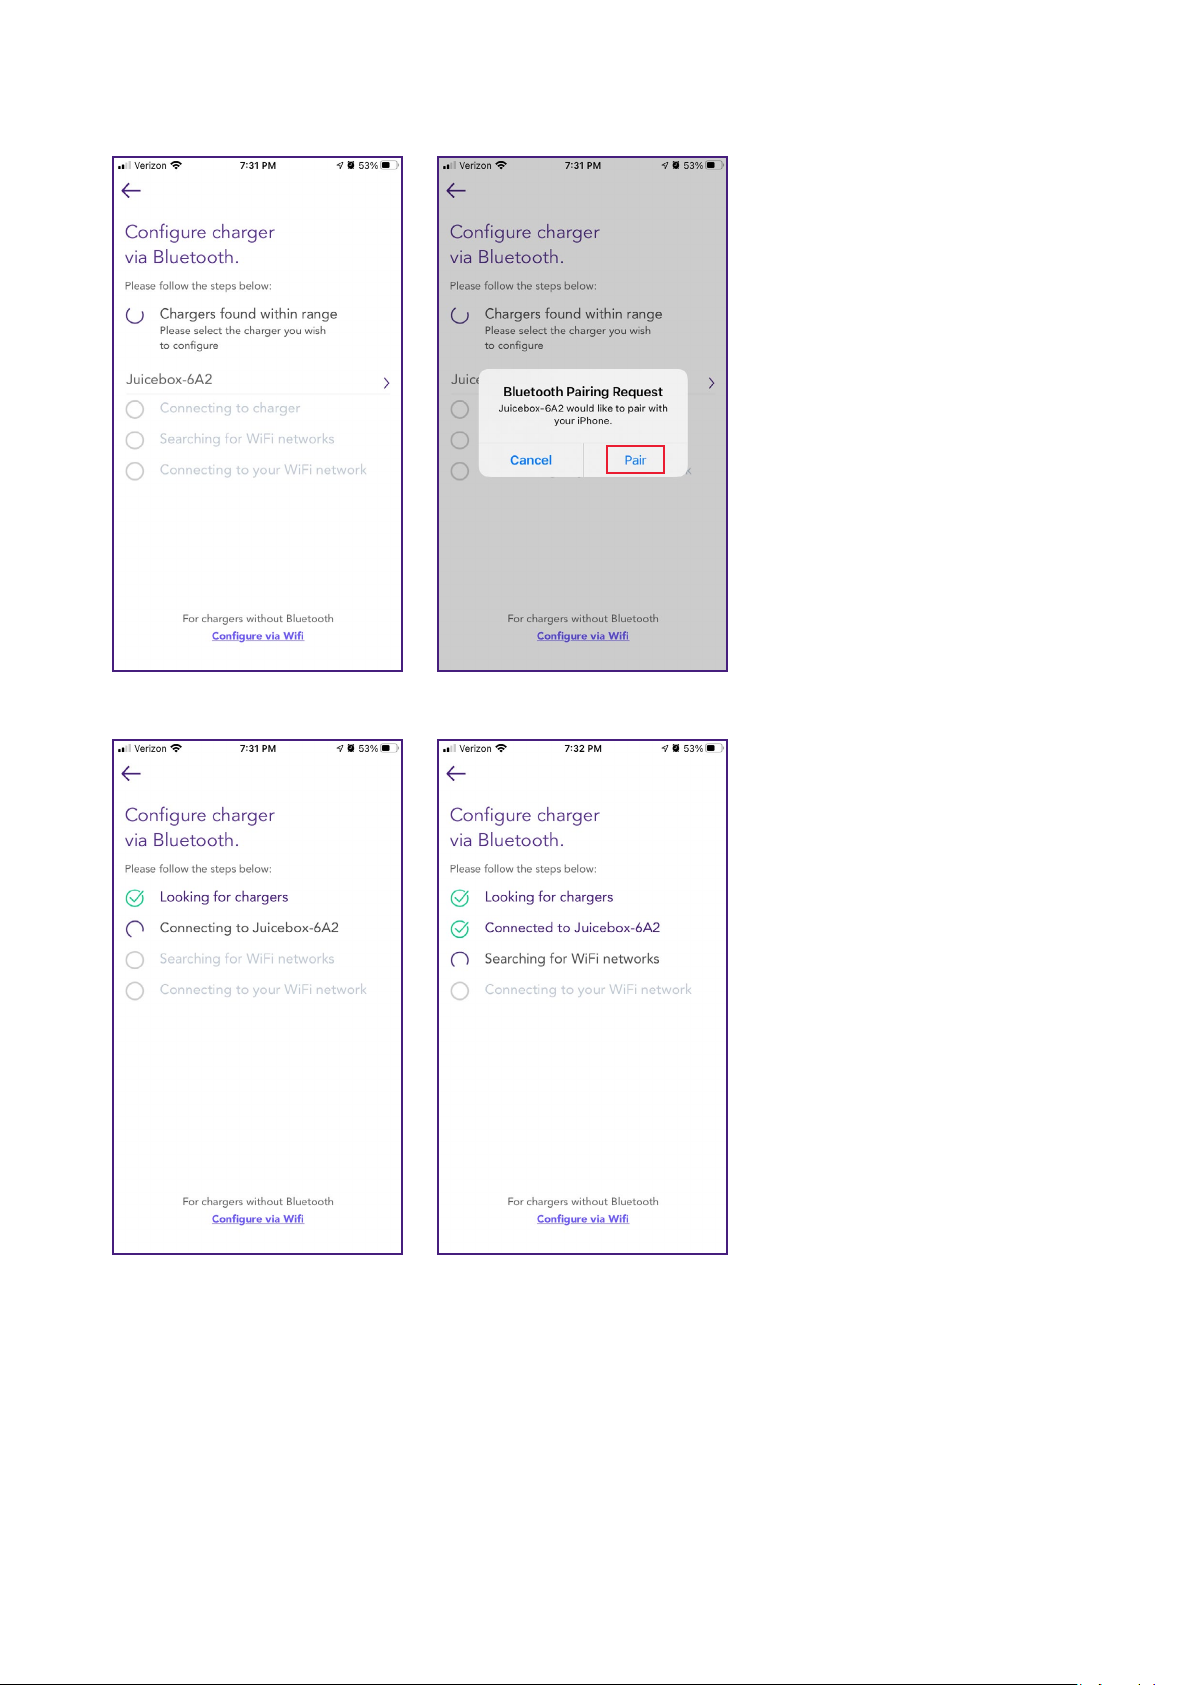
4. Follow the onscreen instructions to proceed to JuiceBox conguration.
13
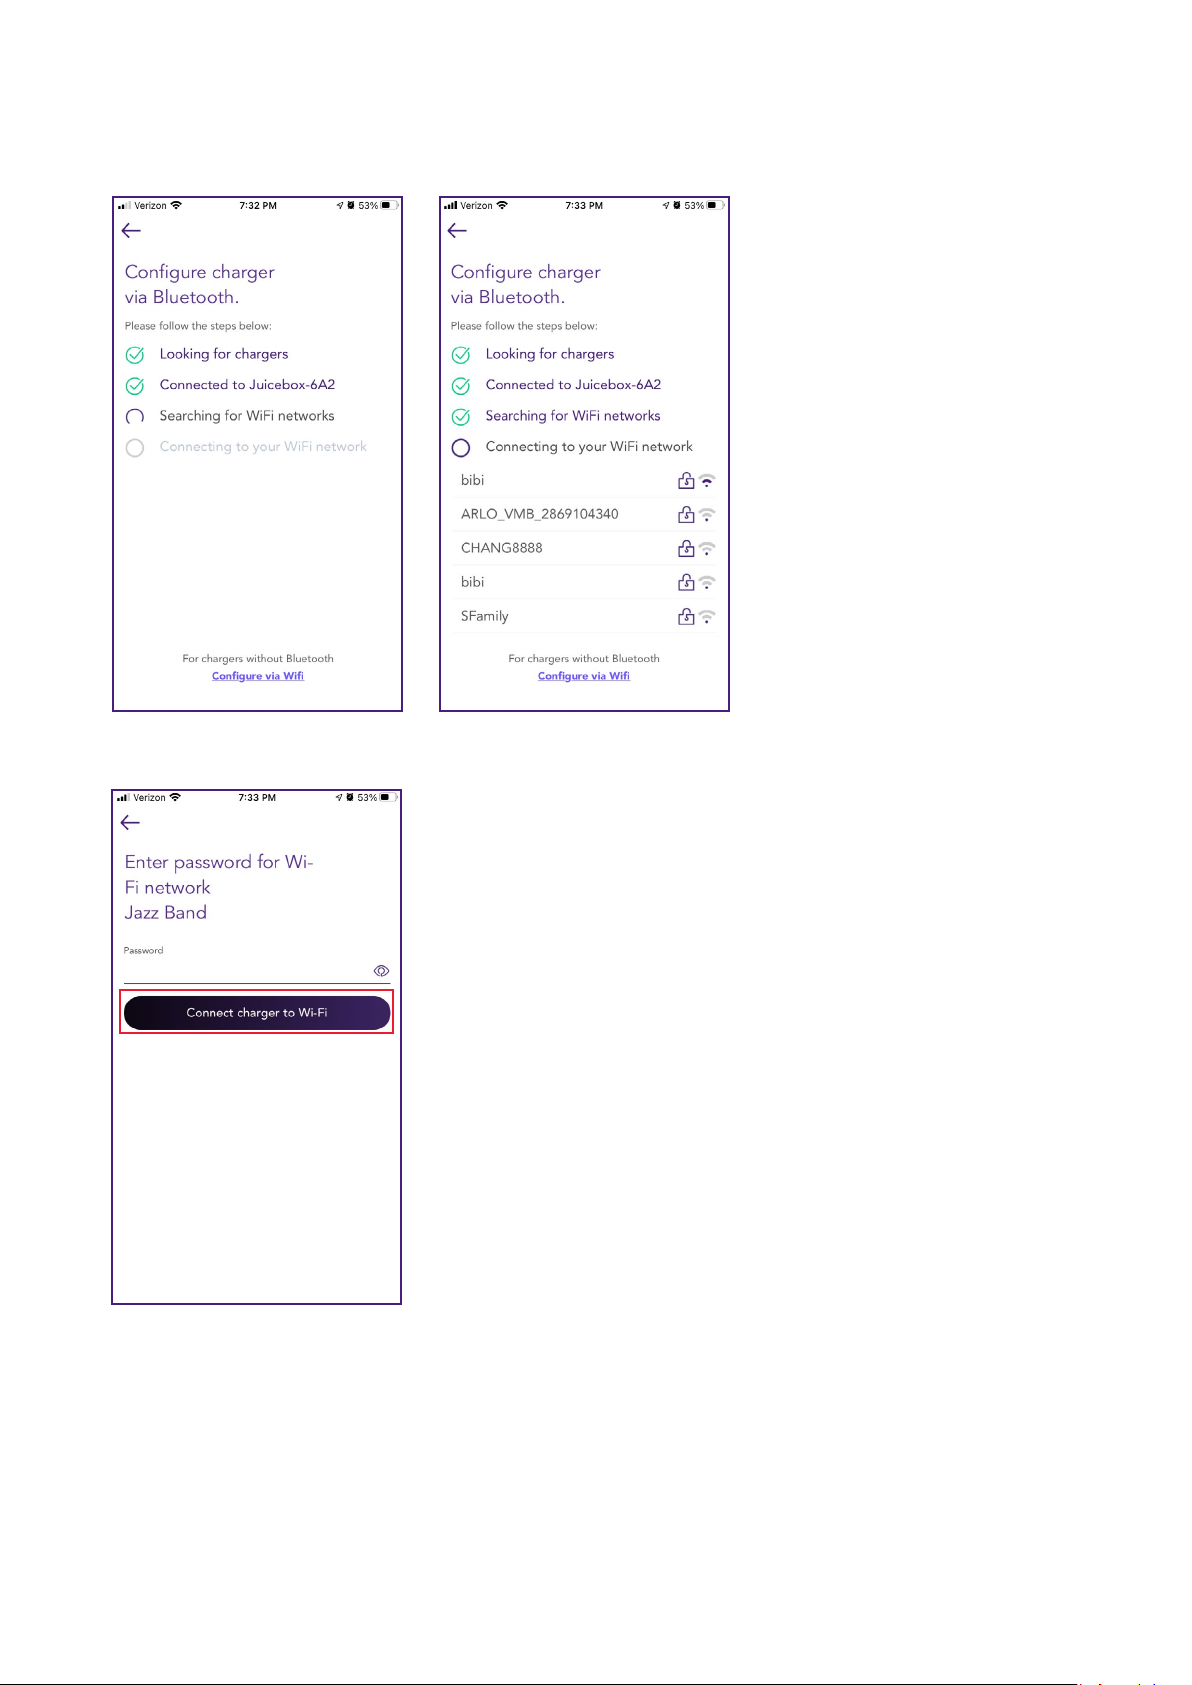
5. Chargers are scanned and listed on the screen. Select Pair to congure the charger.
6. Your JuiceBox is now connected to your account.
14
7. Wi-Fi networks are scanned and listed on the screen. Select the network you want to
connect your JuiceBox to.
8. Enter the password of the selected Wi-Fi network and select Connect charger to Wi-Fi.
15
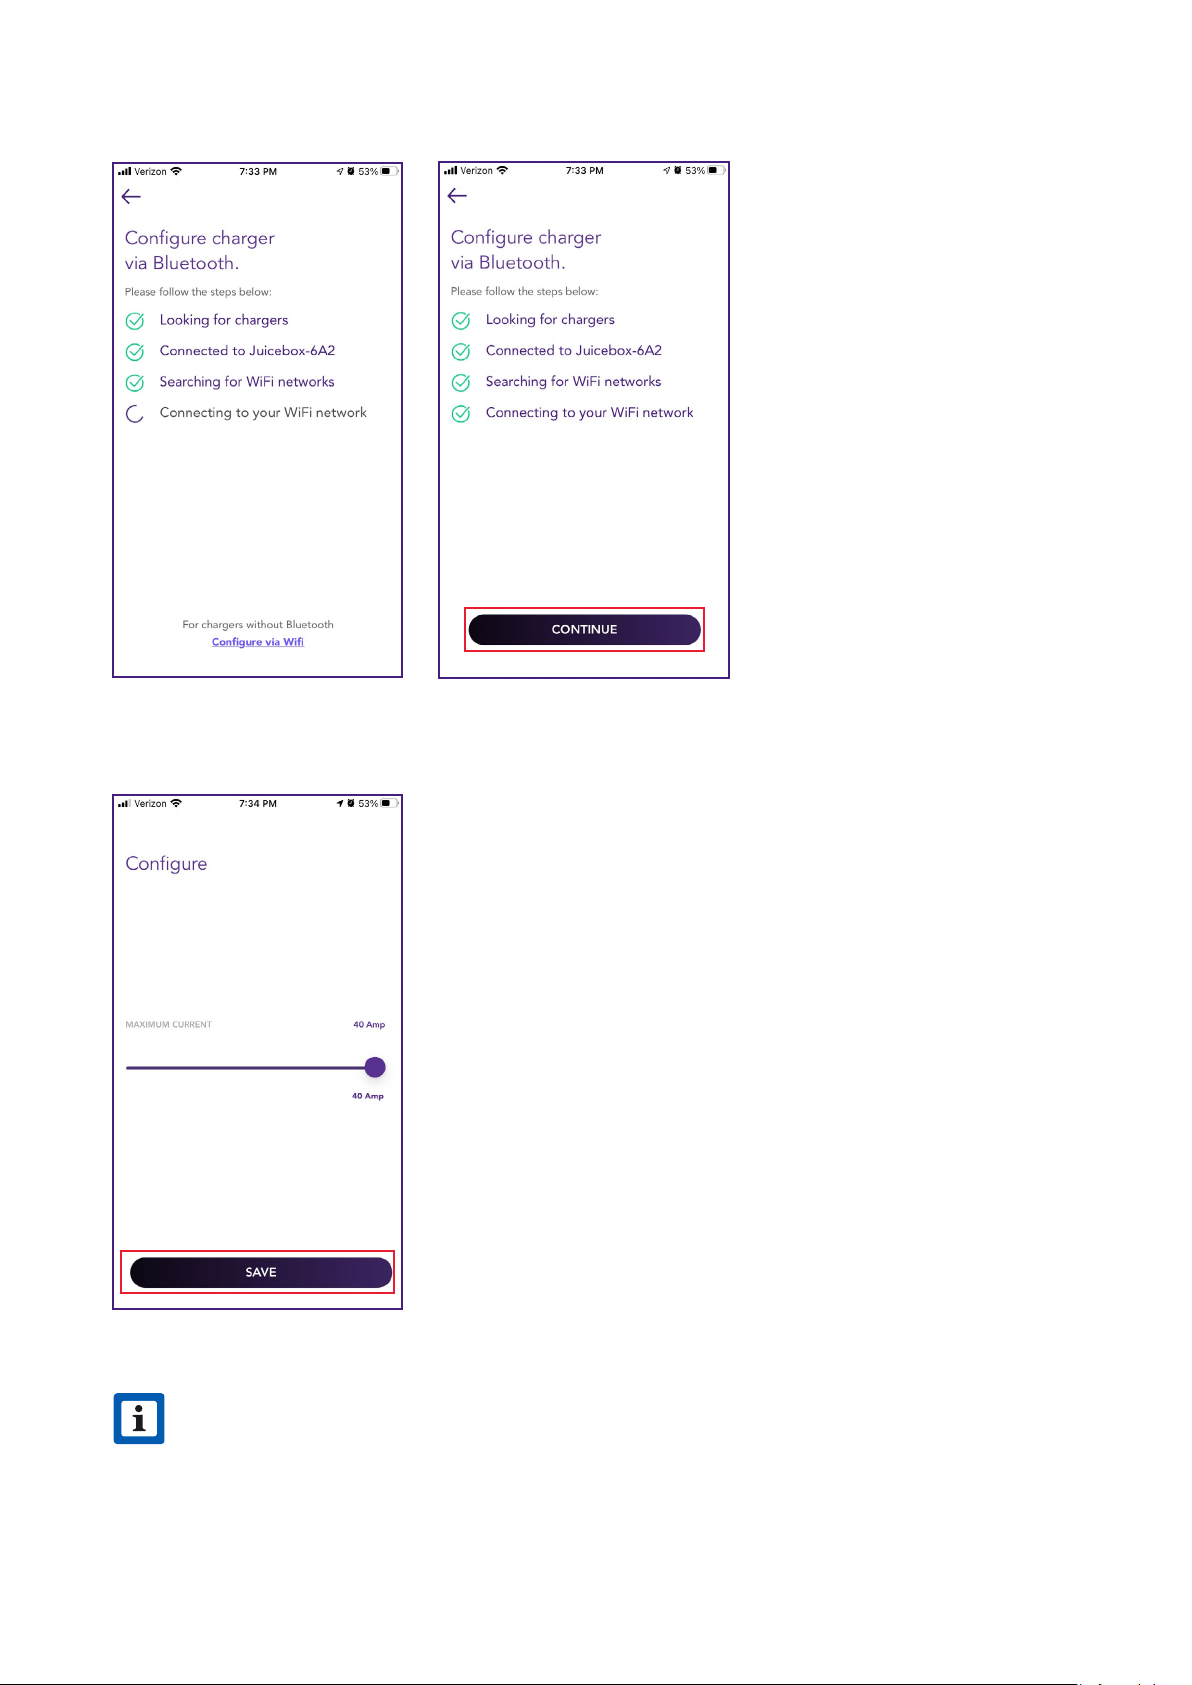
9. The JuiceBox is connected to your account. Select CONTINUE.
10. In the conguration screen, set the maximum current for charger at which you want to
charge your vehicle, then select SAVE.
NOTE
After connecting, JuiceBox checks its rmware version and peorms any necessary
updates. Wait 10 minutes before plugging in a vehicle.

17
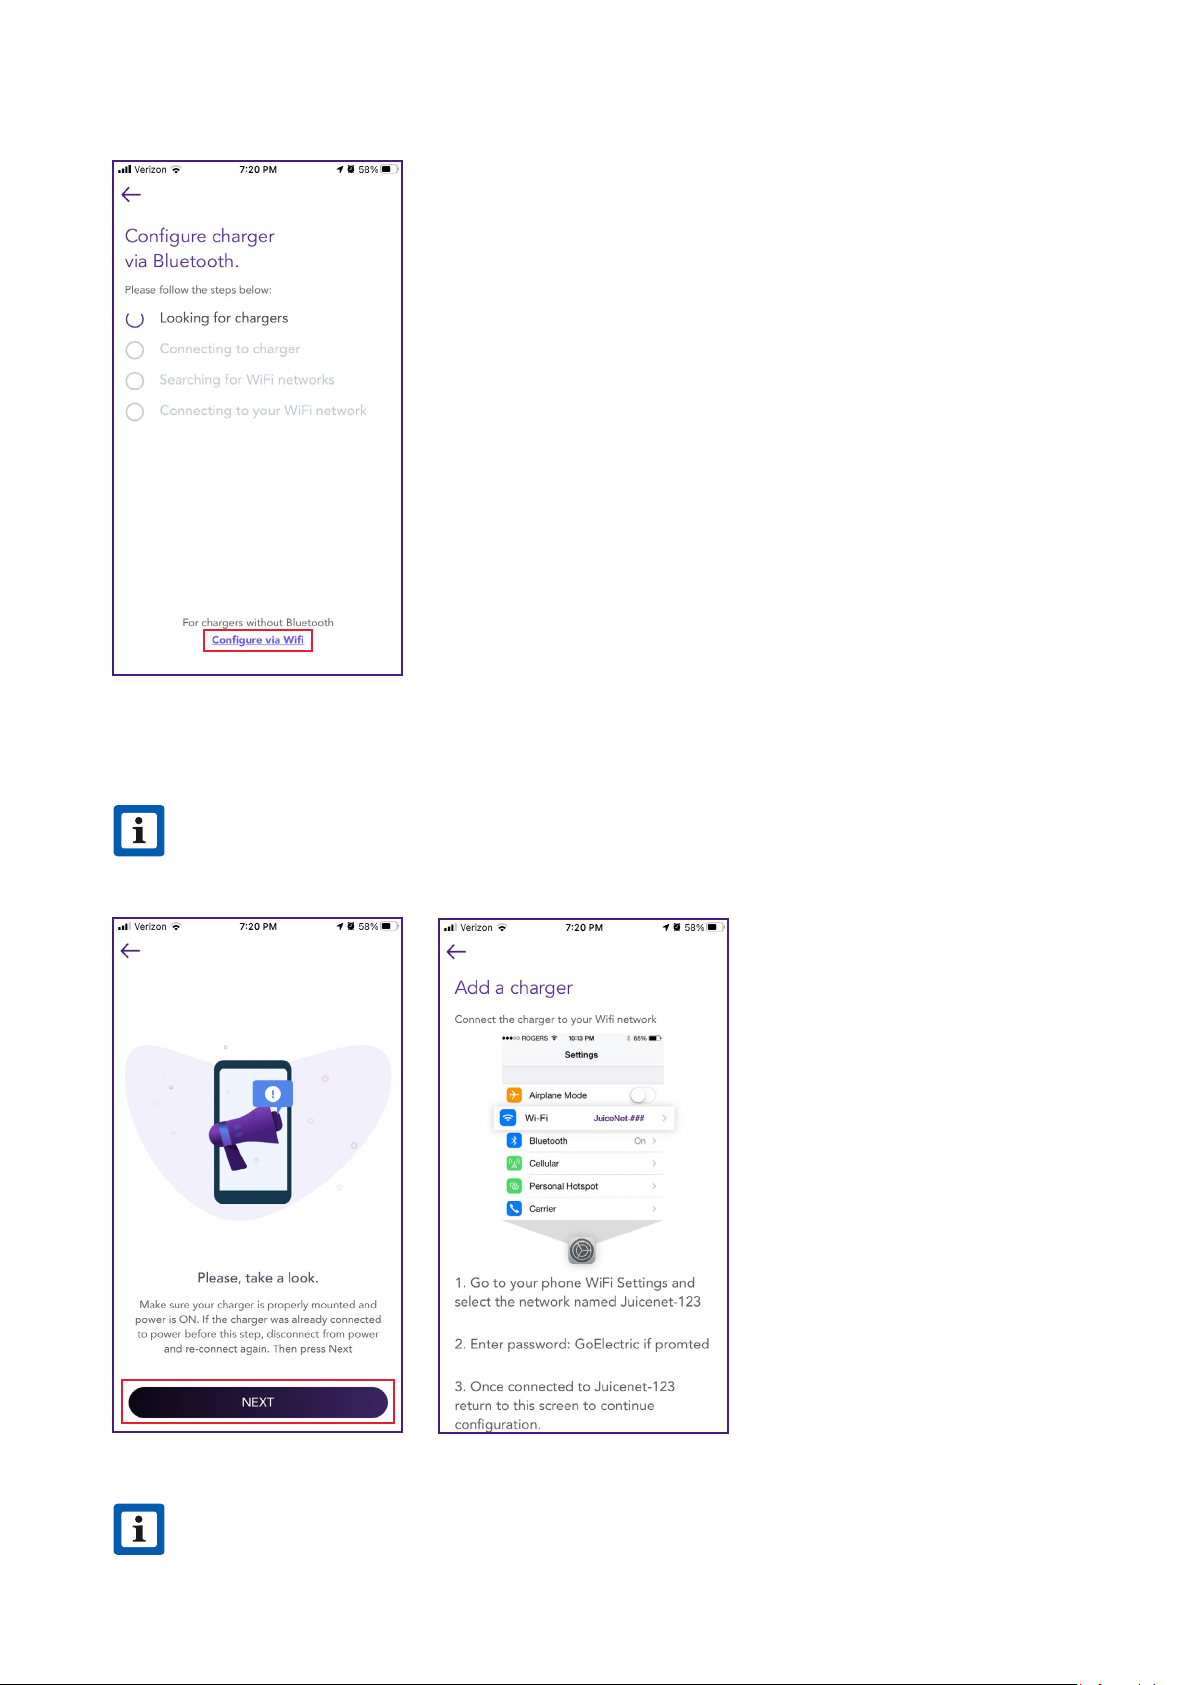
4. Select Congure via Wi.
5. Have the Wi-Fi network password ready, then select NEXT.
NOTE
If the JuiceBox is already power on before this step, disconnect it from power and
re-connect again before proceeding.
NOTE
After powering the JuiceBox, complete the steps 6 through 9 within 2 minutes.

18
6. Navigate to the Wi-Fi seings on your mobile device. Connect to the “JuiceBox-###” or
“JuiceNet-###” Wi-Fi network. If the network requires a password, use the password
“GoElectric” (case-sensitive).
7. Return to the JuiceCongure app.
NOTE
The actual name of the network varies by device, such as “JuiceBox-123”.

19
8. In the JuiceCongure app, select the preferred local Wi-Fi network.
9. Enter the Wi-Fi network password, if necessary, then select CONNECT CHARGER TO
WI-FI.
20
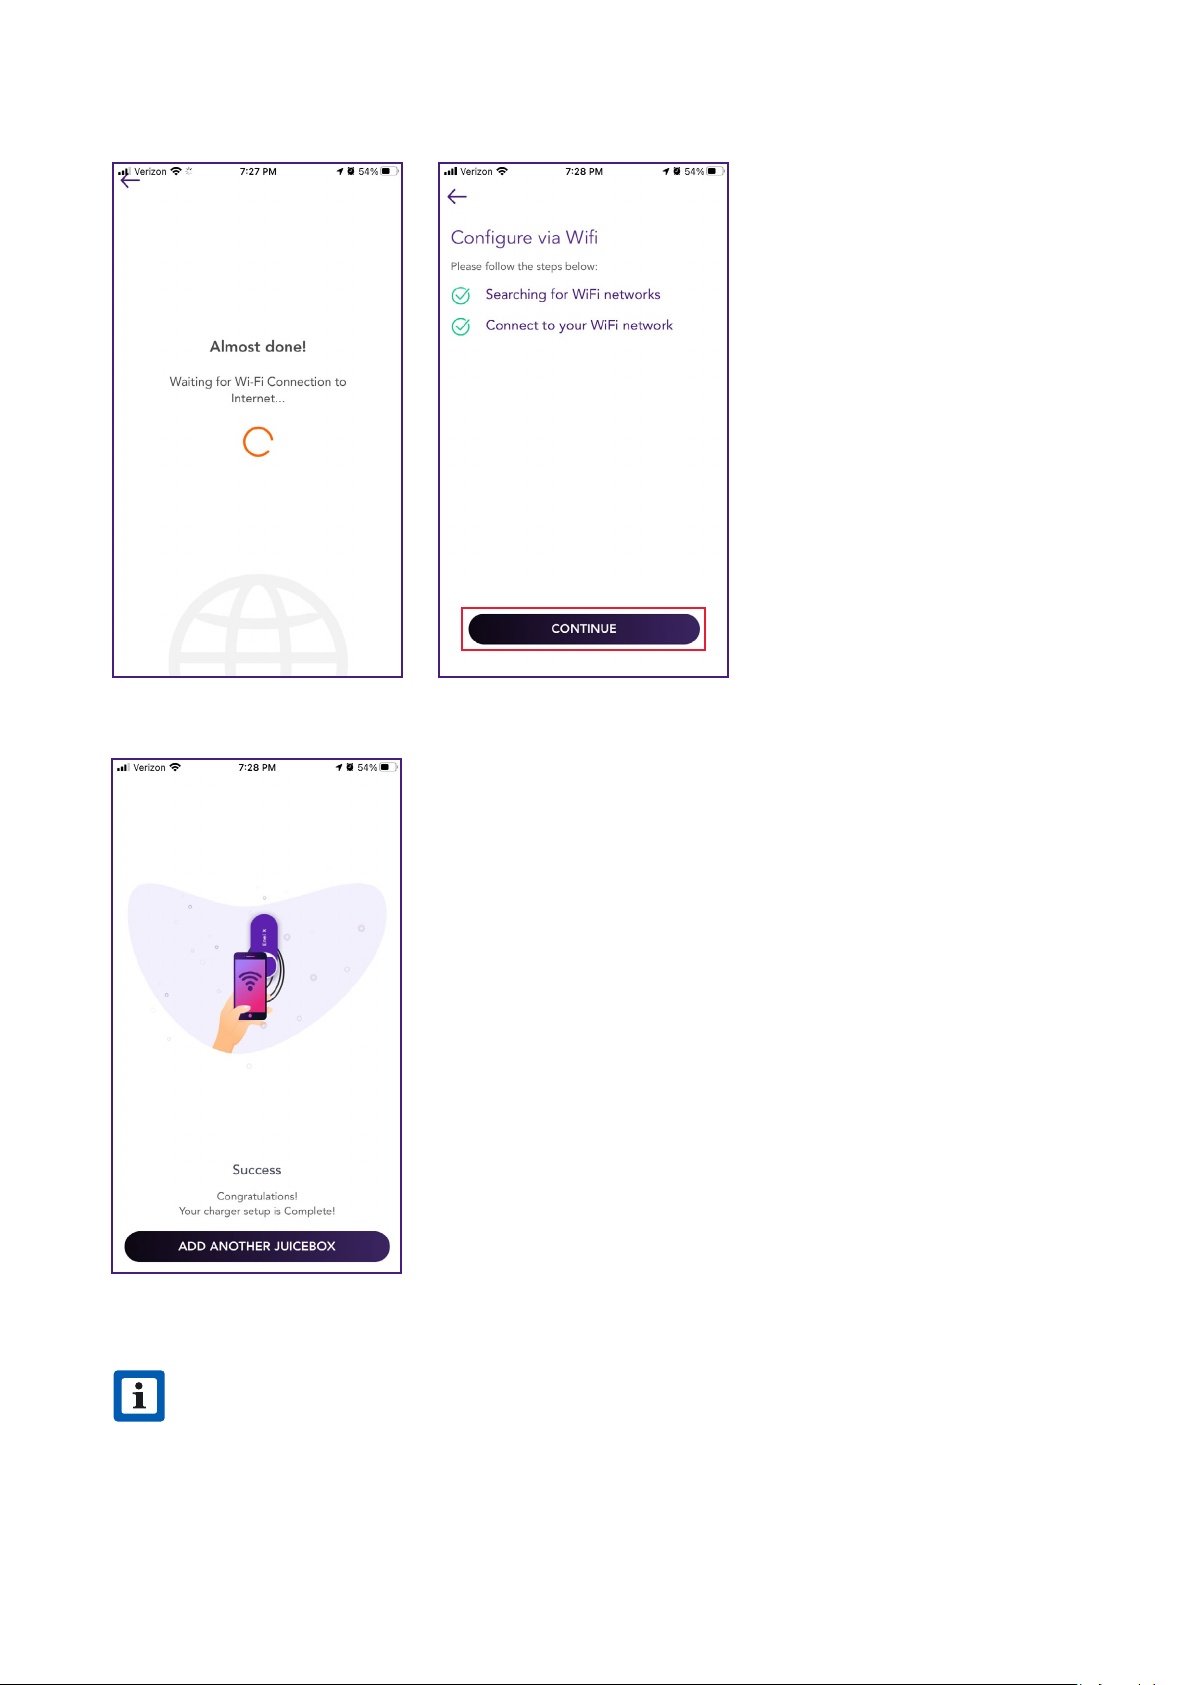
10. The app connects the JuiceBox to the Wi-Fi network, then select CONTINUE.
11. You did it! The JuiceBox is now online and ready to charge.
NOTE
After connecting, JuiceBox checks its rmware version and peorms any necessary
updates. Wait 10 minutes before plugging in a vehicle.
Other manuals for JUICEBOX PRO
2
Table of contents
Other Enel X Batteries Charger manuals

Enel X
Enel X JuicePump 150 User manual

Enel X
Enel X JUICEBOX PRO User manual

Enel X
Enel X Way JuiceBox OpenPay User manual

Enel X
Enel X JUICEBOX PRO User guide

Enel X
Enel X Waymedia 2 User manual

Enel X
Enel X JuicePump User manual

Enel X
Enel X Waypole User manual

Enel X
Enel X JuiceBox User manual

Enel X
Enel X Waypole User manual

Enel X
Enel X Way JuiceBox User manual


