Blue Torrent AC 50032 User manual
Thank you for choosing Blue Torrent.
PLEASE READ BEFORE RETURNING THIS
PRODUCT FOR ANY REASON.
SAVE THIS MANUAL FOR FUTURE
REFERENCE.
INSTRUCTION MANUAL
MODE D'EMPLOI
MANUAL DE INSTRUCCIONES
POOL WATCH SWIMMING POOL ALARM
MODEL NUMBER
AC 50032
NSF - 50
ASTM F2208

SAFETY GUIDELINES — DEFINITIONS
It is important for you to read and understand this manual. The
information it contains relates to protecting YOUR SAFETY and
PREVENTING PROBLEMS. The symbols below are used to help you
recognize this information.
Indicates an imminently hazardous situation which, if not
avoided, will result in death or serious injury.
Indicates a potentially hazardous situation which, if not
avoided, could result in death or serious injury.
Indicates a potentially hazardous situation which, if not
avoided, may result in minor or moderate injury.
(Used without word) indicates a safety-related message.
Used without the safety alert symbol indicates potentially
hazardous situation which, if not avoided, may result in
property damage.
IMPORTANT SAFETY
INSTRUCTIONS
When using an electrical appli-
ance, basic precautions should
always be followed, including the
following:
READ ALL
INSTRUCTIONS
BEFORE USING
THIS POOL ALARM.
DANGER:
WARNING:
CAUTION:
NOTICE:
• Do not allow to be used
as a toy. Close attention is
necessary when used by or near
children.
• Use only as described in this
manual.
2
• Battery fluid is corrosive and may
be toxic. It may be harmful or fatal if
swallowed. Avoid all contact with
this substance.
•Keep batteries out of reach of
children.
•Immediately remove old, weak, or
worn out batteries from your device.
Recycle or dispose of old, weak, or
worn batteries in accordance with
local, regional, or national law or
regulations.
•Never dispose of batteries in fire, as
they may leak and explode.
•Secure battery cover. Do not allow
batteries to become wet.
•When inserting batteries, follow the
polarity markings.
•Replace all batteries at the same
time. Do not mix new and old
batteries.
•Never mix alkaline, standard
(carbon-zinc), and rechargeable
(nickel-cadmium) batteries.
•Remove batteries when alarm is not
in use for an extended time.
•Do not put any object into openings.
•If appliance is not working as it
should, has been dropped,
damaged, or dropped into water,
return it to a service center.
•Do not allow children to operate the
alarm system.
•This appliance is intended for
household use only and not for
commercial or industrial use.
WARNING:
Read all safety warnings
and all instructions. Failure
to follow the warnings and
instructions listed below may
result in electric shock, fire and/
or serious injury.
WARNING:
To reduce the risk of fire,
electrical shock, or injury:

IMPORTANT SAFETY
INSTRUCTIONS,
CONTINUED.
Once reading these safety
instructions, follow the manual
step by step to ensure a quick,
easy, and safe installation.
• Protect the pool with a
barrier fence, a gate, a gate
or door alarm, a pool cover,
and any additional
protections.
•Never leave children
unattended near the pool.
•Keep the alarm in an area
where it can be easily heard.
•Maintain a proper water
level in your pool to ensure
proper detection.
•Once installed, test the
system on a weekly basis.
•Keep pool water clean and
clear. Green or cloudy water
caused by improper
maintenance can conceal
individuals who have fallen
into the pool.
•Monitor children in proximity
of the pool closely.
•Increase supervision if more
people or children are in the
pool.
•Under supervision, teach
children to swim as soon as
possible.
3
•Children who are unable to
swim should always wear a life
vest in the pool area.
•Learn life saving techniques,
especially for small children.
•Do not leave toys or objects
floating in an unattended pool.
Toys or objects could be seen
as an invitation for a child to
enter an unattended pool.
•Prohibit running near the pool.
•Store pool chemicals in a secure
location out of reach from
children.
•Remove the unit if water
temperature drops below 32°
F/0° C.
WARNING:
WARNING:
The AC 50032 is not
intended for negative edge
or infinity-style pools.
DANGER:
At the sound of alarm, an
immediate response is
imperative. Drowning can
occur in as little as three
minutes.
DANGER:
Have an action in plan
should the alarm sound.
Keep a working phone
within the pool area. Be
prepared for an
emergency.
The AC 50032 is a pool alarm
designed to detect intrusions
into an unsupervised pool. It
is not a lifesaving device. It
should never replace the
supervision of children by
responsible adults.
WARNING:
To reduce risk of injury:
4
POOL WATCH
AC 50032 POOL
ALARM FACTS
•This is a alarm designed to
detect an intrusion into the
swimming pool, especially by
young children. Alarm should
only be used for this application.
•This alarm has been engineered
to circumvent false alarms
caused by wind, rain, floating
objects, or automatic cleaners.
•Loaded with patented features
and the result of years of
research and development, this
alarm when used properly is
designed to provide an efficient
and trouble-free solution to
pool security.
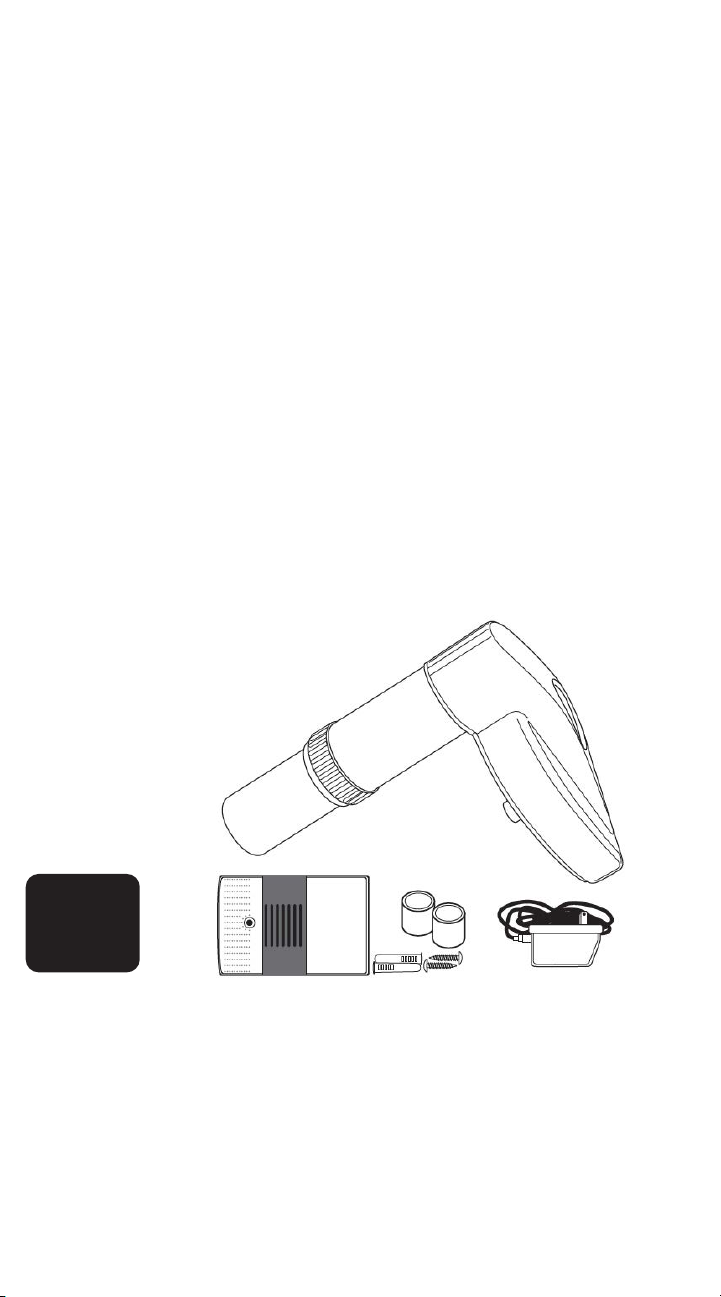
A. Main Alarm Body
B. Remote Siren
C. AC Adapter for Remote
Siren
D. Mounting Screws for
Main Alarm
CONTENTS:
USES HIGH TECH SENORS
FOR ELEVATED SAFETY.
Alarm must have working
batteries. Test unit weekly.
NSF - 50
ASTM F2208
Begin installation by carefully
unpacking box. If any parts
are missing, contact
for replacements.
NOT INCLUDED: 6 Long
Life Alkaline D Cell 1.5V
Batteries and 1 Long Life
Alkaline 9V Battery

5
WHERE TO INSTALL ALARM
To ensure alarm performs at its optimal capability, choose
closest pool type from diagram below and use the
corresponding mounting points for alarm installation.
REQUIRED TOOLS:
For a Rectangular Pool: the AC 50032 should be installed at
location 1 for pools up to 32' x 16' or 9.6 meters x 4.8 meters. A
second AC 50032 should be installed at location 2 for larger pools.
For a Freeform Pool: the AC 50032 should be installed at location
1 for pool size is up to 26' or 8 meters. For larger pools, a second
alarm is required, and AC 50032 alarms should be installed at
location 2 and location 3.
For an Oval Pool: the AC 50032 should be installed at location 1
for pools up to 24' or 8 meters. For larger pools, a second alarm is
required, and AC 50032 alarms should be installed at location 1
and location 2.
For an L-Shaped Pool: the AC 50032 should be installed at
location 1 for pools up to 17'. For larger pools, a second alarm will
be needed at location 2.
For a Round Pool: the AC 50032 should be installed in any of the
4 locations for pools up to 24'. For larger pools, a second alarm
will be needed.
1. Pencil
2. Phillips head screwdriver
3. 1/4" drill bit
4. Electric drill
5. Adjustable wrench
6. Masking tape
6
INSTALLING THE ALARM
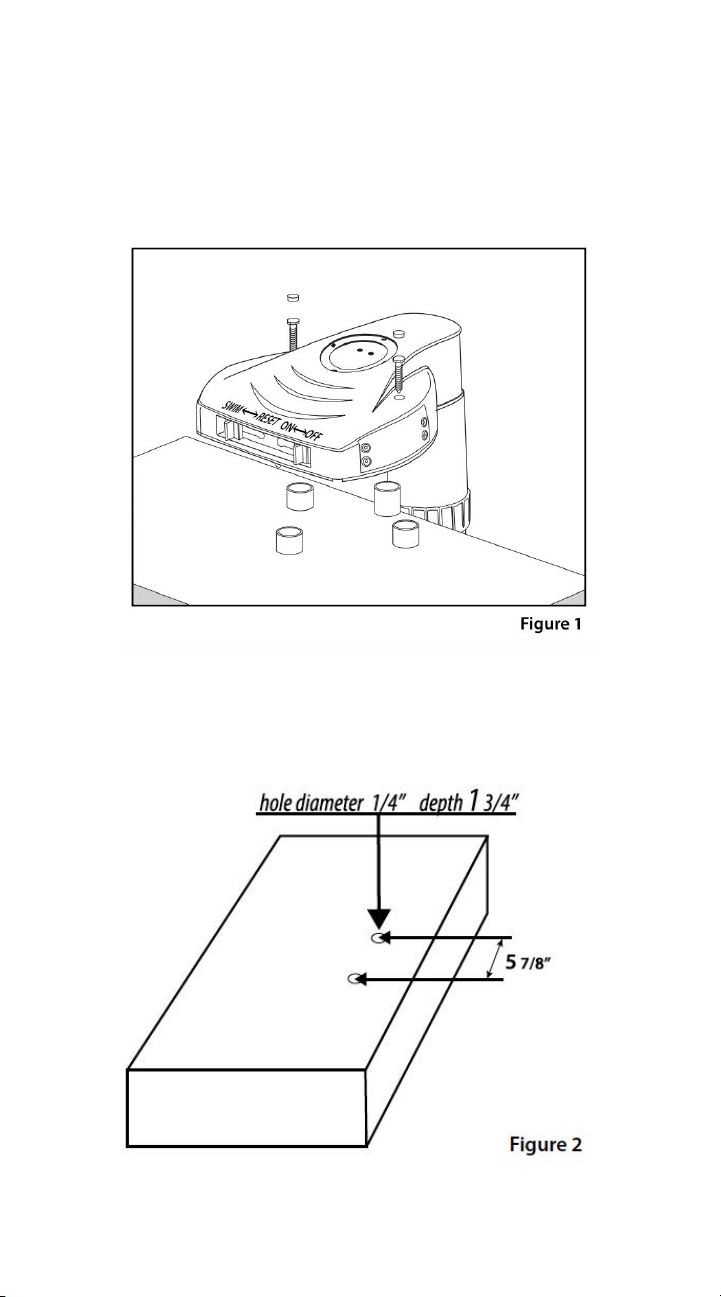
STEP 1: Test fit alarm in location determined above. As shown in
Figure 1, the alarm sensor pipe throat should be in the water and
the mounting area level and flat. The alarm base should easily
snap into the bottom of the main alarm body and allow the sensor
throat to extend directly into the pool at a 90° angle.
STEP 2: Use pencil to mark two holes to be drilled into deck to
secure alarm, aligning marks with holes in left and right of the
alarm body head. Refer to Figure 2 for appropriate spacing.
7
STEP 3: Drill holes into hole markings with a 1/4" masonry drill.
Refer to Figure 2 to drill holes 1.75" deep. To achieve the right
depth, measure 1.75" inches from the end of the drill bit, and mark
point with masking tape. Stop drilling when deck is level with
tape. Remove dust and debris from hole. Remove nuts and
washers from mounting anchors, and insert mounting anchors
into previously drilled holes. To mount into wood deck or metal
rail, use screws provided.
WARNING:
Use power tools only as recommended by
manufacturer. Do not install alarm or use
power tools when swimmers are in the
pool. Remove all power tools from pool
area as soon as possible.
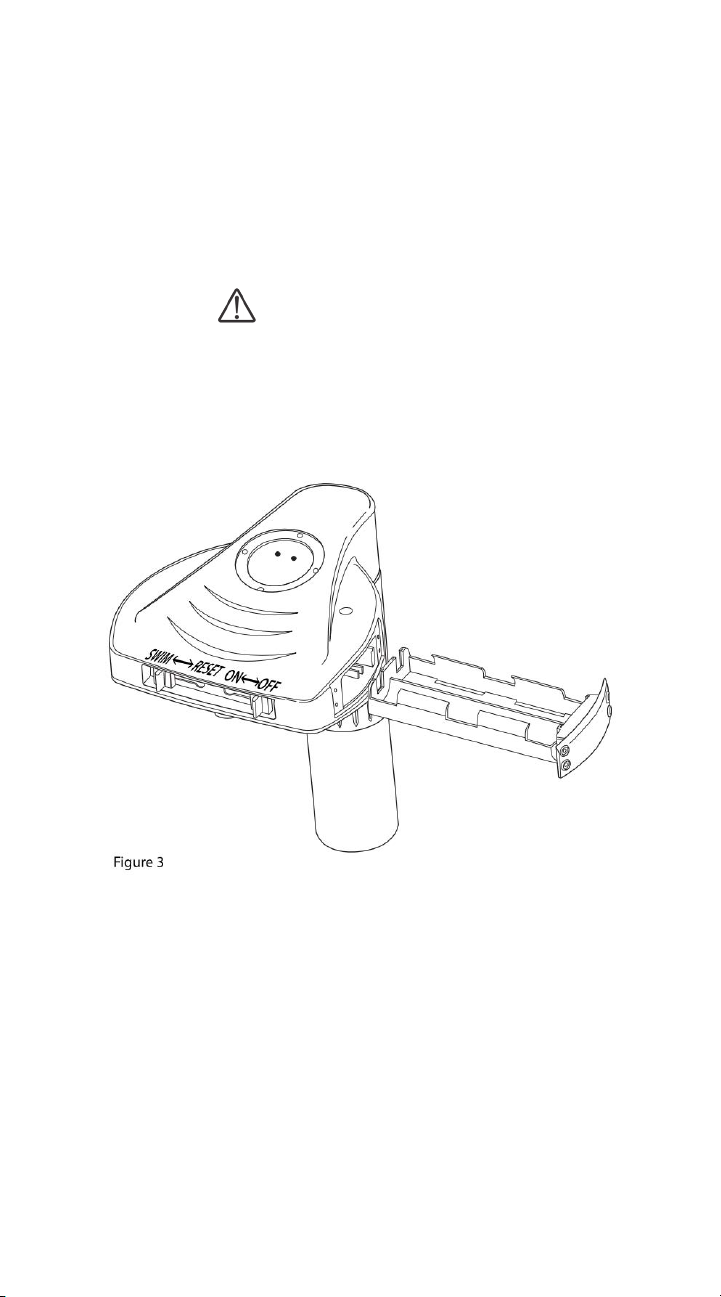
STEP 4: To install/replace batteries, remove all four screws
from the battery cover. Refer to Figure 3. Do not lose screws.
When the 6 long life alkaline D cell 1.5V batteries are installed,
the alarm will loudly beep twice. Next, turn front switch to SWIM
mode. The alarm will sound in one long burst to signify it is in
swim mode. WHITE LED will flash on top of alarm head every 20
seconds to indicate that the alarm is on and can be handled for
3 minutes without siren sounding.
STEP 5: Screw the main alarm body into mounting anchors on
pool edge.

8
STEP 6: Adjust and maintain pool water level. This step is
imperative in order for the pool alarm sensor to perform properly.
The alarm sensor throat should be no more shallow or deep than
0.19" to 0.39" in the water at all times. Never block or fill air hole
located on the back of alarm sensor throat. See Figures 4.1-4.4 for
improper water level and Figure 5 for proper water level.
STEP 7: Mount the Remote Siren no more than 100 linear feet
from the alarm base unit in an area inside your home where it will
be heard throughout the house in the event of alarm sounding.
FIG. 5
0.19" - 0.39"/
9
MOUNTING THE REMOTE SIREN: Remove the Phillips head
screw from the back of the remote siren. Install 1 long life alkaline
9V battery and replace cover. Plug the AC adapter into the
remote siren. Then place remote siren on flat surface or use a
screw to mount it to wall near electrical socket. Plug AC adapter
into electrical socket, using Figure 6 for reference. To show
function, the remote will give two short sirens and display a RED
LED light. When siren receives a trigger signal from the main alarm
unit, it will sound. Battery in remote siren unit is intended as
backup in the case that main AC power should fail. Make sure main
AC adapter is plugged in at all times. If battery in main alarm is low,
remote siren will beep once each 8 seconds. It's imperative at that
time to change battery for main alarm.
• Do not use with damaged cord or plug. If appliance is not
working as it should, has been dropped, damaged, left outdoors
or dropped into water, return it to a service center.
• Do not pull or carry by cord, use cord as a handle, close a door
on cord, or pull cord around sharp edges or corners. Do not run
appliance over cord. Keep cord away from heated surfaces.
• Do not unplug by pulling on cord. To unplug, grasp the
plug, not the cord.
• Use only in a standard electrical outlet (120V/60Hz).
WARNING:

10
STEP 8: Turn the return jets built into inside pool walls down
toward the bottom of the pool, using Figure 7 as a guide. This
will both help conserve the chemical consumption of your pool
and allow the pool alarm to work efficiently. If water features
such as waterfalls, automatic cleaners, or pump cycling cause
false alarms, turn the water feature off when the pool is not in
use. Contact the manufacturer with any additional questions.
UNDERSTANDING "FAR" MODE
To help reduce false alarms, the Pool Watch AC 50032 Alarm is
equipped with "False Alarm Resistant" technology. When in FAR
mode, the alarm monitors the water and detects outside
interference from conditions such as wind and automatic
cleaners. It then compensates for these factors without
compromising alarm safety.
FAR mode is alternate to the alarm's default armed mode
setting. After the GREEN LED light has been on for a constant 6
seconds, the alarm will beep for 1 second, and the LED will then
flash every 2 seconds. After any 5 minute period without
detecting movement, the alarm will automatically revert to
normal armed mode.
The alarm can also be taken out of FAR mode by adjusting the
switch from RESET to SWIM to RESET.
11
- Duct tape
- Strong string (6 ft.)
- 1.5 liter water bottles (4 units)
TESTING THE AC 50032 POOL ALARM
The unit MUST be tested on a weekly basis. To test the alarm,
create a simple device (see Figure 8 and Figure 9) that will
stimulate the size and weight of a young child using the
following:
INSTRUCTIONS:
1. Fill the 4 bottles with water.
2. Use the duct tape to strap all 4 bottles together.
3. Tie the string tightly to one of the bottles.
4. Drop the bottles into the pool from a height of 4.5 inches.
5. The alarm, if working, will sound.
6. Use the string to retrieve the bottles.

12
USING THE AC 50032 POOL ALARM
SWIM MODE:
The unit must be set to "SWIM" mode before swimmers enter the
pool in order for the pool to be used without the alarm sounding.
Once the switch at the front of the alarm head is moved to SWIM/
ON, the alarm will emit a long beep. The LED in the transparent
cover will flash WHITE until SWIM mode is turned off. When all
swimmers exit the pool and the water becomes still for more than
3 minutes, the alarm will emit two beeps to announce it is again in
active protection mode. The GREEN LED in the transparent cover
will flash every 21 seconds. SWIM mode can also be turned off
manually by moving the switch to the RESET/ON position.
RESETTING THE ALARM:
If the alarm is sounding, check the pool first for unsafe conditions.
If the pool is clear of danger, push the switch button to the
RESET position.
POWERING THE ALARM ON/OFF:
To shut off the pool alarm system, move the switch to OFF. To
turn on the alarm, move the switch to ON. The system will emit
one beep to indicate activation.
LOW BATTERY INDICATION:
When the alarm has low battery power, it will emit a chirp every 8
seconds to indicate that batteries must be immediately replaced.
Refer to Step 4 for battery replacement.
WINTERIZING THE ALARM:
When the pool is closed and covered for the winter, remove the
main alarm body from the pool, remove the batteries from the
main unit and remote siren, and store all parts indoors. The alarm
should also be removed from the pool if the air temperature drops
below 32° F. Freezing pool water will damage the alarm and freeze
damage is not covered by warranty.
13
TROUBLESHOOTING GUIDE
Changes or modifications not expressly approved by party responsible
for compliance could void the user's authority to operate equipment.
ALARM INDICATOR GUIDE
1. Batteries ON: Two beeps and the GREEN LED
flashes every 21 seconds.
2. From ON to OFF: The RED LED will flash every 20
seconds.
3. From OFF to ON: One beep and the GREEN LED
will flash every 21 seconds.
4. From RESET to SWIM: One beep and the WHITE
LED will flash every 20 seconds.
5. From SWIM to RESET: Two beeps and the GREEN
LED will flash every 21 seconds.
6. ALARM SOUNDING: The RED LED will be
continuously on. Alarm will last five minutes if not
stopped manually.
7. Self-REARMED: After water surface is calm for 3
minutes, alarm will beep twice and GREEN LED will
blink.
8. FALSE ALARM RESISTANT MODE (FAR): One beep
after GREEN LED light flashes for a constant 6
seconds. Then GREEN LED will flash every 2
seconds.

14
3 YEAR
LIMITED
WARRANTY
Blue Torrent warranties this
product to be free from defects in
material or workmanship of a
period of three (3) years following
the date of purchase, provided
that the product is used in a home
environment. This limited warranty
does not cover failures due to
abuse, accidental damage or when
repairs have been made or
attempted by anyone other than
Blue Torrent and its Authorized
Service Centers.
A defective product meeting the
warranty conditions set forth
herein will be replaced or repaired
at no charge in either of two ways:
The first, which will result in
exchanges only, is to return
the product to the retailer from
whom it was purchased
(provide that the store is a
participating retailer). Returns
should be made with the time
period of the retailer’s policy for
exchanges. Proof of purchase may
be required. Please check with the
retailer for its specif-
ic return policy regarding time
limits for returns or exchanges.
The second option is to take or
send the product (prepaid) to
Pump Service Center for repair or
replacement.
Pump Service Center
(516) 796-2425
1075 Hicksville Road
Seaford, NY 11783 U.S.A.
This warranty does not apply to
accessories. This warranty gives
you specific legal rights and you
may have other rights which vary
from state to state. Should you
have any questions, contact the
manager of The pump service
center listed above.
This product is not intended for
commercial use, and accordingly,
such commercial use of this
product will void this warranty.
All other guarantees, express or
implied, are hereby disclaimed.
FREE WARNING LABEL
REPLACEMENT
If your warning labels become
illegible or are missing, call
1-800-544-6986 for a free
replacement.
Manufactured by
Blue Torrent Pool Products
444 E 81 St St.
New York, NY 10028-5859
Blue Torrent and
Blue Torrent logos and product
names are trademarks of Blue
Torrent, used under license.
All rights reserved.
Table of contents


