Blue Wave Monterey NG2585 User manual

MONTEREY 8' POOL TABLE
ASSEMBLY INSTRUCTIONS
NG2585
Please Do Not Hesitate to
Contact Our Consumer Hotline
at 800-759-0977
with Any Questions That May
Arise During Assembly or
Use of This Product!
Ver. 0417

THANK YOU!
Thank you for purchasing this product. We work around the clock and around the globe to ensure
that our products maintain the highest possible quality. However, in the rare case of issues during
assembly or use of this product, please contact our Consumer Hotline at 800-759-0977 for immediate
assistance before contacting your retailer. Please read the warranty information at the back of these
assembly instructions for further details.
2
CARE AND USE
1. This product is intended for INDOOR use only.
2. Do NOT drag the table when moving it, as this will damage the legs.
ASSEMBLY TIPS
1. Find a clean, level surface to begin the assembly of your game table. We recommend that two adults
work together to assemble this game. You may want to carefully cut or tear the four corners of the box
so that the bottom of the box can be used as your work surface.
2. Remove all of the contents from box and verify that you have all of the parts shown on the Parts
List before you begin assembly. Note: Some parts may be pre-installed or pre-assembled.
3. Some figures or drawings may not look exactly like product.
4. When installing parts that have more than one screw or bolt, hand tighten all screws or bolts
in place before final tightening with screwdriver or wrench.
5. Electric screwdrivers may be helpful during assembly; however, please set a low torque and use
extreme caution because screws may be stripped or overtightened, resulting in damaged parts, if the
electric screwdriver’s torque is set too high.
WARNINGS!
READ AND FOLLOW ALL ASSEMBLY, OPERATION AND SAFETYINSTRUCTIONS CAREFULLY.
CHOKE HAZARD - THIS ITEM MAY CONTAIN SMALL BALLS AND PARTS
NOT SUITABLE FOR CHILDREN UNDER 3 YEARS OF AGE.
IMPORTANT! PLEASE READ THESE ASSEMBLY INSTRUCTIONS
IN ENTIRETY BEFORE ASSEMBLING YOUR PRODUCT.
After reading the assembly instructions, if you don’t feel comfortable doing the
assembly yourself, you can search local listings for a professional Pool Table
Installer in your area. To help with assembly, a video is available at:
https://www.bluewaveproducts.com/pages/slate-table-assembly

3
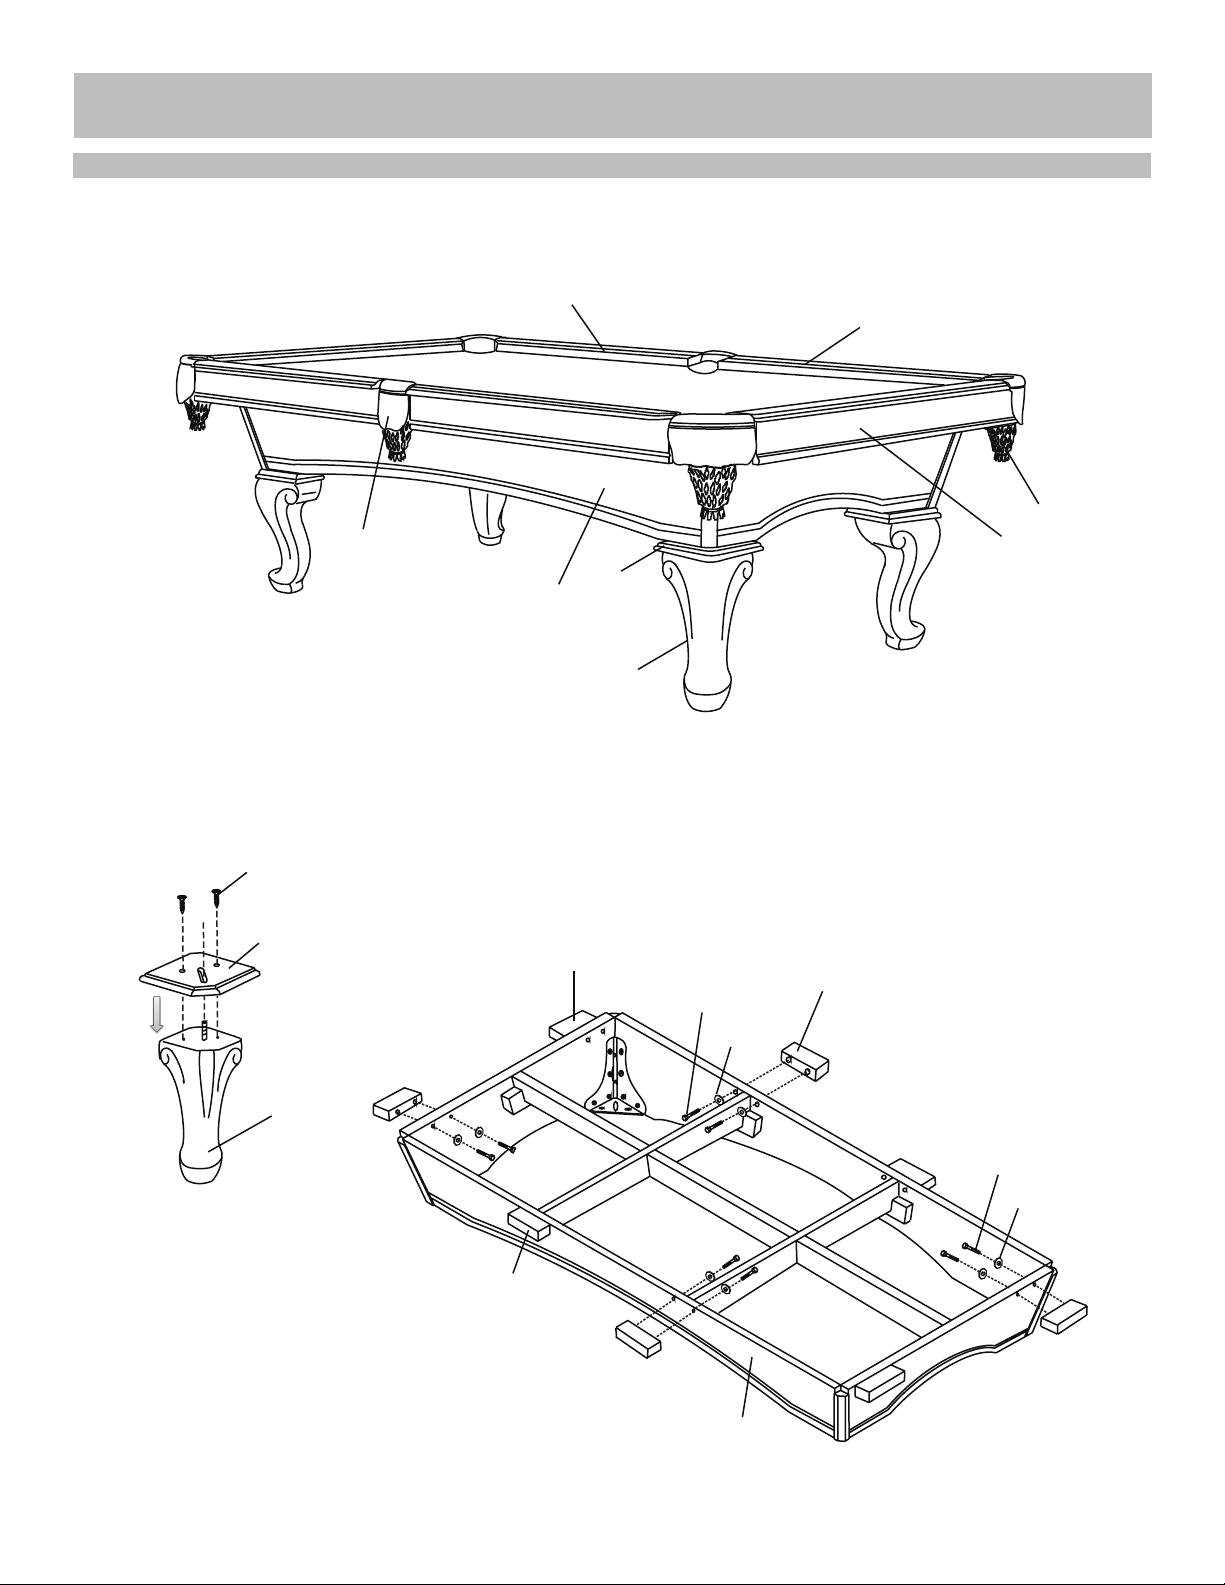
Parts List
4/17
MONTEREY 8' POOL TABLE - NG2585
P1
Leg with Leg Leveler
x4 x4
P2
x8
P3
x1
P4
x2
P5
x2
P6
x2
P7
x2
P8
x4
P9
x1
P10
x1
P11
x1
P12
x1
P13
x6
P14
Slate Anchor Block Table Cabinet
Leg Support Brace Top Rail Left Side
Top Rail Right Side Side Pocket Corner Pocket
Top Rail End Slate (Left)
Slate (Right)
Slate (Center) Play Surface Cloth Rail Cloth
PARTS
x2
x1
A2
x1
A3
x1
A4
x2
A5
Cue Stick
Bridge Head
Rail Brush
Bridge Stick
Cue Chalk
A1
x1
x1
A7
Billiard Ball Set
Triangle
A6
Illustrations Not to Scale
HARDWARE PACK - NG2820 Illustrations Not to Scale
NG2585__*
NG2585__*
NGP2810 NGP2813
NGP2815
NGP2812NGP2811
NG2690B
NGP2817
NGP5191**
NGP2816
NGP5191** NGP2819**
NGP2818
NG2690B
NGP2814
NGP5077**
NG2690B
NGP5136** NGP5135** * Table Cloth is available separately in 5 colors and includes
6 pre-cut rail pieces, Item No. NG2585__: Add the following letters
after numbers to identify cloth color: BK (black), BR (burgundy,
CA (camel), GR (green), or RD (red). Surface Cloth and Rail Cloth
are available as combined sets only.
** All items also available as Accessory Kit, NG2543
x1
P15
Feather Stripping
H1
x4
H2
x4
H3
x1
H4
x8
Wood Screw
H5
x8
H6
x16
H12
x24
H11
x18
H10
x18
H9
x12
H8
x12
H7
x28
Flat Washer
#9 X 1-3/4" Washer Screw Hex Bolt 5/16”X 2"
(Slate Anchor Block Bolt)
Wrench 3/8”
#9 X 2-1/2" (Slate Screw)
Wood Screw Hex Bolt 5/16” X 3/4"
(Pocket Bolt) Dome Washer 3/8"
(Rail Washer) Wood Screw#6 x 3/4”
(Pocket Strap Screw)
Hex Nut 3/8"
5/16" (Rail Bolt)
Hex Bolt 3/8” X 2-1/4"
Flat Washer 3/8”
NGP2809
NG2808
For replacement parts please call 800-759-0977.

4
P4
P1
P2
P8
P9
P6
P5
P7
STEP 1 STEP 2
PARTS IDENTIFIER
P1
P2
H4
P4
P3
P3
P3
H6
H7
H6
H7
THANK YOU!ASSEMBLY INSTRUCTIONS

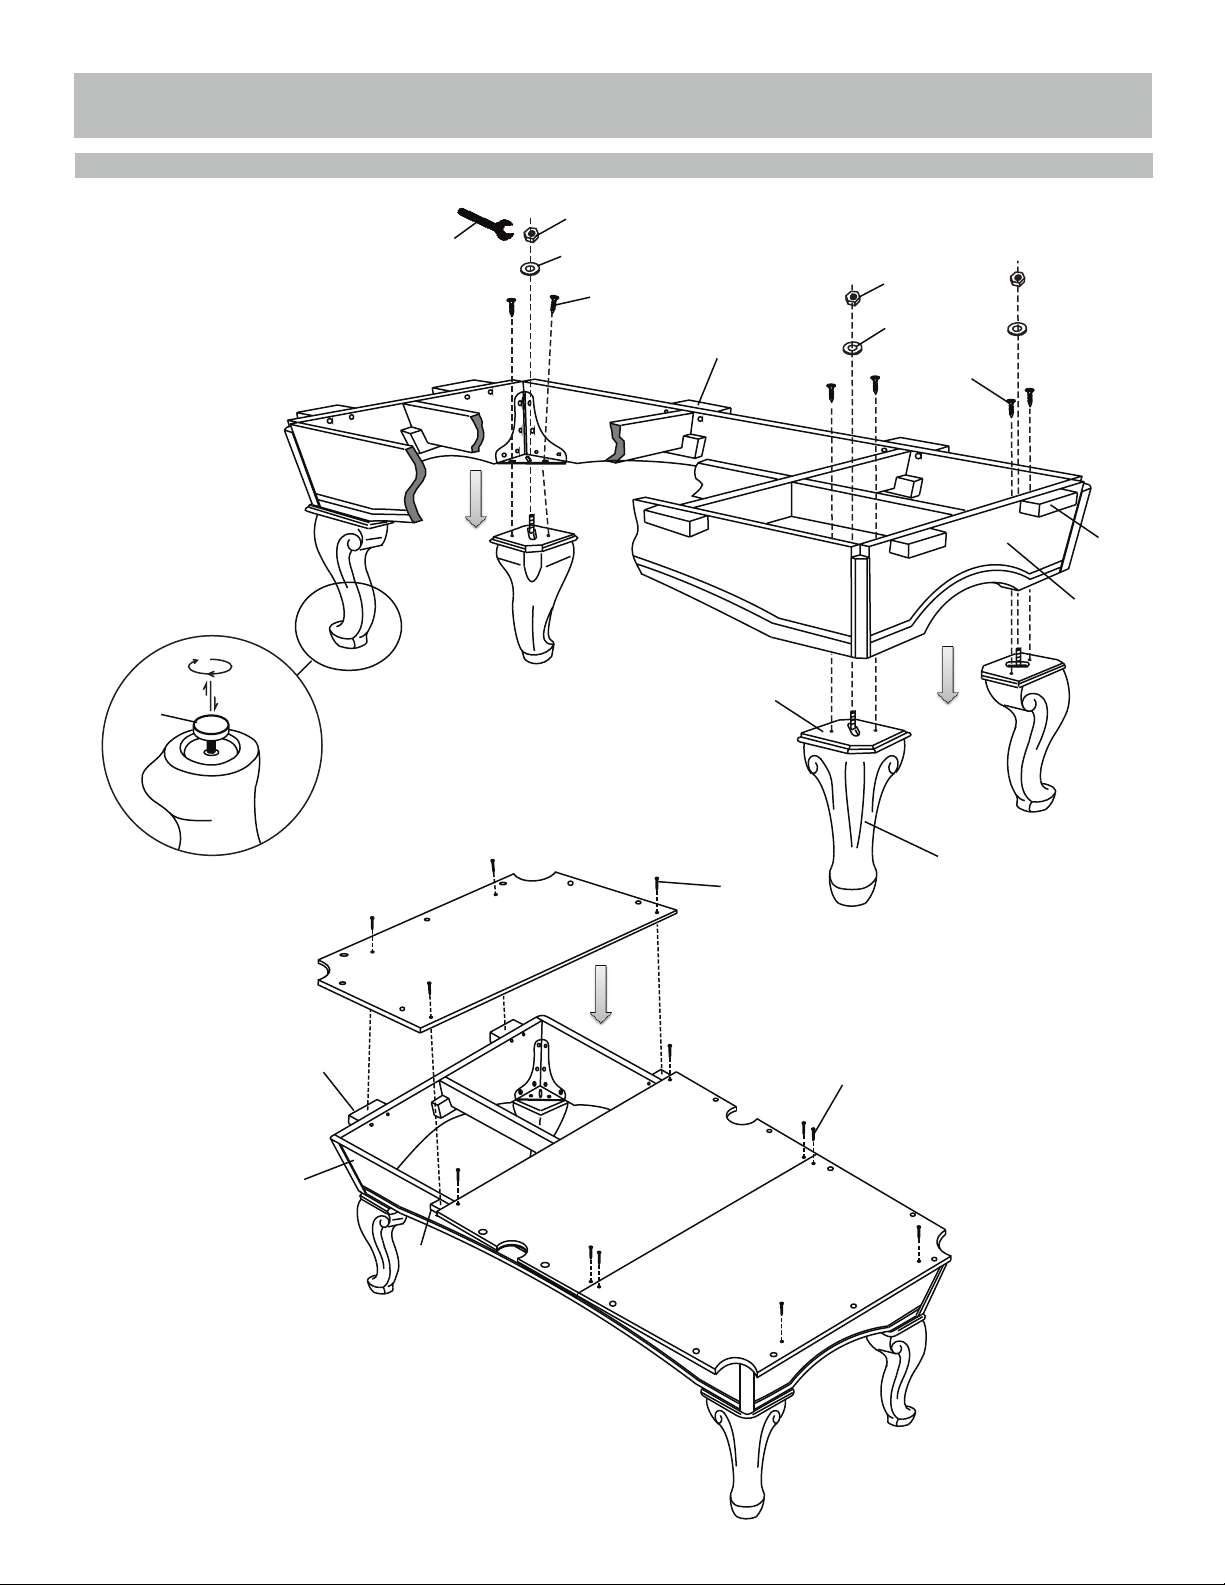
STEP 3
Leveler
Pre-installed
P3
P4
P3
P1
P2
H1
H2
H5
H3
H1
H2
H5
5
THANK YOU!ASSEMBLY INSTRUCTIONS (CONT.)
STEP 4
P4
P3
P12
P11
P10
H8
H8
P3
6
THANK YOU!ASSEMBLY INSTRUCTIONS (CONT.)
STEP 5
P13
NAP
Head
Foot Right Side
Left Side
Cuts
Cuts
STEP 6
P13
Wrinkles
Wrinkles

7
THANK YOU!ASSEMBLY INSTRUCTIONS (CONT.)
Staples
Staples
STEP 7 P13
Head
Right Side
Foot
Left Side
STEP 8 Cut Holes in Cloth at
Rail Bolt Locations

THANK YOU!
8
ASSEMBLY INSTRUCTIONS (CONT.)
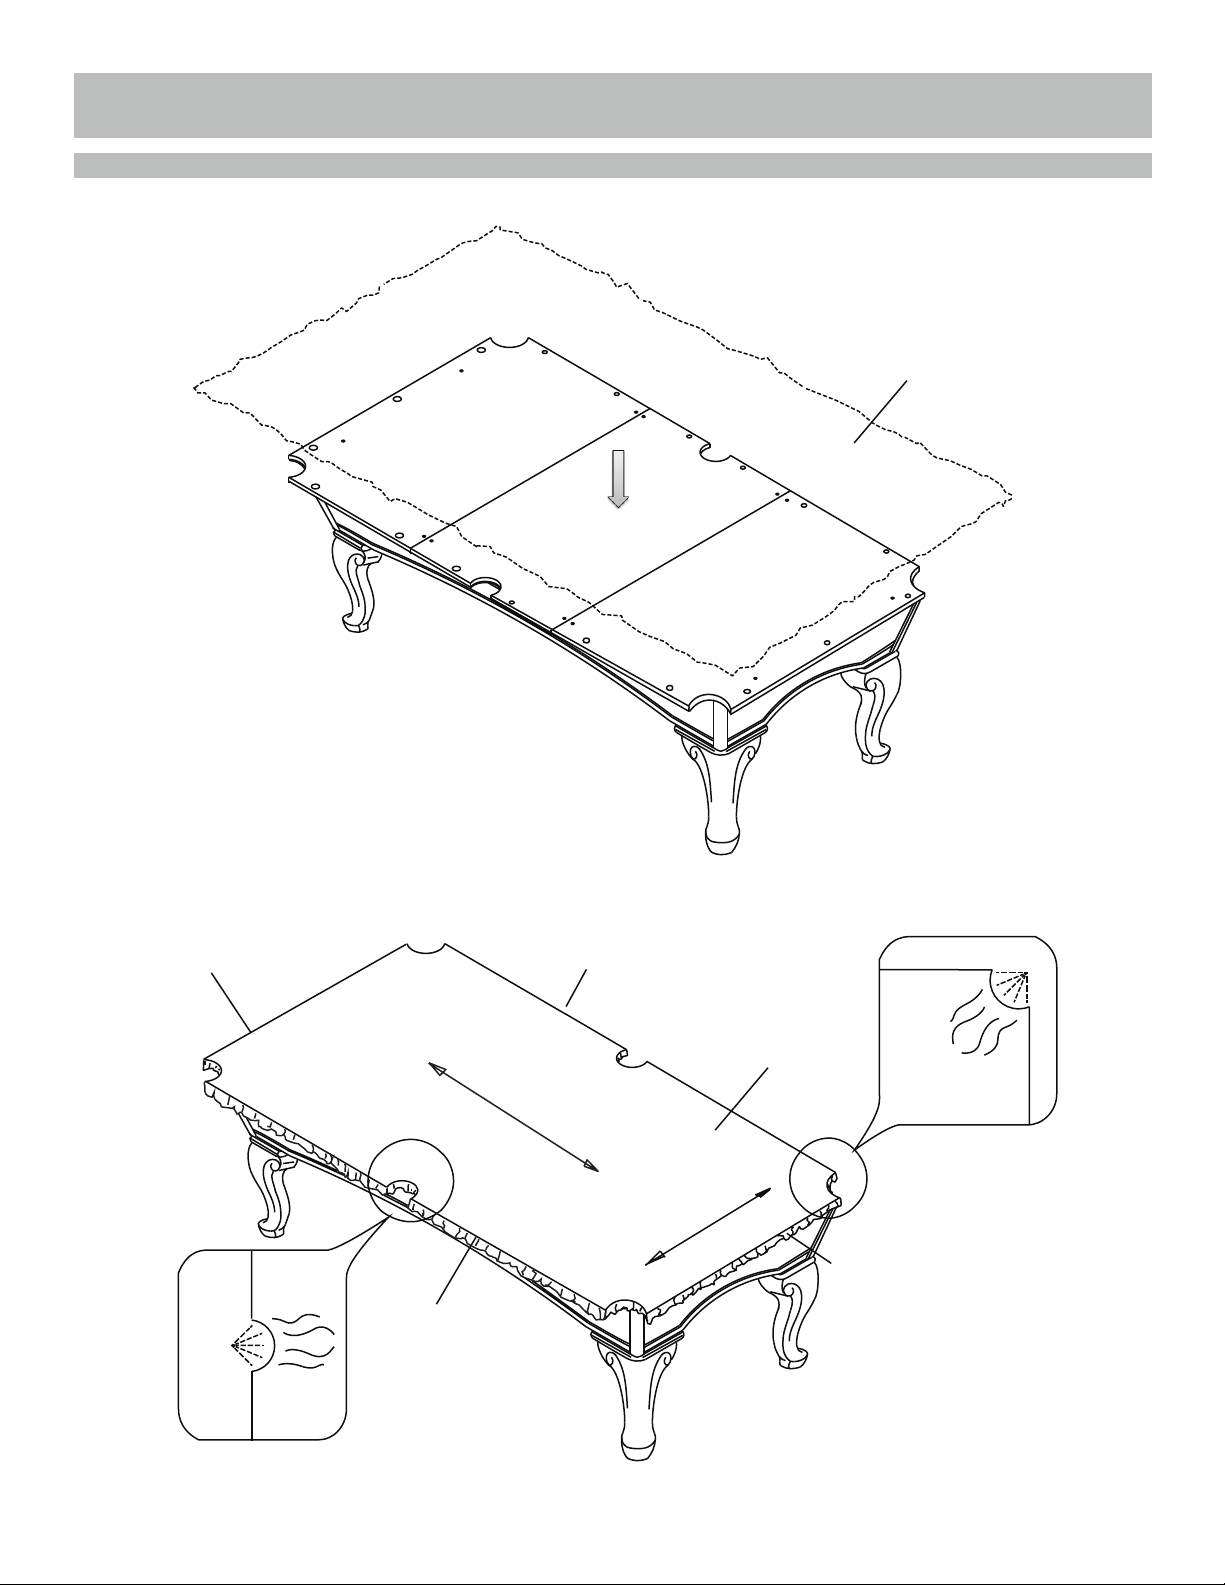
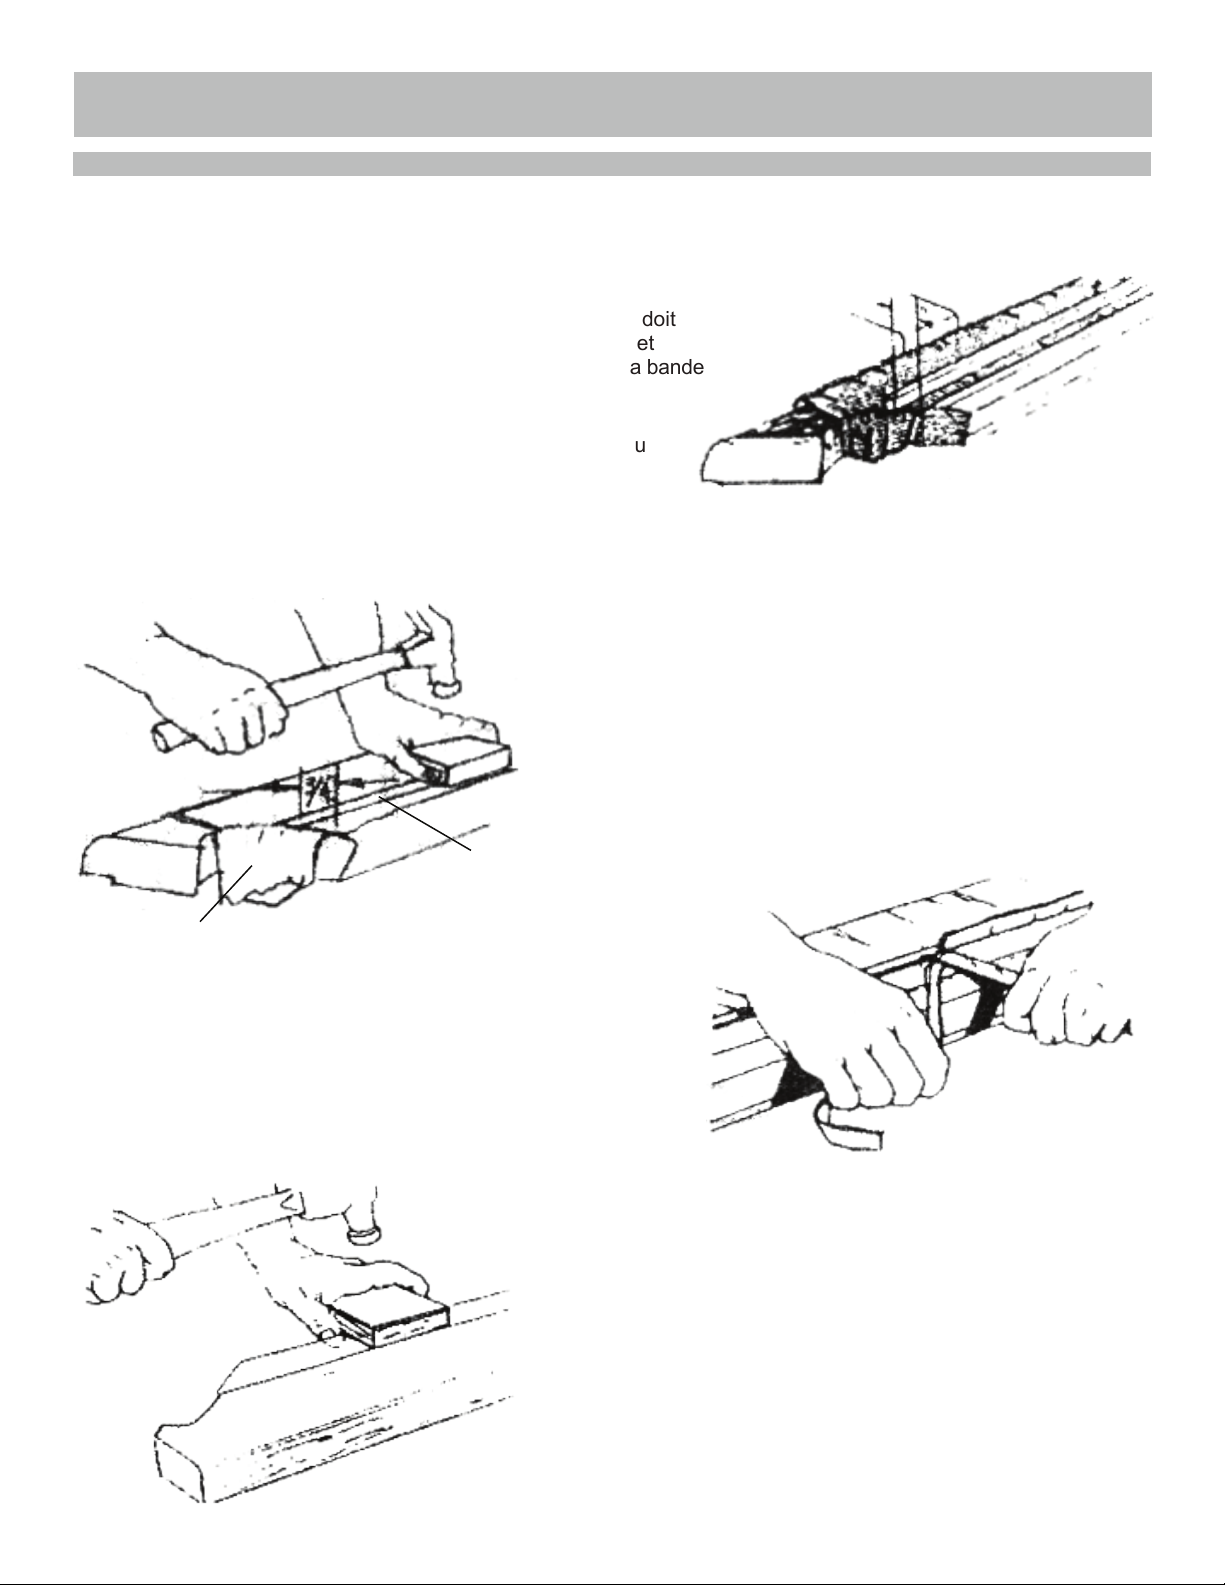
ATTACHING CLOTH TO RAILS
Corner Pockets:
1. Place rail cloth piece over rail with "face" side down. The cloth
should have an equal over-hang at each end of the rail and extend
approximately 1/2" over the featherstrip groove on the cushion side
(Figure 1).
2. Starting at the center of the rail, tap the featherstrip down to
within 1/16" above the rear side of the featherstrip (Figure 1)
using a wood block and hammer.
3. Stretching the cloth tightly from the center toward the ends,
tap the feather strip down to 1/16" while maintaining the half inch
over-hang to within approximately 3" from ends of the featherstrip.
4. At each end of the featherstrip pull the cloth toward rubber
cushion an additional 1/2" toward the cushion then tap the
featherstrip down (Figure 2).
Figure 1
Figure 2
5. Trim the cloth on the cushion side of the featherstrip along
the entire length of the featherstrip with a sharp knife as shown
in Figure 3.
6. Tap the entire length of the featherstrip flush with the top
of rail at the rear side of the featherstrip (Figure 4). Never try
to tap the feather strip flush with just a hammer as you will
dent the rail surface behind the featherstrip.
Figure 3
Figure 4
1/2”
P15
P14
ASSEMBLY INSTRUCTIONS (CONT.)
9
ATTACHING CLOTH TO RAILS
Corner Pockets (Cont.):
7. Turn the rail over and at the corner pockets fold the cloth over the
mitered edge as shown in Figure 5, stretching the cloth tightly and
working out the wrinkles as you staple in the area shown in Figure 5.
8. Pulling the cloth tightly over the rear edge of the pocket
facing, staple three places at Figure 6, location X.
9. If the rail is an end rail repeat step 8 at the other end of
the rail. Then starting at the center of the rail stretch the
cloth tightly over the cushion and staple at the center on
the bottom of the rail - working toward each end (Figure 6).
10. Trim any excess cloth from the bottom of the rail
(Figure 7).
Figure 5
Side Pockets:
11. At the side pocket, stretch the cloth tightly over the nose of
the cushion and staple in three places as shown in Figure A.
12. Slit the cloth up to the edge of the cushion nose as shown
in Figure B, then firmly pull the small strip to the rear of the pad.
13. Hold the small fold in place with your thumb and forefinger
and firmly fold it down over the facing. Now staple at the rear of
the facing and at the bottom of the rail as shown in Figure C.
14. Trim excess cloth as required.
Figure 6
Figure 7
10
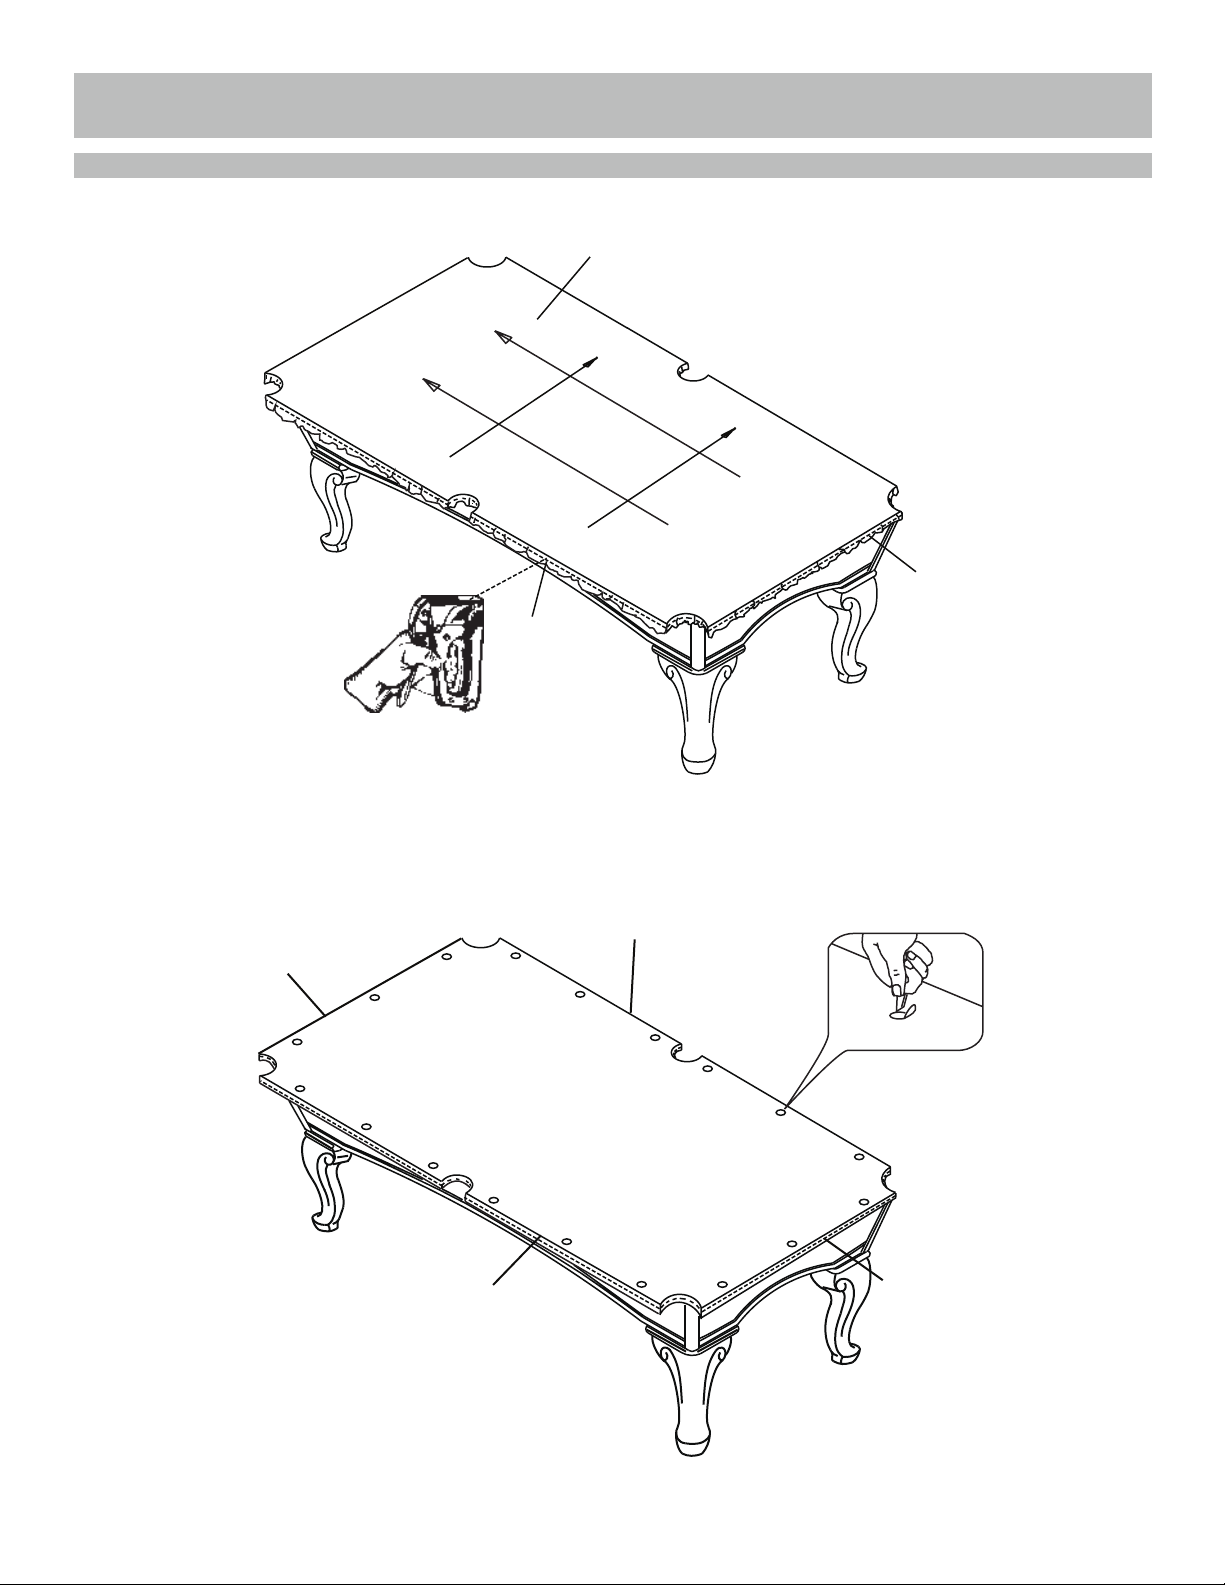
ASSEMBLY INSTRUCTIONS (CONT.)
STEP 9
P8
P9
P9
P8
P6
P5
P7
H9
H7
H9
H7
H7
H9
P5
P6
P5

11
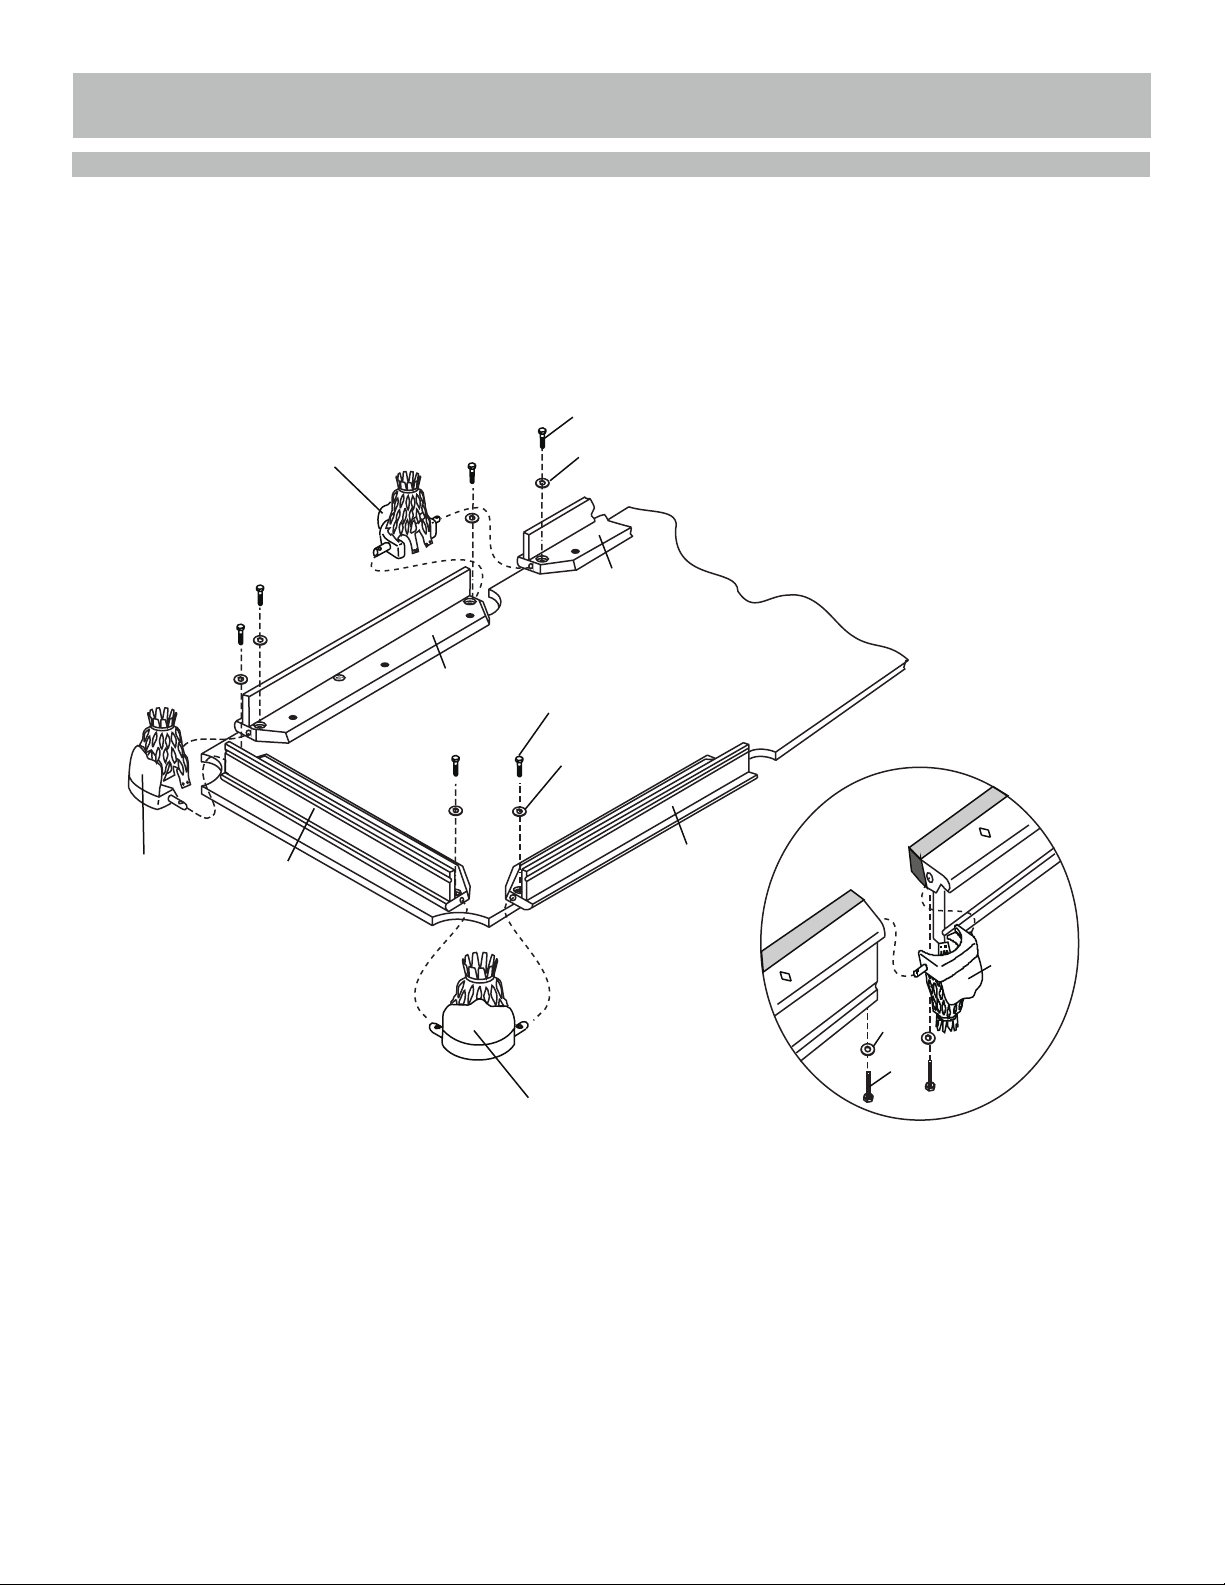
ASSEMBLY INSTRUCTIONS (CONT.)
STEP 10
STEP 11
H12
H11
H10
H11
H10
P9
P8

To send in this warranty card,
fill out below, detach and mail
to the following address:
BLUEWAVE PRODUCTS
1745 Wallace Ave., Suite B
St. Charles, IL 60174
SLATE POOL TABLE WARRANTY REGISTRATION FORM
Date Purchased: _____/_____/_____
Name: ____________________________________________________________________________________
Address: ___________________________________________________________________________________
City/State/Zip: ______________________________________________________________________________
Phone: ( ) ____________________________________ Email: _____________________________________
Purchased from: ____________________________________________________________________________
ItemNumber:____________________________________ Purchase Price: ______________________________
LIMITED LIFETIME WARRANTY
This warranty applies to the original purchaser (Owner) of the pool table and covers defective materials and workmanship
for the life of the table.
This warranty is nontransferable and is expressly limited to the repair or replacement of the defective product. During the
warranty period, the manufacturer shall repair or replace defective parts at no cost to the purchaser. Shipping charges and
insurance are not covered and are the responsibility of the purchaser. Labor charges and related expenses for removal,
installation or replacement of the product or components are not covered under this warranty.
This warranty does not apply if the pool table is transferred from the original purchaser. It does not cover table leveling.
This warranty does not provided for a replacement table or "loaner" during any period of repair. It does not apply to damage
due to normal wear and tear, fire, flood or any other natural event or calamity. This Warranty does not cover cloth, rubber,
or pockets. This Warranty does not cover damage resulting from negligence or abuse. Negligent and abusive damage
including a failure to care for the table pursuant to maintenance instructions or a failure to provide a proper environment
for the table will void the warranty. Improper or incorrectly performed maintenance or repairs by an unauthorized installer
voids this warranty.
This warranty does not cover defects or damage due to improper installation, alteration, accident or any other event beyond
the control of the manufacturer. This warranty does not cover scratching or damage that may result from normal usage.
This product is not intended for institutional or commercial use; the manufacturer does not assume any liability for such
use. Institutional or commercial use will void this warranty.
The manufacturer reserves the right to make substitutions to warranty claims if parts are unavailable or obsolete.
The manufacturer shall not be liable for loss of use of the product or other consequential or incidental costs, expenses or
damages incurred by the consumer of any other use. The user assumes all risk of injury resulting from the use of this product.
The manufacturer will not be liable for direct, consequential, incidental or special damages (including without limitation
loss of business or profits or economic loss) or for punitive, statutory, or exemplary damages, resulting from or in any
manner relating to the table, the use of the table. The sole and exclusive coverage is to the original Owner for repairs,
corrections or replacement of components, at the discretion of the manufacturer.
This warranty is expressly in lieu of all other warranties, expressed or implied, including warranties of merchantability or
fitness for use to the extent permitted by Federal or state law. Neither the manufacturer nor any of its representatives
assumes any other liability in connection with this product.
Some states do not allow the exclusion or limitation of incidental or consequential damages, so the above limitation or
exclusion may not apply to you. This warranty gives you specific legal rights, and you may also have other rights which
vary from state to state.
In order to be eligible for service under this warranty you must return the warranty registration card below within
90 days of purchase. All warranty claims must be made through the retailer where the product was originally
purchased. A purchase receipt or other proof of date of purchase will be required to process all warranty claims.
The model number and part numbers found within the assembly instructions will be required when submitting
any parts requests or warranty claims.
For further warranty information or inquiries, please call 800-759-0977
Ver. 0417
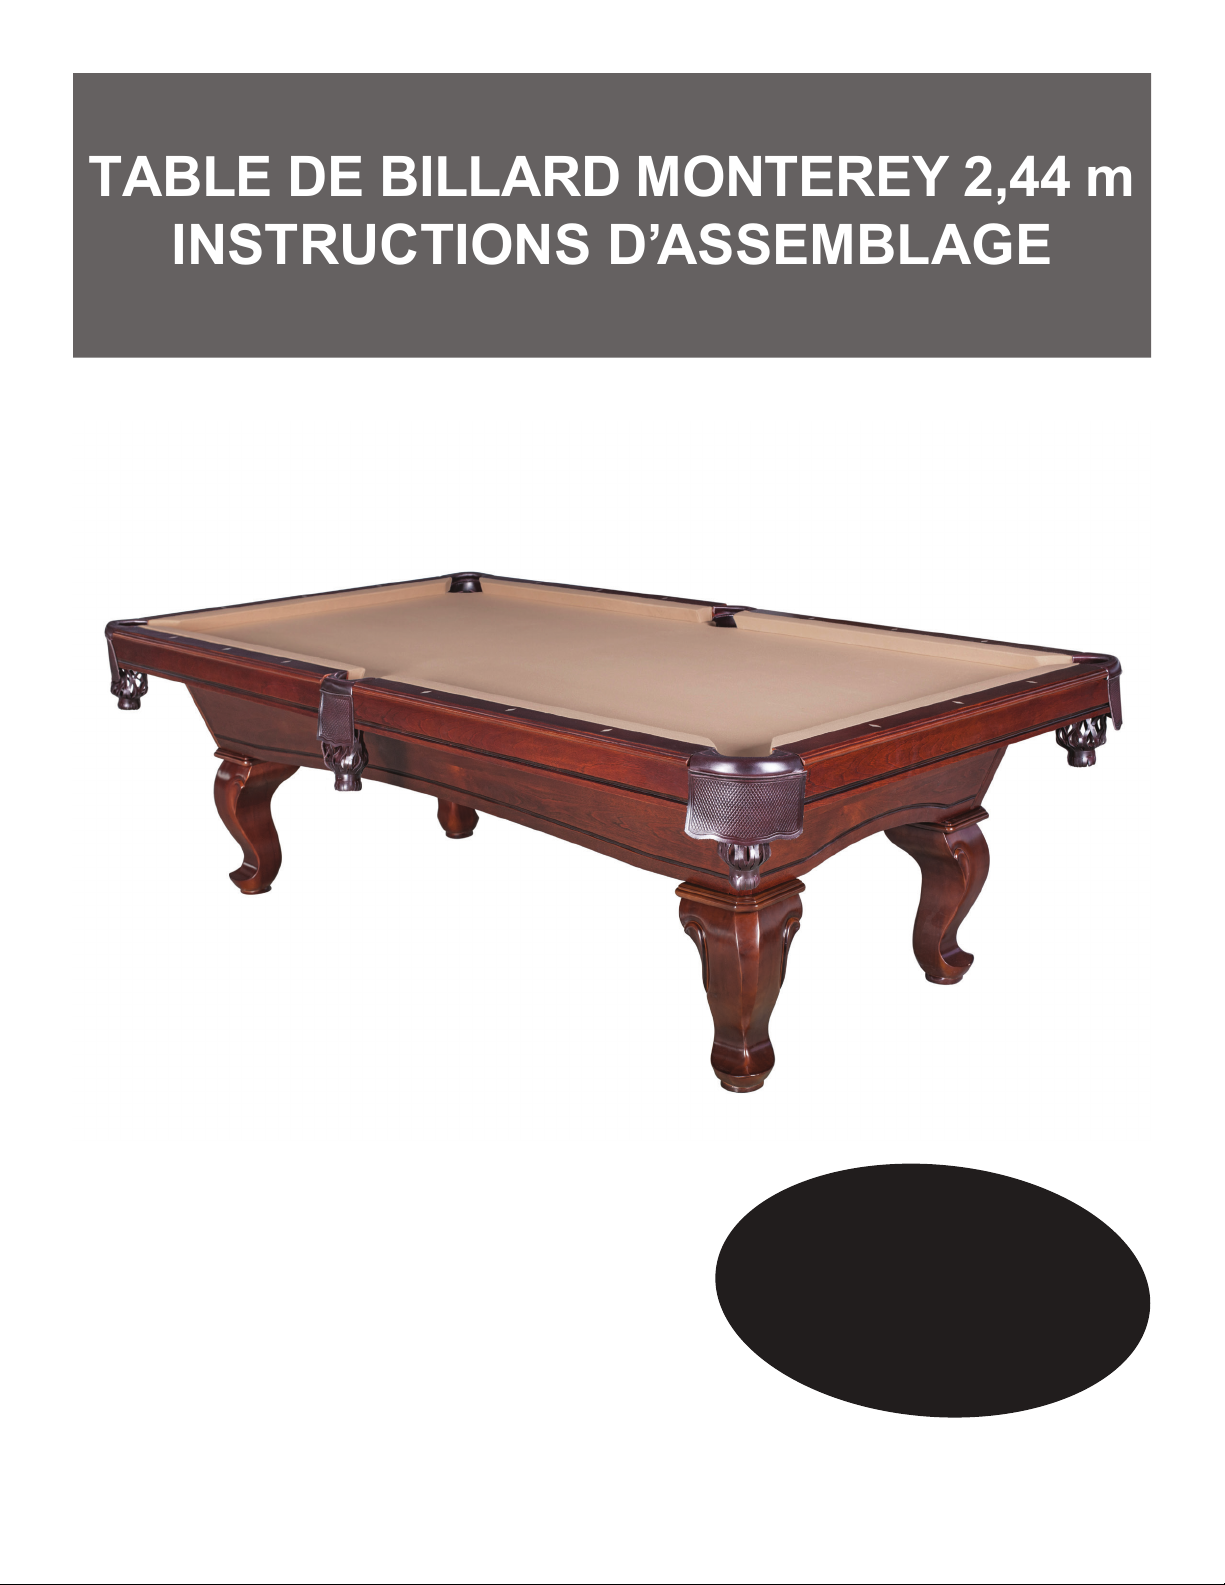
TABLE DE BILLARD MONTEREY 2,44 m
INSTRUCTIONS D’ASSEMBLAGE
NG2585
Ver. 0417
Contactez notre
service à la clientèle au
800-759-0977
avec des questions sur le montage
ou l'utilisation de ce produit.

2
Après avoir lu les instructions d'assemblage, si vous ne vous sentez pas à l'aise de
faire l'assemblage vous-même, vous pouvez rechercher des listes locales pour un
installateur de table de billard professionnel dans votre région.
Pour faciliter l'assemblage, une vidéo est disponible sur:
https://www.bluewaveproducts.com/pages/slate-table-assembly
MERCI!
Merci d’avoir acheté notre produit. Nous travaillons 24 heures sur 24, partout dans le monde, à garantir
que nos produits sont de la meilleure qualité possible. Toutefois, dans les rares cas de problèmes lors
du montage ou de l'utilisation de ce produit, se il vous plaît communiquer avec notre service à la clientèle
au 800-759-0977 pour une aide immédiate avant de contacter votre revendeur. Pour obtenir de plus amples
renseignements, veuillez lire l'information relative à la garantie au verso de ce guide d’instructions.
ENTRETIEN ET USAGE
1. Ce produit doit être utilisé À L’INTÉRIEUR seulement.
2. NE JAMAIS déplacer la table en la traînant, cela pourrait endommager les pieds.
INSTRUCTIONS D’ASSEMBLAGE
1. Trouver une surface propre et plane, pour commencer le montage de votre table de jeu. La table
s’assemble à l’envers pour être ensuite retournée sur ses pieds, une fois l’assemblage complété.
Cette table est lourde et nécessite au moins deux adultes forts pour la soulever et la retourner.
2. Retirez le contenu de la boîte, avant de commencer l’assemblage, assurez-vous d’avoir toutes
les pièces telles que listées et illustrées au tableau d’identification. Avis : certaines pièces sont
préassemblées ou préinstallées.
3. Certaines illustrations ou dessins peuvent ne pas ressembler au produit que vous avez acheté.
4. Quand vous fixez en place une pièce avec plus d’une vis ou écrou, veuillez, en premier, les
visser à la main et terminer la fixation avec un tournevis ou une clé.
5. Un tournevis électrique peut être utile lors de l’assemblage, mais veuillez le régler à basse torque
et l’utiliser avec prudence; si la torque est trop élevée, la vis peut se défaire ou être trop serrée.
AVERTISSEMENTS!
LIRE TOUTES LES INSTRUCTIONS D’ASSEMBLAGE ET LES CONSIGNES DE SÉCURITÉ ATTENTIVEMENT.
RISQUE D’ÉTOUFFEMENT – CERTAINS ÉLÉMENTS DU PRODUIT CONTIENNENT
DE PETITES PIÈCES - NE CONVIENT PAS À UN ENFANT DE MOINS DE TROIS ANS.
IMPORTANT! VEUILLEZ LIRE, EN ENTIER, TOUTES LES
INSTRUCTIONS AVANT D’ASSEMBLER VOTRE PRODUIT.

3
liste des pièces
4/17
TABLE DE BILLARD MONTEREY 2,44 m - NG2585
P1
x4 x4
P2
x8
P3
x1
P4
x2
P5
x2
P6
x2
P7
x2
P8
x4
P9
x1
P10
x1
P11
x1
P12
x1
P13
x6
P14
Tissu de surface de jeu Tissu de rail
x2
x1
A2
x1
A3
x1
A4
x2
A5
Tête de pont
Bâton de pont
A1
x1
x1
A7
Triangle
A6
Boulon hexagonal 0,9 cm
Rondelle 0,8 cm
NG2585__*
NG2585__*
NGP2810 NGP2813
NGP2815
NGP2812NGP2811
NG2690B
NGP2817
NGP5191**
NGP2816
NGP5191** NGP2809NGP2819**
NGP2818
NG2690B
NGP2814
NGP5077**
NG2690B
NGP5136** NGP5135** * Tissu de table est disponible séparément en 5 couleurs et comprend
six pièces pré-coupées ferroviaires, Article n° NG2585__: Ajouter les
lettres suivantes après numéros pour identifier la couleur de tissu:
BK (noir), BR (bourgogne), CA (chameau), GR (vert), ou RD (rouge).
** Tous les articles sont également disponibles en kit accessoire, NG2543
Pied
Bloc d’ancrage pour ardoise
Caisson Bande supérieure gauche
Poche centrale Poche de coin
Bande supérieure de bout
Plaque supérieure pied
Ardoise (gauche)
Bande supérieure droite
Ardoise (centre) Ardoise (droite)
Brosse
Boules de billard
Bloc de craie
Queue de billard
Rondelle dôme 0,9 cm
(rondelles de bande) Vis à bois no.6 x 1,9 cm
(vis courroie de poche)
Rondelle 0,9 cm
(rondelle de pied) Boulon hexagonal 0,8 cm
(boulon de d’ardoise)
Boulon hexagonal 0,8 cm
(boulon de poche)
illustrations non à l'échelle
Pour commander une pièce de remplacement, veuillez téléphoner au 1 800 759-0977
illustrations non à l'échelle
PIÈCES
Le sac de quincaillerie NGP2820 comprend
x1
P15
Languette
NG2808
H1
x4
H2
x4
H3
x1
H4
x8
H5
x8
H6
x16
H12
x24
H11
x18
H10
x18
H9
x12
H8
x12
H7
x28
Vis de rondelle
écrou hexagonal 0,9 cm clé 0,9 cm Vis à bois no.9 x 2,5 cm
Vis à bois no.9 x 5 cm
(vis de d’ardoise) (boulon de bande)
4
ÉTAPE 1 ÉTAPE 2
IDENTIFICATION DES PIÈCES
P1
P2
H4
P4
P3
P3
P3
H6
H7
H6
H7
P4
P1
P2
P8
P9
P6
P5
P7
THANK YOU!INSTRUCTIONS D’ASSEMBLAGE
ÉTAPE 3
niveleur
Préinstallé
5
THANK YOU!INSTRUCTIONS D’ASSEMBLAGE (suite)
ÉTAPE 4
P3
P4
P3
P1
P2
H1
H2
H5
H3
H1
H2
H5
P4
P3
P12
P11
P10
H8
H8
P3

6
THANK YOU!INSTRUCTIONS D’ASSEMBLAGE (suite)
ÉTAPE 5
P13
NAP
Coupures
Coupures
ÉTAPE 6
P13
les rides
les rides
Côté droit
Tête
Côté gauche
Pied
7
THANK YOU!INSTRUCTIONS D’ASSEMBLAGE (suite)
Agrafes
Agrafes
ÉTAPE 7 P13
ÉTAPE 8 Découpez un trou dans le tapis
aux deux endroits de la bande.
Côté droit
Tête
Côté gauche
Pied
8
FIXEZ LE TISSU AUX BANDES
Poches de coin :
1. Installez le tissu, à l'envers, par-dessus la bande. Le tapis doit
dépasser de façon égale de chaque côté (environ 1,27 cm), et
s’étendre par-dessus la rainure de languette sur la partie de la bande
avec coussin (figure 1).
2. En partant du centre de la bande, enfoncez la languette à
0,16 cm au-dessus de sa partie externe à l’aide d’un marteau
et d’un morceau de bois.
3. Étirez le tissu du centre vers les extrémités, tapoter sur la
bande de duvet à 0,16 cm, travaillant vers les extrémités,
tout en maintenant la demi-pouce surplomb et environ 7,54 cm
de tissu sur chaque extrémité de la bande.
4. À chaque extrémité de la bande, étirez le tissu vers le coussin
de caoutchouc de plus de 1,27 cm vers le coussin et enfoncez
la languette. (figure 2)
Figure 1
Figure 2
5. Enlever l'excès le tissu sur le côté coussin de la languette
tout le long de la bande à l’aide d’un couteau tranchant tel
qu’illustré à la Figure 3.
6. Enfoncez la face arrière de la languette à l’égalité avec
le dessus de la bande (figure 4). Ne jamais seulement
utiliser un marteau car vous risquez d’abîmer la surface
de la bande située derrière la languette.
Figure 3
Figure 4
1/2”
THANK YOU!INSTRUCTIONS D’ASSEMBLAGE (suite)
P15
P14
Table of contents
Languages:
Other Blue Wave Accessories manuals


