Blue Wave FlowXtreme NS1002 User manual

FX Flat Panel Solar Heater
- 21' Pool Manual
VER.0418 NS1002

A.Safety instructions
Read through these instructions carefully before you use the product.
Caution: Failure to comply fully with our instructions for use, or safety instructions, may cause
damage or injury to individuals.
Please read the instruction manual and the directions shown there.
Do not allow children to handle the solar collector.
Always turn off your filter system when you are working with your solar heater.
Do not position the solar heater too close to the pool (adequate safe distance).
Do not use any petroleum-based lubricants. Petroleum attacks the product’s plastic components.
This solar heater is not intended for use by anyone (including children) with restricted physical, sensory
or mental ability, or with limited experience and / or limited knowledge, unless they are supervised by
someone responsible for their safety, or they receive instruction from them regarding the use of the solar
heater.
Children must be supervised to ensure they do not play with the solar heater.
B. General information
1. Conditions for the installation of the solar heater
The solar heater you have purchased is intended for use with in-ground and above-ground pools, and is
easy to install and handle. These installation instructions are based on the following conditions:
1) You have a pool which is fully built and filled with water.
2) Your pool has a filter system.
3) You have the required connector & hoses Ø 1.25”-1.5”(Ø 32/38 mm) to supply the pool and filter system
with water.
4) You are not installing the solar heater under trees.
These are the requirements so that the solar heater can force water through the solar chambers when it is
installed and fully connected to the filter pump.
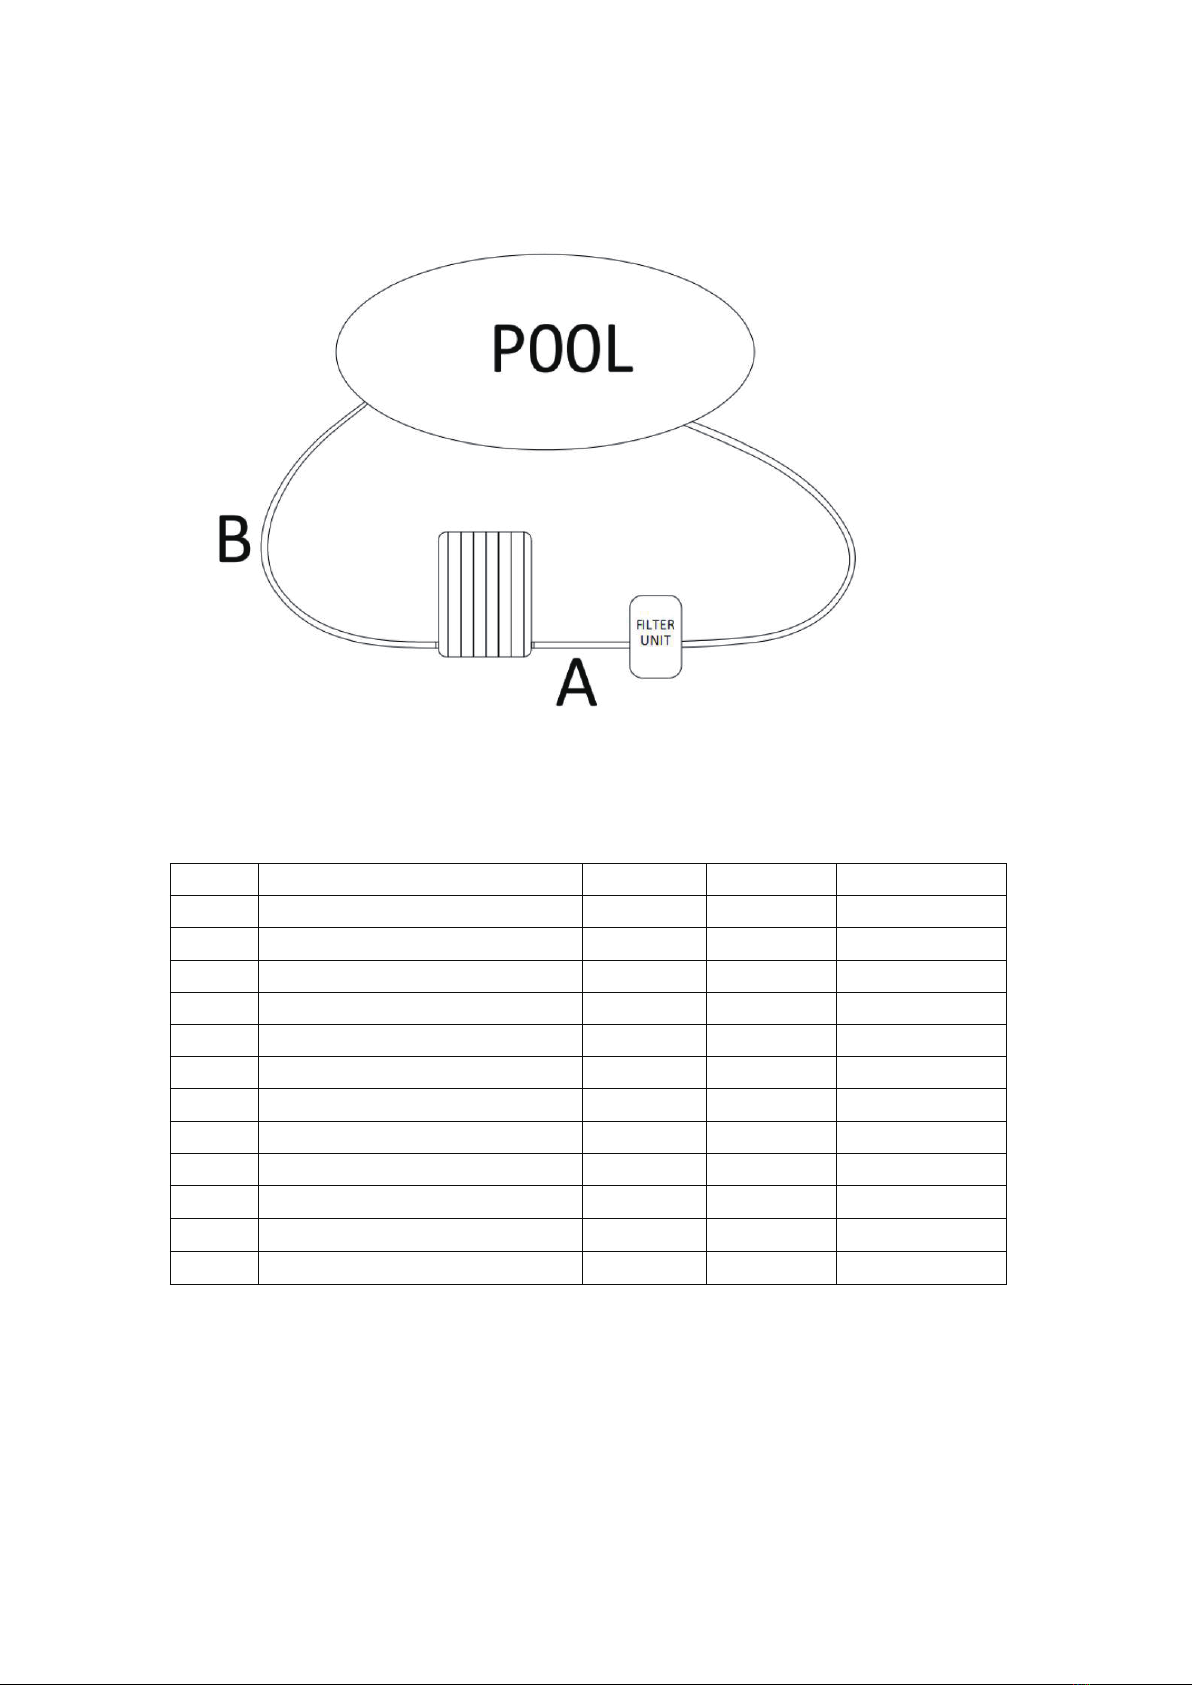
2. Use (Figure 1)
Once the solar heater is installed, it is connected between your filter system and your pool using the two
hose connectors.
The water is heated by the sun’s energy and then fed back through connector hose to the pool.
A = feed from the filter unit to the solar heater
B = feed from the solar heater to the swimming pool inlet nozzles
Water heating depends on the following factors: flow rate and intensity of sunshine.
Solar heating only functions efficiently in sunshine. The solar heater can remain connected to the pump in
poor weather or at night as this only causes a slight loss of pressure in the pump.
3. Tools and accessories required
Tools required for assembly, but are not included in your set:
Phillips screwdriver
Flat head screwdriver
4. The ideal location for your solar heater
Your solar heater needs to be in a location with as much sunshine as possible.
Never position the solar heater over the surface of your pool.
The solar heater is designed to allow maximum possible capture of sunshine.
5. Product care
The solar heater should not be left connected in extreme cold weather. The solar heater should be stored in
1

an area protected from freezing. The solar heater should be removed before the first frost, or at the end of
the pool season.
All parts must be rinsed or cleaned with water only. Detergents may damage the protective cover.
6. Storage
Drain all the water from the solar heater by closing off the pipes. Store the solar heater for Winter in an area
protected from freezing. Remove the pool return pipes.
Make sure there is no water left inside the solar collector as it can freeze. Freezing water can damage the
solar chambers.
C. Technical data
NS1002 FX Flat Panel Solar Heater - 21'Pool
Dimensions: L x W x H 37.8"x 29.53"x18.50" (96x75x47cm)
Maximum pressure 14.5psi/1 bar at 68℉(20℃)
Water flow rate max. 1980GPH (7500LPH)
Water capacity 3.2gal (12l )
D. Unpacking Your Solar Heater
Carefully remove the product and all component parts from the box. Make certain all
parts are present before beginning assembly.
Refer to section I for a complete PARTS BREAKDOWN.
E. Installation instructions
1.Assembly instructions
Before you begin installation of the solar heater turn off the filter pump and close off all water connections.
Unfold the feet at the bottom and adjust position according to the sun. Make sure to obtain a 30°
inclination.
Fit the 2 hose connectors (4) with the connector caps (5) on either side of the solar heater.
A. Pools with 1¼” or 1½’’ Diameter Unthreaded Hoses
Connect the hoses (8+9) between the filter unit, the solar heater and the pool.
Assembly with a 1¼” (32mm) hose connector.
This has to be pushed directly over the hose connector (4) and fastened with the hose clamp (7) .
Assembly with a 1½’’ (38mm) hose connector.
First push the hose reducer (6) 1¼”-1½’’ (32mm/38mm) over the hose connector. Then push the 1½“
(38mm) hose over the hose reducer (6) and fasten it with a hose clamp (7) .
B.Pools with 40mm Diameter Intex® Threaded Hoses
Attach the adapter for either Intex® (#10,11&12, Included in the product you purchased) or Bestway
(Not included) to the hose connectors (4). Make sure the o-ring is in the collared tube adapter prior to
attachment.
Screw existing threaded 40mm Intex® pool hoses onto the adapters. Be sure to place the thick connec-
tor gasket between the hose and the adapter for a tight seal.
2

F. Initial use
Once the solar heater is assembled and the hoses are connected to the filter pump and
the pool, open the water supply and ensure that water is flowing through the hose. Then
turn on the filter system. Air bubbles will rise from the inlet nozzle in the pool. This
happens as the air is expelled from the solar heater. If this continues for more than 2-3
minutes, check the tightness of the connections in your system.
Please note: We recommend that you cover your pool overnight to avoid loss of heat.
G.Trouble shooting
Problem Cause / Solution
The pool does not warm up. Make sure that water is flowing
through the hoses.
Has it been sunny enough?
Insure the maximum amount of
sunshine and increase the running
time of the filter pump.
Cover your pool overnight to
avoid loss of heat.
It is possible that you may need
several solar heaters.
No bubbles appear after the
equipment has been attached to
the pump.
Check the filter system and
ensure that water from the pool is
flowing through the filter pump, then
through the solar heater and
through the connector hose back to
the pool.
Air bubbles come out of the pool
return after the pump has been
turned on.
Check the connector hoses for
any damage.
Check that the hose clamps have
been properly tightened.
Water draining out of the system Check the seals in the system of
hoses.
Check the hose clamps to insure
they are tight enough.
Check the connector hoses for
any cracks.
3
H.Installation Figure
I . NS1002 FX Flat Panel Solar Heater Parts Breakdown
Key Part Name Qty BW SKU For Model #
1 Kappa Solar Panel 1 NUP4061 NS1002
2 Leg Brace 2 NUP4062 NS1002
3 Flat Gasket 2 NUP4063 NS1002
4 H32mm ose Connector 2 NUP4064 NS1002
5 Connector Cap 2 NUP4065 NS1002
6 Hose Reducer 2 NEP4079 NS1002
7 Hose Clamp 2 NEP4260 NS1002
8 Long Hose 1 NUP4082 NS1002
9
10
11
12
2
2
2
S
O-Ring for Intex® Special Adapter
Intex Special Adapter
NEP4236
NEP4233
NEP4234
NS1002
NS1002
NS1002
Flat Gasket
hort Hose 1 NUP4083 NS1002
Figure 1
4

a. Connection for 1¼” or 1½’’Diameter Unthreaded Hoses
b. Connection for 40mm Diameter Intex® Threaded Hoses
5
Table of contents
Popular Heater manuals by other brands


Dimplex
Dimplex DTD2R05 Installation and operating instructions

Coates
Coates ST Series Installation & operation manual

NEO TOOLS
NEO TOOLS 90-070 TRANSLATION OF ORIGINAL INSTRUCTIONS

Dru
Dru OPERA DVS 2-01 Instructions for installation and operation

NARVI Oy Finland
NARVI Oy Finland Velvet installation, user and maintenance instructions

Kogan
Kogan KGNPHT22VA user manual


