Blueair BSR Series Installation instructions

Blue Air FSE, LLC
223 W, Rosecrans Ave. Gardena, CA 90248 .
T. (310) 808-0102 • (866) 677-8500 • F. (310) 808-0242
Installation and Owner’s Manual
www.blueairfse.com
Reach Ins
Stainless Steel
BSR**-HC
BSF**-HC
BSR**T-HC
BSF**T-HC
**/23,49,72/
**/23T,49T,72T/
Food Prep Tables
Undercounters
BLUR **-HC
BLUF ** -HC
BLPT** -HC
BLMT** -HC
**/28,36,48,60,72/
and optional
Drawer models
Work top models
! Read these instructions. ! Failure to follow maintenance guidelines may result in a cancellation of warranty

1
Installation and Operation Guide
www.blueairfse.com
Contents
Notice to Customer
To avoid any risk of personal injury, material damage
or incorrect use of this appliance, be sure to observe
the following warnings and safety precautions. (After
reading these owner’s instructions, keep them in a
safe place for future reference.)
Any loss or spoilage of products, such as food, loss
of sales, or consequential damages is not covered by
warranty.
Use appliances only for its intended purpose as
described in this manual.
Failure to comply with these requirements might
result in personal injury and (or) property damage,
and will void warranty.
Serial number : The serial number is located on the
rating label which is on the left interior wall of the
unit. Retain the unit's serial number for service
purposes.
1. Warnings & Safety Precautions --------------- 1
2. Installation -------------------------------------------- 3
3. Operation Guide ------------------------------------ 6
4. Maintenance, Cleaning --------------------------- 7
5. Troubleshooting ------------------------------------ 9
1. Warnings &
Safety Precautions
Refrigeration units that contain Hydrocarbon (R-290)
See Below:
•Danger - Risk of fire or explosion. Flammable
refrigerant used. Do not use mechanical devices to
defrost refrigerator. Do not puncture refrigerant tubing.
•Danger - Risk of fire or explosion. Flammable
refrigerant used. To be repaired only by trained service
personnel. Do not puncture refrigerant tubing.
•Caution - Risk of fire or explosion. Flammable
refrigerant used. Consult repair manual/owner's guide
before attempting to service this product. All safety
precautions must be followed.
•Caution - Risk of fire or explosion. Dispose of properly
in accordance with federal or local regulations.
Flammable refrigerant used.
•Caution - Risk of fire or explosion due to puncture of
refrigerant tubing; follow handling instructions carefully.
Flammable refrigerant used.
•Caution- Keep clear of obstruction all ventilation
openings in the appliance enclosure or in the structure
for building-in.
▶Safety Precautions
Basic safety precautions must be followed when using
electrical appliances as the followings. and Blue Air
strongly recommend that any servicing must be
performed by a qualified technician.
•Before this appliance is used, it must be properly
installed and located in accordance with the Installation
Instructions.
•Do not allow children to climb, stand or hang on the
shelves in the refrigerator or doors. They could damage
the refrigerator and seriously injure themselves.
•Do not touch the cold surfaces in the refrigerator
compartment when hands are wet. Skin may stick to
these extremely cold surfaces.
•Do not store or use gasoline or other flammable vapors
and liquids in the vicinity of this or any other appliance.
•Do not store pharmaceutical products, scientific
materials or other temperature sensitive products in this
appliance
•Do not spray inflammable gas near the refrigerator
•Keep fingers out of the "pinch point" areas; clearances
between the doors and between the doors and cabinet
are necessarily small; be careful closing doors when
children are in the area.

2
Installation and Operation Guide
www.blueairfse.com
•Unplug the appliance before cleaning and making
repairs.
•Use caution, the unit does remain powered when
system controls are used to turn off unit.
•Unplug unit before replacing the interior light
•Do not plug several appliances into the same wall
outlet.
•After unplugging the appliance, wait at least five
minutes before re-plugging it into a wall outlet.
•Any deterioration in the insulation may cause fire.
•Do not allow children to touch or play with the
control panel
•Do not stand or lean on the base panel, pull-out
parts, doors and any other parts of the unit.
•Do not place this equipment directly under direct
heat or sunlight.
•This appliance must be grounded.
You must ground the appliance to prevent any
power leakages or electric shocks caused by current
leakage from the appliance. Never use gas pipes,
telephone lines or other potential lightning rods as
grounding.
•Unplug the appliance before cleaning and making
repairs.
Use of extension cords is NEVER allowed
Blue Air will not warranty any refrigerator that has been
connected to an extension cord.
Do not install this appliance at an improper location
The installation location should not be exposed to direct
sunlight and not placed near any heat source, e.g.
stove, oven, radiator, or etc.
Replacement of parts
•Component parts must be replaced with like
components.
•Servicing shall be done by authorized service
personnel, to minimize the risk of possible ignition
due to incorrect parts or improper service.
•Lamps must be replaced by identical lamps only.
•If the supply cord is damaged, it must be replaced by
a special cord or assembly available from the
manufacturer or its service agent.
Cautions
Proper disposal of Freezer and Refrigerator.
Child entrapment and suffocation are not problems
of the past. Junked or abandoned refrigerators are
still dangerous. even if they will sit for "just a few
days." If you are getting rid of your old refrigerator,
follow the instructions below to help prevent
accidents.
Before throwing away your old Refrigerator or
Freezer:
• Take off all of the doors.
• Leave the shelves in place so that children may not
easily climb inside.
Refrigerant Disposal
Your old refrigerator may have a cooling system
that uses "Ozone Depleting " chemicals. If you are
throwing away your old refrigerator, make sure the
refrigerant is removed for proper disposal by a
qualified service technician. If you intentionally
release any refrigerants you can be subject to
fines and imprisonment under provisions of
environmental regulations.

3
Installation and Operation Guide
www.blueairfse.com
** Four screws (M6) are provided per each caster(R834F-200)of table unit.
** Keys for door locks are in manual packet. (Reach-ins only)
Models
Caster Box
Shelf Clip
Shelf
Quantity of casters
Quantity of clips
Quantity of Shelves
BSR/BSF23,23T,23G-HC R834E-130 4 R8429-060 1set(16ea) R836A-070 1set(4ea)
BSR/BSF49,49T,49G-HC R834E-130 4 R8429-080 1set(32ea) R836A-050 1set(8ea)
BSR/BSF72,72T-HC R834E-140 6 R835A-020 1set(48ea) R836A-060 1set(12ea)
BLUR/BLUF28-HC R834F-200 4 R835A-110 1set(10ea) R834G-080 1set(2ea)
BLPT/BLMT28-HC R834F-200 4 R835A-110 1set(10ea) R834G-080 1set(2ea)
BLUR/BLUF36-HC R834F-200 4 R835A-130 1set(18ea) R834G-090 1set(4ea)
BLPT/BLMT36-HC R834F-200 4 R835A-130 1set(18ea) R834G-090 1set(4ea)
BLUR/BLUF48-HC R834F-200 4 R835A-130 1set(18ea) R834G-100
1set(4ea)
BLPT/BLMT48-HC R834F-200 4 R835A-130 1set(18ea) R834G-100
1set(4ea)
BLUR/BLUF60-HC R834F-200 4 R835A-130 1set(18ea) R834G-110 1set(4ea)
BLPT/BLMT60-HC R834F-200 4 R835A-130 1set(18ea) R834G-110
1set(4ea)
BLUR72-HC R834F-200 4 R835A-150 1set(26ea) R834G-120 1set(6ea)
BLPT/BLMT72-HC R834F-200 4 R835A-150 1set(26ea) R834G-120 1set(6ea)
BLUR/BLPT/BLMT/28-D2-HC R834F-200 4 n/a n/a
BLUR/BLPT/BLMT/48-D4-HC R834F-200 4 n/a n/a
BLUR/BLPT/BLMT/60-D4-HC R834F-200 4 n/a n/a
BLUR/BLPT/BLMT/72-D6-HC R834F-200 4 n/a n/a
2. Installation
Before you start to install your Blue Air unit, carefully
inspect it for freight damage. If damage is discovered,
immediately file a claim with the delivery freight carrier.
Blue Air is not responsible for damage incurred during
shipment.
To ensure that your unit works properly from the first
day, it must be installed properly. We highly
recommend a trained refrigeration mechanic and
electrician install your Blue Air equipment. The cost of
a professional installation is money well spent.
Tools Required.
• Wrench(included with casters), Figure 2
• Adjustable Wrench
• Screwdriver
• Leveler
Uncrating
The following procedure is recommended for uncrating
the unit. Move your unit as close to the final location as
possible before uncrating.
2) Check all Part accessories listed are included with the appliance :
1) Remove the wooden pallet :
Unscrew the bolts shown in Figure 1 (Reach-in 4-
M13 Bolts and Undercounter 2-M6 Bolts)
Figure 1
Figure 2

4
Installation and Operation Guide
www.blueairfse.com
3) Assembling casters:
(1). Reach-ins (Figure3): Install casters in the bottom rails
assembly on the bottom of the unit. It is important in
order to achieve maximum strength and stability of the
unit that you ensure that each caster is securely
tightened with a 3/4" (19mm) open-ended wrench.
Casters with brakes Must be installed in front. and the
casters must be in contact firmly with the bottom rails of
the unit.
(2) Undercounter and Tables (Figure4): Install casters in
the bottom rails assembly on the bottom of the unit with 4
M6 bolts for each caster. This is required in order to
achieve maximum strength and stability of the unit.
Casters with brakes Must be installed in front and the
casters must be in contact firmly with the bottom rails of
the unit.
4) Leveling:
Proper leveling of your Blue Air unit is critical to
operating success. Effective condensate removal
and door operation will be effected by leveling.
1) Reach Ins; The unit should be leveled front to
back and side to side with a level. For unit with
casters Models: Four shims have been provided
in the caster package for leveling unit with casters
units positioned on uneven floors. Shims must be
positioned between rail end and bearing race.
• If the cabinet is not level, use a 3/4" (19mm)
open-end wrench to turn the anchoring bolt
under the bearing race counter-clockwise until
the cabinet is level.
• Install the desired number of shims, making sure
the slot of the shim is in contact with the
threaded stem of the caster.
• If more than one shim is used, turn the slot at a
45° angle at least so they are not in line.
• Turn the anchoring bolt clockwise with a 3/4"
(19mm) open-end wrench to tighten and secure
the caster
• Ensure that the drain hose or hoses are
positioned in the condensate water pan.
• Untangle plug and cord from unit (do not plug
unit into power supply while leveling).
• The unit should be placed close enough to the
electrical supply so that the extension cords are
never used.
Warning: Warning Compressor warranties are
void if the unit is more than 6-1⁄2 ft. (2m) from
plugin connection.
Caution
To avoid damage to lower rail assembly, raise
unit slowly and carefully to upright position.
2) Table Units: The unit should be leveled front to
back and side to side as shown
Figure 3
Figure 4

5
Installation and Operation Guide
www.blueairfse.com
7) To connect electricity :
The power cord of this appliance is equipped with a
grounding plug which mates with a standard grounding
wall outlet to minimize the possibility of electric shock
hazard from the appliance.
Do not, under any circumstances, cut or remove the
ground prong from the power cord.
For personal safety, this appliance must be properly
grounded.
Have the wall outlet and circuit checked by a qualified
electrician to make sure the outlet is properly grounded.
If the outlet is a 2-prong outlet, it is your personal
responsibility and obligation to have it replaced with the
properly grounded wall outlet before using the unit.
A 3-prong outlet ensures the best performance and also
prevents overloading building wiring circuits which
could cause a fire hazard from overheated wires.
Never unplug your refrigerator by pulling on the power
cord.
Always grip plug firmly and pull straight out from the
outlet.
Repair or replace immediately all power cords that have
become frayed or otherwise damaged. Do not use a
cord that shows cracks or abrasion damage along its
length or at either end.
Plugs used depending on unit
1) NEMA Plugs
NEMA-5-15R, 115V/60/1
2) Make sure the power cord is connected to the
proper voltage. (Rated ±10%)
3) Compressor warranties are void if compressor burns
out due to usage of improper voltage.
4) A protected circuit of the correct voltage and
amperage must be used.
5) Turn ‘off the power switch before disconnecting the
power cord whenever performing maintenance
service or cleaning the refrigerated cabinet.
6) If the power cord of Refrigerator (Freezer) is
damaged, it should be replaced by the manufacturer
or service agent or a similarly qualified person in
order to avoid a hazard.
7) If unit is disconnected, wait 5 minutes before re-
starting.
“If you have any questions about set up or installation
of your refrigerator, call our technical service”
5) Ventilation:
Set unit in its final location. Be sure there is
adequate ventilation in your room. you may need to
install an exhaust fan under the extreme heat
conditions, (100°F+, 38°C+),
Warning: Warranty is void if ventilation is
insufficient.
6) Space clearance:
Ensure air circulation around unit
7) Assemble shelf clips :
•Install all the shelf clips before installing the
shelves.
1) Put the tap back side of clip into the hole of the
pilaster.
2) Rotate the clip with 180 degree.
•install the clips as shown above then install
shelves.

6
Installation and Operation Guide
www.blueairfse.com
8) Electrical requirements
“There are several factors that will affect the proper
operation of your refrigerator. Among these factors, the
electrical installation is the most important and should
always be checked before connecting your refrigerator as
follows: “
1) Make sure the electrical installation complies with
national, state, and local codes.
2) Make sure the circuit is properly grounded.
3) Check circuit for proper voltage at receptacle.
4) Make sure that the wire gauge and breaker sizes are
correct and comply with the minimum allowance for
voltage drops (rated ±10%)
3. Operation Guide
1) Temperature control range of appliances:
MODEL Temperature
BSR23/23T/23G-HC Hold 33F~ 38F(0.5
℃
~ 3.3
℃
)
BSR49/49T/49G-HC Hold 33F~ 38F(0.5
℃
~ 3.3
℃
)
BSR72/72T-HC Hold 33F~ 38F(0.5
℃
~ 3.3
℃
)
BSF23/23T-HC Hold -10F(-23.3
℃
)
BSF49/49T-HC Hold -10F(-23.3
℃
)
BSF72/72T-HC Hold -10F(-23.3
℃
)
BLUR28,36,48,60,72-HC Hold 33F~ 38F(0.5
℃
~ 3.3
℃
)
BLPT28,36,48,60,72-HC Hold 33F~ 38F(0.5
℃
~ 3.3
℃
)
BLMT28,36,48,60,72-HC Hold 33F~ 38F(0.5
℃
~ 3.3
℃
)
BLUF28,36,48,60-HC Hold -10F(-23.3
℃
)
2) Operations
• Connect the power to the unit, the display panel will
light up, and the compressor will begin to run.
• The compressor is automatically cycled by the
electronic controller.
• The interior light is activated by the door switch when
the door is open. (applies only to reach-in models)
• Evaporator fan motors will run after all doors are
completely closed. (applies only to reach-in models)
3) How to set the temperature
▶Touch the lock button for 3 seconds to
adjust the temperature.
▶Adjust the temperature to the value you
desire by touching the or buttons.
▶When you have finished adjusting the
settings, leave it for 3 seconds. Then the
changes will be applied.
☞Default set temperature
▶Refrigerator(Cooler) : 35°F(2°C)
▶Freezer : 0°F(-18°C)
Icon and “DF” will show up while defrost cycle.
Icon will show up when evaporator fan(s) are in
operation
Icon will show up when compressor is in
operation
Icon will show up either Celsius or Fahrenheit
depending on operation setting.
Buttons to adjust setting temperature.
Icon is used to unlock the buttons.
7
Installation and Operation Guide
www.blueairfse.com
4. Maintenance, Clean
For keeping the best efficiency, it is very important
to clean the condenser coil in period. Blue Air
recommend to clean the condenser coil by a month.
Dirty condensers result in compressor failure, product
loss, and lost sales, which are not covered by warranty.
If you keep the Condenser clean you will minimize your
service expense and lower your electrical costs.
The Condenser requires scheduled cleaning every
month or as needed. Air is pulled through the
Condenser continuously, along with dust, lint, grease,
etc.
A dirty Condenser can result in NON-WARRANTEED
part & Compressor Failures, Product Loss, and Lost
Sales.
Proper cleaning involves removing dust from the
Condenser. By using a soft brush, or vacuuming the
Condenser with a shop vac, or using CO2, nitrogen, or
pressurized air.
If you cannot remove the dirt adequately, please call
your refrigeration service company.
Tools Required.
•Screwdriver and Vacuum cleaner
•N2 or CO2 Tank
•Stiff bristle Brush
Cleaning the condenser coil
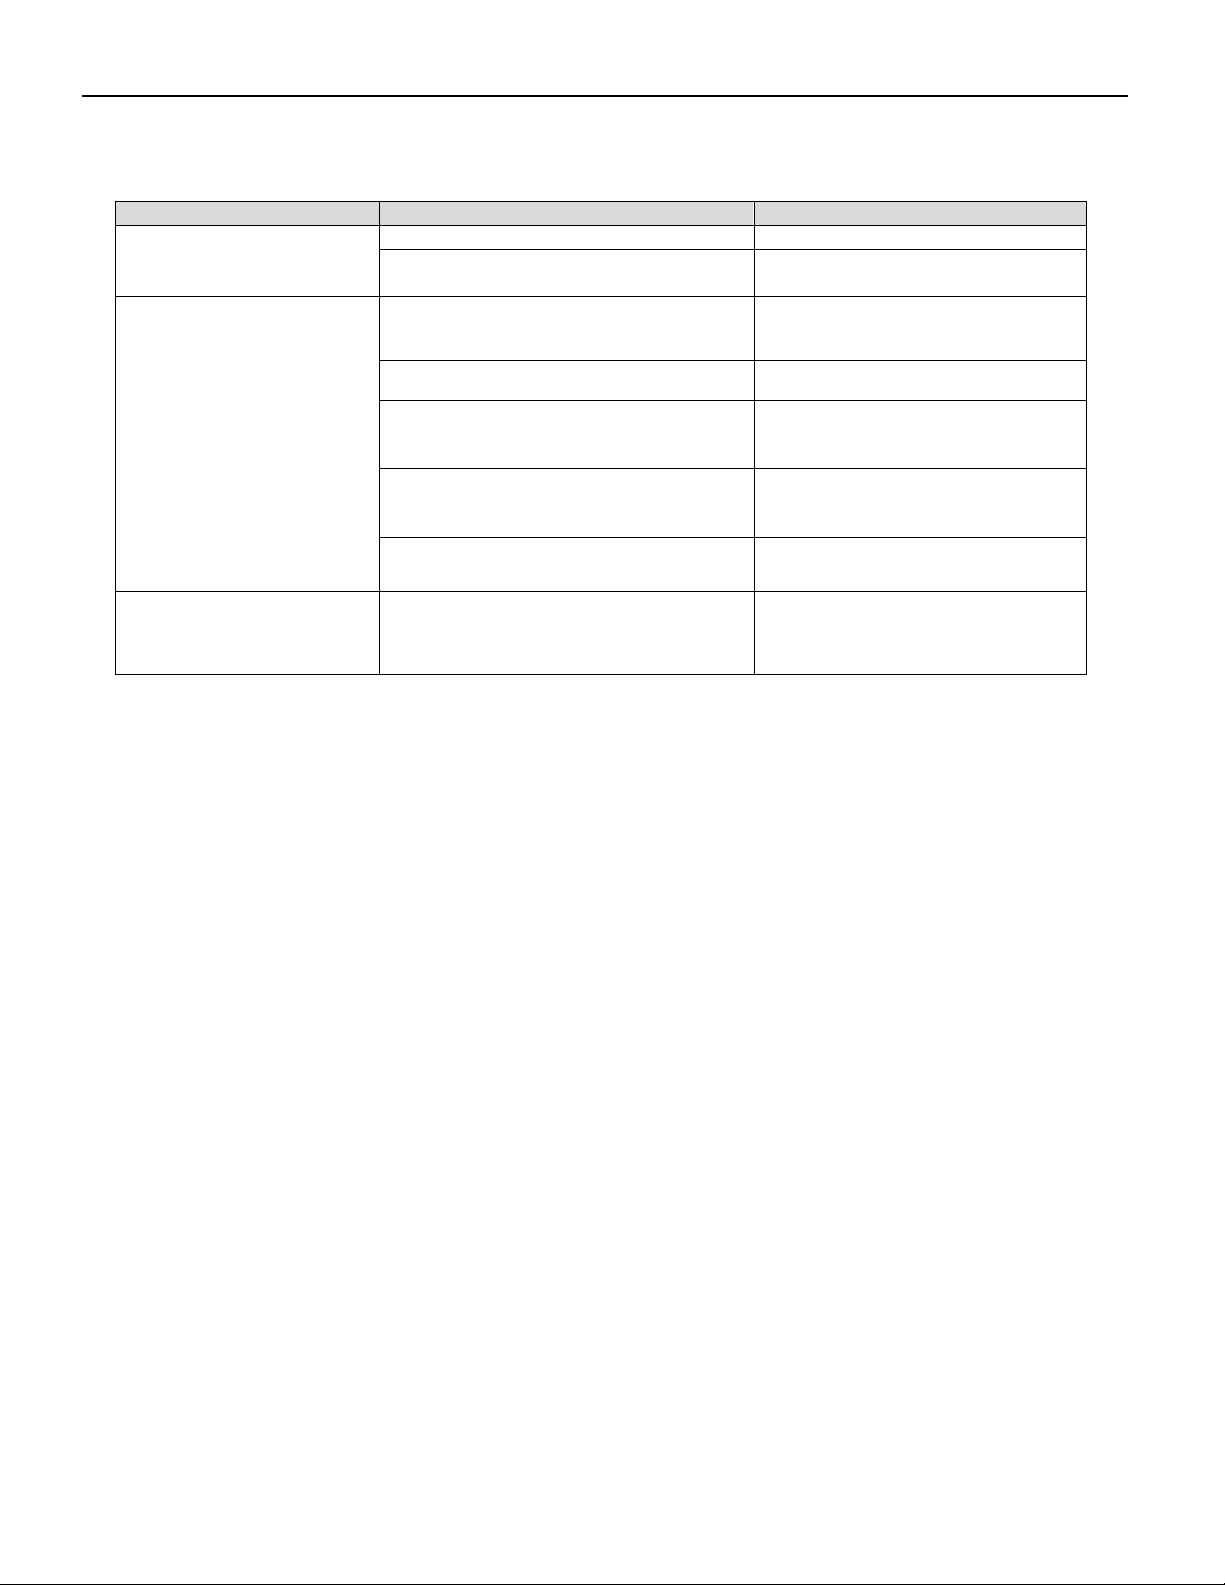
1) Table units:
• Disconnect power to unit
• Take off rear cover at the bottom rear by removing
screws (only rear table unit). Do not bend or pinch
tubes and wires.
• Clean off accumulated dirt from condensing coil and fan
blades with a stiff bristle brush.
•Vacuum dirt from the condenser coil after
brushing.
•Reinstall the rear cover in the reverse order of
disassembly. Make tighten all screws.
•Plug the unit to power and check if compressor
and fan is working.
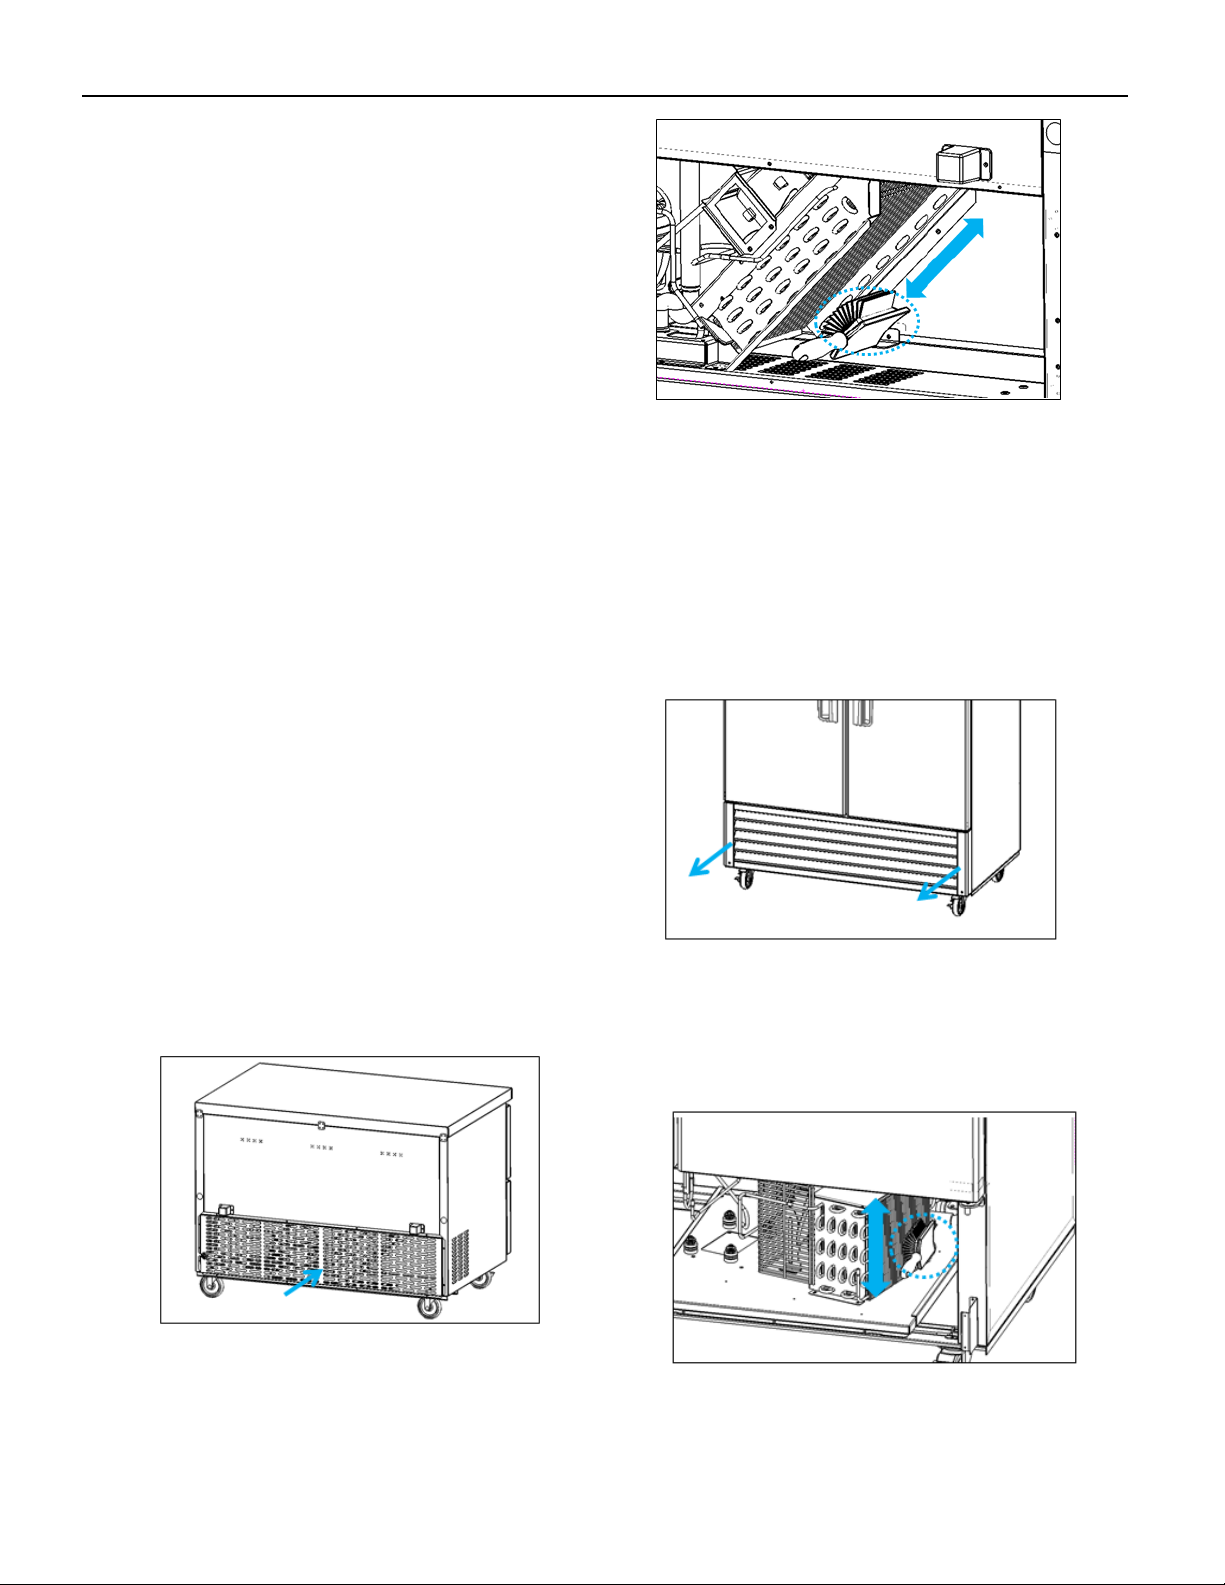
2) Reach ins (Bottom mounted compressor unit):
• Disconnect power to unit
• Take off grille at the bottom front by removing
screws. (only bottom mounted compressor units).
•Unscrew the base of the compressor and pull it out
carefully until you have enough space to clean
condenser coil. Do not make bend or pinch tubes
and wires.
• Clean off accumulated dirt from condensing coil and
fan blades with a stiff bristle brush.
•Reinstall the base and grille in the reverse order of
disassembly. Make Tighten all screws.
•Plug the unit to power and check if compressor
and fan is working.

8
Installation and Operation Guide
www.blueairfse.com
4) Cleaning the cabinet.
To reduce the risk of electric shock, unplug before
cleaning or service”
A. Cleaning the interior and exterior
•The interior and exterior of the unit can be
cleaned using warm water with soap.
•Do not use an abrasive cleaner because it will
scratch the surface.
B. Cleaning the gasket
•The door gasket should be cleaned frequently to
maintain proper sealing.
•Use warm water and a mild soap.
C. Cleaning the evaporator
•If you need to clean the evaporator, please
contact the qualified service technicians.
D. Check after cleaning
•Check the unit again for safety.
•Check if the unit is operating properly.
Tips that help prevent rusting on stainless steel
Use soft cloths or plastic scouring pads the will not harm
the stainless steel’s passive layer.
• Use the correct cleaning tools.
When cleaning your stainless steel products that make
sure to use non-abrasive.
• Cleaning along stainless steel finish line.s
Always scrub parallel to visible lines on stainless
steels. Use a plastic scouring pad or soft cloth when
you cannot see the grain.
• Use the cleaners that are either Alkaline, Alkaline
chlorinated or Non Chloride based.
Avoid cleaners containing quaternary salts as they can
attack stainless steel, causing pitting and rusting.
• Water Treatment.
It is recommended to use soft water when possible to
reduce deposits. Installation of certain filters can
remove corrosive and distasteful minerals.
Talk to a water treatment specialist if you are not sure
of the proper water treatment.
• Clean your equipment frequently
3) Reach ins (top mounted compressor unit):
• Take off top grille at the bottom by removing screws
(only reach-in top mounted compressor model)
• Clean off accumulated dirt from condensing coil and
fan blades with a soft brush.
• Reinstall cover onto unit. Make tighten all screws.
•Plug the unit to power and check if compressor and
fan is working.
9
Installation and Operation Guide
www.blueairfse.com
5. Troubleshooting
Problem
Possible Cause
Action
Compressor will not start
Power connection failure
Check Power Cord and plug it in
Power switch is in off position
Ensure switch is in the “on”
position
The unit does not
refrigerate well
Temperature set point is too high Correct temperature set point
The door is opened too frequently Minimize door opening
Loading of too much warm or moist
product Load product in intervals
Not enough ventilation
Move the unit to a well
Ventilated location with at least 3
Inches of clearance on all sides
Condenser is clogged Clean it
Condensation
On cabinet exterior High moisture air can produce dews
during the rainy season Wipe with cloth
** A water-flowing sound can be heard when the unit is operating. This is the sound of refrigerant flowing.

10
Installation and Operation Guide
www.blueairfse.com
Blue Air has a Nationwide Service Network
to provide timely services to our customer's needs.
Please call or fax us at the following numbers.
Toll Free, 1-866-677-8500
Blue Air Refrigeration Nationwide Service Network
TEL, (310) 808-0102
Fax, (310) 808-0242/0262
This manual suits for next models
22
Table of contents
Other Blueair Commercial Food Equipment manuals


Popular Commercial Food Equipment manuals by other brands


MKN
MKN FlexiCombi Classic Series operating instructions

Blanco
Blanco MANHATTAN MNE 3 operating instructions

Proluxe
Proluxe TORTILLAPRO DP2000PB Operation manual

METAL SUPREME
METAL SUPREME AS2406E instruction manual

Prince Castle
Prince Castle DHB-KFC3GB operating instructions

croydon
croydon FZM8 Assembly, Installation and Operation