BLUEBOT EZ1 User manual

EN
DE
FR
NL
ALL
USER MANUAL
BEDIENUNGSANLEITUNG
MANUEL DE L’UTILISATEUR
GEBRUIKERSHANDLEIDING
DiSpoSAL AND REcycLiNG
01
23
45
67
89
EZ1

1
EN
Foreword
welcome!
Thank you for choosing the Bluebot EZ1 robot vacuum cleaner.
With this manual we would like to support you in the set-up and
usage of your Bluebot robot.
For extra instructions, you can go to:
www.bluebotsupport.com/ez1
In this manual you will nd the following topics to support you in the
set-up and usage of the robot:
1 Safety regulations..................................................................... 02
2 Product information.................................................................. 04
3 Installation of the robot & charging station ............................. 07
4 Installation of the Bluebot application ....................................... 10
5 Usage of the robot .................................................................... 12
6 Cleaning settings ...................................................................... 14
7 Maintenance ............................................................................. 15
8 Basic parameters ...................................................................... 19
9 Usage limitations ..................................................................... 20
10 Troubleshooting ....................................................................... 21
11 Warranty ................................................................................... 22

2
WARNING:
· Use only the original rechargeable battery and charging station specially
equipped by the manufacturer. Non-rechargeable batteries are strictly prohibited,
please refer to "product parameters" for battery specication information.
· It is forbidden to use the product in environments with open ames or fragile
objects.
· It is forbidden to use the product in extremely hot (above 40 °C) or extremely
cold (below 0 °C) environments.
· It is forbidden to use the products near burning or evenly hot objects, for
example a burning replace.
· Do not use this product in high temperature environments.
· It is forbidden to approach the opening and operating parts of the robot with
ngers, clothes, hair and any item for safety reasons.It is forbidden to use the
products on wet or uneven ground.
· It is forbidden for the product to absorb any articles such as stones and waste
paper that may clog the product.
· It is forbidden for the product to absorb any inammable substances, such as
petrol, toner and toner for printers. Prohibit the use of products in clean areas with
ammable items.
· It is forbidden for the product to absorb any burning articles, such as cigarettes,
matches, ashes and other articles that may cause re.
· It is forbidden to place objects at the suction opening. Do not use the product
when the suction port is blocked. Clean all possible blockage at the suction
opening to ensure smooth air circulation at the suction opening.
· Use the power cord carefully to avoid damage. It’s forbidden to use the power
cord to drag or pull the product and the product charging station. It’s forbidden
to use the power cord as a handle. It’s forbidden to clamp the power cord in the
crack of the door. It is forbidden to pull the power cord at sharp corners.
· Do not use a damaged charging/auto station.
· Even if the product has been severely damaged, burning of the product is
prohibited, which may lead to explosion of the battery of the product.
GENERAL SAFETY REGULATIONS:
Before using this product, please read the following safety instructions and follow all routine safety precautions.
Please read the instructions carefully, please keep the instructions.
Any operation inconsistentcy with this instruction manual may cause damage to this product.
Make sure to maintain the robot following the guidelines stated in the manual.
1. SAFeTY reGUlATIoNS

3
EN
SAFeTY reGUlATIoNS
ATTENTION:
· Only authorized technicians can disassemble this product. Users are not
recommended to disassemble this product by themselves.
· This product can only use the power adapter provided by the factory. lf other
adapters are used, the product may be damaged.
· Do not touch wires, sockets or power adapters when your hands are wet.
· Make sure no fabrics or bigger items roll into the product drive wheels.
· Do not place this product near cigarette butts, lighters and other smoldering res.
· Please clean the product after charging.
· Do not bend wires excessively or place heavy objects and sharp objects on
the machine.
· This product is an indoor household product. Do not use it outdoors.
· Do not sit on the product.
· Do not use this product (e.g. bathroom) in a wet environment.
· Before using this product, please remove all vulnerable items (e.g. glasses,
lamps, etc.) on the ground as well as items (e.g. wires, paper sheets, curtains)
that may entangle the side brushes and air suction passages.
· Do not put this product in a place where it is easy to fall (e.g. on desks and
chairs, by the stair case).
· Please carefully check whether the power adapter is connected to the socket
before use, otherwise the battery may be damaged.
·To prevent tripping, please inform other members of the house when this
product works.
· Please empty the dust bin before using this product when the dust bin is full.
· Please remove the battery from the machine before the product is scrapped.
· Please make sure that this product is not powered on when removing the
battery.
· Please recycle the discarded batteries safely.
· Recommended to block the staircase exit or areas where the robot may
fall. The anti-drop sensors prevent the robot from tumbling down stars and
steep drops. However, they may work less effectively when dirty or used on
reflective/very dark-colored floors.
· To clean and maintain the robot, you must turn it off. Pull out the power cord
from the socket and disconnect the power supply first.
· Do not immerse the robot or the charging station in water for cleaning or rinse
them with water.
· Do not whipe any part of the product with a damp cloth or any liquid.
· Do not use the mopping module on the carpet.
4
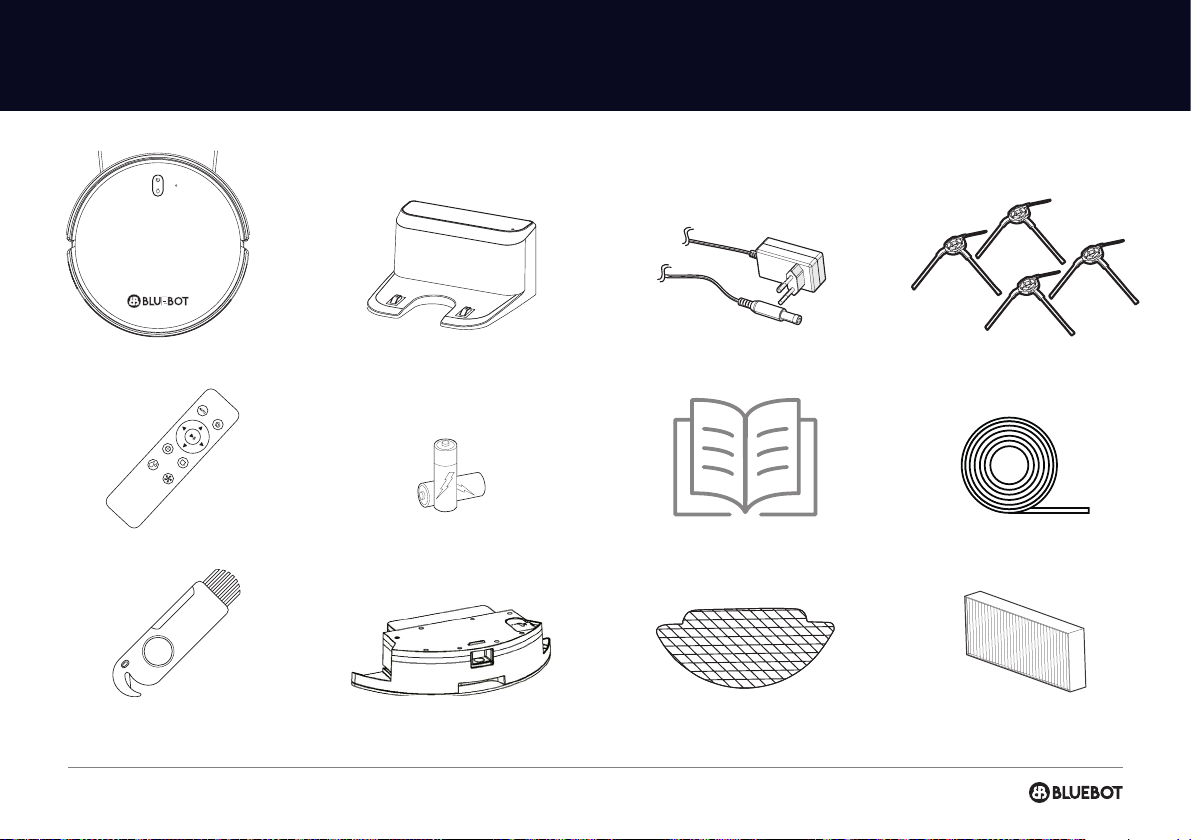
2. prodUcT iNFormATioN
EZ1 robot Charging station Adapter
Instruction manual Magnetic strip
Side Brush (4x)
Cleaning brush
with knife
2 in 1 Dustbin and
Watertank
Mopping cloth (2x) HEPA lter +
Sponge lter (2x)
Remote control 2 x battery

5
EN
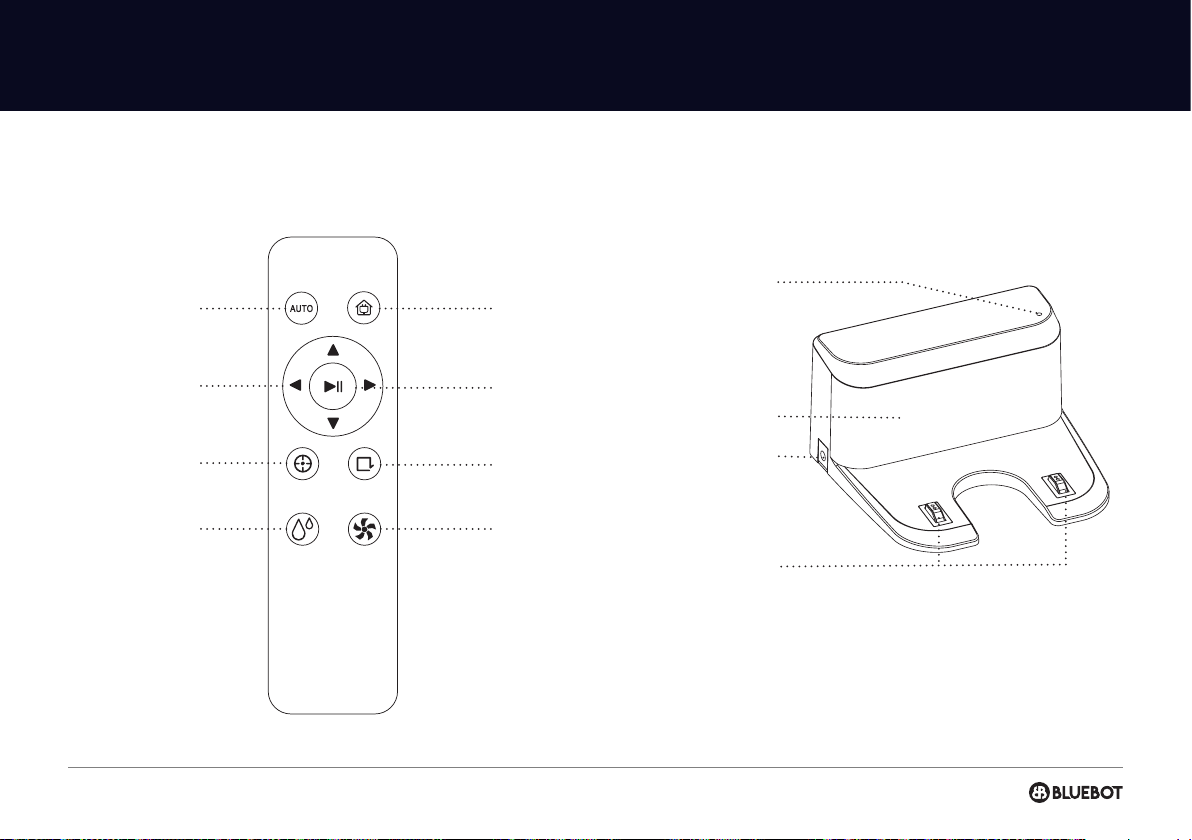
prodUcT INFormATIoN
Anti-collision sensor
Mop module
Dustbin
Infrared lens
TOP & FRONT
SIDE
BOTTOM
Anti-drop sensor
Charging contact points
Side brush Side brush
Mop module
2 in 1 Dustbin and Watertank
Driving wheel
Battery cover
Universal wheel
Suction inlet
Dustbin button
Filter cover
Cleaning on & off
• Short press to start clean/pause
• Long press for 3secs for on/off
Charging
• Short press charge/pause
Indicator light
• Blue: normal operation
• Red: abnormal condition and low battery
• Blue flashing: recharging
Reset wifi
• Long press both buttons simultaniously to start
network connection
6
prodUcT INFormATIoN
Automatic cleaning
Spot cleaning
Direction control
Water flow adjustment
Recharge
Start & Pause
Edge cleaning mode
Suction adjustment
Power indicator light
Signal emission area
Adapter plug
Charging connectors
REMOTE CONTROL & CHARGING STATION

7
EN
3. INSTAllATIoN INSTrUcTIoN | roboT & cHArGING STATIoN
PRODUCT ASSEMBLY
1Please remove the protective foams from the robot.
2Install the brushes. Make the left side-brush (L) and the right-side brush (R)
correspond to L and R on the bottom casing, keep pressing L and R and the side
brushes. They are installed when you hear a “click” sound.
3Place the 2-in-1 combi watertank in the robot.
4 Install the charging station. The recharging indicator light ashes during charging
and it’s steady on when charging is nished. The charging time is about 3 hours.
5Fully charge the robot (before 1st time use)
6Connect with Bluebot app (optional)
7Start cleaning

8
NOTE
• Please do not move the charging station without reason and keep it
out of direct sunlight.
• If the charging station is relocated, the robot may fail in positioning.
• Direct sunlight will interfere with the recharging signal and consequently,
the robot may be unable to return to the charging station.
• The robot cannot be used to remove liquids.
• If the battery level is less than 20% the robot will not work. Please
charge it.
• The robot will return to the charging station automatically if the
battery level is less than 20% when in use and will be powered off.
• Please clear various wires (including the power line of the charging
station
) from the ground before use to avoid outage and damage of
objects or wires when wires are dragged by the robot.
INSTAllATIoN INSTrUcTIoN | roboT & cHArGING STATIoN
0,5m
1,5m
0,5m

9
EN
INSTAllATIoN INSTrUcTIoN | roboT & cHArGING STATIoN
INSTALLATION OF MOPPING MODULE
1 Fill the water tank: uncap the cover and ll with water.
2 Paste the mopping cloth at onto the bottom of the water tank.
3Press and hold the button in the middle of the tank and push it horizontally along
the rear of the robot. The module is correctly in place correctly if you hear the
sound of a “click".
4Remove the mopping module:
When the robot is nished working, press the button in the middle of water tank
to remove the mopping module backwards, empty the water tank and clean the
mopping cloth (do not move or turn the robot over during cleaning).
NOTES FOR MOPPING MODULE
• Please do not use the mopping module after it has been left unused.
• For safety reasons, please be sure to remove the mopping module when it is
being charged or left unused.
• Please do not mop the carpet. Set a forbidden area with a magnetic strip to
prevent the machine from going onto the carpet.
• To achieve a better mopping effect, the mopping module should be installed after
take out and reassemble the mopping module according to step 3. Please do not
move or turn the robot over, otherwise, it could fail in its positioning.
• The mopping function of the machine is intended for wiping and is not condu-
cive to deep cleaning. It cannot remove stubborn stains effectively and replace the
labour force.
• Please don't use any detergent in the watertank to prevent clogging.
• The robot cannot be used to remove liquids.
Back
fixation
Hole position of the mop module

10
4. INSTAllATIoN blUeboT App
Bluebot application 1 Fully charge robot 2 Download Bluebot app 3 Steps for registration 4 Connect robot with app (steps)
Place the robot on the charging station to
charge and make sure it’s fully charged
before use.
Download the Bluebot app. The app can be
found in the Appstore and Google Play.
Register a new account
if you are not yet an
existing user.
Open the Bluebot app
and press the “+” icon to
add you device.
Remove the robot from the charging station. Make sure the robot is on, by holding in the
“On button” for a few seconds on top of the
robot. Wait until the robot has started fully.
1
4
2
5
3
6

11
EN
INSTAllATIoN blUeboT App
7
10
8
11
9
12
Select the
Bluebot EZ1
Reset the device:
Power on the device.
Power off after 10s and
then power on again.
After done, press “Next“ to
continue.
Reset the device:
Hold the Power and
Recharge button for 3s.
After done, press “Next“ to
continue.
Reset the device:
Click: “Confirm the
indicator is blinking
rapidly.”, then press “Next“
to continue.
Your robot is connecting
to the Bluebot app, please
wait till connection is
complete.
Select your 2.4Ghz
wifi network, enter the
password and press
confirm.
Note: a 2.4 Ghz
connection only will work.
BLUEBOT EZ1

12
WORKING MODES
5. USAGe oF THe roboT
AUTOMATIC CLEANING
After automatic cleaning begins, the robot start
cleaning the whole space, and automatically
recharges after the cleaning is completed.
SPOT CLEANING
Press “ “ button on the remote control to clean
in a spiral clokwise from the inside to the outside
(maximum radius is 60 centimeters). After the spot
cleaning is completed and nally return to the
starting position the robot will nish the cleaning.
You can also use the direction buttons on the app
to control the robot to the location that needs to be
cleaned.
You can also use the Bluebot app to start the spot
cleaning after placing the robot on the right spot
manually.
EDGE CLEANING
The robot cleans the periphery on the indoor xed
places such as walls, tables corners, etc, then the
robot returns to the charging station after working
along the edges. You can also press “ “ on the
remote control or in the Bluebot app to quicly start
the edge cleaning.

13
EN
USAGe oF THe roboT
USAGE OF MAGNETIC STRIP
The magnetic strip is used for setting no-go areas such as petfood bowls and
children’s toys, to prevent the robotic vacuum from going into a place you
don’t want it to.
1 Conrm the no-go area that you don’t want the robotic vacuum in.
2 Cut the magnetic strip based on the length and width of the area measured.
Note: the minimum length of a magnetic strip should be 1 meter. A 5 meter strip is
available for sale, which can be cut in a preffered length.
3 Fix the magnetic strip on the boundary of the planned oor using double-sided
adhesive tape. And ensure that it is at and not tilted at both ends
Double Sided Adhesive Tape

14
6. cleANiNG SeTTiNGS
MORE OPTIONS
Timer*
Set a timer to program the robot to clean at a certain time or day.
Manual
Control the robot manually with the remote control or use the Bluebot app on
your phone as a remote control.
Find robot
Tap this button when you lost your robot and your robot will tell you where it is.
Record*
View all your previous vacuum cleaning records. You can see how many m2 has
been cleaned and the time it took.
Silent mode
Here you can schedule a do not disturb time period.
Consumables and maintenance*
Here you will nd an overview of consumables and indicates when consuma-
bles need to be replaced or maintenance is required.
More info*
Here you will nd network and robot information.
* Via Bluebot app only
15
EN
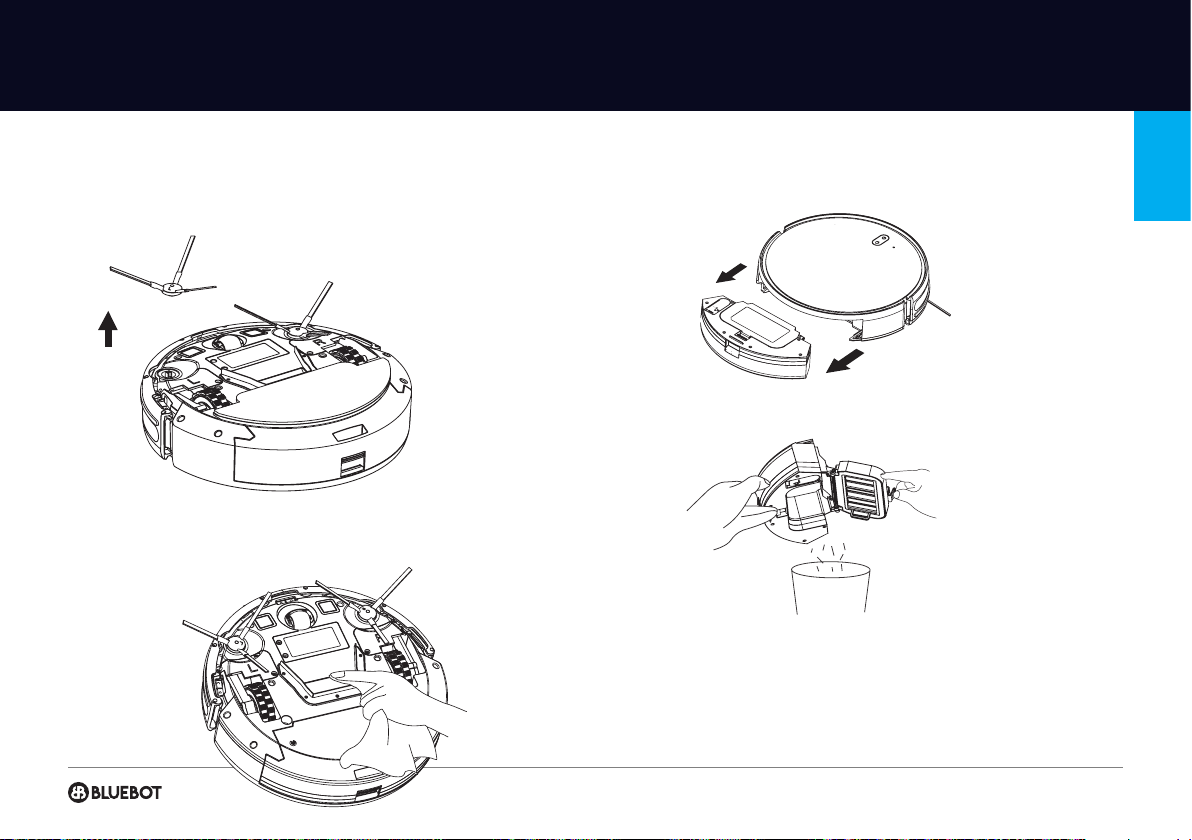
7. mAiNTeNANce
SIDE BRUSH | REGULAR CLEANING
1 Turn over the robot and pull the side brush out and upwards
2 Remove hair and dirt and reassemble the side brush.
SUCTION INLET | WEEKLY CLEANING
1 Turn over the robot and wipe the suction port with a clean and dry cloth.
ELECTRICALLY-CONTROLLED WATER TANK | REGULAR CLEANING
1 Press the button and pull the dustbin out backwards.
2 Open, empty and clean the dustbin.
Warning 2-in-1 water tank & dustbin:
Make sure to empty the watertank before letting the robot start charging on the
charging station.
16
mAiNTeNANce
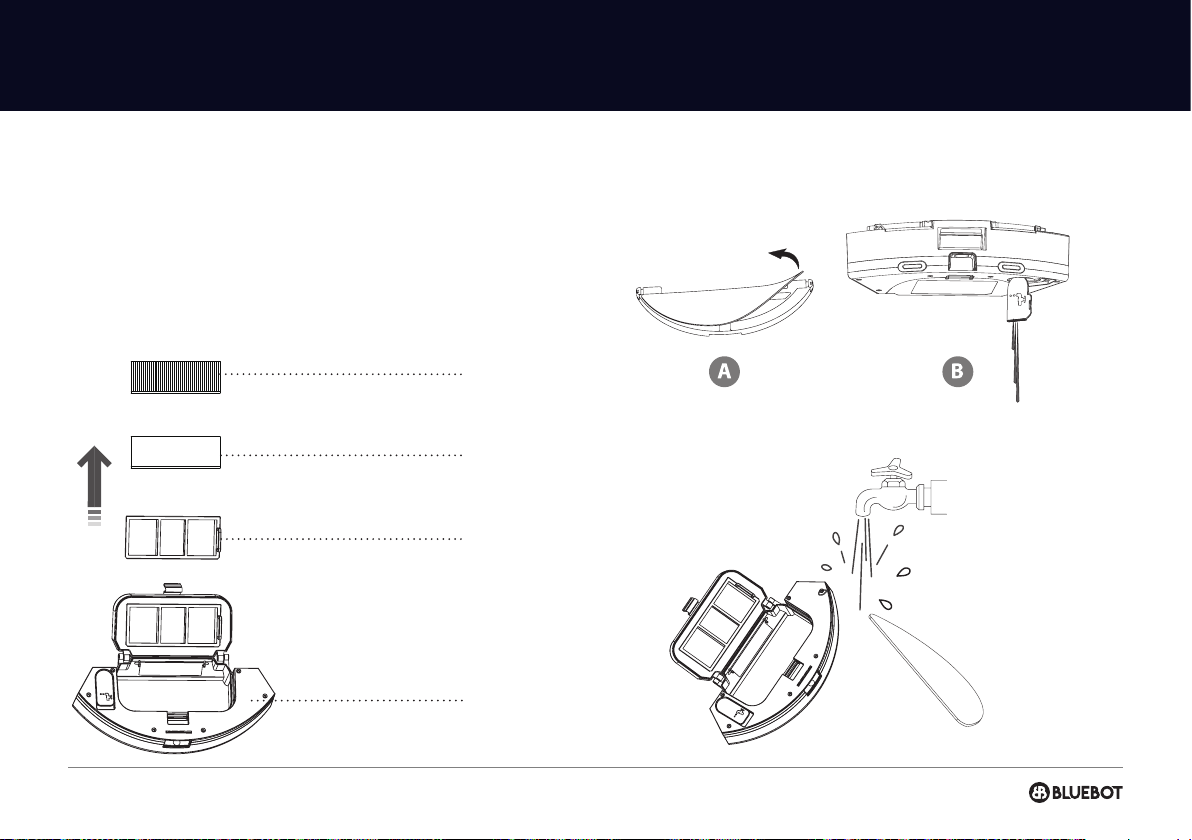
FILTER | REGULAR CLEANING
1 Remove the primary lter, sponge and HEPA.
2 Clean the removed primary lter, sponge, and HEPA with water if needed.
3 Shake o the water drops and dry the pieces naturally, then use them after
they have completely dried.
4 When dry, install them in the sequence: HEPA > sponge > primary lter.
MOPPING MODULE | 2 IN 1 ELECTRICALLY-CONTROLLED WATER TANK
1 Remove the mop, empty the water tank after each use.
2 Clean the mop (by hand or in a washing machine; max 40°C), dry naturally, do
not tumble dry the mop. Dry the water tank naturally by air.
Primary lter
Sponge
HEPA
Water tank
17
EN
mAiNTeNANce
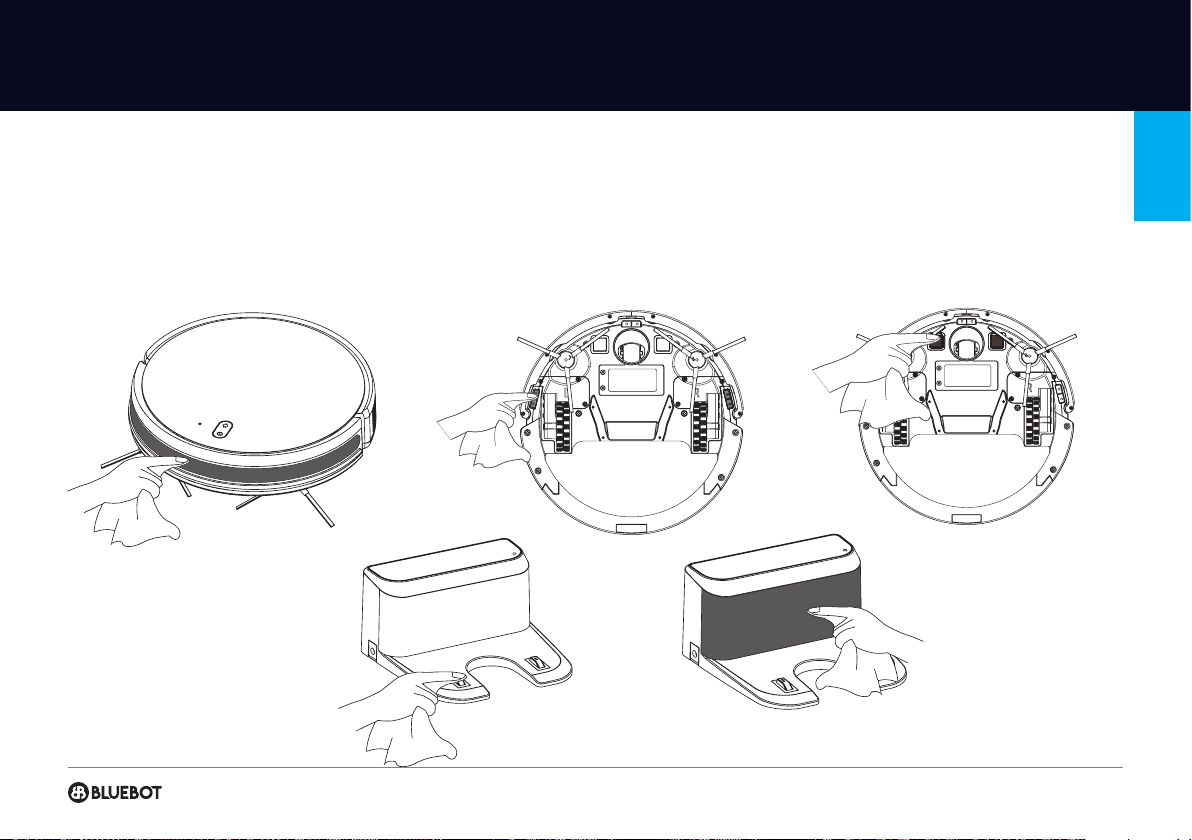
SENSOR | REGULARY CLEANING
Clean the sensors with a soft, dry mop, including:
1 Three anti-dropping sensors at the bottom of the robot.
2 Electric shock protector and the pins to connect with the charging station at
the bottom of the robot (please cut the power o during cleaning)
3 Signal transmission area of charging station.

18
mAiNTeNANce
COMPONENT MAINTENANCE
Regular maintenance
To achieve the best cleaning eect, clean and maintain the robot regulary
according to below table. Determine the frequency of cleaning and
maintenance according to your use habits.
BATTERY
· The robot is furnished with high-performance lithium-ion batteries.
· To maintain battery performance, please keep the robot charged in daily use.
· If the machine is left unused for any length of time, please shut down and
keep it properly.
· Charge it at least every three months to avoid damaging batteries due to
excessive discharge.
FIRMWARE UPGRADE
· Upgrade rmware using the Bluebot app. If new rmware is detected,
upgrade it according to the report.
· The battery level should be ≥ 50% during rmware upgrade, so if needed the
machine should be placed on the charging station to charge before the rmware
upgrade takes place.
SYSTEM RESET
· If you need to reset the robot, please switch it o and on again.
PARTS CLEANING
FREQUENCY
REPLACEMENT
FREQUENCY
Filter Weekly Every 2 months
Side brush Weekly
Every 3 to 6 months
or when it is obviously
damaged
Sensor Monthly When it is obviously
damaged
Charging pins Monthly -
Universal wheel Monthly -
2-in-1 combi tank Weekly | After each use When it is obviously
damaged
19
EN
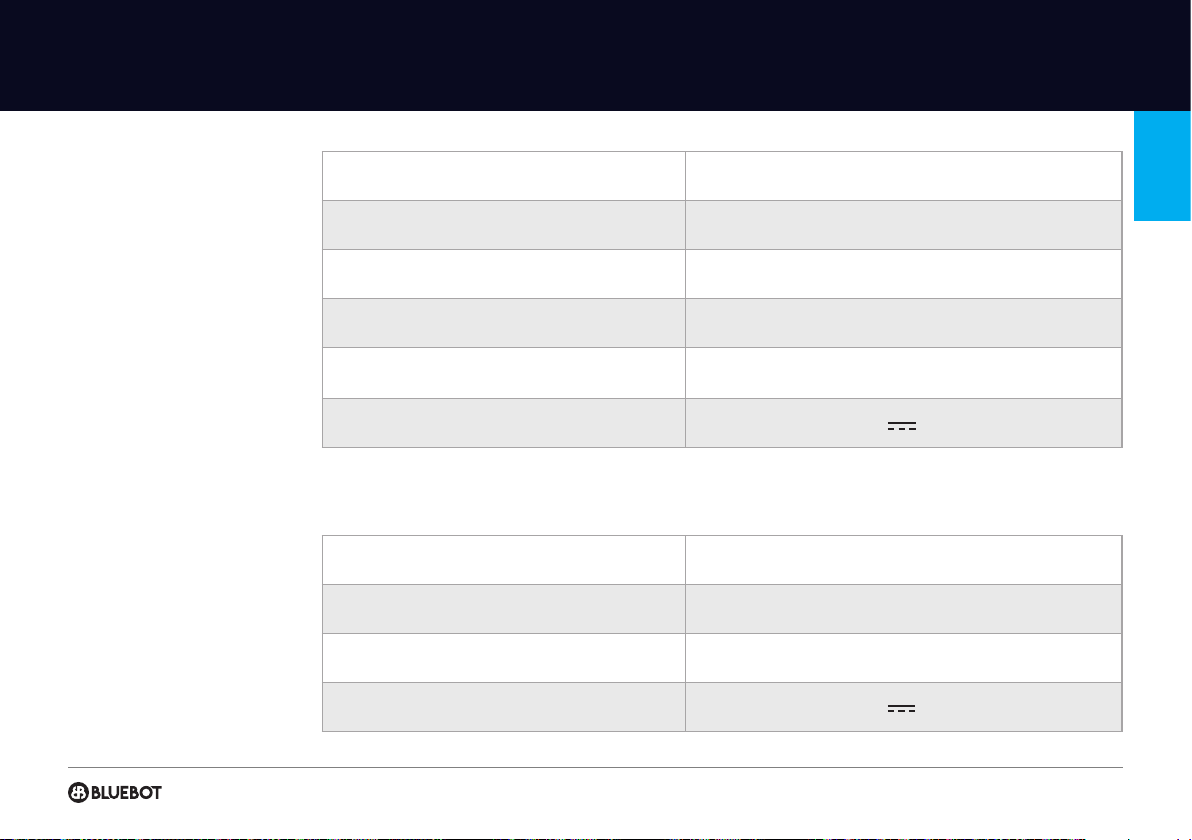
ITEM PARAMETER
Model BLUEBOT EZ1
Overall dimension 300X300X75mm
Product weight 2.2 kg
Li-ion battery 14.4V 2500mAh
Rated input 19V 0.6A
ITEM PARAMETER
Overall dimension 158x137X84mm
Rated input 100-240V ~ 50/60Hz 28W
Rated output 19V 0.6A
RoboT
CHARGING STATIoN
8. bASic pArAmeTerS
Table of contents
Languages:
Popular Vacuum Cleaner manuals by other brands

cecotec
cecotec Conga Popstar Glass Titanium instruction manual

KitchenAid
KitchenAid KKVR100 quick start guide

cecotec
cecotec Conga 1790 Titanium quick start guide

Makita
Makita DCL181F instruction manual

Termozeta
Termozeta Aspirabriciole Wet&Dry instruction manual

Simplicity
Simplicity Jessie Vacuum Bag and Filters owner's manual


