Blueskysea B2W User manual
Thank you for choosing your Blueskysea B2W dash
camera. Please read this user manual carefully before
using the camera, then keep the manual safe for future
reference. Please feel free to contact our customer
support team by email if you need any assistance:
Blueskysea B2W Dash Camera
User Manual

Table of Contents
Main features
Standard package contents
Optional accessories
Product diagram
Product Overview
Inserting/removing the microSD card
Formatting the microSD card
Loop recording time/memory card size table
Quick test before installation in your car
Changing operation mode
Buttons function table
Led indicators
Voice event list
Performing a Quick Test at home before
installation
Power on/off
Start/stop recording
Take a photo
Lock video clip
Playback video footage
WiFi switch on/off
Specifications
Camera Installation
Basic Operation
Display Overview
Menu settings
Smartphone APP operation
FAQ
Customer Service
1
5
15
16
21
25
26
33
40
44

2
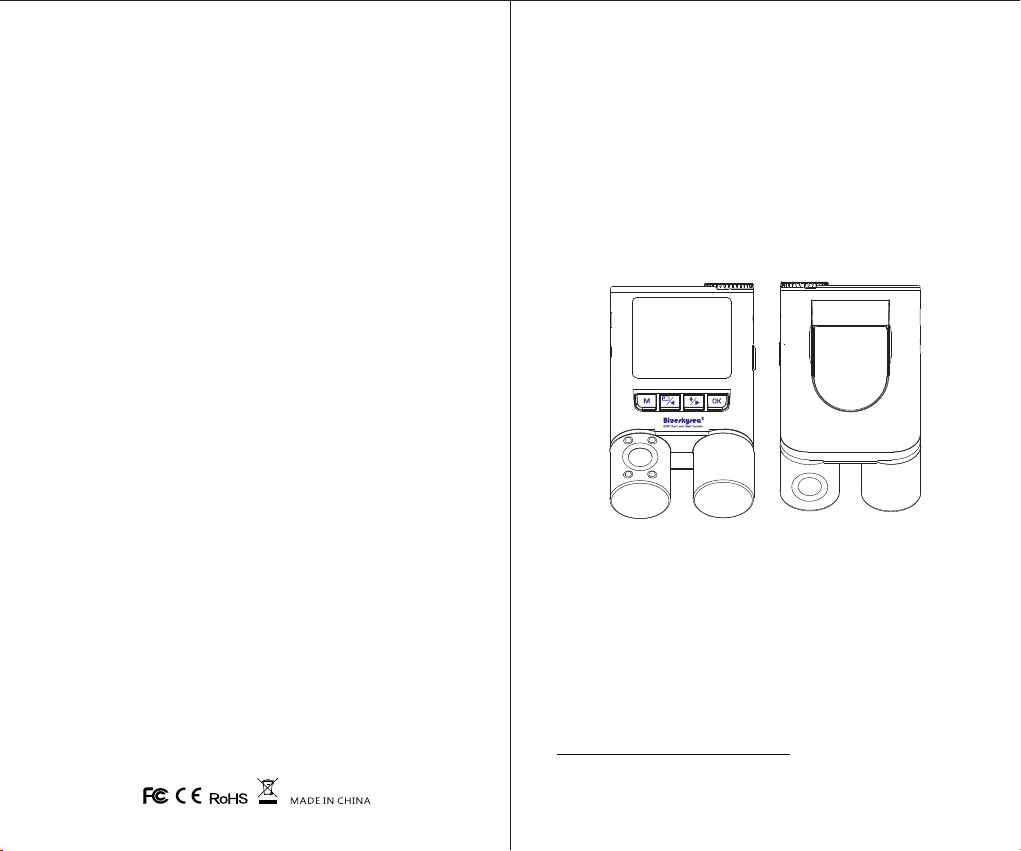
1. Dual lens design (front view and cabin/rear view) with
a smooth, easy horizontal adjustment (E.g.cabin lens
can very quickly be pointed towards the driver's door).
2. A secure 3M adhesive windscreen mount provides
easy installation and vertical adjustment to match
the glass angle. (No rubber suction cup to fall off
the windscreen and cause vibration.)
3. Ultra-wide angle lenses (132° horizontal field of view)
paired with the new Sony IMX307 Starvis sensors
for superior night time video quality and reduced
motion blur on both front and cabin views.
4. Full HD (1920x1080) resolution on both views.
5. Invisible infrared cabin illumination utilizing 4 IR LEDs
allowing the cabin view to see passengers even in
true darkness, with an automatic switchable IR-cut
filter to provide enhanced sensitivity at night time
while providing correct color during daylight.
6. Super-capacitor power supply, avoids reliability and
safety problems with lithium batteries swelling/failing
in high summer temperatures.
7. Voice announcements for memory card error, file
lock, etc. safely inform the driver of camera status
while driving. (Not necessary for the driver to take
their eyes off the road to investigate beeping noises.)
8. In addition to the built-in setup menu and playback
modes, Wi-Fi and app support provide setup,
playback and video clip download to iPhone and
Android devices.
1
Main features:
9. Loop recording ensures the camera never stops
button
recording, and a G-sensor and large "lock
ensure important video clips do not get overwritten.
10. Large, easy to read LCD monitor with setup menus,
video playback, live view, and screen saver function.
11. Optional hardwire kit (separate purchase) with parking
mode function, provides recording of video clips while
parked when triggered by the G-sensor detecting
an impact.
12. MicroSD memory card (separate purchase), supports
capacity up to 400GB (approximately 30 hours record
time).
13. Video playback function built into camera, or via phone
app for better image quality.
"
Product Overview
Standard package contents
1x Camera
1x USB car charger (supplies power from car Accessory
socket)
1x Windscreen mount with 3M adhesive
1x USB data cable (for connection to laptop/computer)
4x Cable clips
1x Trim removal tool
1x User manual
Optional Accessories
1x GPS module (for recording correct time, speed and
location)
3
1x Hardwire kit (for power connection to fusebox instead
of accessory socket, also provides parking mode and
car battery protection)
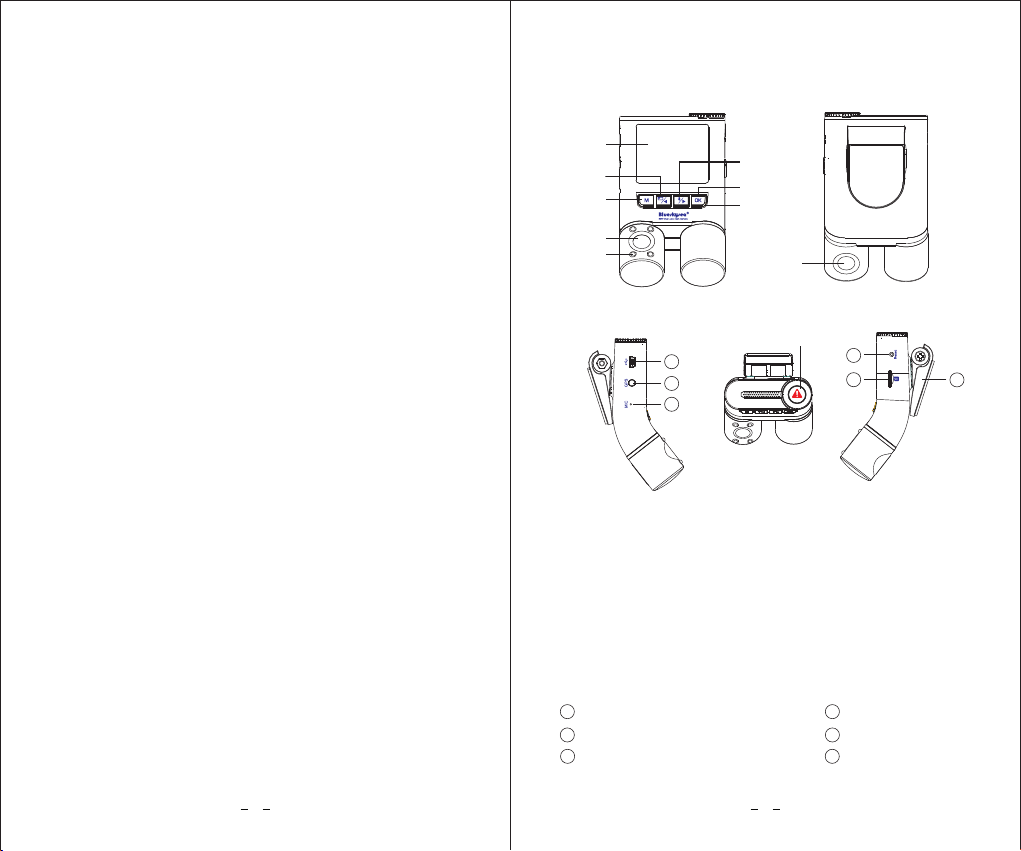
Product Diagram
LCD Screen
Front Lens
IR lights
Menu Up/PIP Mode Switch
Menu Down/Microphone On/Off/ Wi-Fi Switch
Menu Confirm/Recording Start/Stop
Recording Status Indicator
Rear Lens
Lock Current Video/Video Playback/Power Switch
Menu/Take Photo
Memory Card Slot
Reset Button
GPS Module Jack
Microphone
① ② ③
④
⑥
⑦
⑧
⑨
⑩
15
11 12
13
⑤
14
①
②
11
12 15
14
⑥
③
④
⑤⑦
⑧
⑨
⑩
13
Mount
16
16
4
USB Power Port

1. Insert a microSD card (minimum Class 10,16Gb) into
the camera and push firmly until it locks into place.
2. To remove the microSD card, press the end of
microSD card inwards until it clicks and can be released
from the slot, then pull the memory card out.
3. The card slot is spring loaded, take care not to let
the card eject freely.
Notes:
Formatting the microSD card
Inserting/removing the microSD card:
To avoid corrupted recordings, the camera should
not be recording when removing the microSD card,
it is best to power the camera off first. The dash
camera will reboot if it is not powered off first.
The microSD card is sold separately. The microSD
card must have a Class-10 or UHS-1 rating or better,
and a capacity between 16GB and 400GB.
1. Before first use in the dash camera, the microSD card
should be formatted in the dash camera using the
format menu.
2. Formatting will permanently erase any data stored
on the micro SD card. For best performance, format
periodically (after backing up any important files to
your phone or computer).
3. IMPORTANT:
256Gb/400Gb micro SD cards must be formatted
again in the camera after you format cards with a
windows computer.
Loop recording time/memory card size table
Memory
card
FHD 60fps
F+R FHD
12+12 Mbps
F+R FHD
16+8 Mbps
16Gb
32Gb
64Gb
128Gb
200Gb
256Gb
400Gb
1h 35m
3h 10m
6h 20m
12h 15m
18h 50m
22h 30m
1d 10h 40m
1h 20m
2h 40m
5h 20m
10h 30m
16h 14m
19h 36m
1d 6h 10m
1h 25m
2h 50m
5h 40m
11h 50m
16h 45m
20h 10m
1d 7h 15m
5 6
Performing a Quick Test at Home
before installation:
* d=day; h= hour; m= minute

Quick test before installation in your car
1. Insert a memory card into the camera.
2. Using the supplied USB cable, connect the camera
to a USB power bank, or a 5V USB phone wall charger
for a quick test before installation in your car. (Do
not plug into a computer.)
3. The camera should start video recording a few seconds
after the power is connected and its screen will show
the output from both cameras.
4.If necessary, format the microSD card so that recording
can start, this can be done using the dash camera
menu.
Changing operating mode
1. At power on, the default working mode is Recording
mode with Wi-Fi disabled.
Operating mode preview (see photo 1)
Red-dot flashes all the time in the recording mode.
00:00:03
F+R 16+8Mbps
03/20/2019 16:19:01
WDR
3
photo 1
2. To enter Standby mode from Recording mode:
press the OK button to stop recording.
[ ]
Operating mode preview (see photo 2)
Red-dot is invisible in the standby mode.
05:20:33
03/20/2019 16:19:01
WDR
3
photo 2
F+R 16+8Mbps
7 8
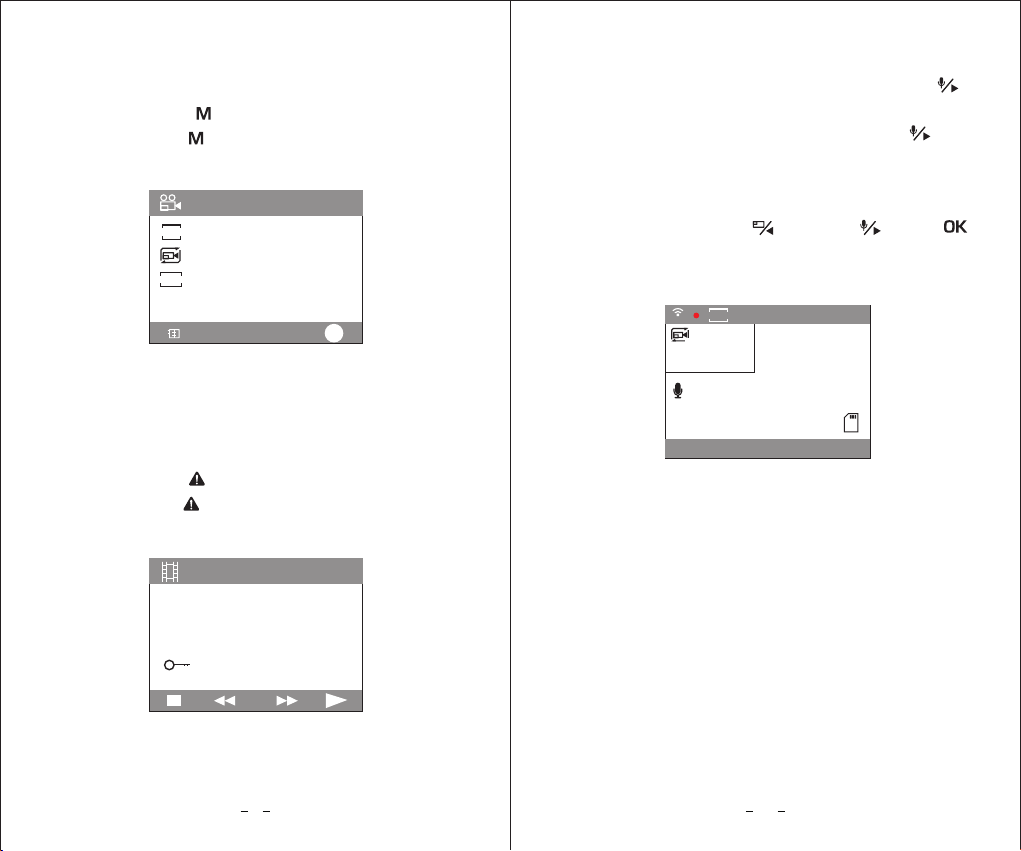
3. To enter Menu mode:
First enter Standby mode (see step 2)
Press the Menu button to enter Menu mode.
[ ]
Press the Menu button again to exit Menu mode.
[ ]
Operating mode preview (see photo 3)
WDR
EV
SIZE
Video
OK
Resolution
Loop Recording
WDR
Exposure Comp
>
>
>
photo 3
4. To enter Playback mode:
First enter Standby mode (see step 2)
Press the Lock button to enter Playback mode.
Operating mode preview (see photo 4)
[ ]
Press the Lock button again to exit Playback mode.
[ ]
2019_0320_144746_R.MP4
photo 4
1080FHD
19/03/20
14:47
5. To switch on Wi-Fi: long press (hold the button
down for 5 seconds) the Menu Down/Wi-Fi
button.
To switch off Wi-Fi, long press the Down
button to terminate Wi-Fi connections and disable
Wi-Fi.
Operating mode preview (see photo 5)
[ ]
[ ]
[ ]
If there is no APP connection with your smartphone,
a short press of the Up or Down or OK
buttons will disable Wi-Fi.
[ ] [ ]
00:00:09
WiFi
EV
0.0
SSID:B2W_146b9c227b7e
PWA2:12345678
2019/03/20 16:19:27
WDR
3
photo 5
F+R 16+8Mbps
9 10

Button Functions Table
Mode
Power Off
Standby mode
(Not recording)
Buttons/
Icons
Purpose/Behavior
Long press: Power camera on.
Long press=hold button for 5
seconds, the screen will take
another 6 seconds to illuminate.)
(
Lock
[ ]
Menu
[ ]
Short press: Enter/Exit the menu.
[ ]
[ ]
Up
Short press: Toggle screen view:
Front camera only,
Rear camera only,
Front + Rear camera overlaid.
When current resolution is FHD
60 fps, only the front camera is
available.
Down
Short press: Enable/disable
audio recording;
Long press: Switch Wi-Fi On/Off
REC
[ ]
Short press: Start Recording
Short press: Enter Playback Mode;
Long press: Power camera off.
Lock
[ ]
Recording
Mode
(Wi-Fi disabled)
Short press: Lock current video
file (Stored in RO folder), and
take a Photo (Stored in Photo
folder).
Short press: Toggle screen view:
Front camera only,
Rear camera only,
Front + Rear camera overlaid.
When current resolution is
FHD 60 fps, only the front
camera is available.
Menu
[ ]
[ ]
Up
Playback
Mode
Short press: Stop Recording
Short press: Lock current video
file (Stored in RO folder), and
take a Photo (Stored in Photo
folder);
Long press: Power camera off.
[ ]
Down
Short press: Menu up.
REC
[ ]
Short press: Menu confirmation/
Play/Pause.
Short press: Exit Playback mode.
Lock
[ ]
Menu Settings
Mode
Short press: Exit menu/Back to
previous menu.
Menu
[ ]
[ ]
Up
REC
[ ]
Lock
[ ]
Menu
[ ]
Short press: Lock current video
clip/Delete current video clip/
Back to previous menu.
[ ]
Up
Short press: Menu down.
Short press: Menu up.
[ ]
Down
Short press: Menu down.
REC
[ ]
Short press: Menu confirmation.
N/A
Lock
[ ]
Short press: Enable/disable
audio recording;
Long press: Switch Wi-Fi On/Off
[ ]
Down
1211

[ ]
Down
REC
[ ]
(If smartphone app is connected)
Short press: Stop Recording
Lock
[ ]
[ ]
Up
(If smartphone app is connected)
Short press: Toggle screen view:
Front camera only,
Rear camera only,
Front + Rear camera overlaid.
When current resolution is FHD
60 fps, only the front camera
is available.
(If no smartphone app connected)
Short press: Disable Wi-Fi.
(If smartphone app is connected)
Short press: Enable/Disable audio
recording (Mute);
Long press: switch Wi-Fi Off.
(If no smartphone app connected)
Short press: disable Wi-Fi.
(If no smartphone app connected)
Short press: disable Wi-Fi.
Short press: Lock current video
file (Stored in RO folder), and
take a Photo (Stored in Photo
folder);
Long press: Power camera off.
LED Indicators
Led
Led Status
Indication
[ ]
Flashing Red
Camera in recording mode.
Off
Solid Blue
No Light
Camera in standby mode,
not recording
Microphone on, recording audio.
Microphone off, mute.
REC
MIC
[ ]
Voice event list
Voice event
Indication
Melody with
Blueskysea Logo
Camera power on
Please insert SD card"
"
Dang-Dang-Dang"
"
No microSD memory card
detected-please insert one.
MicroSD memory card writing speed
too slow, please replace with a higher
speed card, class 10 or above.
A failed or corrupt card has been
detected.
Under non-loop recording mode,
the camera has detected card
memory is full, please format the
card or change to an empty card.
The camera has locked the current
video clip due to the lock button
being pressed or a G-sensor activation.
"lock file"
1413
Recording
Mode
(Wi-Fi enabled)
Menu
[ ]
Short press: Lock current video
file (Stored in RO folder), and
take a Photo (Stored in Photo
folder).
Chip
CMOS sensor
Video resolution
Screen
Video Codec/Format
Audio
Memory card capacity
Voice indicator
WIFI Connection
G-sensor
Parking mode
Loop recording
Backup power source
Working temperature
Storage temperature
Size
Novatek96660
IMX307,6G Lens,132° wide angle
1920x1080p 30fps;
2.0 inches screen
H.264/MP4
.MP4 file extension.
Built in Microphone/Speaker
MicroSD card, support 400GB
max.(Not included in package)
English language voice indicator
Supported
Supported
Supported (Hardwire kit
not included in package).
Supported:1/3/5 minutes per
segment.
-20°C— +70°C /
-35°C— +75°C /
111*66*29mm / 4.3*2.5*1.1inch
112g / 3.9oz
Net Weight
Super capacitor (No lithium battery).
(Ensures all video is written to
memory card on power failure.)
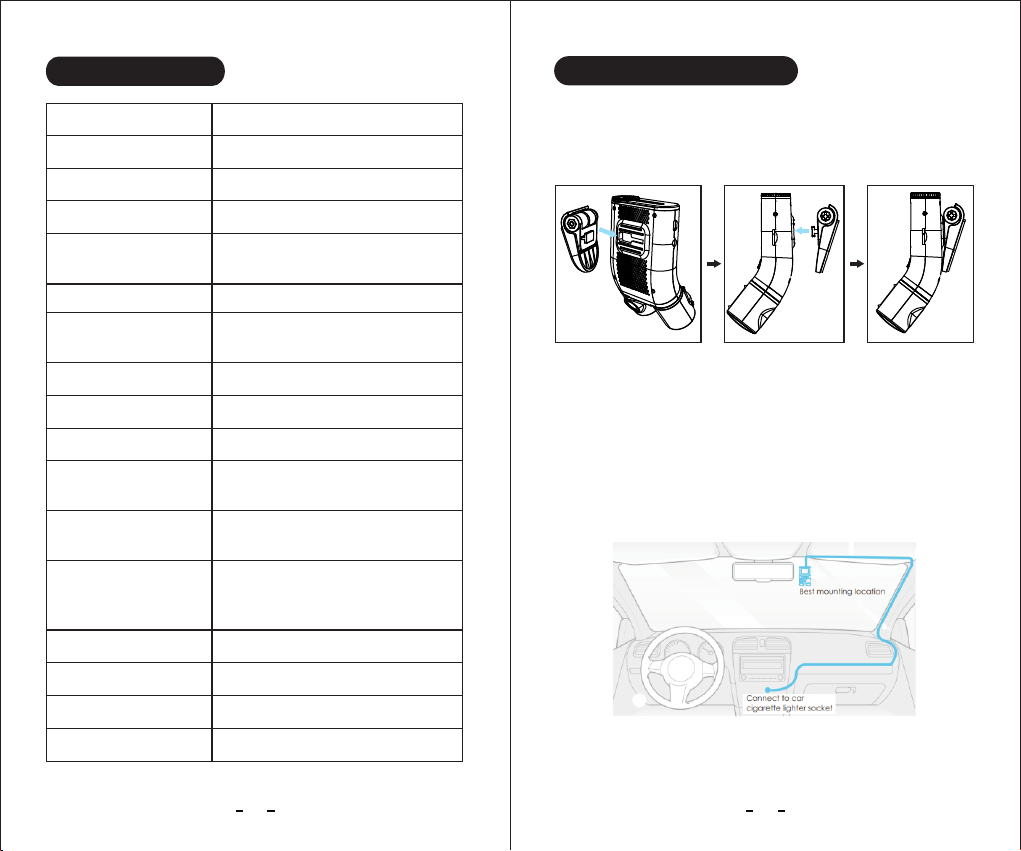
1. Insert a memory card into the camera card slot.
2. Slide the mount horizontally into the slot on the
back of camera.
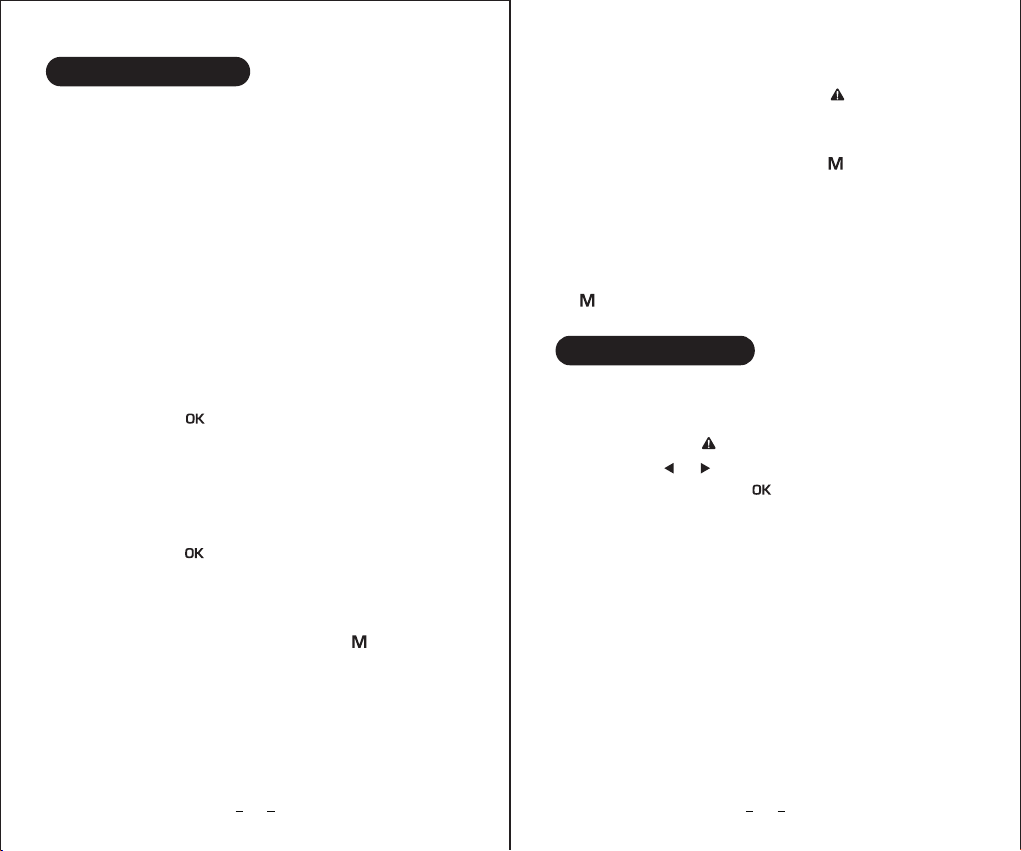
3. Select a location on the windshield, just a little below
the rear-view mirror. The front lens needs to look
through the area swept by the windshield wipers.
The cabin lens needs to be able to see under the
mirror, the camera can be placed alongside or
behind the mirror. It should not obstruct the driver's
view of the road.
1615
Specifications Camera installation
-4°F— +158°F
-31°F— +167°F
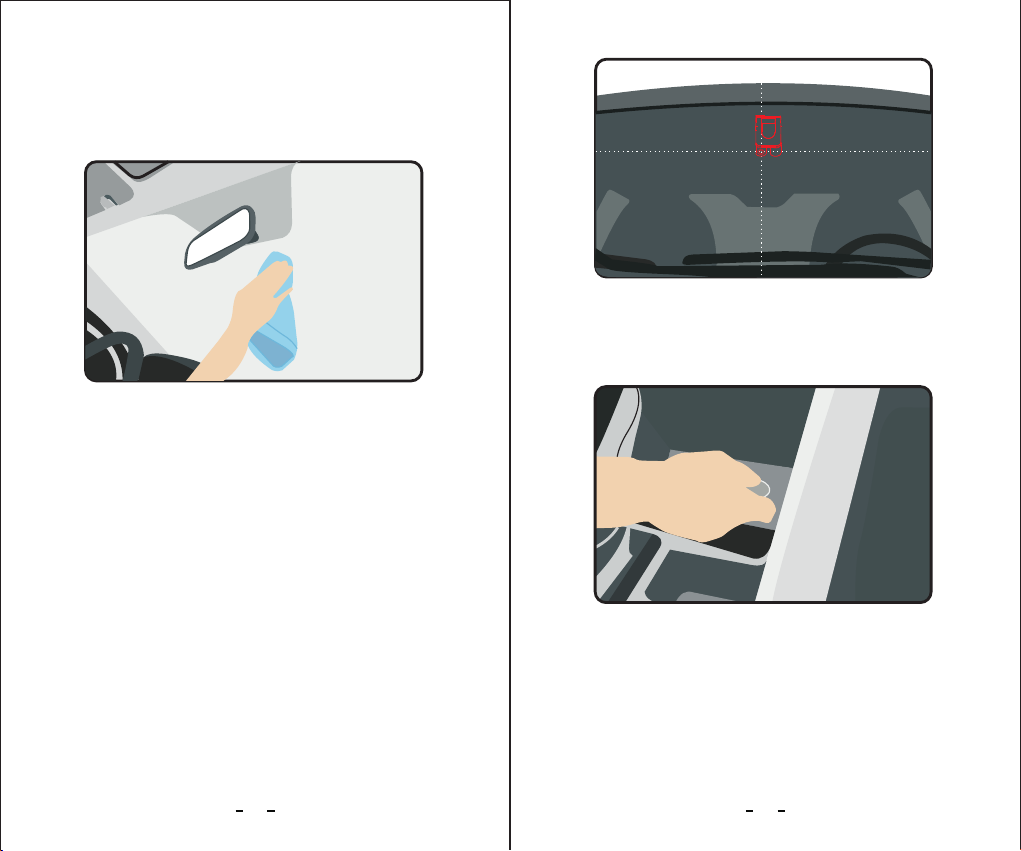
4. Wipe clean the chosen area of the windshield with
a dry cloth; it must be completely grease free for
the sticky pad to stick securely. Use detergent or
an alcohol based wipe to remove any grease.
5. Peel the protection film off the 3M adhesive pad
and the protection film off the camera lenses.
6.Fix the camera on the selected location; making sure
both camera lenses are vertical before contact
between the adhesive and windscreen. Push the
mount firmly against the glass for 10 seconds for
a good bond, the strength of the bond will increase
over the first few days.
7. Plug the USB charger into the car's 12V DC accessory/
cigarette lighter socket.
1817

8. Adjust the lens angle
Look at the live view on the camera screen
Adjust the angle of the lens up/down by folding
mount if necessary so that the horizon on the front
view is half way up the image, the lens units should
look vertical from both rear and sides.
Adjust the angle of the lenses right/left by rotating
lens units if necessary.
9. You may disconnect the USB charger, and slide
camera off its adhesive mount, leaving the mount
stuck to the glass while you take away the camera.
1. Do not install the camera in a location that interferes
with the driver's visibility and safety.
2.Comply with any local laws which may limit the
position of the camera.
3. Install the camera a little down of the rearview mirror
so that both sides of the scene being recorded are
equally covered by the camera's FOV (field of view).
4. To ensure a clear view on rainy days, the lens
's
should be positioned within the windshield wiper
sweeping range.
5. Do not install/mount the camera on or near airbag
panels.
6. The installation/mounting location should not be
affected by sun control film (window Tint).
7. There should not be any other electronic equipment
close to the camera for optimal performance.
Notes:
Do not install/mount the camera or cables near an
airbag panel or within the airbag's working range.
The manufacturer is not liable for any injury or death
caused by deployment of the airbag.
Important Note:
2019
1. The camera will power on automatically shortly after
the ignition is switched on.
2.The Camera will power off automatically when
ignition is switched off.
3. For manual power on/off, press and hold the lock
button for 5 seconds. (When powering on, the screen
will take a further 6 seconds to illuminate.)
Power on/off:
1. The camera will start recording automatically shortly
after the ignition is switched on. The Red LED indicator
light will flash while actively recording.
2.Short press the button to start recording manually
when in Standby mode.
Start recording:
1. The camera will stop recording automatically when
the ignition is switched off.
2. Short press the button to stop recording manually
when in recording mode.
Stop recording:
1. In recording mode: Short press the button to
take a photo. (The current video file will be locked
at the same time.)
Take a photo:
1. In recording mode: Short press button to lock a
video clip manually. This will lock the currently recording
video clip.
2.In recording mode: Short press button to lock a
video clip manually. This will lock the currently recording
video clip.
3. Video clips will be locked automatically when the
G-sensor is triggered. The sensitivity of the G-Sensor
can be adjusted in the settings by pressing the
button.
Lock video clip:
1. Select standby mode.
2.Short press the button to enter Playback mode.
3. Short press or button to select a video recording,
and then press the REC button to playback the
selected video or photo.
Playback on camera
1. Remove the microSD card and Connect to the
computer USB socket via a microSD card reader.
Once connected, open a file browser and navigate
to the SD card.
Or connect the camera to a computer USB socket
by using the supplied short USB data cable. The
camera will automatically turn on and "Mass Storage"
will be displayed on its LCD screen. Once connected,
open a file browser and navigate to the SD card.
Playback on PC
2221
Basic Operation
Video playback
[ ]
[ ]
[ ]
[ ]
[ ]
[ ]
[ ]
[ ]

23 24
2.There will be three file folders when you access the
memory card on the computer: a MOVIE (Normal
loop recording video files) folder, a RO (Locked video
files) video folder and a PHOTO (Video snapshot
files) folder.
You can obtain information from the video file name,
for example:
2019_0320_171504_F.MP4
2019_0320_171504_R.MP4
Separate files are created for the recordings of front
and rear camera.
2019_0320_171504" indicates date and time
"
"F" is for the front camera video files
"R" is for the rear camera video files
"RO" file folder contains any videos that have been locked.
"mp4" is the video file extension (type of file).
Note: The GPS module is not a standard accessory
for this camera, you need to buy it separately for
GPS logger playback.
GPS logger Playback
The GPS signal will be saved in the video file if you
connect a GPS module with the camera and it is
receiving a GPS signal successfully.
The GPS route will be displayed on Google maps when
you playback the video in Dashcam Viewer Player.
(Please download the third-party GPS Player software
at.www.dashcamviewer.com)
1. In recording mode or in standby mode, long press
"down" button for 5 seconds to switch WIFI function
on.
2.The Camera screen will display the Wi-Fi SSID and
Password required by your smartphone:
SSID: B2W_XXXXXXXXXX
PWA2:12345678
3. If there is no Wi-Fi connection with your smartphone
after SSID broadcasting, short press the Up or Down
or OK buttons to disable Wi-Fi.
4. If Wi-Fi is connected with your smartphone, you
need to long press the Down button to disable Wi-Fi.
WIFI Switch On/Off:

1. Recording mode indicator
WDR (Wide Dynamic Range) indicator
2.
3. Emergency Lock indicator
4. WiFi On ( ) /WiFi Off ( ) indicator
5. Video Resolution indicator
6. Recording Time indicator
7. Microphone On ( )/Microphone Off ( )
(mute) indicator
8. Date/Time
9. Front Lens/ Rear Lens live display
10.SD Card status indicator
WDR
EV
SIZE
Video
OK
Resolution
Loop Recording
WDR
Exposure Comp
>
>
>
JUL
Video
OK
Record Audio
Data Atamp
Data/Time
G-SENSOR
>
>
>
7
1
2
Video
OK
Screen Save
Plate Number
Frequency
Beep Sound
>
>
>
HZ
Video
OK
Default Setting
Version
>
>
VER
JUL
7
Video
OK
Time Zone
GPS
Parking Monitor
Display Mode
>
>
>
WiFi
00:00:09
EV
0.0
F+R 16+8Mbps
2019/03/20 16:19:27
WDR
3
65
!
3
7 8 9 10
1 2
Resolution: Sets the video mode.
Front FHD60: Front view only, Full HD, 60FPS.
F+R FHD30 12+12Mbps: Front and Rear views,
Full HD, 30FPS, equal image quality on both views.
F+R FHD30 16+8Mbps: Front and Rear views, Full HD,
30FPS, enhanced front image quality.
25 26
Video
OK
Lens infrared light control
WiFi
Language
Format
>
>
>
1
2
WiFi
A
文
Display Overview System Setting
4

27 28
Notes:
Full HD = 1920*1080 resolution.
FPS = Frames Per Second (smoothness).
Mbps = Mega bits per second = image quality level.
When moving quickly, the front view has more
information to record than the relatively static
rear/cabin view, hence the 16+8 mode is normally
preferable.
Loop Recording: Off | 1 | 2 | 3 | 5 minutes.
Selects the loop recording file length.
Once the microSD card is full, the camera will
automatically replace the oldest files with new files in
a loop to allow continuous recording.
Note that locked files are protected and will not be
replaced, you must manually clear them off the
microSD card when they are no longer required to
avoid the card filling up with only locked files. To avoid
the card filling up and thus preventing new recordings,
the g-sensor option can be turned off.
WDR (Wide Dynamic Range): Off | On
Dynamic range is the ratio of the brightest portion of
the image to the darkest portion of the image.
WDR enables the camera to record more details in
the shadows while not over-exposing the bright areas.
The downside is reduced contrast, the image may look
less natural but records more information.
Exposure Comp:
Adjusts the value of the EV (Exposure Compensation),
making the image darker or brighter. This may be
useful if the automatic exposure is affected by the
front of your vehicle being particularly bright or dark.
You can adjust the EV for front camera only.
2.0 to +2.0 default 0.0
-
Record Audio: Off | On
Turns on/off the microphone (Mute).
During a private conversation, short press the down
button to mute the audio recording.
The blue LED indicates the current status.
Date Stamp: Off | On
Overlay the time and date on the recorded video.
Date / Time: Set system date, time and date/time
display layout.
Easiest method for setting the time is to use the
smartphone app to synchronize the camera time
with your smartphone.
If you have a GPS module then the GPS will set the
time, however you must still set the local time zone
correctly, with adjustment for Daylight Savings Time
if required, otherwise the GPS module will continuously
set the wrong time – See GPS Time Zone menu.
Notes:

G-Sensor:
The G-sensor measures shock forces and locks the
current video file automatically when the set threshold
is exceeded. The settings from "low" to "high" determine
the amount of force needed to lock the file.
Note: Locked files must be manually deleted periodically
to prevent the microSD card filling up with locked files.
Middle
Off | Low | Middle | High Sensitivity, default:
Display Mode: Front camera | Rear camera |
Pip(Front+Rear)
Front + Rear (Rear overlaid)
Configures what is displayed on the live view on the
LCD screen and smartphone app, front view only,
rear view only or both displayed as PIP (Picure in Picture)
with the rear view overlaid on the front view.
Lens infrared light control:Off | On | Auto, default: Auto
Sets the IR mode for the rear view, IR is not available
for the front view.
When IR is On, the IR filter will be removed from the
lens allowing the camera to see IR light that is normally
invisible and allowing much better sensitivity at night,
the image will become monochrome (Black and White).
The IR LEDs may also turn on allowing the camera to
see in complete darkness.
Wi-Fi: Off | On
Turns the Wi-Fi transmitter for communication with
your smartphone on/off.
Notes:
Long press the [down] button to enable Wi-Fi
without needing to enter the menu.
The camera defaults to Wi-Fi off at power on.
When turned on, the SSID and password required
by your smartphone are displayed on the LCD screen.
Warning: You cannot access to Menu settings or
Playback mode when Wi-Fi enabled.
Language: Sets the on-screen display language to
English,Russian,Japanese,Traditional Chinese,French,etc.
Screen Save: Off | 1 | 3 Minutes Default 1 Minute
The LCD screen turns off if not used for this time period,
if Screen Save is set to Off then the LCD screen will
always be on. Having the screen turn off will avoid
distracting the driver unnecessarily, especially at night.
Plate Number: Overlay the vehicle license plate number
on the recorded video footage to identify which
vehicle recorded the video. Use Up+Down buttons
to set each character, OK button to move to the next
character, and press the Menu button when complete.
29 30

Frequency: 50Hz | 60Hz
This option should be set according to the power supply
specification used in your country or geographical
region. for example, USA users should select 60Hz,
Europe 50Hz.
Choosing the correct value will reduce flickering caused
by incandescent/fluorescent lamps at night time. LED
traffic lights may still flicker as these use different
frequencies.
Beep Sound: On | Off.
Controls all buttons notification sounds, if you set
Beep Off, then you can still hear the voice prompt
warnings. Voice prompt warnings are useful to notify
the driver of microSD card errors, missing microSD
card etc.
Format: Formats the microSD card ready for use with
the camera.
Warning: This operation will delete all existing data
on the micro SD card, including locked files and normal
looping recording files! Make sure you back up any
important files first.
Default Setting:
Resets all settings to the factory default settings.
Version: Displays the version number of the currently
installed firmware.
GPS: Off | On
(Only available with optional GPS Module connected)
Turns On / Off the GPS logging.
An optional GPS module is used to record the location
and speed data in the recorded videos. If disabled,
your camera will no longer measure your speed,
position, or synchronize the time.
Note: For correct synchronization with GPS time, the
time zone and Daylight Savings adjustment must be
correctly set using the Time Zone menu.
Speed Unit: Off | GPS KM/H | GPS MPH
(Only available with optional GPS Module connected)
Sets the measurement units for the vehicle speed
overlay on the recorded video.
Time Zone:
(Only available with optional GPS Module connected)
Sets the current time zone and Daylight Savings offset
if required for GPS time and date synchronization.
Notes:
The default time zone is GMT-0 London city. Set
your local time zone, for example, GMT -8 Los Angeles,
and adjust for Daylight savings if required by adding 1.
The GPS module is not a standard accessory for the
B2W camera, it must be purchased separately.
31 32
33 34
Parking monitor: Off | Low | Middle | High sensitivity
(Only available with optional hardwire kit connected)
When the engine is turned off, the camera will enter
parking mode and stop recording, if an impact is
detected by the G-sensor then the camera starts video
recording again automatically to record the incident.
This menu sets the sensitivity of the G-sensor trigger.
Note: The hardwire kit is not a standard accessory for
the B2W camera, it must be purchased separately.
APP Download:
IOS users: Search for Roadcam in the APP Store.
Android users: Search for Roadcam in the Google
Play Store.
WIFI Connection:
1. Turn on Wi-Fi in the menu, or long press the down
button.(Once the Wi-Fi is on, the Wi-Fi status icon,
SSID and password appear on the camera LCD screen.)
00:00:09
WiFi
EV
0.0
F+R 16+8Mbps
2019/03/20 16:19:27
WDR
3
SSID:B2W_146b9c227b7e
PWA2:12345678
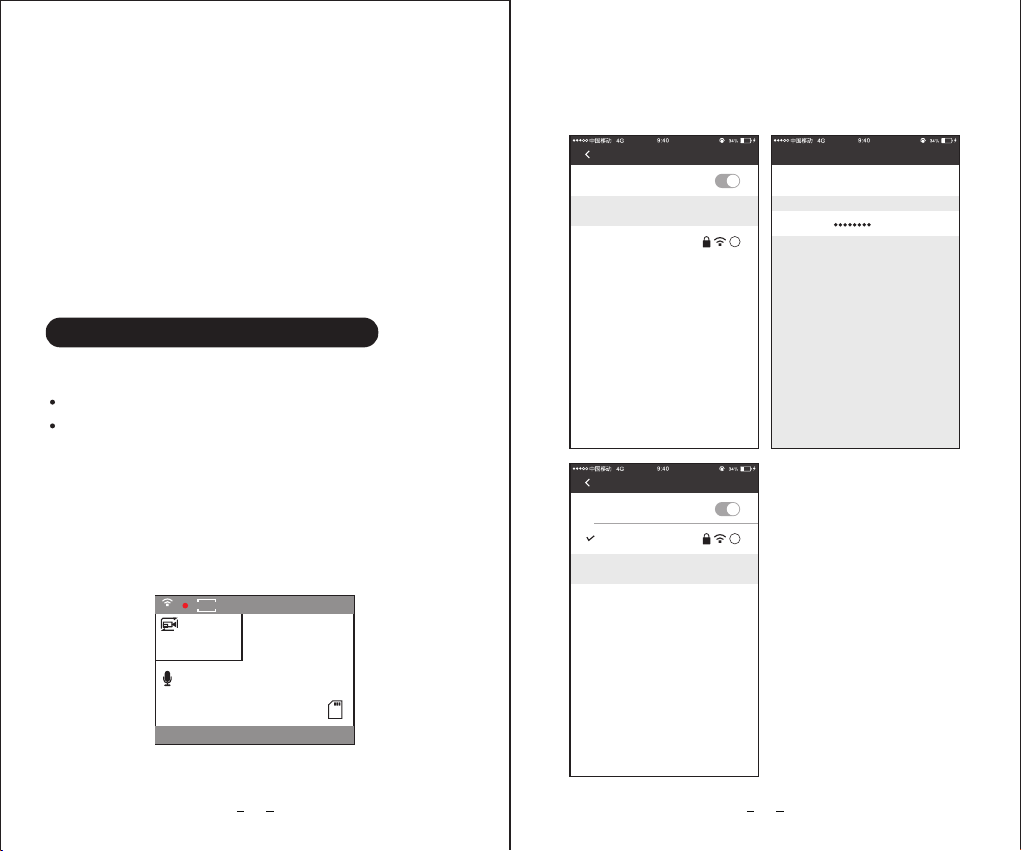
2. Enter the smartphone WLAN(Wi-Fi) settings menu,
select the B2W dash camera SSID: B2W_xxxxxx and
enter the password 12345678 to continue.
Settings
Wi-Fi
Wi-Fi
CHOOSE A NETWORK...
B2W_304a263c6bf7
i
Cancel
Enter the password for “B2W_304a263c6bf7
Password
Enter Password
Join
You can also access this Wi-Fi network by bringing your
iphone near any iphone,ipad,or Mac which has connected
to this network and has you in their contacts.
Settings
Wi-Fi
Wi-Fi
CHOOSE A NETWORK...
B2W_304a263c6bf7
i
Smartphone APP operation
00:00:09
WiFi
EV
0.0
F+R 16+8Mbps
2019/03/20 16:19:27
WDR
3
MAC:xxxxxxxxxxx
35 36
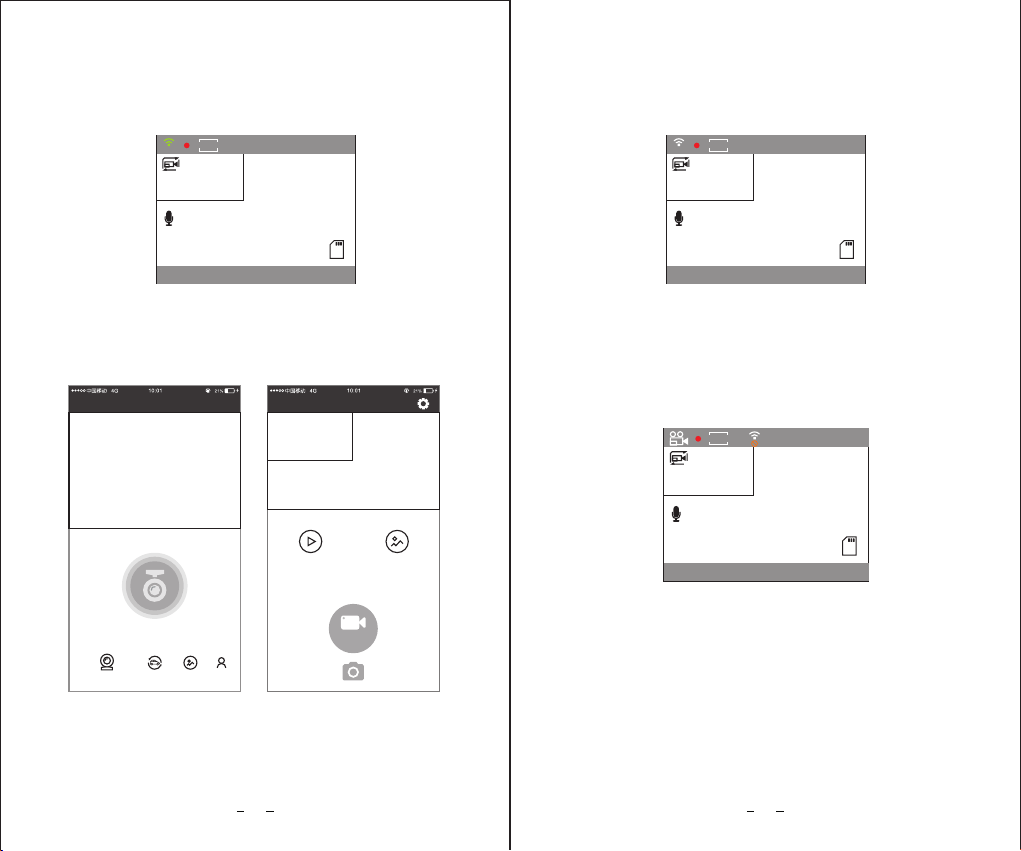
3. When the camera is connected with your smartphone,
the Wi-Fi icon will turn green, and display your
smartphone MAC address on the camera screen.
4. Open the App Roadcam, Click the "camera" icon to
connect the dash cam B2W to the APP.
Break off
B2W_304a263c6bf7
HUD video
HUD photo
video
Recording instrument
Add Recorder
Recording instrument
Moments
Album
Mine
00:00:09
WiFi
EV
0.0
F+R 16+8Mbps
2019/03/20 16:19:27
WDR
3
Mobile Phone not connect
5. When the camera's Wi-Fi is disconnected with your
phone, the Wi-Fi icon will turn white, and display
"Mobile Phone not connect" on the camera screen.
6. Long press the Down button to disable Wi-Fi function
on camera. The Wi-Fi icon will be locked, and camera
will be back to standard video recording mode
automatically.
00:00:03
F+R 16+8Mbps
03/20/2019 16:19:01
WDR
3
Table of contents
Other Blueskysea Dashcam manuals


