Blueskysea DV688 User manual
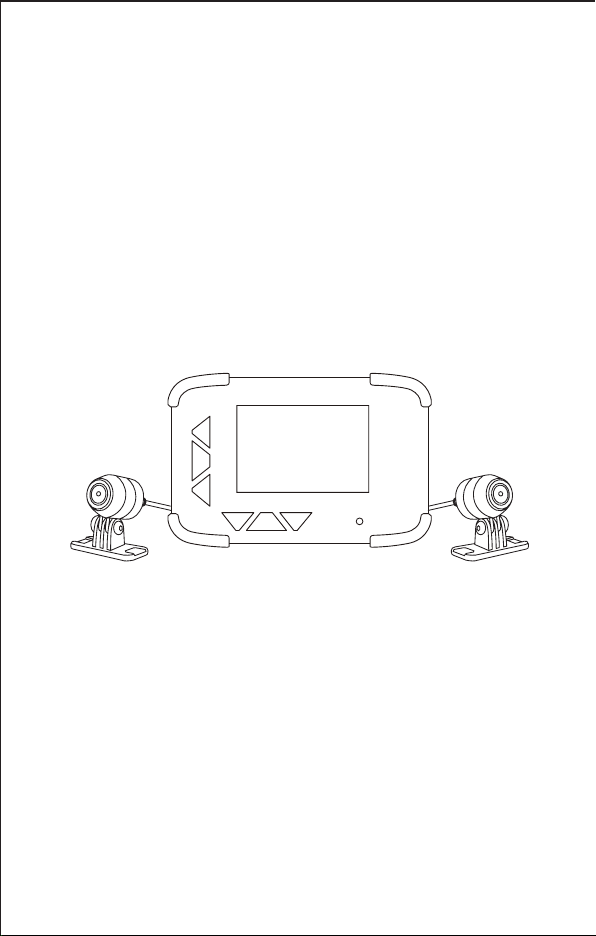
Blueskysea DV688 Motorcycle Camera
User Manual
Thank you for you choosing Blueskysea DV688 Motorcycle camera,please
read this user manual carefully before use it, and keep it for future reference.
If you need any assistance,please feel free to contact our customer support
team by email [email protected]
Blueskysea®

Main features:
1.This DV688 Motorcycle camera comes with 2 (two) full HD 1080p cameras.
Both the front and rear cameras record high quality video 1080P at 30fps.
2.The camera starts recording automatically when the ignition is switched on
and stops recording automatically when the ignition is switched off after a
brief shutdown sequence.
3.130° degree wide angle lens, equipped with 2 low light sensor
(Sony IMX323 Sensor), enhanced video quality at night.
4.The main DVR unit and cameras are rainproof (IP67 rated), it is absolutely
fine to use it on a rainy day.
5.This product has a 960x480 DPI (dot per inch) display which is considerably
brighter than comparable competitors displays. It has excellent visibility,
day or night.
6.This product uses 3rd generation toughened glass for excellent light
transmission for clarity, and exceptional resistance to scratches.
2
RESET TF-card
1
34567
8
9
11
10
12
13
14
15
17
16 18
22
19
20 21
23 24
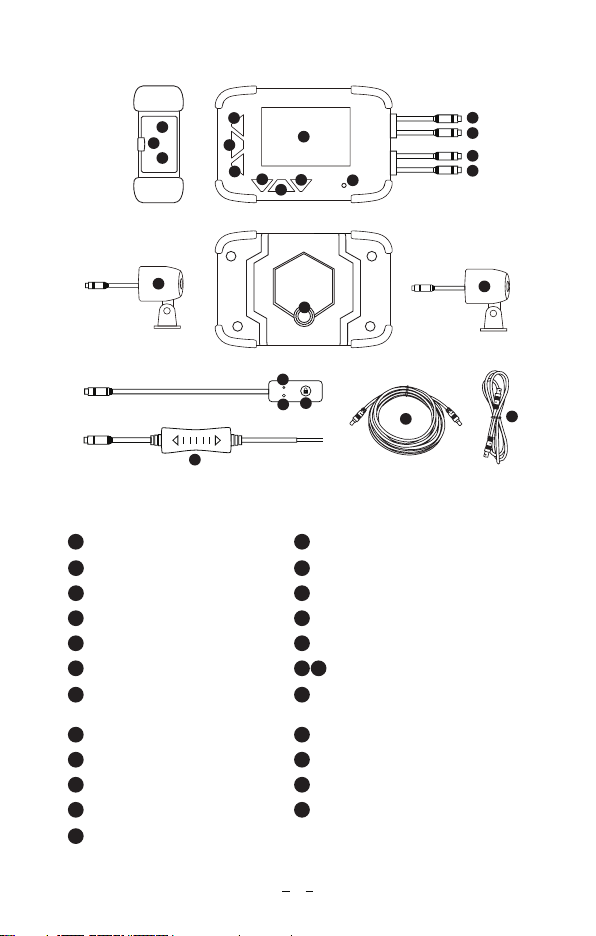
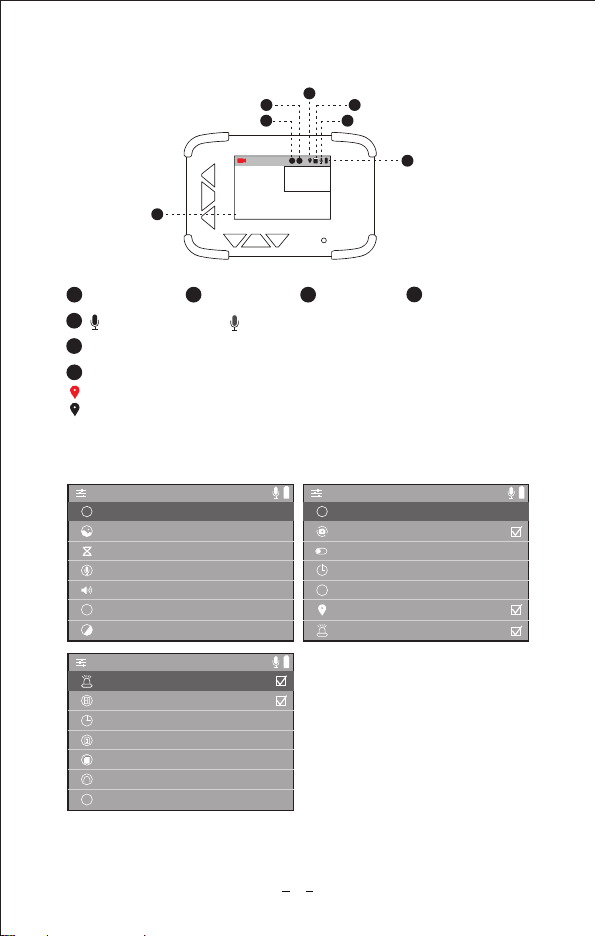
1Menu Setting button
Structure diagram:
2Power button
3Mode Switch 4Up
5OK button 6Down
7Led Indicator 8Screen
9Reset Hole 10 Micro SD Card Slot
11 Battery
14 Power Connector
(Red Cable)
12 Camera Connector
13
15 Wired Controller Connector
(Yellow Cable)
16 Camera A 17 Mount hole
18 Camera B 19 Mic
20 Led indicator 21 Photo Snapshot/File Locked button
22 Power Adapter 23 3 Meters Connection Cable
24 1 Meter Connection Cable
3
Blueskysea®
2
4
G-MOUSE
Blueskysea®
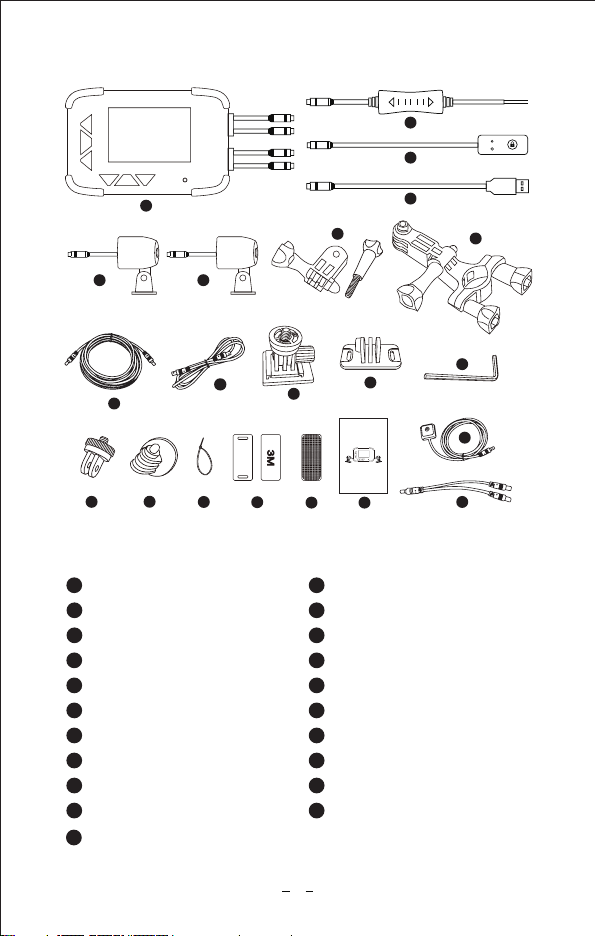
Package contents:
1x DV688 2CH Camera
1x Wired Controller
1x Power Adapter
1x USB Charger Cable
2x 1m connection cable1x 3m connection cable
1x Handlebar Bracket kit
1x Adapter
1
3
5
7
9
11
14
16
18
20
1
2
4
6
8
10
12
13
15
17
19
21
2
3
4
5 6
78
21
13
10 11
12
14 15
20
16 17 18
1x Camera A 1x Camera B
1x Adhesive mount 2x Backup mount for camera
1x Fixed base
6x 3M adhesive tapes
1x Switch mount
1x User manual
Blueskysea DV688 Motorcycle Camera
User Manual
Thank you for you choosing Blueskysea DV688 Motorcycle camera,please
read this user manual carefully before use it, and keep it for future reference.
If you need any assistance,please feel free to contact our customer support
team by email [email protected]
Blueskysea®
9
1x Y Shaped connector power cable (optional)
1x L Shaped Hex Screwdriver
6x Bandages
1x GPS module (optional)
2x Velcro
19

Button Function & LED Indicator
Power Button Long press to Power On/Off; Short press to switch
Screen On/Off.
Menu Button Menu Setting Function,Such as Resolution,
Language,etc
Mode Button Short press to switch Preview Mode/Playback Mode.
OK Button Start recording,Stop recording, and selection
confirmation
UP Button
In Preview mode and Recording mode: Short press
to switch PIP Layout, long press to switch on/off
audio recording.
In Menu setting mode and Playback mode: Short
press to change option selection.
Down Button
In Preview mode and Recording mode: Short press
to take a photo.
In Recording mode: Long press to lock current
video file.
In Menu setting mode and Playback mode: Short
press to change option selection.
Lock Button
on wired Controller
In Preview mode and Recording mode: Short press
to take a photo.
In Recording mode: Long press to lock current
recording file.
Led Indicator
Red light blinking: Battery is charging.
Red light on solid: Battery is fully charged.
Blue light blinking: Camera in Recording mode.
Blue light on solid: Camera in Preview mode.
*The unit will “Beep” an alert if there is a SD memory
card or camera installation error. Please check the
SD card and camera connection cable if an alert
sound is heard!
5
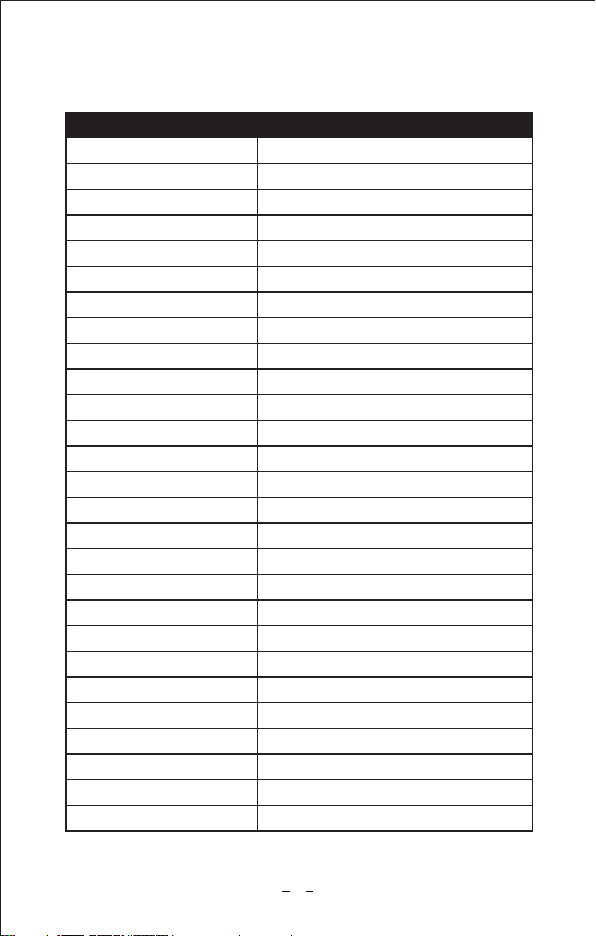
Specification:
Processor
CMOS Sensor
Lens Optical Parameters
Lens Angle
Video resolution
Video Codec/Format
Photo Resolution
Photo Format
Audio
Memory card capacity
Loop Recording
G-sensor
Emergency lock
GPS Logger
Language
Rain Waterproof
Screen Size
DVR Size
Camera Size
Camera Extension Cable Length
Wired Controller Length
Unit weight
Power Input
Power Adapter Output
Removable lithium battery
Storage Temperature
Working Temperature
Allwinner V3
2MP Sony IMX323
7G (6G+IR), F1.8, f2.8mm
130 degree
1920x1080P 30fps; 1280x720P 30fps
H.264 / Mp4
1/2/5/8MP
JPG
Mic on wired controller/Speaker on DVR
Up to 128Gb Max.(not includes in package)
1/3/5/10 minutes
Off/Low/Middle/High
Support
Optional
English/ Chinese/ Japanese/ Korean
IP67 Rated
2.4 inch, 960x480 dots
102x67x25 mm/ 4x2.7x1 in
28x28x33 mm/1.1x1.1x1.3 in (without mount)
5 m/ 16 ft (in total)
2.8 m/ 9 ft
523g/ 18.5oz
12-24V
5V, 2A
3.7V, 500mAh
-4F~+176F (-20°C ~ +80°C)
14F~+104F (-10°C~ + 40°C)
Blueskysea Dv688
6

Basic operation:
1. Insert one micro SD card (Class 10, 16GB or larger) into camera and push
until it locks into place.
2. To remove the micro SD card, press the end of micro SD card until it clicks
and releases from the slot, and then pull out the SD card.
Insert/remove Micro SD card:
Camera will take recording automatically when ignition is switched on. no
need extra operation. Its blue led indicator light flashes during video recording.
Take recording:
1. Camera will stop recording automatically when the ignition is switched off.
2. Short press OK button to stop recording manually.
Stop recording:
1. In Preview mode and in recording mode: Short press the “Lock” button on
the wired controller to take a photo.
2. In Preview mode and in recording mode: Short press “Down” button on
DVR to take a photo.
Take a photo:
1. Long press “lock” button on wired controller to lock video clips manually;
This will lock the currently recording video clip.
2. Long press “Down” button on DVR to lock video clips manually;This will
lock the currently recording video clip.
3. Video clips will be Locked automatically when G-sensor triggered.The
sensitivity of the G-Sensor can be adjusted in the settings by pressing
the “Menu” button.
Lock video clip:
7

Video playback
Short press MODE button to enter Playback mode.
Short press UP or DOWN button to select, and then press OK button to
playback the video or the photo you choose.
Playback on DVR
1. Remove the Micro SD card and Connect to the computer USB socket via
a micro SD card reader. Once connected, open a file browser and navigate
to the SD card.
2. You will find a photo folder when you access the memory card on the computer.
3. You will find Video A, Video B and a SOS video folder. There will be three
file folders when you access the memory card on the computer.
Playback on PC
You can obtain information from the video file name, for example:
The GPS signal will be saved in the video file if you connected a GPS module
with the DVR and receiving GPS signal successfully.
GPS logger Playback(Only works if camera comes with extra GPS module)
20170101_020339A.mp4 20170101_020339B.mp4
20170101_021521A_SOS.mp4
20170101_020339” indicates Date/Time;
“A”, “B” is for camera A/ camera B video files;
“SOS”file folder indicates files was locked;
“mp4” is the video file format;
GPS module is not a standard accessory for this camera, you need to buy it
separately
8
To connect the GPS unit to the DVR:
Locate the “Y” cable and connect the GPS antenna and the “power adapter”
to the “Y” cable on the side that has 2 connections. Connect the end that
has only 1 connection to the “power adapter” cable on the DVR. The GPS
route will be displayed on Google maps when you playback the video in
GPS Player.
To play back, open GPS Player (Please download GPS Player software
at.www.blueskysea-inc.com)
HZ Light frequency 60Hz
>
shut down
>
3seconds
>
midle
>
Screen switch
Delayed shutdown
Vibration lock sensitivity
GPS function
System exception alarm
G
Screen image
2Camera A 3Camera B
GPS (optional)
GPS icon in red color indicates GPS located;
GPS icon in gray color indicates GPS location failed;
Date/Time
Audio recording on/
9
A B
2018-06-26 17:24:41
Blueskysea®
1
6
2
3
5
4
7
/Audio recording off
1
Battery capacity icon
6
7
Micro SD Card
4
5
HD Video resolution 1080P
>
5M
>
5Minutes
>
High
>
High
>
English
>
0
>
Photographic resolution
Loop video
Microphone volume
Speaker volume
Language
EV value setting
A
+-
i
>
0.0/0.0G
>
Date/Time setup
Memory card capacity
Format memory card
Restore factory settings
Version
Power on video
System exception alarm
>
YZ-688-20180605
Main Menu setting:

There are three options for playback speaker volume: High/Middle/Low
Default speaker level is high.
Speaker volume:
There are 8 language options available: English/Chinese/Japanese/Korean/
Spain/etc.
Default language is English.
Language:
There are seven available settings for EV: -3/-2/-1/0/1/2/3
Default value is 0.
EV value setting:
There are two options available: 50Hz/60Hz
This option should be set according to the power supply specifications used
in your country or geographical region. For example, US users should select
60HZ value.
Light frequency:
10
The DVR has four options for microphone recording level: High/Middle/Low/
Shutdown.
Default audio level is low. You have the option to record audio with video,
or turn off microphone so that all recorded videos will be muted.
Microphone volume:
1M/2M/5M/8M are the available options for still picture resolution.
Default resolution is 5MP.
Photographic resolution:
Loop recording mode cannot be switched off.
The camera will continuously erase the oldest video as it records a new video.
However, any locked video files on memory card will not be overwritten as
they are protected.
Press “video partition” and choose 1/3/5/10 minutes to select the video loop
duration. This is the length of each video loop.
Loop video:
(1920x1080p) 30fps / (1080x720p) 30fps are the two available video resolution
options.
Default resolution is 1080x720p.
Video resolution:

11
There are three options available: 3 seconds/5 seconds/10 seconds
Default value is 3 seconds. This setting determines how long after the DVR
and cameras will stay on after the ignition is switched off.
Delayed shutdown:
There are four options available: Shutdown/Low/Middle/High
Default level value is Middle. Video recordings will be locked automatically
if an impact is detected. Do not choose Shutdown if you intend to use the
video lock feature with the G-Sensor as it will disable the automatic lock that
occurs when a collision is detected.
Vibration lock sensitivity(G-sensor):
There are two options available: on/off
Default value is on. The DVR will “Beep” if a card error or camera error is
detected. If the DVR makes a “Beep” sound when turned on, ensure the
cameras and SD card are installed properly.
System exception alarm
Press OK button to switch this function on/off; default value is on;
Suggest option its value to be ON, so it take recording automatically when
ignition on.
Power on video
Press OK button to switch GPS Logger function on/off; default value is off;
This setup only works if camera equipped with extra GPS module.
GPS function (optional):
There are three options available (minutes): 1/3/5/Shutdown
Default value is 3 minutes. The screen will turn off automatically to save power
at the selected time interval. The DVR will disable the screen auto power off
feature if you choose “Shutdown”. The screen must be turned off manually
in this mode. This setting is particularly useful if you choose to use the rear
camera as a rearview mirror.
Screen switch on/ off setup:
There are two options available: On/Off (this only affects camera B)
Default value is off. Press OK button to switch mirror image on/off
Screen image(Mirror image):

It shows spare capacity left and full capacity of the memory card which you
used for camera.
Memory card capacity
Be careful! All files,included locked files will be deleted if you are sure to
format the memory card!
Format memory card
To restore the device to its original manufacturer settings.
Restore factory settings
This setting displays the current internal firmware version. When contacting
customer service or support ([email protected]) please have this
information available.
Version
12
Date/Time in this format:YYYY/MM/DD HH:MM:SS
Press UP or Down button to adjust value, and press “MENU” button to confirm.
Date/Time setup:

Installation Guide
1. Insert one memory card into DVR host.
2. Connect cameras A & B to DVR host.
3. Connect Wired controller (Yellow connector) to DVR host.
4. Find this USB charger cable (Red connector) and connect the DVR to your
power bank, or your Laptop USB socket, or 5V USB phone charger for a
quick test before installation.
5. The unit will power up and the display will show the output from both cameras.
Make sure to identify the orientation of the cameras (which direction is up
in relation to the mounting hardware) in an effort to ease the installation
process.
Quick Test
Dv688 or
+
-
-
+
Motorcycle
ignition switch
Power +
RELAY Headlight or
indicator Switch
Headlight or
indicator
Battery
Motorcycle
DVR
Power adapter Power+
Power-
Power adapter wiring diagram
Connect red wire to the 12V port controlled by key ignition (ACC port);
Black wire to .motorcycle Power Ground(metal knob) or Battery Negative
13
Power adapter
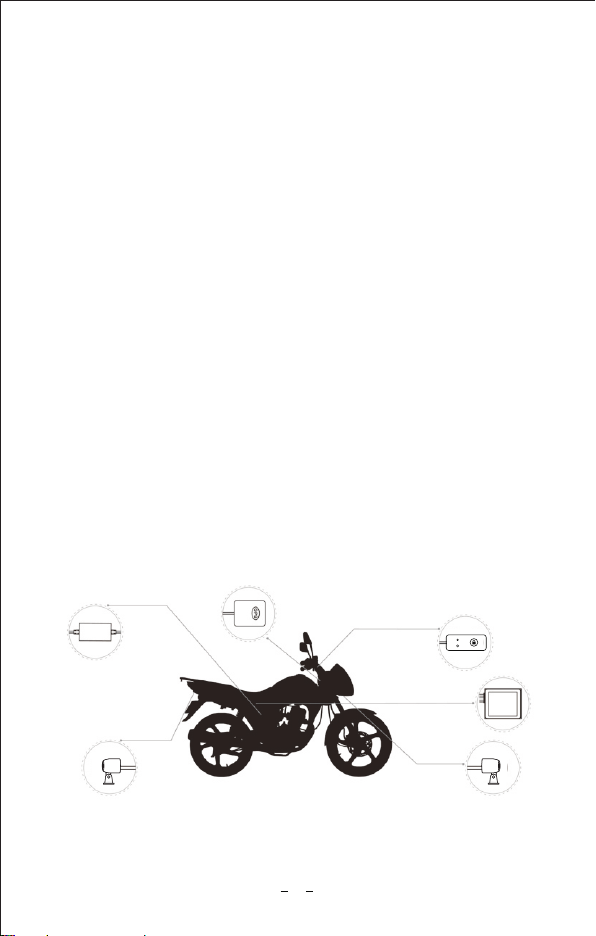
1. Identify an appropriate location to install the front and rear cameras,
wired controller, DVR unit and GPS antenna (optional). We recommend
that the DVR unit be mounted under the seat for maximum security.
2. Plan the routing of camera and power cables before installation. (Wired
controller cable, GPS tracker cable if desired). Keep in mind that all
components should be in a location that the cable routing will not interfere
with the wheels, brakes, clutch, drive chain, or handlebars.
3. Mount and connect the parts using the included mounting hardware.
(3M tape, screws, cable ties)
4. Connect red wire of the supplied power adapter to a switched 12V wire
or connection controlled by the key ignition (ACC port). Connect the black
wire to battery negative terminal or a common ground already in use by
your motorcycle manufacturer.
Quick Installation Guide
The mounting location of the DVR unit and the routing of the camera cables
should be away from the high-voltage circuit like xenon lamp, spark plugs etc.
If your motorcycle is a traditional carburetor system please try to change
a suitable R-value spark plug.
Camera B
Camera A
Power adapter
Wired controller
DVR
14
GPS(optional)
It is recommended that the supplied power adapter be connected to an
ignition controlled power source, or any point after the fuse box (e.g. radio,
lights, etc.) so the system starts up and shuts down with your bike. However,
you can connect it directly to your battery, but you need to make sure to
turn the unit off manually after riding to avoid draining the battery.
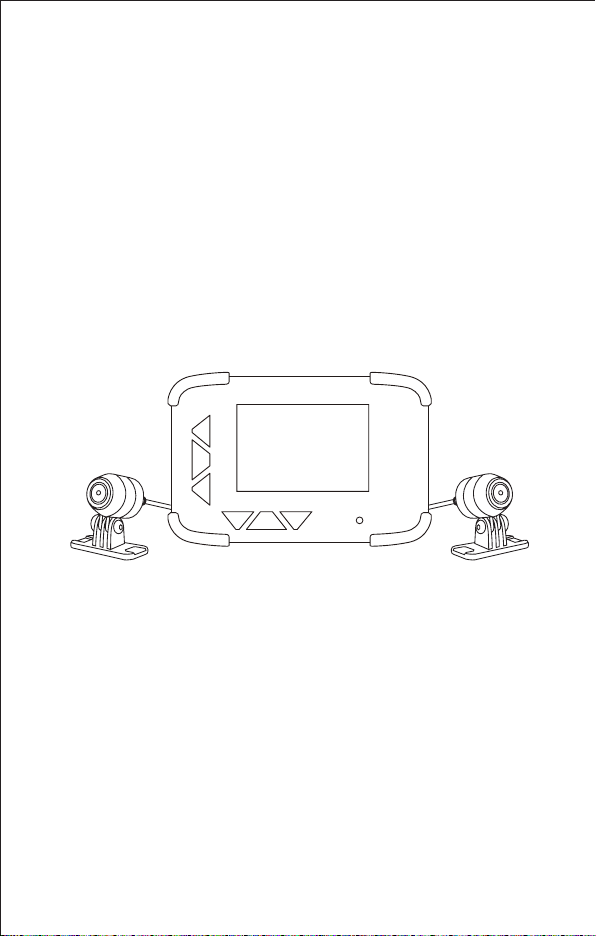
Loosen the lens cap and watch the DVR monitor. Rotate the lens body to
adjust the horizontal view angle. Once the view angle is set, tighten the lens
cap. Be careful not to overtighten the lens cap.
Camera Adjustment
Dv688
360°
360°
loosen clip by the L Shaped Hex Screwdriver
and adjust camera direction if necessary!
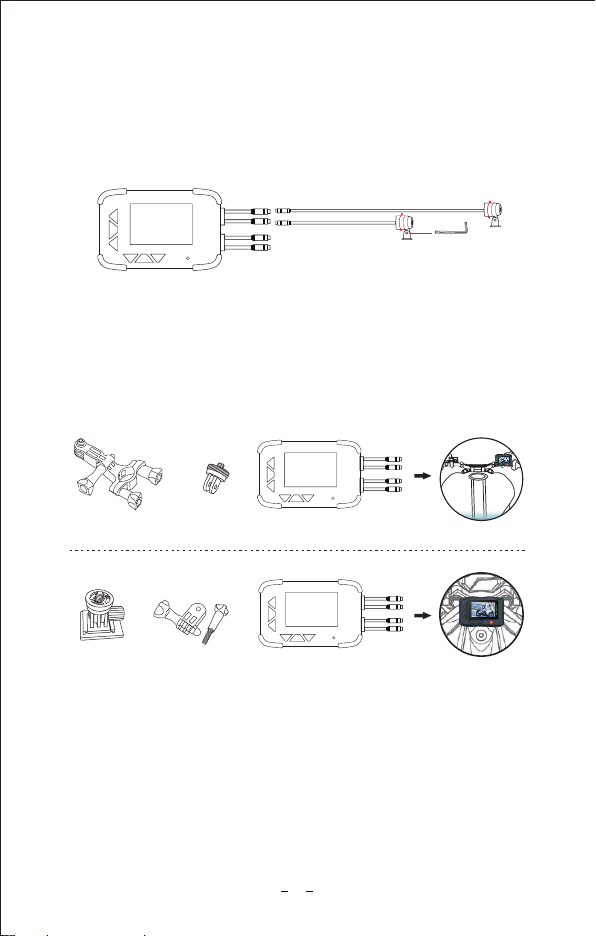
DVR installation
Method 1: DVR+ Adapter+ Handlebar bracket
Method 2: DVR+ Switch mount (optional) Adapter+ Adhesive mount+
Dv688
+ +
Bracket
DVR
Dv688
+ +
DVR
15
Blueskysea®
Blueskysea®
Blueskysea®

The DVR is installed in the front position, in this way, the front lens cable is
1.5 meters, and the rear lens cable is 4.5 meters.
Method 1:
The DVR unit is installed under the seat or in a storage compartment. In this
installation method, the front camera cable is 3 meters, and the rear camera
cable is 3 meters
16
The image is for reference only, if you do not know how to install it properly,
we recommend you contact local professional motorcycle workshop to install it.
Method 2:
Camera System installation
DVR
Wired
controller
Front
camera
Back
camera
Back
camera
DVR
Wired
controller
Front
camera

Customer Contact information
FB@BSSDashcam
twitter@Bob59521
Tel:(213)441-7188 9:00 AM--3:00 PM
Monday ---Friday
www.blueskysea-inc.com
1080 S Los Angeles St Unit C, Los Angeles, CA 90015, USA
17
1. Please use the supplied power adapter and USB Power cable only.
2. Never disassemble or attempt repair of this product. Doing so may damage
the DVR, cause electronic shock and void your product warranty.
3. Never short-circuit the battery.
4. Exposing the DVR to open flames can cause explosion. Due to local laws
and vehicles safety considerations, do not manually operate the device
while driving.
5. Please read the user manual carefully before operation.
Notice
Blueskysea DV688オートバイカメラ
ユーザーマニュアル
このたびはBlueskysea DV688 Motorcycle cameraをお買い上げいただき、
誠にありがとうございます。
ご使用の前に本書をよくご確認のうえ、お手元に大切に保管してください。
ご不明な点がございましたら[email protected] 宛てに電子メー
ルにてお問い合わせください。
Blueskysea®

製品の特長
1. DV688はフルHD 1080pデュアルレンズシステムにより、フロントカメ
ラとリアカメラの両方で、30fps 高品質な1080pで大事な映像を記録し
ます。
2.電源ONで自動的に撮影開始、電源OFFで自動的に撮影を停止します。
3.130° 広角レンズと、2つの低照度センサー(SONY製 IMX323CMOSセン
サー)が夜間でも鮮明な映像を映し出します。
4.DVR本体とレンズがIP67準拠の防水性能を有し、雨天でも使用できます。
5.DV688は960x480ドット高精細ディスプレイを備え、従来品に比べ、
夜間の見やすさが改善されています。
6.DV688は第3世代強化ガラスを採用し、高い透過性と耐傷性を兼ね備え
ています。
、
19

RESET TF-card
1
34567
8
9
11
10
12
13
14
15
17
16 18
22
19
20 21
23 24
1メニューボタン
各部の名称と働き:
2電源ボタン
3モードボタン 4上ボタン
5Okボタン 6下ボタン
7通知ランプ 8スクリーン
9リセット 10 マイクロSDカードスロット
11 バッテリー
14 電源コネクタ(赤色ケーブル)
12 カメラコネクタ
13
15 有線コントローラコネクタ(黄ケーブル)
16 カメラA17 マウント取り付け穴
18 カメラB19 マイク
20 通知ランプ 21 シャッター/ファイル ロックボタン
22 電源アダプタ 23 3m 接続ケーブル
24 1m 接続ケーブル
Blueskysea®
2
20
Table of contents
Other Blueskysea Dashcam manuals


