Blueskysea DV988 User manual
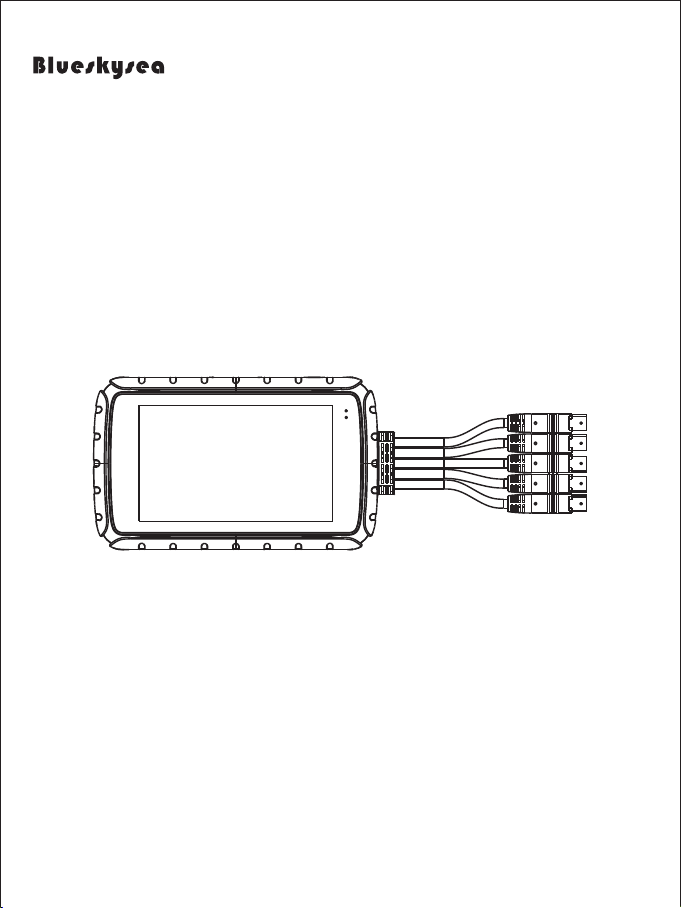
DV988 Motorcycle Camera
User Manual
Thank you for you choosing Blueskysea DV988 Motorcycle camera. Please
read this user manual carefully before use, and keep it for future reference.
If you need any assistance please feel free to contact our customer support
team by email support@blueskysea-inc.com.
®
Thank you for choosing Blueskysea DV988 Motorcycle camera. Please
If you need any assistance, please feel free to contact our customer support
team by emailing us at [email protected].
Contents
Main features
Structure Diagram
Button Function & LED Indicator
Specification
Package contents
Display Overview
Basic operation
Vedio Playback
APP Install & Use
Menu Settings
Notice
Installation Guide
Quick Installation Guide
Camera Adjustment
Camera System installation
Troubleshooting
03
03
04
04
05
06
07
08-09
09
10-13
13
14
15
16
16-17
18
Customer Contact information 18
1. This DV988 Motorcycle camera comes with 2 (two) full HD 1080p cameras. Both
the front and rear cameras record high quality video 1080P at 30fps.
2. This product has a 800x480 DPI (dot per inch) display, which can be operated
by touch, it is very convenient to use and very bright on day and night.
3. The camera starts recording automatically when the ignition is switched on and
stops recording automatically when the ignition is switched off after a brief
shutdown sequence.
4. The product has a safety riding reminder function, which will send out reminders
when riding at overspeed or overtime, making riding safer.
5. The main DVR unit and cameras are rainproof (IP67 rated), it is absolutely fine
to use them on a rainy day.
6. This product is simple and easy to use. Watching videos and setting items can
be done through the mobile app.
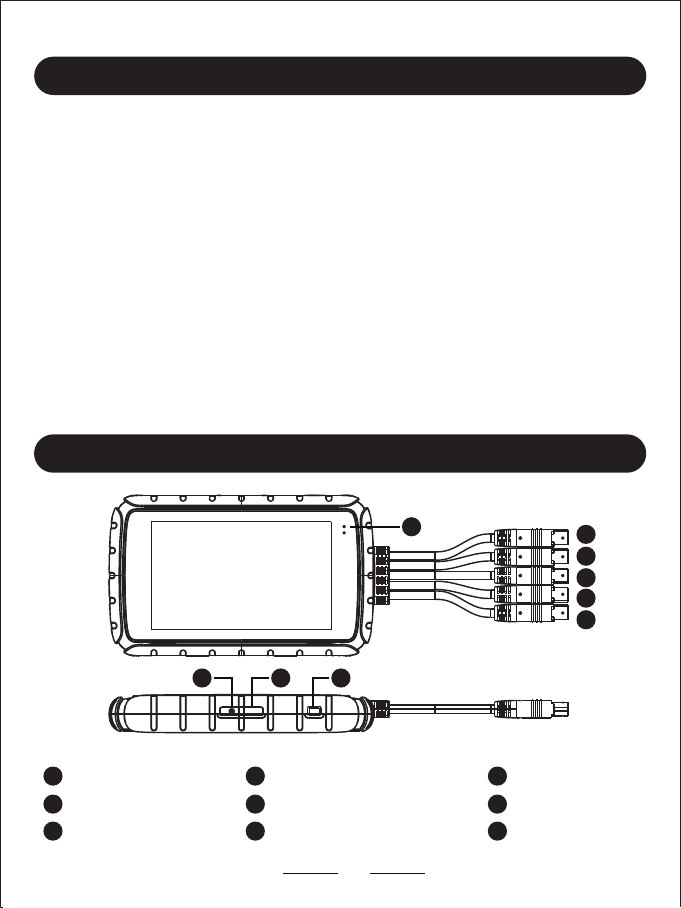
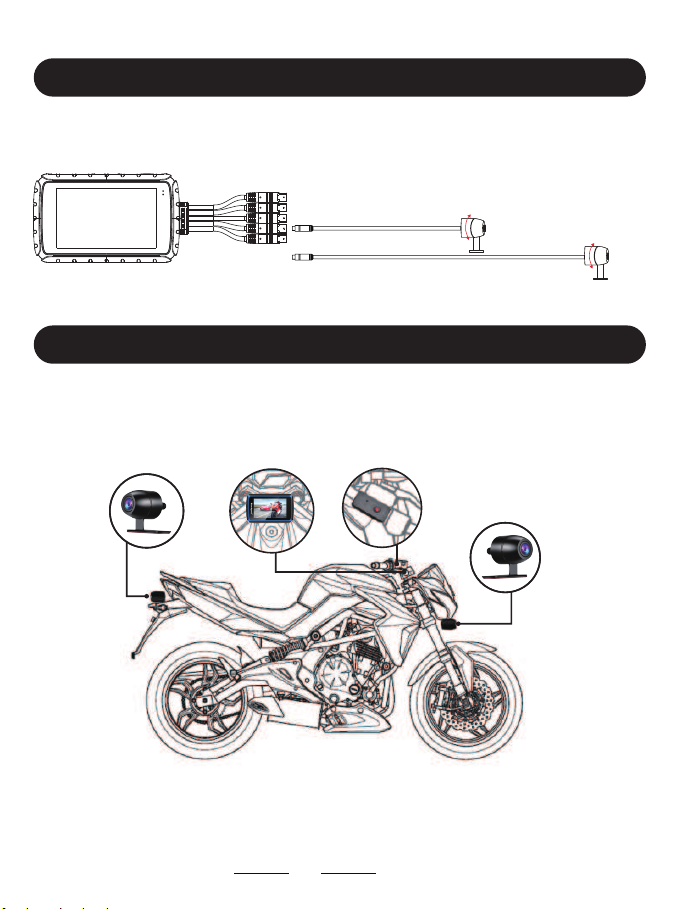
Reset Hole Micro SD Card slot Power Button
LED Indicator GPS Wired Controller
Power Adapter Rear Camera Front Camera
Main features
Structure Diagram
03
1
4
7
2
5
8
3
6
9
1 2 3
45
6
7
8
9
by touch. It is very convenient to use and very bright, day and night.
stops recording automatically when the ignition is switched off, after a brief
5. The main DVR unit and cameras are rainproof (IP67 rated), so it is absolutely fine

Button Function & LED Indicator
Package contents
Button on wired Controller
1x DV988 2CH Camera DVR unit
1x Wired Controller
1x USB Power Adapter
2x 1m connection cable
1x 2m connection cable
1x L Shaped Hex
Screwdriver
1x Adapter
1x Fixed Base
1x Handlebar Bracket kit
4x Screws for cameras
6x Bandages
3x Spare 3M tape
1x User manual
1x GPS module (optional)
1x Hardwire Kit (for power connection to
fusebox instead ofaccessory socket, also
provides parking mode and batteryprotection)
In Preview mode and Recording mode: Short press to
take photos.
In recording mode: Long press to lock current recording file.
LED Indicator
(wired controller)
Red light on solid: Power on.
Red light blinking: Camera in Recording mode.
Blue light on solid: Power on.
Blue light blinking: GPS signal reception is normal.
LED Indicator (main body) Red light on solid: Power on.
Red light blinking: Camera in Recording mode.
Blue light on solid: Power on.
Blue light blinking: GPS signal reception is normal.
Button on main body Power button
Long press: Power ON/OFF
Short press: Display ON/OFF
Reset button
Long press: Restart dash cam
04

Specification
Chipset
Blueskysea DV988
MSC8339D
Sensor GC2053
Video resolution Front: 1080P 30fps Rear: 1080P 30fps
Host Waterproof Level IP66
Lens Waterproof Level IP67
Video Codec/Format H.264 / MOV
Photo Format JPEG
G-sensor 3 axis G-sensor, L/M/H level
Loop recording Yes
Memory Card capacity Class 10,256Gb max.
Screen 4” HD Touch Screen
Working Voltage DC 5V
Working Current 1000mA~1100mA (DC 5V)
Working Temperature(℃)(-20℃~60℃)
Working Humidity(℃)15%-60%RH
Backup power source Super capacitor (No lithium battery). (Ensures all video is
written to memory card on power failure.)
Wi-Fi Support
Wi-Fi APP RoadCam
GPS Yes
Lens Angle 140 degree
Lens Optical Parameters 5G(4G+IR),F1.8
05

Display Overview
Home view
06
2Video resolution indicator
3G-sensor Sensitivity indicator
SD card status indicator
Recording mode indicator
1
1
7GPS connect indicator
8
Front and Rear camera status indicator
9Recording Time indicator
10
Date/Time
11
11
Toggle screen view button
12
12
Start/Stop recording Button
13
13
Menu Button
14
14
Microphone On/Off (mute) indicator
4
5 Loop recording time indicator 6 Wi-Fi ON/OFF indicator
FHD F RG
2
00:45
2015-01-01 00:10:32
2 3 4 5 6 7 8 9
10

Screensaver view
07
When the screen saver time has expired, the screen displays this view, which i
ncludes the current time and the current driving speed.
Time Speed
Speed Unit
08:11
Kmh
0 0 0
When the screen saver time has expired, the screen displays this view, which
includes the current time and driving speed.

Basic operation
Insert/remove Micro SD card:
08
1. Insert one micro SD card (Class 10, 16GB or larger) into camera and push until
it locks into place.
Vedio Playback
Playback on phone:
Open the RoadCam App, Press the video button ,you will find video files.
Playback on DV988:
1. Click the menu button in the lower right corner to enter the menu page.
2. Click on the playback menu and you will see 3 folders Photo, SOS Video and
Normal Videos. They store pictures and videos separately.
2. To remove the micro SD card, press the end of micro SD card until it clicks and
releases from the slot, and then pull out the SD card.
Start recording:
Camera will start recording automatically when ignition is switched on. The red
LED indicator light will flash while actively recording.
Stop recording:
Camera will stop recording automatically when the ignition is switched off.
Start/Stop Wi-Fi:
1. Click the menu button in the lower right corner to enter the menu page.
2. Click on the “Functional set” button and you will see the Wi-Fi setting menu
” Wifi CARCAM”.
3. Click on the “Wifi CARCAM” button and you will see the ON/OFF menu, you
can start/stop Wi-Fi via them.
releases from the slot, then pull out the SD card.
Click on the “Wifi CARCAM” button and you will see the ON/OFF menu.
You can start/stop Wi-Fi with this function.
Open the RoadCam App and press the video button to locate the video files.
2. Click on the playback menu and you will see 3 folders: Photo, SOS Video and
Playback on PC:
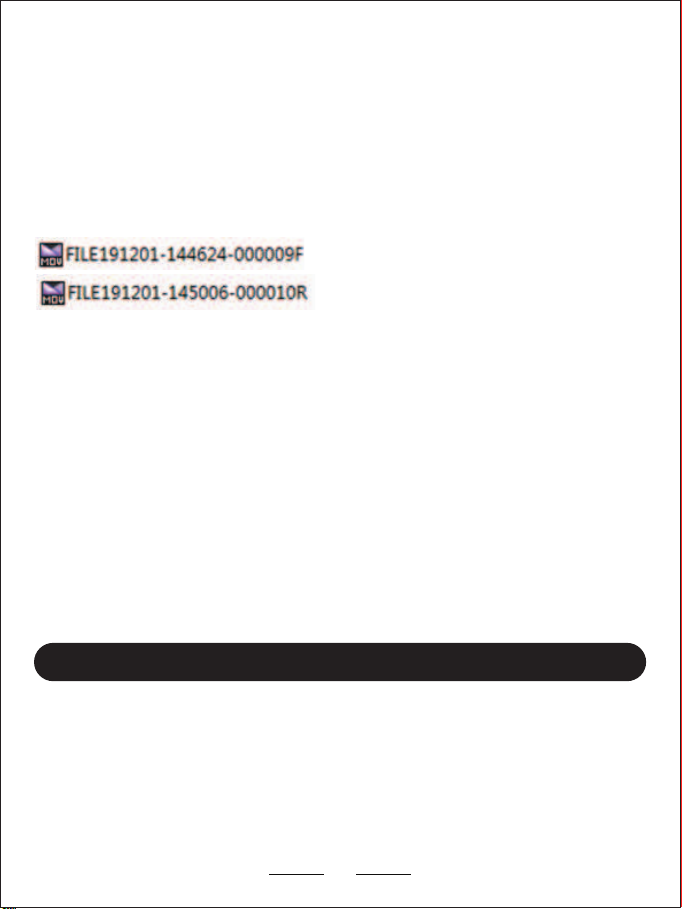
You can obtain information from the video file name, for example:
GPS logger Playback:
1. Remove the Micro SD card and Connect to the computer USB socket via a
micro SD card reader. Once connected, open a file browser and navigate to the
SD card.
APP Install:
1. Search the app "RoadCam" on your phone, download and install it.
2. Turn on the Wi-Fi function via the Wi-Fi menu on the DVR.
3. To connect your phone to the wireless network NPD_CarDV_WiFi
(default password is 12345678).
4. Open the Motorcycle camera App and Connect to the DVR Unit.
2. You will find Normal, Photo and a Sos folder. There will be three file folders
when you access the memory card on the computer.
"191201_144624" indicates date/time
"000009" indicates Video serial number
"F" is for front camera video files
"R" is for rear camera video files
"Sos" file folder contains any videos that have been locked.
The GPS signal will be saved in the video file if you connect a GPS module with
the camera and it is receiving a GPS signal successfully.
The GPS route will be displayed on Google maps when you playback the video in
GPS Player.
(Please download GPS Player software at https://www.blueskysea-inc.com)
APP Install & Use
09
micro SD card reader. Once connected, open the file browser and navigate to the
2. You will find Normal, Photo and a SOS folder. There will be three file folders
the camera, and it is receiving GPS signal successfully.
To connect your phone to the wireless network, connect to NPD_CarDV_WiFi

APP Control:
1. In the APP Preview mode, press "video recording" button to start/stop video
recording;
2. In the APP Preview mode, press "photo snap button" to capture photo;
3. In the APP Preview mode, press the menu button on the top right corner to
enter main menu setup;
4. In its sub-menu setup,you can set up its resolution; Sound recording On/Off;
Video partition 1/3/5mins; G-sensor level Low/Middle/High; Format memory
Card etc.
5. In the APP Preview mode, press "HUD video" button to playback videos; press
" HUD photo" button to view photos;
6. Normal looping recording video footages are stored in the loop recording
section ,and all locked video footages are stored in the emergency file folder.
(see photo 3)
7. Short press to preview video footage on your smartphone, long press the video
icon to download/delete video footages on your smartphone. (see photo 4)
8. In the APP Preview mode, press the Disconnect botton in the top left corner to
return to the dash camera connection interface.
10
Disconnect dashcam
Main Menu setting
Full screen display
Video playback
Recording time indicator Video recording Recording Start/Stop
Picture review
Photo snap Press one time to take a picture
7
8
Break off DV988_304a263e8e8c
HUD video HUD photo
video
7
6
8
00:00:34
recording.
Within the menu setup, you can set up its resolution; Sound recording On/Off;
section, and all locked video footages are stored in the emergency file folder.

11
Settings
Wi-Fi connection password
Sound recording
Camera watermark time
Cycle record time
G-Sensor sensitivity
1MIN
MED
When the wehicle collides,the wideo is not coverd
automatically when it is hit.It is used to provide the basis for
the accident
Video resolution F+R FHD30 16+8Mbps
Formatted recorder
Firmware version B2W_190329_V02
Restore factory settings
Picture
2019/04/01
image1 image2 image3
image1 image2 image3
image1 image2
image3
image1
image2 image3
movie
Loop video
2019/04/01 16:00
Emergency video
16:47:46
16:47:46
110.73MB
62.87MB
16:20:38
17:01:40
110.50MB
62.91MB
17:01:16 17:01:40
41.22MB 72.42MB
17:00:26 17:00:26
62.86MB 110.28MB
2019/04/01 16:00
movie
Loop video
2019/04/01 17:00
Emergency video
17:02:20
17:02:20
31.88MB
18.33MB
17:01:40
17:01:40
3.07MB 5.19MB
17:01:16 17:01:40
4.66MB 8.08MB
17:00:26 17:00:26
Photo 1 Photo 2
Photo 3 Photo 4

System Set
Volt set: 11.5V | 11.7V | 11.9V | 12.1V | 12.3V | 12.5V, Default: 11.5V
In order to prevent the motorcycle camera from excessively consuming power
and causing the battery to fail to start the motorcycle, this option provides voltage
protection. When the battery voltage is lower than the set voltage value, the
parking mode is automatically turned off.
Voice:
Set touch sound ON/OFF and volume.
Format SD:
Formats the microSD card ready for use with the camera.
Warning: This operation will delete all existing data on the micro SD card,
including locked files and normal looping recording files! Make sure you back up
any important files first.
Clock Settings:
Set system date and time.
Reset Setup:
This setting restores the device to its original manufacturer settings.
Language:
Sets the on-screen display language to English, Japanese,Traditional Chinese,
Simplified Chinese.
FW Version:
This setting displays the current internal firmware version. When contacting
information available.
Notes:
If you have a GPS module then the GPS will set the time, however you must still
set the local time zone correctly, with adjustment for Daylight Savings Time if
required, otherwise the GPS module will continuously set the wrong time – See
GPS Time Zone menu.
Menu Settings
12
Formats the microSD card to be ready for use with the camera.
set the local time zone correctly, with adjustment for Daylight Savings Time if
required. Otherwise the GPS module will continuously set the wrong time – See
Sets the on-screen display language to English, Japanese, Traditional Chinese,

Preference
LCD Save: OFF | 1 min | 3min
The LCD screen display screensaver view if not used for this time period, if the
screensaver is set to Off then the LCD screen will always be on. Having the screen
display screensaver view will avoid distracting the driver unnecessarily, especially
at night.
Safe Mode: Speed | Time | OFF
Set the maximum riding speed and time. When the speed or riding time exceeds
the set value, a warning will be issued.
Protect Level: Off | Low | Middle | High Sensitivity, default: Middle
The G-sensor measures shock forces and locks the current video file automatically
when the set threshold is exceeded. The settings from "low" to "high" determine
the amount of force needed to lock the file.
Note: Locked files must be manually deleted periodically to prevent the microSD
card filling up with locked files.
Sound Record: On | Off
Turns on/off the microphone (Mute).
Movie Clip: 1min | 2min | 3min | 5min | 10min
Selects the loop recording file length. Once the microSD card is full, the camera
will automatically replace the oldest files with new files in a loop to allow
continuous recording. Note that locked files are protected and will not be
replaced, you must manually clear them off the microSD card when they are no
longer required to avoid the card filling up with only locked files. To avoid the
card filling up and thus preventing new recording, this option can be turned off.
There are six available settings for speed: OFF | 60km/h | 80km/h | 100km/h |
120km/h | 130km/h. The default value is 60km/h.
There are five available settings for time: OFF | 1h | 2h | 3h | 4h. The default value
is 60km/h.
Rear Mirror
There are two options available: On/Off (this only affects rear camera), Default
value is off.
13
card filling up with locked files.
replaced. You must manually clear them off the microSD card when they are no

Auto-Rec: ON | OFF
ON: if the screen is not operated within 30 seconds, it will automatically return to
the home page and start recording.
OFF: If the screen is not operated, it will stay on the current page and will not
automatically return to the home page and start recording.
SOS Cycle: ON | OFF
The storage capacity of the SD card is fixedly allocated: 69% for normal videos,
30% for emergency videos, and 1% for pictures. For example, a 100G card has a
maximum storage space of 69G for normal video, a maximum storage space of
30G for emergency video, and a maximum storage space of 1G for photos.
ON: When the storage space of the emergency video reaches the upper limit, the
new emergency video file will overwrite the old emergency video file and be
saved in a loop.
OFF: When the storage space of the emergency video reaches the upper limit, the
recording will be stopped.
Functional set
ParkingMonitor: ON | OFF
This menu sets the ON/OFF of the parking monitoring function. if it sets to "off",
the parking monitoring function is invalid. if it sets "ON", an impact is detected by
the G-sensor then the camera starts video recording again automatically to record
the incident.
GPS: ON | OFF
Turns On / Off the GPS logging.
A GPS module is used to record the location and speed data in the recorded
videos. If disabled, your camera will no longer measure your speed, position, or
synchronize the time.
Note: For correct synchronization with GPS time, the time zone and Daylight
Savings adjustment must be correctly set using the Time Zone menu.
Wi-Fi CARCAM: ON | OFF
Turns on/off the Wi-Fi function.
14
ON: If the screen is not operated within 30 seconds, it will automatically return to
The storage capacity of the SD card is fixedly allocated: 69% for normal videos,
Parking Monitor:
This menu sets the ON/OFF of the parking monitoring function. If it is set to "off",
the parking monitoring function is invalid. If it is set to "ON", an impact is detected by
Note: For correct synchronization with GPS time, the time zone and Daylight

Flicker: 50HZ | 60HZ
There are two options available: 50Hz/60Hz.
Speed Mode: Km/h | Mph
Sets the measurement units for the vehicle speed overlay on the recorded video.
1. Please use the supplied power adapter and USB Power cable only.
2. Never disassemble or attempt repair of this product. Doing so may damage the
DVR Unit, causing electronic shock and void your product warranty.
3. Never short-circuit the battery.
4. Exposing the DVR Unit to open flames can cause explosion.
5. Due to local laws and vehicles safety considerations, do not operate the device
using the Dash Cam App while moving.
6. Please read the user manual carefully before operation.
This option should be set according to the power supply specifications used in
your country or geographical region. For example, US users should select 60HZ
value.
There are thirty-three available settings for time zoom: -12:00/-11:00/-10:00/
-9:00/-8:00/-7:00/-6:00/-5:00/-4:00/3:30/-3:00/-2:00/-1:00/0/1:00/2:00/3:00/3:30/
4:00/4:30/5/5:30/5:45/6:00/6:30/7:00/8:00/9:00/9:30/10:00/11:00/12:00/13:00.
The default value is +9.
Time Zone
Notice
15
value.

1. Insert a memory card (minimum 16GB – maximum 256GB) into DVR Unit.
2. Connect cameras A & B on DVR Unit being sure to match the arrows and to not
force the connectors.
3. Use the USB cable provided to connect the DVR Unit to a power source,
5V USB phone charger or a USB power bank. (Do not plug into a computer.)
4. The camera should start video recording a few seconds after the power is
connected and its screen will show the output from both cameras.
5. If necessary, format the microSD card so that recording can start, this can be
done using the dash camera menu.
Power adapter wiring diagram
Installation Guide
Quick Test
16
To Wired Remote or
DVR Unit
DVR Unit
Connected to Ground
black
white
red
Connected to Auxiliary
(Only on when the key is on)
Connected to Always On Power
•
Connect the Red wire to the positive 12VDC source that is always on.
•
Connect the White wire to a positive 12VDC source that is controlled by ignition
key (also known as ACC port).
•
Connect the Black wire to the negative source, battery or ground on the bike.
If necessary, format the microSD card so recording can start. This can be

1. Locating the proper place to fix the front & rear camera, wired controller, GPS
tracker (optional) and DVR Unit.
3. Fix and connect the front and rear cameras by method of your choice (3M tape,
screws, cable ties) in the proper viewing location.
4. Supplied power adapter connection.
2. Plan the path of camera cables and power cable before installation. Most bikes
will require you to remove the fuel tank to properly run the cable for the front
camera.
The wired controller cable, and/or the GPS tracker cable may also have to run
under the tank so plan the mounting locations before putting your fuel tank
back on.
Note: If you plan on using 3M tape you should properly clean the surface, if
you use a top coat paint product it can limit the ability of the 3M tape to adhere
properly.
Quick Installation Guide
It is recommended the supplied power adapter to be connected to ignition, or any
point after, such as fuse box, radio, lights. ... so the system starts up and shuts
down with your bike. However, you can connect to your battery, but you need to
make sure to turn the unit off manually after rides to avoid draining the battery.
The position of the DVR Unit and camera cables should be away from the
high-voltage circuit like xenon lamp, ignition plug etc. If your motorcycle is a
traditional carburetor system please try to change a suitable R-value ignition plug.
17
1. Locate the proper place to fix the front & rear camera, wired controller, GPS
under the tank, so plan the mounting locations before putting your fuel tank
3. Fix and connect the front and rear cameras by your method of choice (3M tape,
Note: If you plan on using 3M tape, you should properly clean the surface. If
you use a top coat paint product, it can limit the ability of the 3M tape to adhere
4. Connect the supplied power adapter.
It is recommended that the supplied power adapter be connected to the ignition, fuse
box, radio or lights so the system starts up and shuts down with your bike. On the
other hand, it can be connected to your battery, but you will need to make sure to
turn the unit off manually after rides to avoid draining the battery.
high-voltage circuit like xenon lamp, ignition plug etc. If your motorcycle uses a
traditional carburetor system, please try to change to a suitable R-value ignition plug.
Camera Adjustment
Loosen the lens cap, viewing the screen on the RoadCam App on your phone and
rotate the lens body to adjust the horizontal view angle.
Camera System installation
Method 1 :
The DVR unit is installed in the front position. In this installation method,
the front camera cable is 1 meters, and the rear camera cable is 3 meters.
18
DVR Unit
360°
360°
DVR
Wired
controller
Front
camera
Back
camera
Loosen the lens cap, and while viewing the screen on the RoadCam App on your phone,

There are two supplied installation options for the DVR Unit. It can be installed
using the Adapter and Handlebar Bracket, or the velcro.
The image is for reference only, if you do not know how to install it properly, we
recommend you contact a local professional motorcycle workshop to install it.
19
Method 2 :
The DVR unit is installed under the seat or in a storage compartment. In this
installation method, the front camera cable is 2 meters, and the rear camera cable
is 2 meters.
Back camera
DVR
Wired
controller
Front camera
++ +
Main body
Main body
+
using the Adapter and Handlebar Bracket, or velcro.
The image is for reference only. If you do not know how to install it properly, we
Problem: Unit beeps when power is applied
Solution 1: No MicroSD card installed in DVR Unit, install approved MicroSD card
Solution 2: Bad MicroSD card installed, try another card
Problem: Unable to connect to DVR Unit using RoadCam App
Solution 1: Verify that you are connected to the wireless network(NPD_CarDV_WiFi)
Solution 2: Close the App on the phone, connect to the wireless network and open
the App
Solution 3: Power off the DVR Unit, close the App and power off your phone.
Power on the DVR Unit, power on your phone, connect to the wireless
network (NPD_CarDV_WiFi), open RoadCAM App.
Troubleshooting
Customer Contact information
20
www.blueskysea-inc.com
twitter@Bob59521
FB@BSSDashcam
Tel:(213)441-7188 9:00 AM--3:00 PM
Monday --- Friday
1080 S Los Angeles St Unit C, Los Angeles, CA 90015, USA
Table of contents
Other Blueskysea Dashcam manuals


