BlueSpot MINI HVLP 07909 User manual

MINI HVLP SPRAY GUN
(125ML)
User Manual
07909

01
Thank you for purchasing a BlueSpot product, you can find further information
on our range at www.BlueSpot.uk.com. Please ensure that you are using the
product correctly and that all guidance and cautions are followed in accordance
with the instructions. Please retain these instructions for future reference.
General Information
Please make sure that you read these instructions carefully in order to avoid injury when
using the spray gun. Follow all health and safety rules and regulations. If in doubt and
available please contact a more knowledgeable source.
DO NOT use if damaged.
• ALWAYS make sure the spray gun is disconnected from the air supply before changing
accessories, servicing or performing any maintenance.
• BE AWARE the paint cup remains pressurised after the gun has been disconnected
from the air line. Depressurise the paint cup by gently opening, do not pull the trigger.
• If the spray gun is damaged do not use as this may cause damage to property or injury.
• Maintain the spray gun in good and clean condition for best and safest performance.
• Keep the work area clean and uncluttered and ensure that there is adequate lighting.
• Maintain correct balance and footing. Ensure the floor is not slippery and wear non-slip
shoes.
• ALWAYS dress appropriately – protective overalls, gloves and boots are recommended.
• ALWAYS wear the correct eye or face protection when operating the spray gun.
• ALWAYS wear approved respiratory protection.
• Keep children and unauthorised persons away from the work area.
• When not in use ensure the air supply is turned off.
• When not in use store the spray gun in a safe, dry area, away from children.
• Avoid unintentional operation.
• NEVER point the spray gun at yourself, at other persons or animals.
• DO NOT carry the spray gun by the air hose or yank the hose from the air supply.
• DO NOT allow untrained persons to operate the spray gun.
Safe use
• DO NOT get the spray gun wet or use in damp or wet locations or areas where there is
condensation.
• DO NOT force the spray gun to achieve a task that it was not designed to perform.
• DO NOT direct air from the air hose at yourself or others.

Low Operating Pressure
Air Consumption
Pot capacity
Pattern width covering
Inlet
43PSI (3 bar)
8CFM (225L/min)
125ml
190mm
1/4" BSP
Please make sure that you read these instructions carefully in order to avoid injury when
using the spray gun. Follow all health and safety rules and regulations. If in doubt and
available please contact a more knowledgeable source.
DO NOT use if damaged.
• ALWAYS make sure the spray gun is disconnected from the air supply before changing
accessories, servicing or performing any maintenance.
• BE AWARE the paint cup remains pressurised after the gun has been disconnected
from the air line. Depressurise the paint cup by gently opening, do not pull the trigger.
• If the spray gun is damaged do not use as this may cause damage to property or injury.
• Maintain the spray gun in good and clean condition for best and safest performance.
• Keep the work area clean and uncluttered and ensure that there is adequate lighting.
• Maintain correct balance and footing. Ensure the floor is not slippery and wear non-slip
shoes.
• ALWAYS dress appropriately – protective overalls, gloves and boots are recommended.
• ALWAYS wear the correct eye or face protection when operating the spray gun.
• ALWAYS wear approved respiratory protection.
• Keep children and unauthorised persons away from the work area.
• When not in use ensure the air supply is turned off.
• When not in use store the spray gun in a safe, dry area, away from children.
• Avoid unintentional operation.
• NEVER point the spray gun at yourself, at other persons or animals.
• DO NOT carry the spray gun by the air hose or yank the hose from the air supply.
• DO NOT allow untrained persons to operate the spray gun.
02
Safe use (continued)
The BlueSpot Mini HVLP Spray Gun is ideal for coating materials with paint with minimal
wastage. The supplied nozzle and low operating pressure of 43psi (3bar) covers a pattern
width of 190mm with reduced overspray. The cup capacity of 125ml is ideal for smaller
projects or those with a large number of colours and finishes. Nozzle size 0.8mm. Air
consumption 8CFM (225L/min).
Introduction
Specification
• DO NOT get the spray gun wet or use in damp or wet locations or areas where there is
condensation.
• DO NOT force the spray gun to achieve a task that it was not designed to perform.
• DO NOT direct air from the air hose at yourself or others.
03
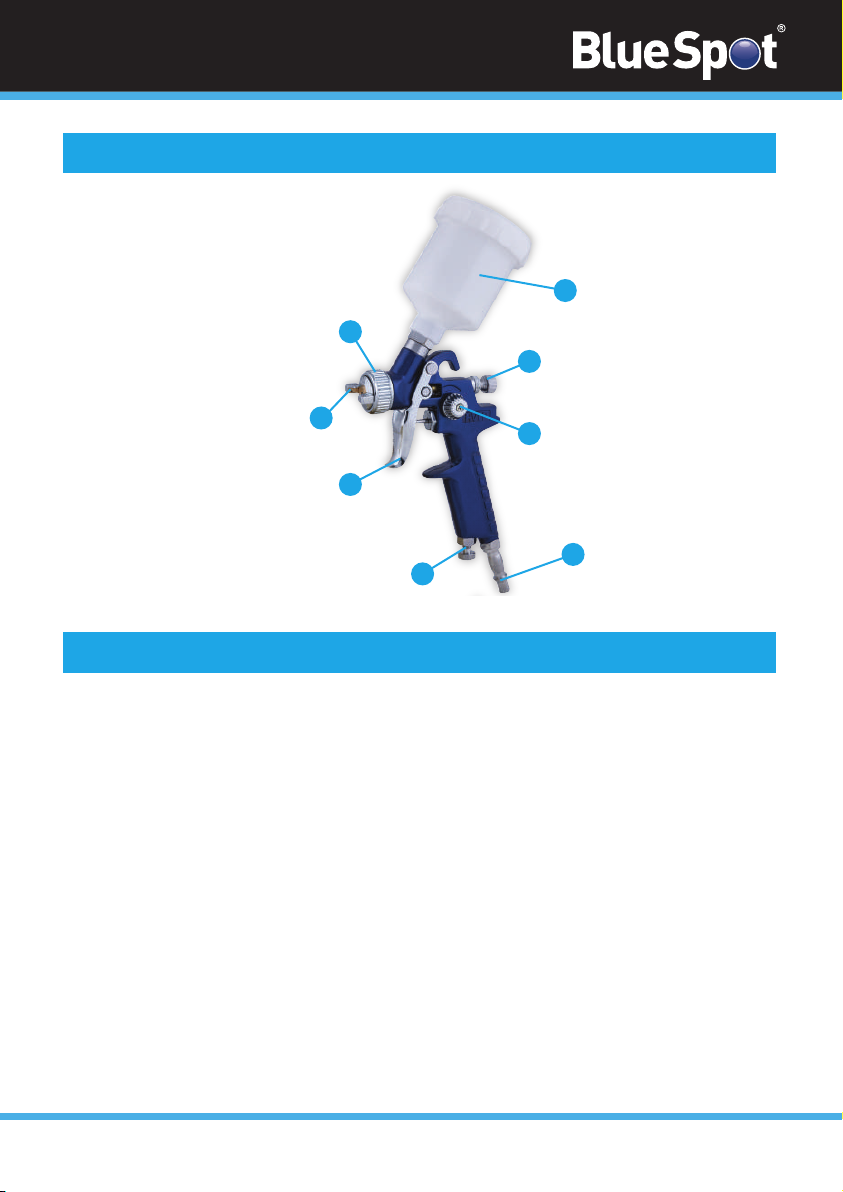
Parts Diagram
Air Supply Connection
1. Air Flow Control Knob
2. Paint Adjustment Screw
3. Paint Cup
4. Retaining Ring
5. Air Nozzle
6. Trigger
7. Air Input Adjustment Knob
8. ¼” BSP Inlet
1. Always make sure the spray gun air valve is in the ‘off’ position before connecting to the
air supply.
2. You will require air pressure of 43 PSI.
ALWAYS ensure when using the spray gun that the air supply is clean and does not exceed
43PSI. Using unclean air and air pressure that is too high will result in the product life being
shortened for the spray gun due to excessive wear. This may result in the spray gun becoming
dangerous and causing damage to property and/or injury.
1
3
2
8
7
6
5
4

retaining
ring
air nozzle Horizontal Fan Vertical Fan
04
Work Area Set Up
1. Keep the work area clean and uncluttered and ensure that there is adequate lighting.
2. Ensure there are no children or pets within the work area that could cause distraction
or injury.
3. Make sure the air hose route can reach the work area without creating a tripping
hazard. Ensure the air hose is long enough to allow free movement whilst working.
4. Before you begin spraying, mask nearby objects that are not being sprayed.
Fan Direction
To change the direction of the fan from horizontal to vertical, loosen the retaining ring and
turn the air nozzle 90°.
NOTE - Test the consistency by spraying onto a piece of scrap material.
As the width of spray is increased more material must pass through the spray gun to obtain
the same coverage on the increased area.
1. Thread the cup to the top of the spray gun and tighten until the cup is securely in place.
2. Follow the paint manufacturer’s directions for prepping the paint and mix thoroughly.
3. Unscrew the lid on the cup. Fill the cup with the paint ¾ full. Secure the lid back onto
the cup and tighten.
4. Start the air compressor and set the regulator to the needed pressure. NEVER exceed
the maximum air pressure.
5. Use the paint adjustment knob to adjust the amount of paint flow.
6. Use the air flow control knob to control the atomizing air flow.
7. Use the air input adjustment knob to control the volume of air input.
8. Turn the air nozzle to achieve either a horizontal or vertical fan spray.
9. Lock the nozzle in place with the retaining ring.
Operation
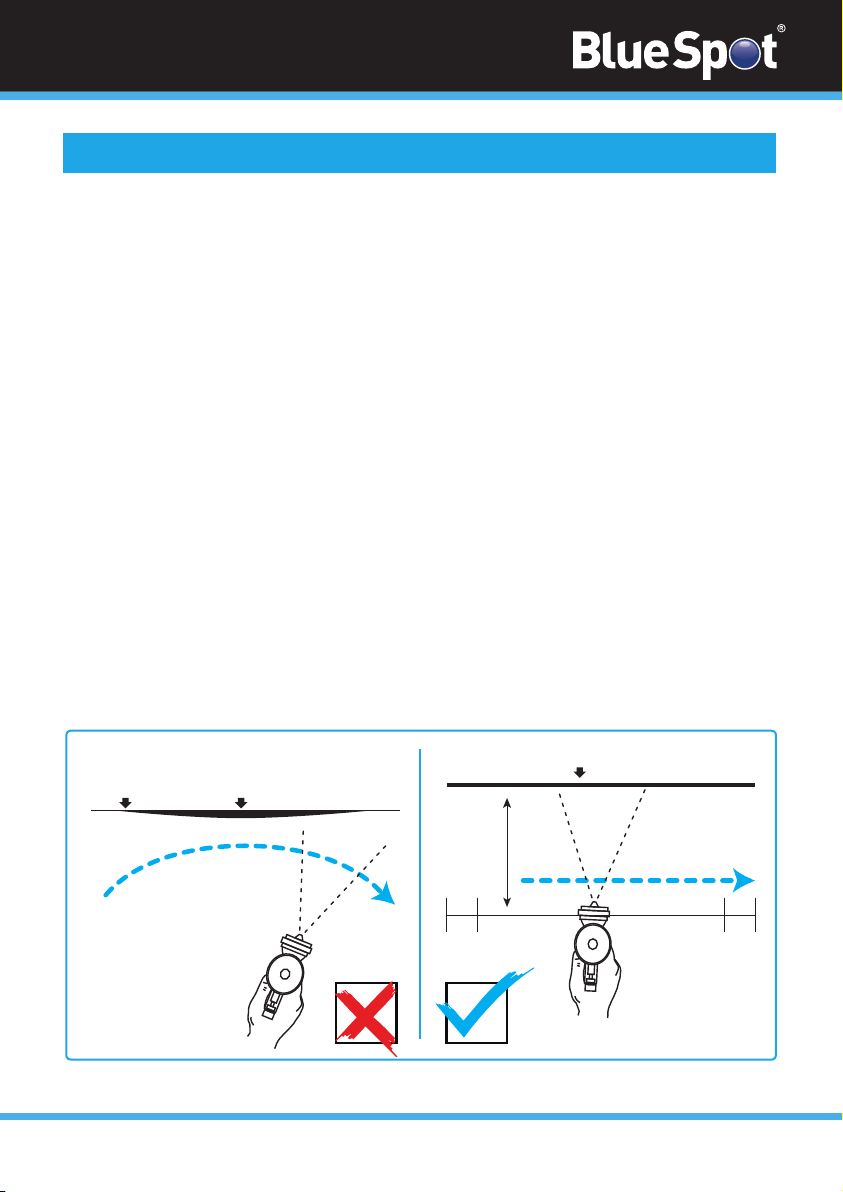
fig.1
05
Spraying Technique
1. Hold the spray gun perpendicular to the surface being sprayed and move it parallel to it.
2. Use two hands, one to steady the cup and the other to operate the spray gun.
3. Aim the nozzle at the piece of material that you would like to spray.
DO NOT stop when spraying. If you need to stop for more than 5 minutes, turn off the air
supply, disconnect the cup from the spray gun, and thoroughly rinse the cup and spray gun
with clean water.
4. Pull the trigger slowly and move the spray gun parallel to the workpiece you are
spraying. Keep a distance between the spray gun and the material to about 6” to 9”,
depending on the flow adjustment and the paint (refer to figure 1).
5. To avoid paint building up in the spray gun, start the stroke before squeezing the trigger.
6. To obtain a uniformed finish each stroke must overlap the preceding stroke.
7. When you have finished, release the trigger before finishing the stroke.
DO NOT stop moving the spray gun while spraying.
ALWAYS allow are hose fittings to cool down completely before dismantling the spray gun.
8. Release the trigger, disconnect from the air supply, and safely discharge any residual air
pressure.
9. Clean the spray gun immediately after every use, in between coats and when it is not
being used for 5 minutes or longer.
Coating will
be light at
this point
Coating should be even and wet
when spraying
Coating will
be heavy at
this point
150 -
250mm 6 - 10”
INCORRECT CORRECT
Travel of gun
Start
Stroke
End of
Stroke
Pull
Trigger
Release
Trigger

06
Cleaning
ALWAYS make sure that the spray gun is cleaned immediately after every use. Delayed or
inadequate cleaning of the spray gun will cause blockages and affect the performance of the
product in the future.
ALWAYS disconnect the spray gun from the air supply before attempting to clean or
perform maintenance.
ALWAYS follow the paint manufacture’s recommendations for cleaning, solvent and
disposal.
Cleaning the spray gun cup
1. Make sure any solvent used is recommended by the paint manufacturer.
2. Remove the cup, as well as any tubes.
3. Scrape the paint out of the cup carefully. Dispose of this excess paint properly.
4. Clean the cup with the solvent.
5. Allow to dry.
Cleaning the spray gun
1. Flush the spray gun through with clean solvent.
2. To wash off any paint that has accumulated on the spray gun use a bristle brush and
solvent.
3. With a dampened solvent rag wipe the outside of the spray gun.
4. Allow to dry.
Air nozzle, fluid nozzle and needle assembly
1. To clean the nozzles soak them in solvent to dissolve any dried material then blow the
clean with air. Carefully handle all nozzles and do not make any alterations to the gun.
2. If you need to probe the holes in the nozzles, do not use metal instruments. Always
ensure you use a tool that is softer than brass.
3. Adjust the fluid needle valve so that when the gun is triggered airflow occurs before fluid
flow.
1. Always take care when re-assembling the spray gun. Avoid cross-threading by screwing
the parts hand tight. If a part cannot easily be turned by hand, check that you have the
correct part, or unscrew, realign and try again. DO NOT use excessive force when
re-assembling.
2. If you change the nozzle size, ensure the complete nozzle set is exchanged. Before
putting the paint needle in, insert the paint nozzle.

Problem Possible Causes Solution
1. The paint may be too thick
2. The Air pressure is too low
1. Thin paint according to the
manufacturer’s instructions
2. Increase air pressure
1. Loose or damaged air nozzle
2. Low paint level
1. Tighten or replace
2. Refill paint cup
1. The air pressure is too high
2. The adjustment screw is not
open enough
1. Reduce the air pressure
2. Open the adjustment screw
Heavy
centre
pattern
Light
centre
pattern
1. Air nozzle blocked
2. Air nozzle loose or the seal
is dirty
3. Dried paint on air nozzle
over the fluid tip
4. Fluid needle damaged
1. Clean the air nozzle
2. Clean and tighten the air
nozzle and seal
3. Clean the air nozzle
4. Replace the fluid needle
and fluid tip
1. Dirt on one side of the air
nozzle – blocking the fluid
tip
2. The holes on the air nozzle
are blocked
3. Damaged fluid needle
1. Use a non-metallic point to
clean the fluid tip
2. Use a non-metallic point to
clean the air nozzle
3. Replace the fluid needle
and fluid tip
Heavy top
/ bottom
pattern
Pattern on
right or
left only
Fluttering
Spray
07
ContactDistance to Spot SizeDisposal
ALWAYS make sure that the spray gun is cleaned immediately after every use. Delayed or
inadequate cleaning of the spray gun will cause blockages and affect the performance of the
product in the future.
ALWAYS disconnect the spray gun from the air supply before attempting to clean or
perform maintenance.
ALWAYS follow the paint manufacture’s recommendations for cleaning, solvent and
disposal.
Cleaning the spray gun cup
1. Make sure any solvent used is recommended by the paint manufacturer.
2. Remove the cup, as well as any tubes.
3. Scrape the paint out of the cup carefully. Dispose of this excess paint properly.
4. Clean the cup with the solvent.
5. Allow to dry.
Cleaning the spray gun
1. Flush the spray gun through with clean solvent.
2. To wash off any paint that has accumulated on the spray gun use a bristle brush and
solvent.
3. With a dampened solvent rag wipe the outside of the spray gun.
4. Allow to dry.
Air nozzle, fluid nozzle and needle assembly
1. To clean the nozzles soak them in solvent to dissolve any dried material then blow the
clean with air. Carefully handle all nozzles and do not make any alterations to the gun.
2. If you need to probe the holes in the nozzles, do not use metal instruments. Always
ensure you use a tool that is softer than brass.
3. Adjust the fluid needle valve so that when the gun is triggered airflow occurs before fluid
flow.
1. Always take care when re-assembling the spray gun. Avoid cross-threading by screwing
the parts hand tight. If a part cannot easily be turned by hand, check that you have the
correct part, or unscrew, realign and try again. DO NOT use excessive force when
re-assembling.
2. If you change the nozzle size, ensure the complete nozzle set is exchanged. Before
putting the paint needle in, insert the paint nozzle.
Maintence
ContactDistance to Spot SizeDisposal
Troubleshooting - Spray pattern diagnosis

1. Clean air valve
2. Lubricate air valve
3. Replace air valve spring
4. Replace air valve assembly
5. Replace air valve stem
1. Dirty air valve
2. Sticking air valve
3. Damaged air valve spring
4. Worn/damaged air valve
5. Bent air valve stem
Problem Possible Causes Solution
1. Refill with paint
2. Hold the spray gun upright
3. Clear air vent hole
4. Adjust or replace fluid tip
and fluid needle
Spluttering spray 1. Paint level low
2. Tipped cup
3. Air vent clogged on cup
4. Loose/damaged fluid tip
1. Check the air hoses
2. Open adjustment screw
3. Thin fluid or increase air
pressure. (Do not exceed
the maximum)
Will not spray 1. No pressure at spray gun
2. Adjustment screw not open
enough
3. Fluid too thick
1. Use a non-metallic point to
clean fluid tip
2. Replace fluid needle spring
3. Replace fluid tip and fluid
needle
Fluid tip leak 1. Fluid tip dirty
2. Broken fluid needle spring
3. Worn or damaged fluid tip
Air leaking from
air nozzle
1. Move moderately and
parallel
2. Adjust distance
3. Reduce air pressure
Overspray
(paint drifting to
unintended objects)
1. Improper application speed
2. Improper distance from
workpiece
3. Too much air pressure
08
ContactDistance to Spot SizeDisposalContactDistance to Spot SizeDisposalGeneral Troubleshooting

09
Notes
Contact
Find out more about the BlueSpot® Lifetime Guarantee at www.BlueSpot.uk.com
Tel: 0800 093 0115
Email: [email protected]
Orme Business Centre,
Greenacres Road,
Oldham,
OL4 3NT
ContactDistance to Spot SizeDisposal
Recycle unwanted materials instead of disposing of them as waste. All tools, accessories and
packaging should be sorted, taken to a recycling centre and disposed of in a manner which is
compatible with the environment. When the product becomes completely unserviceable and
requires disposal, drain any fluids (if applicable) into approved containers and
dispose of the product and fluids according to local regulations.
Environmental Protection
Always check and adhere to national regulations when disposing of any tools that are no longer
functional and cannot be repaired.
• Contact your local waste disposal authority for information on how to correctly
dispose of tools.
Disposal
Table of contents
Other BlueSpot Paint Sprayer manuals


