bluSensor AIR User manual

1

23
Version BluSensor AIQ Manual V5_EN / APP 5.0.3 / FW 1.04 / LT,TVOC
Schutz Membran
Content
1 Warranty...........................................................4
2 Safety Instructions.......................................5
3 Basic Information..........................................7
3.1 Scope of delivery.........................................................7
3.2 Features...........................................................................7
4 Scope of application....................................7
5 Starting up the device.................................8
5.1 bluSensor
®
Mini - Power Suppy.......................... ...8
5.2 bluSensor
®
- Calibration ...........................................9
5.3 Suitable smartphone or tablet .......................... 10
5.4 Turning on Bluetooth............................................. 10
5.5 Download the app.................................................. 11
5.6 Range of the device................................................ 11
5.7 Connect the device to the smartphone.......... 11
5.8 Conguring the device (sensors)....................... 14
6. Operation ...........................................21
6.1 Your overview in the device list.......................... 21
6.1 Sensor value in detail............................................. 26
6.2 Query statistics......................................................... 30
6.3 Marking the measurement.................................. 35
6.4 Finding the device .................................................. 36
6.5 Check battery life..................................................... 37
6.6 Query the size of the used memory ................. 38
6.7 Calibrate sensor ....................................................... 39
6.8 Reset device .............................................................. 40
6.9 Manufacturer information ................................... 41
6.10 Managing the device list.................................... 43
6.11 Other settings in your app................................. 45
6.11.1 Setting the temperature unit (°C or °F).......46
6.11.2. Smartphone location.......................................46
6.12 Canceling the app................................................. 47
6.13 Useful accessories................................................. 48
6.13.1 The bluSensor® Gateway App.........................48
6.13.2 The bluSensor® Cloud .......................................48
6.13.3 Integration of a bluSensor® ............................49
7 Technical data............................................. 52
45
Intended Use
This device is suitable for the measurement of sen-
sor values in the dry areas. Any other use is deemed
to be improper. Unauthorized alterations or con-
versions are not permitted. Never open the device
yourself and do not attempt any repair yourself.
Site
Avoid exposure to smoke, dust, shock, chemicals,
moisture, heat or direct sunlight. Do not use the
unit in potentially explosive atmospheres.
Maintenance
Wipe the unit with a damp cloth or anti - static
cloth. Never use a dry cloth. There is a risk of static
charge.
Not suitable for children under 3 years.
1 Warranty
This device has a 24-month warranty. The warranty
period begins with the purchase. For proof of the
date please keep the purchase documents, such as
receipt, invoice, cash note or delivery note. If items
without purchase documents are sent for repair,
the repair can only be carried out for a fee. This also
applies to insuciently packaged items. Within
the warranty period, all defects resulting from ma-
terial or manufacturing defects are remedied free
of charge. Within the warranty period, warranty is
provided by repair or replacement of the device.
Excluded parts / devices become our property. The
warranty does not automatically renew or extend
the guarantee due to the replacement of the de-
vice. The original warranty period of the rst device
remains, which ends after 24 months. The warranty
does not cover damage caused by improper use,
wear and tear, by third parties or by force majeure.
The guarantee does not cover consumables (batte-
ry, battery, packaging, etc.) and also does not aect
those defects, which impair the value or the usabili-
ty of the device insignicantly. Claims for damages
are excluded as far as they are not based on intent
or gross negligence on the part of the manufactu-
rer. Of course, our customer service is available to
you even after the guarantee period has expired.
After expiration of the warranty or for damages for
which we cannot guarantee you will receive a cost
estimate.
2 Safety Instructions
Read this manual carefully.

67
This manual is intended for informational purpo-
ses, its content is not part of the contract. All data
given are merely normal values. The described
equipment and options may dier depending on
the country-specic requirements and integrated
sensors. For more detailed information, please re-
fer to the respective data sheets for the products.
Technical changes reserved.
Copyright:
Almendo Technologies GmbH
All rights reserved.
Full or partial reproduction of this manual is only
permitted with the written permission of Almendo
Technologies GmbH.
3 Basic Information
3.1 Scope of delivery
• Measuring device
• Quick guide
3.2 Features
• Graphical display on the smartphone or tablet
• Wireless data transmission
• Current measured values
• Long-term records
• Congurable alarms
• Statistical evaluations
4 Scope of application
Depending on the model and package you have
purchased, dierent sensors are integrated. You
can nd more information about the dierent mo-
dels and packages on our homepage www.blusen-
sor.com.
The most important ones are mentioned here:
bluSensor
®
Mini -
Humidity and Temperature Data Logger
This data logger is ideal for monitoring humidi-
ty and temperature in rooms. Due to its size and
wireless transmission, it can also be positioned in
poorly accessible locations. It is battery operated
and communicates with the smartphone or tablet
via Bluetooth.

89
bluSensor
®
Mini -
Air Quality Sensor Smart Home
The bluSensor® Air Quality Sensor is ideal for moni-
toring the air quality in rooms. It must be perma-
nently powered via USB and communicates with
the smartphone or tablet either via Bluetooth or
optionally via Wi-Fi.
Recommended accessories:
renkforce „Gooseneck“ Extension USB 2.0
All accessories are available in our webshop:
www.blusensor.com/shop.
5 Starting up the device
5.1 bluSensor
®
Mini - Power Suppy
bluSensor
®
Mini - battery operated:
Open the battery compartment on the side with a
coin. Insert a type 2450 button cell. A red light ap-
pears briey on the front. Close your device again.
Your device is now ready for operation.
bluSensor
®
Mini - USB powered:
Plug your bluSensor® into a USB socket or USB
adapter to supply it with power. As soon as the
sensor is supplied with power, a red light on the
sensor lights up for a short time. As soon as the
light goes out, the sensor is ready for operation.
Please take into account that power supplies pro-
duce heat and can therefore falsify the measure-
ment result of the sensor. To achieve the highest
measurement accuracy, it is recommended to
purchase a USB gooseneck as an accessory and to
position the device in the optimal position.
5.2 bluSensor
®
- Calibration
For temperature and humidity: The sensors are
already pre-calibrated. Calibration even after lon-
ger operation is not necessary.
For package Air quality sensor smart Home:
During starting up, the sensor must be continuous-
ly supplied with power for 12 hours and the room
must be well ventilated. The sensor automatically
calculates the „best state“ within this time interval
and stores this value. The sensor can now also be
unplugged. The calibration is maintained for 7 days
without power.

10 11
Automatic recalibration: If a better value is achie-
ved during normal operation, this is automatically
saved as the new „best value“. Please take into ac-
count that the sensor automatically adapts to your
conditions over the runtime: i.e. if, for example, you
should never ventilate within 7 days, the sensor will
adapt to the ambient conditions as it assumes that
this is the normal condition.
Further details and additional documents can be
found on our homepage at www.blusensor.com/
help.
5.3 Suitable smartphone or tablet
In order to operate your device, you need a smart-
phone or tablet with a Bluetooth version as of 4.0.
Other versions are not supported. In retail, com-
patible devices are also referred to as „Bluetooth
smart ready“.
5.4 Turning on Bluetooth
Go to Settings and turn Bluetooth on.
5.5 Download the app
Go to the app store and download the „bluSensor®
AIR“ app to your smartphone.
This app is available for both iPhones and Android
smartphones.
NOTE:
The following description and its screenshots are adapted to the
iPhone. In the Android version, there may be deviations in the dis-
play. However, the functions are the same.
5.6 Range of the device
In order to be able to connect to the device, the
smartphone must be in the appropriate range. In
the open view, the range is 3m - 50m. If there are
any obstacles, persons or walls in between, the ran-
ge can be correspondingly reduced.
5.7 Connect the device to the smartphone
Launch the BluSensor AIR app and scan accessible
devices. To do this, touch the circle-shaped icon at
the bottom right.

12 13
Your device appears in the overview list under the
default name „New device“
When the device is within range, the Bluetooth
connection icon is displayed in gray color. As soon
as you are actively connected to the device, the co-
lor changes from gray to blue.
NOTE:
If you cannot nd a device, this can be due to the following reasons:
a) the battery of your device is empty or
b) the device is not in the appropriate range or place
c) another user is already connected to the device. In this case, the
other user must disconnect the connection manually. You will nd
more information in the chapter „Settings“.
d) You have not activated Bluetooth on your smartphone / tablet.
New Wi-Fi enabled devices do not have a Wi-Fi con-
nection yet. Therefore, the Wi-Fi icon is crossed out.
Tap the „New device“ line and you are asked to en-
ter a name.
You can assign an individual name, e.g. Living
room, John Smith or the like. As soon as you have
assigned a name, your device appears in the „MY
DEVICES“ list. If you tap on the line entry, you will
be taken to a detailed view in which your current
sensor values are displayed. This may dier depen-
ding on the device type and integrated sensors.
E.g. bluSensor® Mini - Package Humidity and Tem-
perature Data Logger
NOTE:
The dew point is additionally calculated and indicates at which
temperature items (e.g. windows) begin to fog under the given hu-
midity.
E.g. bluSensor® Mini - Package Air Quality Sensor
Smart Home
This display is updated every ve seconds with an
active Bluetooth connection. Powered devices up-
14 15
date the measured values every two seconds. You
can recognize an active Bluetooth connection by
the Bluetooth symbol above the rst measured
value, in this example above the airquality index.
If this symbol is crossed out, values can only be
displayed if your device is connected to the blu-
Sensor® Cloud via Wi-Fi. In this case, the last valu-
es saved in the cloud are displayed. Depending on
the storage interval, these can also be up to e.g. 10
minutes old.
If you go back to the „MY DEVICES“ device list, you
will also see the current values and the connection
status in the overview list.
E.g. bluSensor® Mini - Package Humidity and Tem-
perature Data Logger
You can be connected to multiple devices at the
same time via Bluetooth. However, a device can
connect to only one smartphone or tablet at a time.
In this case, another user would not nd the device.
5.8 Conguring the device (sensors)
To congure your device, press the „tool key“ icon
at the bottom left in the detail view.
You can choose which conguration you want to
perform. Select the item „Sensor settings“.
You can use this function
• to change the name of the device,
• to activate the alarm function,
• to dene the suggested value ranges to the in-
tegrated sensors,
• to set the time interval for the logging mecha-
nism.
Alarms
If you want to receive a message on your smartpho-
ne when exceeding/falling below the limits, you
must activate the „Message“ function.
NOTE:
Attention: You will receive the notication only if there is a current
Bluetooth connection to your device. To avoid continuous alarms,
your device will wait 15 minutes before sending another alarm.

16 17
NOTE for bluSensor® Mini - Package Air Quality Sensor Smart Home:
If you are not actively connected to your device via Bluetooth, no
messages will be sent at the moment. This option will be available
in a later version of the app.
If you select „Light“ as the alarm function, a light
on the front of the device will start ashing if the
sensor values are outside dened limits.
E.g. bluSensor® Mini - Package Humidity and Tem-
perature Data Logger
Please note that increased battery consumption is
used in this mode. You can also enable both func-
tions at the same time.
Dene the optimal range
You can set your optimal range at your own conve-
nience. Use the „Reset“ function to reset your set-
tings back to the factory settings
bluSensor® Mini - Package Humidity and Tem-
perature Data Logger: Interval
If you have this model, your device can store the
sensor values directly on the device. To do this, you
must activate the data logger for this device by
selecting a storage interval. You can choose from
dierent presets.
Once you have made a selection, the number of
available memory values is calculated. For examp-
le, if you select 30 minutes as the memory interval,
your device stores the sensor values for 341 days. If
you do not transfer the measured values from your
device to your smartphone or tablet at the end of
this period, the values on your device are overwrit-
ten with the oldest one. In our case, the rst day
would be overwritten on the 342th day. They have
a total of ca.16.300 memory values available.
bluSensor® Mini - Package Air Quality Sensor
Smart Home - Interval:
This generation of devices cannot currently save
measured values directly on the device. If you want
to store your sensor data, you have to connect the
device to your Wi-Fi and the bluSensor® Cloud. In
this case, your data will be stored every 10 minu-
tes in the free version. You have a total of approx.

18 19
16,300 memory values at your disposal. If you need
a smaller storage interval or a higher memory, ple-
Save device conguration
If you have made your individual congurations,
you must save them. Please leave the view of the
sensor settings with the „Done“ function, which
you will nd on the lower right.
If you have purchased a Wi-Fi enabled device, you
still need to enter the access data to your Wi-Fi so
that your sensor is also online if you are not in cor-
responding Bluetooth range. To do this, press the
„Tool key“ icon at the bottom left in the detailed
view of the sensor values and select the „Wi-Fi Se-
tup“ item.
You get to choose which conguration you want
to perform.
Select the „Wi-Fi Setup“ item. If your smartphone
or tablet is already in a Wi-Fi, this name will be dis-
played as a suggestion. In the following example,
the smartphone is already connected to the Wi-Fi
network „Dorly“. Therefore, it is displayed in the list
and can be selected.
If you want a dierent Wi-Fi, please select the „Ma-
nual input“ item and enter a dierent Wi-Fi name.
In both variants you will be asked to enter the pass-
word for your Wi-Fi.
Once you have entered your Wi-Fi credentials, your
device will reboot and briey ash red.
You will be returned to the list view and your de-
vice will go through dierent connection states
until it is nally connected to the bluSensor® Cloud.
20 21
In the rst step, the sensor goes oine resp. no Wi-
Fi is active.
In the second step, it tries to dial into the congu-
red Wi-Fi network.
IMPORTANT:
Please note that only 2.4 Gz networks are supported.
In the third step, it connects to the bluSensor®
Cloud. As soon as the „cloud symbol“ appears, the
sensor is properly connected.
NOTE:
Please note that in secured Wi-Fi networks, IP-enabled devices must
be enabled separately. Please contact your IT expert for this. He will
ask you for the MAC address of your device. To do this, switch to the
detailed view of your device and tap the „Tool key“ icon at the bot-
tom left, and select the device information menu item. There you
will nd the unique MAC address of your device under „Wi-Fi“, e.g.
FC.5C:C4:64:20:98.
Congratulations
Your device is now ready for use and you can begin
your measurements. Please position your device
anywhere in the room.
6. Operation
6.1 Your overview in the device list
At the top of the device list, the measured values
from the nearest public measuring station in your
area are displayed:
You will be shown the name of the public outdoor
measuring station, the temperature, the humidity
of the UV index and the outdoor air quality.
Below you will see a list of your devices and the
most important sensor values for your devices.
A symbol of the device type is displayed on the left.
Its color signals the state. On the right side there are
icons for the connection state (Bluetooth and Wi-Fi)
and the battery state of the device and below it you

22 23
can see the two sensor values of the device type.
NOTE:
If you can not nd a device, this can be due to the following reasons:
a) the battery of your device is empty or
b) the device is not in the appropriate range or range
c) another user is already connected to the device. In this case, the
other user must disconnect the connection manually.
d) You have not activated Bluetooth on your smartphone / tablet.
The display in the device list does not refresh auto-
matically, but is only supplied with „fresh informati-
on“ when the page is loaded, If you want to refresh
again, please press the circle-like icon at the bot-
tom right.
Note: In Bluetooth mode, new values are available every 2-5 se-
conds when the connection is active; when the connection is inacti-
ve and the device is within range (broadcasting mode), a new value
is available every 20-60 seconds. If the device is not in range and
congured for Wi-Fi, the last value stored in the bluSensor® Cloud
is taken. This may be 1-30 minutes out of date depending on the
storage interval you set.For the exact polling frequency for the indi-
vidual device types, please refer to the data sheet on our homepage
www.blusensor.com.
The state of your Bluetooth connection is dis-
played for each device in the corresponding line
entry in the upper right corner:
actively connected: blue
in range, but not actively connected: gray
not in range: gray crossed out
First, an attempt is made to query measured values
directly via Bluetooth. However, if this is not possi-
ble, the data is fetched from the bluSensor® Cloud
for Wi-Fi enabled devices. The status of your online
connection is also displayed for each device in the
corresponding line entry to the left of the Blue-
tooth symbol:
Connected to the bluSensor® Cloud: gray cloud
Cloud not available: gray cloud crossed out
Wi-Fi not available or wrong password: Wi-Fi icon
with call sign
Device does not support Wi-Fi: no icon

24 25
In the device list you can see the status of your de-
vice by the color.
Depending on the device type, dierent colors
may appear here. For the exact color denitions,
please refer to the technical data sheets of the re-
spective devices. The following color table applies
to the bluSensor® Data Logger and the bluSensor®
Mini - Package Air Quality Sensor Smart Home.
Gray: no connection to your device.
Blue: good air quality
Yellow: moderate air quality
Orange: poor air quality
Red: unhealthy air quality
Purple: too humid or too warm
Turquoise: too dry or too cold
In the device list you have an overview of your sen-
sors. If you tap on a line, you will get to the detailed
view, in which several functions are available per
device. These can dier per models and packages.
26 27
6.1 Sensor value in detail
As soon as you switch to the detailed view for the
measured values, your smartphone or tablet ac-
tively tries to establish a connection to your device.
You can see this by the text: „Waiting for sensor
data“. This process takes a maximum of 5 seconds.
After that, the attempt is aborted and you have to
go back to the device list and try again.
If you have a connection to your sensor, the asso-
ciated sensor values are displayed. These can dier
depending on the model and package you have.
In our example, the values for the bluSensor® Mini
- Package Humidity and Temperature Data Log-
ger
resp. for the bluSensor® Mini - Package Air Quali-
ty Sensor Smart Home are displayed.
Please refer to the individual data sheets of your
model and package for the interpretation of the
various sensor values.
After the sensor values there is an information line
which helps you to analyze your sensor values. On
the one hand, the status is signaled by means of a
color table (see previous chapter) and a short infor-
mation text is also displayed:
At the end you will get a graph in which you can
see the changes of your measured values.
28 29
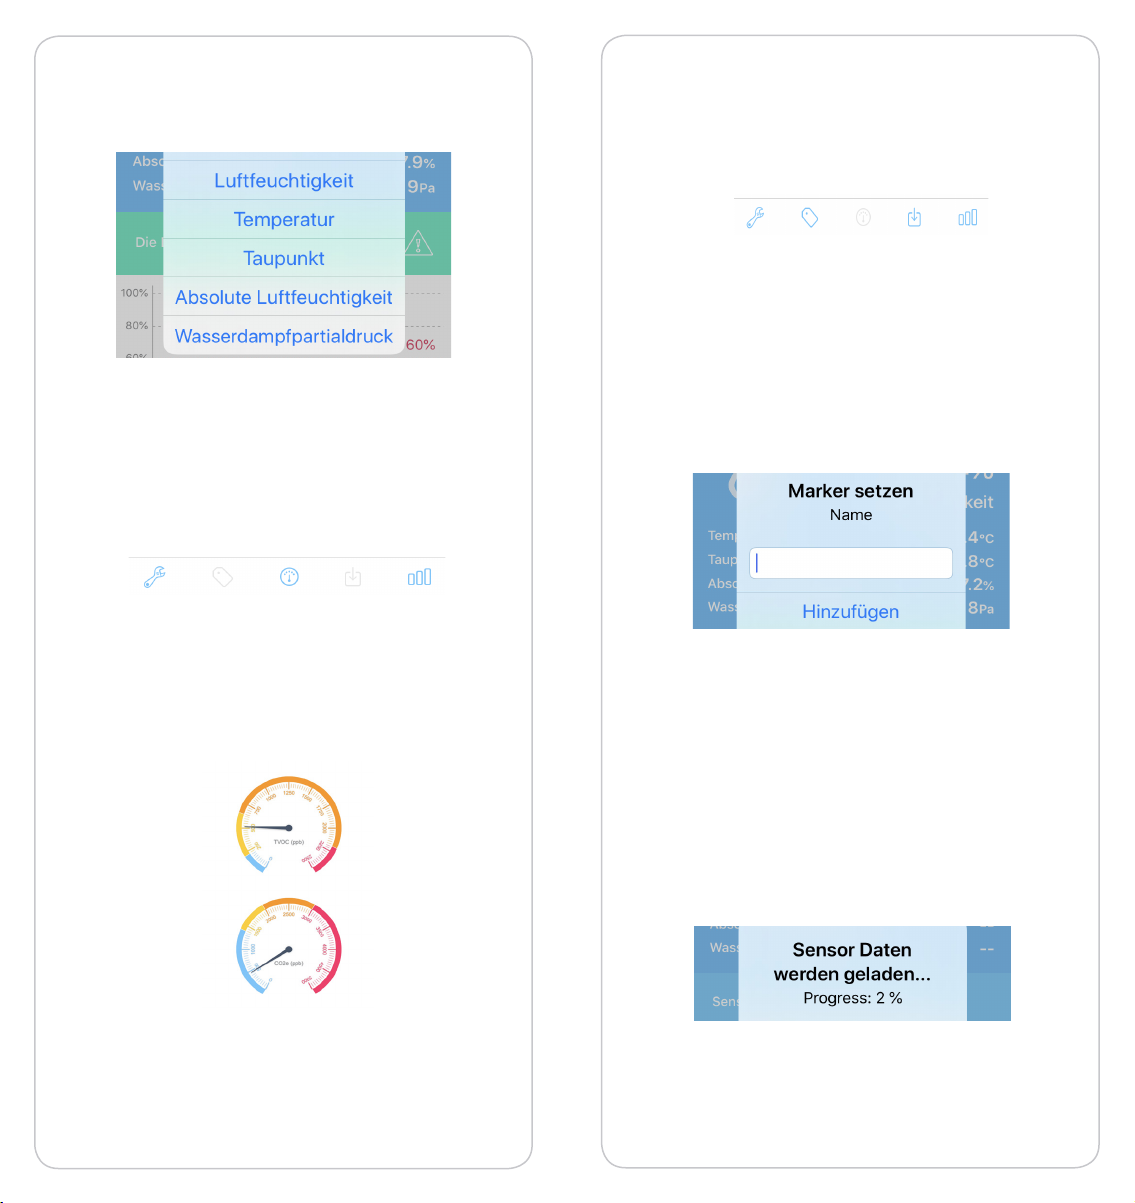
At the end you will get a graph in which you can
see the changes of your measured values.
Depending on the the model and pacakge, additi-
onal functions are available:
bluSensor® Mini - Package Air Quality Sensor
Smart Home:
Another view is available for the air quality sensor.
Please select the middle icon „Speedometer dis-
play“ for this (see at the very bottom of your app).
To exit this display, swipe down from the top.
bluSensor® Mini - Package Humidity and Tem-
perature Data Logger:
If you have dened a measurement interval for
your data logger, you can add a comment to your
measurement series using the „Marker“ function
(see second icon from the left at the very bottom
of your app). If you later export your sensor data
e.g. to Excel (CSV) this note will be shown in your
recordings.
Another function that is only available for the data
logger is the „Download“ function (see second
icon from the right at the very bottom of your app).
Before you can view the statistics, you must trans-
fer the values stored on your device to your smart-
phone. This is done with this function. Depending
on how many values your device has stored, this
may take some time.
30 31
As soon as the values are completely loaded, you
can display statistics for your values.
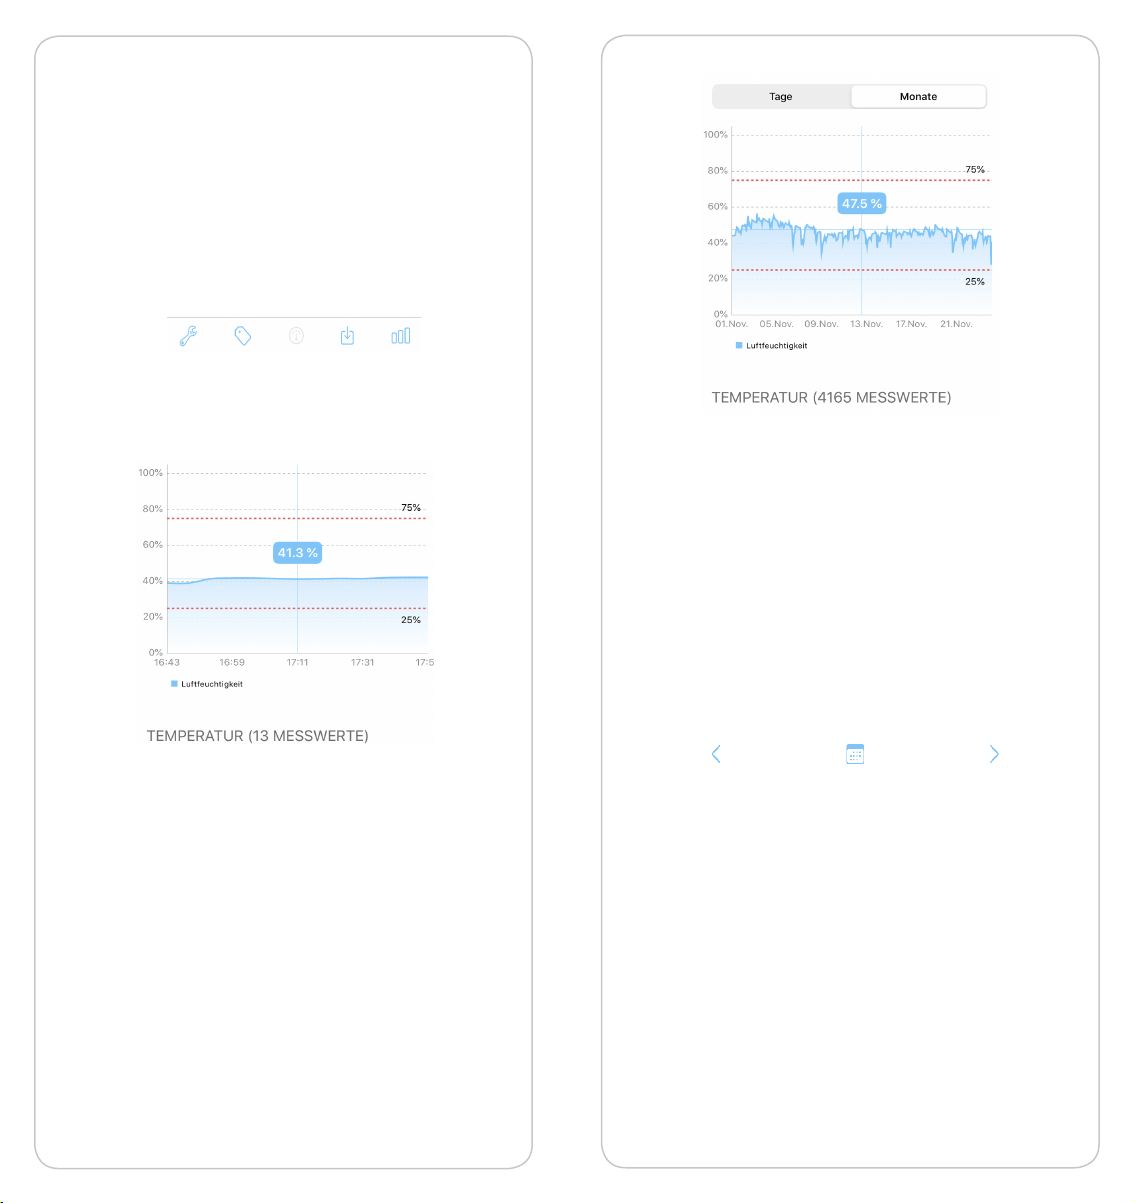
6.2 Query statistics
To do this, press the „Statistics“ icon in the details
view - see the icon at the very bottom right of your
app).
This function is available for all bluSensor
®
models
and packages.
You can choose between a daily view and a
monthly view.
In the monthly display, the average values are cal-
culated and displayed at hourly level. If you tap on
the statistics, the sensor value is displayed above
the statistics. The red lines illustrate the dened
limit values. Exceeding/falling below limit values
can be easily detected in this way.
If you want to view the values for a specic day,
please tap on the „Calendar“ icon (see in the bot-
tom center of your app).
Select a specic day for which you want to display
statistics.

32 33
Selecting the day will take you back to the statistics
view.
If you want to get to the single values view, you
have to press the „single selection“ icon (see top
right of your app).
The color at the beginning of each line indicates
whether the limit values were met or not.
In this case, each entry shows the color turquoise,
which means too dry or too cold air.
bluSensor® Mini - Package Humidity and Tem-
perature Data Logger:
If you have selected the „Save location“ option in
the settings (see Chapter 6.10), you can determine
the location by selecting a measuring point.
bluSensor® Mini - Package Air Quality Sensor
Smart Home:
For this device type location activation cannot cur-
rently be enabled via app. Please contact our sup-
enabled.
34 35
bluSensor® Mini - Package Luftfeuchtigkeit und
Temperatur Datenlogger
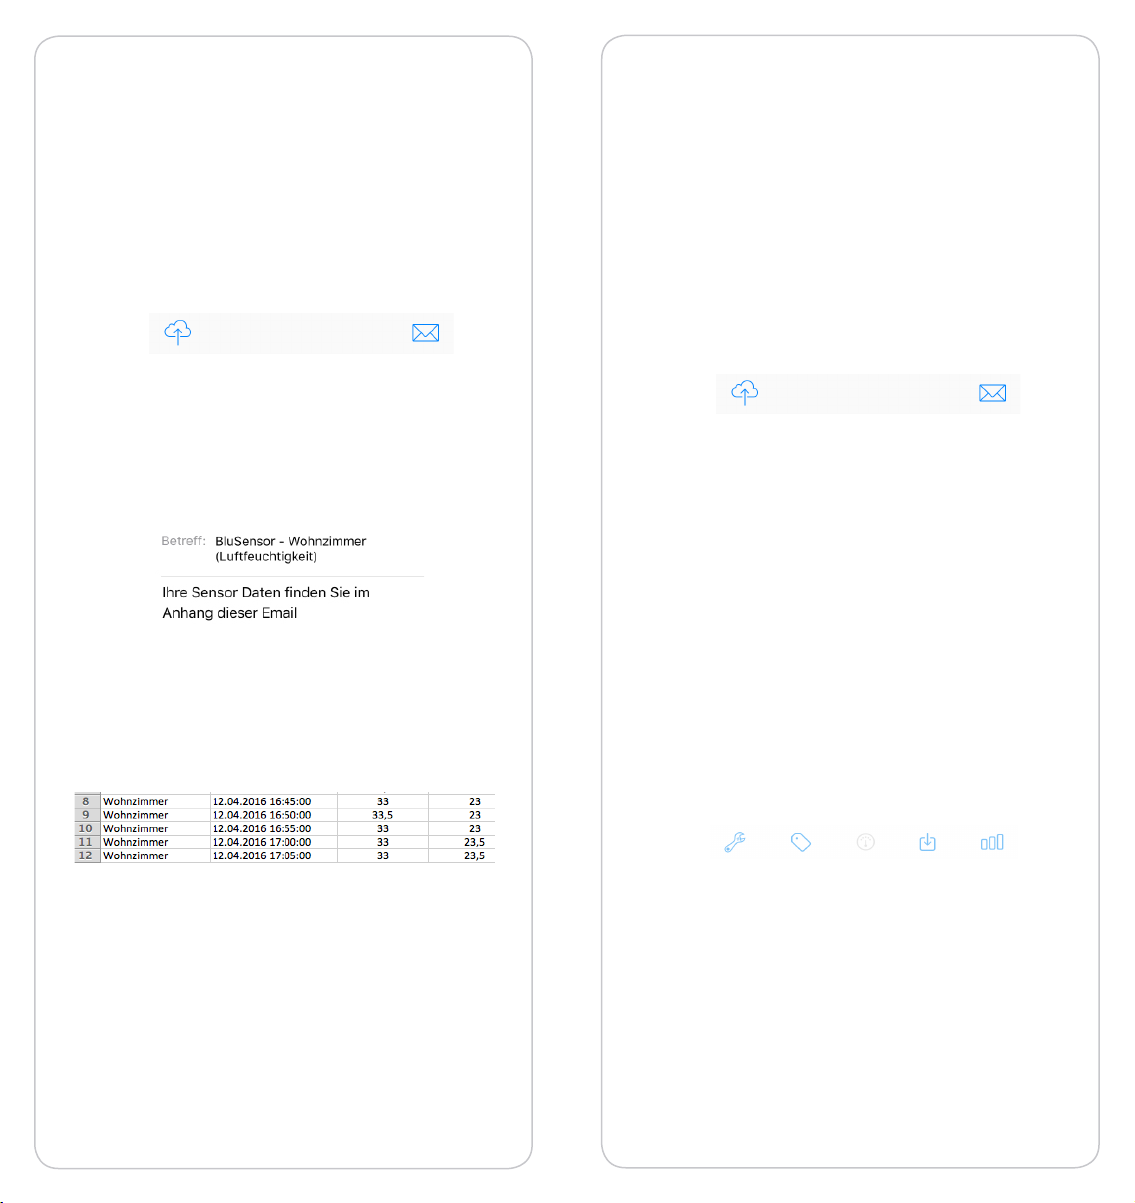
Export and e-mail function:
You can also have the statistics for the data logger
sent to you as a CSV le for Excel as an e-mail. To
do this, you must select the envelope icon at the
bottom right in the single value view.
The mail program is opened and the statistics are
attached in the form of a CSV le. The text „bluSen-
sor“, the name of the device and the selection of
the relevant sensor are preset as the subject. Add
the addressee and send the e-mail.
The CSV le e.g. „blusensor-Kitchen.csv“ can be
opened and further processed with the program
„Microsoft Excel“.
bluSensor® Mini - Package Air Quality Sensor
Smart Home:
For these device types there is currently no export
function available in your app, but an export of the
data is only possible via the bluSensor® cloud por-
tal. If you need this function, please contact sup-
Upload - Function
You can upload your sensor data to the bluSensor®
Cloud for the bluSensor® Mini - Package Humidity
and Temperature Data Logger. To do this, select
the cloud icon at the bottom left in the single value
view.
If this feature is not yet available for your country,
6.3 Marking the measurement
bluSensor® Mini - Package Humidity and Tem-
perature Data Logger:
If you want to edit the data using the „Excel“ pro-
gram and identify certain measurements, you can
use the „Set marker“ function in the detailed view
of the sensor values. To do this, please tap on the
„Marker“ icon in the detailed view of the device (see
in the middle at the very bottom of your app).
You will be asked to enter a name for identication.
This can be for example: „Start measurement Mr.
Smith / Living room“.

36 37
If you end a specic measurement, you can enter
as text for example „End measurement Mr. Muster-
mann“. In the exported CSV le, this label is visible
in a separate column.
This function is currently not available for the blu-
Sensor® Mini - Package Air Quality Sensor Smart
Home.
6.4 Finding the device
If you have multiple devices and do not know
which device you are currently connected to, you
can make the device blink. In the detail view of your
device, please select the „tool key“ icon in the bot-
tom left corner and then select „device informa-
tion“.
As soon as you tap on the text „Find device“, the
red warning light on the bluSensor® Mini - Package
Humidity and Temperature Data Logger or a blue
light on the bluSensor® Mini - Package Air Quality
Sensor Smart Home will light up briey to indicate
which device you are currently connected to.
E.g. bluSensor® Mini - Package Humidity and Tem-
perature Data Logger
6.5 Check battery life
bluSensor® Mini - battery operated
If you want to carry out a longer measurement, it is
recommended to check the battery status before-
hand. In the detailed view of your device, please se-
lect the „tool key“ icon at the bottom left and then
the „Device information“ selection.
You can see the charge level numerically in percent
as well as in bar form. The sensor itself requires very

38 39
little energy, but please take into consideration
that every connection to the smartphone or tablet
also costs energy.
6.6 Query the size of the used memory
bluSensor® Mini - Package Humidity and Tem-
perature Data Logger:
If you do not know exactly how much data is al-
ready stored on your device, you can query this in-
formation. Please select the „tool key“ icon at the
bottom left in the detailed view of your device and
then select „Device information“.
On the one hand, you can see when device
monitoring was started and, on the other
hand, how many measured values have al-
ready been recorded. The percentage indica-
tes how much memory has already been used.
In our example, the logger was started on 26 th
November, 2020 at 16:54:30. Since then, 889 mea-
sured values have been recorded and 5.4% of the
memory is occupied, i.e. 94.6% is still available. A
total of 16,384 measured values can be stored.
This function is currently not available for the blu-
Sensor® Mini - Package Air Quality Sensor Smart
Home.
6.7 Calibrate sensor
In most cases, the sensors used are pre-calibrated,
have long-term stability and measure in absolute
values, i.e. they do not have to be calibrated sepa-
rately. For exact details on the integrated sensors,
please refer to the technical data sheets of the indi-
vidual models and packages.
bluSensor® Mini - Package Air Quality Sensor
Smart Home
The air quality sensor of this model is based on a
relative measuring principle, i.e. it measures the de-
viation from the best value of the past 7 days. You
can reset this calibration by selecting the „Perform
sensor calibration“ function. Please take into ac-
count that you must ventilate extensively during a
restart within the rst 12 operating hours.
To do this, please select the „tool key“ icon at the
Other manuals for AIR
1
Table of contents


