BMB DAS-300 User manual

1
OWNER'SMANUAL
Thankyou verymuchforpurchasing ourKARAOKEA/VAMPLIFIER.
Priortouse,besuretoreadthisowner's manualfromcovertocover
sothatyoucanmakethemost out of thisunit. Themanualwillcome
inhandywheneveryoucomeacross anyquestion ortroublewhile
usingtheunit.
CONTENTS
USING THEUNITSAFELY............................................2
IMPORTANTNOTES.....................................................5
SPECIALFEATURES....................................................6
BEFORECONNECTION...............................................6
NAMESOFFRONTPANELCONTROLSAND THEIR
FUNCTIONS..................................................................7
NAMESOFREARPANELCONTROLSAND THEIR
FUNCTIONS..................................................................8
SYSTEMCONNECTIONS...........................................10
CONNECTIONS..........................................................11
BASICOPERATION....................................................12
AUDIO/VIDEO SIGNALDETECTIONMODE..............13
VIDEOSWITCHING....................................................13
SETTING MODE..........................................................13
TROUBLESHOOTING.................................................14
AFTER-SALESERVICING..........................................15
MANNERSFORCUSTOMERS...................................15
COPYRIGHT................................................................15
ABOUTTHEPRODUCT..............................................15
SPECIFICATIONS.......................................................16
ÞßÔßÒÝÛ
ÔÎ
ÓËÍ×ÝÊÑÔ
ÐÑÉÛÎ ÐÛßÕ×ÒÜ×ÝßÌÑÎ
ÛÏóÍÛÔ ÛÝØÑóÍÛÔ
ñÛÈ×Ì
ÓËÌÛ
Ó×Ýï
Ó×Ýî
Ó×Ýí
ÛÝØÑÊÑÔ
Ó×ÝÓßÍÌÛÎÊÑÔ
Ó×Ý×ÒÐËÌ
ïîí
KARAOKEA/VAMPLIFIER
DAS-300/DAS-150

2
USING THEUNITSAFELY
ABOUTTHESAFETYSYMBOLS
INSTRUCTIONSFORTHEPREVENTIONOFFIRE,
ELECTRICSHOCK, ORINJURYTOPERSONS
AboutWARNINGand CAUTIONNotices
About theSymbols
-------ALWAYS OBSERVETHEFOLLOWING-------
The lightning flashwitharrowhead symbol,
withinequilateraltriangle, isintended toalert
the usertothe presenceof uninsulated
"dangerousvoltage"withinthe product's
enclosurethat maybe of sufficient magnitude
toconstituteariskofelectricshock topersons.
The exclamation point withinan equilateral
triangleisintended toalert the usertothe
presenceof important operating and
maintenance(servicing)instructionsinthe
literatureaccompanying the appliance.
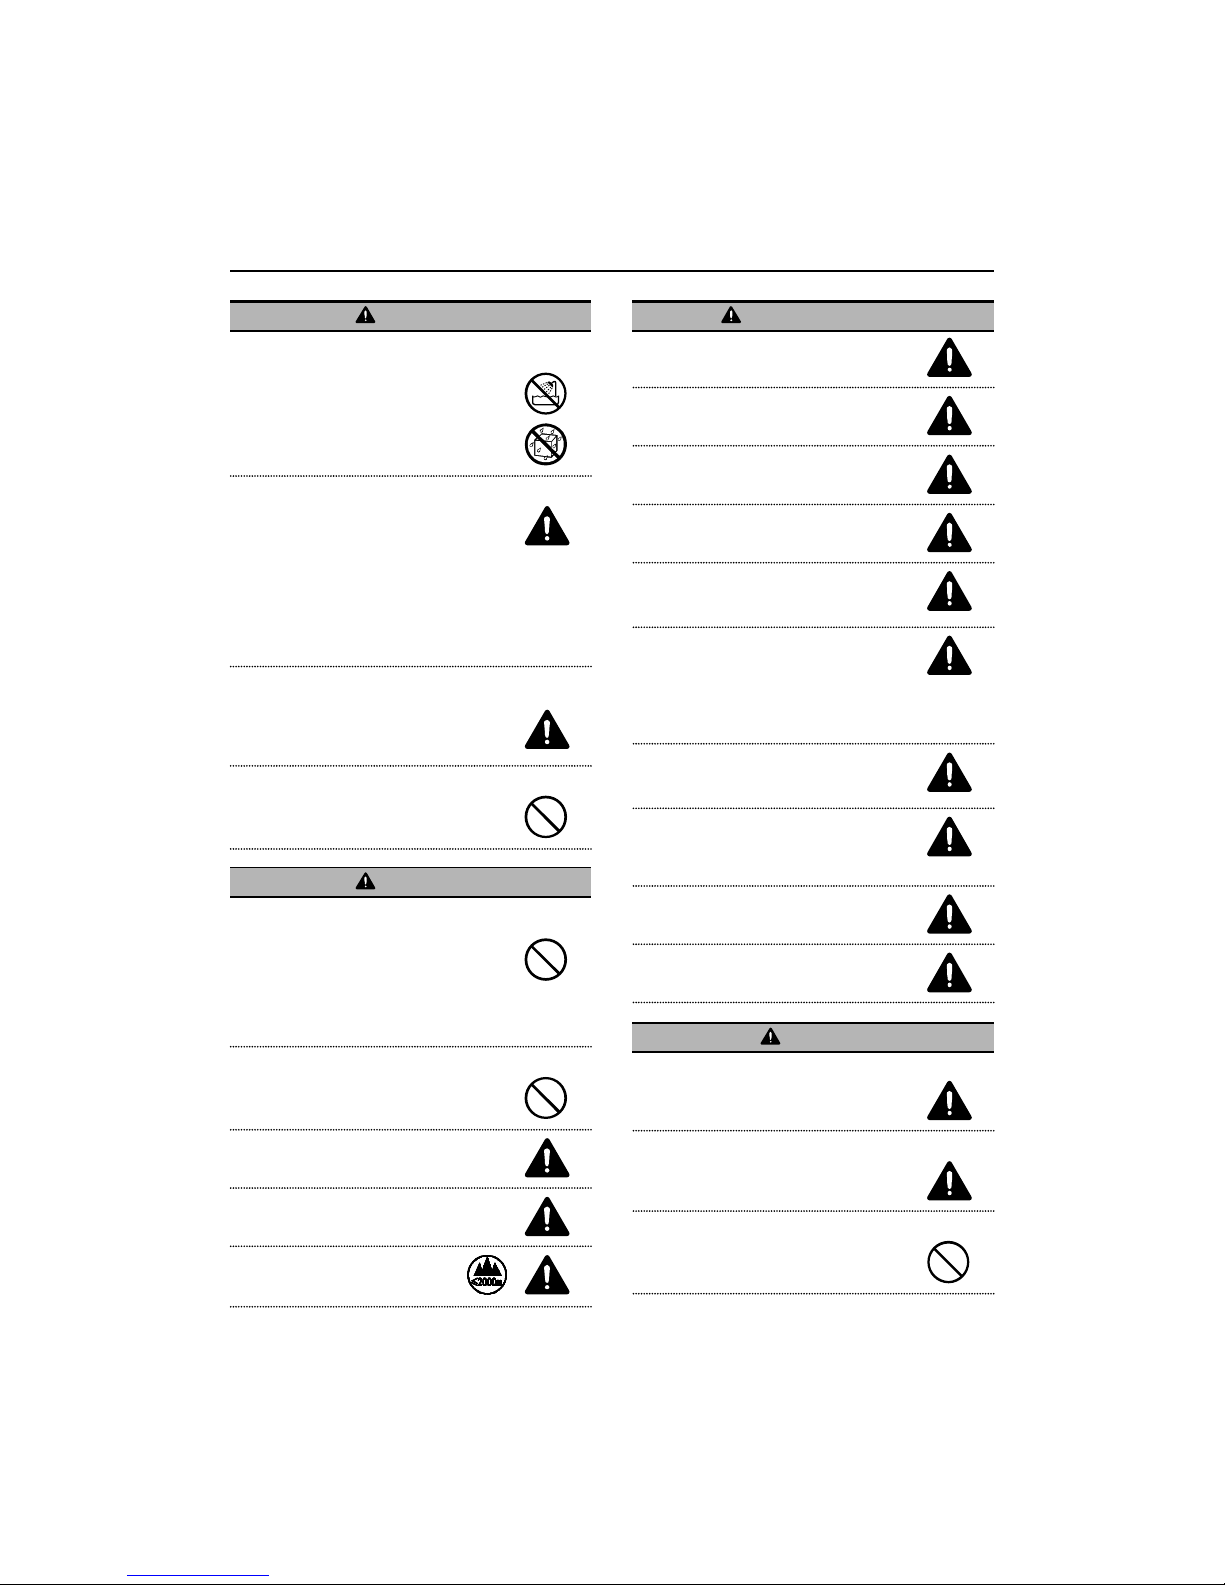
WARNING
Used forinstructionsintended toalert
the usertothe riskof deathorsevere
injuryshouldthe unit be used
improperly.
CAUTION
Used forinstructionsintended toalert
the usertothe riskofinjuryormaterial
damage shouldthe unit be used
improperly.
*Materialdamagereferstodamage or
otheradverseeffectscaused with
respect tothe home and allits
furnishings, aswell todomestic
animals orpets.
The symbolalertsthe usertoimportant
instructionsorwarnings.The specificmeaning of
the symbolisdetermined bythe design
contained withinthe triangle. Inthecaseof the
symbolat left,it isused forgeneralcautions,
warnings,oralertstodanger.
Thesymbolalertsthe usertoitemsthatmust
neverbe carried out(areforbidden).The specific
thingthat must not be doneis indicated bythe
design contained withinthe circle. Inthe caseof
the symbolat left, it meansthat the unitmust
neverbe disassembled.
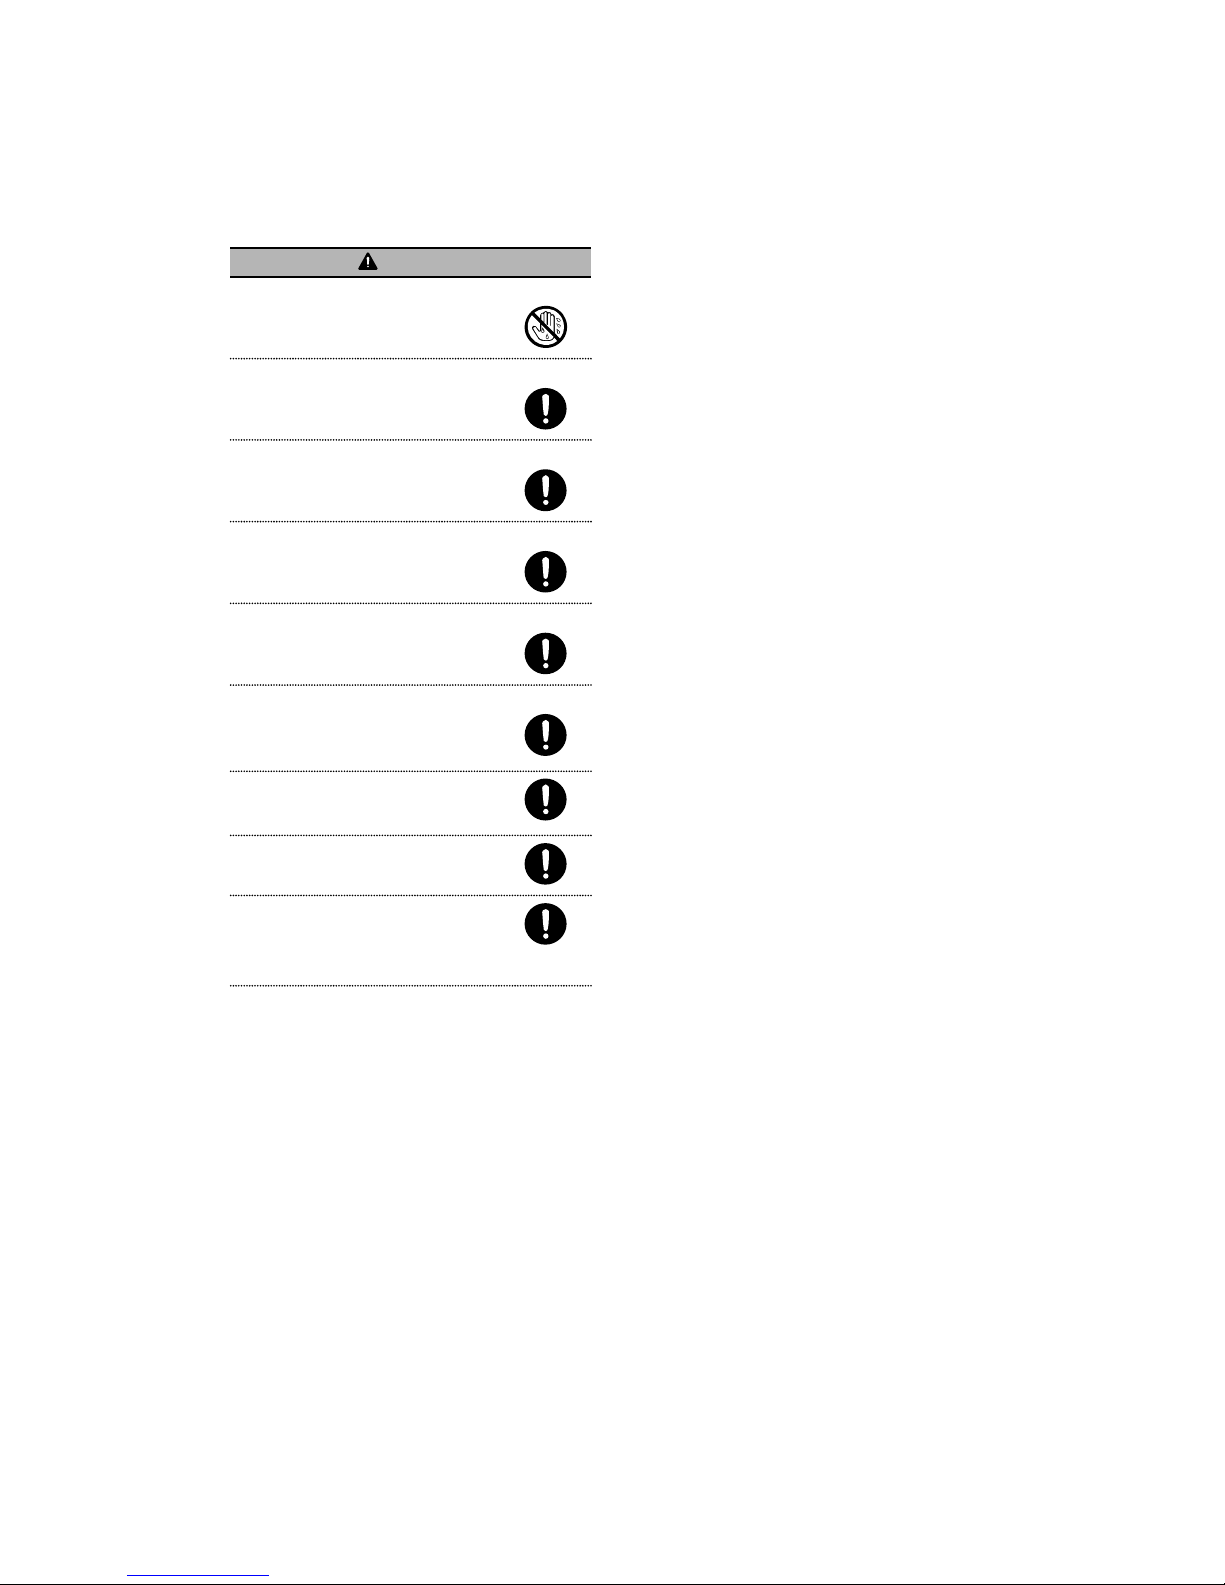
Thesymbolalertsthe usertothingsthatmust
be carried out. The specific thing that must be
done isindicated bythe design contained within
the circle. Inthe caseofthe symbolat left, it
meansthatthe powersupplycableplug must be
unplugged from the outlet.
ÝßËÌ×ÑÒ
Î×ÍÕ ÑÚÛÔÛÝÌÎ×Ý
ÍØÑÝÕÜÑ ÒÑÌÑÐÛÒ
WARNING
Donotdisassembleormodifybyyourself
Donot open (ormodifyinanyway)
the unit oritspowersupplycable.
Donotrepairorreplacepartsbyyourself
Donot attempt torepairthe unit, orreplace
partswithinit (except when thismanual
providesspecificinstructionsdirecting you todo
so). Referallservicing toyourretailer.
Donotuse orstoreinthefollowingtypes oflocations
Subjecttotemperatureextremes(e.g., direct
sunlightinan enclosed vehicle, neara
heating duct, on top of heat-generating
equipment); orare
Damp (e.g., baths, washrooms, on wet
floors); orare
Exposed tosteam orsmoke; orare
Subject tosaltexposure; orare
Humid; orare
Exposedtorain; orare
Dustyorsandy; orare
Subjecttohigh levelsof vibration and shaki-
ness; orare
Inaplacenearcooking utensils wherethe
unitmaybe subjected tosoot, smoke,fume or
heat.
Donotplace inanunstablelocation
Makesureyou always havethe unitplaced soit
isleveland suretoremainstable.Neverplaceit
on standsthat couldwobble, oron inclined
surfaces.
Use onlythesuppliedpowercord
Useonlytheattached power-supplycord. Also,
the suppliedpowercordmust not be used with
anyotherdevice.
Donotbend thepowercordorplace heavy objectsonit
Donot excessively twist orbend the power
cord, norplaceheavyobjectson it. Doing so
candamage the cord, producing severed
elementsand shortcircuits.Damaged cordsare
fireand shockhazards!
Avoidextendeduse athighvolume
This unit incombination withspeakersmaybe
capableof producing sound levelsthat could
causepermanent hearing loss. Donot operate
foralong period oftime at ahigh volume level,
orat alevelthat isuncomfortable.If you
experienceanyhearing lossorringing inthe
ears, you shouldimmediately stop using the
unit,and consult an audiologist.
The lighting flashwitharrowheadsymbolis
intended toalert the usertothe presenceof
uninsulated "dangerousvoltage"withinthe
product'senclosurethat maybe of sufficient
magnitude toconstitutearisk ofelectricshock
topersons.
3
WARNING
Don'tallowforeignobjectsorliquidsto enterunit;never
place containerswithliquidonunit
Donot placecontainerscontaining liquidon
thisproduct. Neverallow foreign objects(e.g.,
flammableobjects,coins,wires)orliquids(e.g.,
waterorjuice)toenterthisproduct. Doing so
maycauseshortcircuits, faultyoperation, or
othermalfunctions.
Turnofftheunitifanabnormalityormalfunctionoccurs
Immediatelyturnthe unit off, removethe power
supply cablefrom the outlet, andrequest
servicingbyyourretailer:
The powersupplycable,orthe plug hasbeen
damaged; or
If smokeorunusualodoroccurs; or
Objectshavefallen into, orliquidhasbeen
spilled ontothe unit; or
The unit hasbeen exposed torain(or
otherwisehasbecomewet); or
The unitdoesnot appeartooperatenormally
orexhibitsamarked change inperformance.
Adultsmustprovidesupervisioninplaces where
childrenarepresent
When using theunit inlocationswherechildren
arepresent, becarefulsono mishandling of the
unitcan takeplace. Anadult shouldalwaysbe
on hand toprovide supervisionand guidance.
Donotdrop orsubjecttostrong impact
Protect theunit from strong impact.
(Donot drop it!)
WARNING
Donotshareanoutletwithanunreasonablenumberof
otherdevices
Donot forcetheunit
!
s power-supply cordtosharean
outlet withanunreasonablenumberof otherdevices.
Beespeciallycarefulwhen usingextensioncords-the
totalpower usedby all devices youhaveconnected
totheextensioncord
!
s outletmust neverexceedthe
powerrating(watts/amperes)fortheextensioncord.
Excessiveloadscancausetheinsulationon thecord
toheatupandeventually meltthrough.
Check thevoltageofyourlocal mainssupply
The powercordshouldnot be connected toa
direct current(DC).
The apparatusshallbe connected toaMAINS
socket outlet withaprotectiveearthing
connection.
The externalwiring connected toSpeaker
terminalsrequiresinstallationbyaninstructed
personortheuseof readymadeleadsorcords.
Use this unitat an elevationlowerthan
2,000 meters.
WARNING
Keeptheseinstructions.
Heed allwarnings.
Follow allinstructions.
Donotblock anyventilation openings.
Install inaccordancewiththe manufacturer's
instructions.
Donotinstallnearanyheatsourcessuchas
radiators, heat reqisters,stoves, orother
apparatus(inculdingamplifiers)that produce
heat.
Donotdefeatthe safetypurposeofthe polarized
orgrounding-typeplug.Apolarizedplughastwo
bladeswithone widerthan the other.Agrounding
type plug hastwobladesandathirdgrounding
prong.The wide blade orthe thirdprong are
provided foryoursafety.If the provided plugdoes
not fit intoyouroutlet,consult anelectricianfor
replancement ofthe obsoleteotlet.
Protectthe powercordfrom beingwalkedon or
pinchedparticularly atplugs,convenience
receptacles,andthepointwheretheyexitfrom
theapparatus.
Useonlywiththecart, stand, tripod, bracket, or
tablespecifiedbythemanufacturer, orsoldwith
theapparatus. When acartisused, usecaution
when moving the cart/apparatuscombinationto
avoidinjuryfromtip-over.
Unplug thisapparatusduringlightningstormsor
when unusedforlongperiodsof time.
Toreducetherisk offireorelectricshock,donot
exposethis apparatustorainormoisture.
CAUTION
Place inawellventilatedlocation
The unit shouldbelocated sotheirlocation or
position doesnot interferewiththeirproper
ventilation.
Managecables forsafety
Trytoprevent cordsandcablesfrom becoming
entangled. Also, allcordsand cablesshouldbe
placed sotheyareout of the reachof children.
Avoid climbing on top oftheunit,or placing heavyobjectson it
Neverclimb on top of, norplaceheavyobjects
on the unit.
4
CAUTION
Donotconnector disconnect thepowercord withwet hands
Neverhandlethe powersupplycableorits
plugswithwet handswhen plugging into,or
unplugging from, an outlet orthisunit.
Disconnecteverythingbeforemovingtheunit
Beforemoving the unit, disconnect the power
supply cableand allcordscoming from external
devices.
Unplugthepowercordfromtheoutletbeforecleaning
Beforecleaning theunit, turnit off and unplug
the powersupplycablefrom the outlet .
Unplugthepowercordfromtheoutletbeforerepairing
Beforerepairingthe unit, turnit off and unplug
the powersupplycablefrom the outlet.
Keepsmall itemsout ofthereachofchildren
Toprevent accidentalingestion, alwayskeep
them out of the reachof smallchildren.
Whenunusing theunitforanextendedperiodoftime
When you leaveyourhome foralong periodof
time,turnOFFthe powerandremovethe power
supply cablefrom the AC outlet. Thiswill
prevent from unexpected accident and fire.
The apparatusshallnot be exposed todripping
orsplashing and that no objectsfilled with
liquids, suchasvases, shallbe placed on the
apparatus.
Wherethe MAINSplug oranappliancecoupler
isused asthe disconnect device, the
disconnect deviceshall remainreadily operable.
Theseservicing instructionsareforuseby
qualified servicepersonnelonly. Toreducethe
riseof electricshock do not performany
servicingotherthan that contained inthe
operating instructionsunless you arequalified
todo so.

5
IMPORTANTNOTES
PowerSupply
Donot connect thisunit to sameelectricaloutlet that
isbeingused byan electricalappliancethat is
controlled byaninverteroramotor(suchasa
refrigerator,washing machine,microwaveoven,orair
conditioner).Dependingon the wayinwhichthe
electricalapplianceisused,powersupplynoisemay
causethisunit tomalfunctionormayproduceaudible
noise.If it isnot practicaltouseaseparateelectrical
outlet, connect apowersupplynoisefilterbetween
thisunit and theelectricaloutlet.
Toprevent malfunction andequipment failure, always
makesuretoturnoff the poweron allyourequipment
beforeyou makeanyconnections.
Placement
Using theunit nearotherequipment containinglarge
powertransformersmayinducehum. Toalleviatethe
problem,change the orientation ofthisunit; ormoveit
fartherawayfromthe sourceof interference.
Thisdevicemayinterferewithradioand television
reception.Donotusethisdeviceinthe vicinityofsuch
receivers.
Noisemaybe produced if wireless communications
devices, suchascellphones,areoperated inthe
vicinityof thisunit. Suchnoisecouldoccurwhen
receiving orinitiating acall, orwhileconversing.
Shouldyouexperiencesuchproblems,youshould
relocatesuchwirelessdevicessotheyareata
greaterdistancefromthisunit, orswitchthemoff.
Donot exposetheunit todirect sunlight, placeitnear
devicesthat radiateheat, leaveitinsidean enclosed
vehicle, orotherwisesubject it totemperature
extremes. Excessiveheat candeform ordiscolorthe
unit.
Whenmovedfromone locationtoanotherwherethe
temperatureand/orhumidityisverydifferent, water
droplets(condensation)mayforminside the unit.
Damage ormalfunction mayresult if you attempt to
usetheunit inthiscondition. Therefore,beforeusing
the unit, you must allowit tostand forseveralhours,
until the condensationhascompletelyevaporated.
Dependingon the materialand temperatureofthe
surfaceon whichyouplacetheunit, itsrubberfeet
maydiscolorormarthesurface. Youcan placea
pieceof felt orclothundertherubberfeet toprevent
thisfromhappening. If youdo so, pleasemakesure
thatthe unitwill notslipormoveaccidentally.
Donot putanything that containswateron thisunit.
Also, avoidthe useofinsecticides,perfumes,alcohol,
nail polish,spraycans,etc., nearthe unit. Swiftlywipe
awayanyliquidthat spillsonthe unitusing adry, soft
cloth.
Maintenance
Foreverydaycleaningwipe theunit withasoft, dry
clothorone that hasbeen slightlydampenedwith
water. Toremovestubborndirt, useacloth
impregnatedwithamild, non-abrasivedetergent.
Afterwards, besuretowipe theunit thoroughlywitha
soft, drycloth.
Neverusebenzine, thinners,alcoholorsolventsof
anykind, toavoidthepossibilityof discoloration and/
ordeformation.
AdditionalPrecautions
Useareasonableamount of carewhen using the
unit'sbuttons, sliders, orothercontrols; andwhen
using it'sjacks andconnectors. Rough handling can
lead tomalfunctions.
Neverstrikeorapplystrong pressuretothedisplay.
When disconnectingall cables, graspthe connector
itself"neverpull on the cable. Thiswayyou will avoid
causing shorts, ordamage tothe cable'sinternal
elements.
When you need totransportthe unit, packageit inthe
box(including padding)thatit camein, if possible.
Otherwise, you willneed touseequivalent packaging
materials.
Someconnection cablescontainresistors.Donotuse
cablesthatincorporateresistorsforconnectingtothis
unit. The useof suchcablescancausethesound
leveltobeextremelylow, orimpossibletohear.For
informationon cablespecifications, contact the
manufacturerof thecable.
Copyrights/ Licenses / Trademarks
It isforbidden bylawto makean audiorecording,
video recording, copyorrevision ofathirdparty's
copyrighted work(musicalwork, video work,
broadcast, liveperformance,orotherwork), whether
inwholeorinpart, anddistribute, sell,lease, perform,
orbroadcastit without thepermission ofthe copyright
owner.
Donot usethisproduct forpurposesthat could
infringe on acopyrightheldbyathirdparty. We
assumeno responsibilitywhatsoeverwithregardto
anyinfringementsof third-partycopyrightsarising
through youruseof thisproduct.
Companynamesandproductnamesappearinginthis
documentareregistered trademarks ortrademarks of
theirrespectiveowners.

6
SPECIALFEATURES
Ultrahighperformanceprofessionaldigital power
amplifier.
Multiplewaysof systemconfiguration;
DAS-300
300Wmode: 300W ×2CH
FrontSYSTEM(300W)+Rear
SYSTEM(300W)
150Wmode: 150W ×2CH ×2SYSTEM(4CH)
DAS-150
150W ×2CH
It has aecho ofsixtypes.It canbeselected to
matchthemelody.
Three input channel functions areautomatically
selectedinthepreset prioritysequence.
It isequippedwiththeequalizerof 10Bands. It
canbesetseparatelymusicandmicrophone.
Effector terminal whichpermitsconnection of a
graphicequalizer.
Fivemicrophones canbeused simultaneously,
one of whichindependentlypermitsON/OFFof
echofor usebyanemcee(MC).
Lowimpedancecompatiblepower amplifier
configurationthatcandrivetwopairsofspeakers
individually.
A ±6-positionkeycontrollerthat canvaryupto
3.0pitch(chromaticintervals)isincorporated.
Multi-function LCD displaythatenables displaying
andsettingofequalizerinput ,echo,etc.
PEAKINDICATORindicatespeaklevelto
preventoverheadsaturation.
BEFORECONNECTION
Cautionsandwarnings
When makingconnections, dosowiththepower
totheunit switchedOFF.
Asfortheinput andoutputjackson theamplifier,
"white"denotes left channel whereas"red"right
channel. Firmlymakeconnectionsincorrect left
andrightchannels.
Connect cordplugsfirmly.Improper connection
may leadtonosoundoutput or togeneration of
noise.
Whendisconnectingthe power supplycablefrom
theoutlet, besuretoholditsplug.
7
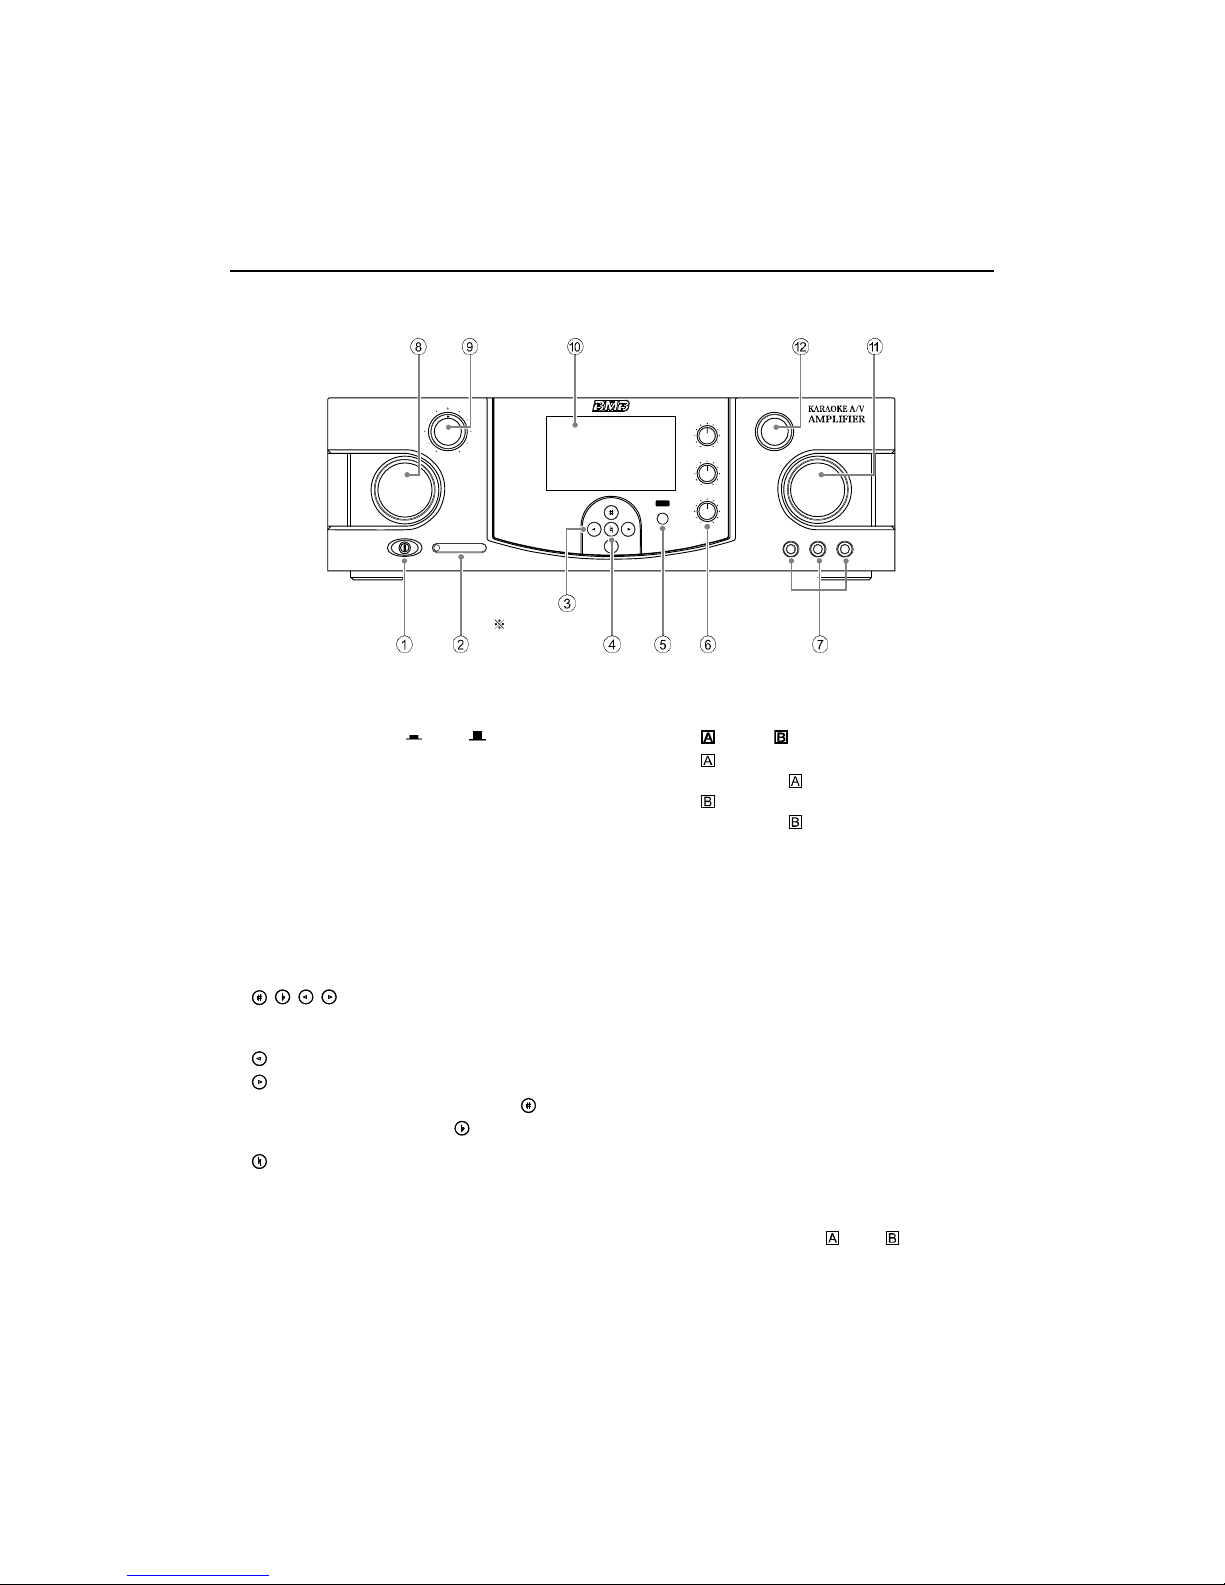
NAMES OFFRONTPANELCONTROLSANDTHEIRFUNCTIONS
FRONTPANEL(DAS-300/DAS-150)
1POWERswitch(ON /OFF)
PresstoturnONthe power. Pressthisagainto
turnit OFF.
Theproduct isstill connectedtopower supply,
evenif thepowerswitchisOFF.
2PEAKINDICATOR
Indicatestheoutput power.
Whentheoutputpoweristoo high, the PEAK
INDICATORlights. Reducethevolumelevel by
adjustingMUSICVOLand MICMASTERVOL,
and adjustingthesettingvalueofMAXfor
MUSICVOLandMICMASTERVOLat setting
interface.
3///(UP/DOWN/LEFT/RIGHT) buttons
Presseachbuttontoenteryour desired
interface.
: Select theEQmodeattheTopinterface.
: Select theEcho mode at the Topinterface.
Note: Toincrease thepitch, pressthebutton.
Tolower thepitch, pressthebutton.
4ENTERbutton
Pressthisbuttontoconfirmtheinterfacethat
youhavejustselected.
Note: Pressingthisbuttonalso allowsthe
standardpitchtoberesumed.
5MUTE/EXITbutton
Whenthe unit isinuse,pressthisbuttontomute.
Duringsetting,press thisbuttontoreturntothe
previousinterface.
6MIC1/,MIC2/,MIC3knobs
MIC1/:Adjust theinputlevelsofMICINPUT1
andMIC(Rear).
MIC2/:Adjust theinputlevelsofMICINPUT2
andMIC(Rear).
MIC3:Adjusttheinput level of MICINPUT3.
Note: WhenMic3EchoissettoOFF,usebyan
emceeisenabled.
7MICINPUT1,2, 3jacks
Microphoneinput jacks.
8MUSICVOLknob
Adjust thevolumeoftheequipment connected
totheaudioinputterminals.
9BALANCEknob
Adjust thebalancebetweentherightandleft
channellevelsoutput fromthespeakers.
0LCD Display
Display variousinterfaces.
aMICMASTERVOLknob
Adjust the overallmicrophoneinput volume
level.
bECHOVOLknob
Adjust theentireechoandeffect level ofMIC
INPUTs1, 2, 3andMIC,MIC(Rear).
ÞßÔßÒÝÛ
ÔÎ
ÓËÍ×ÝÊÑÔ
ÐÑÉÛÎ ÐÛßÕ×ÒÜ×ÝßÌÑÎ
ÛÏóÍÛÔ ÛÝØÑóÍÛÔ
ñÛÈ×Ì
ÓËÌÛ
Ó×Ýï
Ó×Ýî
Ó×Ýí
ÛÝØÑ ÊÑÔ
Ó×ÝÓßÍÌÛÎÊÑÔ
Ó×Ý×ÒÐËÌ
ïîí
Ы-¸¸»®»º±®é
-»½±²¼-¬±»²¬»®
ÍÛÌÌ×ÒÙ ³±¼»ò
8
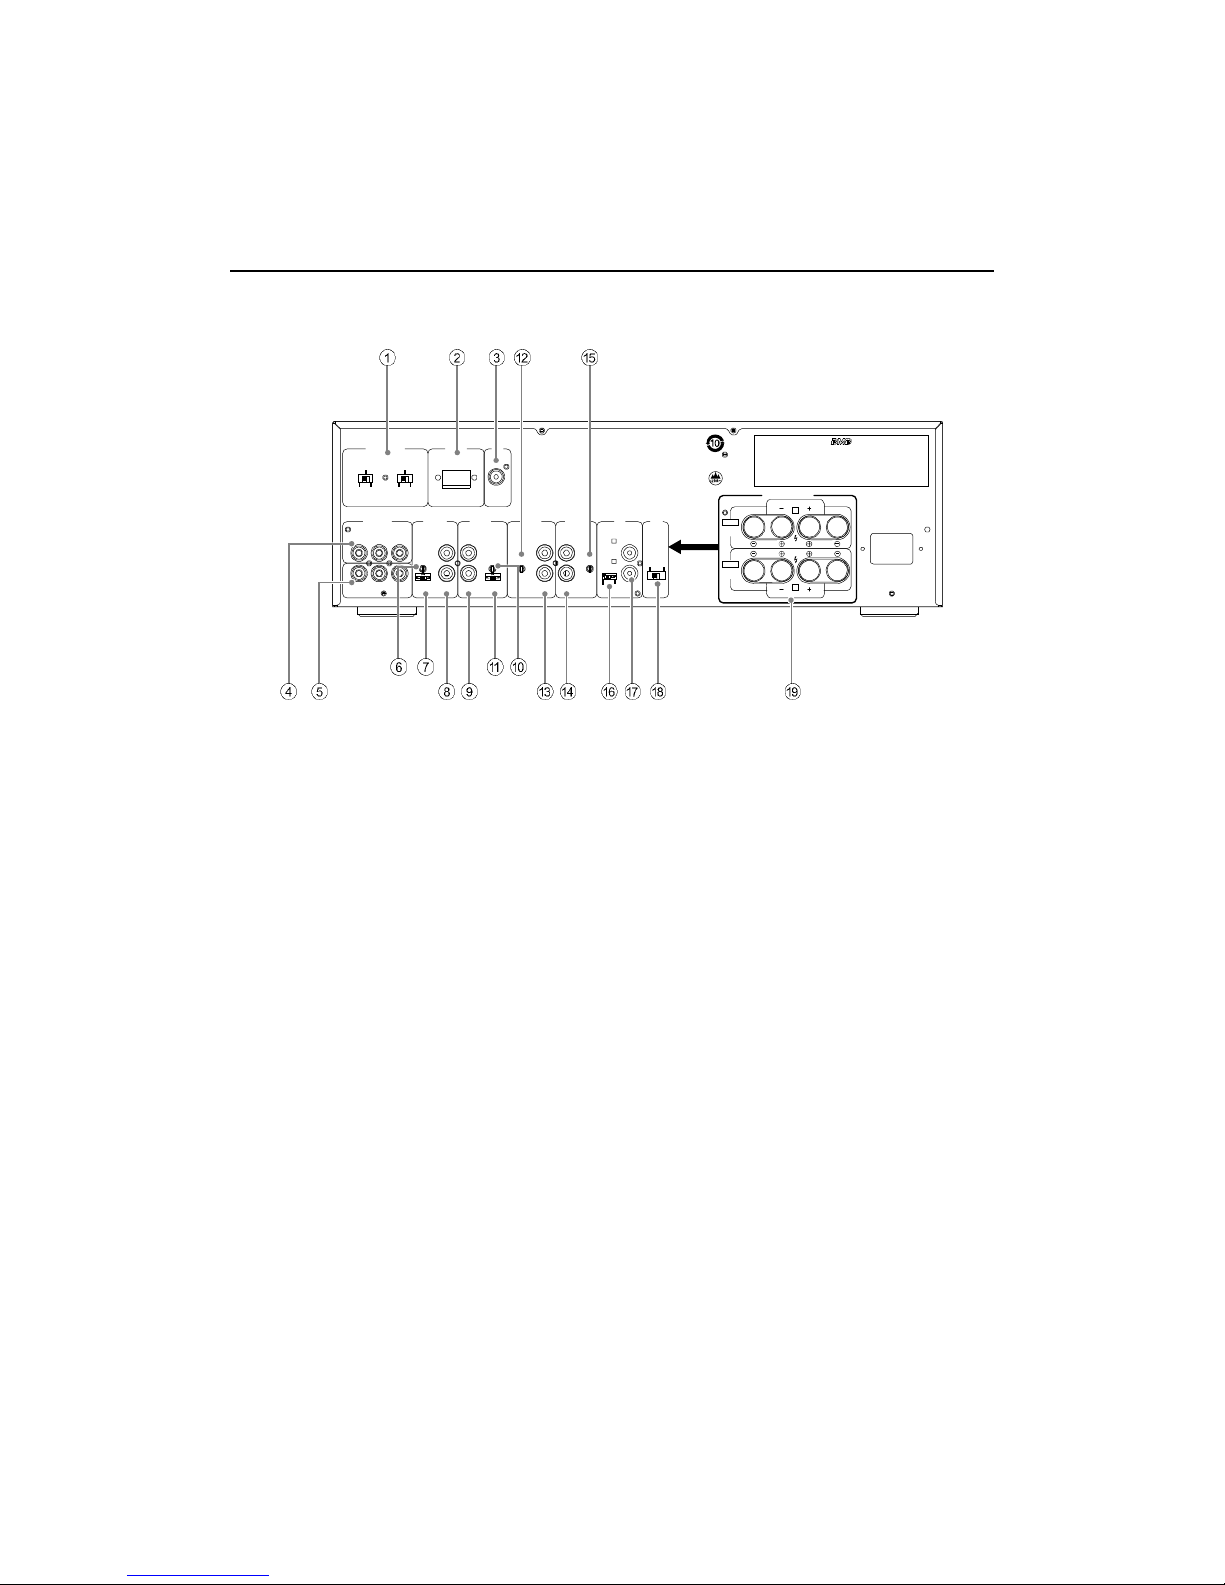
NAMES OFREARPANELCONTROLSANDTHEIR FUNCTIONS
REARPANEL
1AUTOSELECTswitches
KARAOKE
Dependingontheswitchposition, thedetection
modewill beswitchedfromamongthe three
modes,Audio,A&Vor VIDEO.
AUX1
Dependingontheswitchposition, thedetection
modewill beswitchedfromamongthe three
modes,Audio,A&Vor VIDEO.
2RS232Cserial port
Inputcommands for remotecontrol.
3SUB OUTjack
Connect thejackofthe amplifierof sub woofer.
4VIDEOINjacks
KARA: Connect thevideooutputjackofthe
KARAOKEunit here.
AUX1:Connecttheoutput jackofexternalvideo
sourceequipment here.
AUX2:Connecttheoutput jackofexternalvideo
sourceequipment here.
5VIDEOOUTjacks
UptothreeTVmonitorscanbeconnected to
thesevideooutput jacks.
6KARAOKEINPUTLEVELcontrol
Adjust thiscontrol bybalancingwiththelevel of
inputs.
7KARAOKESENSITIVITY switch
Set the sensitivityatwhichKARAOKEaudio
inputlevel isdetectedand switchedautomati-
cally.
L(ow): Settothispositionwhenthefunction
doesnot change toother modeevenif
KARAOKEplayisover.
M(id): Set tothispositioninnormal operating
conditions.
H(igh): Settothispositionwhenfunction
changestoothermode duringKARAOKEplay.
8KARAOKEjacks
Connect theaudiooutput jackof theKARAOKE
unit.
9AUX1jacks
Connecttheaudiooutputjacksofexternal audio
sourceequipment here.
0AUX1INPUTLEVELcontrol
Adjust thiscontrol bybalancingwiththelevel of
inputs.
ÕßÎßÑÕÛ ßËÈï
ßúÊ
ßËÜ×ÑßËÜ×ÑÊ×ÜÛÑ Ê×ÜÛÑ
ßúÊ
ÕßÎßßËÈïßËÈî
Ó×Ò ÓßÈ
×ÒÐËÌ
ÔÛÊÛÔ
ÔÓØ
ÍÛÒÍ×Ì×Ê×ÌÇ
ßËÌÑÍÛÔÛÝÌ
Ê×ÜÛÑ×Ò ÕßÎßÑÕ
Ê×ÜÛÑÑËÌ
Ô
ÎÎ
ÔÔ
ÎÎ
Ô
ßËÈïßËÈî ÐÎÛóÑËÌ Ó×Ý ÍÎÕ
ÍÇÍÌÛÓÍ ÍÐÛßÕÛÎ
ÍÇÍÌÛÓ Í»¬¬·²¹
ÍÐÛßÕÛÎÍÇÍÌÛÓ
Ú®±²¬
ÎÔ
λ¿®
ÍÇÍÌÛÓ
ïëðÉ
ÍÇÍÌÛÓ
ïëðÉ
íððÉ
ÍÐÛßÕÛÎ ×ÓÐÛÜßÒÝÛ
Ú®±²¬ÍÇÍÌÛÓïëðÉæÎßÌÛÜ èÑØÓÍ
λ¿® ÍÇÍÌÛÓïëðÉæ ÎßÌÛÜ èÑØÓÍ
Ú®±²¬ñλ¿®
íððÉ
ÎÍîíîÝ ÍËÞ
ÑËÌ
Ó×Ò ÓßÈ
×ÒÐËÌ
ÔÛÊÛÔ
ÔÓØ
ÍÛÒÍ×Ì×Ê×ÌÇ
Ó×Ò ÓßÈ
×ÒÐËÌ
ÔÛÊÛÔ
ÑËÌÐËÌ
ÔÛÊÛÔ
Ó×Ýß
ÞÓ×Ý
Ô×ÒÛÓ×Ý
ïëðÉíððÉ
Ô
Î
ÎÔ
ÍÇÍÌÛÓíððÉ æÎßÌÛÜèÑØÓÍ

9
aAUX1SENSITIVITYswitch
Set the sensitivityatwhich AUX1audioinput
levelisdetectedandswitchedautomatically.
L(ow): Set tothispositionwhenthefunction
doesnot change toother modeevenifAUX1
playisover.
M(id): Settothispositioninnormal operating
condition.
H(igh): Settothispositionwhenthe function
changestoothermode duringAUX1play.
bAUX2INPUTLEVELcontrol
Adjust thiscontrol bybalancingwiththe level of
inputs.
cAUX2jacks
Connecttheaudiooutputjacksof external audio
sourceequipment here.
dPRE-OUTjacks
Output terminalsforuseinconnectingapower
amplifier.
ePRE-OUTOUTPUTLEVELcontrol
Adjust thiscontrol bybalancingwiththe level of
power amplifier.
fMIC/LINEswitch
Set thisswitchtoMICtoenableMICAandMICB.
Set thisswitchtoLINEtoconnect other
microphonelines.
Note: Please reducethevolumeof MIC
MASTERVOLorpresstheMUTE/EXITkey to
mutebeforesettingtheswitch.
gMIC, MICjacks
Jack AisamixinginputjackwithMICINPUT1
onthefront panel whereasjack Bisamixing
inputjackwithMICINPUT2.
hSPKSYSTEMswitch(OnlyforDAS-300)
300W: Thespeakersystemcanbe drivenat
300WbyFront SYSTEMorRearSYS-
TEMseperately.
150W: Thespeakersystemcanbe drivenat
150WbyFront SYSTEM(L/R), or Rear
SYSTEM(L/R).
Note: DAS-150isnot equipped withthisswitch.
iSPEAKERSYSTEMSconnectors
Connectorstowhichspeakerswithanominal
impedanceof8 .
Pleaseseepage10for moreinformation.

10
SYSTEMCONNECTIONS
DAS-300
DAS-150
1.SPEAKERCONNECTIONS 2.Theconnectionmethod of other jacksissimilar
tothatofDAS-300,butnoSPKSYSTEMswitch.
KARAOKEAUX1
A&V
AUDIOAUDIOVIDEO VIDEO
A&V
KARAAUX1AUX2
MINMAX
INPUT
LEVEL
LMH
SENSITIVITY
AUTO SELECT
VIDEO IN KARAOK
VIDEO OUT
L
RR
LL
RR
L
AUX1AUX2 PRE-OUT MIC SRK
SYSTEMS SPEAKER
SYSTEM Setting
SPEAKERSYSTEM
Front
RL
Rear
SYSTEM
150W
SYSTEM
150W
300W
SPEAKERIMPEDANCE
FrontSYSTEM150W: RATED8OHMS
RearSYSTEM150W:RATED8OHMS
Front/Rear
300W
RS232C SUB
OUT
MINMAX
INPUT
LEVEL
LMH
SENSITIVITY
MINMAX
INPUT
LEVEL
OUTPUT
LEVEL
MICA
BMIC
LINEMIC
150W300W
L
R
RL
SYSTEM300W: RATED8OHMS
1
TV
Karaokeplayer
AUX1
AUX2Subwoofer
MIC
RightLeft
Right
Poweramplifier
Left
RightLeft
2
TV
3
TV
SPEAKERSYSTEM
RightLeft

11
CONNECTIONS
Howtoconnectspeakercords
1.Loosenthe speaker terminals.
2.Insert thestrippedendof thecordfromupside.
3.Tighten thespeaker terminals.
Note: For DAS-300,insert thestripped endofthe
cordfromdownside.
HowtoconnectRCApinplugs
When connectingRCApinplugcords,match the
colors. Connectredcordtoredjack andwhiteto
white.
Cautions:
Seethat wirefrays (stragglyconductors) arenot
sticking outof thespeakerconnectors.If thewire
frayscomeintocontact withother conductors, it
may leadtofailureoftheunit.
Usespeakerswithanominal impedanceof8 .
If speakerswithanimpedancelowerthan8 are
connected, theprotectivecircuit maygointo
operation, defeatingnormalstereoplayback.
When the300Wsettingison, use speakerswith
anominal impedanceof 8 and notethe
connection.
DAS-150
DAS-300
Note: Whenstereospeakers(4CH)areenabled,
pleaseadjust eachvolumetoobtainproper
balance ofeachSYSTEMs, LandR
channels.
Stripabout 15 mmof theouter
coveringfromthe endsof the
cordsbyusing thepliersbefore
makingconnections.
λ¼ λ¼
ɸ·¬»
ɸ·¬»
η¹¸¬
Ô»º¬
150W150W
SYSTEM
SPEAKERSYSTEM
300W
300W
300WMode Setting
SPK
SYSTEM
150W 300W
Settheswitchpositionto !300W"
inthebeginning.
SPEAKERSYSTEM
Front
RL
Rear
SYSTEM
150W
SYSTEM
150W
300W
300W
L
R
RL
150WMode Setting
Settheswitchpositionto !150W"
inthebeginning.
150W
150W
150W
150W
SPK
SYSTEM
150W300W
SPEAKER SYSTEM
Front
RL
Rear
SYSTEM
150W
SYSTEM
150W
300W
300W
L
R
RL

12
BASICOPERATION
1Depressthepowerswitchof thisunit and
otherequipment.
2Connect therequirednumberof micro-
phones.
3Setthe KARAOKE machine totheplay mode,
then settheMUSICVOLknob tothe required
level.
4Turnthe MICVOLknobsandMICMASTER
VOLknobtobalance thelevelwiththatof
musicsource.
Note:
IfthePEAKINDICATORlights,inputlevelistoo
high,then reducetheinput levelby adjusting
MUSICVOL, or MICMASTERVOLknobs.
5Adjusttheecholevel asrequired.
6Adjustthepitchusingthekeycontrol
buttons.
Nowthattherequiredsettingisfinished,youdonot
havetooperatethisunit. All youneedtodoisto
operatethemusicsourceequipment.
Howtousemicrophonesproperlyand
operating precautions
Keep the microphoneapprox. 5to10cmaway
fromyour mouth.
Tomake thevoice soundclearly, leavethe
properspace betweenthe microphoneheadand
holding positiononthe microphone.
Donot coverthelower windscreenof the
microphone. Asthismaymufflethebass sound,
defeatingpropervocal reproduction. It mayalso
causehowling.
Whenyouuse theIRmicrophonesystem,do not
cover orshadetheIRradiationparts(black
plasticwindow) ofmicrophoneatthebottomas
thewirelesssignal isweakened.
Donot usethe microphone towardthespeaker
asit maycausethe feedback(howling).
BALANCE
LR
MUSICVOL
POWER PEAKINDICATOR
EQ-SEL ECHO-SEL
/EXIT
MUTE
MIC1
MIC2
MIC3
ECHO VOL
MICMASTERVOL
MICINPUT
6
135
2
4
(1) Provideaspaceof approx.
5to10cm.
(2) Leavetheproper
space.
13
AUDIO/VIDEO SIGNALDETECTIONMODE
Asfor theKARAOKEandAUX1functions,the
detectionmodewill beswitchedfromamongthe
threemodes(AUDIO, A&VorVIDEO) depending
onthepositionoftheAUTOSELECTswitches on
therearpanel.
Whenthe switchisset to"AUDIO"
Theaudioinputisdetected.
Whenthe switchisset to"VIDEO"
Thevideoinputisdetected.
Whenthe switchisset to"A&V"
Eithertheaudioinputor videoinput isdetected.
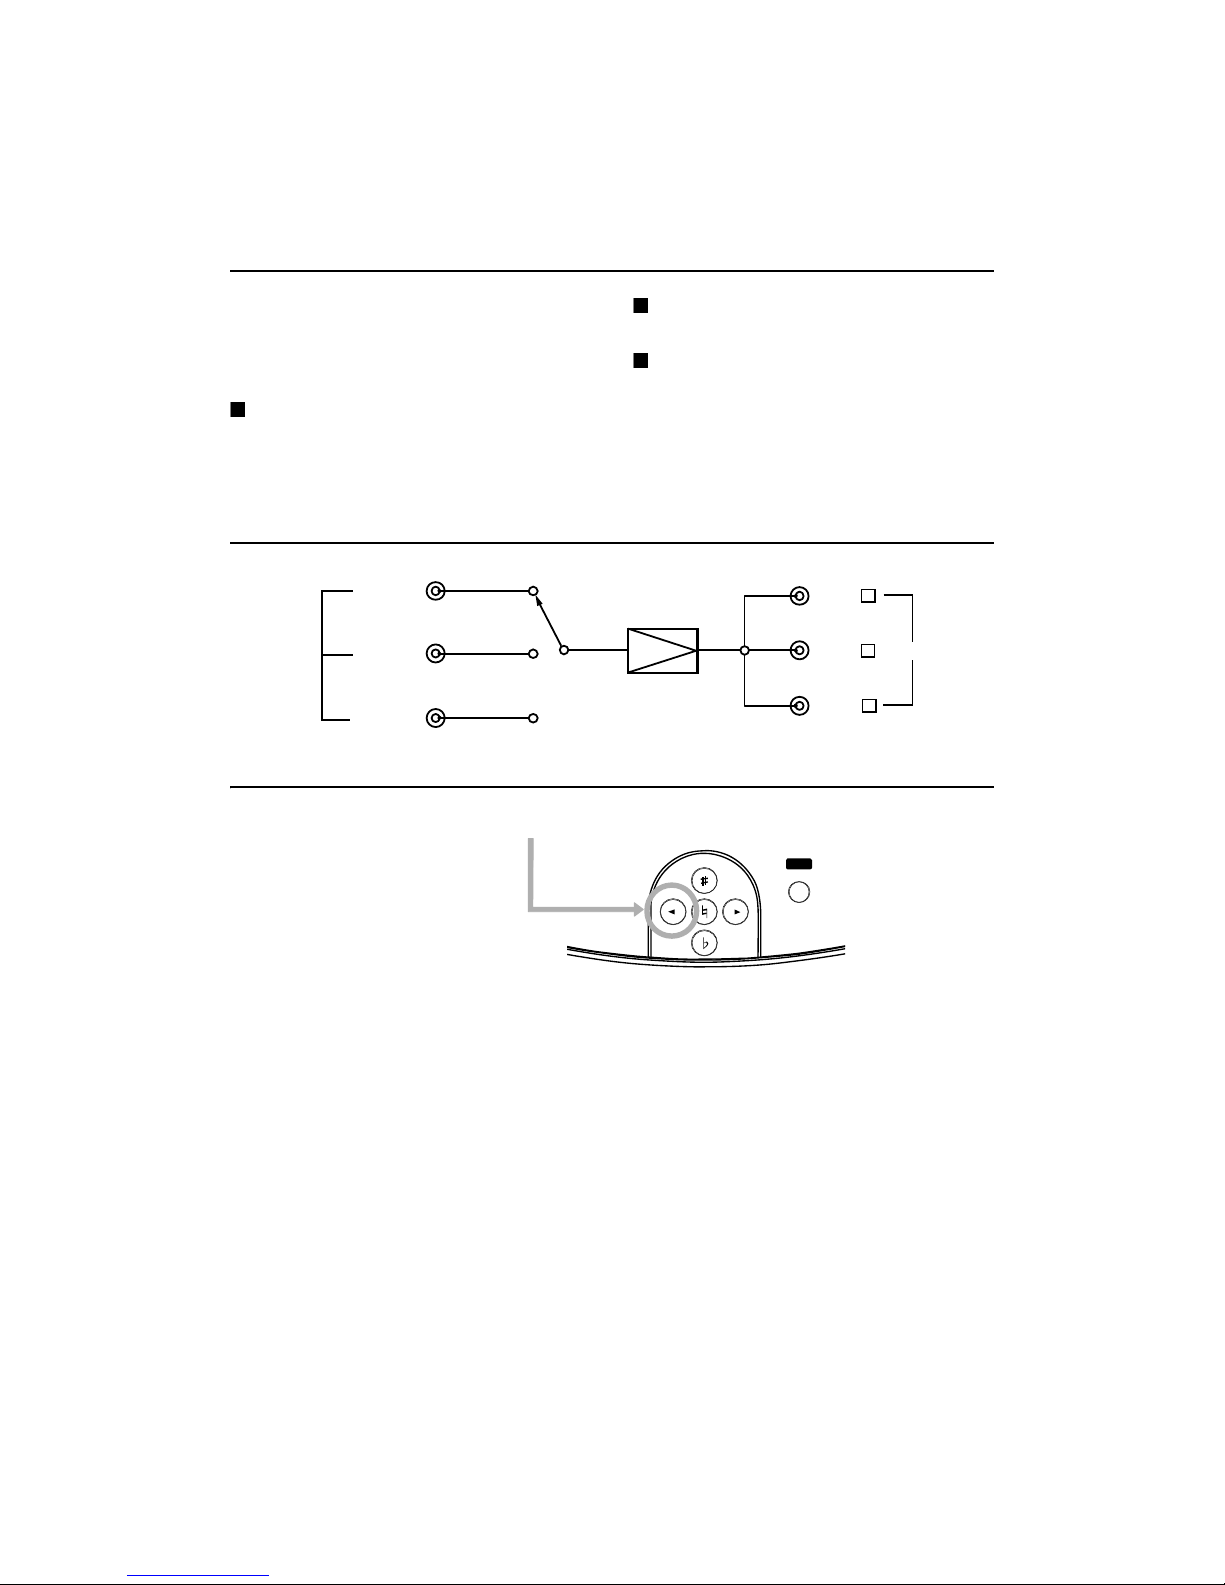
VIDEO SWITCHING
SETTING MODE
Ó±²·¬±®ï
Ó±²·¬±®î
Ó±²·¬±®í
ÕßÎßÑÕÛ
ÕßÎßÑÕÛ
ßËÈï
ßËÈï
ßËÈî
ßËÈî
Ê×ÜÛÑ×Ò Ê×ÜÛÑÑËÌ
ÛÏóÍÛÔ ÛÝØÑóÍÛÔ
ñÛÈ×Ì
ÓËÌÛ
Ы-¸¸»®»º±® •é-»½±²¼-Œ ¬±»²¬»® ÍÛÌÌ×ÒÙ³±¼»ò
д»¿-»±°»®¿¬»¿½½±®¼·²¹¬±
¬¸»¼·-°´¿§ ±º ¬¸»ÔÝÜò

14
TROUBLESHOOTING
TroublePossiblecauseRemedy
Nopowerissupplied tothe
unit.
The powerplugisdisconnectedfrom
the poweroutlet.
Firmlyconnect the powerplugtothe
poweroutlet.
PowerONbut no sound. MusicVolumecontrolorMicVolume
controlmaybeset tominimum.
Adjust forthe propersound level.
The speakercablesaredisconnected. Connect the speakercablesproperly.
Breakinthe speakercables. Repairthebreakinthe cables.
Speakercablesareshort -circuited. Repairtheshort -circuit.
Equipment tobe connected are
disconnected.
Properlyconnect the equipment.
Nosound at beginning of the
musicwhenswitching
function.
Sensitivityswitchissetto"Low". Set the Sensitivityswitchto"high".
Outputlevelofaudiocomponentisset
tominimum.
Adjustitforsuitablelevelif it hasa
levelcontrol.
Nosoundfrommicrophone
(but musicisplayedback).
Microphone switchisset toOFF. Set it toON.
Breakinthe microphone cord. Repairorreplaceit.
The microphone plug isdisconnected. Connectitproperly.
Novideo. VIDEO OUTjacks arenot fully
connected.
Firmlyinsert TVmonitorpluginto
VIDEO OUTjack.
VIDEO INjacks arenotfully
connected.
Firmlyinsert plugsintoVIDEO IN
jacks.
Noaudioisplayedback even
if CD orLDaudiosignalis
input.
AUTO SELECTswitchesareset to
VIDEO.
Set AUTO SELECTswitchesto
AUDIO orA&V.
Playback picturedoesnot
appearevenif CDorLD
signalisinput.
AUTO SELECTswitchesareset to
AUDIO.
Set AUTO SELECTswitchesto
VIDEO orA&V.
Function isswitched toAUX
2whileplaying KARAOKEor
AUX1.
Input sensitivity of KARAOKEorAUX
1islow.
Set SENSITIVITYswichestoH.
Noaudioisplaybackedeven
if KARAOKEorAUX1audio
signalisinput.
AUTO SELECTswichesaresetto
VIDEO.
Set AUTO SELECTswichesto
AUDIO orA&V.
Playback picturedoesnot
appearevenif KARAOKE or
AUX1signalisinput.
AUTO SELECTswichesaresetto
AUDIO.
SetAUTOSELECTswichestoVIDEO
orA&V.
15
AFTER-SALESERVICING
(1)If thisunit isfoundtobedefective,your local
dealer will repair orreplace defective partswith
chargeat yourrequest.
(2)Beforeyourequest therepairtoyour local
dealer,seethe"TROUBLESHOOTING"section
and check it again.
Fordealer:
If youarerequestedtheafter-saleservicefrom
yourcustomer,checkthefollowingcontentsfirst.
Confirmingthe detailsof theaccident.
Checkingout all cables andconnections.
Clean thelensor the discofwhichconnected
equipment.
Cautionofoperationandinstructionforusingthe
systemtoyourcustomer.
MANNERSFORCUSTOMERS
Karaoke,thoughenjoyable,couldbenoisyat
timesunlesspropertimeandplacearechosen.
Pleasebesufficientlythoughtful of your
neighbors.
Karaokevolumecouldbehigh if youare
engrossedinsinging.Evenasmall soundcanbe
penetratingespeciallyat quietnight.Therefore,
pleasegivespecialattentiontoaudiolevel
especiallyat night. Asnosoundleakstoyour
neighbors,it isadvisabletoclosethewindows
and observeproper mannerstomaintain
pleasant livingenvironment.
COPYRIGHT
Broadcasting, musicsourcesuchasrecorded
musictape, DVD, videotape, CDandsoonare
strictlyprotectedunder copyrightlaw.
Youneedtohavepermissionfromthecopyright
holder touse,distribute,rent thesemusic
sources forcommercial use, or sell dubbed
mediatootherpeopleexcept whenenjoying
thesesourcesbyyourself.
ABOUTTHEPRODUCT
Thisunit isproducedby harmlessmaterialsin
conformitywithrelevantproduct safetylaws.

16
SPECIFICATIONS
DAS-300/DAS-150KARAOKEAMPLIFIER
DAS-300DAS-150
Audiooutput power 150W+150W+150W+150W(4ch) 150W+150W
300W+300W(2ch)
Speakerimpedance Rated 8
Input impedance
MIC1-MIC33.3k
MICA/MICB3.3k
AudioInput (KARAOKE,AUX1,AUX2) 4.7k (middleposition)
Video Input(KARAOKE,AUX1,AUX2)75
Output impedance
Pre-Out1k
Sub-Out1k
Video Output75
Nominalinput level
MIC1-MIC310mV
MICA/MICB 10mV(Gainsetting: MIC)
1Vpp(Gainsetting: LINE)
AudioInput (KARAOKE,AUX1,AUX2)1Vpp
Video Input(KARAOKE,AUX1,AUX2)1Vpp
Nominaloutput level Pre-Out1Vpp
Sub-Out1Vpp
Video format NTSC,PAL
Connectors
SpeakerTerminal(Black&Red)42
Front panelMICinput3
RearpanelMIC input2
KARAOKEAudioinput Jack(L&R)1
AUX1Audioinput Jack(L&R)1
AUX2Audioinput Jack(L&R)1
VIDEOINPUTJACK3
VIDEOOUTPUTJACK3
PRE-Out audiooutput jack(L&R)1
SUB-Out audiooutputjack1
Remotecontrolport (RS232)1
Display4.3inchTFTLCD display
Dimensions
420(W)×135(H)×335(D)
GrossWeight14kg12kg
Net Weight12.5kg10.5kg
Powersupply100:AC110-120V, 200:AC220-240V50/60Hz
Powerconsumption650W350W
ÞßÔßÒÝÛ
ÔÎ
ÓËÍ×ÝÊÑÔ
ÐÑÉÛÎ ÐÛßÕ×ÒÜ×ÝßÌÑÎ
ÛÏóÍÛÔ ÛÝØÑóÍÛÔ
ñÛÈ×Ì
ÓËÌÛ
Ó×Ýï
Ó×Ýî
Ó×Ýí
ÛÝØÑÊÑÔ
Ó×ÝÓßÍÌÛÎÊÑÔ
ÕßÎßÑÕÛßñÊ
ßÓÐÔ×Ú×ÛÎ
Ó×Ý×ÒÐËÌ
ïîí
íðê³³
ïíë³³ íïð³³
íîç³³
îçï³³
ïîè³³
ìîð³³

17
Ú±®Õ±®»¿
̸·-°®±¼«½¬ ½±³°´·»-©·¬¸¬¸» ®»¯«·®»³»²¬-±º ÛÓÝÜ·®»½¬·ª»îððìñïðèñÛÝò
Ú±®ÛËݱ«²¬®·»-
̸·-Ý´¿-- ß¼·¹·¬¿´¿°°¿®¿¬«-³»»¬-¿´´®»¯«·®»³»²¬-±º ¬¸»Ý¿²¿¼·¿²×²¬»®º»®»²½»óÝ¿«-·²¹Û¯«·°³»²¬Î»¹«´¿¬·±²-ò
Ý»¬ ¿°°¿®»·´²«³7®·¯«»¼»´¿½´¿--»ß®»-°»½¬»¬±«¬»-´»-»¨·¹»²½»-¼«Î8¹´»³»²¬ -«®´»³¿¬7®·»´¾®±«·´´»«®¼«Ý¿²¿¼¿ò
ÒÑÌ×ÝÛ
ßÊ×Í
Ú±®¬¸»ËÍß
ÚÛÜÛÎßÔÝÑÓÓËÒ×ÝßÌ×ÑÒÍÝÑÓÓ×ÍÍ×ÑÒ
ÎßÜ×ÑÚÎÛÏËÛÒÝÇ×ÒÌÛÎÚÛÎÛÒÝÛÍÌßÌÛÓÛÒÌ
̸·-¼»ª·½»½±³°´·»-©·¬¸Ð¿®¬ïë ±º ¬¸» ÚÝÝΫ´»-ò Ñ°»®¿¬·±²·--«¾¶»½¬¬±¬¸»º±´´±©·²¹¬©±½±²¼·¬·±²-æ
øï÷¬¸·-¼»ª·½»³¿§²±¬ ½¿«-»¸¿®³º«´·²¬»®º»®»²½»ô¿²¼
øî÷¬¸·-¼»ª·½»³«-¬ ¿½½»°¬ ¿²§·²¬»®º»®»²½»®»½»·ª»¼ô ·²½´«¼·²¹ ·²¬»®º»®»²½»¬¸¿¬ ³¿§½¿«-»«²¼»-·®»¼±°»®¿¬·±²ò
Ú±®Ý¿²¿¼¿
ÉßÎÒ×ÒÙ
̸·-°®±¼«½¬ ½±²¬¿·²-½¸»³·½¿´-µ²±©²¬±½¿«-»½¿²½»®ô ¾·®¬¸¼»º»½¬-¿²¼ ±¬¸»®®»°®±¼«½¬·ª»¸¿®³ô ·²½´«¼·²¹ ´»¿¼ò
Ú±®Ýòßò ËÍ øЮ±°±-·¬·±² êë÷
Ú±®¬¸»ËÍß
ÜÛÝÔßÎßÌ×ÑÒ ÑÚÝÑÒÚÑÎÓ×ÌÇ
ݱ³°´·¿²½» ײº±®³¿¬·±² ͬ¿¬»³»²¬
Ó±¼»´Ò¿³»æ
̧°»±º Û¯«·°³»²¬ æ
λ-°±²-·¾´»Ð¿®¬§æ
ß¼¼®»-- æ
Ì»´»°¸±²»æ
ÜßÍóíðð ñ ÜßÍóïëð
ÕßÎßÑÕÛ ßÓÐÔ×Ú×ÛÎ
ßÝÛÕßÎßÑÕÛÝÑÎÐò
ïêï Íò 謸ߪ»òô Ý·¬§±º ײ¼«-¬®§ô Ýßçïéìêô ËÍß
õïóêîêóêððóëíêê
̸·-»¯«·°³»²¬ ¸¿-¾»»²¬»-¬»¼¿²¼º±«²¼¬±½±³°´§©·¬¸¬¸» ´·³·¬-º±®¿Ý´¿-- ß¼·¹·¬¿´¼»ª·½»ô °«®-«¿²¬¬±°¿®¬ ï뱺¬¸»
ÚÝÝΫ´»-ò̸»-»´·³·¬-¿®»¼»-·¹²»¼¬±°®±ª·¼» ®»¿-±²¿¾´»°®±¬»½¬·±²¿¹¿·²-¬¸¿®³º«´·²¬»®º»®»²½»©¸»²¬¸»»¯«·°³»²¬·-
±°»®¿¬»¼ ·²¿½±³³»®½·¿´»²ª·®±²³»²¬ò ̸·-»¯«·°³»²¬ ¹»²»®¿¬»-ô«-»-ô ¿²¼½¿² ®¿¼·¿¬»®¿¼·±º®»¯«»²½§»²»®¹§¿²¼ô ·º ²±¬
·²-¬¿´´»¼ ¿²¼«-»¼·²¿½½±®¼¿²½»©·¬¸¬¸»·²-¬®«½¬·±²³¿²«¿´ô ³¿§½¿«-»¸¿®³º«´·²¬»®º»®»²½»¬±®¿¼·±½±³³«²·½¿¬·±²-ò
Ñ°»®¿¬·±²±º ¬¸·-»¯«·°³»²¬ ·²¿®»-·¼»²¬·¿´¿®»¿·-´·µ»´§¬±½¿«-»¸¿®³º«´·²¬»®º»®»²½»·²©¸·½¸½¿-»¬¸»«-»®©·´´ ¾» ®»¯«·®»¼
¬±½±®®»½¬ ¬¸»·²¬»®º»®»²½»¿¬¸·-±©²»¨°»²-»ò

ÞÓÞײ¬»®²¿¬·±²¿´Ý±®°ò
¸¬¬°æññ©©©ò¾³¾ò½±³
18
This manual suits for next models
1
Other BMB Amplifier manuals

II User manual")


