Boavision HD22M102M User manual
User Guide
Wireless Pan/Tilt Home Security
HD22M102M
(V2.3)

Contents
Declaration
Introduction
Product Detail
Insert Micro SD Card
Set Up Your Camera
Add Camera
Format Micro SD Card
Wall Mount
Intelligent Tracking
Motion Detection and Push Alert Message
Actions When Detect a Motion
Playback and Download Videos From Micro SD Card
Device Information
How to Use Two-way Talk Function
IR LED Night Vision and Floodlight
Share The Camera With Your Family
Camera Works On Other Devices
ONVIF & RTSP
How to Reset The Camera
Connect to Blue iris
Connect to Synology
Connect to QNAP
Connect to iSpy
Warranty & Support
Trouble Shooting
1
2
3
4
5
6
9
10
11
12
13
15
18
19
20
21
22
23
24
28
30
21
21
22
31

Declaration
Copyright 2021 Boavision Technology Co.,Ltd All Rights Reserved.
Without written permission, please do dot Imitate, Reproduce, or translate part or all of the contents of this manual, and cannot be
used for commercial dissemination in any form.
This guide provides a brief introduction to the Pan/Tilt home security Wi-Fi Camera and the CamHipro app, as well as regulatory
information.Please note that The Product Specifications, Appearance Pictures And Related Information Mentioned In This Manual
Are For Reference Only and may not reflect your actual Boavision Camera experience.
C
Conventions
In this guide, the following convention is used:
Blue
Hyperlinks are in teal and underlined. You can click to redirect to a website.
Ignoring this type of note might result in a malfunction or damage to the device.
Note
:
Convention
Key information appears in teal, including management page text such as menus,
items, buttons and so on.
Description
Underline
1

Introduction
When you are away home, there are always something you care about. This is where the smart camera functions. No matter your
child is climbing the kitchen cabinet, or the pet is stealing snacks, the Pan/Tilt Home Security Wi-Fi Camera helps you stay with
them anytime, anywhere. Receive a notification whenever your camera detects motion and see a video clip of this motion to check
everything.
• Smooth Pan and Tilt – 355° horizontal range and 90° vertical range.
• 1080p High -Definition – Capture every detail in crystal-clear Full HD definition.
• Advanced Night View – Even at night, the camera can provide a visual distance of up to 100 ft.
• Live View – Always stay with that matters most to you from anywhere, anytime.
• Two-Way Audio – Communicate with others with the built-in microphone and speaker.
• Sound and Light Alarm – Trigger light and sound effects to frighten away unwanted visitors.
• Privacy Mode - Shut down the surveillance to protect your privacy.
• Sharing - Share the memorable moments with your family and friends.
• Safe Storage – Store up to 128 GB on a micro SD card.
*The micro SD card is not included in the package.
.
2

Product Detail
Microphone
Night Vision Switch Sensor
Night Vision IR Led
Lens
Floodlight
Reset
(Optional)
Lan Port
Long press the reset button for 20
seconds to factory default
Note
:
Power port
3
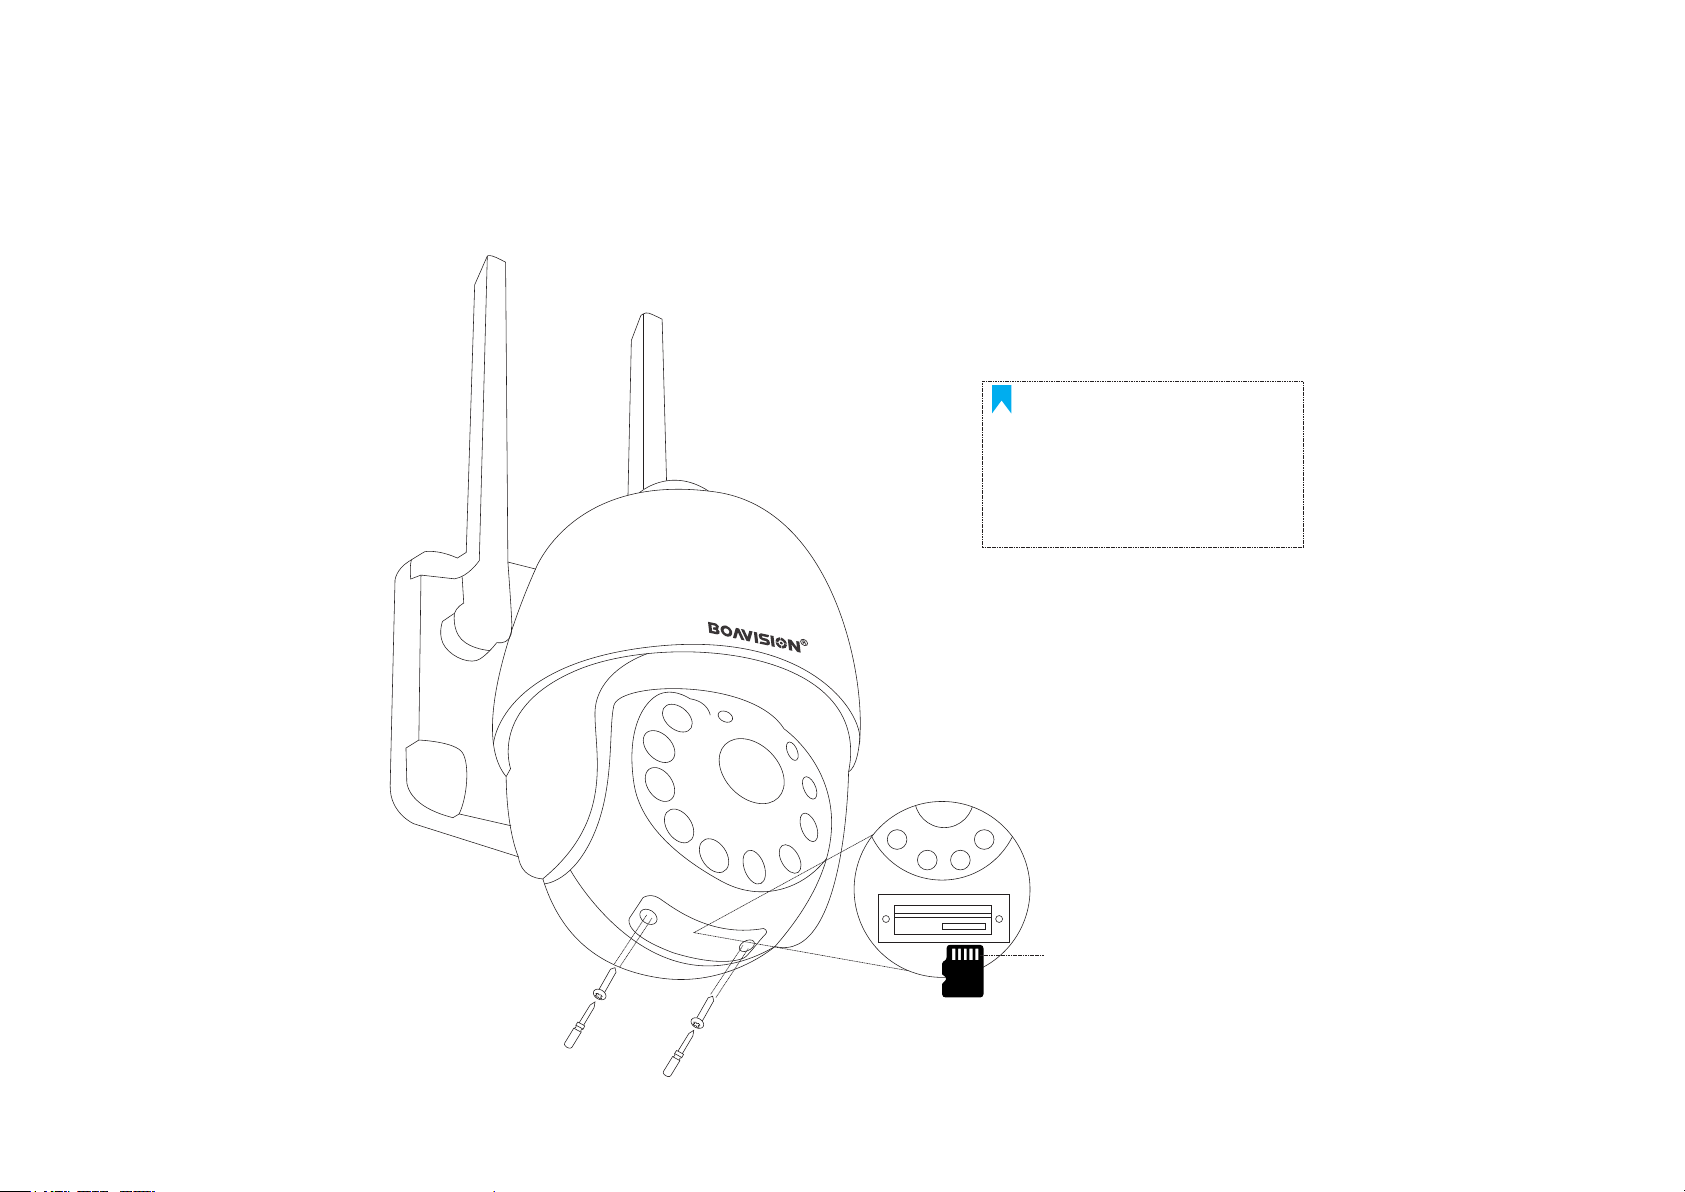
Micro SD Card Slot
Wifi Antenna
4
Insert Micro SD Card
Undo Screws and insert the micro SD card
Golden Face Up
Note
:
Please power off the
camera when you insert
the micro SD card.
Open the bottom micro SD Card slot cover with a small screw driver
Insert a micro SD card (Support Class 10, 8Gb~128Gb, micro SD Card Not Included ,Sold Separate)

Set Up Your Camera
For Android Phones, Please Select "Agree" To The Tips Pop-Up:
1. Allow Camhipro To Access Mobile Cellular Data And Wireless Lan, Otherwise It Can not Add Camera.
2. Allow Camhipro To Receive Pushed Messages, Otherwise The Phone Will Not Receive an Alarm Push Message.
3. Allow Camhipro To Use The Microphone When You Want To Use 2 Way Audio Function.
Note
:
CamHipro
Download The "Camhipro" App From The
Apple App Store Or From The Google
Play Store.
Please use Supplied Power Adapter
Please Make Sure Your Router Is Working Properly,And The Wifi Signal
Is 2.4Ghz,Camera Only Support 2.4Ghz Wifi, Not 5Ghz. If Your 2.4Ghz Wifi And
5Ghz Wifi Are Same Ssid, You Need To Separate The Ssid, By Login To Your Wifi
Router.
5
Please Keep Your Phone and Camera
Close to WiFi Router
Note
:
Note
:
Note
:
Don't use extension cable from other
brand between camera and adapter,or
will cause malfunction and damage.
Add Camera
Please follow the steps below to find the hotspot AP of the camera and connect to it, set up the camera's WiFi, and let it connect to the WiFi router in your home wirelessly.
6
Step1: Download the mobile app (CamHiPro)
Search "Camhipro" in App Store /Google Play Store or Visit www.boavision.com
Step2:Connect AP Wifi "IPCAM-XXXXX"
Turn On The Mobile Wlan And Connect the Hotspot Wifi "IPCAM-XXXXX" ,Default Password "01234567"
Wi-Fi
Jimmyoffice
Enter the password for ”IPCAM-257445"
Enter password
Cancel Join
Settings
WLAN
IPCAM-257445
Jimmyoffice
Wi-Fi
Settings
You can also access this WLAN network by bringing your
iPhone near any iPhone,iPad,or Mac which has connected to
this network and has you in their contacts
MY NETWORKS
OTHER NETWORKS
360WIFI-3E0075
GSWIFI
MERCURY-49F8
unitopteksky
UTKGuest-4C4E
Other...
APPS Using WLAN & Cellular
Enable WAPI
Ask to Join Networks
Known networks will be joined automatically. If no known
networts are acailable,you will be notified of available
netwrks.
TP-CS
Note:
Hot Spot Wifi: IPCAM-XXXXXX
Default password: 01234567
01234567Password
IPCAM-257445
1 2 3

7
Add Camera
Cancel
Device not connected to the network after first use or
factory reset
New device
Add device AP equipment
Back
Yes,I want to add this devic e->
Current networt: IPCAM-257445
To add another new decice,first disconnect you phone from this hotspot
AAEE-257445-BBDDC
Yes,I want to add this device
Device information
Camera
UID: AAEE-257445-FFDDB
admin
username:
password: admin
FILL IN YOUR DEVICE INFORMATION
Add device
Cancel
Battery wireless camera
4G camera
Add a sharing device
Device in use
IP camera
Add to
Note:
Camera UID: XXXX-XXXX-XXXX
Default usename: admin
Password: admin
Step3:Add New Device in App
Open The Camhipro App, Select --->“+”---> “IP camera”--->“New device”--->You will see a new device UID
name as “xxxxx-xxxx-xxxx "--->Click "Yes,I want to add this device”--->"Add to"
CamHipro
4 5 6 7 8
9
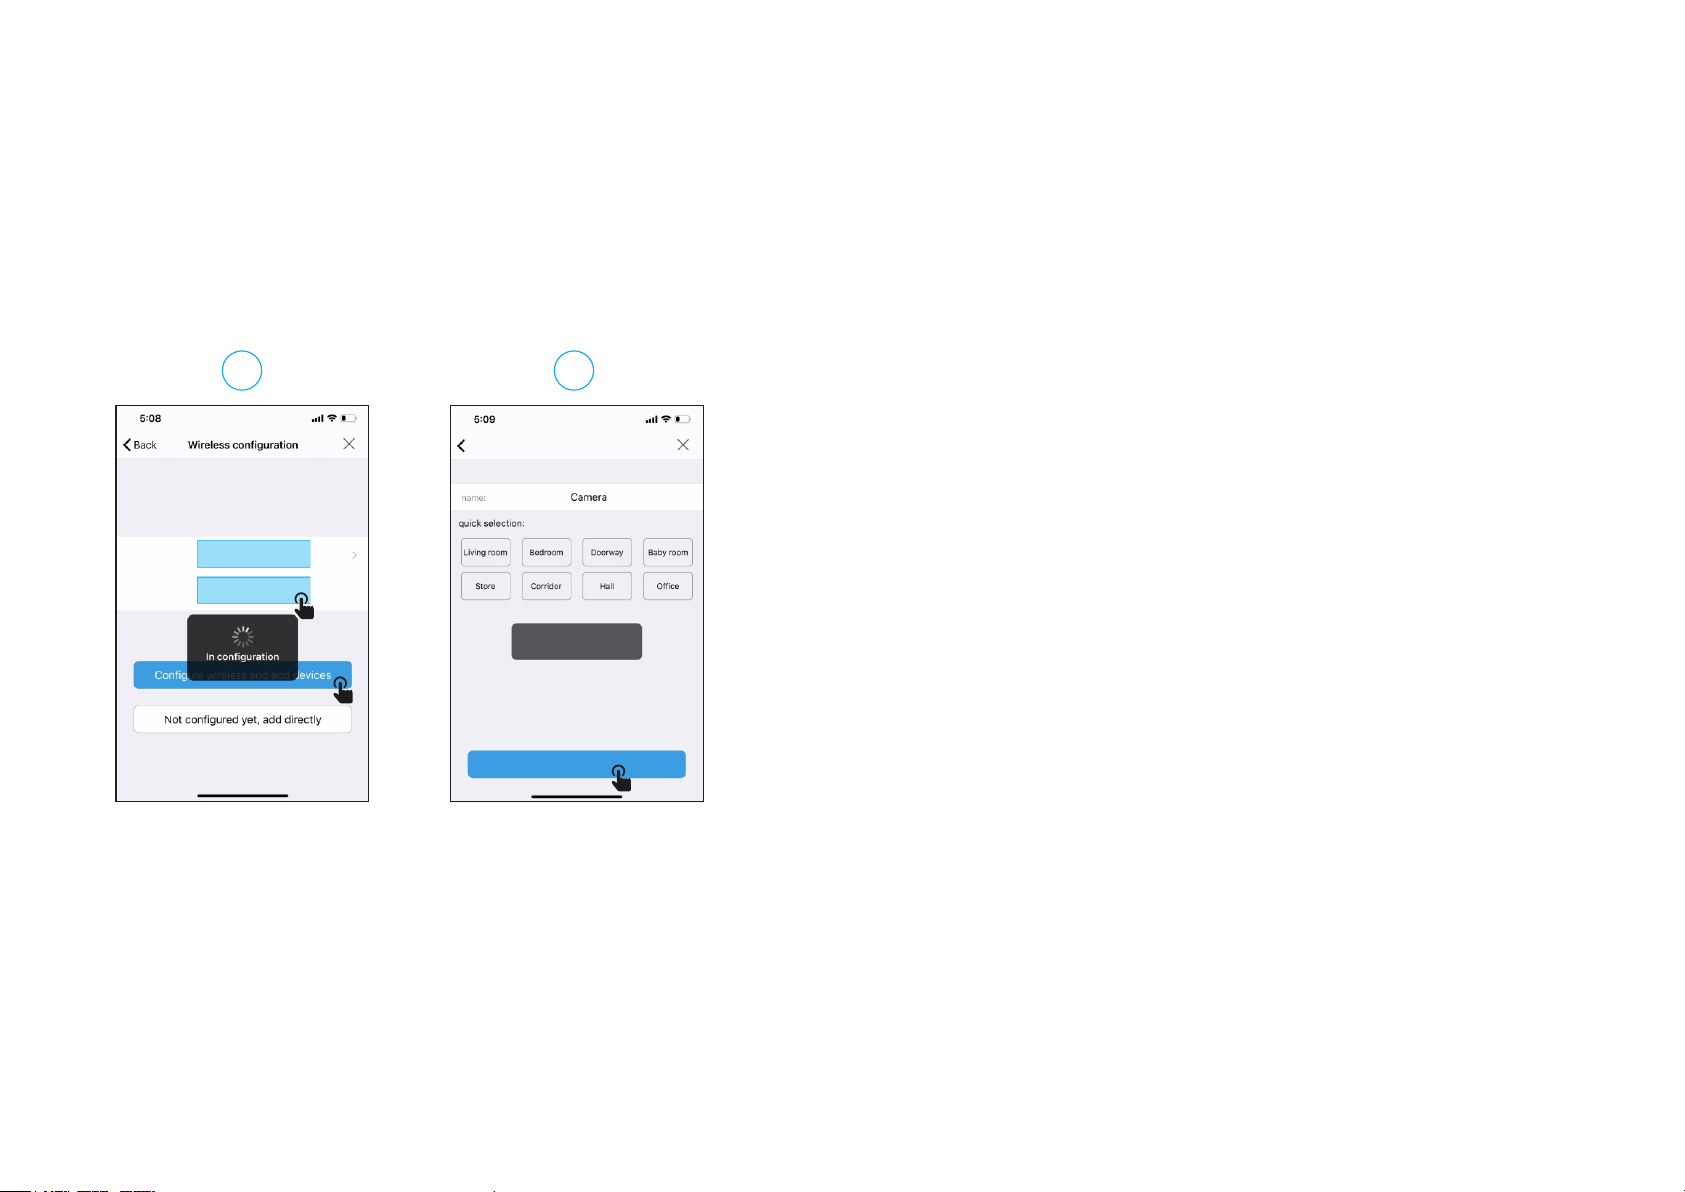
Step4:Configure the WiFi connection
Select your home Internet WiFi and enter your WiFi password,Click"Configure wireless and add device" to finish
the setting.(You will hear a tone from camera once it connected to your WiFi network.)
Tips:
1.the camera will be sending One Big voice out when connected successfully.
2.if not success, the camera gives you 4 small tones, that will be WIFI Password error.
Name setting
Back
Wireless
name:
THE DEVICE HAS BEEN ADDED SUCCESSFULLY!GIVE IT
A NAME
PLEASE CHOOSE THE WIRELESS NETWORK
CONFIGURATION YOU USE FREQUENTLYT TO MAKE IT
EASIER FOR YOU TO USE TO USE THE DEVICE ON A DAILY BASIS
Current deviceUID: AAEE-257445-FFDDB
Added successfully
Confirm
Password:
Jimmyoffice
Un66668888
10 11
9
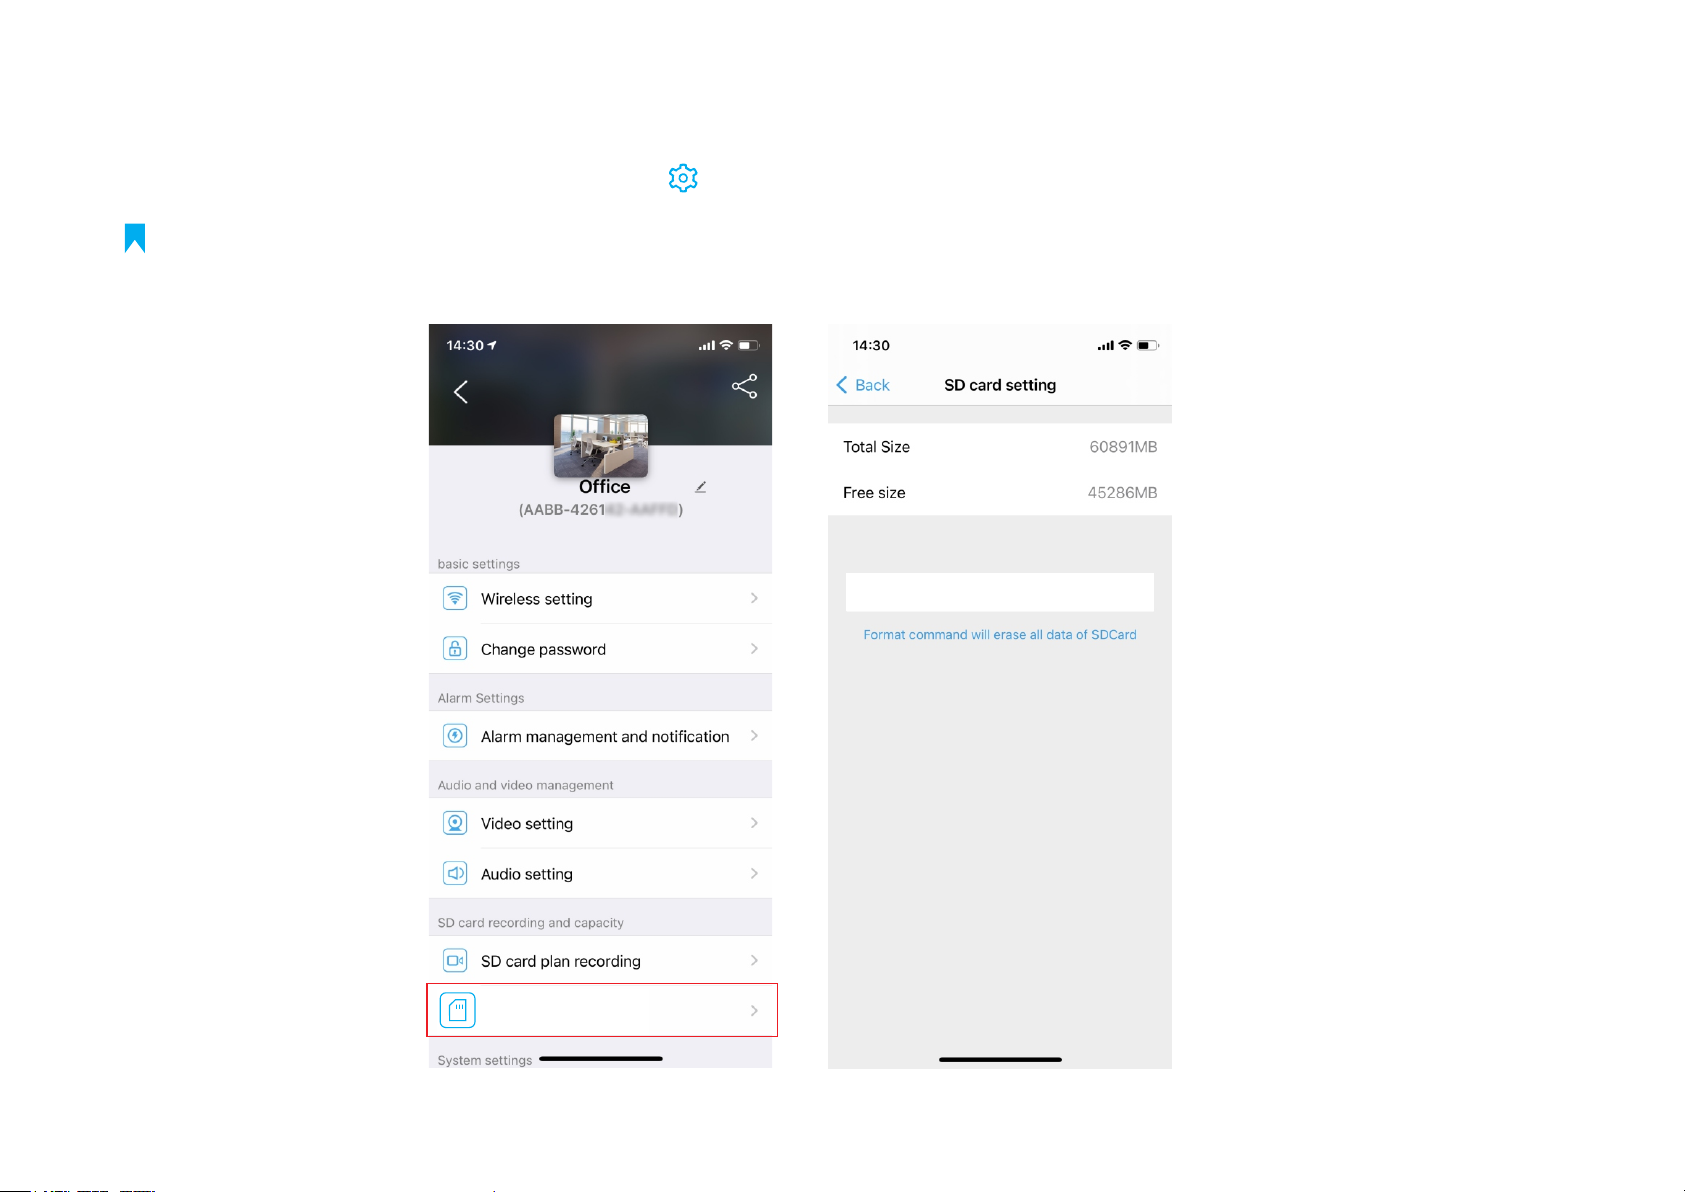
Format Micro SD Card
Format SD Card
SD card setting
Note
:
Open Camhipro app, Tap on the Gear Wheel Icon” “ --> SD card setting --> format SD card.
The camera will start loop recording once installed micro sd card, 10min per video,the latest video will
cover the oldest video.

Wall
Drilling Location Mark
Anchors
Screws
10
Wall Mount
Paste the drilling location mark on the wall, then drill the hole according to the mark and Insert the anchors, pass the screw
through the back of the bracket, and fix the top of the bracket on the wall.
1. Mark Position
Place the mounting template where you
want the camera.For wall mounting, drill
four holes through four circles.
2. Mount Camera
Affix the camera base using the screws. For wall mounting, insert four
anchors into the holes and use the screws to affix the camera base over
the anchors.
Note
:
After installation, please properly insert the rubber plug to Lan
Port and Enclose the reset button cover.

11
Intelligent Tracking
1. Slide the menu to 3
2. Click the icon “ ”
3. Tap on Intelligent tracking
123

12
Motion Detection and Push Alert Message
1. If you want the camera also detects a sound, please turn on “Audible alarm”.
2. If you only want the camera detect motion at night or any special time, you can go to “Advanced Setting” to set up
the time range.
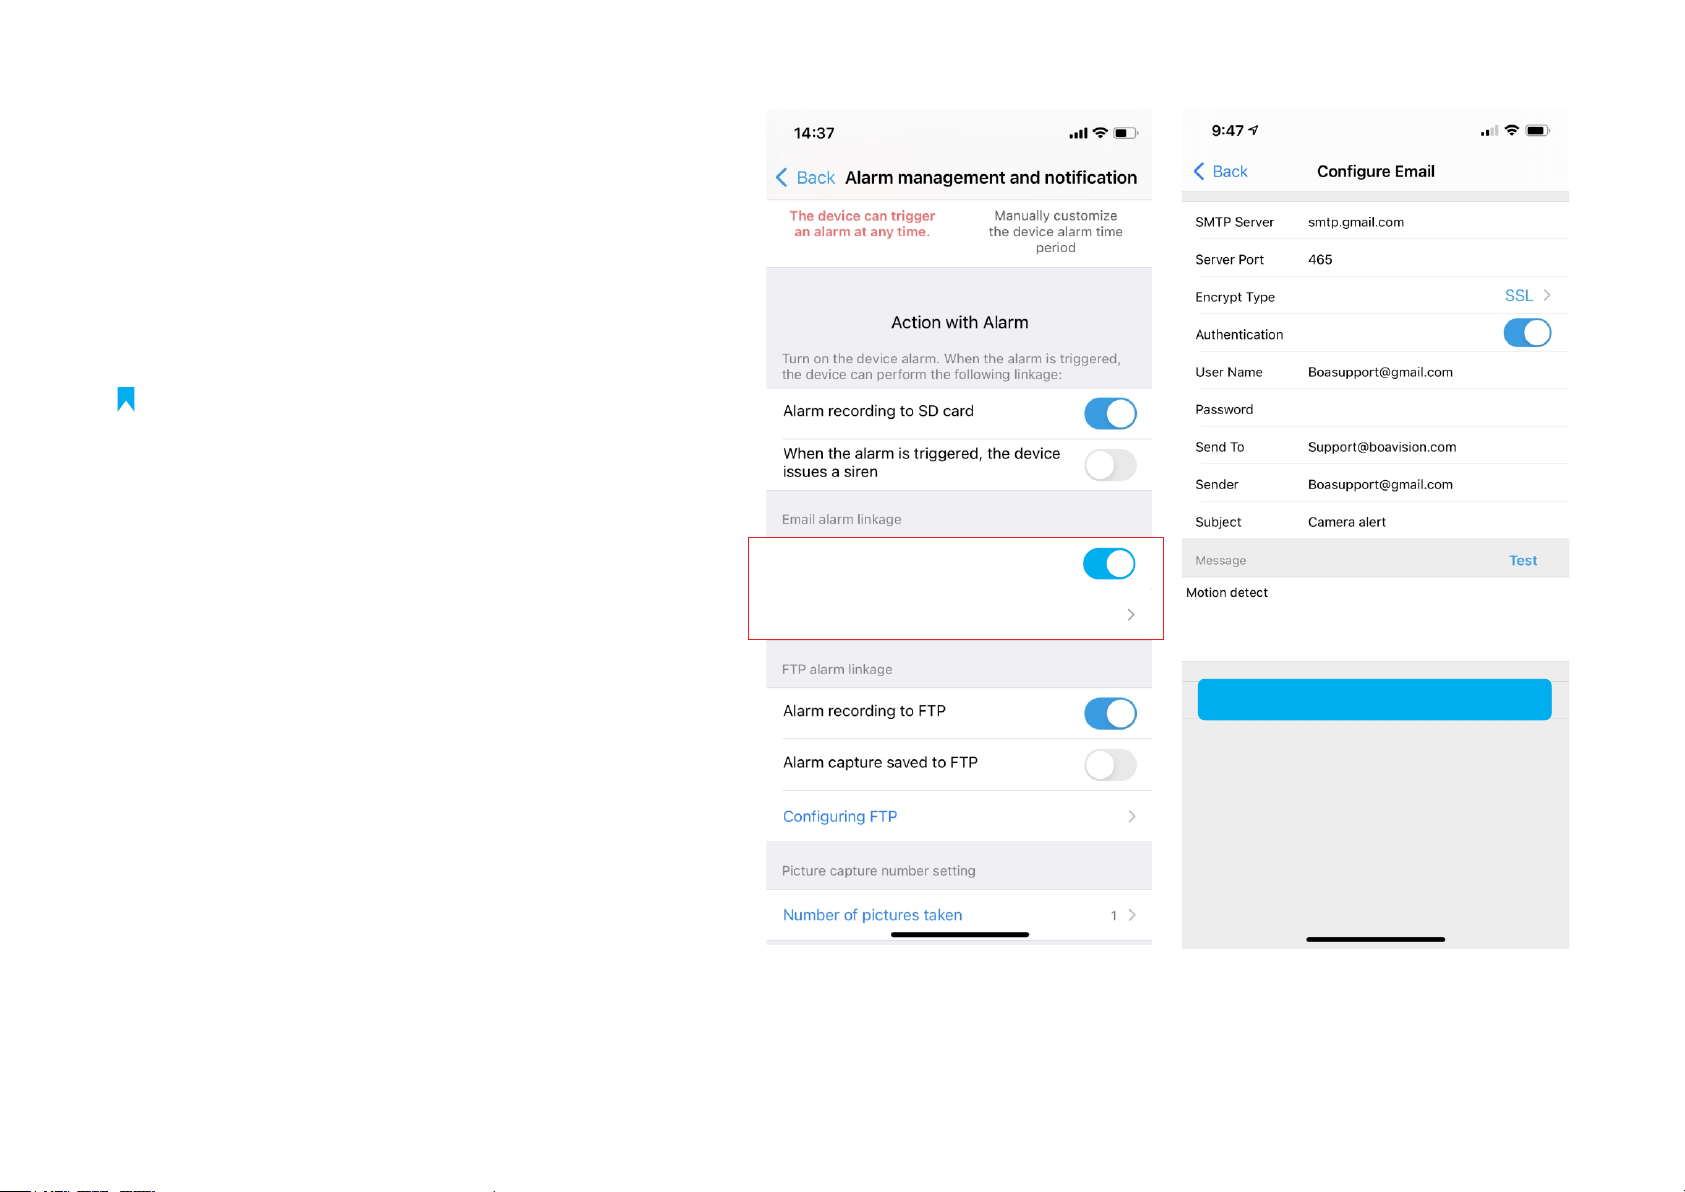
Alarm management and notification
Receive alarm push
Motion detection alarm
Trigger an alarm when the device screen
detects a moving object
CAMHIPRO
Camera
Motion Alarm AABB-42xx42-xxxxx
now
Open Camhipro app, Tap on the Gear Wheel Icon” “
--> Alarm management and notification-->Turn on both “Receive alarm push” and “Motion detection alarm”.
Note
:

13
Actions When Detect a Motion
Save Motion Videos to micro SD Card
If you have inserted a micro SD card to camera, you
will be able to turn on the switch “Alarm recording to
SD card” (can not turn on if no sd card).
Sound Warning
If you want the camera warning with a sound when detect
the motion, please turn on “When the alarm is triggered,
the device issues a siren”.
Alarm recording to SD card
When the alarm is triggered,the
device issues a siren
14
Email Alert (Gmail setting reference)
1. If you want camera send an Email Alert with
picture, you can turn on “Alarm Capture sent
to Email”, and configure Email, see below photos
for your reference.
2. Tap “Apply” before Test
Please turn on Gmail 2-factor Authentication
1. If your gmail has not turned on 2-factor
authentication
a. Login gmail account and go to Google apps -->
Account -->Security page.
b. Scroll the page down to Less secure app acess
and click to turn it on (only personal gmail
account has this option)
2. If you gmail has turned on 2-factor authentication
a. Please login gmail account and go to Google
apps-->Account-->Security page, find 2-step
verification and turn on.
b. Setup an APP password, select windows mail type,
and use this unique password instead your original
gmail password in email alert settinge page.
Alarm capture sent to Email
Configure Email
Apply
Note
:........
15
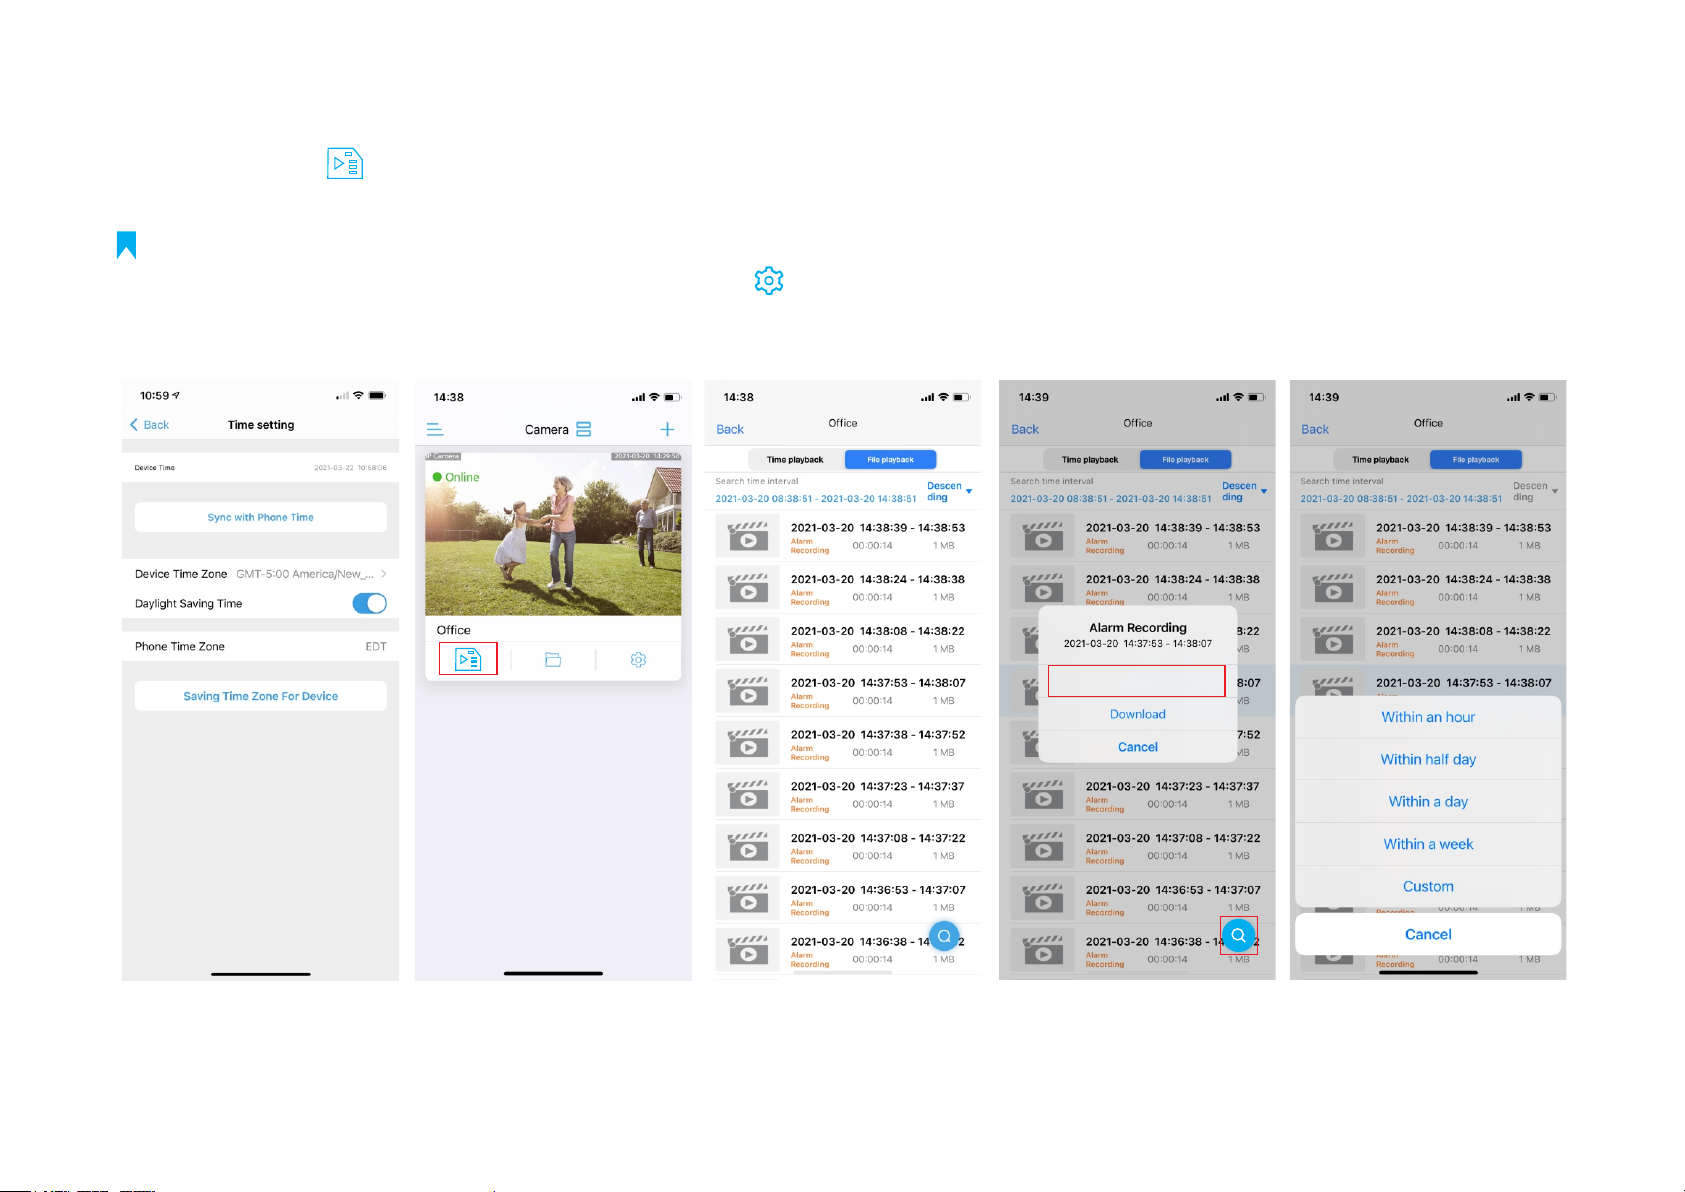
Playback and Download Videos From Micro SD Card
Please tap the icon to check videos saved in micro SD card, select and tap a video to play, if you wan t to find older videos,
tap the right down Search icon to select the date.
AABB-4XXXXX-XXXXX
AABB-4XXXXX-XXXXX
Play
AABB-4XXXXX-XXXXX AABB-4XXXXX-XXXXX
Note
:Select your Time Zone, and enable Daylight Saving Time, then Click Saving Time Zone for Device,
Open Camhipro app, Tap on the Gear Wheel Icon” “
--> Time Setting --> Enable Daylight Saving Time --> Saving Time Zone for Device.

16
If you want to upload pictures and videos to FTP server, please turn on “Alarm recording to FTP” and “Alarm Capture saved to FTP”,
and configure FTP, Tap “Apply” before test.
Alarm recording to FTP
Alarm capture saved to FTP
Configuring FTP
Apply
········
This IP address is the example for setup
192.168.1.xxx
Upload Pictures and Videos to FTP Server

Download Video
Select the video --> Tap the video --> Tap Download --->after Download complete, Tap “To View”.
If you want to save this video to phone or share with family, you can tap download icon to save to album,
then you can find the videos in your phone photo album. right down Search icon to select the date (make sure your camera
date and time were right when recorded).
17
Save to album
To view
AABB-4XXXXX-XXXXX
Download
AABB-4XXXXX-XXXXX

18
. The camera will continue loop record videos after you inserted the sd card.1
2. Saved to sd card 10min per video, no matter if there is a motion, there is a blue label “plan recording” for this kind
of videos.
3. If you have turned on the motion detection and action with alarm “Alarm recording to SD card”, you may also find
there are 14s short videos with Orange label “Alarm Recording”, these videos are all recorded when the camera is
triggered by a motion.
4. The Alarm recording could stop the Plan recording when there is a motion, so the plan recording maybe shorter
than normal 10min per video.
5. If you just want to save the motion videos and hope the limited sd card to save videos for a longer time, please go
to “SD card plan record” to turn OFF “Enable record”, and also make sure “motion deteciton alarm” and “motion
reording to sd card” are both opened.
Device Information
You can easily find camera ip address with the device information, and access the camera with its ip address on Web browser.
(IE, Edge, Firefox, Chrom, Safari)
Note
:
Table of contents
Other Boavision Security Camera manuals


