Bobot WIN 701 User manual

BOBOT WIN 701
*Please read this instructions carefully before using the product
and keep it in a safe place.

WIN 701
WIN 701
WIN 701
WIN 701

Must be replaced by the manufacturer or its service agent in order to avoid a hazard. must be removed
and discarded according to local laws and regulations before disposal of the Appliance. Please dispose of
used batteries according to local laws and regulations.

4.
5.
6.
8.
9.
10.
11.
12.
13.
14.
7.
3
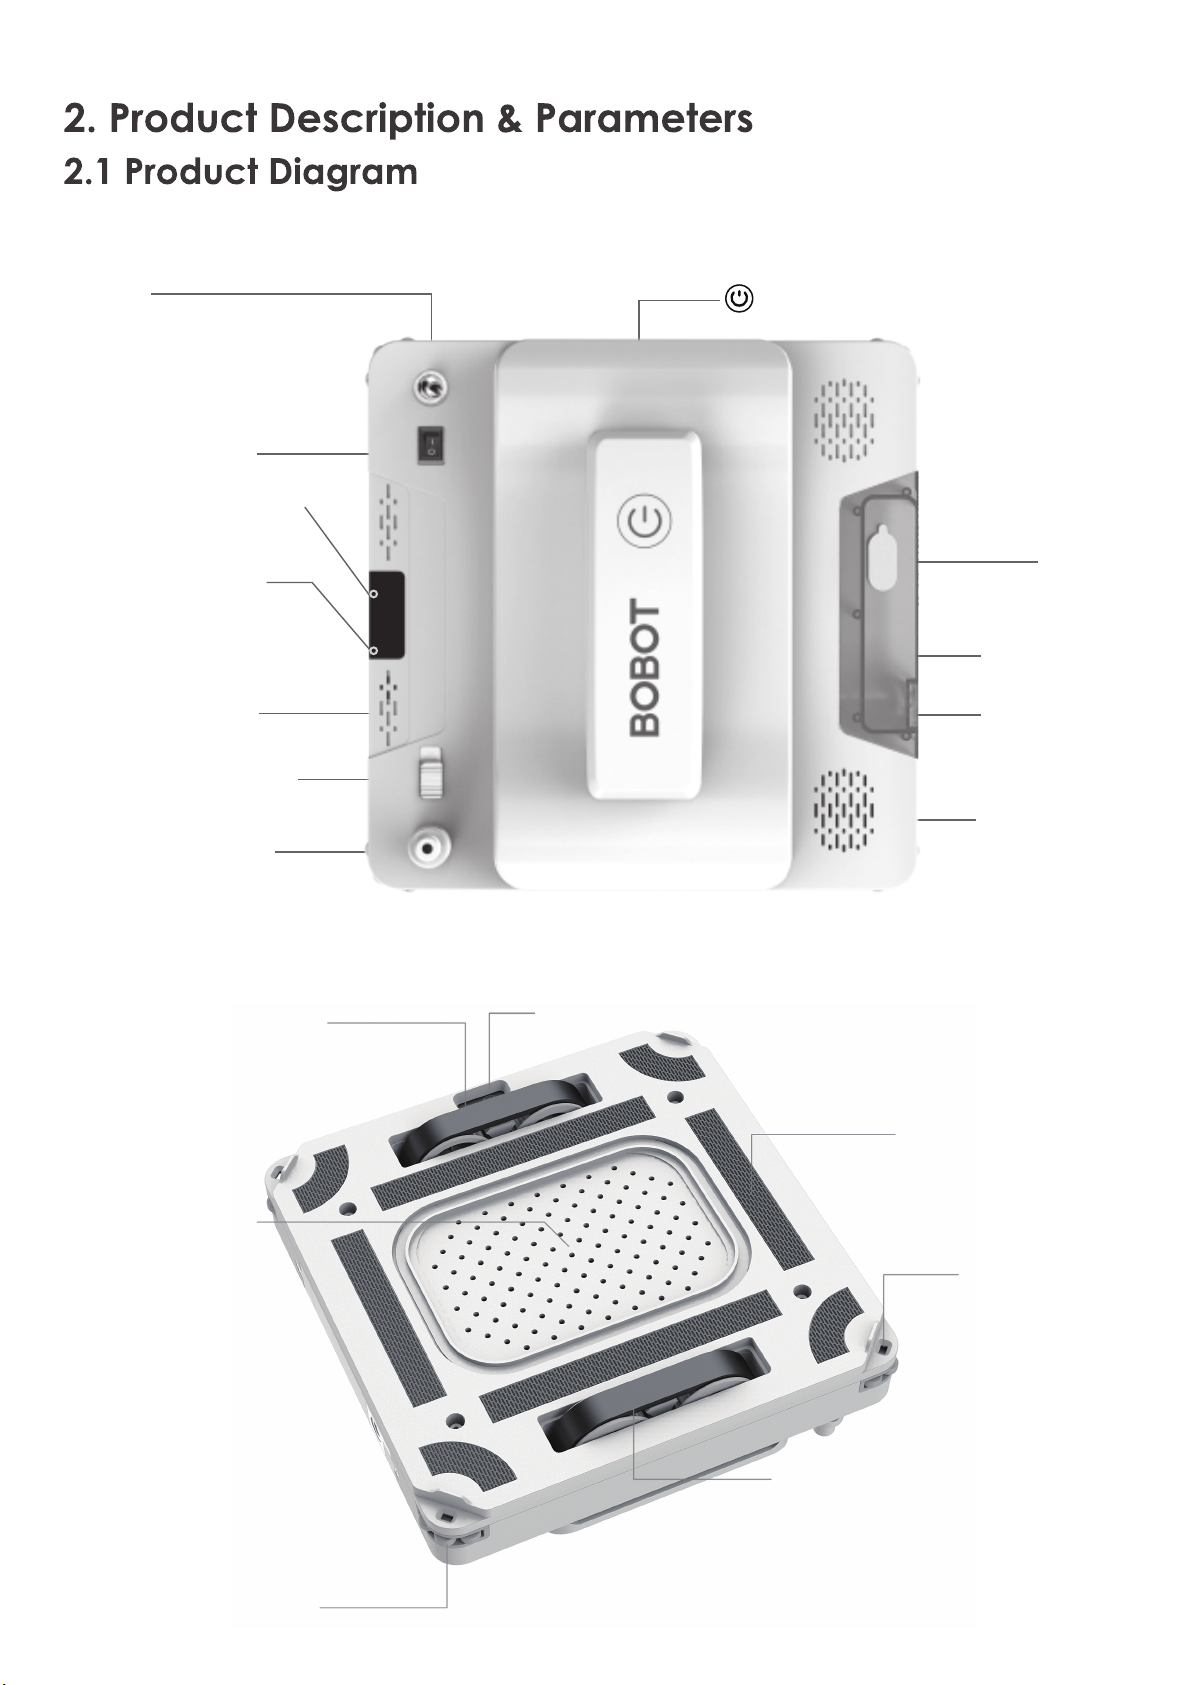
Power-on indicator
(blue)
Fan motor
Corner
anti-collision wheel
Infrared remote control sensor
Velcro
Frameless
anti-drop sensor
Driving wheel
Power connector
Power switch
Buzzer
Safety rope hole
Speaker
Silicone waterproof plug
for water injection port
Switch button
Water tank
Spray Nozzle
Safety rope switch
Indicator light
Charging indicator
Blue is normal work;
Red have a buzzer when
there is a malfunction;
Green is water spray
function is on.
Green: full of
Red: charging
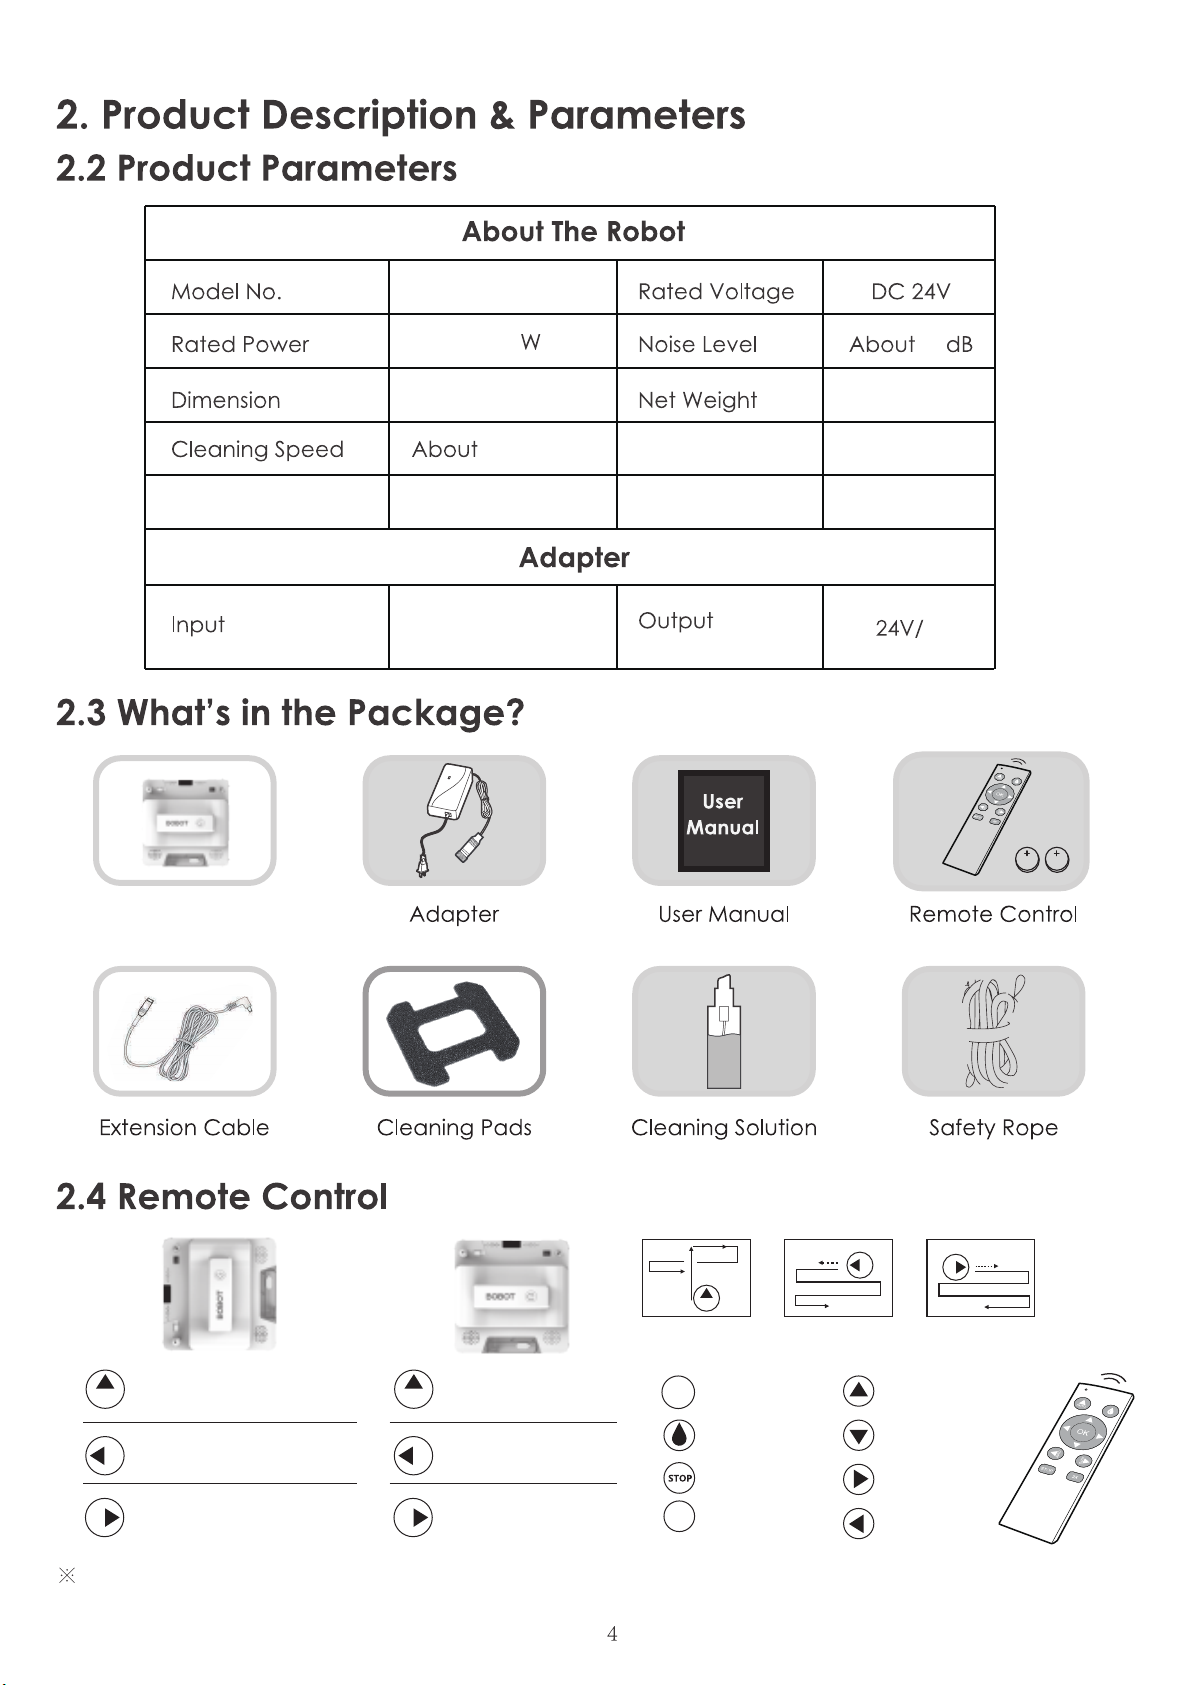
BOBOT WIN 701
WIN 701
2.5min/m²
DC
100~ 240VAC
50H~ 60HzA
245*240*85.8mm
72
about1.52kg
3.75A
75
Tank capacity 36ml
(Optional purchase)
The remote control adopts undisturbed infrared technology, which can operate at a distance of 180
degrees and 15M without obstruction.
Go Z-shaped, then go
N-shaped, automatically
wipe the full window.
AUTO
First to the left, go down the
Z-shape, automatically wipe the
rest of the window.
AUTO
First to the right, go down the
Z-shape, automatically wipe
the rest of the window.
AUTO
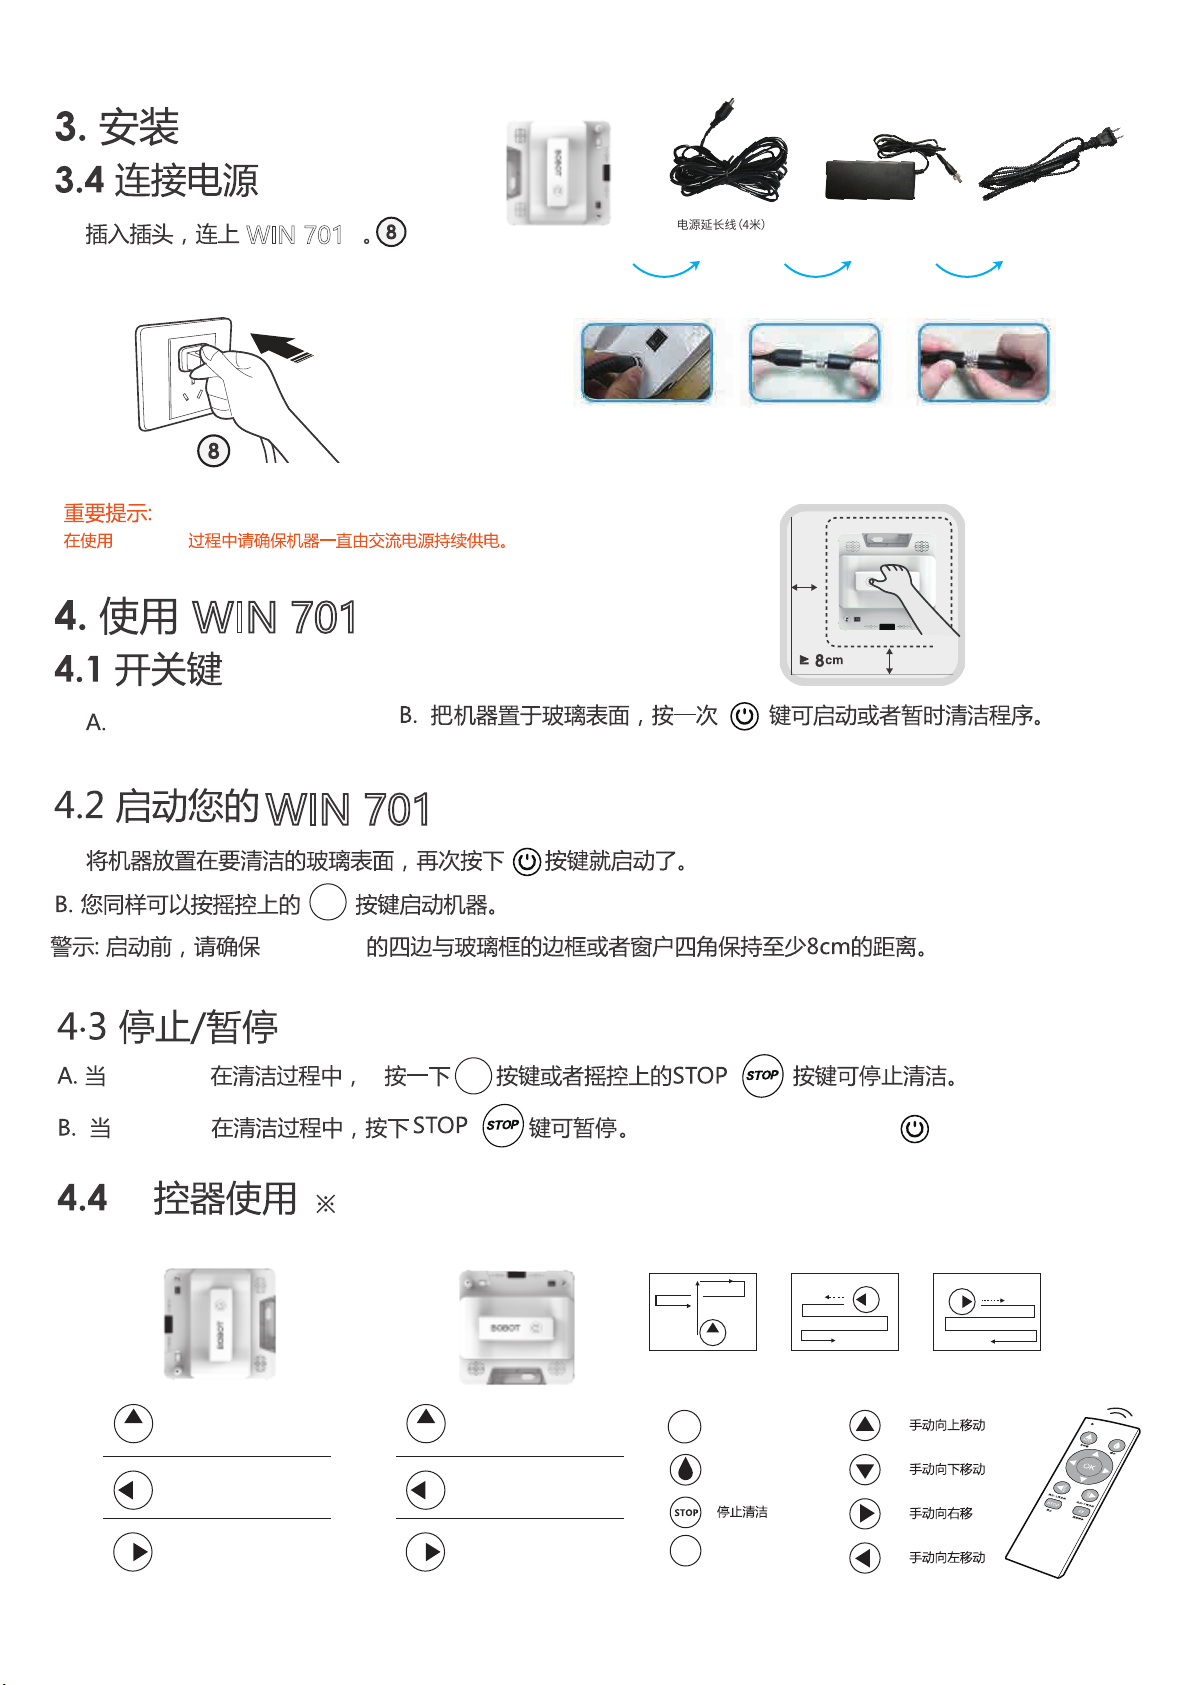
OK One-click
start/stop
Move up
manually
Move down
manually
Move right
manually
Move left
manually
Clean twice
2X
Sprinkler
switch
Stop
cleaning
Horizontal
placement
Go N-shaped, automatically
wipe the full window.
AUTO
First up, go N-shaped to
left automatically wipe
the rest of window.
AUTO
First down, go N-shaped
to left automatically wipe
the rest of window.
AUTO
Vertical
placement
AUTO
Clean automatically
first right and then down,
AUTO
Clean automatically
first left and then down
AUTO
Clean automatically first
up and then down.
Battery 14.8V / 800mAh
lithium battery Battery
capacity

Safety Lock
WIN 701
WIN 701
Plug in the safety lock into hole.
bottom

WIN 701
WIN 701
WIN 701
WIN 701
A . When the WIN 701 is cleaning, press the button again or button on the remote control to stop cleaning.
B . When the WIN 701 is cleaning,press the Stop button to pause.
C. Press the Start button on the machine to stop.
OK
WIN 701 will automatically return to the bottom position after completing a cleaning cycle.
There are three voice prompts after the cleaning is completed, once every 10 seconds.
A . Use the remote control to remotely control your machine to a location convenient for removal
B . Hold on to the handle, press the power switch and turn off the power
C. Remove the machine from the window
D. Untie the safety rope and put the machine and its related accessories in a dry and ventilated environment for the next use
A. Press the button could start /shutdown
B. Put the machine on the surface of the glass,press the button one time could start
up or pause cleaning process
A. Plugging in the power is equivalent to booting up, and then
pressing the start/stop button to start/stop working.
B. Place the machine on the glass surface to be cleaned,
press the button again to start.
C. You can also press the button on the remote control to start
the machine.
Warning: Before starting, please ensure that the four sides of WIN701 and the frame of the glass frame
or the four corners of the window are kept at least 8cm away
OK
WIN 701 Insert the plug and connect to WIN 701
Important note: During the use of WIN 701, please ensure that the machine
is continuously powered by AC power.
WIN 701
WIN 701
WIN 701
WIN 701
E.
F.
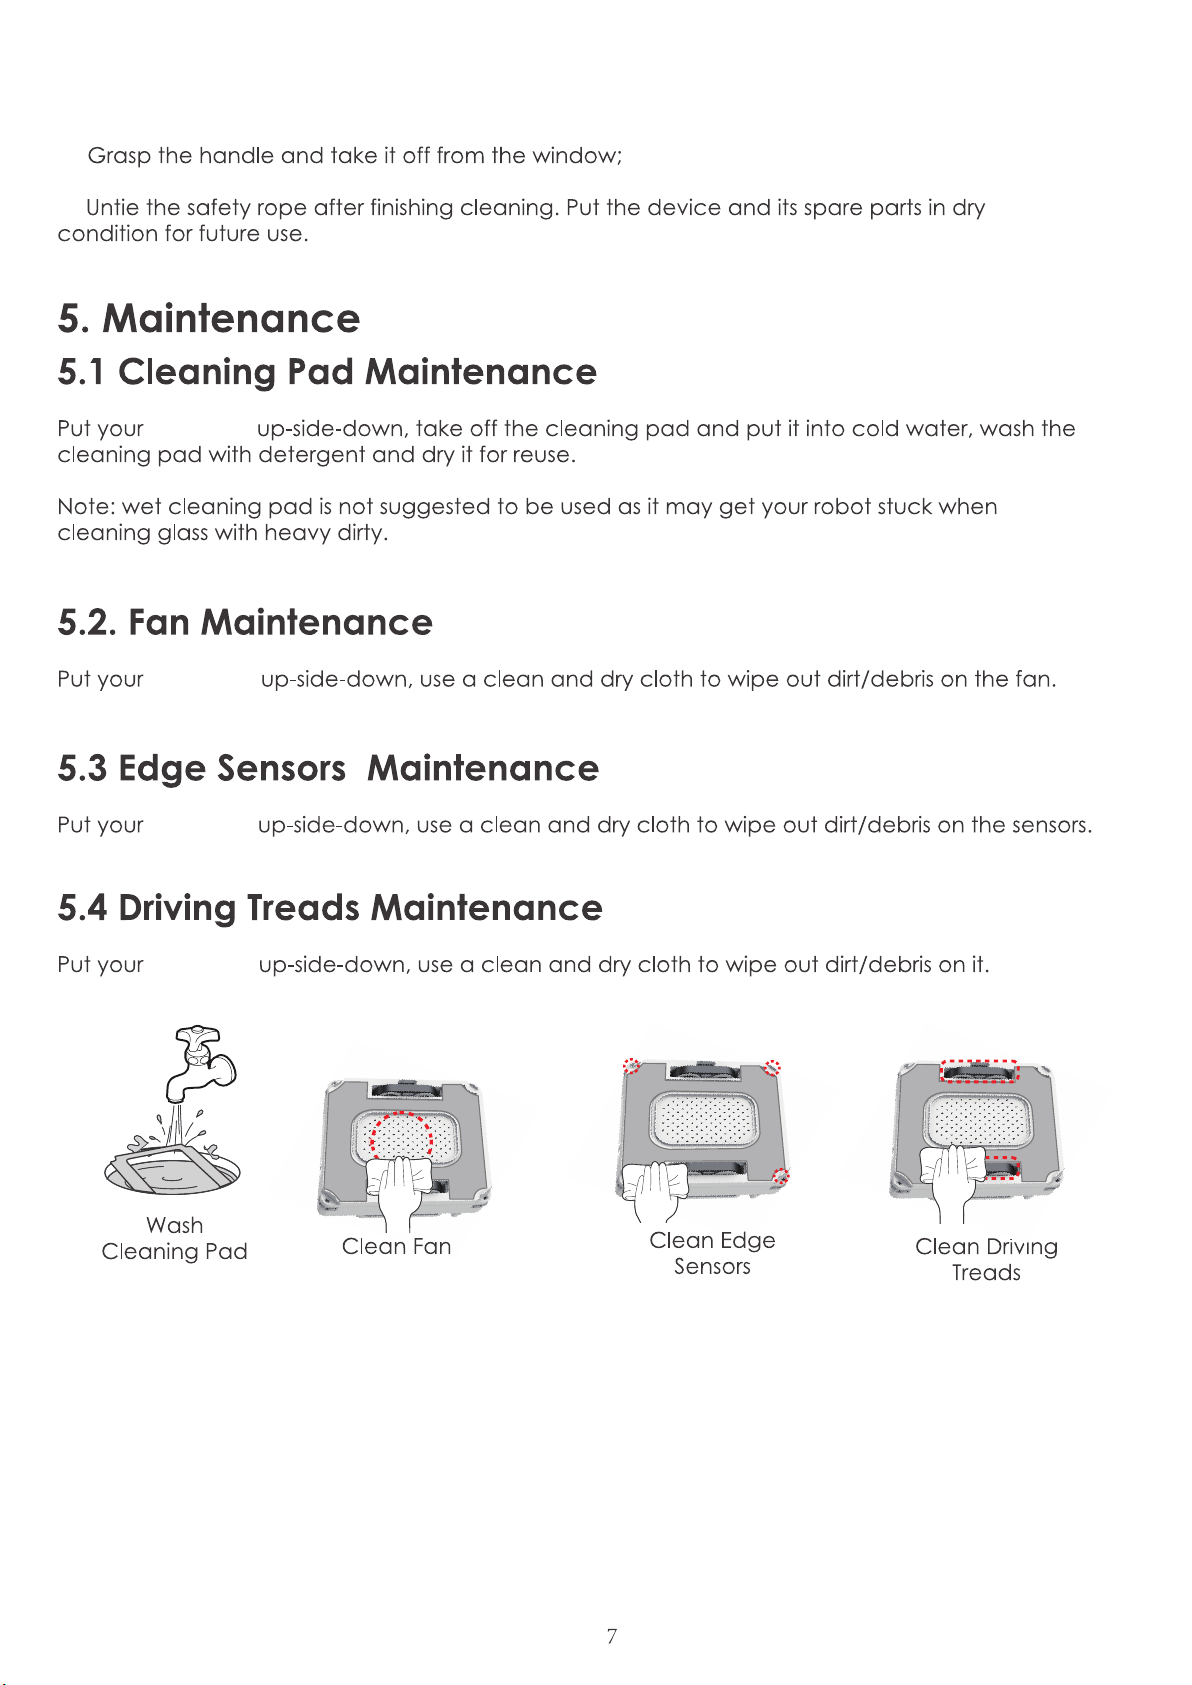
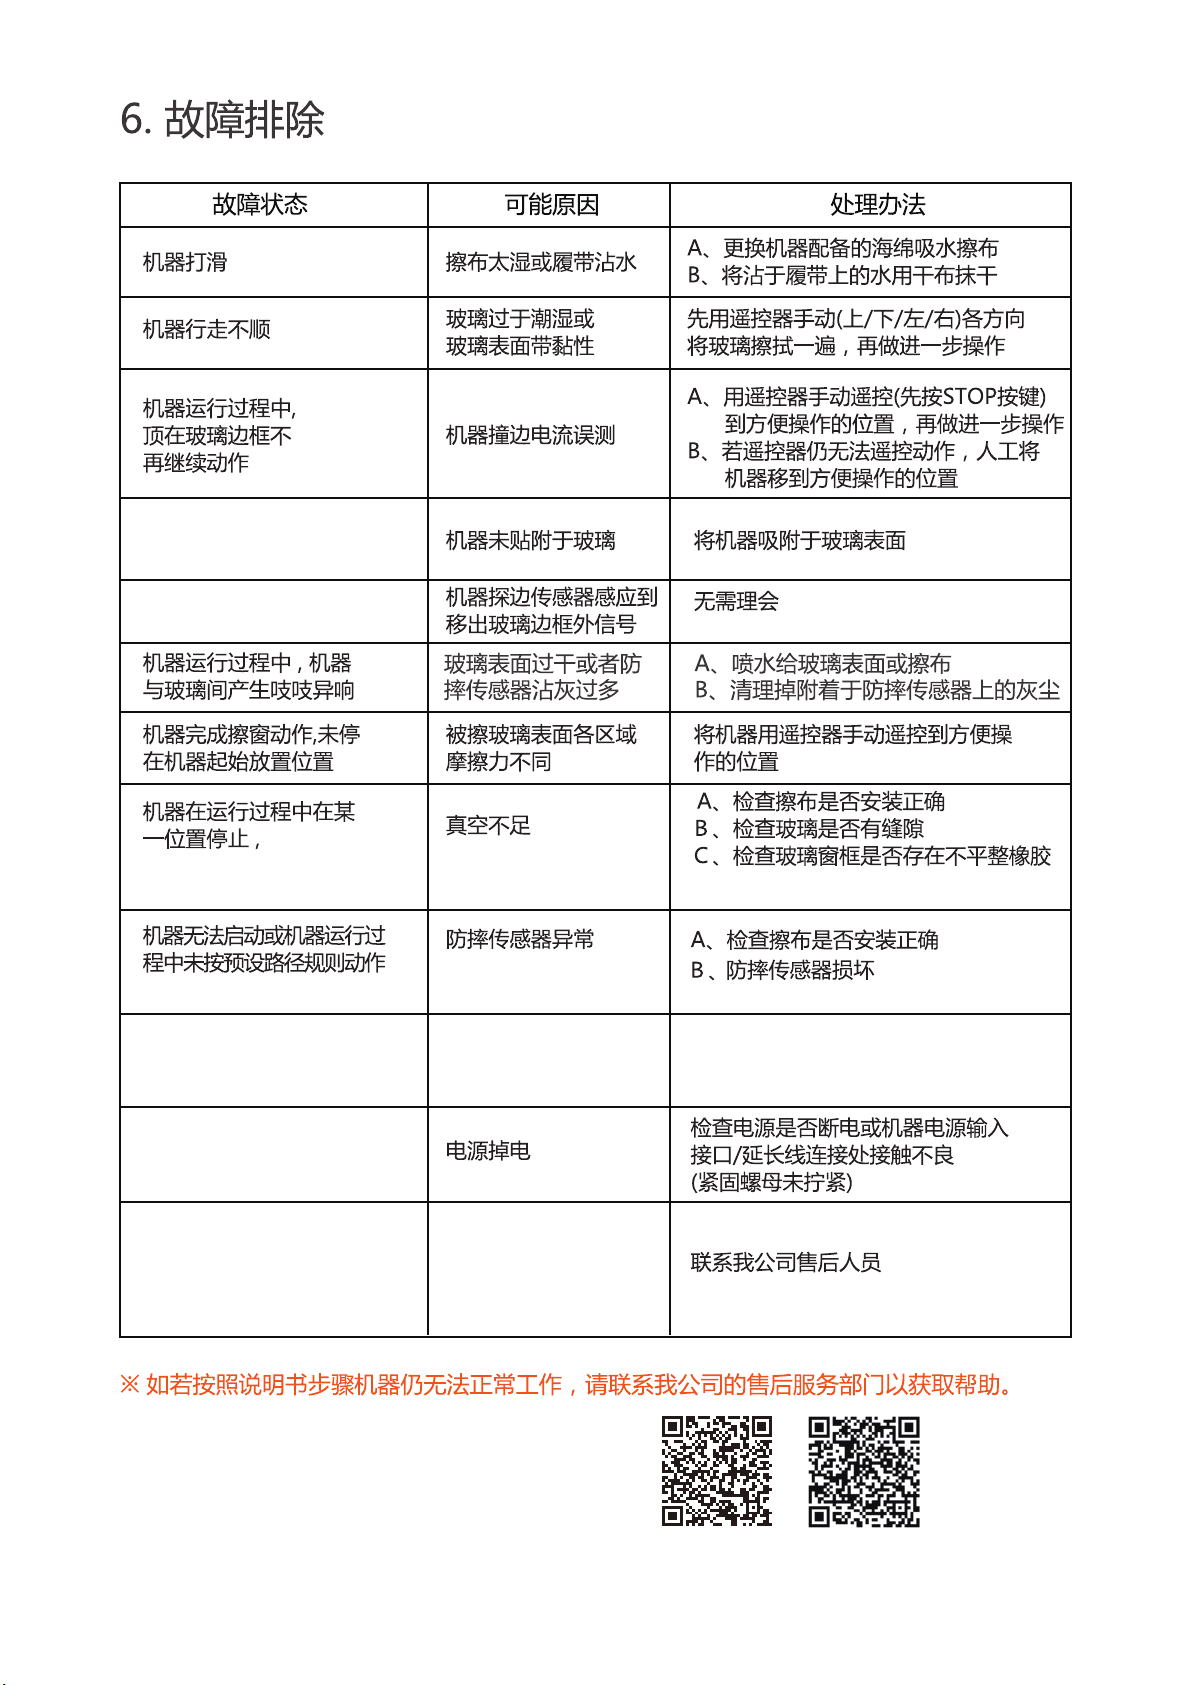
The machine is slipping The cloth is too wet or the track is
wet
A. Replace the sponge absorbent cloth
equipped with the machine.
B. Dry the water on the track with a dry cloth.
First, wipe the glass manually (up, down,
left and right) with the remote control,
and then make further operation
The machine is attached to the glass surface
The machine does not run
smoothly
The glass is too wet or the glass
surface is sticky
During the operation of the
machine,when it reach on the
top glass frame , will not
continue to operate
Red light flickers, buzzer rings
synchronously, voice prompt: please
put it again, baby can't stand stably.
During the operation of the
machine, flash the red light
During the operation of the
machine, there is squeaking
noise between the machine
and the glass
The machine finished the window
cleaning action and did not stop at
the initial position of the machine
When the machine stops at a certain
position during operation, the red light
flashes and the buzzer rings synchro-
nously,Voice prompt: Please rearrange,
baby stand unsteadily
The machine can not be started or the
machine does not act according to the
preset path rules, and the red light
flashes at the same time
The red light flashes and the buzzer
rings synchronously.
Voice prompt, please fasten the
safety rope.
Red light flashing, buzzer rings;
voice prompt: please connect the
power supply
The red light flickers, the buzzer
rings synchronously; the voice
prompt: if the machine fails, please
look the call center for help
Power failure
Other abnormal equipment Contact our after-sales personnel
Check whether the power supply is cut off
or the connection of machine power input
interface and extension line is poor
(fastening nut if it is not tightened)
The safety rope is not locked or
broken
Check whether the safety rope is
locked properly
Fall proof sensor abnormal
A. Check that the cloth are properly
installed
B. Check the glass if have some gaps
C. Check glass window frame for
uneven rubber
A. Check that the cloth are properly
installed
B. Fall proof sensor damaged
The friction force on the surface of
the polished glass is different
Lack of vacuum
Manually control the machine to a convenient
position by remote control
The glass surface is too dry or there
is too much dust on the anti drop
sensor
The machine edge sensor senses the
signal of moving out of the glass
frame
Ignore it
A. Spray water on glass surface or cloth
B. Remove the dust attached to the anti fall
sensor.
Wrong measurement of machine
edge impact current
The machine is not attached to the
glass
The machine is attached to the glass surface
WIN 701
Version :1.1

器器机机置置放放再再源源电电开打先先请请
源源电电闭闭关关再再器器机机下下取取请请
窗窗门门璃璃玻玻的的框框边边无无于于用用使使慎慎谨谨请请
用用使使慎慎谨谨请请天天雨雨下下
绳全安安好好系系先先前前用用使使
警告
BOBOT WIN 701
*使用产品前请仔细阅读本使用说明书,并妥善保管本使用说明书
BOBOT公众号
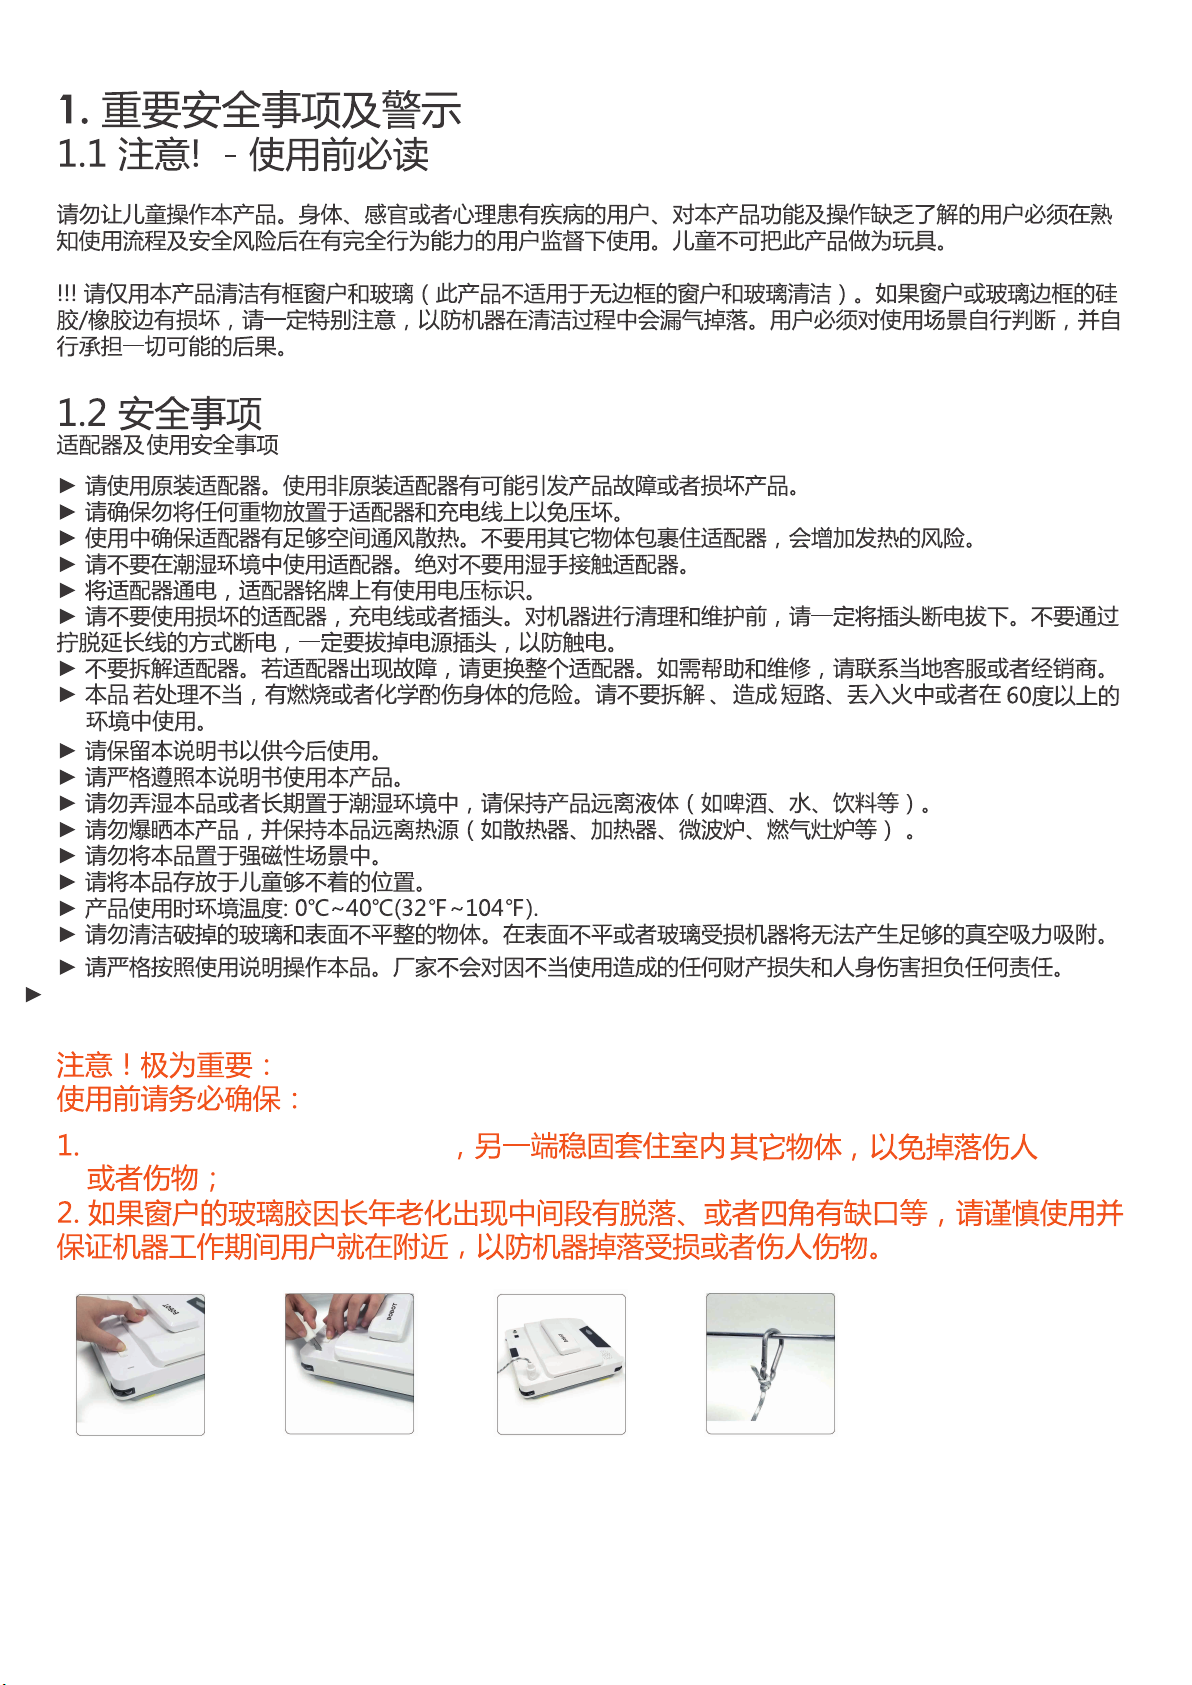
使用本产品时必须按照要求系挂安全绳,确保使用之处无人和牲畜活动,确保使用环境安全才可使用。
安全绳索扣插于机器锁扣插孔
1
拨动安全绳开关 把安全绳锁扣对准安全
绳钥匙孔插入放开拨动
安全绳开关即可
安全绳锁扣已上锁 把安全扣锁在可固定的
建筑物体上即可

如果电源软线破坏,必须用专用软线或从制造商或维修部买到的专用组件来更换。
2
使用本产品时必须按照要求系挂安全绳,确保使用之处无人和牲畜活动,确保使用环境安全才可使用。

3
电源接口
电源开关
工作指示灯
充电指示灯
蜂鸣器
安全绳开关
安全绳孔
喇叭孔
注水口硅胶
防水塞
水箱
喷水口
开机指示灯
(蓝色)
风机
边角
防碰撞轮
红外遥控传感器
魔术贴
无框防摔
传感器
行走轮
蓝色: 正常工作;
红色: 出现故障
会有蜂鸣声;
绿色: 喷水功能开启;
绿色: 已充满
红色: 充电中
启动/停止键

DC
BOBOT WIN 701
4
72
100~ 240VAC
50H~ 60HzA
约2.5min/m²
245*240*85.8mm
水箱容量 36ml
约1.52kg
75
遥控器
约
锂电池 电池容量电池 14.8V / 800Mah

WIN 701
WIN 701
将安全绳锁扣插头插入安全绳插孔
5
WIN 701
WIN 701
WIN 701
WIN 701
WIN 701
WIN 701
WIN 701
a.将延长线一端插入机
器电源口
b.将延长线一端与电源
适配器接口对接
c.将对接头拧紧
电源延长线(4米)
6
OK
OK
走Z字型,再走N字型
自动擦完全窗。
AUTO
先向左,走Z字型往下
自动擦完余窗。
AUTO
先向右,走Z字型往下
自动擦完余窗。
AUTO
OK 一键启动/停止
清洁两次
2X
喷水切换开关
再
按下电源开关,可开/关机。
A.
遥遥控器为采用不受干扰的红外技术,可1 80度,15M远距离无阻挡操作。
C. 也可以按下机器上的 停止清洁。
水平放置
走N字型自动
擦完全窗。
AUTO
先向上,走N字型往左
自动擦完余窗。
AUTO
先向下,走N字型往左
自动擦完余窗。
AUTO
垂直放置
AUTO
先向右再往下自动清洁
AUTO
先向左再往下自动清洁
AUTO
先向上再往下自动清洁

WIN 701
WIN 701
WIN 701
WIN 701
WIN 701
7
WIN 701在完成一次清洁循环后会自动回到底部位置。清洁完成后有三次语音提示,每10秒一次。
按下电源开关,关掉电源。
版本:V1.2
8
BOBOT公众号
BOBOT旗舰店
红灯闪烁,蜂鸣器同步响;
语音提示:请重新摆放,
宝宝站不稳
机器运行过程中
红灯闪一下
红灯闪烁,
同时红灯闪-下
蜂鸣器同步响;语音提示:
请重新摆放,宝宝站不稳
红灯闪烁,蜂鸣器直响;
语音提示:请连接电源
红灯闪烁,蜂鸣器同步响;
语音指示:
机器故障,请求助呼叫中心
设备其它异常
红灯闪烁,蜂鸣器同步响;
语音提示:请系好安全绳 安全绳没有锁上或锁坏 检查安全绳是否锁好
Other Bobot Vacuum Cleaner manuals


