Body Action Enterprise 5mins Shaper Pro User manual

© 2015 Body Action Enterprise Co., Ltd. All rights reserved.
MADE IN CHINA
USER MANUAL
CAUTION
Maximum User Weight : 100 kgs
READ ALL PRECAUTIONS AND INSTRUCTIONS IN
THIS MANUAL BEFORE USING THIS EQUIPMENT
AND KEEP THIS FOR FUTURE REFERENCE

Before beginning this or any exercise program, consult
your physician. This is especially important for persons who
Have not exercised regularly before or persons with preexisting
health problems. Read all instructions before using. We
assume no responsibility for personal injury or property damage
sustained by or through the use of this product.
Before beginning any exercise program, you should consult with your doctor.
It is recommended that you under go a complete physical examination.
Work within your recommended exercise level, do not work to exhaustion. If you
feel any pain or abnormal systems, stop your workout immediately. Consult your
physician immediately.
Use the equipment on a solid, flat level surface with a protective cover for your
floor or carpet. For safety, the equipment should have at least 0.5 meter of free
space all around it.
Do not allow children to play on or around your 5 Mins Shaper PRO. Keep hands
away from moving parts.
Check your 5 Mins Shaper PRO prior to exercising to ensure that all parts are
assembled, and nuts, bolts are tightened before every use.
Always wear proper workout clothing and shoes when using your 5 Mins Shaper
PRO. Do not wear loose clothing. Do not wear shoes with leather sole or high
heels.
SAFETY PRECAUTIONS
WARNING
1 2
WARNING
SAFETY PRECAUTIONS
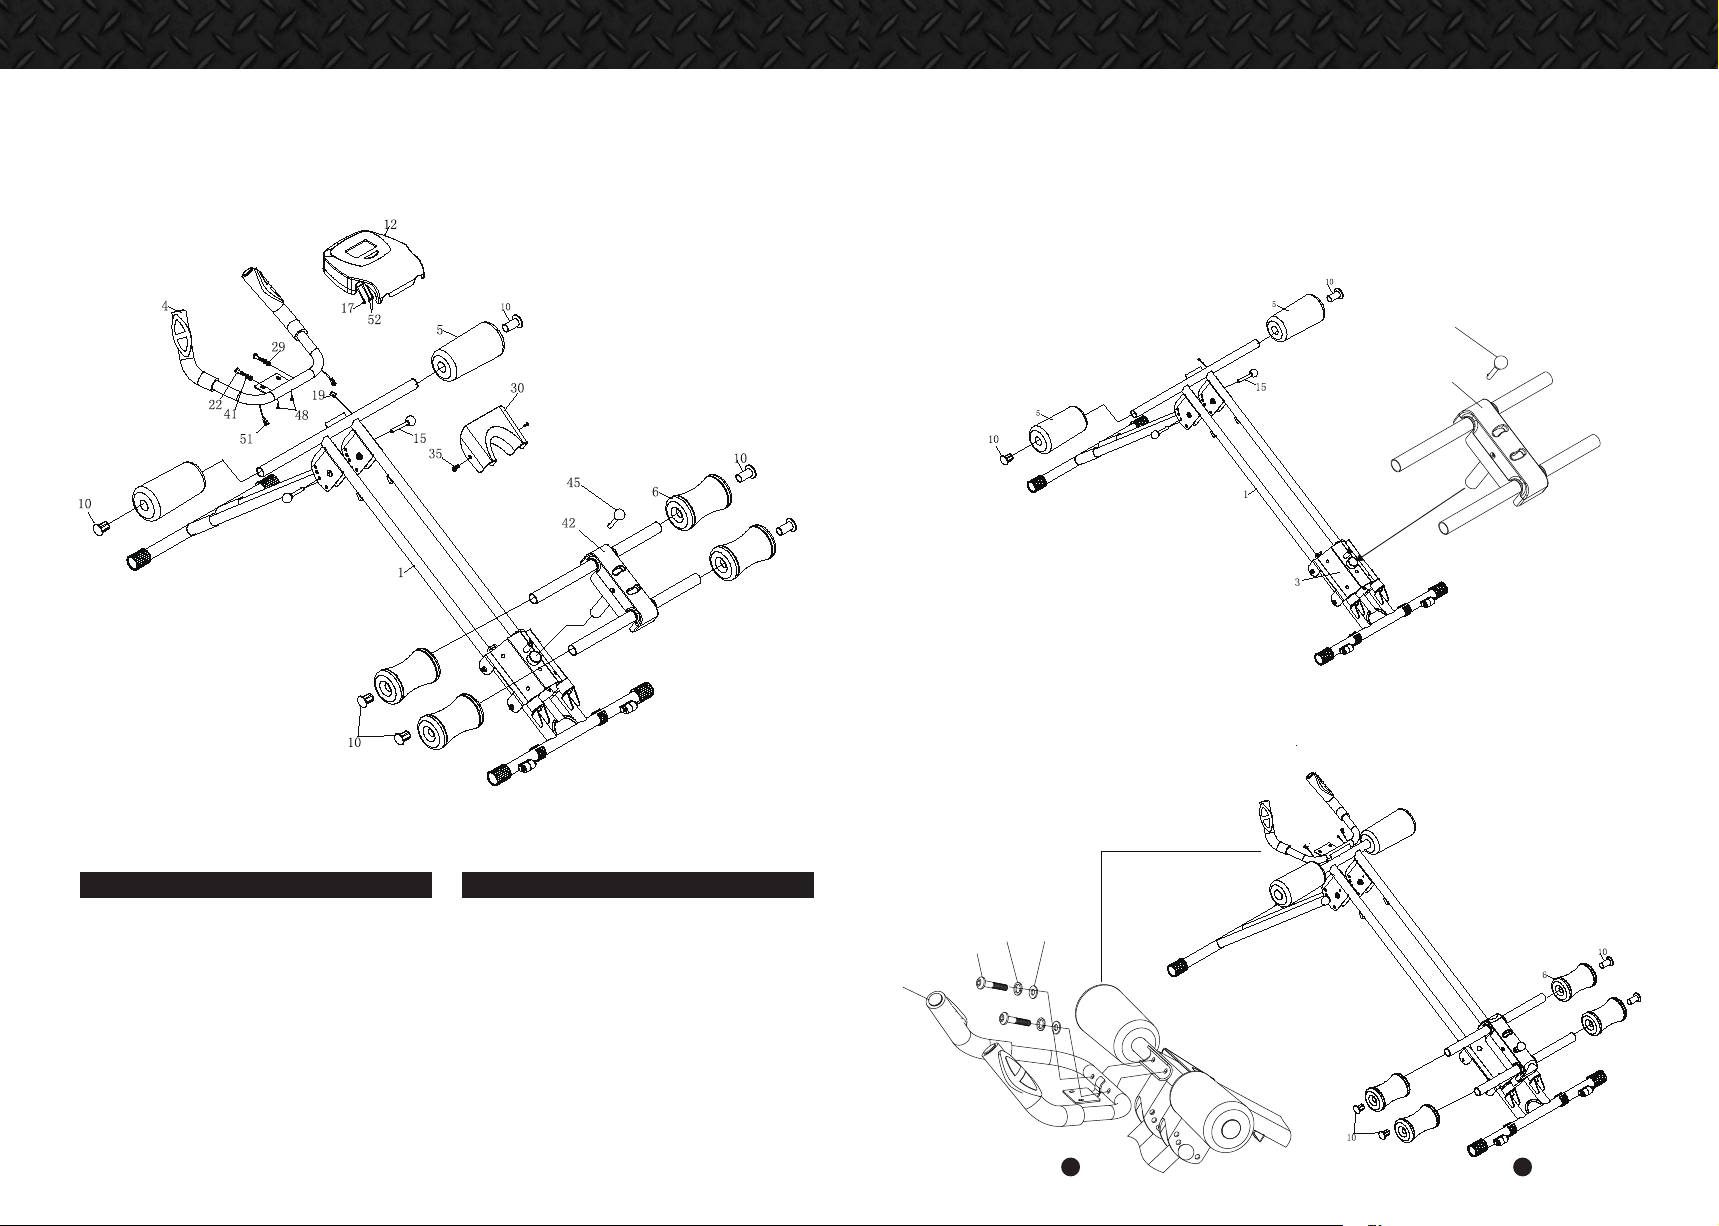
EXPLODE DRAWING
PART LIST
ASSEMBLY DIAGRAM
ASSEMBLY
EXERCISE COMPUTER
ROTATION ADJUSTMENT
CARE AND MAINTENANCE
WARM-UP
SCOPE OF SAFE USE
02
02
03
04
05
06
08
09
10
11
14
CONTENTS

3 4
EXPLODE DRAWING PART LIST
Front main frame
Rear support tube
Slide tube 1
Handle bar
Foam A
Foam B
Velcro
End cap for Main frame
Protect cap
Round end cap
Foam grip A
Computer
Pulley
Bearing
Pin
Axes
Upper computer wire
Bushing for wire A
Lower computer wire
Bushing for wire B
Allen bolt M8*45L
Allen bolt M8*40L
Washer
Nylon nut
Allen bolt M8*40L
Cushion A
Metal bushing A
Metal bushing B
Curve washerID8.2*OD22.2
Big cover
Handle pulse key
Foam grip B
Transportaon wheel
Cushion B
Screw M5*12L
Allen bolt M6*48L
Nut
End cap
End cap for handle bar
Magnet
Spring washer
Slide tube 2
Plasc bushing
Big washer
Pin
Plasc cover
Screw M4*15
Computer screw
Hoodle
Plasc cap
Hand pulse sensor
Hand pulse sensor
Screw M4*20
Washer
Plasc bushing
Metal bushing C
Allen key
1
2
3
4
5
6
7
8
9
10
11
12
13
14
15
16
17
18
19
20
21
22
23
24
25
26
27
28
29
30
31
32
33
34
35
36
37
38
39
40
41
42
43
44
45
46
47
48
49
50
51
52
53
54
55
56
57
1
1
1
1
2
4
1
4
2
6
2
1
4
8
2
2
1
3
1
1
2
2
4
8
4
2
4
4
2
1
2
2
2
2
2
2
2
2
2
1
2
1
1
1
1
1
2
2
1
2
2
2
2
2
1
2
1
NO DESCRIPTION Q'TY
#22 M8 X 40 2PCS
#29 ID8.2 X 0D22.2 2PCS
#35 M5 X 12 2PCS
#41 ID8.2 2PCS
#57 S5 1PCS
#45 1PCS
ASSEMBLY DIAGRAM
PART LIST
01
04
05
06
10
12
15
17
19
22
29
30
35
41
42
45
48
51
52
Curve washer
Big cover
Screw M15*12L
Spring washer
Slide tube 2
Pin
Computer screw
Hand pulse sensor
Hand pulse sensor
Front Main frame
Handle bar
Foam A
Foam B
Round end cap
Computer
Pin
Upper computer wire
Lower computer wire
Allen bolt M8*40L
1
1
2
4
6
1
2
1
1
2
2
1
2
2
1
1
2
2
2
DESCRIPTION Q’TYPART NO. DESCRIPTION Q’TYPART NO.
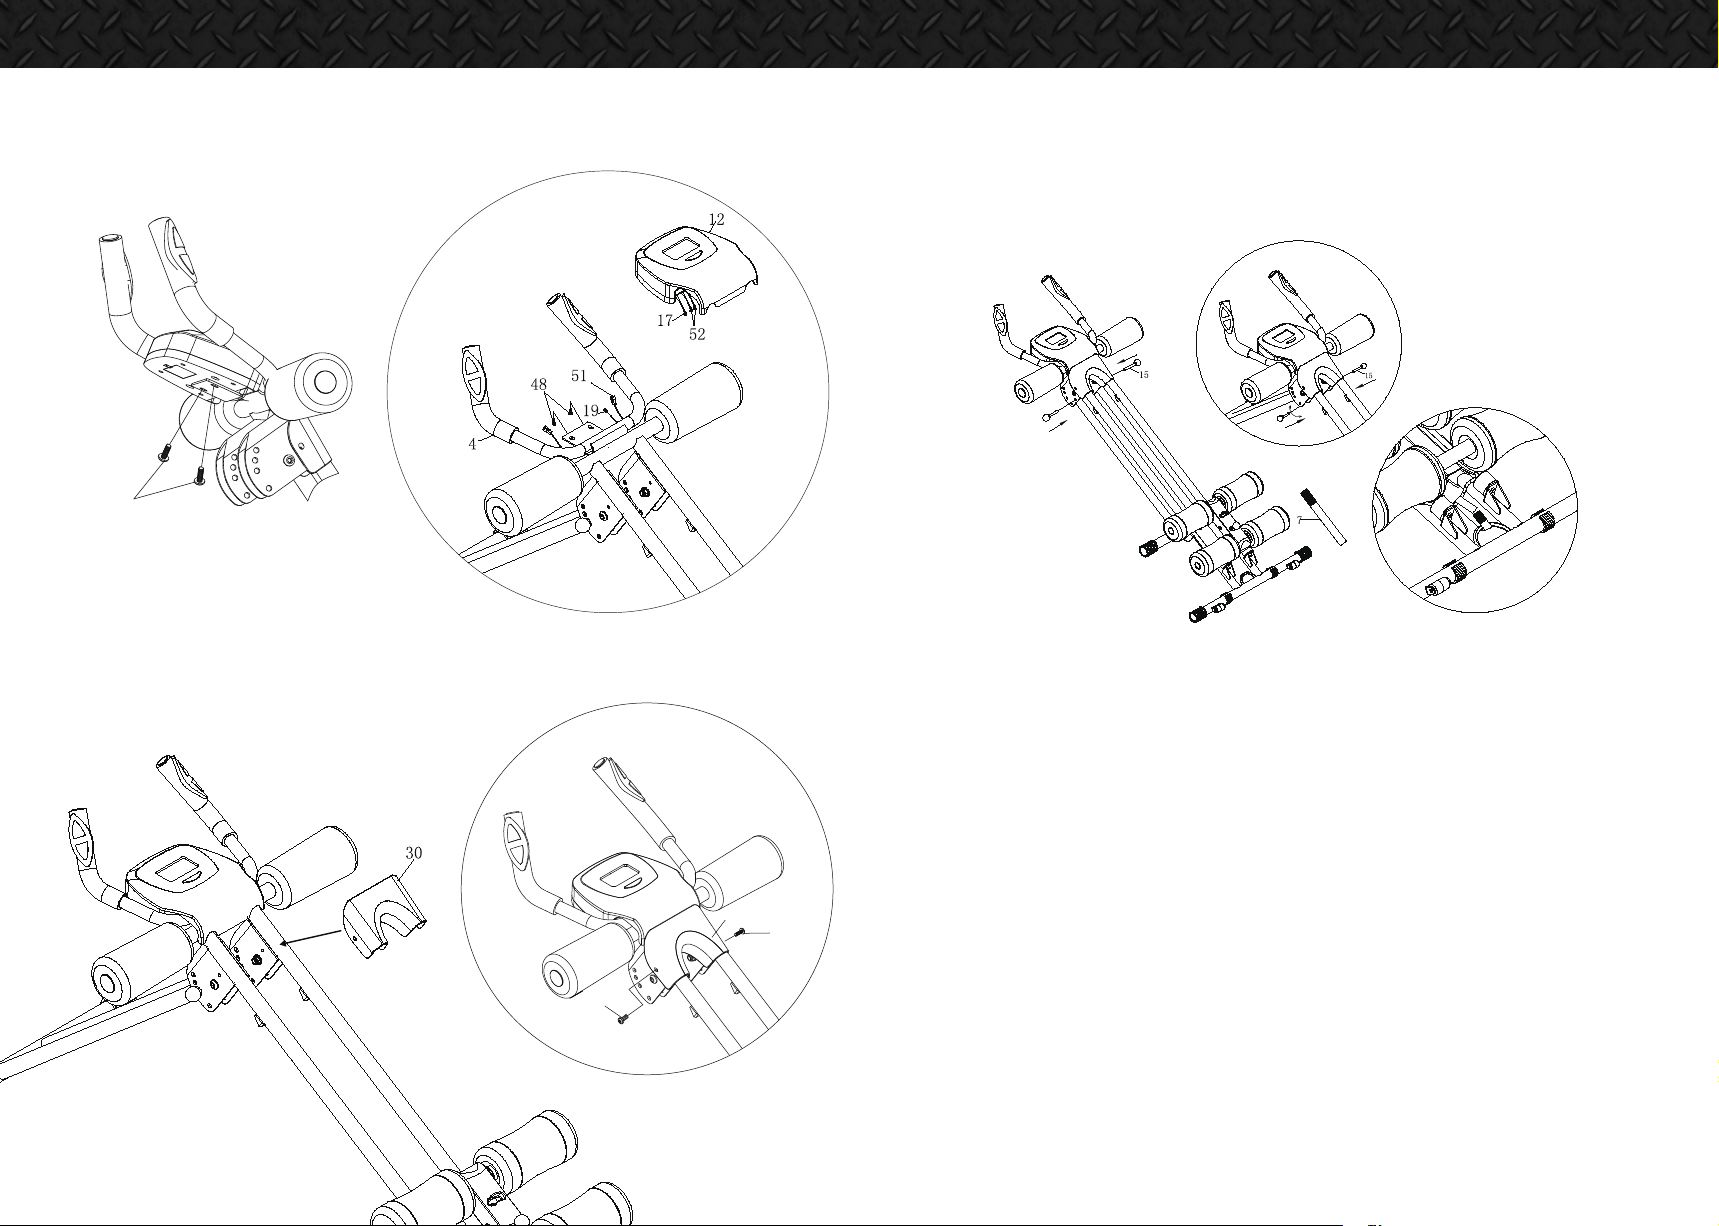
ASSEMBLY
STEP 1
A) Open the 5 Mins Shaper PRO, then insert the 2xPin(15)into the hole of the Front main frame at your desired locaon.
Insert the 2xFoam A(5) into the Front main frame(01), then aach the 2x Round end cap(10).
B) Aach the Slide tube 2 (42) to the Slide tube 1 (03),Then aach the PIN(45).
REMARK: IF IT IS DIFFICULT TO INSERT FOAM, PLS ADD SOME SOAP WATER ON THE TUBE.
STEP 2
A) Aach the Handle bar (04) to the Front main frame (01).lock with 2 x Curve washer(29) ,2 x Allen bolt(22) and 2 x
Spring washer(41) and fasten using the allen key(57) .
B) Insert the 4xFoam B(6) into the Front main frame(01), then aach the 24x Round end cap(10).
5 6
42
45
29
41
22
4
A B
7 8
STEP 3
Slide the Computer (12)into the Handle bar(04) ,then connect the Upper computer wire(17) with
Lower computer wire (19) and connect the Hand pulse sensor (52) with Hand pulse sensor (51).
STEP 4
Aach the Big cover (30) to the Front main frame (01), ghten with 2x Screw (35).
A) Pull out the Pin (15), fold the 5 Mins Shaper PRO as fig A and fig B show, then insert the Pin(15).
B) Aach Slide tube (03) onto boom of Front main frame (01) by Velcro (07) as fig C show.
Fig A
Fig C
Fig B
SPECIFICATIONS
1.COUNT 0 - 9999 TIMES
2.TIME 0:00 - 99:59 MIN
3.CALORIES 0 - 9999 CAL
4.PULSE 0 - 9999 TIMES/MIN
KEY FUNCTION
MODE: This buon allows you to cycle through all the monitor funcons.
OPERATION PROCEDURES
1. AUTO ON/OFF :
The system turns on when the MODE buon is depressed or when it senses a signal input from the speed
sensor.
The system turns off automacally when the speed sensor receives no signal input or no buon is pushed for
approximately 4 minutes.
2. RESET :
The unit can be reset by changing baery or holding the MODE buon for 3 seconds.
3. FUNCTION :
COUNT : Total accumulated steps.
SELECT : You can operate the MODE buon to select and lock on a funcon in the lower part of the LCD screen
for the following sequence : TIME → COUNT → CAL → PULSE → SCAN
BATTERY : This monitor uses two AAA-1.5V baery. You can replace baeries through the back of the unit.
EXERCISE COMPUTER
HOW TO FOLD THE 5 MINS SHAPER PRO
35
35
30
48

INTERMEDIATE
BEGINNER
ADVANCE
INTENSE
9 10
INTERMEDIATEBEGINNER ADVANCE INTENSE
4 LEVELS OF INCLINESROTATION ADJUSTMENT
CARE AND MAINTENANCE
•Periodically check all parts of the product and screws of all parts to see if they are loose. Lock
them if you find any loose parts.
•Use a dry cloth to clean the product aer using.
•Keep away from direct sunshine or environment with high temperature and humidity.
•This equipment is not suitable for children. Do not allow children to play on or around it.
•Do not clean the product by abrasive or corrosive cleaners such as gasoline or acetone.
•Check your equipment before each use to ensure that all parts are assembled, and all nuts,
bolts, knobs, pins are ghten and in proper place.
•Before EACH use, visually inspect the equipment. Never use this equipment if it is not
working properly or if there are damaged or worn parts. call our Customer Service
Department with any quesons.
•The safety level of the equipment can be maintained only if it is examined regularly for
damage and wear.
Le and right direcons to any slide moons Vercal sliding movement
Fixed le workoutFixed right workout

11 12
GETTING STARTED
Always warm-up your muscles before exercising. Start your exercise program
conservatively. Select a goal or pace for each exercise that is easily performed.
Alternating your daily workouts every other day reduces lactic acid build up and
consequently reduces muscle soreness. Begin and end each exercise session by
stretching your muscles for 7-10 mintes.
● Recommended Warm Up Program
A successful exercise program consists of a warm-up, aerobic exercise, and a
cool-down. Do the entire program at least two and preferably three times a week,
resting for a day between workouts. After several months you can increase your
workouts to four or five times per week.
● Warm-up and Cool-down
Warming up is an important part of your workout, and should begin every exercise
session. It prepares your body for more strenuous exercise by heating up and
stretching out your muscles, increasing your circulation and pulse rate and delivering
more oxygen to your muscles. At the end of your workout, repeat these exercises to
reduce sore muscle problems. We suggest the following warm-up and cool-down
exercises:
HEAD ROLLS
Rotate your head to the right for one count, feeling
the stretch up the left side of your neck. Next rotate
your head back for one count, stretching your chin
to the ceiling and letting your mouth open. Rotate
your head to the left for one count, and finally, drop
your head forward for one count. Repeat the same
movement to the right, again taking one count for
each position. Then reverse direction and do the
same thing two times to the left.
SHOULDER LIFTS
Lift your right shoulder up toward your ear for one count. Then
lift your left shoulder up for one count as you lower your right
shoulder. Repeat right and left shoulder lifts for a total of eight
counts.
SIDE STRETCHES
Open your arms to the side and continue lifting them until they are
over your head. Reach your right arm as far upward toward the
ceiling as you can for one count. Feel the stretch up your right
side. Repeat this action with the left arm. Repeat this entire
stretch, reaching right and left for a total of eight counts.
HAMSTRING STRETCH
Sit with your right leg extended. Reset the sole of
your left foot against your right inner thigh. Stretch
toward your right toe as far as possible. Hold for 15
counts, then relax. Repeat with the left leg extended.
INNER THIGH STRETCH
Sit with the soles of your feet together with your knees
pointing outward. Pull your feet as close into your groin
areas as possible. Gently push your knees towards the
floor. Hold for 15 counts. Repeat again.
WARM-UP WARM-UP

13 14
WARM-UP
TOE TOUCH STRETCH
Slowly bend forward from your waist, letting your
back and shoulders relax as you stretch toward your
toes. Reach down as far as you can and hold for
fifteen counts. Repeat again.
CALF / ACHILLES STRETCH
Lean against a wall with your left leg in front of the right
and your arms forward. Keep your right leg straight and
left foot on the floor; then bend the left leg and lean
forward by moving your hips toward the wall. Hold then
repeat on the other side for fifteen counts.
QUADRICEPS STRETCH
With one hand against the wall for balance, reach behind you and
pull your right foot up. Bring your heel as close to your buttocks as
possible. Hold for fifteen counts and repeat with left foot up. Repeat
this entire stretch again.
Licence holder:BODY ACTION ENTERPRISE CO., LTD.
Address:NO.42-3, SEC.3, YA TAN RD., TAN TZU DIST,
TAICHUNG CITY, TAIWAN, R.O.C 42756
Name:5mins Shaper Pro
Type:BJ-10456
Class:
SCOPE OF SAFE USE
SCOPE OF SAFE USE
INSTALLATION SPACE
For safety, make sure to place the 5mins Shaper Pro on a flat stable
floor. The equipment should have at least 60 cm of all-around free
space.
0.7m
1.3m
1.2m
1.8m
1.1m
1.7m
Table of contents


