body Power BK-167 User manual
综合训练器
BK-167
Mul-Staon Leverage Gym
Installaon Instrucons
IMPORTANT: Please read the Safety Guidelines and Installaon
Instrucons in this manual before assembly of this product.

•Before beginning assembly, please take the me to read the instrucons thoroughly.
•Read each step in the assembly instrucons and follow the steps in sequence. Do not skip
ahead. If you skip ahead, you may learn later that you have to disassemble components and
that you may have damaged the equipment.
•Assemble and operate the product on a solid, level surface.
•Locate the unit a few feet from the walls or furniture to provide easy access.
•The product is designed for your enjoyment. By following these precauons and using
common sense, you will have many safe and pleasurable hours of healthful exercise with
your new product.
•Aer assembly, you should check all funcons to ensure correct operaon.
•If you experience problems, first recheck the assembly instrucons to locate any possible
errors made during assembly. If you are unable to correct the problem, call our product
service team who will be able to assist.
•It is highly recommended that you consult your physician before beginning any exercise
programme. This is especially important for individuals over the age of 35, or persons with
pre-exisng health problems.
•Always warm up before starng a workout. Try to do a total body warm up before you
start. It is especially important to warm up the specific muscle groups you are going to be
using. This can be as simple as performing a warm up set of high repeons and light
weight for each
Safety Guidelines When Using This Product
Personal Safety during Assembly.
Successful resistance training programmes have one prominent feature in
common...safety.Resistance training has some inherent dangers, as doall physical
acvies.The chance of injury can be greatly reduced or completely removed by using
correct liing techniques, proper breathing, and maintaining equipment in good
working condion, and by wearing the appropriate clothing.
Assistance may be required during assembly of this
product.
exercise.
•Use proper form. Focus on only working the muscle groups intended for the exercise you
are doing. If there is strain elsewhere, you may need to re-evaluate the amount of weight
that is involved with the li. Keeping proper form also includes maintaining control through
an enre range of moon.

•Breath properly. Inhale during the eccentric phase of the exercise, and exhale during the
liing, or concentric phase. Never hold your breath during any part of an exercise.
•Always wear the appropriate clothing and shoes when exercising. Wearing comfortable
athlec shoes with good support and loose fing, breathable clothing will reduce the risk of
injury.
•Maintaining equipment in proper operang condion is of utmost importance for a safe
resistance training program. Pulleys and cables should be checked for wear frequently and
replaced as needed. Equipment should be lubricated as indicated by the manufacturer.
•Read and study all warning labels on this machine. It is absolutely necessary that you
familiarize yourself and all others with the proper operaon of this machine prior to use.
•Keep hands, limbs, loose clothing and long hair well out of the way of all moving parts.
•Do not aempt to limore weight than you can control safely.
•Inspect the machine daily for loose or worn parts. If a problem is found do not allow the
machine to be used unl all parts are ghtened or worn or defecve parts are repaired or
replaced.
When the machine is not in use carefully run your fingers along the cable to feel for thinning
or bulging areas. Replace cables immediately at the first sign of damage or wear. Do not
use equipment unl damaged cable has been replaced.
Visually inspect the cables for fraying, cracking, peeling or discoloraon.
Check slack in cables and re-adjust cable tension if needed.
Check that the jam nut on the selector rod top bolt is ght.
Wipe down aer every workout.
Periodically take the me to use a mild soap or a mild vinyl upholstery cleaner. Avoid using
any abrasive cleaner not intended for use on vinyl.
Keep sharp or pointed objects out of your pockets and clear of all upholstery.
Periodically inspect all nuts and bolts. Tighten if needed. If bolts seem to loosen
periodically, use Locte 242 for a long-term cure.
Go through a re-ghtening sequence periodically to ensure that all hardware is properly
tensioned.
Product Maintenance
CABLES:
UPHOLSTERY:
NUTS/BOLTS/FASTENERS:

GUIDE RODS:
ADJUSTMENTS / LOCKING PINS / TIGHTENING KNOBS:
ANTI-SKID SURFACES:
WARNING INSTRUCTION LABELS:
Product Service Team;
Tel No.: 01604 673029
Email:
Wipe clean with a dust free rag. Lubricate with a Silicon or Teflon based lubricant.
Check all pieces for signs of visible wear or damage.
Check springs in Snap Links and Pop Pins for proper tension and alignment.
If the spring scks or has lost its rigidity, replace it immediately.
Replace if they appear worn or become slippery.
Inspect and familiarize yourself with all safety warnings and other user informaon on
decals.
service@bodypower.co.uk

Parts list ………………………………………………………………………………………………………………………6-9
Assembly step-1 …………………………………………………………………………………………………………10-15
Assembly step-2 …………………………………………………………………………………………………………16-17
Assembly step-3 …………………………………………………………………………………………………………18-20
Assembly step-4 …………………………………………………………………………………………………………21-22
Assembly step-5 …………………………………………………………………………………………………………23-24
Assembly step-6 …………………………………………………………………………………………………………25-27
Assembly step-7 …………………………………………………………………………………………………………28-30
Assembly step-8 …………………………………………………………………………………………………………31-34
Assembly step-9………………………………………………………………………………………………………….35-38
Assembly step-10 ……………………………………………………………………………………………………….39-42
Contents
5

Parts list
6
NO.
Serial NO.
Descripon
Note
Qty.
1
BK-167-1
base frame
1
2
BK-167-2
base frame le
1
3
BK-167-3
base frame right
1
4
BK-167-4
upright frame
1
5
BK-167-5
hexagon bolt
M12*100
2
6
BK-167-6
gasket
Φ12
37
7
BK-167-7
lock nut
M12
19
8
BK-167-8
hexagon bolt
M10*30
8
9
BK-167-9
spring gasket
Φ10
20
10
BK-167-10
gasket
Φ10
18
11
BK-167-11
hexagon bolt
M12*95
4
12
BK-167-12
hexagon bolt
M12*105
4
13
BK-167-13
bending tube le
1
14
BK-167-14
bending tube right
1
15
BK-167-15
hexagon bolt
M12*80
3
16
BK-167-16
footplate
1
17
BK-167-17
hexagon bolt
M12*75
4
18
BK-167-18
hexagon bolt
M10*75
1
19
BK-167-19
lock nut
M10
7
20
BK-167-20
connecon tube right
1
21
BK-167-21
connecon tube le
1
22
BK-167-22
reinforcing plate
1
23
BK-167-23
seat pad le
1
24
BK-167-24
back pad le
1
25
BK-167-25
seat pad frame
1
26
BK-167-26
back pad front
1
27
BK-167-27
gasket
Φ8
24
28
BK-167-28
hexagon bolt
M8*55
4
29
BK-167-29
hexagon bolt
M8*35
4
30
BK-167-30
hexagon bolt
M8*20
12
31
BK-167-31
arm curl pad
1
32
BK-167-32
arm curl pad adjuster tube
1
33
BK-167-33
hexagon bolt
M10*20
10
34
BK-167-34
big gasket
Φ25*10*2.0
8
35
BK-167-35
sha
1
36
BK-167-36
leg curl tube
1
37
BK-167-37
barbell rod ring
8
38
BK-167-38
allen bolt
M8*25
4

Parts list
7
39
BK-167-39
foam inner cover
4
40
BK-167-40
foam outer cover
4
41
BK-167-41
foam
4
42
BK-167-42
foam rod
2
43
BK-167-43
bending handle
1
44
BK-167-44
T shape pin
Φ10*75
1
45
BK-167-45
hexagon bolt
M12*55
1
46
BK-167-46
allen bolt
M10*20
10
47
BK-167-47
end cap-50
Φ50*Φ11*9.5
10
48
BK-167-48
lat pull tube le
1
49
BK-167-49
lat pull tube right
1
50
BK-167-50
upright connecon tube
1
51
BK-167-51
barbell plate holder tube
1
52
BK-167-52
sha
Φ20*74
1
53
BK-167-53
hook
2
56
BK-167-56
shoulder pushing tube
1
57
BK-167-57
sha
Φ25*254
1
58
BK-167-58
hexagon bolt
M10*65
2
59
BK-167-59
sha
Φ25*256
3
60
BK-167-60
selector plate right
1
61
BK-167-61
selector plate le
1
62
BK-167-62
barbell plate holder
1
63
BK-167-63
frame
1
64
BK-167-64
tube plug
1
65
BK-167-65
locking spring knob
2
66
BK-167-66
rubber cushion
3
67
BK-167-67
tube plug
32-25
2
68
BK-167-68
powder metallurgy sleeve
Φ22*Φ18*Φ12*15
10
69
BK-167-69
rivet nut
M10
10
70
BK-167-70
magnec pin
2
71
BK-167-71
double screw rod
M12*218
1
72
BK-167-72
selector frame
1
73
BK-167-73
rubber cushion
Φ40*Φ25*Φ11*29
1
74
BK-167-74
tube plug
8
75
BK-167-75
foot cover
4
76
BK-167-76
allen bolt
M8*16
3
77
BK-167-77
tube plug
6
78
BK-167-78
sha
Φ12*92
1
79
BK-167-79
sha
Φ12*125
2

Parts list
8
80
BK-167-80
sleeve tube
1
81
BK-167-81
back pad frame 1
1
82
BK-167-82
bearing
6001
4
83
BK-167-83
tube plug
Φ40*60
2
84
BK-167-84
selector tube
1
85
BK-167-85
powder metallurgy sleeve
Φ32*Φ29*Φ20*18
8
86
BK-167-86
tube plug
Φ45*45*2.0
2
87
BK-167-87
support tube
1
88
BK-167-88
locking spring knob
1
89
BK-167-89
base frame
1
90
BK-167-90
seat pad adjuster frame
1
91
BK-167-91
support frame
2
92
BK-167-92
powder metallurgy sleeve
Φ26*Φ22*Φ16*12
8
93
BK-167-93
back pad frame 1
1
94
BK-167-94
big gasket
Φ30*Φ10.5*3.0
4
95
BK-167-95
powder metallurgy sleeve
Φ50*Φ47*Φ25*15
20
96
BK-167-96
sha
Φ25*67-M10
1
97
BK-167-97
allen bolt
M10*20
3
98
BK-167-98
rubber sheet
t4.0*45*85
1
99
BK-167-99
screw
ST4.0*12
12
100
BK-167-100
tube plug
Φ40*Φ25*Φ11*29
1
101
BK-167-101
tube plug
32-25
2
102
BK-167-102
tube
2
103
BK-167-103
end cap
Φ50*Φ11*11
8
104
BK-167-104
allen bolt
M10*25
6
105
BK-167-105
tube plug
1
106
BK-167-106
handle cover
Φ25*130
2
107
BK-167-107
end cap
Φ25
10
108
BK-167-108
screw
M4*3
10
109
BK-167-109
plasc nut
M8
4
110
BK-167-110
tube plug
□50*70*2.0
14
111
BK-167-111
handle cover
Φ25*150
6
112
BK-167-112
tube
Φ50*200
2
113
BK-167-113
rubber ring
Φ70*Φ50*10
4
114
BK-167-114
bearing
6005
4
115
BK-167-115
tube
Φ50*260
2
116
BK-167-116
handle cover
Φ25*400
2
117
BK-167-117
tube plug
Φ48
4
118
BK-167-118
locking spring knob
75
2

9
Parts list
0 1 6 7 8 9 10 11 12 13 14 152 3 4 5
Bolt length meter
cm
119
BK-167-119
selector plate
2
120
BK-167-120
inner thread lock screw
M4*5
6
121
BK-167-121
outer thread lock screw
Φ5*8-M4
6
122
BK-167-122
tube
Φ50*300
2
123
BK-167-123
pad
2
124
BK-167-124
allen bolt
M10*30
2
125
BK-167-125
hexagon bolt
M8*100
4
126
BK-167-126
rubber sheet
t4.0*45*85
2
127
BK-167-127
handle cover
Φ12*70
1
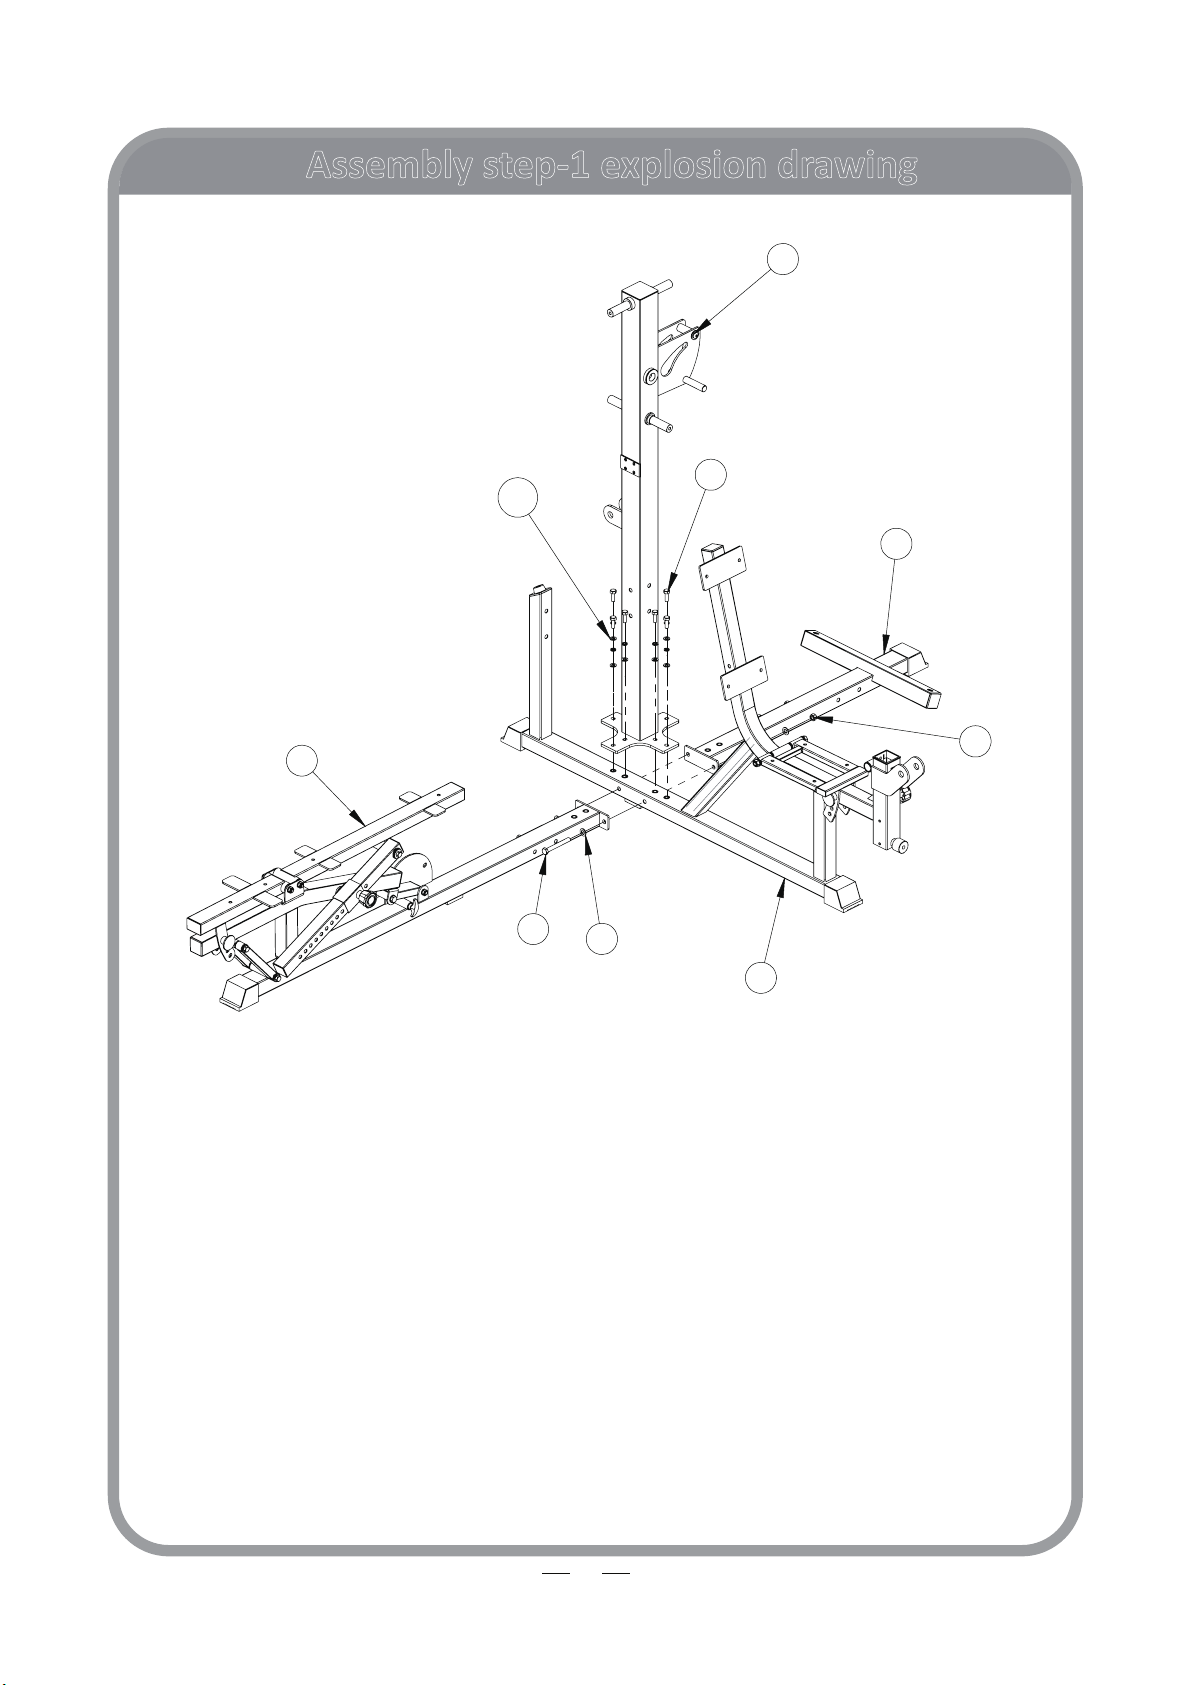
Assembly step-1 explosion drawing
10
4
8
3
7
1
10
6
5
2
No.
Descripon
Note
Qty.
1
base frame
1
2
base frame le
1
3
base frame right
1
4
upright frame
1
5
hexagon bolt
M12*100
2
6
gasket
Φ12
4
7
lock nut
M12
2
8
hexagon bolt
M10*30
8
9
spring gasket
Φ10
8
10
gasket
Φ10
8

No.
Descripon
Note
Qty.
6
gasket
Φ12
2
7
lock nut
M12
2
63
frame
1
64
tube plug
1
65
locking spring knob
1
66
rubber cushion
1
67
tube plug
32-25
2
68
powder metallurgy
Φ22*Φ18*Φ12*15
6
69
rivet nut
M10
4
70
magnec pin
1
71
double screw rod
M12*218
1
72
selector frame
1
73
rubber cushion
Φ40*Φ25*Φ11*29
1
74
tube plug
1
75
foot cover
2
76
allen bolt
M8*16
1
77
tube plug
2
11
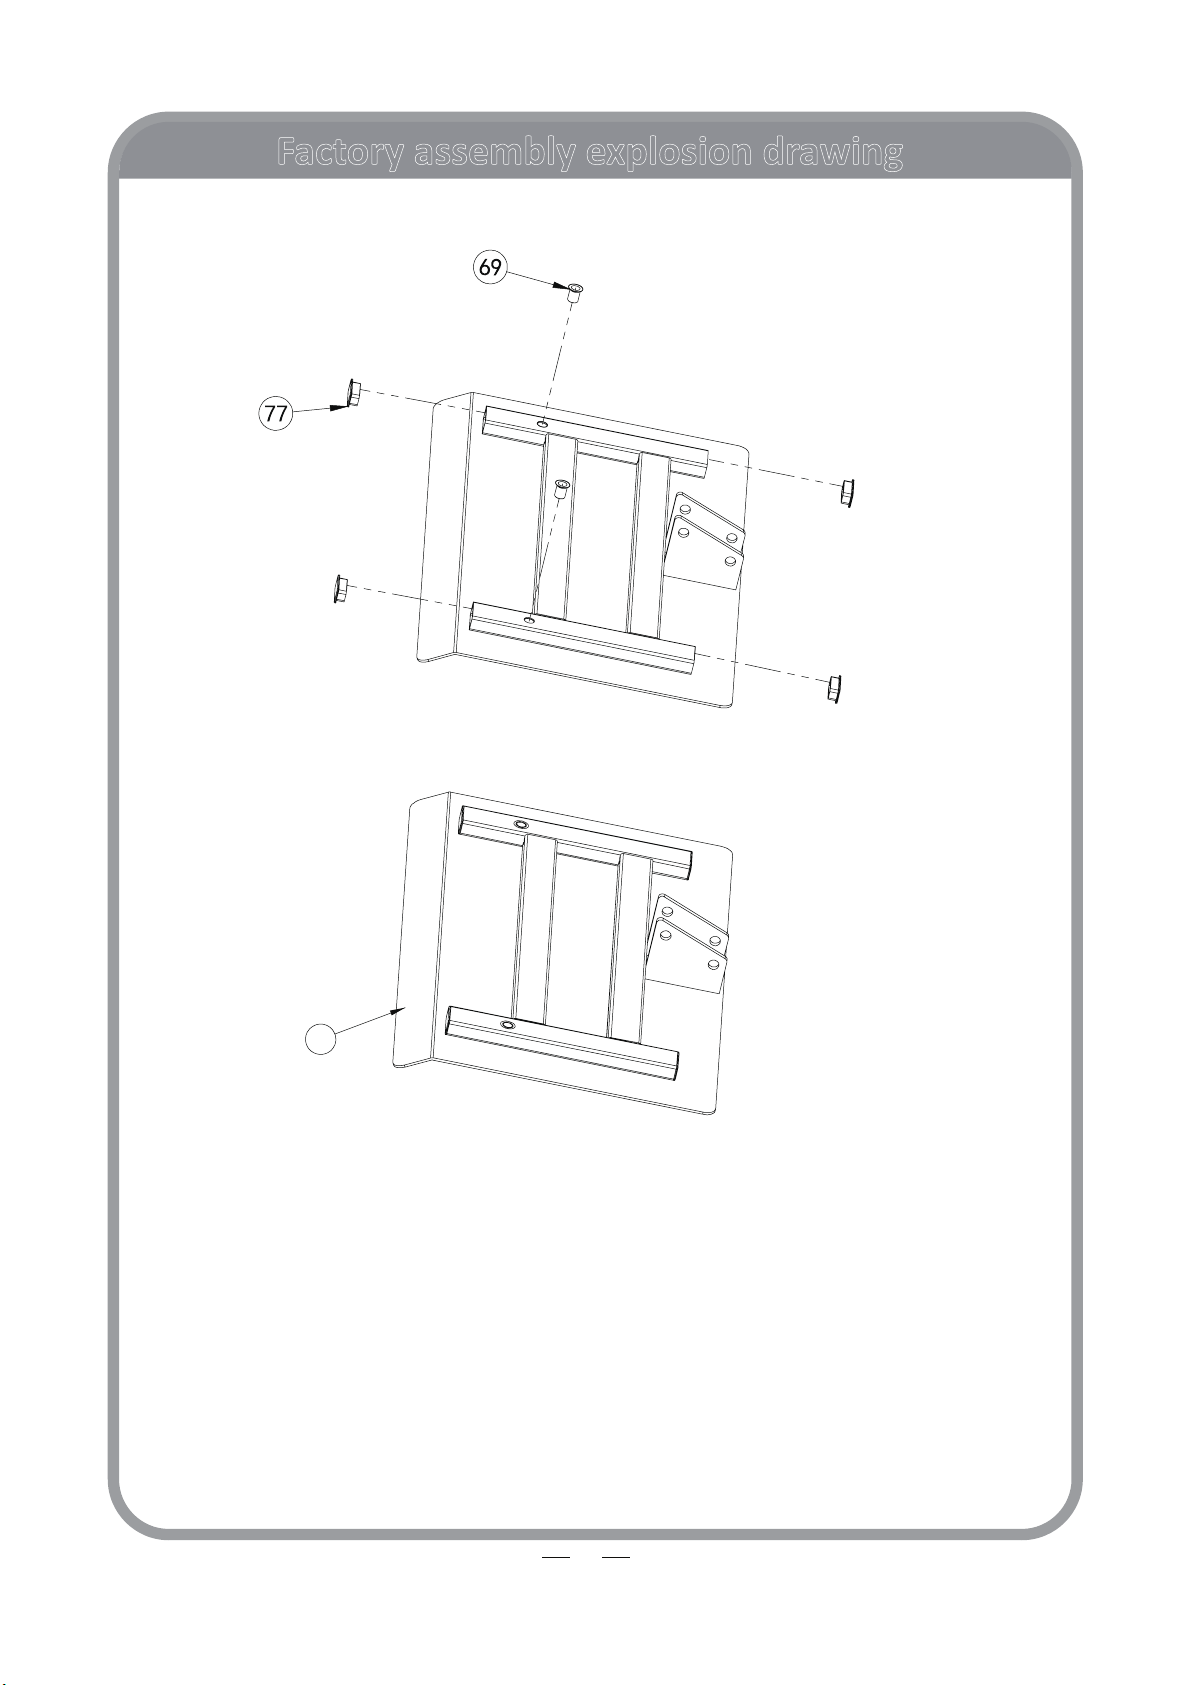
Factory assembly explosion drawing
1
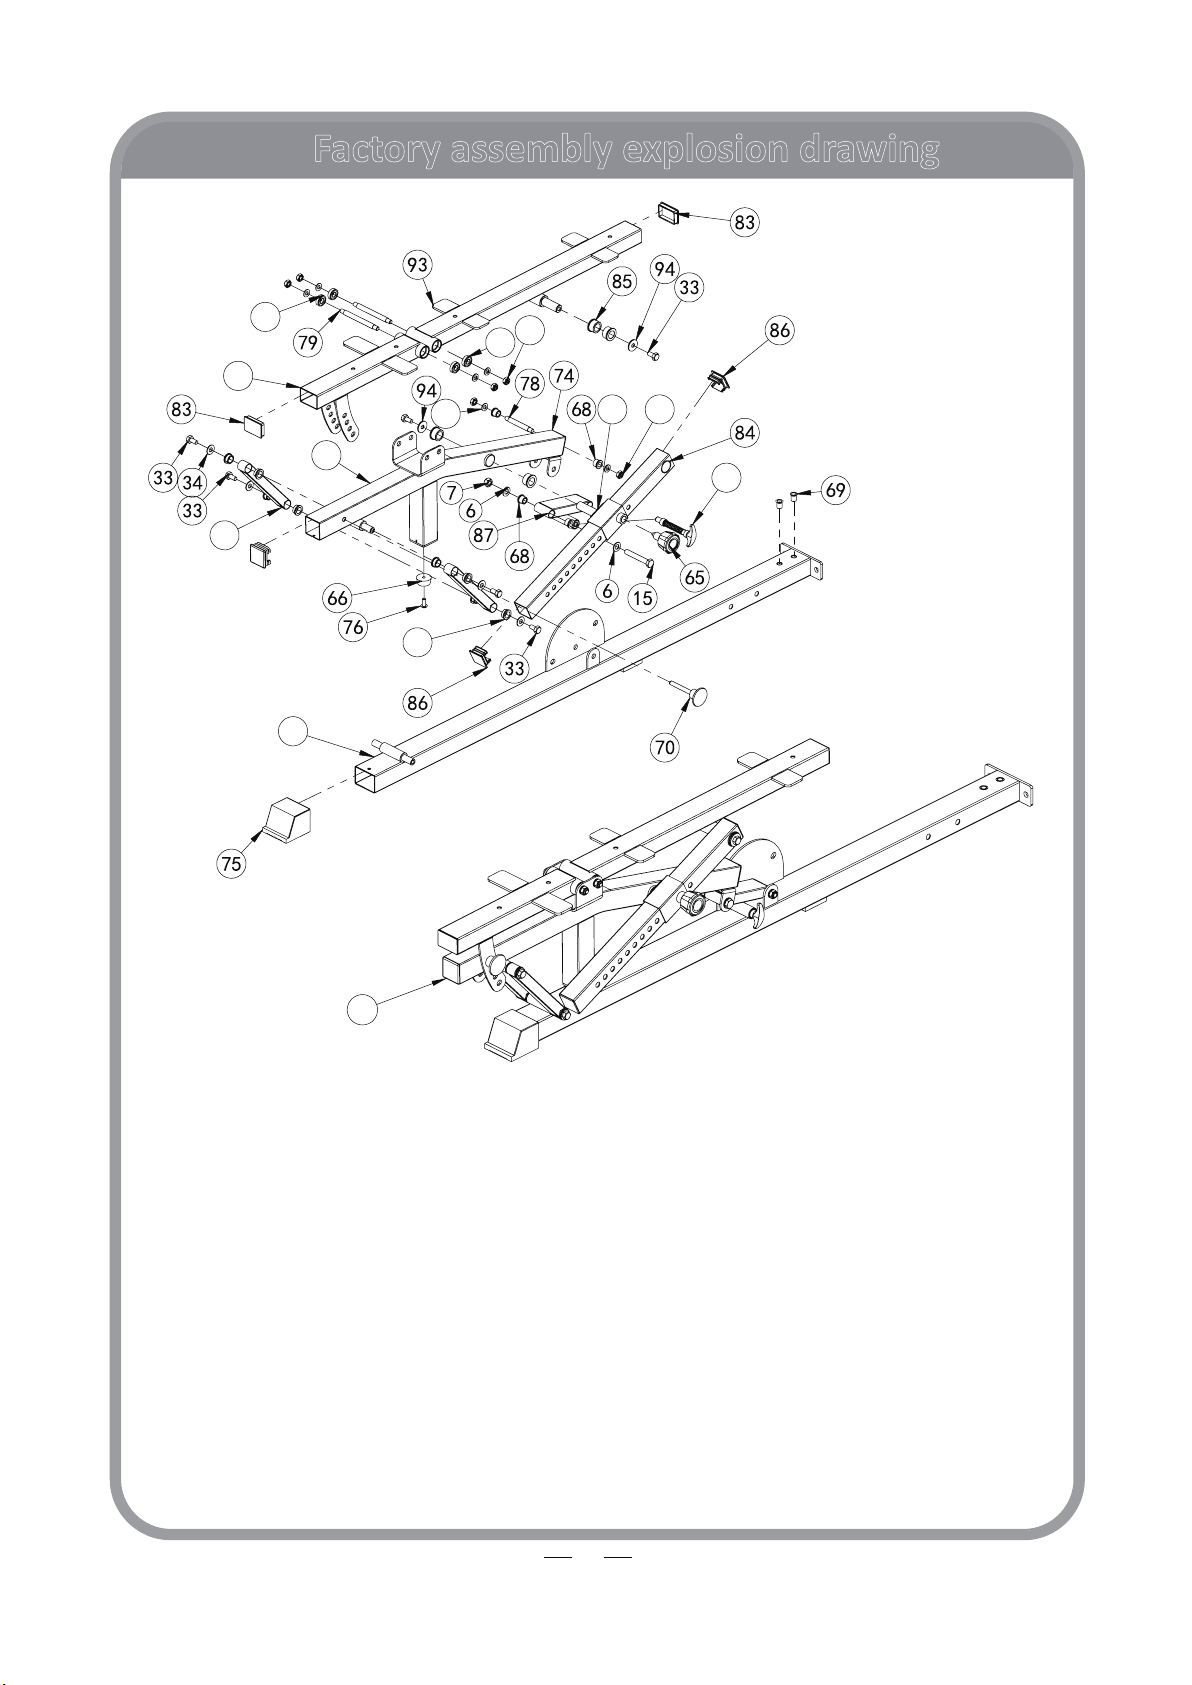
No.
Descripon
Note
Qty.
79
sha
Φ12*125
2
80
sleeve tube
1
81
back pad frame 1
1
82
bearing
6001
4
83
tube plug
Φ40*60
2
84
selector tube
1
85
powder metallurgy sleeve
Φ32*Φ29*Φ20*18
4
86
tube plug
Φ45*45*2.0
2
87
support tube
1
88
locking spring knob
1
89
base frame
1
90
seat pad adjuster frame
1
91
support frame
2
92
powder metallurgy sleeve
Φ26*Φ22*Φ16*12
8
93
back pad frame 1
1
94
big gasket
Φ30*Φ10.5*3.0
2
No.
Descripon
Note
Qty.
6
gasket
Φ12
2
7
lock nut
M12
1
10
gasket
Φ10
6
15
hexagon bolt
M12*80
1
19
lock nut
M10
6
33
hexagon bolt
M10*20
6
34
big gasket
Φ25*Φ10*2.0
4
65
locking spring knob
1
66
rubber cushion
1
68
powder metallurgy sleeve
Φ22*Φ18*Φ12*15
4
69
rivet nut
M10
2
70
magnec pin
1
74
tube plug
2
75
foot cover
1
76
allen bolt
M8*16
1
78
sha
Φ12*92
1
12
Factory assembly explosion drawing
82
10 80 19
88
92
89
91
90
81
19
82
2
13
Factory assembly explosion drawing
3
No.
Descripon
Note
Qty.
69
rivet nut
M10
2
74
tube plug
2
75
foot cover
1
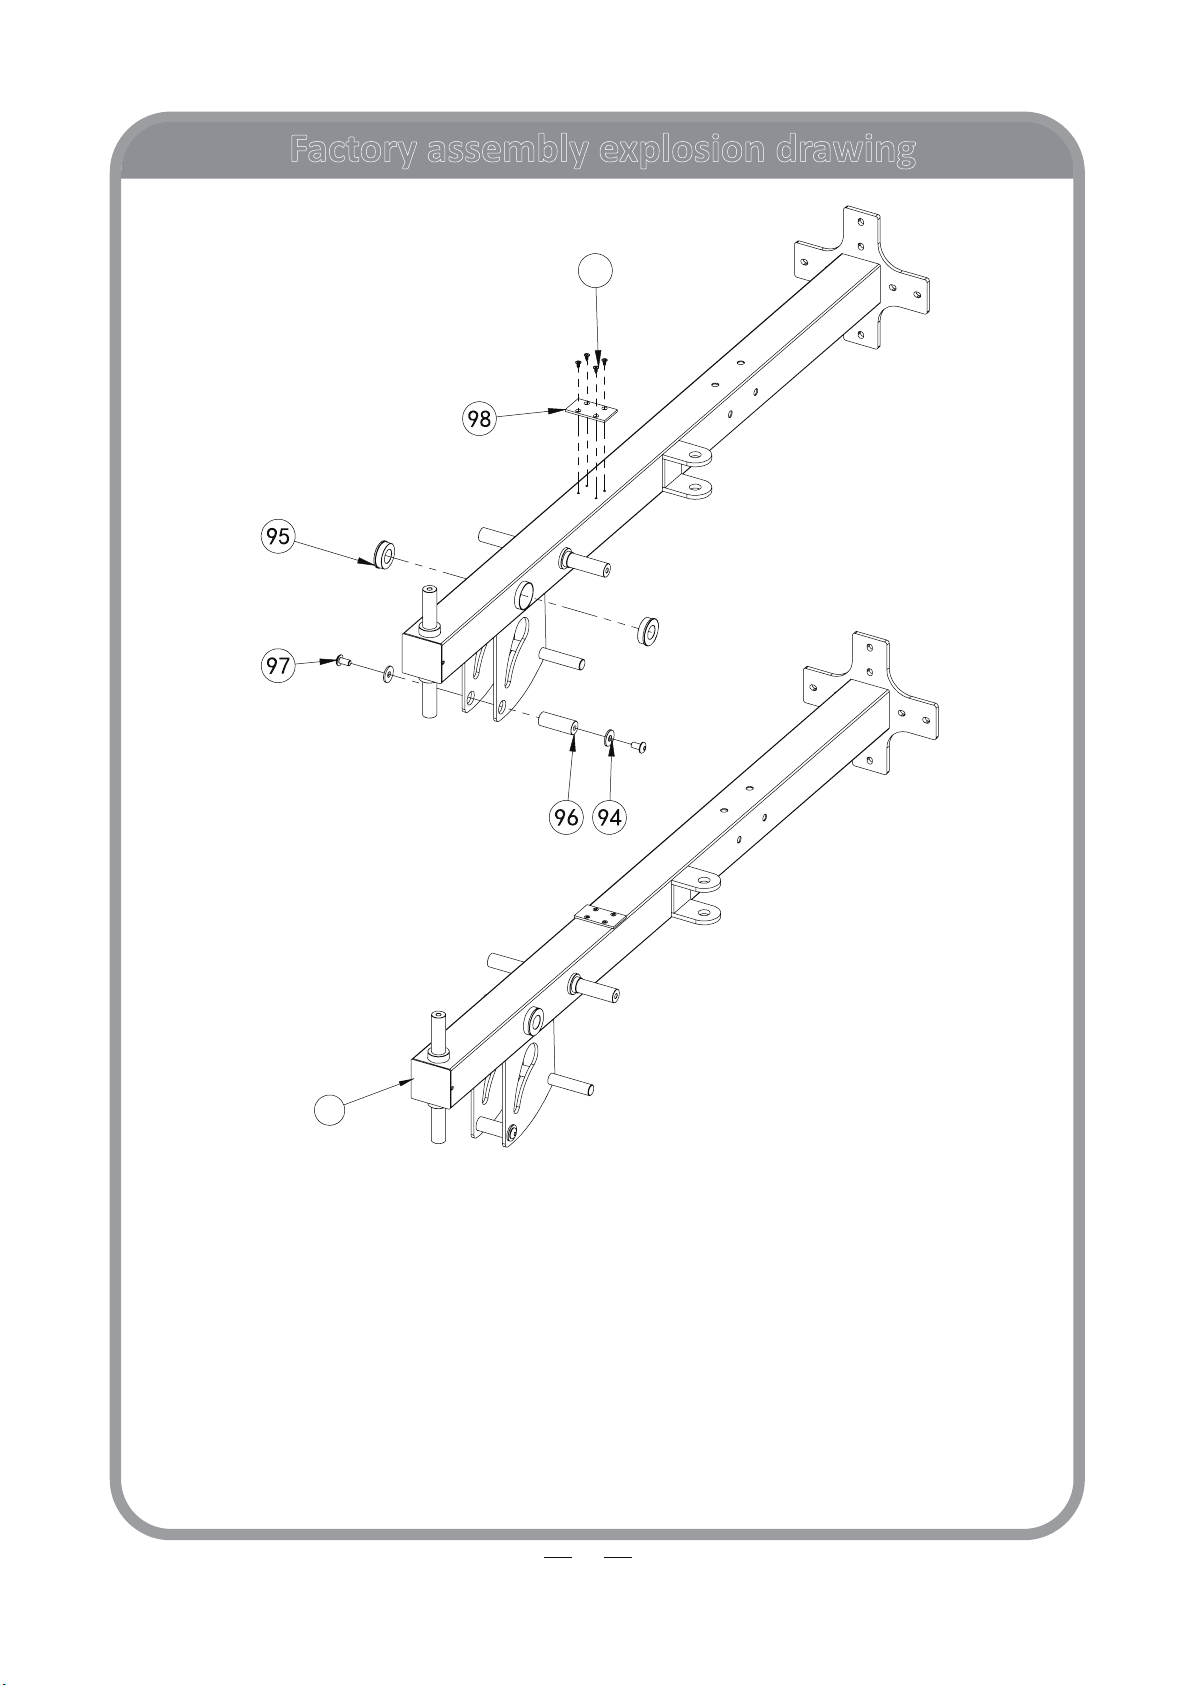
11
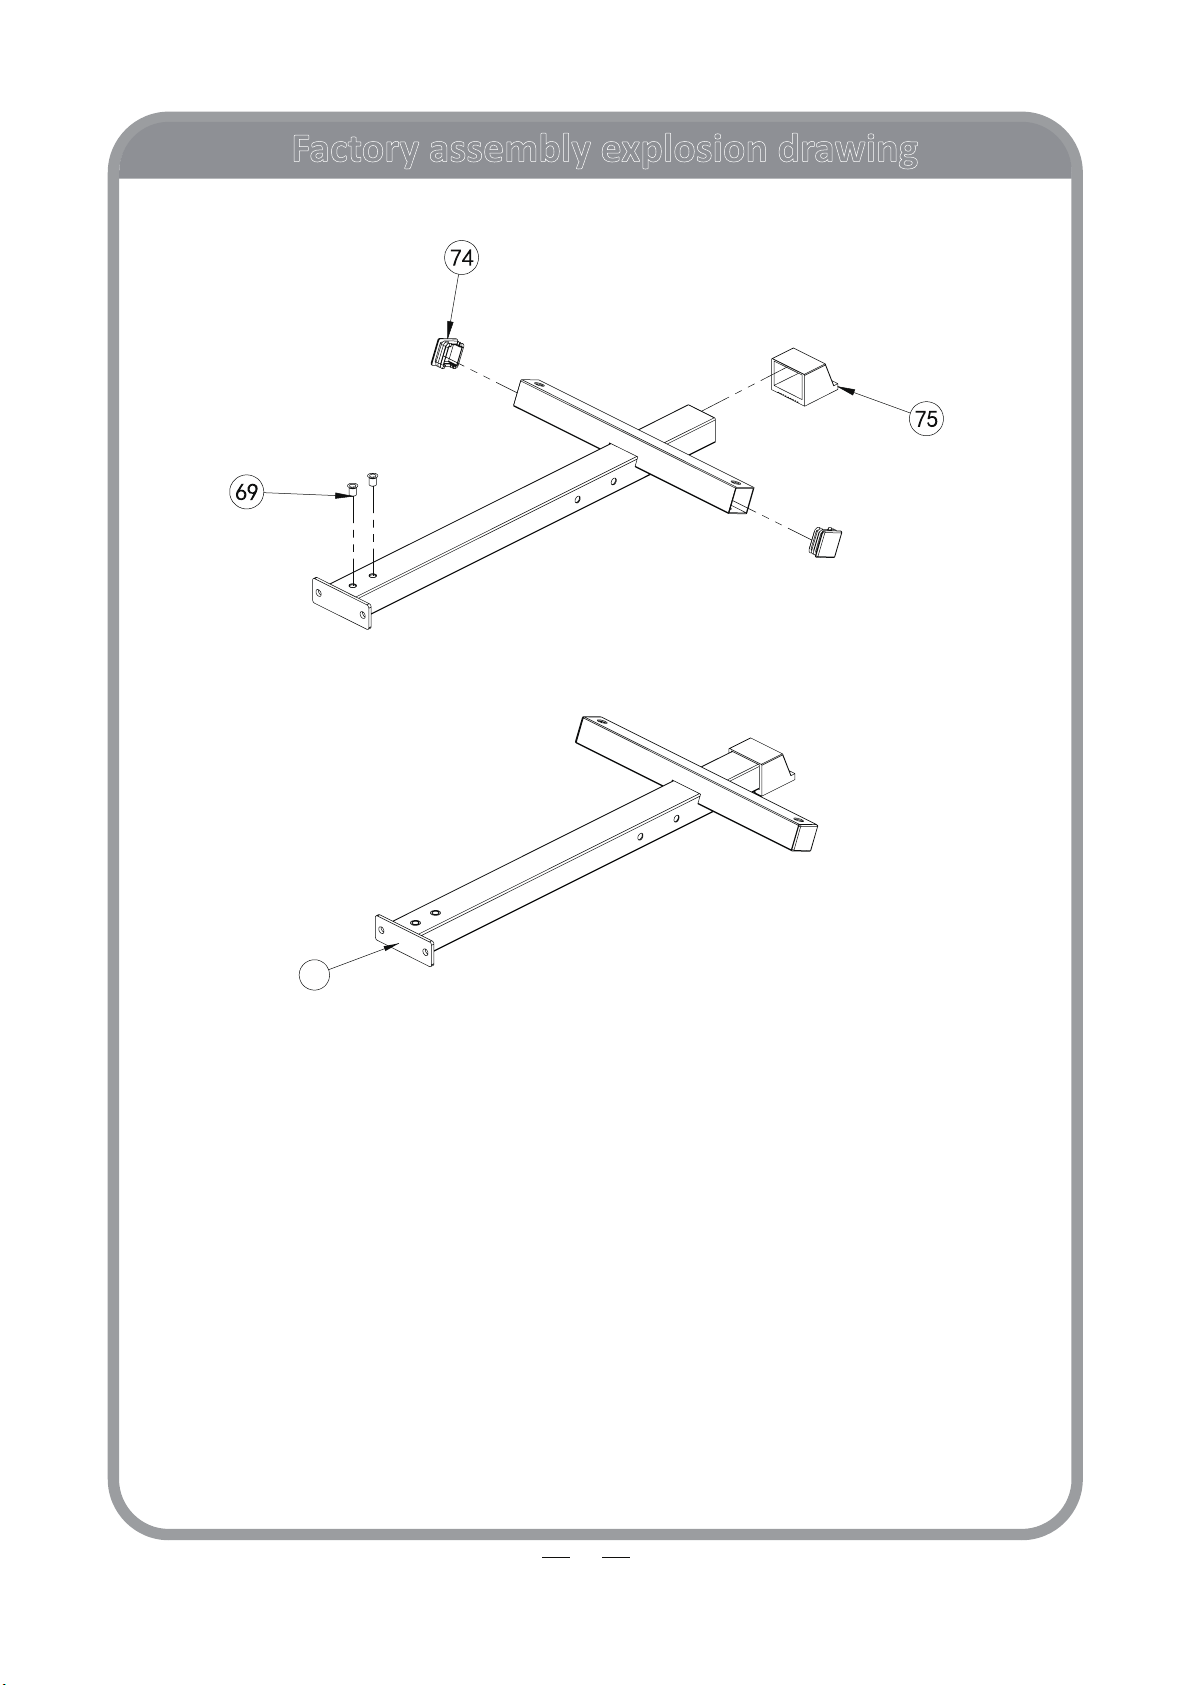
Factory assembly explosion drawing
99
4
No.
Descripon
Note
Qty.
94
big gasket
Φ30*Φ10.5*3.0
2
95
powder metallurgy sleeve
Φ50*Φ47*Φ25*15
2
96
sha
Φ25*67-M10
1
97
allen bolt
M10*20
2
98
rubber sheet
t4.0*45*85
1
99
screw
ST4.0*12
4

Assembly step-1 drawing
15
Assembly step-1 installaon instrucon
1 Fix base frame le-2 and base frame right-3 fastening with base frame-1 using
M12*100 hexagon bolt-5, Φ12 gasket-6 and M12 lock nut-7.
2 Fix upright frame-4 fastening with base frame le-2,base frame right-3 and base
frame-1 using M10*30 hexagon bolt-8, Φ10 spring gasket-9 and Φ10 gasket-10.
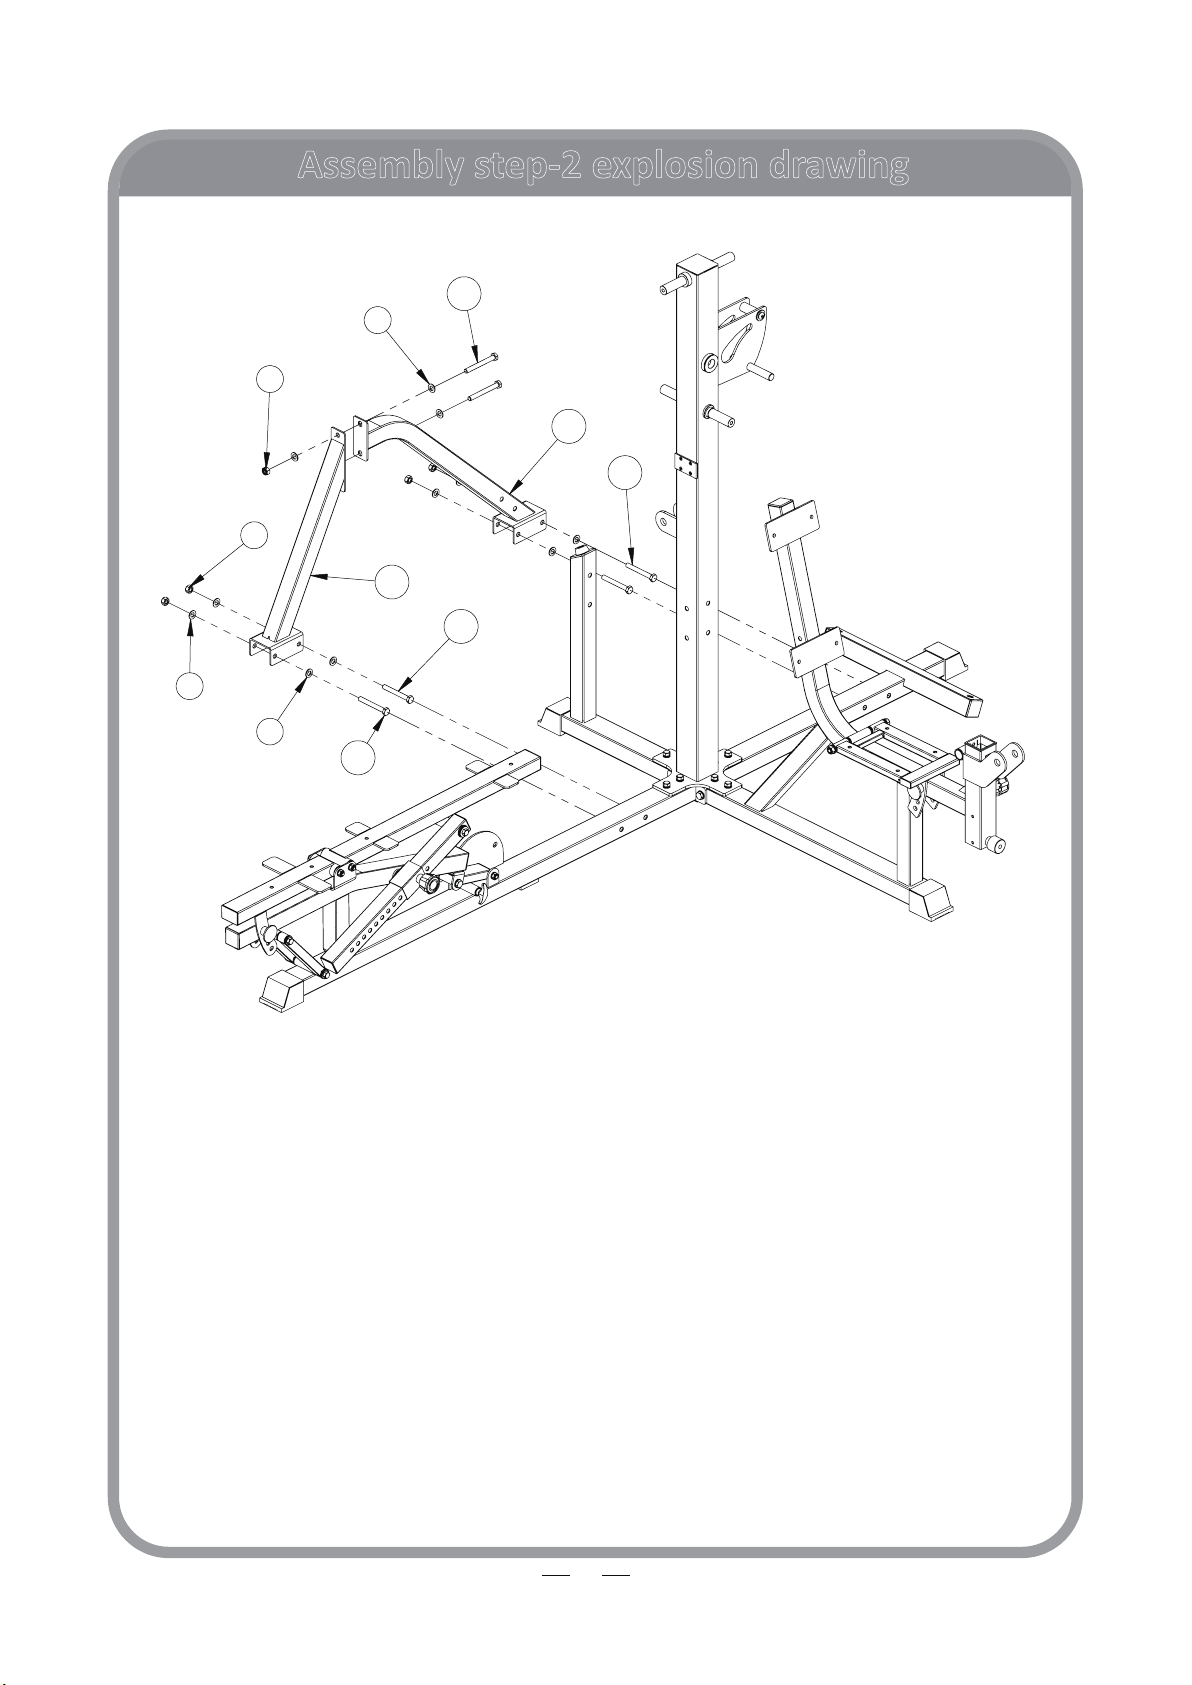
Assembly step-2 explosion drawing
16
14
11
6
13
12
7
7
11
6
11
6
No.
Descripon
Note
Qty.
6
gasket
Φ12
11
7
lock nut
M12
5
11
hexagon bolt
M12*95
4
12
hexagon bolt
M12*105
2
13
bending tube le
1
14
bending tube right
1
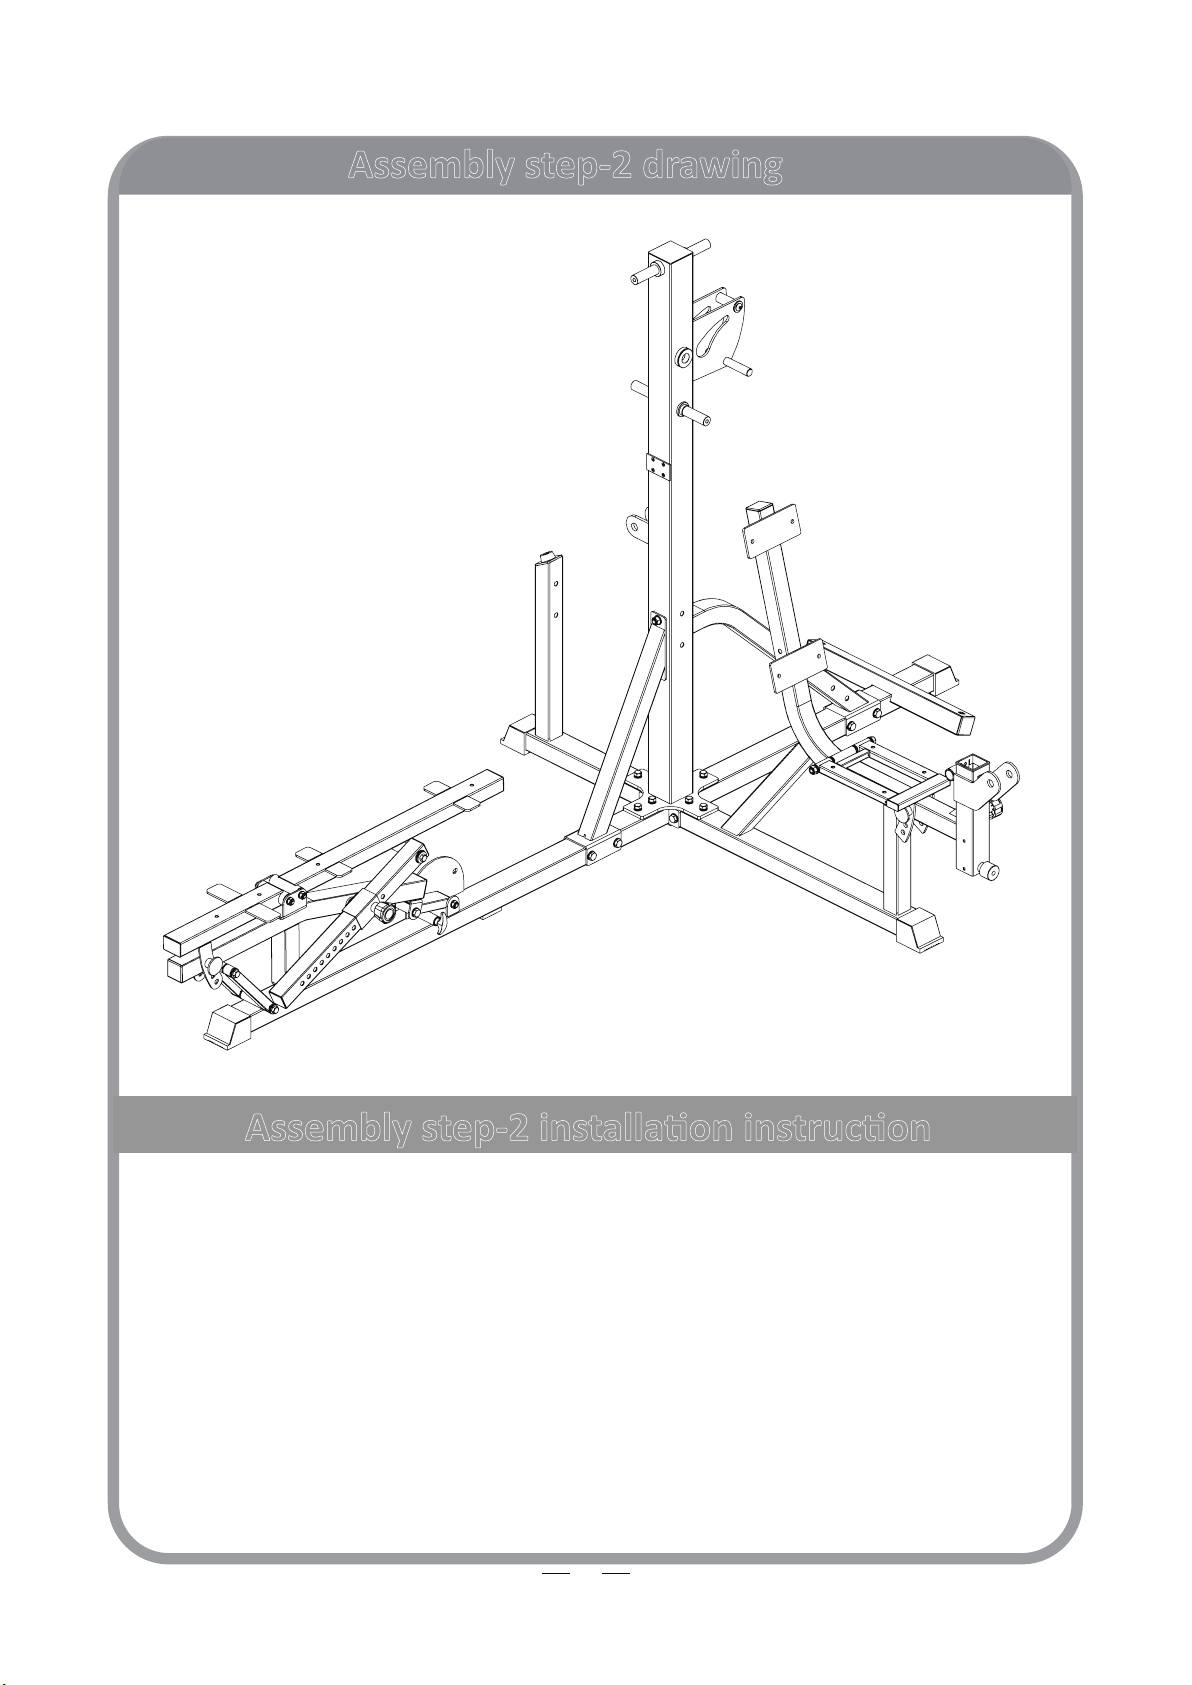
Assembly step-2 drawing
17
Assembly step-2 installaon instrucon
1 Fix bending tube le-13 fastening on base frame le-2 using M12*95 hexagon bolt-
11, Φ12 gasket-6 and M12 lock nut-7
2 Fix bending tube right-14 fastening on base frame right-3 using M12*95 hexagon bolt-
11, Φ12 gasket-6 and M12 lock nut-7.
3 Fix bending tube le-13 and bending tube right-14 fastening on main frame using
M12*105 hexagon bolt-12, Φ12 gasket-6 and M12 lock nut-7.

Assembly step-3 explosion drawing
16
58
10
15
7
6
No.
Descripon
Note
Qty.
6
gasket
Φ12
4
7
lock nut
M12
2
10
gasket
Φ10
2
15
hexagon bolt
M12*80
2
16
footplate
1
58
hexagon bolt
M10*65
2
18
19
Factory assembly explosion drawing
16
No.
Descripon
Note
Qty.
69
rivet nut
M10
2
77
tube plug
4
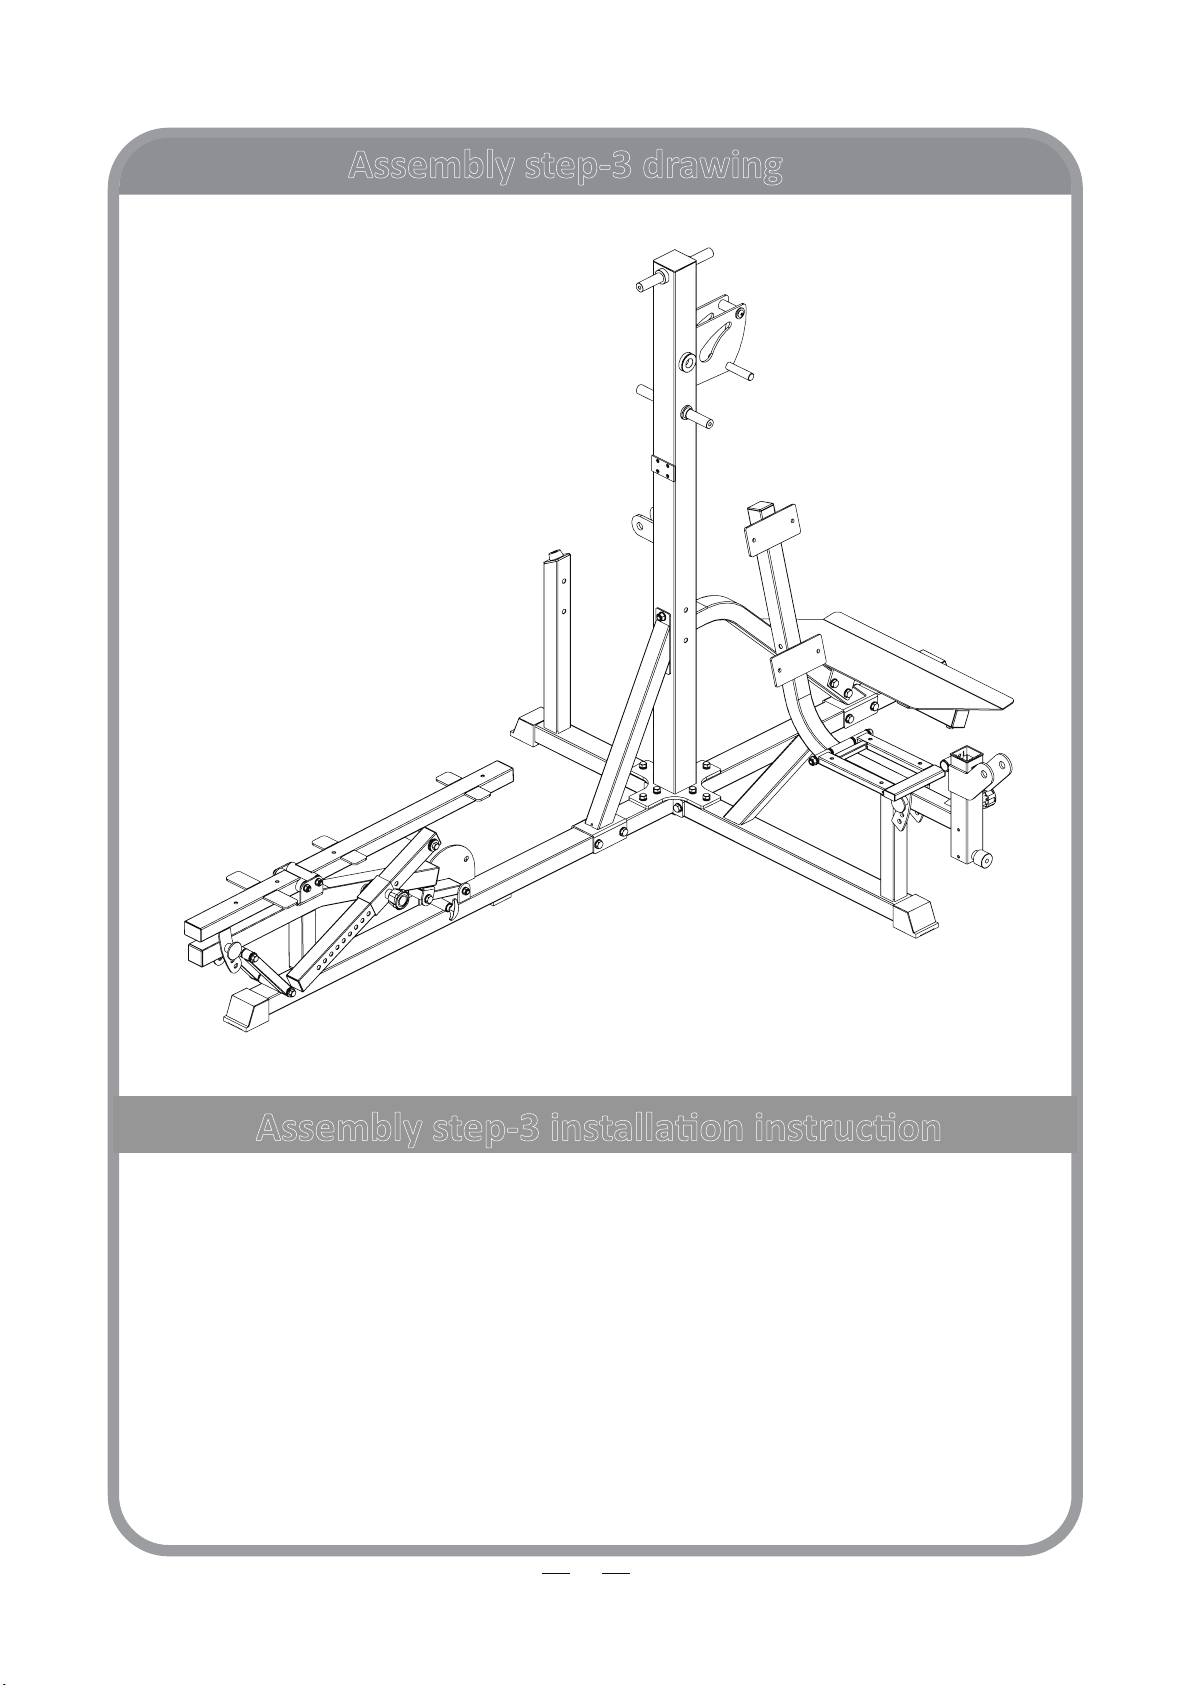
Assembly step-3 drawing
20
Assembly step-3 installaon instrucon
1 Fix footplate-16 fastening on bending tube right-14 using M12*80 hexagon bolt-15, Φ
12 gasket-6 and M12 lock nut-7.
2 Fix footplate-16 fastening on base frame right-3 using M10*65 hexagon bolt-58 and Φ
10 gasket-10.
Table of contents
Other body Power Home Gym manuals


