BodyCAP e-Celsius Performance User manual
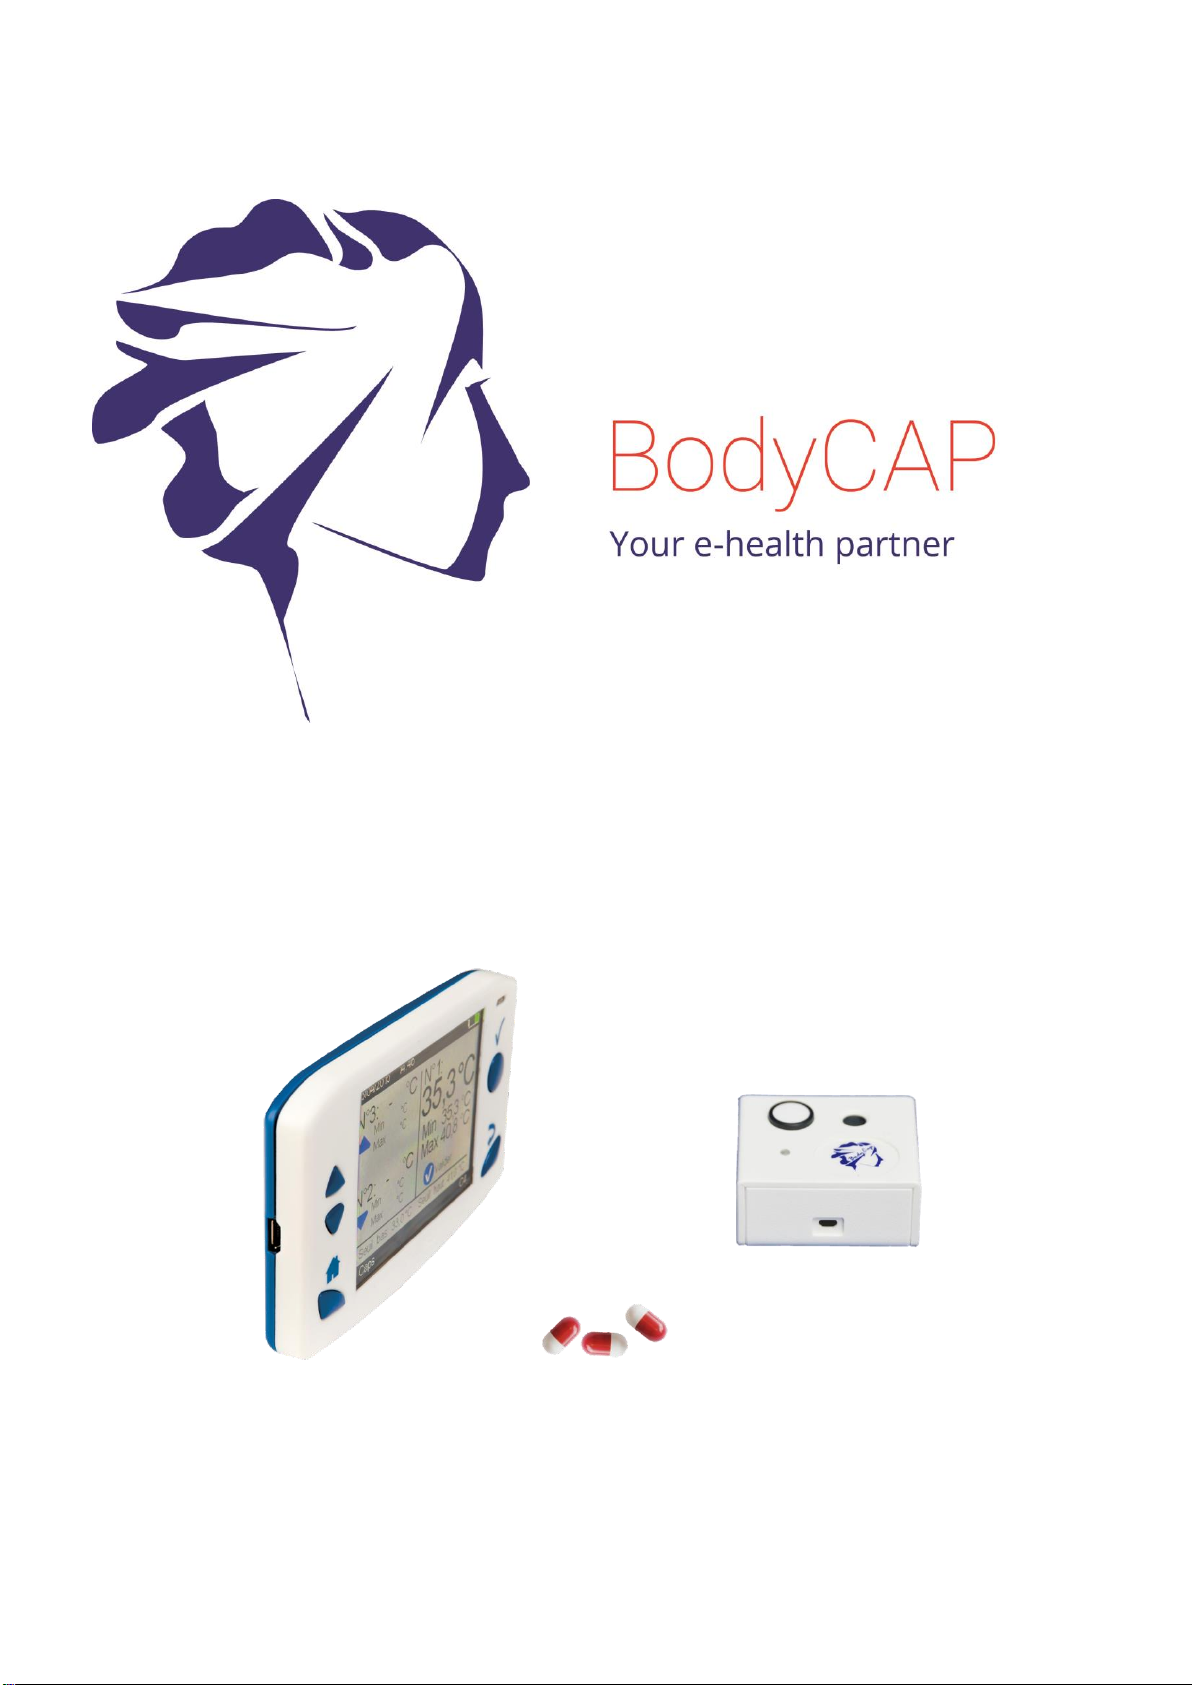
User Guide
e-CELSIUS® Performance
Telemetric system for gastrointestinal temperature monitoring
Jan. 2017 Before use, please read
entirely theses instructions
User Guide e-CELSIUS Performance.2
EN
2
Index
1Precautions for use................................................................. 4
2Use claims and contraindications............................................ 5
Use claims ....................................................................................... 5
Contraindications and Warnings...................................................... 6
3First use.................................................................................. 6
Installation of e-Performance Manager Software............................ 6
Implementation of the device ......................................................... 7
3.2.1 Power up of the e-Viewer®performance monitor ..........................................7
3.2.2 Supply the batteries.........................................................................................7
3.2.3 Configuration of the monitor...........................................................................7
4The e-Celsius®performance capsule ..................................... 10
5The Activator........................................................................ 11
The buttons....................................................................................11
LED.................................................................................................11
6e-Viewer®performance monitor ........................................... 11
The buttons....................................................................................12
The LEDs.........................................................................................13
Battery ...........................................................................................13
Connection.....................................................................................14
RF Communication .........................................................................14
Monitor interface menu .................................................................15
Main functions ...............................................................................18
6.7.1 Set the monitor ..............................................................................................18
6.7.2 Changing the channel used by the monitor.................................................18
6.7.3 Activate a pill..................................................................................................18
6.7.4 Consult temperature data in real time..........................................................20
6.7.5 Detailed temperature data visualization.......................................................21
6.7.6 Synchronization of the data in memory of the capsule...............................21
6.7.7 Visualization of the end-of-life of the capsule .............................................23
6.7.8 Min/Max reset.................................................................................................23
6.7.9 Measurement period......................................................................................23
6.7.10 Deactivation of a pill......................................................................................24

User Guide e-CELSIUS Performance.2
EN
3
6.7.11 Use of the monitor screen.............................................................................24
6.7.12 Low battery.....................................................................................................25
6.7.13 Overview of the alarm system.......................................................................25
7e-Performance Manager®software ....................................... 26
Main functions ...............................................................................26
7.1.1 Unload and consult the temperature data on the e -Performance Manager
software 26
7.1.2 Markers from the e-Viewer®performance monitor......................................27
7.1.3 Automatic markers on e-Performance manager software ..........................27
7.1.4 Hide markers..................................................................................................28
7.1.5 Export temperature’s data unloaded on e-Performance Manager software
28
Secondary functions .......................................................................29
7.2.1 Backup mode.................................................................................................29
8Cables and power supply ...................................................... 31
9Equipment specifications ...................................................... 32
9.1.1 Manufacturer Information..............................................................................32
9.1.2 e-Performance Manager –Required configuration .....................................32
9.1.3 e-Celsius Performance pill technical data: ..................................................32
9.1.4 Activator technical data: ...............................................................................33
9.1.5 e-Viewer Performance technical data:..........................................................34
9.1.6 Power Supply technical data: .......................................................................35
10 Failures guide ....................................................................... 35
11 Symbols................................................................................ 36

User Guide e-CELSIUS Performance.2
EN
4
To our customers, we thank you for purchasing the e-CELSIUS®performance system. The
system includes an activator and a monitor “e-Viewer®performance” respectively dedicated to
the activation and reception of data sent from e-Celsius®performance capsules. Furthermore,
a PC / Mac software allows to set the monitor and to export the data stored in the monitor. The
Activator, e-Viewer®performance Monitor and e-Celsius®performance capsules are
manufactured by the company BodyCap. This manual is designed to introduce the features
and operation of your system and to support you installing and using this product. The use of
this device does not require training or specific skills; however, please read these instructions
carefully and keep it handy in order to refer to it whenever you need.
Destination and use case:
e-CELSIUS®performance system is designed to continuously measure the gastrointestinal
temperature. The e-Celsius®performance capsule should be swallowed. It is supplied in its
original packaging and intended for a single use. It has to be activated with the Activator then
associated with the monitor that stores the data collected by the capsule. Data transfer from
Monitor to a PC / Mac is enabled via an interface provided with the system.
The system is designed for Non-Medical uses; the applications fields of medical
diagnosis and therapeutics in patients are excluded.
1Precautions for use
The following safety instructions ensure proper operation and will optimize the use of the e-
CELSIUS®performance system. Follow them carefully. For any questions that have not been
answered in the manual, please ask for assistance from your distributor or manufacturer
(contact information at the end of this leaflet).
The e-CELSIUS®performance system is not claimed MRI compatible: It is imperative that the
patient ingesting a capsule does not undergo any MRI. The patient should wear the wrist band
supplied with the system.
The bracelet is fixed just before the ingestion and should only be removed after removal of the
capsule.
Do not place or drop any object on the
device, do not introduce foreign objects.
Do not expose the e-CELSIUS®
performance system to dust or dirt (clean
up the system into its packaging).
Do not use in the presence of flammable
substances.
Do not expose the system to strong
magnetic or electrical fields.
Do not touch or press the screen of the
monitor.
Do not place the monitor or the Activator
around small objects that may scratch then
or enter inside.
Do not expose the monitor or the Activator
to rain or humidity; keep them away from
liquids or sprayed water.
In order to reduce the risk of fire, electric
shock and interference, only use the micro-
User Guide e-CELSIUS Performance.2
EN
5
USB cable and the adapter supplied with
the system.
Do not use a damaged micro-USB cable or
power adapter.
It is highly recommended to pay attention to
the localisation of the cables so they are not
in the passage and do not constitute a risk
of falling.
Take care to not shake orstrike the monitor
and the Activator. This could affect their
normal way of working.
Do not use the capsule if the packaging is
damaged.
Do not use the system if it is damaged.
Connect only units, which have been
identified such as parts of or compatible
with the device.
Safety instructions: DO NOT THROW INTO FIRE
DO NOT SHORT-CIRCUIT
DO NOT DISASSEMBLE
Do not put the device as unsorted municipal waste. The Monitor and the Activator
have been designed to allow a reuse and a suitable recycling of some components.
The symbol representing a waste container with a cross indicates that the product
(electrical equipment, electronic and pile and / or battery) should not be put in
municipal waste. Check local regulations for disposal of electronic products.
Cleaning
It is not recommended to clean the device using hydro alcoholic solutions.
The system should not, in any case, be introduced in an autoclave on pain of permanent
damage for capsules concerned.
2Use claims and contraindications
Use claims
The e-CELSIUS®performance system is an electronic device for non-medical uses.
The device is designed for continuous human gastrointestinal temperature measurement.
The device is made of four elements:
-A disposable electronic capsule (e-Celsius® performance), intended to be swallowed.
-A monitor (e-Viewer®performance) to collect, display and record the data.
-An activator (Activator) to set the capsules in operation before ingestion.
-A software (e-Performance Manager) allows you to set the monitor and display the data
recorded by the monitor on a computer screen.
The accuracy of the system compared to the absolute temperature value is ±0.2°C, variability
level, 0.1°C.
User Guide e-CELSIUS Performance.2
EN
6
The system is designed for non-medicals uses. It is designed for physiological
monitoring in order to optimise sports performances or to improve knowledge of human
physiology. The device must not be used for diagnosis or therapeutic uses in patients.
Contraindications and Warnings
Contraindications:
The e-CELSIUS®performance system is designed for the measurement of core temperature
in humans; it is contraindicated in a number of situations:
-For people weighing less than 40 kg.
-For people with or presenting a risk of intestinal disorders that can lead to obstruction
of the digestive tract, including diverticula.
-For people with motility disorders of the gastrointestinal tract.
-For people who have undergone surgical procedures in the gastrointestinal tract.
-For people with known swallowing disorders.
-For people who have to undergo strong electromagnetic field during the period of use
of the system (MRI particular).
Warnings:
The measure being carried out in the digestive system, the collected data may be influenced
by factors such as food or water intake (hot or cold) during the first two hours following the
ingestion of the capsule.
If users are overweight people, communication issues between the capsule and the monitor
may be encountered due to the system operating mode. The communication between the
capsule and the monitor being performed by radio-frequency at 433 MHz - 434 MHz, the signal
may be attenuated by the presence of adipose tissue. Thus, communication distance between
the capsule and the monitor could be reduced or even void.
3First use
Installation of e-Performance Manager Software
Computer installation
Minimal configuration Requirement:
Processor 1GHz.
500Mo de RAM.
200Mo disk space required for the installation
Windows®7 or operating systems Microsoft®compatibles (32 or
64 bits), Mac OS X (10.9 Lion) or ulterior. The screen resolution
has to be at minima 1024x768.
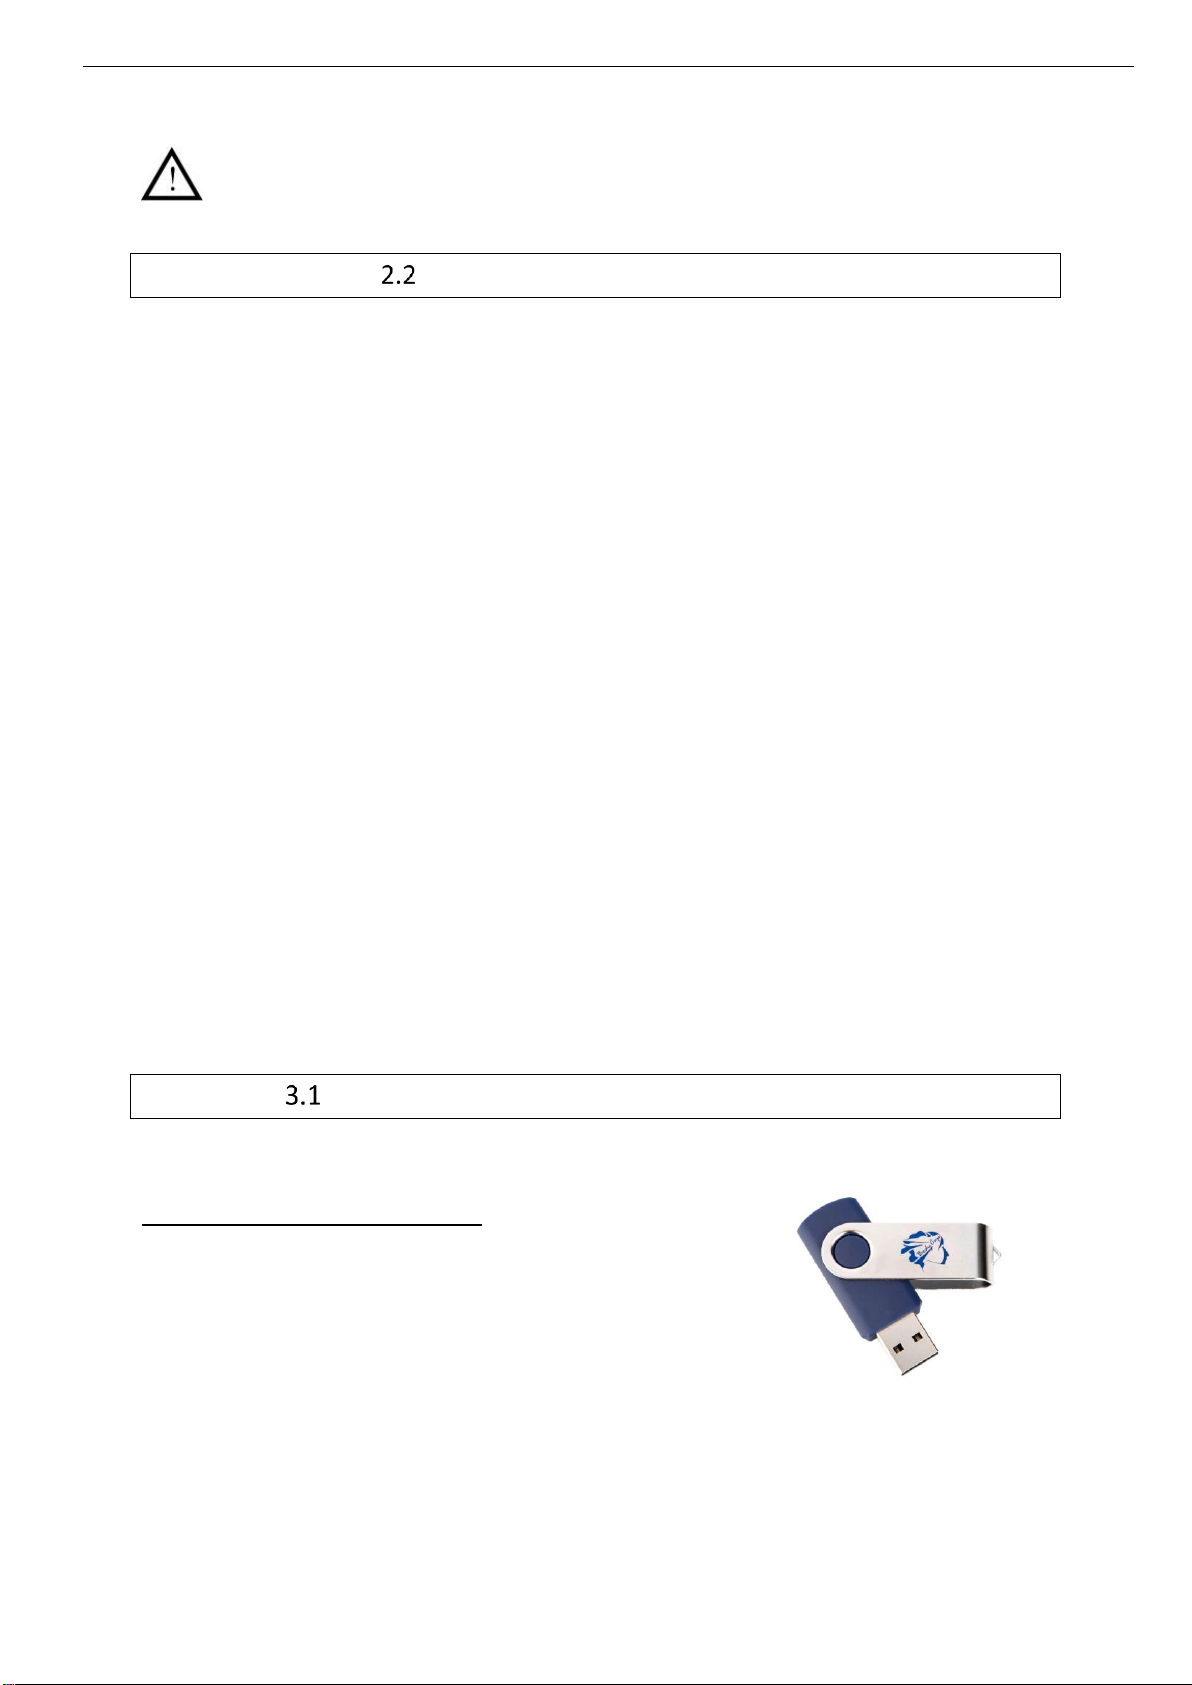
To install e-Performance Manager software and the drivers of e-Viewer®performance monitor,
please:
Picture 1: USB stick BodyCap

User Guide e-CELSIUS Performance.2
EN
7
Launch the installer "e-Performance_Manager" or "MAC-e-Performance_Manager"
according to your operating system. These installers are present on the USB memory
stick provided (Picture 1: USB stick BodyCap) with your system e-CELSIUS®
performance;
Follow the instructions step by step
Install the driver.
During the software installation, you have to read and accept the proposed license agreement.
For the Mac version, please also run the second file provided with the installer to install the
driver required to ensure the communication between the monitor and the MAC.
Note: If the driver install does not launch automatically after a double click on the file,
remember to look in the navigation panel on the left of the screen if a new disk appears " Silicon
Labs VCP Driver Install Disk".
Implementation of the device
3.2.1 Power up of the e-Viewer®performance monitor
The monitor e-Viewer Performance is delivered switched off. To exit the storage mode, you
must turn on the system by a short simultaneous pressure on the buttons (on the front)
and (on the right side). This procedure turns on the monitor. If the screen does not light,
put the monitor in charge and repeat few minutes after.
Before using the e-Viewer®performance monitor in battery-run, you have to ensure that its
charge level is sufficient.
To use the e-Viewer®performance monitor with the PC / MAC e-Performance Manager
software, you have to install the PC / MAC e-Performance Manager software and the BodyCap
drivers (provided on the USB stick). At the end of the installation, the monitor and the PC / Mac
software will automatically interface.
To allow communication between the monitor and the PC / Mac software, please connect the
monitor to a USB port of the PC / MAC.
Remark: The first connexion may take time, please let enough time for the PC to recognize
the monitor and to properly install the related driver.
3.2.2 Supply the batteries
If you consider using the monitor in battery-run, ensure previously that you have enough
recharged the battery.
The cable micro-USB - USB allows charging the battery of the monitor when it is connected to
a power supply (wall socket or computer switched on).
3.2.3 Configuration of the monitor
Connect the monitor to a computer having the installed e-Performance Manager software and
launch it. At the opening of the first window, select "Configuration" (Picture 2: Start screen of e-
Performance®Manager ). A menu at the bottom right allows you to select the language.

User Guide e-CELSIUS Performance.2
EN
8
At the opening of the second window (Picture 3: Tabs to configure the monitor), several tabs allow
to configure the monitor before using. At any instant of the configuration, you may consult the
instructions by clicking on the tab "User guide" at the bottom left of the window.
3.2.3.1 The tab monitor
The tab "Monitor" (Picture 3: Tabs to configure the monitor) allows selecting the operation channel
for the next recording session. It is required to take care that the monitor is sufficiently supplied,
and to put it on an available channel.
In order to reduce interferences, the selected channel has to be different from those
of the other monitors working in the same environment.
It is possible to select one of the seven channels (1 to 7) available in the monitor.
The date and time of the computer on which is installed the e-Performance Manager software
will be send to the monitor by clicking on the “Apply” button. This timeline is associated with
stored data.
Picture 2: Start screen of e-Performance®Manager
Picture 3: Tabs to configure the monitor
User Guide e-CELSIUS Performance.2
EN
9
The slide Bar “Number of synchronized data” (or number setting zone) allows to set the number
of data to recover into memory of the associated pills, after a communication disruption. The
monitor will automatically synchronize the missing data, into the range of the setting value. The
synchronization always starts with the oldest missing data and finish with the most recent.
This function is available only when no sensors is associated. The number of synchronized
values will be applied to all the associated sensors.
Click on the button “Apply” to send the data to the monitor and go to the next step.
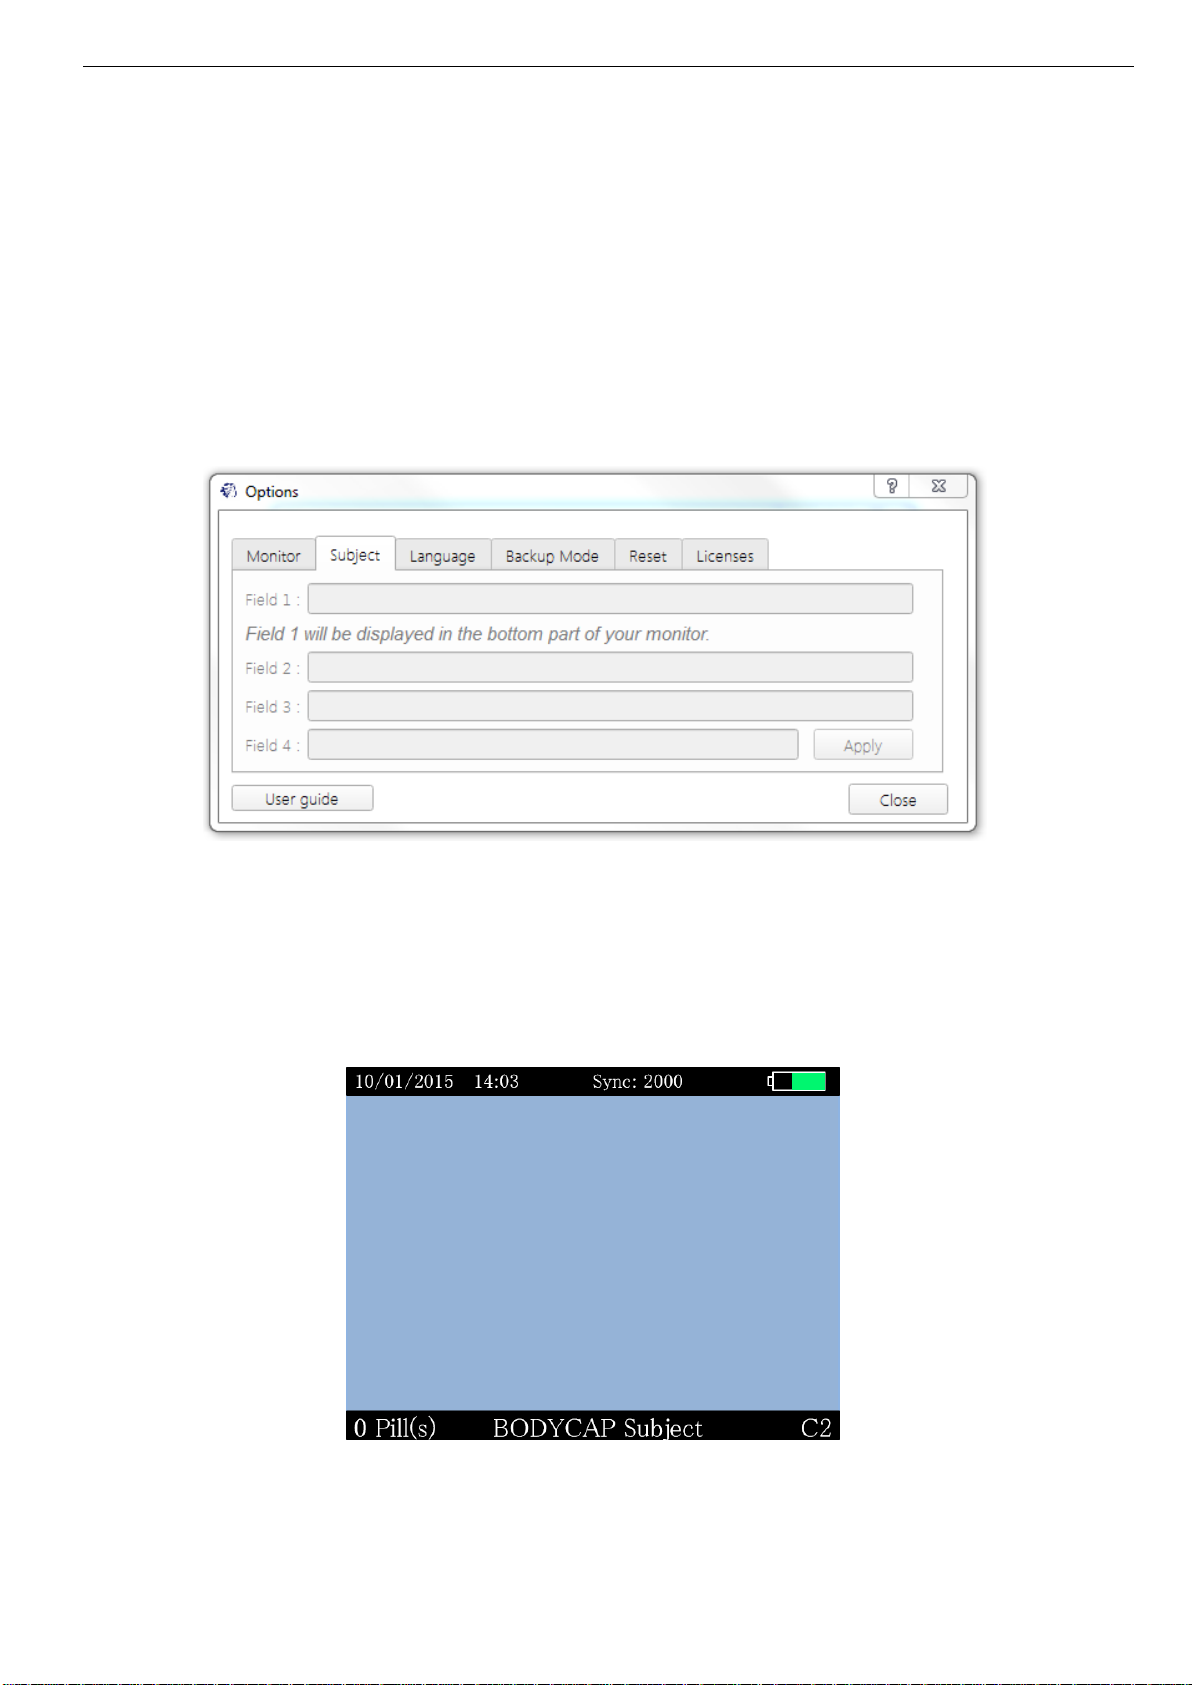
3.2.3.2 The tab Subject
The tab "Subject" (Picture 4: Tab for subject’s data configuration) allows configuring a monitor for
a subject. The four items may thus be completed at the discretion of each. The contents of the
item 1 will be displayed at the bottom of each screen (Picture 5: Screen of e-Viewer®performance
monitor).
Picture 5: Screen of e-Viewer®performance monitor
Picture 4: Tab for subject’s data configuration

User Guide e-CELSIUS Performance.2
EN
10
After the configuration of each item, click “Apply”. The activation of the capsules can begin (cf.
§6.7.3).
3.2.3.3 The tab language
The tab "Language" (Picture 6: Item to configure the language of the monitor and the e-Performance
Manager ) allows to import from one to three translation files on the monitor. User can choose
its preferred language on the monitor by clicking on "Apply". Different language files are
available on the website www.bodycap-medical.com. (This list is regularly updated).
To replace the selected language among the three options stored on the monitor, please visit
the menu "Monitor" and "Language" and select the language you want to use.
3.2.3.4 The tab Backup mode
The tab "Backup mode" is used to replace a defaulting monitor. The use of the "Backup mode"
is presented in §7.2.1.
3.2.3.5 The reset tab
The tab "Reset”is used to restore the original configuration of the monitor and to delete all the
data stored in the monitor. Reset is possible only if no capsule is associated with the monitor
AND THEN if all data have been downloaded.
3.2.3.6 The tab licenses
The tab "Licenses", allows to consult information related to used licenses and the release of
the e-Performance Manager.
4The e-Celsius®performance capsule
The capsule (Picture 7: e-Celsius®performance capsule) is intended to be
swallowed to measure gastrointestinal temperature, for non-medical uses. It is
delivered in deep sleep mode and has to be woken up by the activator and
associated to a monitor to measure temperature periodically.
Picture 7: e-Celsius®
performance capsule
Picture 6: Item to configure the language of the monitor and the e-Performance Manager
User Guide e-CELSIUS Performance.2
EN
11
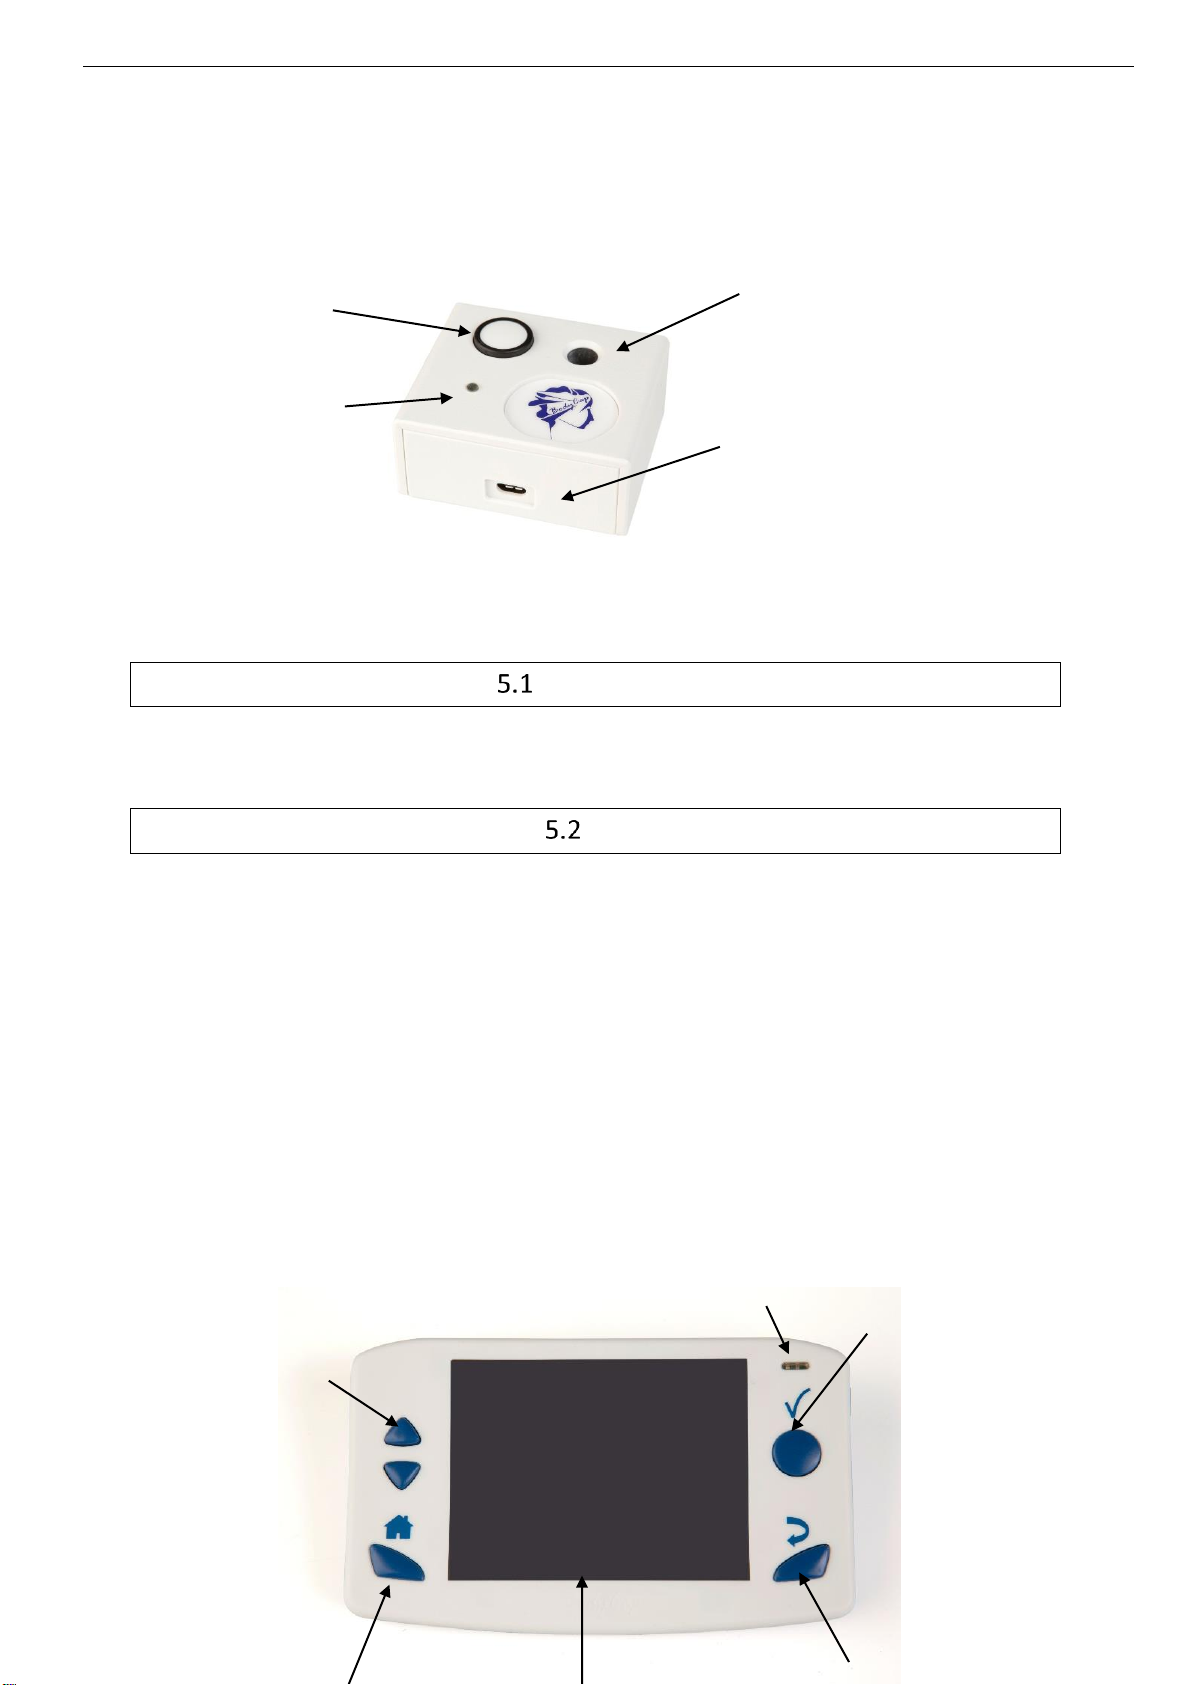
5The Activator
The Activator is intended to activate the capsule e-Celsius®before a recording session.
Picture 8: Description of the Activator
The buttons
The button OK is used to launch the activation process.
The activation process is detailed in §6.7.3.
LED
A green LED is positioned on the upper side of the Activator.This LED is continuously switched
on when the Activator is powered and flashes throughout the activation process.
When the LED is flashing, the activation process is running. During this period, it is important
to not remove/move the capsule placed in the hole. In order to optimize the activation process,
you can turn round the pill into the home during the process.
6e-Viewer®performance monitor
The monitor is intended to communicate in RF with the e-Celsius®performance capsule to
recover and store temperature data.
Button OK
Hole to place the
capsule
Micro-USB
connector
LED
verte
4
LEDs
1
3

User Guide e-CELSIUS Performance.2
EN
12
Picture 9: Description of the e-Viewer® performance monitor
The buttons
The monitor has got 6 buttons; the features are described below. 5 are placed around the
screen and 1 on the right side:
Validate (ref. 1 Picture 9: Description of the e-Viewer® performance monitor)
The button Validate is used to confirm the information and to go to the menu.
Home (ref. 2 Picture 9: Description of the e-Viewer® performance monitor)
The button Home allows to come back to the main screen of temperature data.
Back (ref. 3 Picture 9: Description of the e-Viewer® performance monitor)
The button Back allows to come back to the previous submenu or cancel a procedure.
Arrow up (ref. 4 Picture 9: Description of the e-Viewer® performance monitor
Picture 9: Description of the e-Viewer® performance monitor)
6
Micro-USB
connector
5

User Guide e-CELSIUS Performance.2
EN
13
This button allows navigate in the menu.
Arrow down (ref. 5 Picture 9: Description of the e-Viewer® performance monitor)
This button allows to navigate in the menu.
Sleep/wake-up (ref. 6 Picture 9: Description of the e-Viewer® performance monitor)
The button sleep-wake of the screen allows to switch on or off the screen.
The simultaneous use of the button sleep-wake (ref. 6 Picture 9: Description of the e-Viewer®
performance monitor) and the button Home (ref. 2 Picture 9: Description of the e-Viewer®
performance monitor) allows to switch on or off the monitor if no capsule are associated.
This mode is recommanded for the shelf storage of the monitor. The simultaneous use of the
buttons : Home / Sleep-Wake allows to turn off the monitor. This same procedure has to be
repeated to turn on the monitor.
The LEDs
An orange LED and a green LED are positioned on the front of the monitor; in the upper right
corner.
When the orange LED flashes, it means that the battery level is low; the monitor has to be
plugged, quickly, to a power source.
When the monitor is charging for the first time after a complete discharge of the battery, the
orange LED may be blinking in order to inform of the very low level of battery. In this case, the
screen is kept switched off for few minutes in order to get minimum level of charge.
When the green LED is lit, it meansthat the monitor is connected to a power source. Its battery
is charging.
Battery
Information
When it is not plugged to the main supply, a rechargeable lithium-ion battery powers the
monitor. It is strictly FORBIDDEN to disassemble the monitor and to replace the rechargeable
battery under penalty to irreparable damage on the system and security failures.
Charging cycle
In order to recharge the battery, simply plug the power supply of the monitor on the mains
supply and switch off the screen. Few hours are necessary to charge the battery. The battery
life of the monitor in battery operation is around 36h (screen regularly used but not
continuously).

User Guide e-CELSIUS Performance.2
EN
14
Please do not forget to charge e-Viewer®performance monitor at the end of
those 36h under penalty. If the battery reaches a critical level, the system will
turn into an energy saving mode. After charging, press simultaneously the
buttons “Home” and “Sleep-Wake” and the monitor will automatically
recover the associated capsules as soon as the date & time are set correctly
on the monitor.
In order to leverage the risk to lose the connection between the capsules and the monitor, the
device automatically goes into a power-saving configuration (extinction of the screen and of
the RF communication with the capsules) before the total discharge of the battery. Use of
LEDS is described in following table:
Table 1 : Batteries status
Battery status
LED
Functions
Normal
-
Normal operation
Critical
Orange LED
flashes
The screen is switched off
The RF communication is still enabled but
synchronization is disabled
Energy saving
mode
-
The screen is switched off
The RF communication is stopped.
After charging, press simultaneously the buttons
“Home” and “Sleep-Wake.
It is highly recommended, especially in the context of extended use of the material, to
regularly connect the monitor to a power source during operation.
Connection
Female Micro USB port
This connector is located on the left side of the monitor. It is possible to use the micro-USB
port to connect the monitor to the mains supply via the cable and adapter provided by the
manufacturer or directly to a computer. Use of connector are:
(i) to set up the monitor (date, time, channel, number of data to synchronize, patient data)
(ii) to download data from the monitor to e-Performance Manager Software
(iii) to visualize the results of measurements,
(iv) to export them to PDF or spreadsheet format
(v) to recharge the battery monitor.
RF Communication
In operation, it is strongly recommended to avoid putting the device on a metal table or other
metal surface that could reduce the RF emissions.
It is also recommended to be vigilant in environments with high metal stress (reinforced
concrete wall ...) and to regularly check on the monitor screen that the communication with the
capsule is not interrupted. In the Data View menu, a star (*) associated with a capsule number
User Guide e-CELSIUS Performance.2
EN
15
indicates that the monitor must be synchronized with the capsule. If this star turns orange, it
means that the last data has been collected more than 5 minutes ago. The storage capacity of
each capsule is limited to 2000 data, the communication between the capsule and the
associated monitor must be restored within a maximum period of 15 hours under penalty to
definitively lose some data (the automatic synchronization capsule / monitor can take time,
from several minutes to several hours depending on the number of data to be recovered).
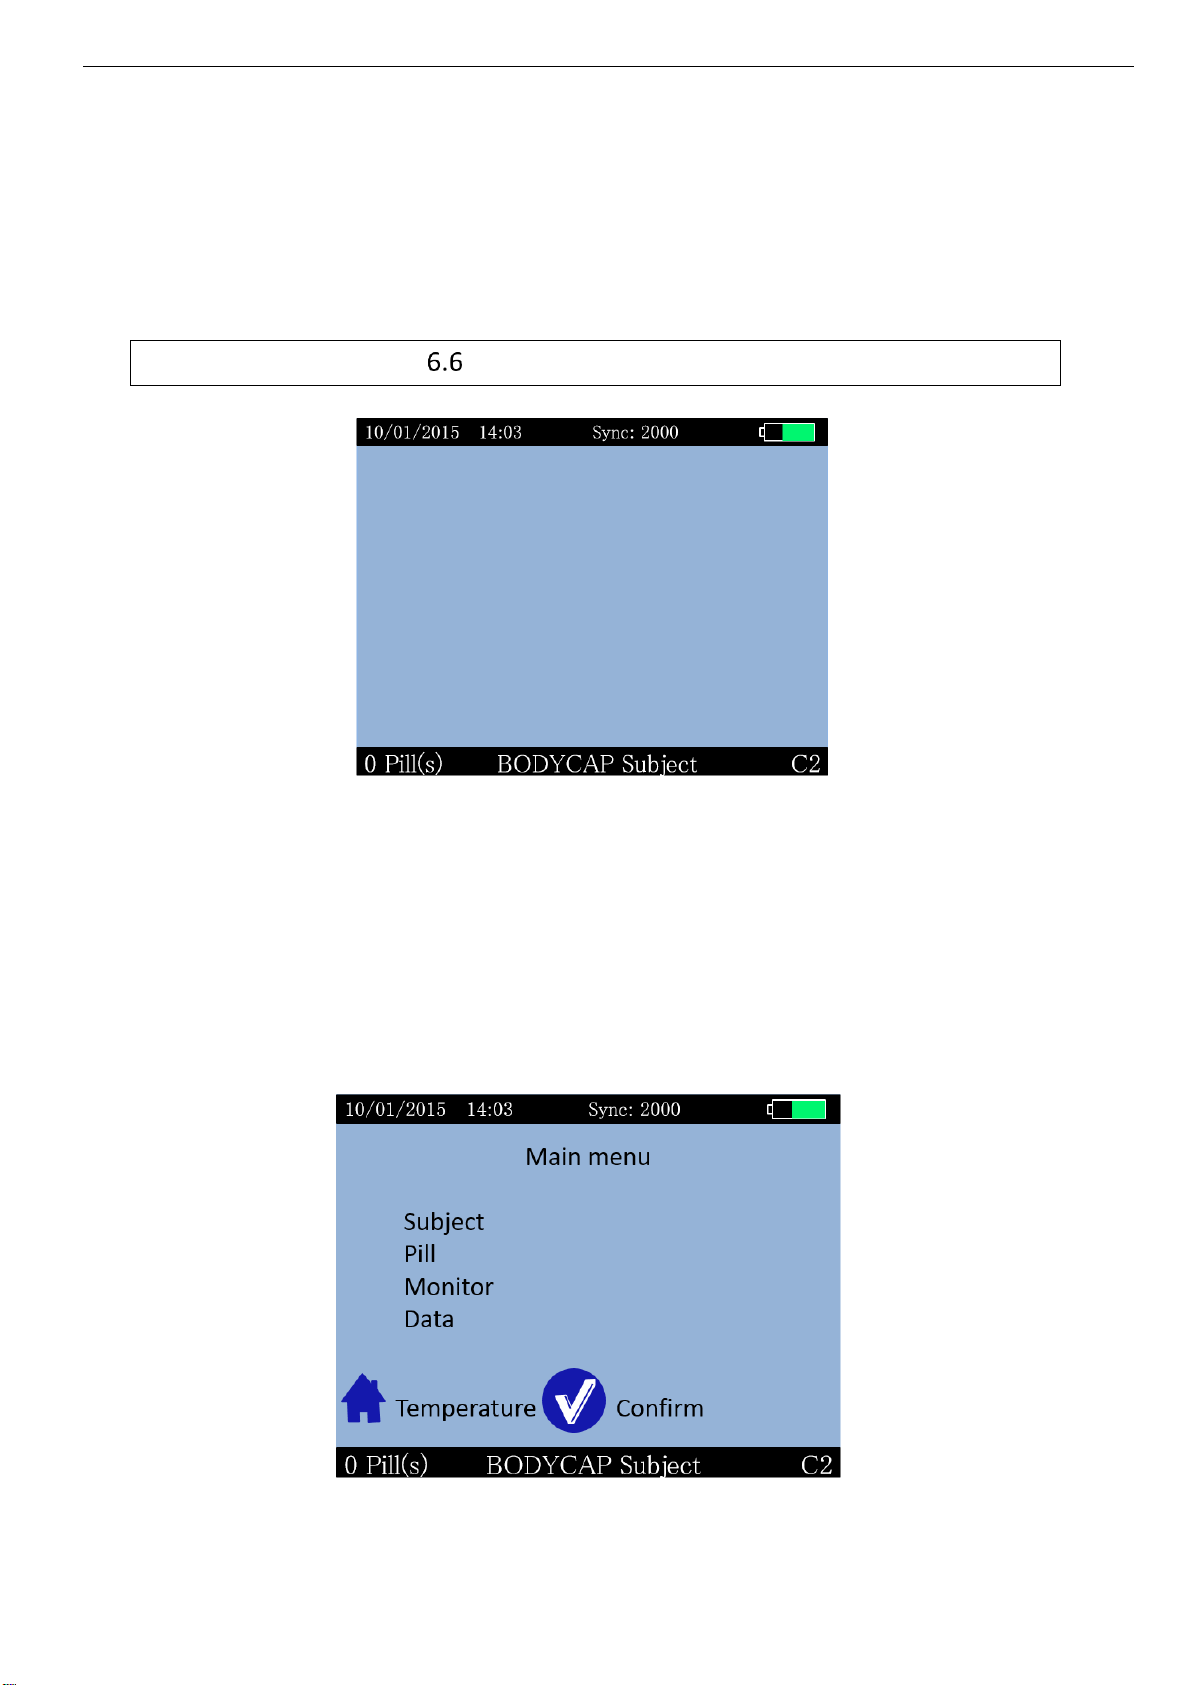
Monitor interface menu
Picture 10: Screen of the e-Viewer®performance monitor including general information
Regarding the level of the menu in which the user is, the monitor screen indicates some
general information including:
Date (e.g. 10/01/2015 => DD/MM/YYYY)
Time (e.g. 14:03 HH: MM)
The number of data to synchronize (e.g. Sync: 2000)
The battery level of the monitor (e.g. the top right of the screen)
The operating channel of the monitor (e.g. C2)
A field corresponding to a patient identification (e.g. BODYCAP Subject)
The number of capsules associated (e.g. Caps 0)
Picture 11: Main menu of e-Viewer®performance monitor
User Guide e-CELSIUS Performance.2
EN
16
To validate a menu and to move to a submenu, press the button OK (§ 6.1).
To come back, press the button Back (§ 6.1).
To return directly to the temperature display, press the button Home (§ 6.1).
Navigation between the menu items is possible by using the up - & down buttons (§ 6.1).
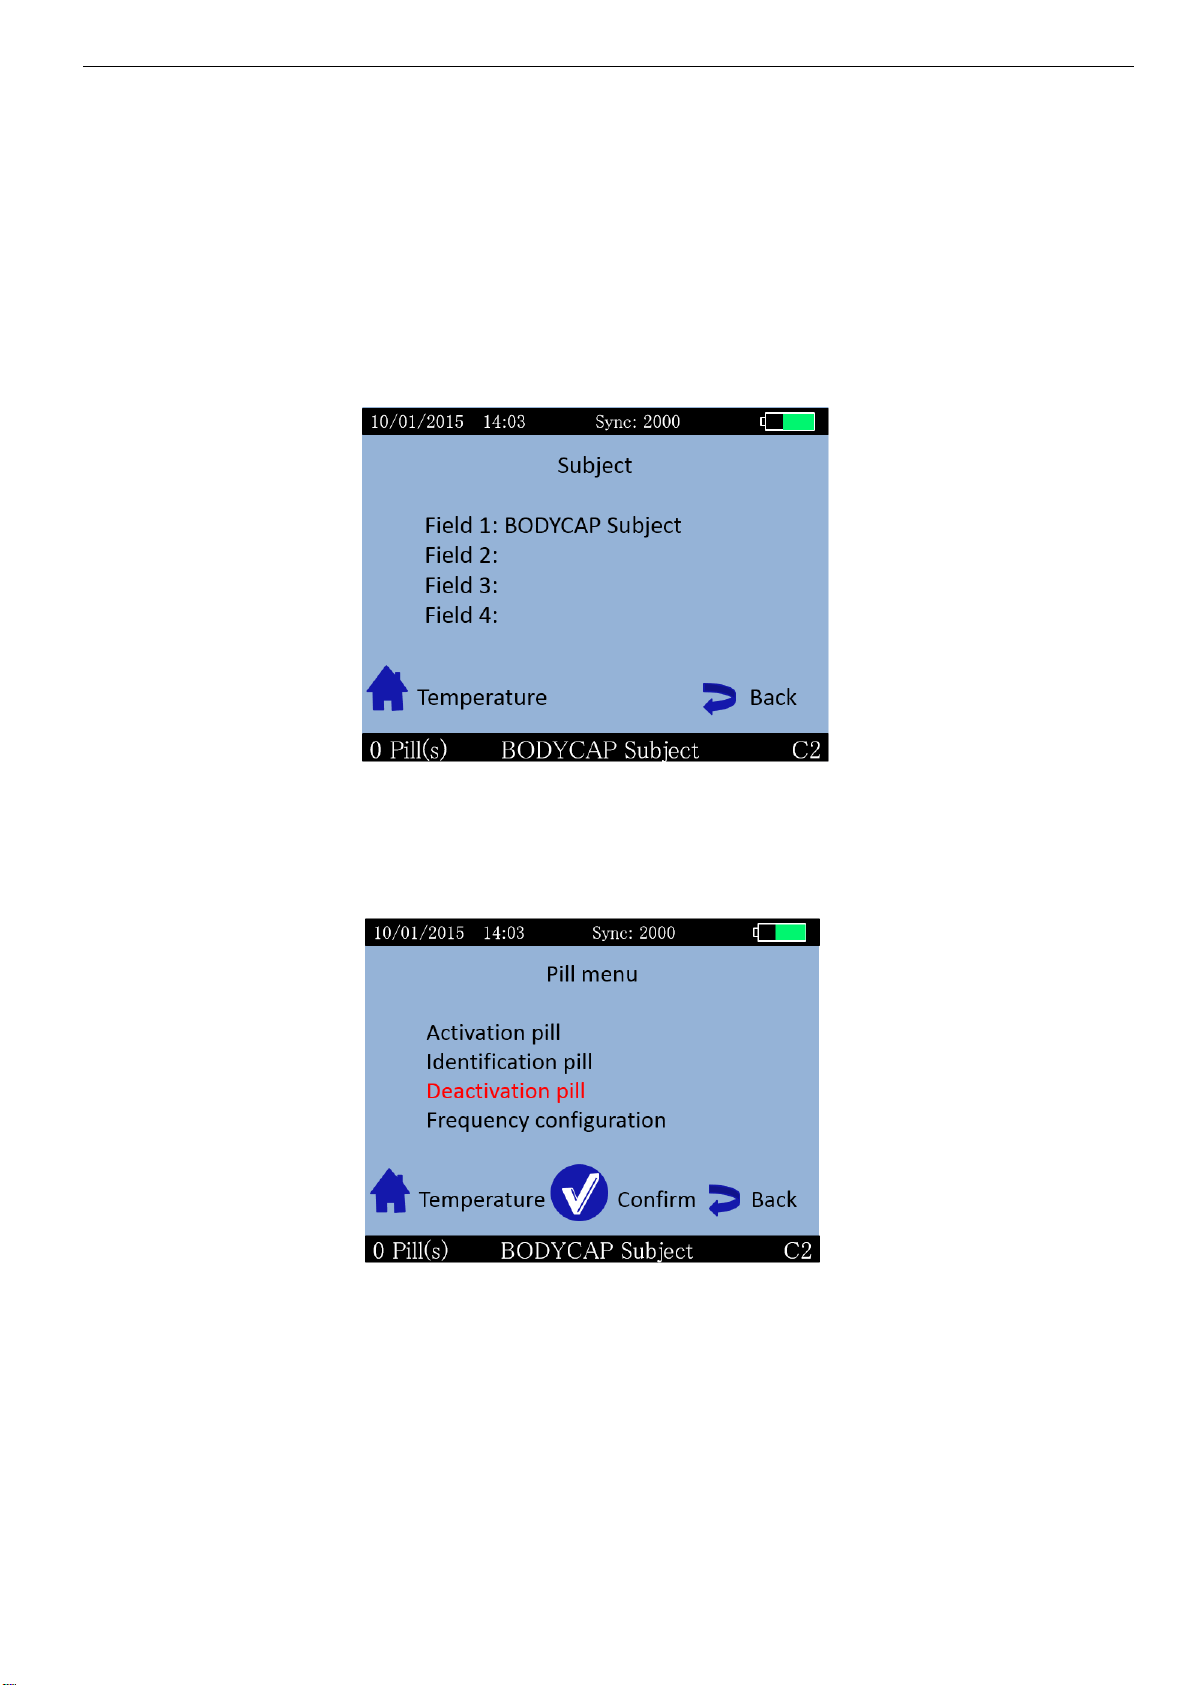
The Subject menu
The Subject menu displays user data. The four fields are configurable from the e-Performance
Manager software. Then Field 1 is visible on all monitor screens, in the lower band. A limitation
of the size of each field is indicated in the e-Performance Manager software.
Picture 12: Subject menu
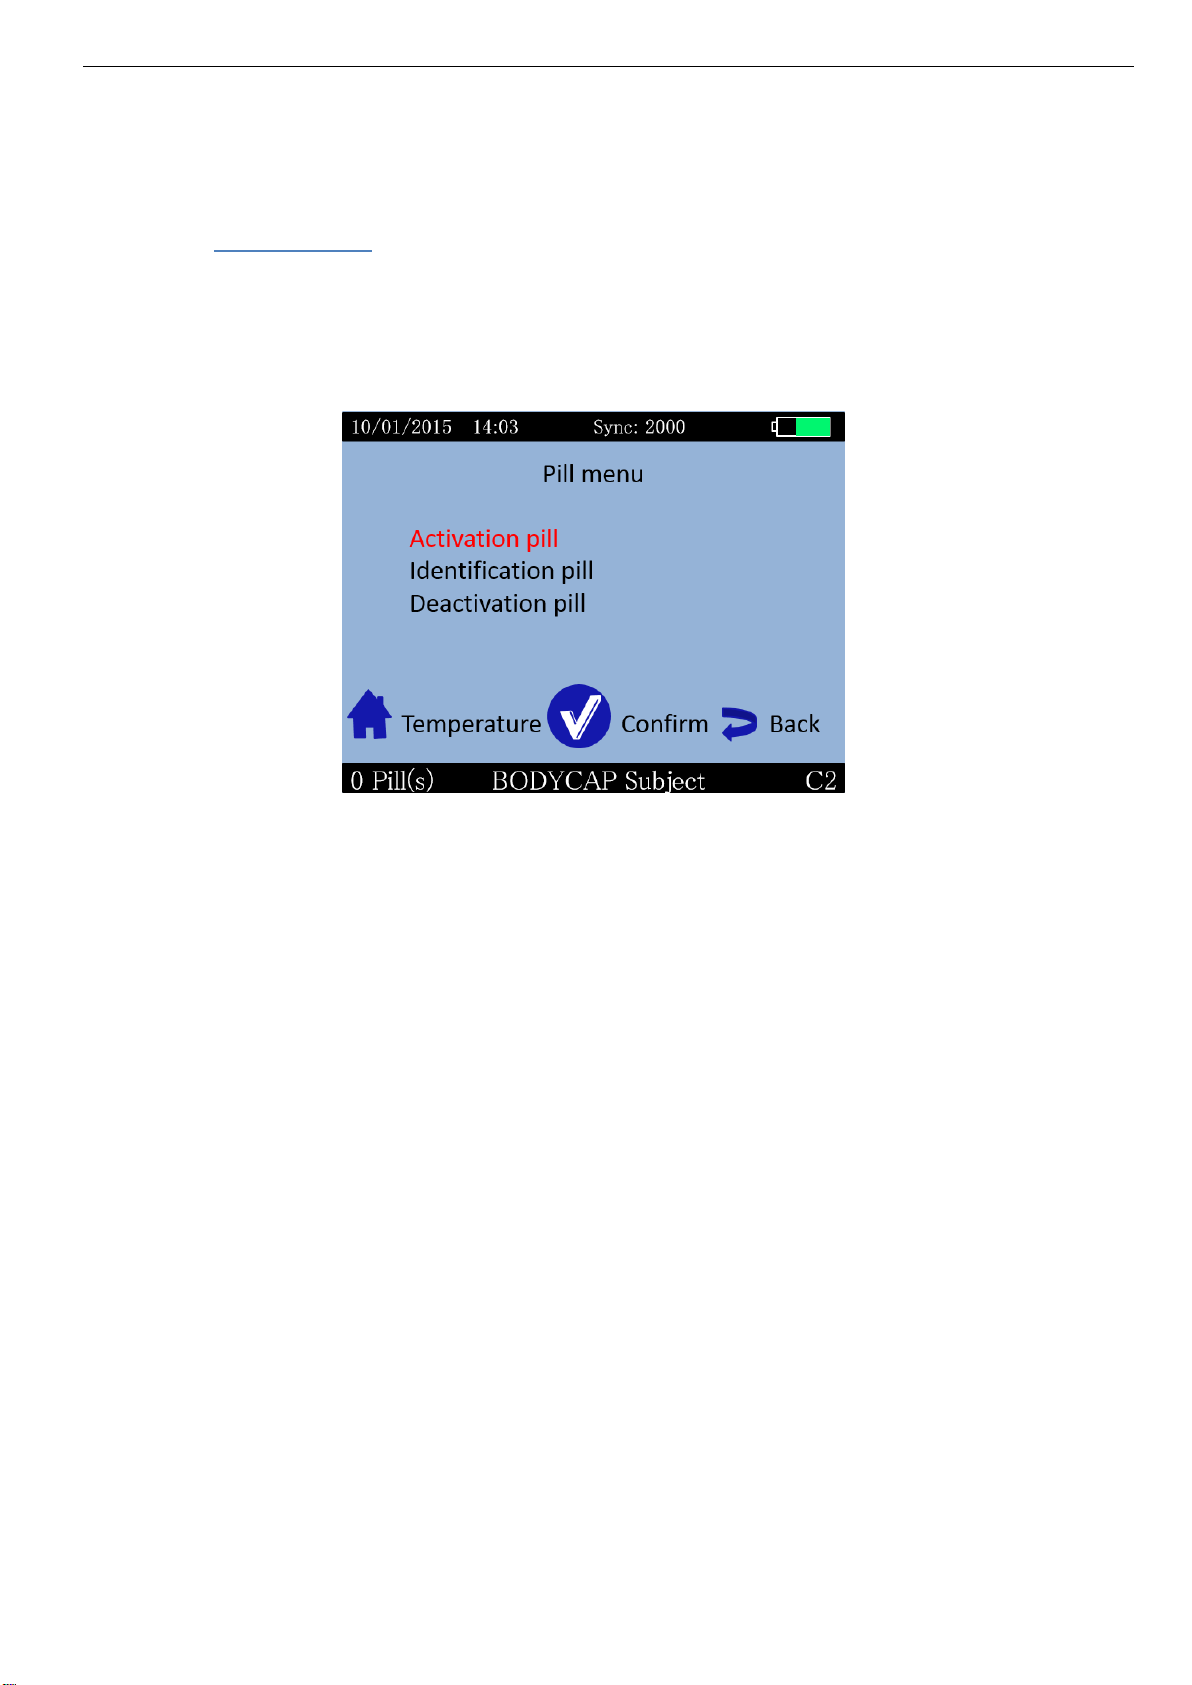
Pill Menu
The menu PILL (Picture 13: Pill menu) brings together the different control functions of the
capsules.
Picture 13: Pill menu
Activation pill: Starts the activation process of the capsule.
Identification pill: Allows to visualize the ID number of associated
capsules.
Deactivation pill: Allows to prepare the release of a location (after data
unloading) and switch off the capsule.

User Guide e-CELSIUS Performance.2
EN
17
Frequency configuration: Allows to modify the measurement period of the
associated pills
Monitor menu
Monitor menu is used to manage the monitor configuration (Picture 14: Monitor menu).
Picture 14: Monitor menu
Date and Time: Allows to set time zone, date and time
Channel: Allows to set the channel.
Language: Allows to change language
About: Allows to visualize the software release number, the
serial number of the monitor and to see if the monitor is
in CE or FCC mode
Data menu
The Data menu is used to visualize the latest temperature data from the associated capsules.
(Picture 15: Data menu of e-Viewer performance monitor).
Picture 15: Data menu of e-Viewer performance monitor
Data view: Allows to visualize the last collected data as well as the
minimum and maximum values collected by each
associated capsule.
User Guide e-CELSIUS Performance.2
EN
18
Add a marker: Allows to add an event marker which will appear in the
graph available on e-Performance Manager software and
the data file when exporting.
Min/max reset: Allows to reinitialize the data display for min and max
value on the detailed data visualization screen
Main functions
6.7.1 Set the monitor
To set the monitor, please connect it to the computer via USB to use the e-Performance
Manager software.
You may also configure:
date and time,
the number of data to synchronize,
operating channel and,
data related to the subject.
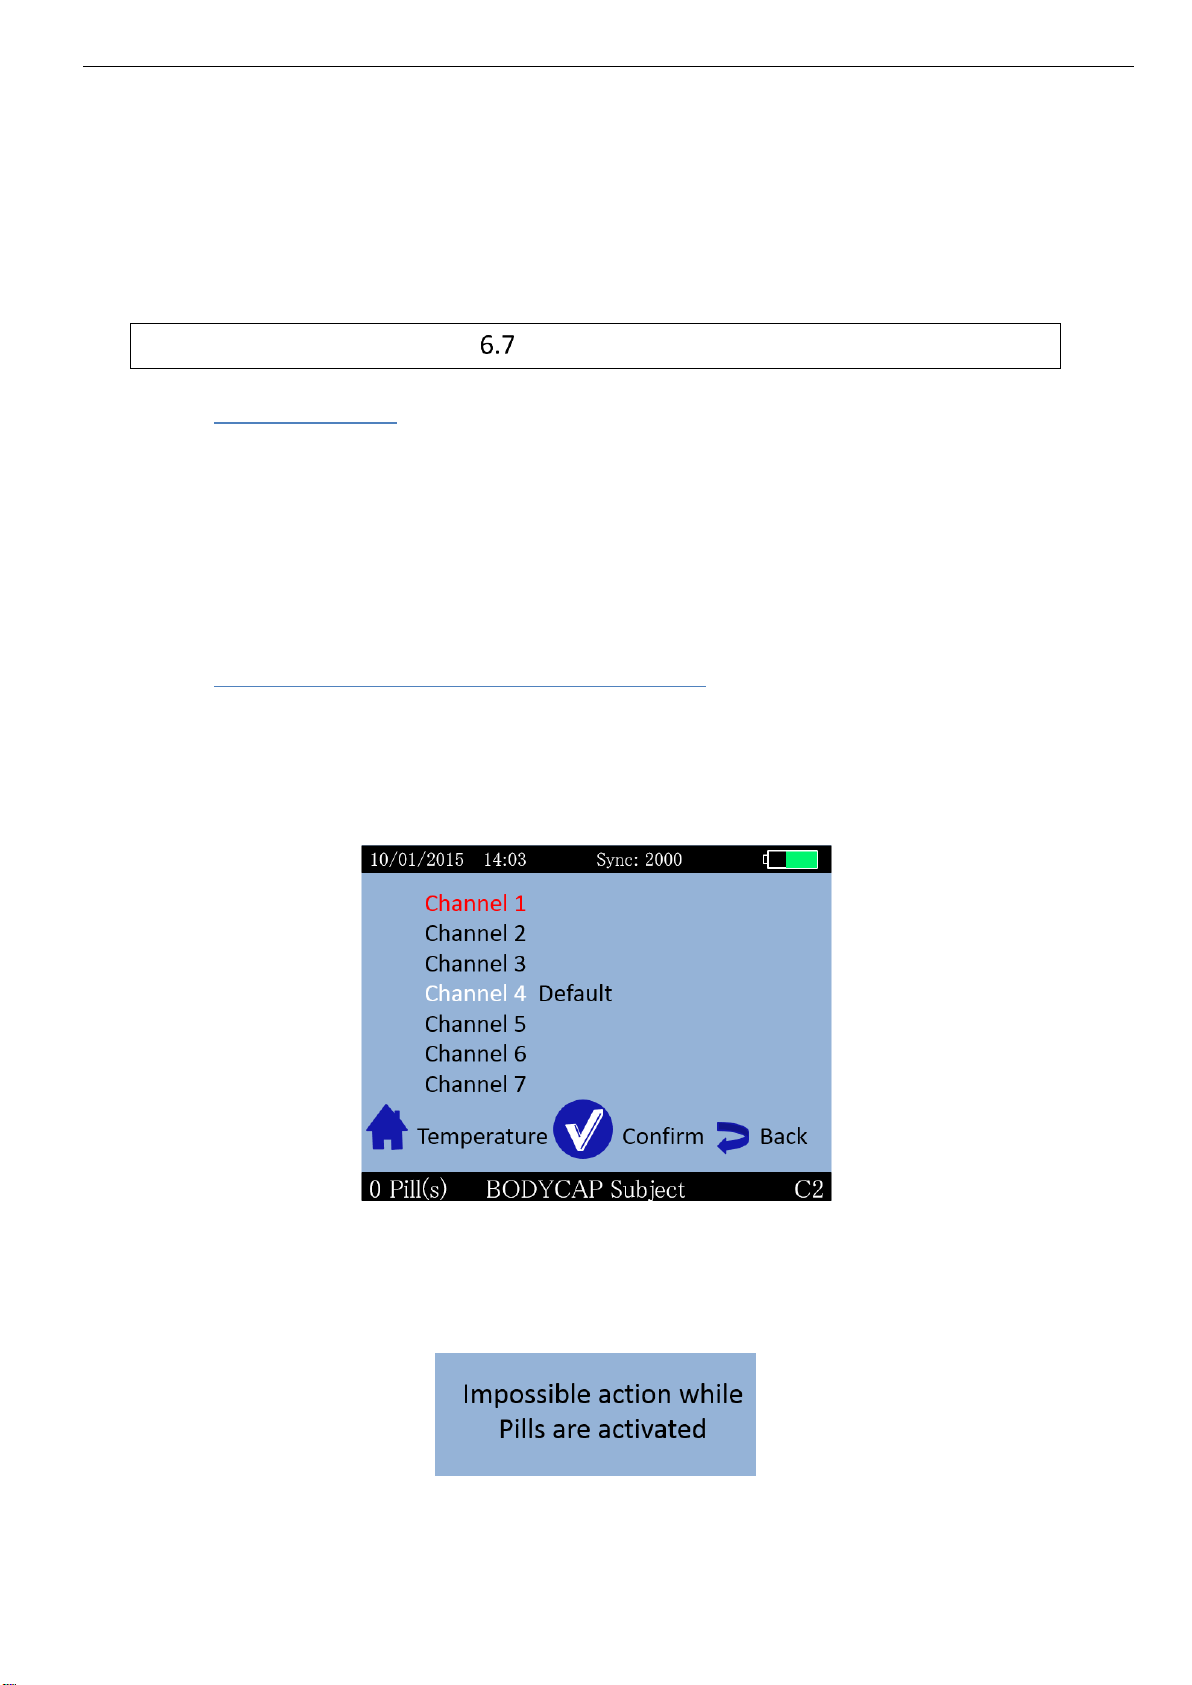
6.7.2 Changing the channel used by the monitor
Up to 7 monitors can operate in parallel, in the same environment, thanks the choice between
7 different communication frequency channels.
This choice can be performed through the e-Performance Manager software or manually on
the monitor. To set the operating channel on the monitor, go to the menu "MONITOR" and the
submenu "Channel". Select a channel not used by monitors located in the same environment.
This command is not possible when e-Celsius®Performance capsules are associated with the
monitor.
The following message appears on the screen:
Picture 17: Setting channel error message
Picture 16: e-Viewer®performance monitor menu to set the working
channel
User Guide e-CELSIUS Performance.2
EN
19
Think about recording the working channel of each monitor; in case of breakage or failure, this
information will be needed to launch the monitor replace procedure (cf. §7.2.1).
6.7.3 Activate a pill
Note: Before pill activation, please check the monitor's operating channel, the date and time
and the number of data to synchronize. No modification of these four parameters will be
authorized after activation of a capsule.
In order to activate a capsule, please go to the "Capsule" menu and then the submenu
"Activation pill" of the monitor (Picture 18: Capsule activation menu).
After validation of the command "Activation pill", dialog boxes will guide you through the
activation process:
First, the message "Plug the activator" appears on the monitor screen; after connecting
the activator and placing it close to the monitor (<1m), press the button OK as soon as
button appears.
Then the message "Place the pill, small part down" appears. The capsule to activate
has then to be placed in the hole of the activator, big part upwards.
Then press the button OK on the monitor.
Finally, the message "Activation in progress ... Push the activator button " appears. You
must then make a short press on the button of the activator.
Once the button of the Activator activated, the green LED located on it will flash; then
leave the capsule in place and wait until you see the message "Capsule activated, ID
number: XX.XX.XX.XX" on the monitor screen. It is recommended to note this ID
number.
Therefore, the capsule is activated and associated with the monitor. Press OK to confirm the
announcement and come back to the Menu Capsule.
Monitor assigns to the capsule a number between 1 and 3, the reference for data display. By
default, the assigned number will always be the lowest available between 1 and 3 (available
mean that there are no associated capsule or stored data associated with this number).
Picture 18: Capsule activation menu
User Guide e-CELSIUS Performance.2
EN
20
If the LED of the activator stops flashing and the message "Error! Would you
like to restart an activation " appears on the monitor screen, please check the
positioning of the e-Celsius®performance capsule in the hole of the Activator
and / or slightly move the e-Celsius®performance capsule in the hole, press the
button OK on the monitor to restart the association process and re-press then
the button on the Activator. It may be wise to rotate the pill inside the hole during
activation progression in order to optimize the process.
Be careful: It is highly recommended to verify the environment table used
for activation. If the environment is metallic, it could be difficult or even
impossible to activate pills properly.
For the activation of an additional capsule, repeat the procedure. It is possible to connect up
to 3 capsules in parallel with a single monitor.
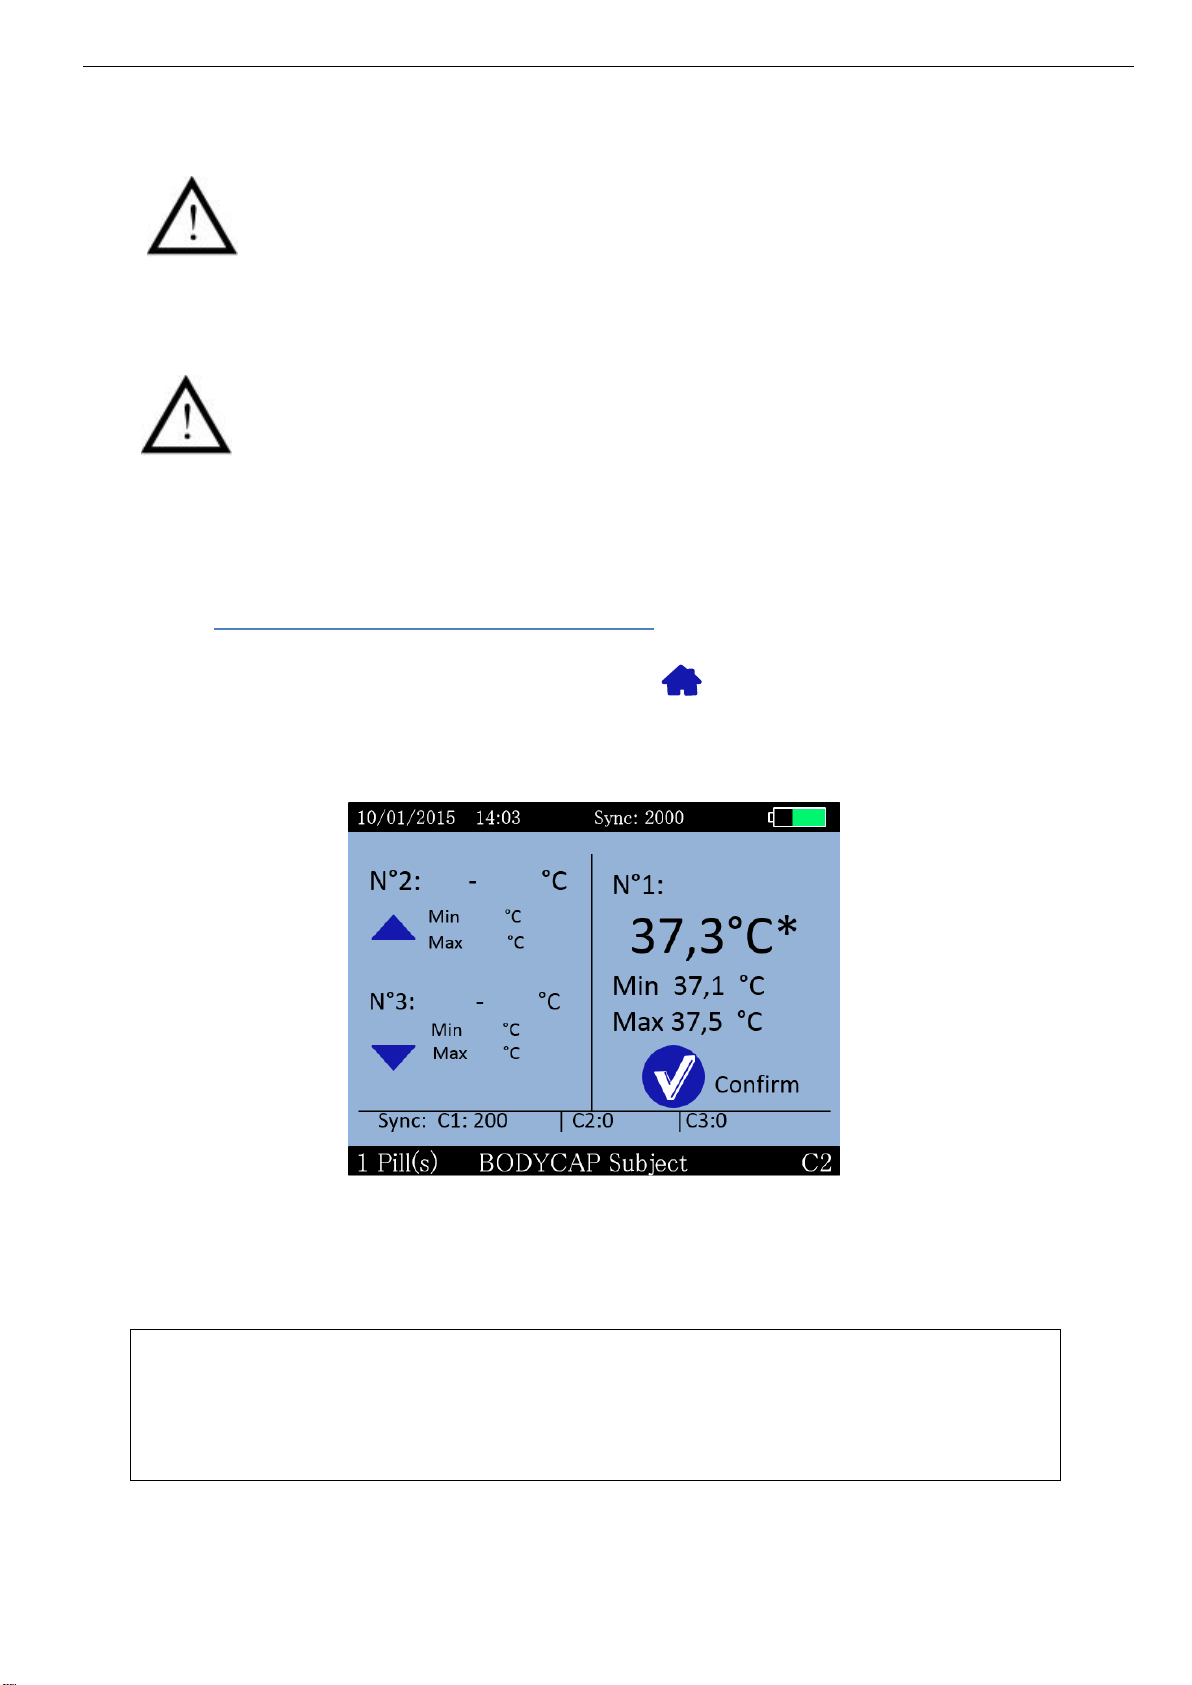
6.7.4 Consult temperature data in real time
In order to visualize the collected temperature data, go to the menu "DATA" and the submenu
"data view" or directly by pressing the button Home . The screen will then allow you to
visualize the latest temperature data collected for each activated capsule and the minimum
and maximum values collected by each associated capsule.
Temperature data (real time temperature data, min and max) of 1 to 3 capsules may be
displayed on the screen.
When this visualization mode in used, the monitor screen never turns off to standby
mode.
Please note that, when the visualization mode is used, the data synchronization
between the monitor and the capsules is slowed. It is advisable to leave this screen to
optimize synchronization delay.
Picture 19: Home screen menu of data view
Other manuals for e-Celsius Performance
3
Table of contents
Other BodyCAP Medical Equipment manuals


Popular Medical Equipment manuals by other brands


MedRx
MedRx AVANT Series Training manual

Dräger Medical
Dräger Medical Fabius GS Assembly and installation

SightLife Surgical
SightLife Surgical EndoSerter user manual

BEMIS
BEMIS SharpSentinel 1031 installation instructions

Defibtech
Defibtech DDU-2300 operating guide

ProMed
ProMed Lec Control Plus quick guide


