Rx Only: Federal Law (USA) restricts this device to sale by or
on the order of a physician.
Description
The HALYARD* family of MIC* gastrostomy feeding tubes allows for delivery of enteral nutrition and
medication directly into the stomach and/or gastric decompression.
Indications for Use
Gastrostomy tube feeding may be indicated for patients needing long-term enteral support or
hydration secondary to a primary condition relating to the head and/or neck. These conditions
include stroke; cancer; head and neck tumors, Injuries, or trauma; and neurological disorders
resulting in a chewing or swallowing abnormality. This device (sold in a kit) is intended as an initial
placement device.The device is placed by one of two techniques, the PULL technique and the over-
the-guidewire technique (PUSH technique). This guidance covers the PULL technique.
Contraindications
Contraindications for placement of a gastrostomy feeding tube include, but are not limited to colonic
interposition, portal hypertension, peritonitis, morbid obesity and esophageal stenosis.
Warnings
Do not reuse, reprocess, or resterilize this medical device. Reuse, reprocessing, or
resterilization may 1) adversely aect the known biocompatibility characteristics of the
device, 2) compromise the structural integrity of the device, 3) lead to the device not
performing as intended, or 4) create a risk of contamination and cause the transmission
of infectious diseases resulting in patient injury, illness, or death.
After MIC* PEG Tube placement, proper positioning of the internal bumper against the
gastric mucosa must be veried endoscopically. Tension on the MIC* PEG Tube should be
avoided to minimize the risk of complications.
Failure to comply with these warnings may result in pressure necrosis of the gastric
mucosa with subsequent erosion, perforation, and/or leakage of gastric contents into
the peritoneum. Migration of the internal bumper into the stoma tract or embedding
into the stomach wall may also occur over time.
Dispose of all sharps according to facility protocol.
Complications
The following complications may be associated with any gastrostomy feeding tube:
• Skin Breakdown
• Infection
• Hypergranulation Tissue
• Stomach Ulcers
• Intraperitoneal Leakage
• Pressure Necrosis
Note: Verify package integrity. Do not use if package is damaged or sterile barrier compromised.
PULL Placement Procedure
1. Use a clinically approved method to prep and sedate the patient for an endoscopic procedure.
2. Use a clinically approved procedure to perform the gastric endoscopy.
3. With the patient in a supine position, insuate the stomach with air and transilluminate the
abdominal wall.
Caution: Proper selection of the insertion site is critical to the success of this procedure.
4. Select gastrostomy site.This site (typically the upper left quadrant) should be free of major
vessels, viscera, and scar tissue.
5. Depress the intended insertion site with a nger. The endoscopist should clearly see the resulting
depression on the anterior surface of the gastric wall.
6. Prep and drape the skin at the selected insertion site. Locally anesthetize the insertion site.
7. Following local anesthesia, make a 1 cm (approximate) incision through the skin with the
scalpel.
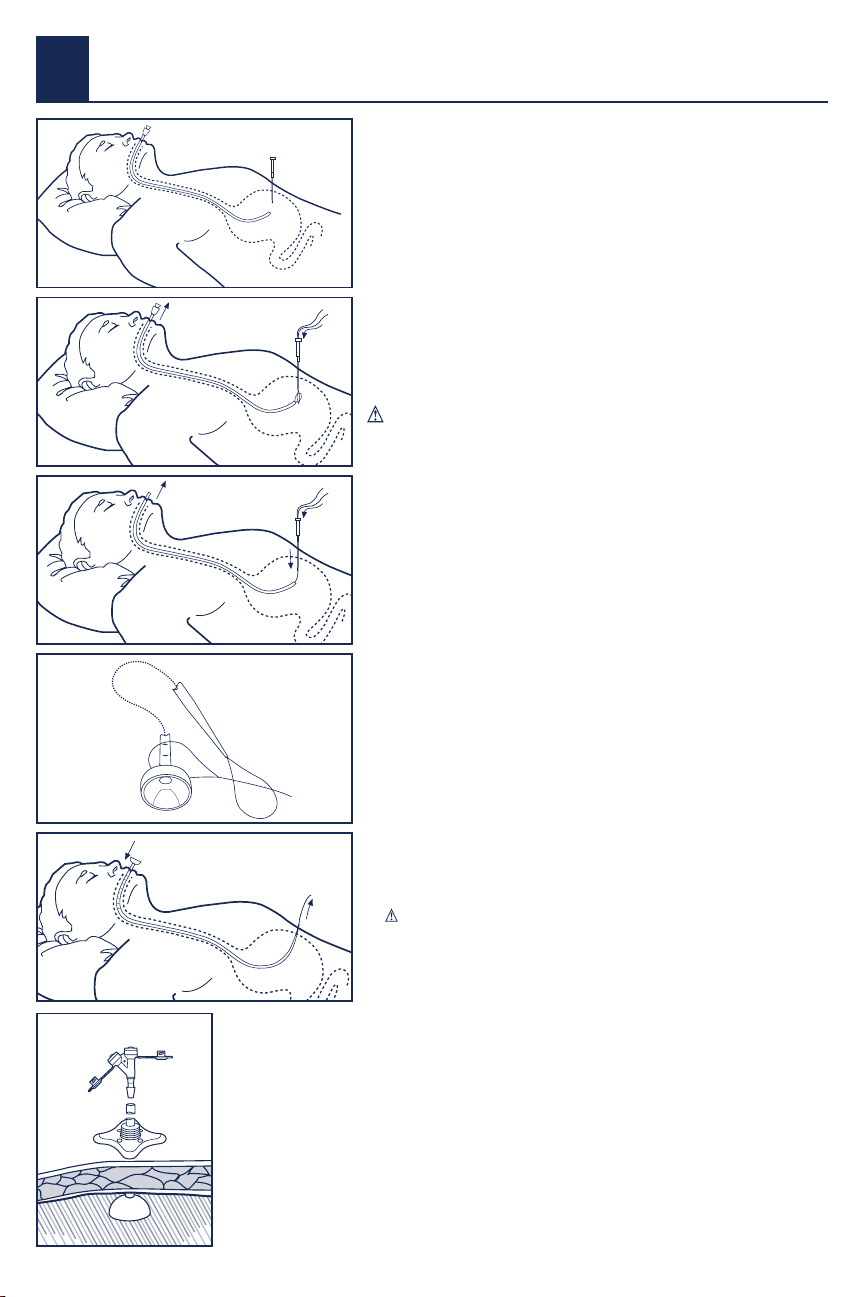
8. Insert the introducer needle system through the incision, advancing through the peritoneum
and the stomach wall.
Fig. 1
9. When the introducer needle is observed in the stomach, remove the introducer needle from the
introducer cannula by rmly holding the cannula hub and pulling back on the needle hub.
10. Insert the retrieval snare intro the endoscope, and push the retrieval snare through endoscope
until observed in the stomach.
11. Place the looped placement wire through the introducer cannula into the stomach. Grasp the
looped placement wire with a retrieval snare.Withdraw the retrieval snare into the endoscope
channel. Fig. 2
12. Remove the endoscope and the looped placement wire through the oropharynx. Pull
approximately 5 inches (13 cm) of the looped placement wire from the mouth.
13. Slowly and smoothly feed the looped placement wire into the introducer
cannula as the endoscope is retracted. Keep the introducer cannula in
place in the stomach with the distal end of the placement loop outside the
abdomen. Fig. 3
14. Connect the looped placement wire with the tube loop. Fig. 4
15. Lubricate the MIC* PEGTube with a water-soluble lubricant. Apply traction
to pull the placement loop and the tube back through the oropharynx,
esophagus, and into the stomach. Fig. 5
16. Re-enter the esophagus with the endoscope and visually follow the
gastrostomy tube as it enters the stomach. Slide the introducer cannula out
of the incision site and gently pull the PEG dilator tip through the abdominal
wall.
17. Use a rotating motion to slowly work the tube up and out until the internal
bumper gently rests against the gastric mucosa.
Note: Graduated markings on the body of the tube will assist in determining
the progress of the tube as it exits the abdomen.
Caution: Do not use excessive force to pull the tube into place.This could
harm the patient and damage the tube.
18. Cleanse the tube and stoma site and apply a sterile gauze dressing. Cut the
tube loop wire with scissors and discard the tube loop and placement wire.
19. Slide the external bolster over the proximal end of the MIC* PEG Tube and
push the external bolster into place next to the sterile gauze dressing.
Visually verify that the internal bumper is properly placed. Remove the
endoscope.The external bolster should be positioned approximately 2 mm
above the skin.
Caution: Do not apply excessive tension. There should be no
compression of the gastric mucosa or the skin. Optionally, a suture loop (not
supplied) may be tied around the external bolster to minimize movement of
the MIC* PEG Tube while the stoma is healing.
20. Cut the MIC* PEGTube straight across, leaving an appropriate length to
attach a MIC* Feedhead Adapter. Fig 6 Discard the removed portion of the
tubing.
21. Slide the clamp on the MIC* PEG Tube.
22. Insert the barb connector of the MIC* Feedhead Adapter completely into the
proximal end of the MIC* PEGTube.
Skin and Stoma Care
1. Keep the skin around the MIC* PEGTube stoma site clean, dry, and free of
drainage.
2. After the stoma is healed, a dressing is not necessary with the MIC* PEG Tube
and may even cause moisture retention resulting in skin irritation.
Removal of the MIC* PEG Tube
The MIC* PEGTube should be removed by either traction removal through the
stoma or through endoscopic retrieval.
Caution: It is not recommended that a portion of the tube be cut to allow
the internal bumper to pass.
Caution: When the 14 Fr PEG is used, use endoscopic removal method only.
Warning: Never attempt to change the tube unless trained by the
physician or other health care provider.
Traction Removal of the MIC* PEG Tube
1. When the physician determines that the tract is formed (usually within 4–6
weeks after placement of PEG), the MIC* PEGTube may be replaced with an
alternative feeding device. We recommend using one of the following:
• MIC-KEY* Low-Prole GastrostomyTube
• MIC* GastrostomyTube
2. Ensure that this type of tube can be replaced at the bedside.
3. To remove the tube, prep the patient for MIC* PEG Tube removal using
standard procedure.
4. Lubricate the skin and tube around the stoma with a watersoluble lubricant.
Rotate the tube 360° and move the tube in and out slightly.
Warning: If the tube does not move without restriction in the
tract, do not attempt to use traction as a method of removal.
Removal of feeding tubes using traction may result in tract
separation and associated complications. Feeding tubes that have
been in place for several months may have an increased potential
for internal bumper separation during traction removal.
Caution: When the 14 Fr PEG is used, use endoscopic removal method
only.
5. Position one hand on the abdomen around the stoma with the thumb and
forenger approximately two Inches apart to stabilize the abdominal wall.
6. Grasp the tube with the opposite hand next to the stoma site. Firmly, but
gently, pull the MIC* PEG Tube until the internal bumper emerges through
the stoma.
7. Replace the MIC* PEG Tube with the appropriately sized gastrostomy tube.
8. If the tube cannot be removed with a reasonable amount of traction, it
should be removed by endoscopic retrieval.
Endoscopic Removal of the MIC* PEG Tube
1. When the physician determines that the tract is formed (usually within 4-6
weeks after placement of PEG), the MIC* PEGTube may be replaced with an
alternative feeding device. We recommend using one of the following:
• MIC-KEY* Low-Prole GastrostomyTube
• MIC* GastrostomyTube
2. To remove the tube, prep the patient for MIC* PEG Tube endoscopic removal
using standard procedure.
3. Cut the MIC* PEGTube at skin level.
4. Retrieve the MIC* PEGTube using endoscopic tools according to facility
protocol.
5. Replace the MIC* PEG Tube with the appropriately sized gastrostomy tube.
Feedhead Adapter with ENFit™ Connectors Replacement
Procedure
1. Cleanse the skin around the stoma site and allow the area to air dry.
2. Clamp the tube and trim the MIC* PEG Tube as necessary using scissors. Cut
the tube straight across.
3. Push the Replacement Feedhead Adapter with ENFit™ Connectors
completely into the MIC* PEGTube.
4. Unclamp the tube to resume use.
Tube Patency Guidelines
Proper tube ushing is the best way to avoid clogging and maintain tube
patency. The following are guidelines to avoid clogging and maintain tube
patency.
• Flush the feeding tube with water every 4–6 hours during continuous
feeding, anytime the feeding is interrupted, before and after every
intermittent feeding, or at least every 8 hours if the tube is not being used.
• Flush the feeding tube after checking gastric residuals.
• Flush the feeding tube before and after medication administration and
between medications.This will prevent the medication from interacting
with formula and potentially causing the tube to clog.
• Use liquid medication when possible and consult the pharmacist to
determine if it is safe to crush solid medication and to mix with water. If
safe, pulverize the solid medication into a ne powder form and dissolve
the powder in warm water before administering through the feeding tube.
Never crush enteric-coated medication or mix medication with formula.
• Avoid using acidic uids such as cranberry juice and cola beverages to ush
feeding tubes as the acidic quality when combined with formula proteins
may actually contribute to tube clogging.
General Flushing Guidelines
Flush the feeding tube with water using an ENFit™ syringe every 4–6 hours
during continuous feeding, anytime the feeding is interrupted, or at least every 8
hours if the tube is not being used. Flush the feeding tube after checking gastric
residuals. Flush the feeding tube before and after medication administration.
Avoid using acidic irrigants such as cranberry juice and cola beverages to ush
feeding tubes.
• Unclamp the MIC* PEG Tube before ushing.
• Use a 30 to 60 ml ENFit™ syringe. Do not use smaller size syringes as this can
increase pressure on the tube and potentially rupture smaller tubes.
• Ensure the second access port (if applicable) is closed with the tethered cap
prior to ushing.
• Use room temperature water for tube ushing. Sterile water may be
appropriate where the quality of municipal water supplies is of concern. The
amount of water will depend on the patient’s needs, clinical condition, and
type of tube, but the average volume ranges from 10 to 50 ml for adults,
and 3 to 10 ml for infants. Hydration status also inuences the volume used
for ushing feeding tubes. In many cases, increasing the ushing volume
can avoid the need for supplemental intravenous uid. However, individuals
with renal failure and other uid restrictions should receive the minimum
ushing volume necessary to maintain patency.
• Do not use excessive force to ush the tube. Excessive force can perforate the
tube and can cause injury to the gastrointestinal tract.
• Document the time and amount of water used in the patient’s record.This
will enable all caregivers to monitor the patient’s needs more accurately.
HALYARD*MIC*Percutaneous Endoscopic Gastrostomy (PEG) Kit
with ENFit™ Connectors
PULL Technique
Fig. 1
Fig. 4
Fig. 2
Fig. 5
Fig. 3
Fig. 6


