Bodylastics Clip and Handle Bands User manual

full booklet2018.indd 1 6/4/2018 10:49:38 AM

Lifetime Warranty
Your Bodylastics system is not a toy. It is a serious piece of
exercise equipment. In fact, what you have in your possession
is the most powerful slingshot on the planet. Use it with caution
and care! When using the door anchor, be sure to lock your door!
When standing on the bands make sure to always wear athletic
shoes, and position the bands securely under the arches of your
feet. Now Let’s get to work!
CAUTION
Replacements in the First 90 days:
US, CA, UK or EU shipping addresses: FREE of charge
All other countries: Market price for shipping
Replacements After 90 days:
US, UK or EU shipping addresses: $£€5.95 per item
CA: CAD 8.95 per item
All other countries: Market price for shipping
Here’s how it works:
To contact us regarding your warranty please call 561-562-4745
or email support@bodylastics.com
full booklet2018.indd 2 6/4/2018 10:49:39 AM

Lifetime Warranty
Replacements in the First 90 days:
US, CA, UK or EU shipping addresses: FREE of charge
All other countries: Market price for shipping
Replacements After 90 days:
US, UK or EU shipping addresses: $£€5.95 per item
CA: CAD 8.95 per item
All other countries: Market price for shipping
* Free Replacement Not Applicable For Products Used In Commercial Settings
Here’s how it works:
To contact us regarding your warranty please call 561-562-4745
full booklet2018.indd 3 6/4/2018 10:49:40 AM

Door Anchor Setup
Door Anchor Position Diagram
Locate the hinge
side of the door.
Push the loop of the
anchor between the
door opening and the
door frame.
Top of the door -
Chest height -
Waist height -
Knee height -
Bottom of the door -
Close the anchor in the door so
the anchor loop is on the side of
the door facing you.
Refer to this diagram for the door anchor position found in the exercise descriptions.
full booklet2018.indd 4 6/4/2018 10:49:41 AM

Door Anchor Setup
Locate the hinge
side of the door.
Push the loop of the
anchor between the
door opening and the
door frame.
Thread your band(s)
through the loop of
the door anchor.
Open the loop of the
door anchor.
1. 3.
2. 4.
Close the anchor in the door so
the anchor loop is on the side of
the door facing you.
Refer to this diagram for the door anchor position found in the exercise descriptions.
full booklet2018.indd 5 6/4/2018 10:49:41 AM

Ankle Strap Setup Handle Band/Ankle Strap Setup
Place the strap
around your ankle
with the soft
cushioned side
against your ankle.
Thread the rough side
of velcro through the
rectangular ring.
Check to make sure
that the strap is
securely attached.
Pull the end of the
strap back and
stick the rough side
securely to the soft
side.
1. 3.
2. 4.
Put on ankle strap
and position O-ring
to the outside of the
ankle.
Thread a handle
through the O-ring.
full booklet2018.indd 6 6/4/2018 10:49:43 AM

Ankle Strap Setup Handle Band/Ankle Strap Setup
Put on ankle strap
and position O-ring
to the outside of the
ankle.
Thread a handle
through the O-ring.
Pull back on the band
until the handle is
seated against the
O-ring sideways.
Finish pulling the
handle through the
O-ring and straighten
handle.
1. 3.
2. 4.
full booklet2018.indd 7 6/4/2018 10:49:47 AM

Attaching The Clip Bands
Increasing Resistance:
Anywhere Anchor Setup
To increase resistance,
simply substitute the
elastic for a thicker
one (thicker = more
tension), or “Stack” the
resistance by clipping
on (combining)
multiple bands.
Wrap the Anywhere
Anchor around a
stationary object.
Pull the strap tight.
Pull one loop through
the other loop. If you
are using the small
Anywhere Anchor,
pull the padded loop
through the non-
padded loop.
Please Note: The large or small Anywhere
Anchors are not included with all systems.
Please check your product description to verify
if they are included in your purchase.
1. 3.
2.
full booklet2018.indd 8 6/4/2018 10:49:48 AM
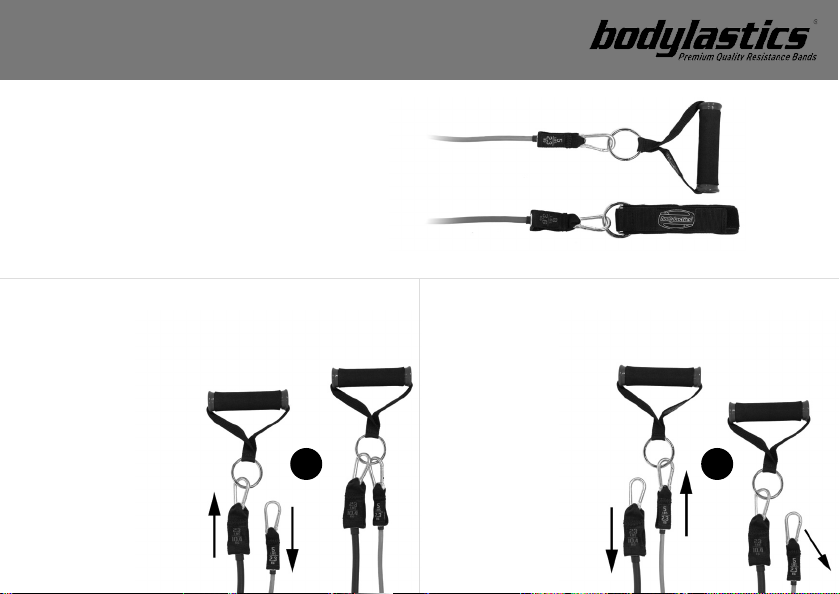
Attaching The Clip Bands
or or
Increasing Resistance:
Attaching The Bands:
Decreasing Resistance:
Anywhere Anchor Setup
To attach your Clip Resistance
Bands to the handles and ankle
straps simply clip them on to the
metal rings.
To increase resistance,
simply substitute the
elastic for a thicker
one (thicker = more
tension), or “Stack” the
resistance by clipping
on (combining)
multiple bands.
To decrease
resistance, simply
change out the
elastic for a
thinner one (less
tension), or remove
additional bands
which are attached.
Please Note: The large or small Anywhere
Anchors are not included with all systems.
Please check your product description to verify
if they are included in your purchase.
full booklet2018.indd 9 6/4/2018 10:49:50 AM

Resistance Bands Care
3 1.4
5 2.3
8 3.6
8 3.6
11 5.0
13 5.9
13 5.9
16 7.3
16 7.3
18 8.3
19 8.6
21 9.5
21 9.5
22 10
23 10.4
24 10.9
24 10.9
26 11.8
26 11.8
27 12.3
27 12.3
28 12.7
29 13.2
30 13.6
30 13.6
lbs. kgs.
Do not saw your
bands. If you are
pulling side to
side wrap one end
of the band back
through the loop.
Never clip your
band to an anchor.
Do not wrap your
bands around
stationary objects.
Never thread your
band through the ring
of an ankle strap.
Resistance Chart - Create the exact amount of resistance you want by using this Resistance Chart below. Not all of the bands are
included with all systems. Please check your product description to verify which bands are included.
To avoid damaging your bands and components only thread your bands through a
Bodylastics anchor, avoid sawing and do not attach a clip to an anchor.
full booklet2018.indd 10 6/4/2018 10:49:52 AM

Resistance Bands Care
3 1.4
5 2.3
8 3.6
8 3.6
11 5.0
13 5.9
13 5.9
16 7.3
16 7.3
18 8.3
19 8.6
21 9.5
21 9.5
22 10
23 10.4
24 10.9
24 10.9
26 11.8
26 11.8
27 12.3
27 12.3
28 12.7
29 13.2
30 13.6
30 13.6
31 14.1
31 14.1
32 14.5
32 14.5
33 15
34 15.4
35 15.9
35 15.9
35 15.9
36 16.3
36 16.3
37 16.8
38 17.3
38 17.3
39 17.7
39 17.7
40 18.2
40 18.2
41 18.6
41 18.6
42 19.1
43 19.5
43 19.5
43 19.5
44 20
44 20
45 20.4
45 20.4
46 20.9
46 20.9
47 21.3
47 21.3
48 21.8
48 21.8
49 22.2
49 22.2
50 22.7
50 22.7
51 23.2
51 23.2
52 23.6
52 23.6
53 24.1
53 24.1
54 24.5
54 24.5
55 25
55 25
56 25.4
56 25.4
57 25.9
57 25.9
58 26.3
58 26.3
58 26.3
59 26.8
60 27.2
60 27.2
61 27.7
61 27.7
62 28.1
62 28.1
63 28.6
63 28.6
64 29.1
65 29.5
65 29.5
66 30
66 30
66 30
67 30.4
68 30.9
69 31.3
69 31.3
70 31.8
70 31.8
71 32.2
72 32.7
73 33.1
74 33.6
74 33.6
74 33.6
75 34.1
75 34.1
77 35
77 35
78 35.4
79 35.9
80 36.3
82 37.2
85 38.6
88 40
93 42.2
96 43.6
98 44.5
101 45.9
lbs. kgs. lbs. kgs. lbs. kgs. lbs. kgs. lbs. kgs.
3 5 8 13 19 23 30 3 5 8 13 19 23 30 3 5 8 13 19 23 30 3 5 8 13 19 23 30 3 5 8 13 19 23 30
•
•
•
••
• •
•
• •
• •
•• •
••
•
• •
•• •
••
•
• •
• • •
••
• • •
••
•• •
• •
•• • •
•
•••
• •
• • •
• •
• • •
• •
• • •
• •
• • •
• • • •
• •
• • •
• • •
••
• • •
• ••
• • • •
• • •
• • • •
•• •
•••
• •
• •
• • •
• • • •
• • •
• • • •
• • •
• • • •
• • •
• • • •
• • •
• • • •
• • •
• • • • •
••
• • • •
• • •
• • • •
• • •
• • • •
• • •
• • • • •
••
• • • •
• • •
• • • •
• • •
• • • •
• • •
• • • •
•••
• • • •
• • •
• • • •
• • • • •
• • • • •
• • • •
• • • •
• • •
• • • •
• • •
• • • •
• • • •
• • • • •
• • • •
• • • •
• • • • •
•••
• • • •
• • • • •
• • • •
• • • • •
• • • •
• • • • •
• • • •
• • • • •
• • • • • •
• • •
• • • • •
• • • •
• • • •
• • • • •
• • • •
• • • • •
• • • •
• • • • •
• • • • • •
• • • • •
• • • • •
• • • • • •
• • • •
• • • • •
• • • • •
• • • • • •
• • • • • •
• • • • • • •
Resistance Chart - Create the exact amount of resistance you want by using this Resistance Chart below. Not all of the bands are
included with all systems. Please check your product description to verify which bands are included.
RESISTANCE BAND WEIGHT RESISTANCE BAND WEIGHT RESISTANCE BAND WEIGHT RESISTANCE BAND WEIGHT RESISTANCE BAND WEIGHT
full booklet2018.indd 11 6/4/2018 10:49:53 AM

Chest Press
Area Targeted: Middle, Upper Chest
Set up:
Anchor Position: #4 - Knee height.
Clip Bands: Attach each end of the band(s) to a handle.
Handle Bands: No adjustment required.
Body Positioning: Grip a handle in each hand, and stand 3 to 4 feet away from the door with
yourbacktothedoor.Positionyourarmssothattheyareparallelwiththeoor,andparallel
with the door behind you. Your palms should bet facing down. Keep your back straight, head
straight and chest up.
Movement:
Push the handles forward, up and in until they about 6 inches apart, and at eye level. While
controlling the resistance, return to the starting position. Repeat.
Points To Remember:
1. Grip the handles lightly to insure that the majority of the stress is placed the chest muscles.
2. Do not bring your elbows past your shoulders as you bring them back to the starting position.
MUSCLE GROUP
CHEST
full booklet2018.indd 12 6/4/2018 10:49:55 AM

Chest Press
Area Targeted: Middle, Upper Chest
Set up:
Anchor Position: #4 - Knee height.
Clip Bands: Attach each end of the band(s) to a handle.
Handle Bands: No adjustment required.
Body Positioning: Grip a handle in each hand, and stand 3 to 4 feet away from the door with
yourbacktothedoor.Positionyourarmssothattheyareparallelwiththeoor,andparallel
with the door behind you. Your palms should bet facing down. Keep your back straight, head
straight and chest up.
Movement:
Push the handles forward, up and in until they about 6 inches apart, and at eye level. While
controlling the resistance, return to the starting position. Repeat.
Points To Remember:
1. Grip the handles lightly to insure that the majority of the stress is placed the chest muscles.
2. Do not bring your elbows past your shoulders as you bring them back to the starting position.
full booklet2018.indd 13 6/4/2018 10:49:55 AM

Double Point Chest Press
Area Targeted: Middle, Upper Chest
Set up:
Anchor Position: #4 - Knee height.
Clip Bands:Attacheachendoftherstbandtoahandle,andeachendofasecondbandtoananklestrap.
Handle Bands: Fortherstbandthereisnoadjustmentrequired.Attacheachendofasecondband
to an ankle strap.
Body Positioning: Secure an ankle strap on each arm, above the elbow, and grip a handle from the
rstbandineachhand.Stand3to4feetawayfromthedoorwithyourbacktothedoor.Positionyour
armssothattheyareparallelwiththeoor,andparallelwiththedoorbehindyou.Yourpalmsshould
be facing down. Keep your back straight, head straight and chest up.
Movement:
Push the handles forward, up and in until they about 6 inches apart, and at eye level. While controlling
the resistance, return to the starting position. Repeat.
Points To Remember:
1. Grip the handles lightly to insure that the majority of the work is handled by the chest muscles.
2. Do not bring your elbows past your shoulders as you bring them back to the starting position.
MUSCLE GROUP
CHEST
full booklet2018.indd 14 6/4/2018 10:49:58 AM

Double Point Chest Press
Area Targeted: Middle, Upper Chest
Set up:
Anchor Position: #4 - Knee height.
Clip Bands:Attacheachendoftherstbandtoahandle,andeachendofasecondbandtoananklestrap.
Handle Bands: Fortherstbandthereisnoadjustmentrequired.Attacheachendofasecondband
to an ankle strap.
Body Positioning: Secure an ankle strap on each arm, above the elbow, and grip a handle from the
rstbandineachhand.Stand3to4feetawayfromthedoorwithyourbacktothedoor.Positionyour
armssothattheyareparallelwiththeoor,andparallelwiththedoorbehindyou.Yourpalmsshould
be facing down. Keep your back straight, head straight and chest up.
Movement:
Push the handles forward, up and in until they about 6 inches apart, and at eye level. While controlling
the resistance, return to the starting position. Repeat.
Points To Remember:
1. Grip the handles lightly to insure that the majority of the work is handled by the chest muscles.
2. Do not bring your elbows past your shoulders as you bring them back to the starting position.
full booklet2018.indd 15 6/4/2018 10:49:59 AM

Resisted Standard Push Up
Area Targeted: Middle Chest
Set up:
Anchor Position: Not required.
Clip Bands & Handle Bands: Wrap the band(s) around your body so that the band(s) are around
your back.
Body Positioning:Layontheoorandplaceyourpalmsovertheband(s),oneachside,
sothatthereisnoslack.Yourhandsshouldbeabout20inchesapartwithngerspointed
overhead. Keep your back straight, legs straight and head straight.
Movement:
Pushyourentirebodyofftheooruntilyourarmsarealmosttotallystraight.While
controlling the resistance, return to the starting position. Repeat.
Points To Remember:
1. Do not let your buttocks push up or sag down during the movement. Your body should be
straight, like a board from your head to your feet.
2. Whenyouloweryourbody,stopwhenyourupperarmsareparallelwiththeoor.
MUSCLE GROUP
CHEST
full booklet2018.indd 16 6/4/2018 10:50:01 AM

Resisted Standard Push Up
Area Targeted: Middle Chest
Set up:
Anchor Position: Not required.
Clip Bands & Handle Bands: Wrap the band(s) around your body so that the band(s) are around
your back.
Body Positioning:Layontheoorandplaceyourpalmsovertheband(s),oneachside,
sothatthereisnoslack.Yourhandsshouldbeabout20inchesapartwithngerspointed
overhead. Keep your back straight, legs straight and head straight.
Movement:
Pushyourentirebodyofftheooruntilyourarmsarealmosttotallystraight.While
controlling the resistance, return to the starting position. Repeat.
Points To Remember:
1. Do not let your buttocks push up or sag down during the movement. Your body should be
straight, like a board from your head to your feet.
2. Whenyouloweryourbody,stopwhenyourupperarmsareparallelwiththeoor.
full booklet2018.indd 17 6/4/2018 10:50:01 AM

Standing One Arm Chest Fly (Mid)
Area Targeted: Middle Chest
Set up:
Anchor Position: #2 - Chest height.
Clip Bands: Attach both ends of the band(s) to one handle, and grip the handle with one hand.
Handle Bands: Grip both handles of the band with one hand.
Body Positioning: Stand 3 to 4 feet away from the door with your active side facing the
door. Position your arm so that it is pointing towards the door anchor and has a slight bend.
Your palm should be facing forward.
Movement:
Pull the handle(s) around until your hand is right in front of your chest. While controlling the
resistance, return to the starting position. Repeat.
Points To Remember:
1. Keep your arm frozen with a slight bend in your elbow throughout the movement.
2. Keep your shoulders square, do not rotate your upper body as your pull the handle(s).
MUSCLE GROUP
CHEST
full booklet2018.indd 18 6/4/2018 10:50:03 AM

Standing One Arm Chest Fly (Mid)
Area Targeted: Middle Chest
Set up:
Anchor Position: #2 - Chest height.
Clip Bands: Attach both ends of the band(s) to one handle, and grip the handle with one hand.
Handle Bands: Grip both handles of the band with one hand.
Body Positioning: Stand 3 to 4 feet away from the door with your active side facing the
door. Position your arm so that it is pointing towards the door anchor and has a slight bend.
Your palm should be facing forward.
Movement:
Pull the handle(s) around until your hand is right in front of your chest. While controlling the
resistance, return to the starting position. Repeat.
Points To Remember:
1. Keep your arm frozen with a slight bend in your elbow throughout the movement.
2. Keep your shoulders square, do not rotate your upper body as your pull the handle(s).
full booklet2018.indd 19 6/4/2018 10:50:03 AM

Kneeling One Arm Chest Fly
Area Targeted: Middle Chest
Set up:
Anchor Position: #1 - Top of the door.
Clip Bands: Attach both ends of the band(s) to one handle, and grip the handle with one hand.
Handle Bands: Grip both handles of the elastic with one hand.
Body Positioning: Kneel 3 to 4 feet away from the door, with your active side facing the
door.Placeyourinactivehandontheoortostabilizeyourbody.Positionyouractivearm
sothattheupperarmisparallelwiththeoor,andelbowisslightlybent.Keepyourback
straight and chest up.
Movement:
Pullthehandle(s)downandarounduntilyourhandisalmosttouchingtheoor,rightbelow
your chest. While controlling the resistance, return to the starting position. Repeat.
Points To Remember:
Keep your arm frozen in position with a slight bend in the elbow.
MUSCLE GROUP
CHEST
full booklet2018.indd 20 6/4/2018 10:50:04 AM
Table of contents
Other Bodylastics Fitness Equipment manuals


