BODYMAX R20 Engage Rower User manual
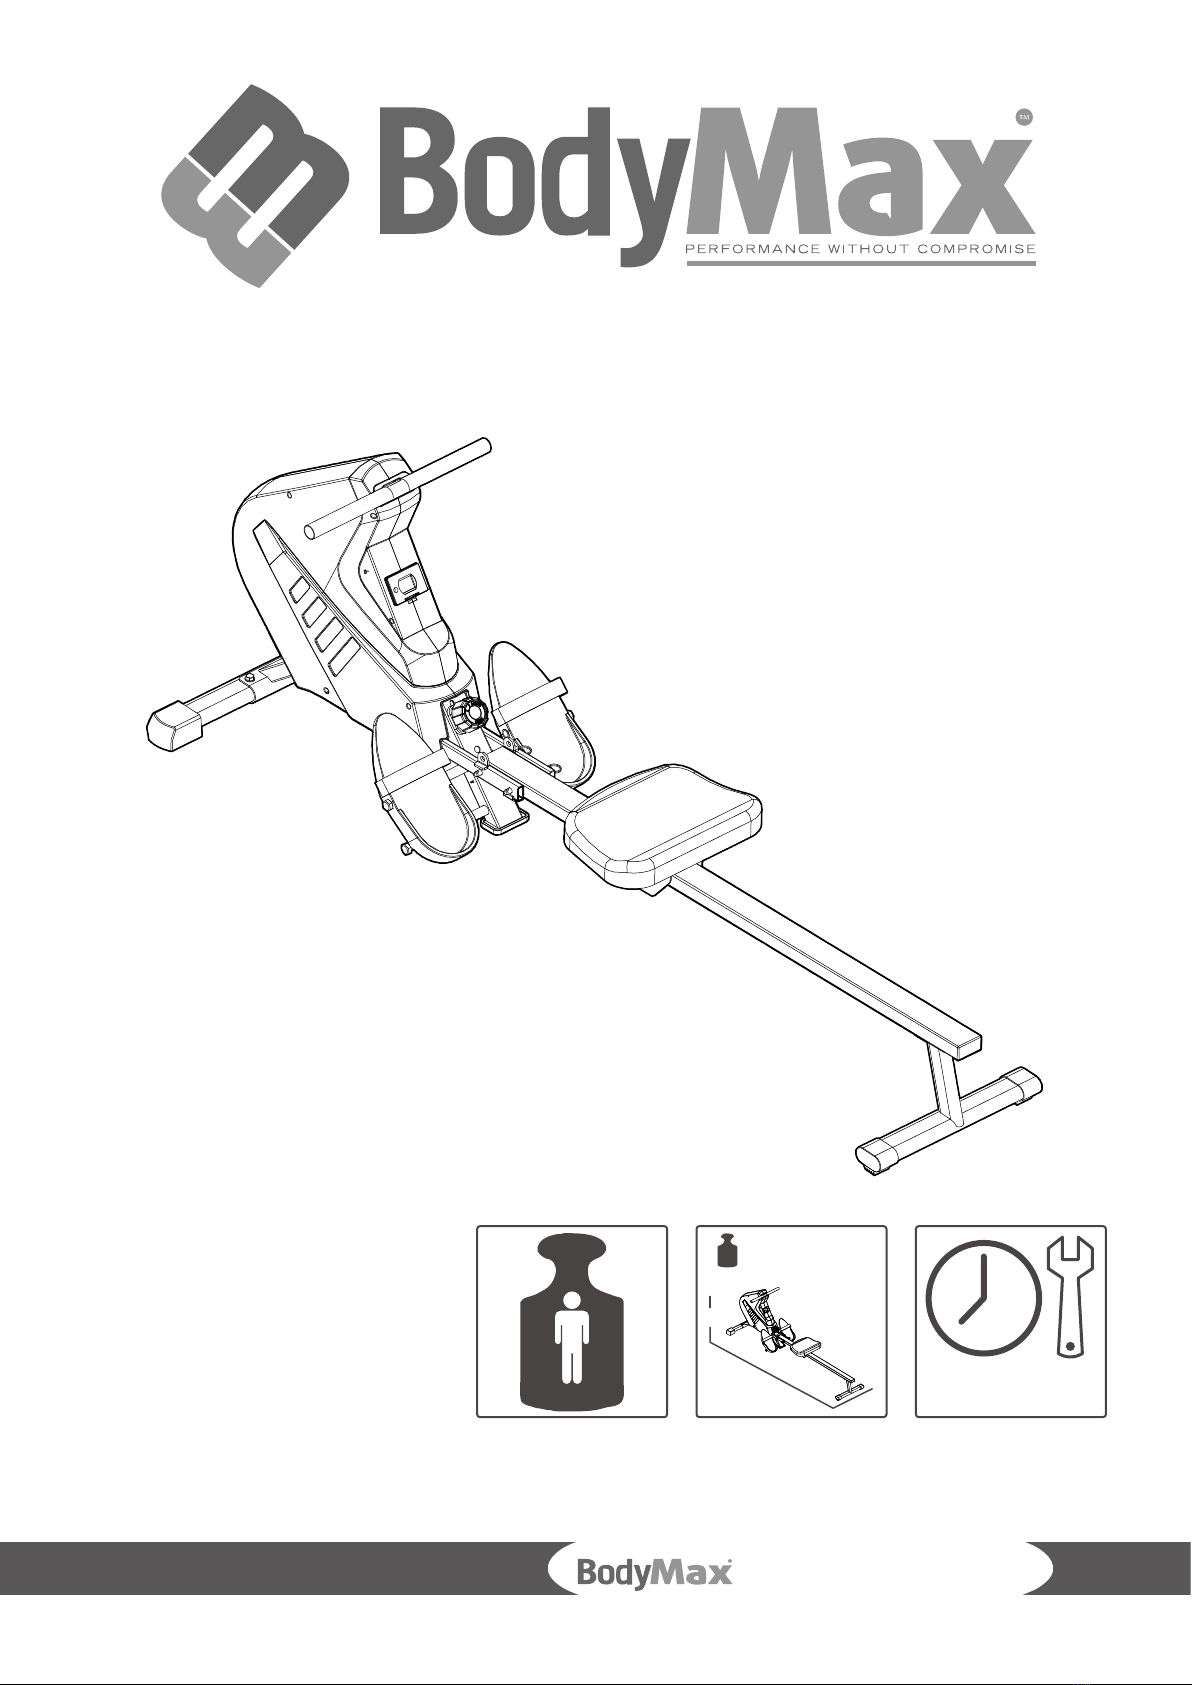
R20 Engage Rower
Assembly and operating instructions
Item number CVRM2452
2019.03
m
a
x
.
1
0
0
k
g
~ 30 min.
20.5 kg
C
B
A
A 188 cm
B 60 cm
C 64 cm


3
Dear Customer,
Thank you for deciding for a high-quality training equipment of the brand BodyMax, the brand that
makes athlete‘s hearts beat faster. BodyMax offers a wide range of home fitness equipment like
elliptical cross trainers, ergometers, treadmills and rowing machines. BodyMax equipment is the
optimal equipment for all those who want to train at home independent of goals and tness level.
For further information please visit www.powerhouse-tness.co.uk or www.bodymax-tness.com.
SAFETY NOTICE
Please read all of the instructions carefully before assembly and rst use. These
instructions are intended to ensure speedy assembly and explain safe usage. Make
sure that all people exercising with the equipment (in particular children
and persons with limited physical, sensory, mental or motor capabilities) are informed about these
instructions and its content in advance. In case of doubt, a responsible person must supervise the
use of the equipment.
This equipment has been manufactured according to the latest safety knowledge. As far as
possible, potential safety hazards which could cause injury have been eliminated. Make sure to
follow the instructions carefully and that all parts are securely in place. If required, read through the
instructions again to correct any mistakes.
Please pay close attention to the safety and maintenance instructions given here. The contract
partner cannot be held liable for damage to health, accidents or damage to the equipment
when it is not used in accordance with these instructions.
The equipment is only suitable for use at home. The equipment is not suitable for semiprofessional (e.
g., hospitals, clubs, hotels, schools, etc.) and commercial or professional use (e. g., health clubs).
Retain these instructions in a safe place for future reference, maintenance or when ordering
replacement parts.

4R20 Engage Rower
1IMPORTANT SAFETY NOTICE 5
2GENERAL INFORMATION 6
2.1 Technical data 6
2.2 Personal safety 6
2.3 Set-up place 7
3ASSEMBLY INSTRUCTIONS, MAINTENANCE AND CARE 7
3.1 General instructions 7
3.2 Faults and Troubleshooting 8
3.3 Maintenance and service calendar 8
4ASSEMBLY 9
4.1 Package contents 9
4.2 Assembly instructions 11
4.3 Adjustment 15
4.4 Computer Function 17
5OPERATING INSTRUCTIONS 18
5.1 Stretching exercises for leg & chest muscles 19
5.2 Workout journal 20
6WARRANTY INFORMATION 21
7DISPOSAL 23
8ORDERING ACCESSORIES 23
9ORDERING SPARE PARTS 24
9.1 Service-hotline 24
9.2 Serial number and model name 24
9.3 Parts list 25
9.4 Exploded drawing 26
10 CONTACT 27
10.1 Head oce 27
10.2 Disclaimer 27
CONTENTS

5
We thank you for choosing our product. To ensure your safety and health, please use this
equipment correctly. It is important to read this entire manual before assembling and using the
equipment. Safe and eective use can only be achieved if the equipment is assembled, maintained
and used properly. It is your responsibility to ensure that all users of the equipment are informed of
all warnings and precautions.
1. Before starting any exercise program, you should consult your physician to determine if you
have any medical or physical conditions that could put your health and safety at risk, or prevent
you from using the equipment properly. Your physician’s advice is essential if you are taking
medication that aects your heart rate, blood pressure or cholesterol level.
2. Be aware of your body’s signals. Incorrect or excessive exercise can damage your health. Stop
exercising if you experience any of the following symptoms: pain, tightness in your chest,
irregular heartbeat, shortness of breath, lightheadedness, dizziness or nauseous feeling. If you
do experience any of these conditions, you should consult your physician before continuing
with your exercise program.
3. Keep children and pets away from the equipment. The equipment is designed for adult use
only.
4. Use the equipment on a solid, at level surface with a protective cover for your oor or carpet.
To ensure safety, the equipment should have at least 2 feet (60CM) of free space all around it.
5. Ensure that all nuts and bolts are securely tightened before using the equipment. The safety of
the equipment can only be maintained if it is regularly examined for damage and/or wear and
tear.
6. Always use the equipment as indicated. If you nd any defective components while assembling
or checking the equipment, or if you hear any unusual noises coming from the equipment
during exercise, discontinue use of the equipment immediately and do not use until the
problem has been rectied.
7. Wear suitable clothing while using the equipment. Avoid wearing loose clothing that may
become entangled in the equipment.
8. Do not place ngers or objects into the moving parts of the equipment.
9. The maximum weight capacity of this unit is 220 pounds (100 KG).
10. The equipment is not suitable for therapeutic use.
11. To avoid bodily injury and/ or damage to the product or property, proper lifting and moving
are required.
12. Your product is intended for use in cool and dry conditions. You should avoid storage in
extreme cold, hot or damp areas as this may lead to corrosion and other related problems.
13. This equipment is designed for indoor and home use only; it is not intended for commercial
use.
WARNING
BEFORE BEGINNING THIS OR ANY EXERCISE PROGRAM, CONSULT YOUR PHYSICIAN FIRST. THIS IS
ESPECIALLY IMPORTANT FOR INDIVIDUALS OVER THE AGE OF 35 OR PERSONS WITH PRE-EXISTING
HEALTH PROBLEMS. READ ALL INSTRUCTIONS BEFORE USING THE SPINNING BIKE. THANE ASSUMES
NO RESPONSIBILITY FOR PERSONAL INJURY OR PROPERTY DAMAGE SUSTAINED BY OR THROUGH
THE USE OF THIS PRODUCT.
1IMPORTANT SAFETY NOTICE

6R20 Engage Rower
2.2 Personal safety
+ Before you start using the equipment, you should consult your physician that this
type of exercise is suitable for you from a health perspective. Particularly aected are
persons who: have a hereditary disposition to high blood pressure or heart disease, are
over the age of 45, smoke, have high cholesterol values, are overweight and/or have not
exercised regularly in the past year.
+ Please note that working out excessively can seriously damage your health.
+ The equipment may only be used for its intended purpose; this means for strength training
for adults.
+ Any other usage is prohibited and potentially dangerous. The contract partner cannot be
held liable for damage resulting from improper use.
+ The equipment may not be used by several persons at the same time.
+ Children should not be allowed unsupervised access to the equipment.
+ Before starting your training, make yourself familiar with all of the equipment‘s functions
and setting options. Have an expert explain the correct usage of the product to you.
+ Make sure that nobody is in the range of motion of the equipment while exercising.
+ Keep your hands, feet and other body parts, hair, clothing, jewelry and other objects well
clear of moving parts.
+ During use, wear suitable sports clothing rather than loose or baggy clothing. When
selecting sports shoes, think about the suitability of the sole – preferably this should be
made of rubber or other non-slip materials. Shoes with heels, leather soles, studs or spikes
are not suitable. Never work out in bare feet.
+ It is also important to take note of the information given in the workout instructions for
creating a workout plan.
+ At the rst signs of weakness, nausea, dizziness, pain, diculty in breathing or other
abnormal symptoms, stop your workout immediately and, if necessary, consult your
physician.
+ Before each training session, check all cables for any possible damage. Immediately
replace defective cables and do not use the equipment until it has been repaired. Also pay
attention to any material fatigue.
2.1 Technical data
Weight and dimensions:
Article weight (gross, including packaging) : 23.5 kg
Packaging dimensions (L x W x H) : Parcel - 115 cm x 24 cm x 70 cm
Set-up dimensions (L x W x H) : approximately 188 cm x 60 cm x 64 cm
Maximum user weight : 100 kg (220 lbs)
2GENERAL INFORMATION

7
+ Never let go of the handlebars or grips as long as there is resistance in order to avoid
crushing and similar injuries.
+ Make sure that the cables are always in the wheel guide. If the cables are stuck while you
are training, stop training immediately and check the cable run.
+ If you adjust the seat, make sure that it fully locks in its new position, because otherwise it
may slide and lead to injuries.
2.3 Set-up place
+ The equipment should only be used indoors, in a suciently heated and dry area (ambient
temperature between 10°C and 35°C). The equipment should not be used outdoors or in
rooms with high humidity (over 70%) like swimming pools. The equipment should only be
stored in surroundings with an ambient temperature between 5°C and 45°C.
+ The training room should be well ventilated during training and not be exposed to any
draughts.
+ Choose a location in which to place the equipment such that there is enough free space/
clearance to the front, the rear and to the sides of the equipment (at least 1.50 m).
Furthermore, the equipment should not be set up in main entrances or on escape routes.
+ No objects of any type should be inserted into the openings of the equipment.
+ The equipment should be placed on a level and solid surface, any unevenness in the oor
should be leveled out.
+ A oor protective mat / equipment underlay can help to protect high-quality oor
coverings (parquet, laminate, cork, carpets) from dents and sweat and can help to level out
slight unevenness.
3ASSEMBLY INSTRUCTIONS, MAINTENANCE AND CARE
3.1 General instructions
+ Please check if all parts and tools belonging to the equipment are included in the delivery
and if there is any transport damage. If there are any complaints, please contact your
contract partner directly.
+ Some of the nuts and bolts to be used in assembly are already pre-mounted in order to
make set-up as easy as possible.
+ The equipment must be assembled by adults. In case of doubt, ask for assistance from
another person with technical skills.
+ Keep children away from the equipment during assembly, because small parts are included
in the delivery and may be swallowed.
+ Make sure that you have enough space (at least 1.50 m) in every direction during assembly.
+ Do not leave any tools and packaging materials like plastic sheeting laying around to avoid
danger of suocation for children.
+ Assemble the equipment on an underlay mat or on the cardboard packaging in order to
avoid damage to the equipment and to the oor (scratches).

8R20 Engage Rower
+ Before starting assembly, all individual parts should be placed on the oor next to each
other.
+ Read the assembly instructions carefully and assemble the equipment according to the
illustrations. Proceed carefully and cautiously.
+ First loosen all parts and check for their correct tting. Then tighten the screws using a tool.
+ Modications to the design or improper repairs may pose a hazard to the user and should
not be carried out. The product warranty may be void as a result.
+ Only authorized service technicians are permitted to carry out all servicing and/or repairs –
it excludes maintenance and care.
+ Damaged or worn components may impair your safety and the lifespan of the equipment.
You should therefore immediately replace damaged or worn components. Please contact
your contract partner in such a case. The equipment should no longer be used until it has
been repaired. When needed, only use original BodyMax spare parts.
+ Check the tightness of all screw connections once a month.
+ In order to be able to guarantee the constructively dened safety level of this equipment,
we recommend having the equipment regularly maintained (at least once a year) by
specialists (service technicians of your contract partner).
+ The equipment may be cleaned of dust, dirt and sweat using a damp cloth. The use of
solvents should be strictly avoided. Also, make sure that no liquids (e. g. sweat) get into the
openings of the equipment (e. g. console).
3.2 Faults and Troubleshooting
The equipment runs through regular quality controls during production. Nevertheless, errors
or malfunctions on the equipment may occur. Individual parts are often the cause of faults
and replacement is usually sucient. Please use the following overview to see the six most
common errors and how to repair them. If the equipment still does not work properly, please
contact your contract partner.
Problem Cause Solution
Squeaking & cracking noises Loose or too tight screw
connection
Check or lubricate screw
connection
3.3 Maintenance and service calendar
The equipment needs to be cleaned after every training session with a moist towel (no
solvent!) in order to avoid damage caused by sweat.
The following routine work must be done in the specied time intervals:
Part Weekly Monthly Annually
Check screws I

9
4ASSEMBLY
In order to make the assembly of the equipment easier, we recommend that you do not
initially fully tighten the screws and bolts. However, you should make sure that all screws
and bolts are rmly tightened after assembly.
4.1 Package contents
The package contains the parts represented in the illustration. If one of the illustrated parts is
missing, please contact your contract partner.
NO.1
Screw (M5x20xS6) x 4 pcs
NO.2
Washer (D8xø16xT1.5) x 4 pcs
NO.52
Spring Washer (D8) x 4 pcs
NO.58
Bolt (ø12.5x160xS19) x 4 pcs
NO.64
Bolt (ø10x95xM6x25) x 1 pc
NO.65
Washer (D10xø20x2) x 1 pc
NO.66
Washer (D10xø20x2) x 1 pc
NO.67
Pull Pin (ø10x100x105) x 1 pc

10 R20 Engage Rower
Tools
#A
Alien Wrench (S5) x 1 pc
#B
Alien Wrench (S6) x 1 pc
#C
Spanner (S17-19) x 1 pc
11
4.2 Assembly instructions
A. Before assembling make sure that you will have enough space around the item.
B. Use the present tooling for assembling.
C. Before assembling please check whether all needed parts are available (at the above of
this instruction sheet you will nd an explosion drawing with all single parts (marked
with numbers) which this item consists of.
Step 1:
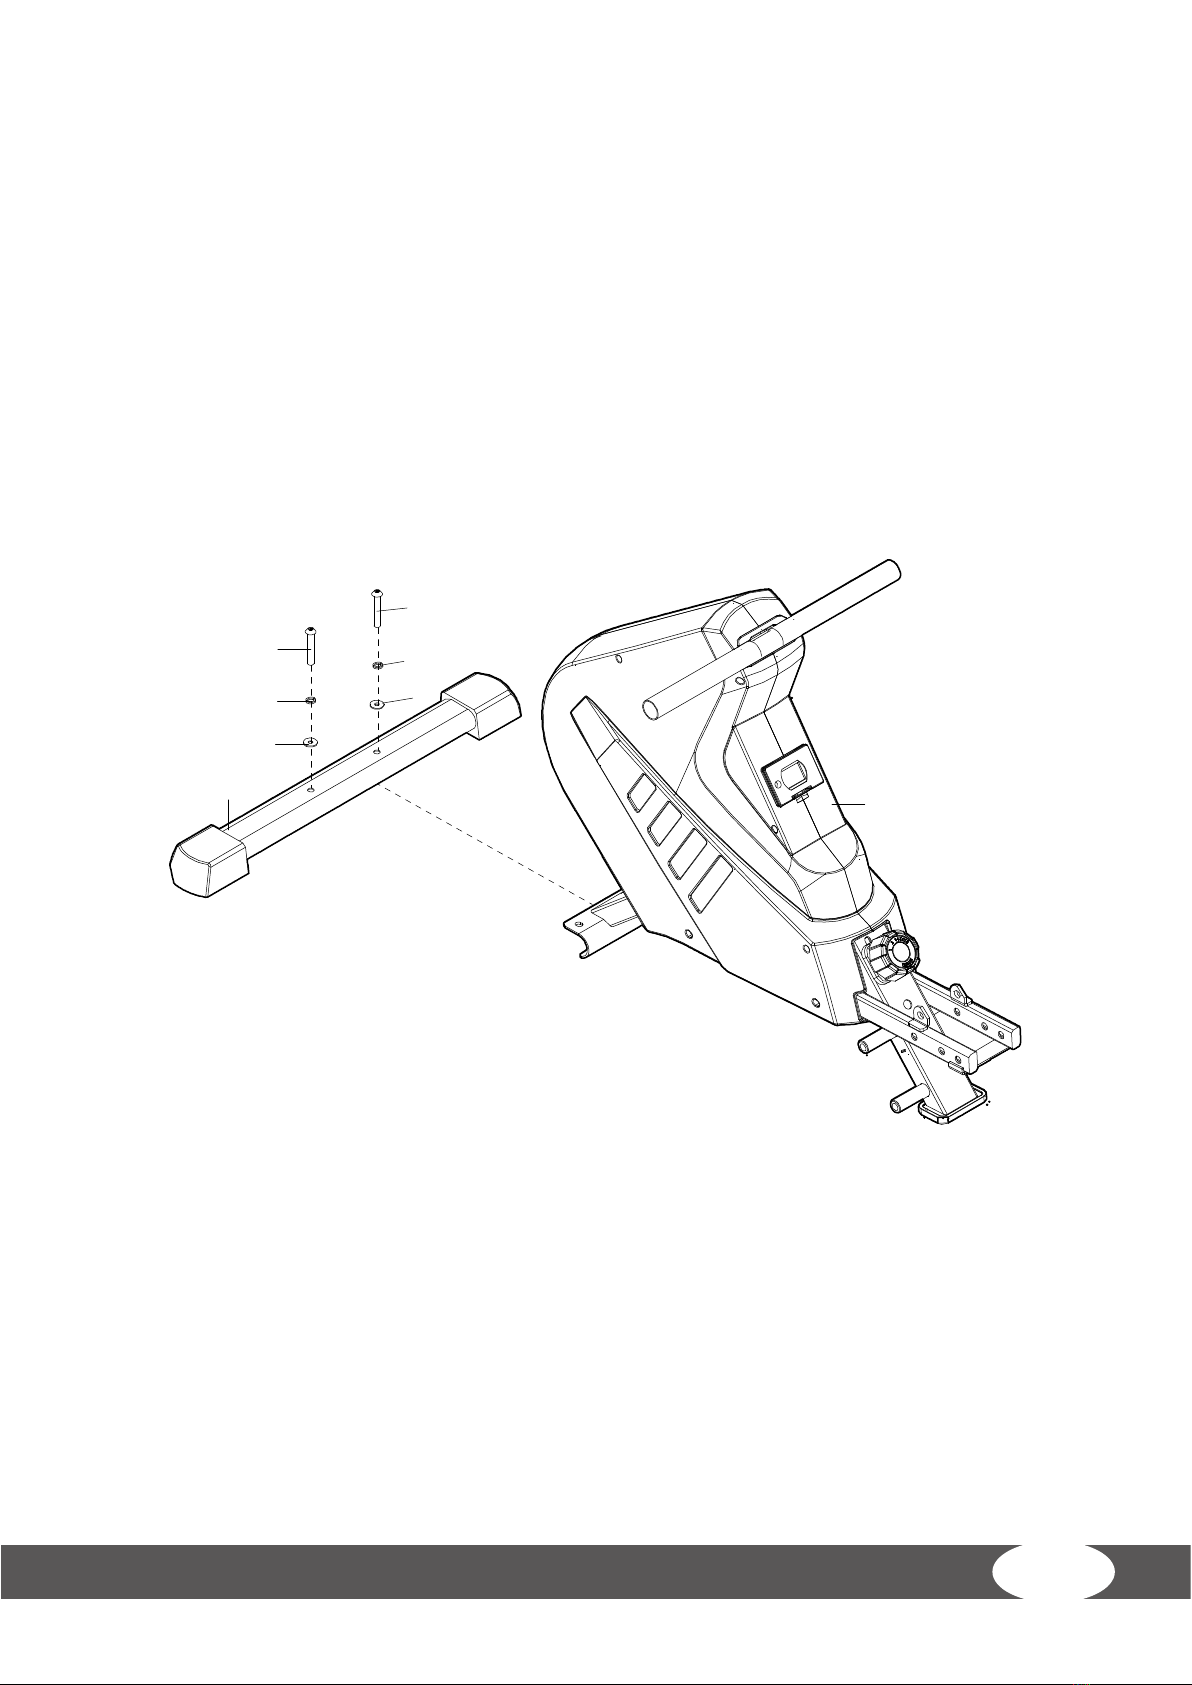
1. Attach Front Stabilizer (3) to Main Frame (49) using two Screws (1), two Spring Washers (52)
and two Washers (2).
2. Tighten and secure with Allen Wrench (B).
1
1
49
52
52 2
2
3
12 R20 Engage Rower
Step 2:
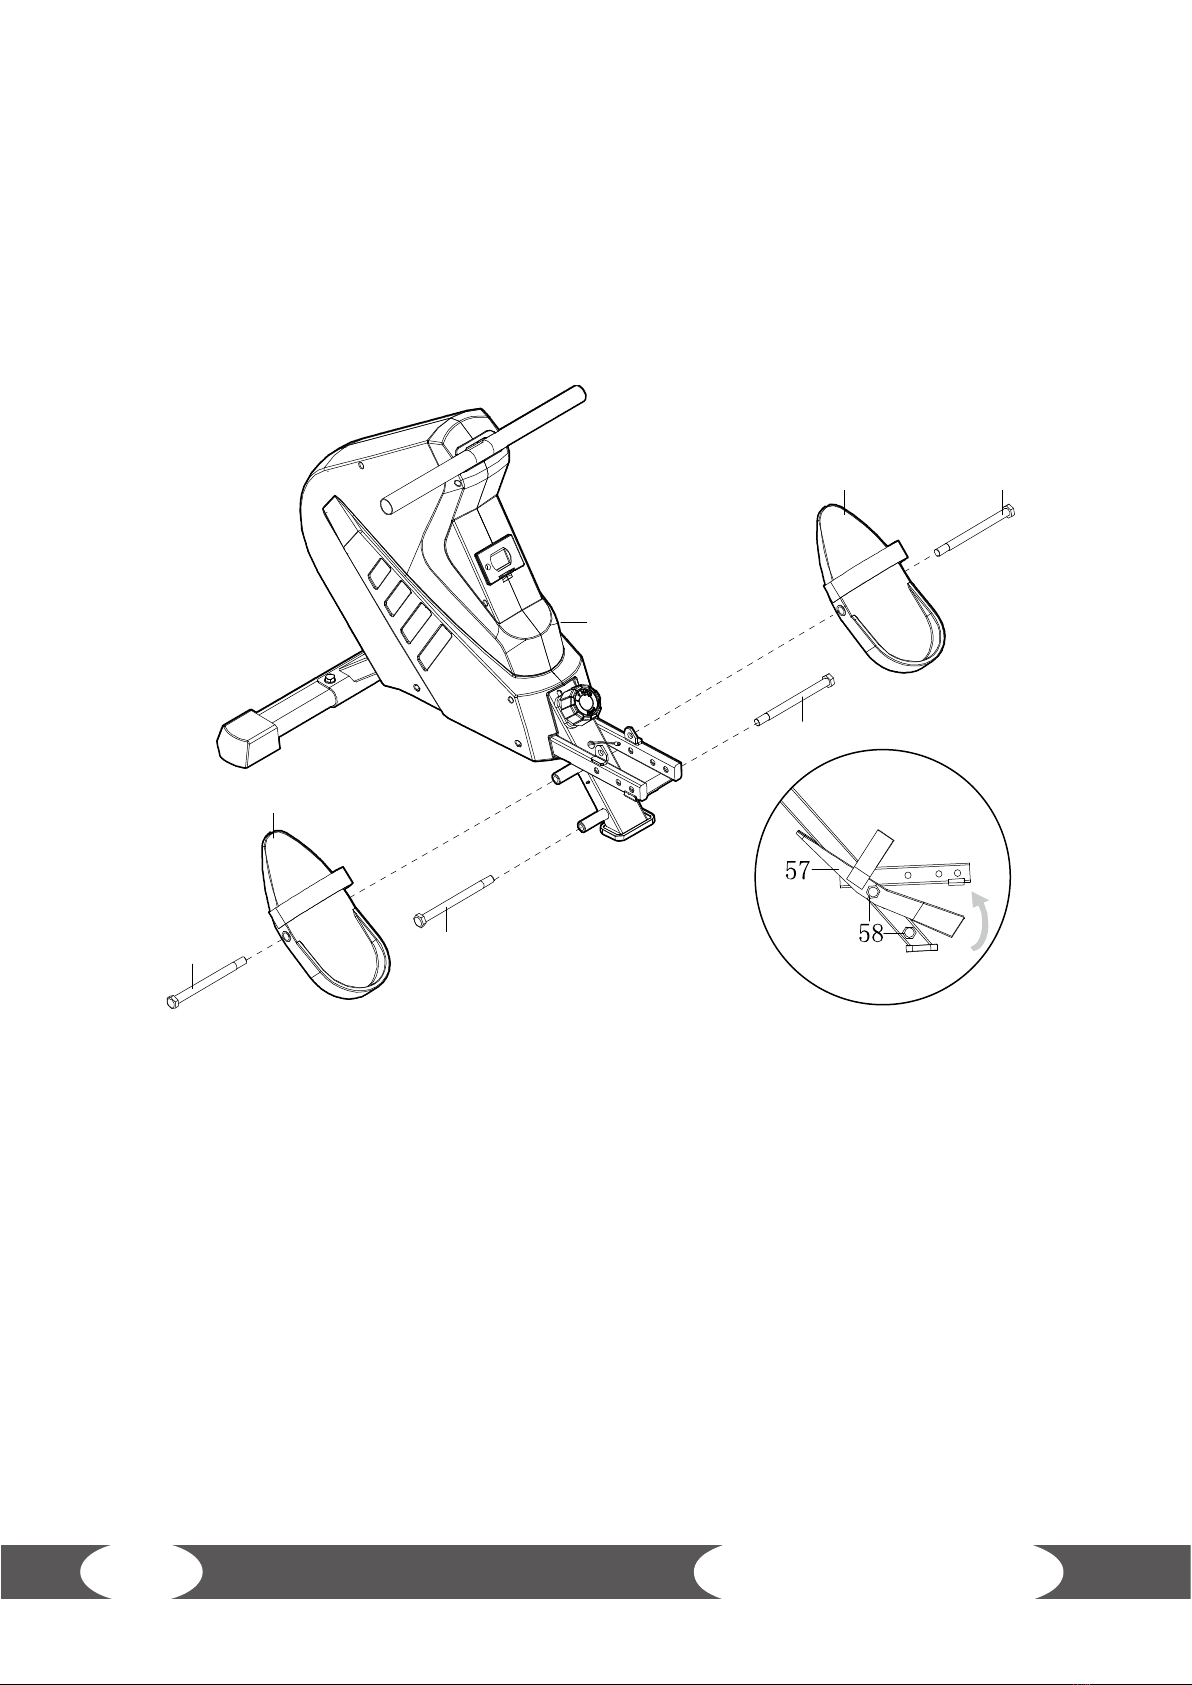
1. Attach two Bolts (58) into the bottom hole of Main Frame (49) with Spanner (C).
2. Attach two Bolts (58) through the Pedals (57), into the upper hole of the Main Frame (49),
and tighten with Spanner (C).
NOTE: The Pedals (57) should rest on the bottom Bolts (58).
49
58
58
58
58
57
57
13
Step 3:
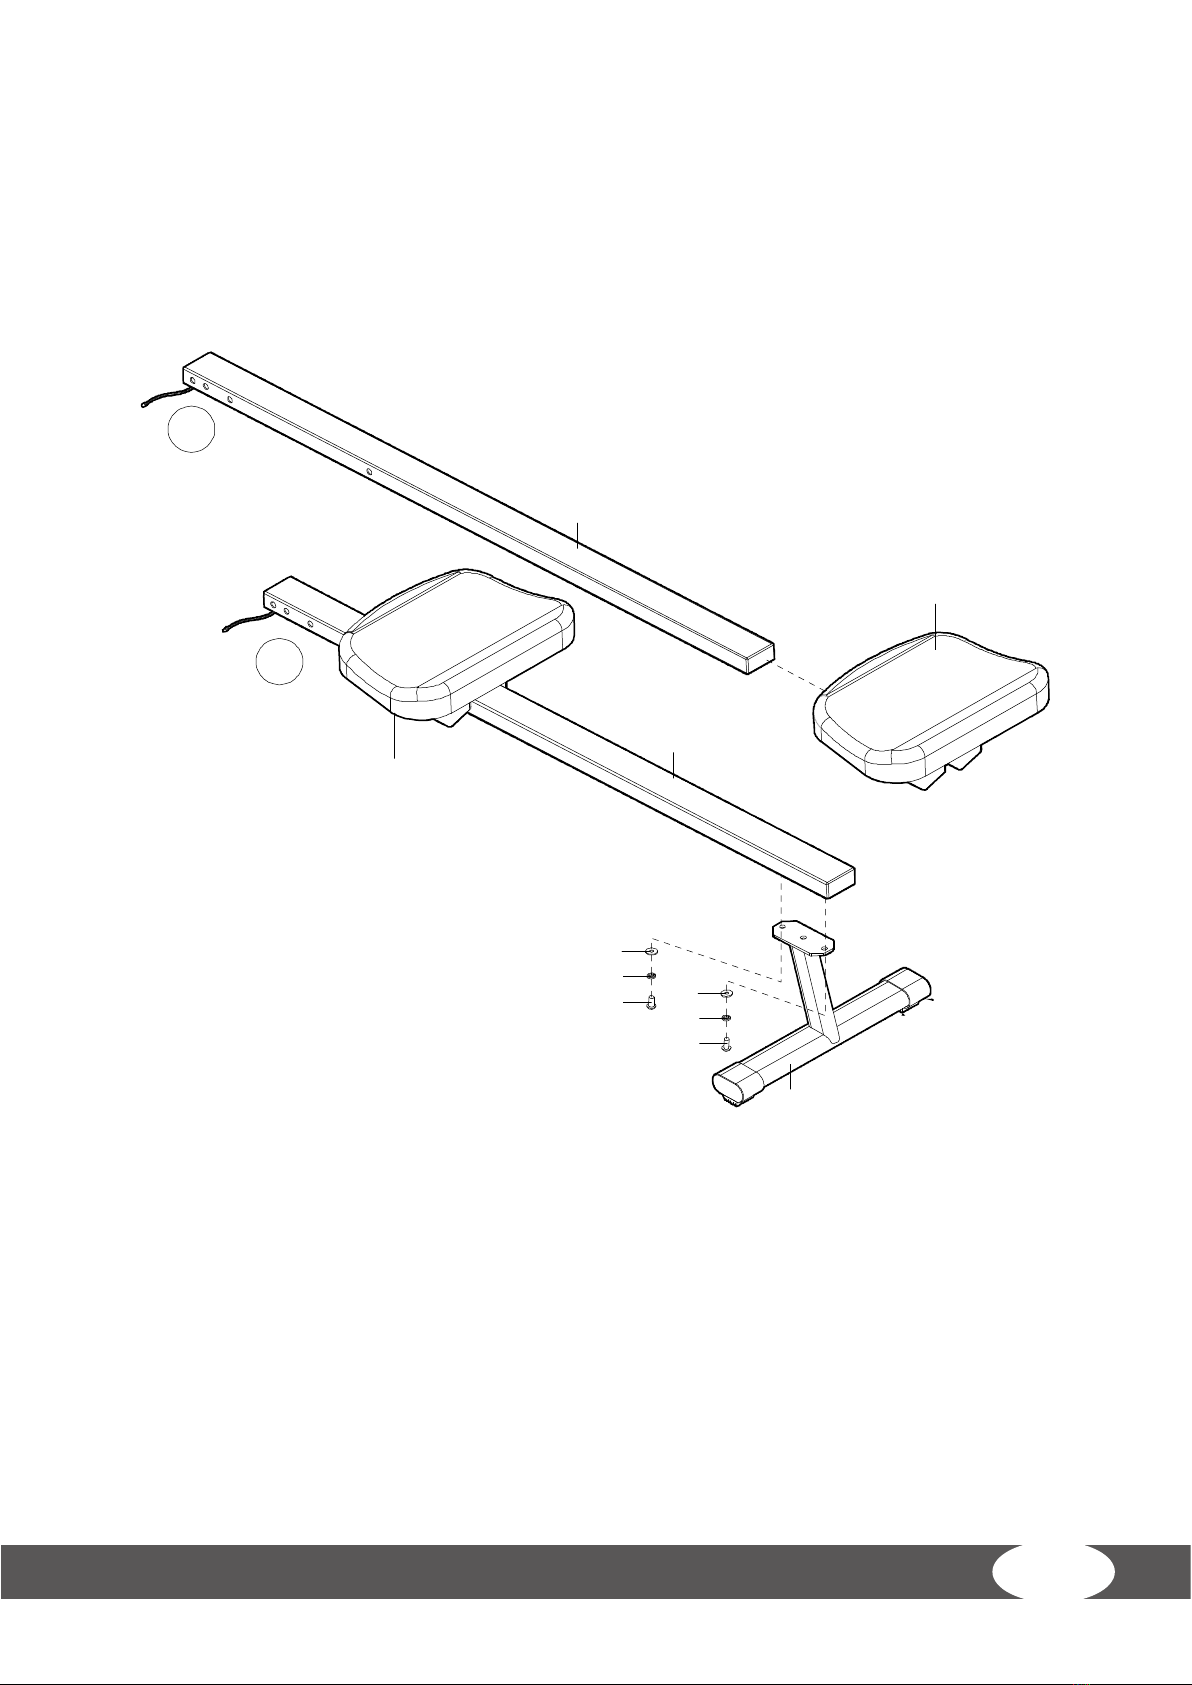
1. Insert Seat (71) onto the Sliding Rail (17).
2. Attach Rear Stabilizer (14) to Sliding Rail (17) using two Screws (No. 1), two Spring Washers
(52) and two Washers (2).
3. Tighten and secure with Allen Wrench (B).
71
2
52
12
52
1
14
17
17
71
1
2

14 R20 Engage Rower
Step 4:
1. Connect Sliding Rail (17) to Main Frame (49) using Bolt (64), Washer (65) and Screw (No. 66).
Tighten and secure with Allen Wrench (A) and Allen Wrench (B).
2. Lift Main Frame (49) and Sliding Rail (17) slightly to align the holes. Then insert Pull Pin ( 67).
3. Connect Trunk Wire 1 (51) with Sensor Wire (63).
4. The assembly is complete!
51
67
67
65
64
63
17
66
51
49
63
1
2

15
4.3 Adjustment Guide
Pedal adjustment
The pedal strap is adjustable and can be
personalized to t the user’s foot size.
Moving the machine
To move the machine, lift upthe rear stabilizer until
the transportation wheels on the front stabilizer
touch the ground.
With the wheels on the ground, you can transport
the bike to the desired location with ease.
45
Adjusting the resistance
Rotate the Tension Control Knob (45) clockwise to
increase the level of resistance. Rotate the tension
control counter-clockwise to decrease the level of
resistance.
Tension levels are set at Level 1 being the lowest
and Level 8 being the highest.
49
48
51
Replace the battery
One AAA battery is included in the Computer (48).
To replace the battery, remove the Computer (48)
from Main Frame (49). Disconnect the Trunk Wire 1
(51) and the link wire of Computer (48).
After the replacement, connect Trunk Wire 1 (51)
with the link wire of Computer (48) and put the
Computer (48) back into the Main Frame (49).
Dispose or recycle battery according to your state
and local guidelines.

16 R20 Engage Rower
4.3 Adjustment Guide
When not in use, you can save space by folding the Sliding Rail (17).
1. Lift slightly Sliding Rail (17) where it joins the Main Frame (49). With the other hand, pull out
the Pull Pin (No. 67). (Figure A)
2. Fold the Sliding Rail (17) to vertical. Insert Pull Pin (67) into the xing board and through
Sliding Rail (17) to secure the Sliding Rail (17). (Figure B)
49
67
17
17
67
67
17
49
49
Figure A
Figure B

17
4.4 Computer Function
SPECIFICATIONS
TIME 00:00 - 99:59 MIN:SEC
COUNT 0 - 9999 STROKES
CALORIES 0 - 9999 KCAL
REPS/MIN (STROKES/MIN) 0 - 9999 STROKES/MIN
KEY FUNCTION
MODE To select the function you want. Hold the key for 4 seconds to have all
function value reset (total reset).
OPERATION PROCEDURES
AUTO ON/OFF The monitor will turn on when you start rowing or press MODE. The monitor
will automatically turn o after inactive for 4 minutes.
FUNCTION
TIME Counts the workout time while exercising.
COUNT Counts the strokes while exercising.
CALORIES Counts calories burned while exercising.
REPS/MIN Displays the strokes per minute while exercising.
SCAN Scans through each function between → TIME → CALORIES → REPS/MIN
(STROKES/MIN) repeatedly.
BATTERY
If there is a problem with the display, try replacing the battery. This monitor
uses one “AAA” battery. Dispose the old battery according to the guidelines of
your state and local region.
18 R20 Engage Rower
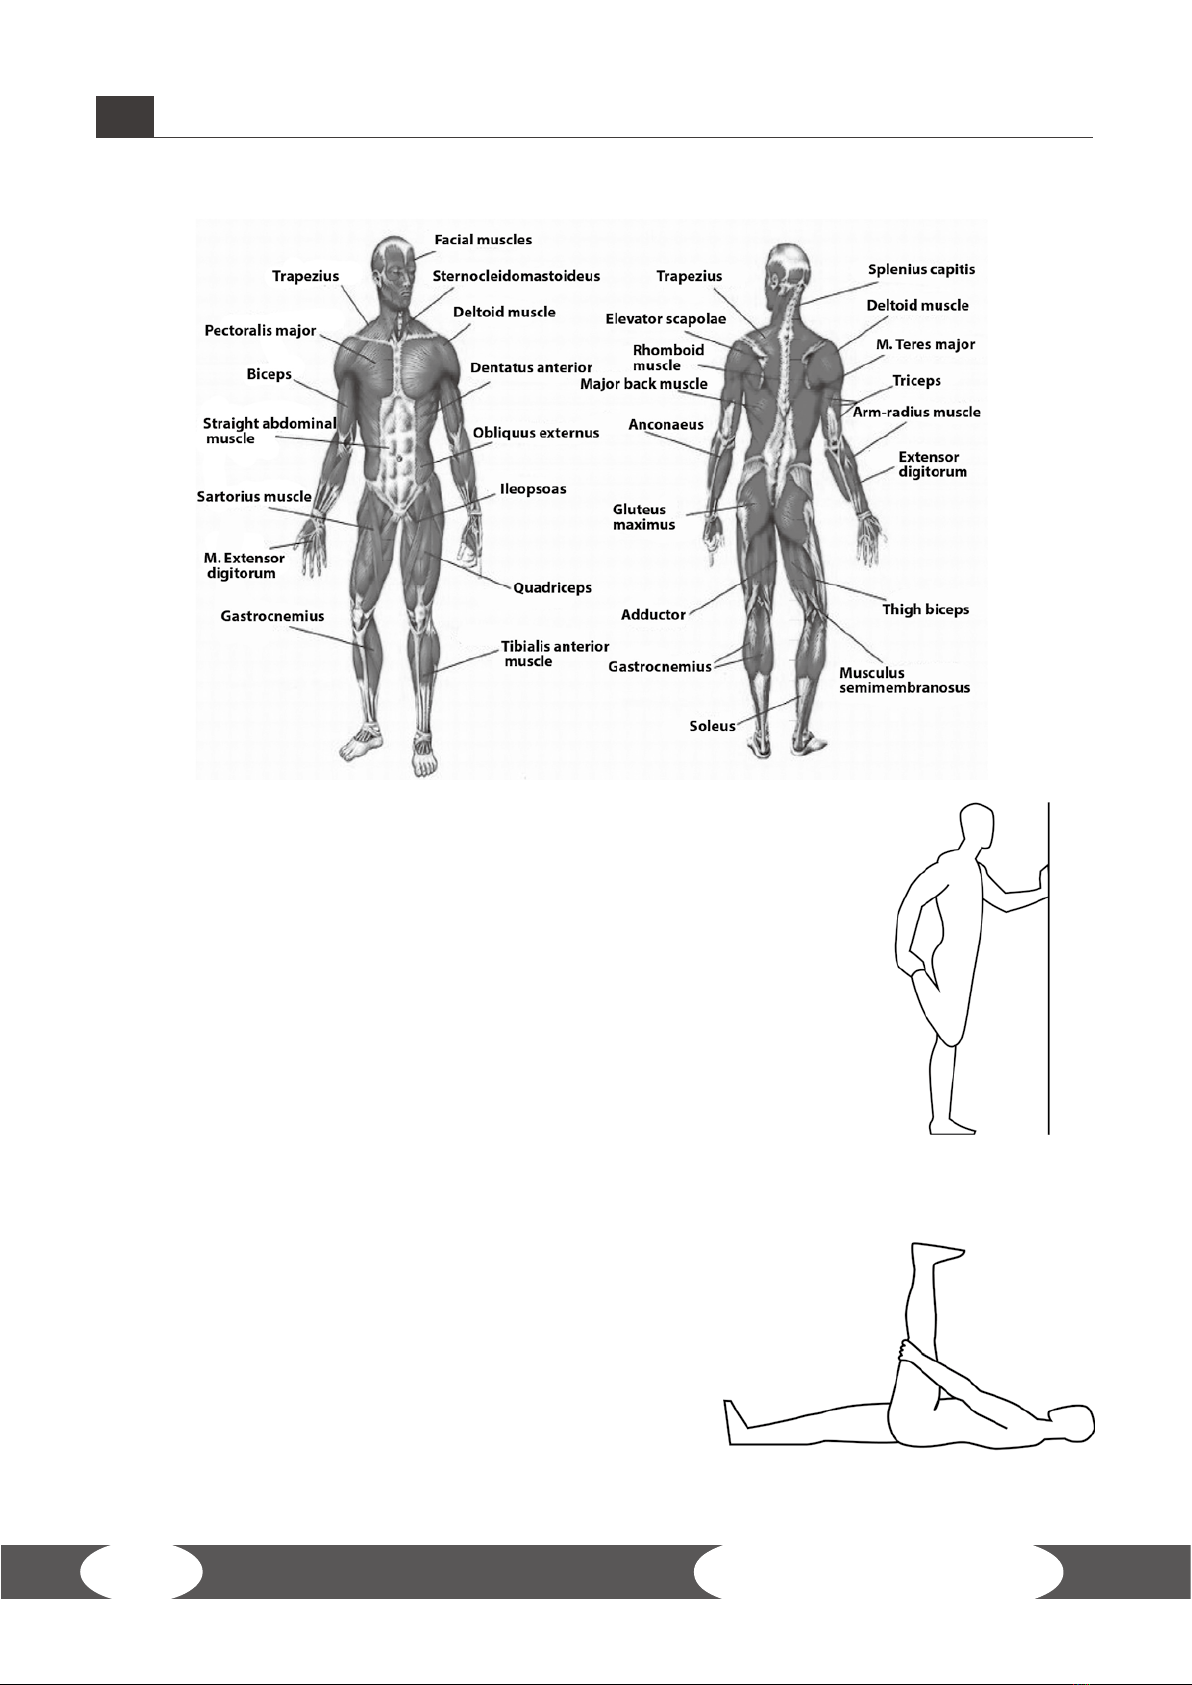
5WORKOUT INSTRUCTIONS
5.1 Stretching exercises for leg and chest muscles
1. Exercise: Stretching of front thigh / leg extension (quadriceps)
• Stable position, grab arches of feet
• Pull heel towards buttocks, knee points
downwards (no abduction)
• Straight upper body, avoid tilting the pelvic
forward (hollow back) by tensing the abdominal
muscles
• Change legs
2. Exercise: Stretching the back thigh / leg curl (hamstring)
• Pull thigh towards upper body with both hands
• Stretch through increased stretching in the knee
joint
• The lower leg maintains contact with the oor,
keep hips bent
• Change legs

19
3. Exercise: Stretching the calf muscles (gastrocnemius)
• Place feet parallel to each other pointing forward, the heels
touch the oor
• Support yourself on a chair coming from a lunge
• Move your body weight to the front leg, press your heel
from the rear leg towards the oor and hold the contact
• Slowly stretch your knee of the rear leg until you feel the
stretch in your calves
• Change legs
4. Exercise: Stretching the chest muscles (pectoralis major)
• Stand parallel to a wall
• Place your forearm at 90° to the wall with the elbow just
above shoulder height
• Turn your head and upper body gradually to the opposite
sides until you feel a stretch in the front chest, of the
shoulder being leaned on
• Pay attention to tension in your abdominal and gluteal
muscles
• Your weight is on your front leg
• Change legs
All recommendations of these instructions apply solely to healthy persons and are not
suitable for those with heart or cardiovascular problems. All of the tips are intended only
as a guide to help you create a workout. Your physician can oer appropriate advice for
particular, personal requirements.
We hope you enjoy your workout and have a lot of success!

20 R20 Engage Rower
Date Training weight
Time (min.) Calories burnt Body weight
(Copy template)
5.2 Workout journal
This manual suits for next models
1
Table of contents
Other BODYMAX Home Gym manuals


Popular Home Gym manuals by other brands

Sportplus
Sportplus SP-MR-008 operating instructions

Weider
Weider Black inversion system WBBE21690.0 user manual

Domyos
Domyos abs bench 500 user manual

Weider
Weider 214 Bench Bedienungsanleitung

Sunny Health & Fitness
Sunny Health & Fitness SF-RW5713 user manual

Weider
Weider Club 290 Power Tower Bench manual


