BODYTONE EVOR4 User manual
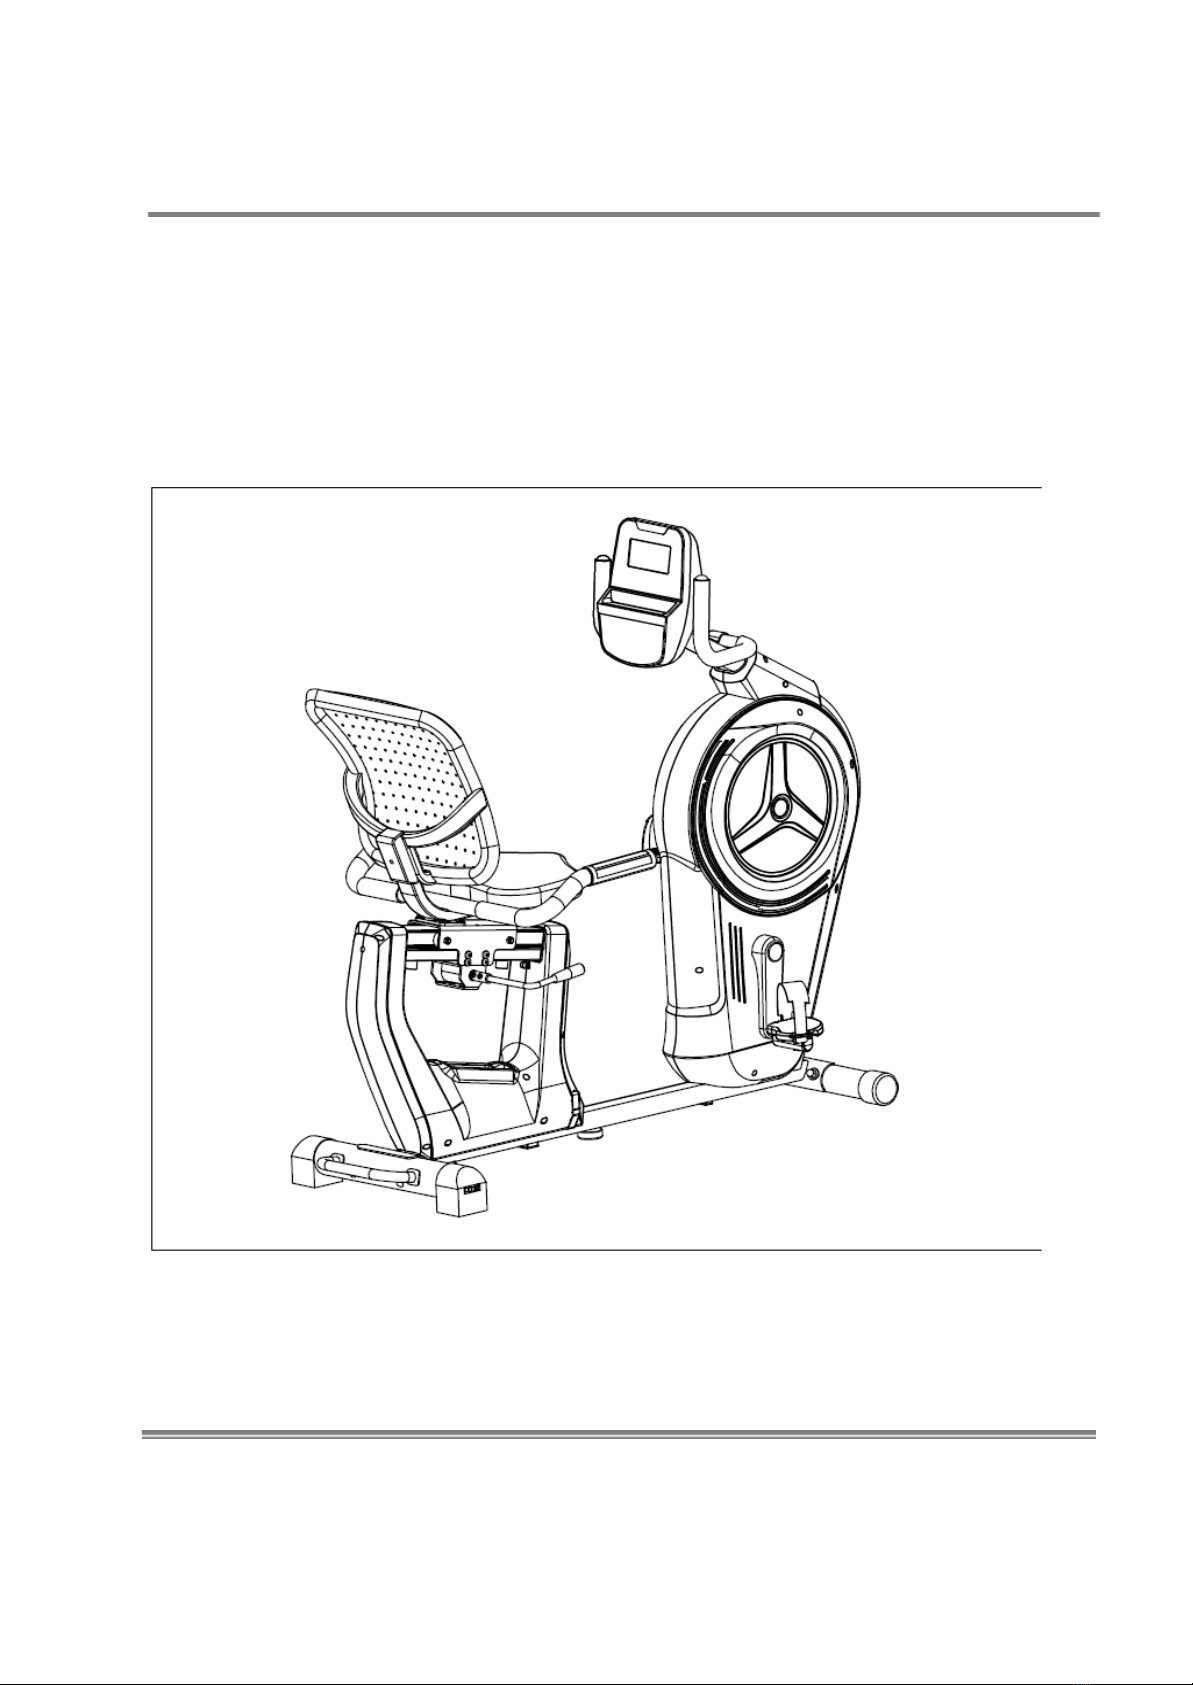
RECUMBENT BIKE
OWNER’S MANUAL
IMPORTANT !
Please read all instructions carefully before using this product.
Retain this manual for future reference.
The specifications of this product may vary slightly from the illustrations and are subject to
change without notice.

Before You Start
For your safety and benefit, read this manual carefully before using the machine.
Prior to assembly, remove components from the box and verify that all the listed parts
were supplied. Assembly instructions are described in the following steps and
illustrations.
IMPORTANT SAFETY NOTICE
READ THE ENTIRE MANUAL BEFORE YOU ASSEMBLE OR OPERATE YOUR
MACHINE. IN PARTICULAR, NOTE THE FOLLOWING SAFETY PRECAUTIONS:
01- Check all the screws, nuts and other connections before using the machine for the
first time and ensure that the trainer is in the safe condition.
02- Set up the machine in a dry level place and leave it away from moisture and water.
03- Place a suitable base (e.g. rubber mat, wooden board etc.) beneath the machine in
the area of assembly to avoid dirt and etc...
04- Before beginning training, remove all objects within a radius of 2 meters from the
machine.
05- DO NOT use aggressive cleaning articles to clean the machine, only use the
supplied tools or suitable tools of your own to assemble the machine or repair any parts of
machine. Remove drops of sweat from the machine immediately after finishing training.
06- Your health can be affected by incorrect or excessive training. Consult a doctor
before beginning a training program. He can define the maximum setting (Pulse. Watts.
Duration of training etc) to which you may train yourself and can get precise information
during training. This machine is not suitable for therapeutic purpose.
07- Only do training on the machine when it is in correct working way. Use only original
spare parts for any necessary repairs.
08- This machine can be used for only one person’s training at a time.
09- Wear training clothes and shoes which are suitable for fitness training with the
machine. Your training shoes should be appropriate for the trainer.
10- If you have a feeling of dizziness, sickness or other abnormal symptoms, please
stop training and consult a doctor asap.
11- People such as children and handicapped persons should only use the machine in
the presence of another person who can give aid and advice.
12- The power of the machine increases with increasing the speed, and the reverse.
13- We recommend lubricating all moving parts every 3 months.
14- Do not wear loose clothing to avoid entangling in any moving parts
1

15- Do not place fingers or any other objects into the moving parts of the bike.
WARNING: BEFORE BEGINNING ANY EXERCISE PROGRAM, CONSULT
YOUR PHYSICIAN. THIS IS ESPECIALLY IMPORTANT FOR INDIVIDUALS OVER
THE AGE OF 35 OR PERSONS WITH PRE-EXISTING HEALTH PROBLEMS. READ
ALL INSTRUCTIONS BEFORE USING ANY FITNESS EQUIPMENT.
SAVE THESE INSTRUCTIONS / Maximum user’s weight: 135KGS
2
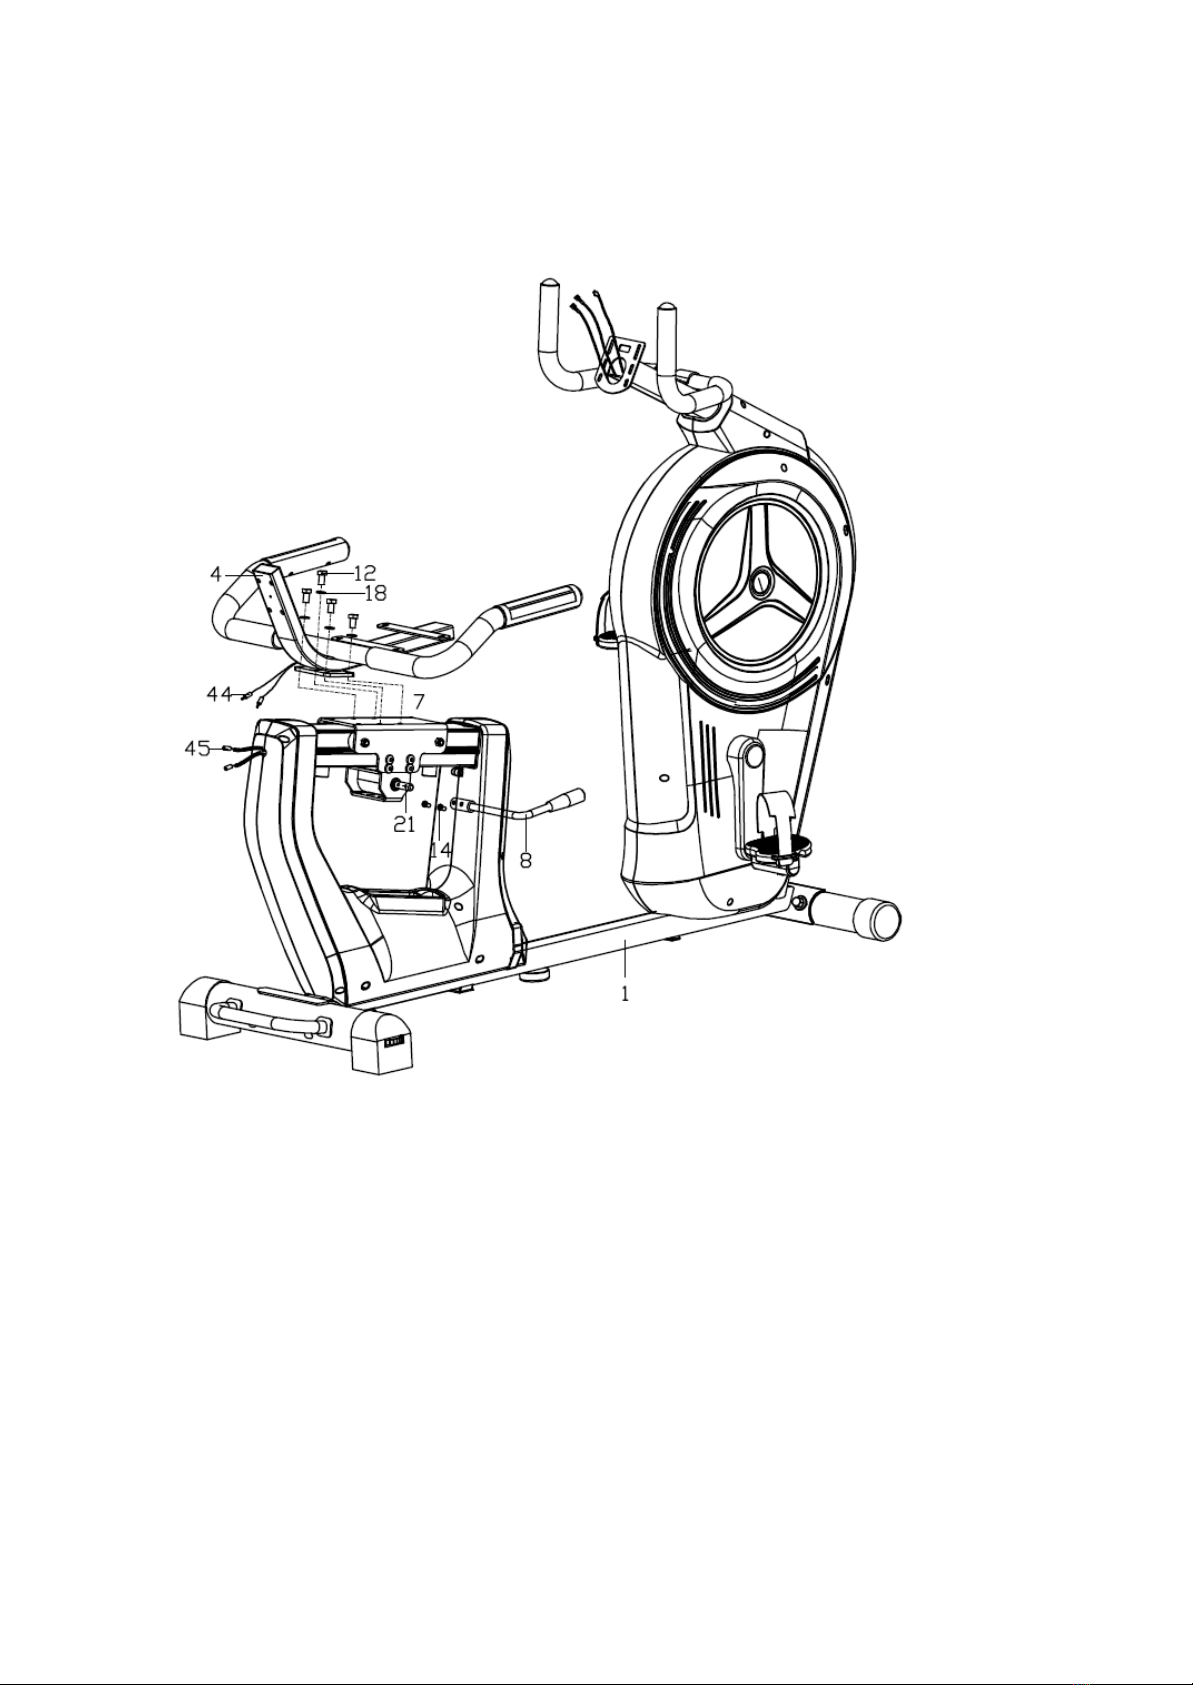
EXPLOADED DIAGRAM
3

4

5

PARTS LIST
NO.
Description
QTY
NO.
Description
QTY
1
Mainframe
1
26
Square end cap
2
2
Handlebar post
1
27
Round cap 1
2
3
Small handle
1
28
Round cap 2
2
4
Saddle frame
1
29
Handlebar foam grip 1
2
5
Front stabilizer
1
30
Handlebar foam grip 2
2
6
Rear stabilizer
1
31L/R
Pedal
1/1
7
Backrest frame seat
1
32
Rear stabilizer end cap
2
8
Adjustable handle
1
33
Adjustable leveler
1
9
Square neck pan head bolt
M8X74 M8X74
2
34
Saddle
1
10
Square neck pan head bolt
M8X93
2
35
Backrest
1
11
Inner hex pan head bolt M8X16
11
36
End cap
1
12
Hex pan head bolt M8X12
16
37
Cross pan head self-drilling screw
39
13
Inner hex pan head bolt M6X40
4
38
Sensor wire
1
14
Inner hex cylinder head M6X10
4
39
Nut M10
1
15
Spring washer D8
12
40
Arc washer
4
16
Inner hex pan head bolt M8XL93
2
41
Console
1
17
Cap nut M8
4
42
Cross pan head screw
4
18
Flat washer D8X1.5
19
43
Sensor trunk wire
1
19
Flat washer D6XD16X1.2
4
44
Pulse wire
2
20
Curve washer D8XD25X1.5, R30
6
45
Pulse trunk wire 1
2
21
Eccentric shaft
1
46
Pulse trunk wire 2
2
22
Handle for moving
1
47
Handle grip
1
23L/R
R
Crank
1/1
48
End cap
1
24L/R
Handlebar cover
1/1
49
Inner hex pan head bolt M8X20
6
25
Front stabilizer end cap
2
50
Motor
1
51
Tension wire
1
76
Clamping eccentric wheel
1
52L/RR
RR
Cover
1/1
77
Upper pressure block
1
53
Phillips tapping screw ST4.2x10
4
78
Hex nut M6
1
54
Crank shield cover
2
79
Chain bolt
1
55
Crank shield
2
80
Allen bolt M8x20
4
6

56
Flange nut M10*1.25
2
81
Setting plate
2
57
Flat washer D5*D16*1.2
4
82
Idler
1
58
Phillips tapping screw ST4.2x12
4
83
Idler link
1
59
Shaft circlip D17
2
84
Nut M10
1
60
Bearing 6203RS
2
85
Arc washer D10*2
2
61
Wave washer D17
1
86
Spring
1
62
Belt pulley
1
87
Flange nut M10*1
2
63
Axis
1
88
Outer hex nut M10X1
1
64
Nylon nut M8
8
89
Inertial wheel
1
65
Aluminum alloy guide rail
1
90
Belt
1
66
Cushion
2
91L/R
Cover piece
1/1
67
Spacer
4
92
Small belt wheel
1
68
Wheel
4
93
Battery box
1
69
Inner hex round head M8X30
4
94
Battery
1
70
Fixed seat frame
1
95
Battery box bottom guard
1
71
72
73
74
75
Shaft circlip D12
2
96
Phillips tapping screw
2
72
72
73
74
75
Shaft circlip D10
1
97
Power generator
1
73
72
73
74
75
Large alloy sleeve
1
98
Fixed sleeve
1
74
72
73
74
Small alloy sleeve
1
99
Inner magnetic cushion cover
1
7

75
75
72
73
74
75
Eccentric shaft
1
100
Inner hex screw M5X4
2
101
Circuit board combination
1
8

NOTE:
Most of the listed assembly hardware has been packaged separately, but
some hardware items have been preinstalled in the identified assembly parts.
In these instances, simply remove and reinstall the hardware as assembly is
required.
Please reference the individual assembly steps and make note of all
preinstalled hardware.
Prior to assembly of this product, remove all components from the package
and verify all the listed parts are supplied. Once certain, begin with the first
assembly step.
ASSEMBLY INSTRUCTIONS
Step 1
Fix the front stabilizer (5) to the mainframe (1) with cap nut (17), spring washer
(15), curve washer (20) and square neck pan head bolt (9).
Lock the rear stabilizer (6) to the mainframe (1)with square neck pan head
bolt(10)、curve washer(20)、spring washer(15) and cap nut(17).
9

Step 2
1. First, connect sensor wire (38), pulse trunk wire 1 (45) with sensor trunk
wire (43) and pulse trunk wire 2 (46).
2. And then fix the handlebar post (2) to the main frame (1) with bolt (49),
spring washer (15)、flat washer(18) arc washer (40) .Fix the handlebar cover
(24L/R) to the mainframe (1) with cross pan head self-drilling screw (37).
10
Step 3
1.Fix the handle (3) to the handlebar post (2) with inner hex pan head bolt (11)
and flat washer (18).
2.Connect the pedal (31L/R) to the crank (23L/R). Note: please turn the pedal in
the direction as showed in the picture. Make sure the pedal (31L/R) is tight
when exercised.
11
Step4
1.Connect the sensor wire (44) with pulse trunk wire 1 (45), and then fasten the
saddle frame (4) to the Backrest frame seat (7) with flat washer (18) and cross
pan head bolt (12).
2.Fix the adjustable handle (8) to the eccentric shaft (21) with inner hex
cylinder head bolt (14).
12
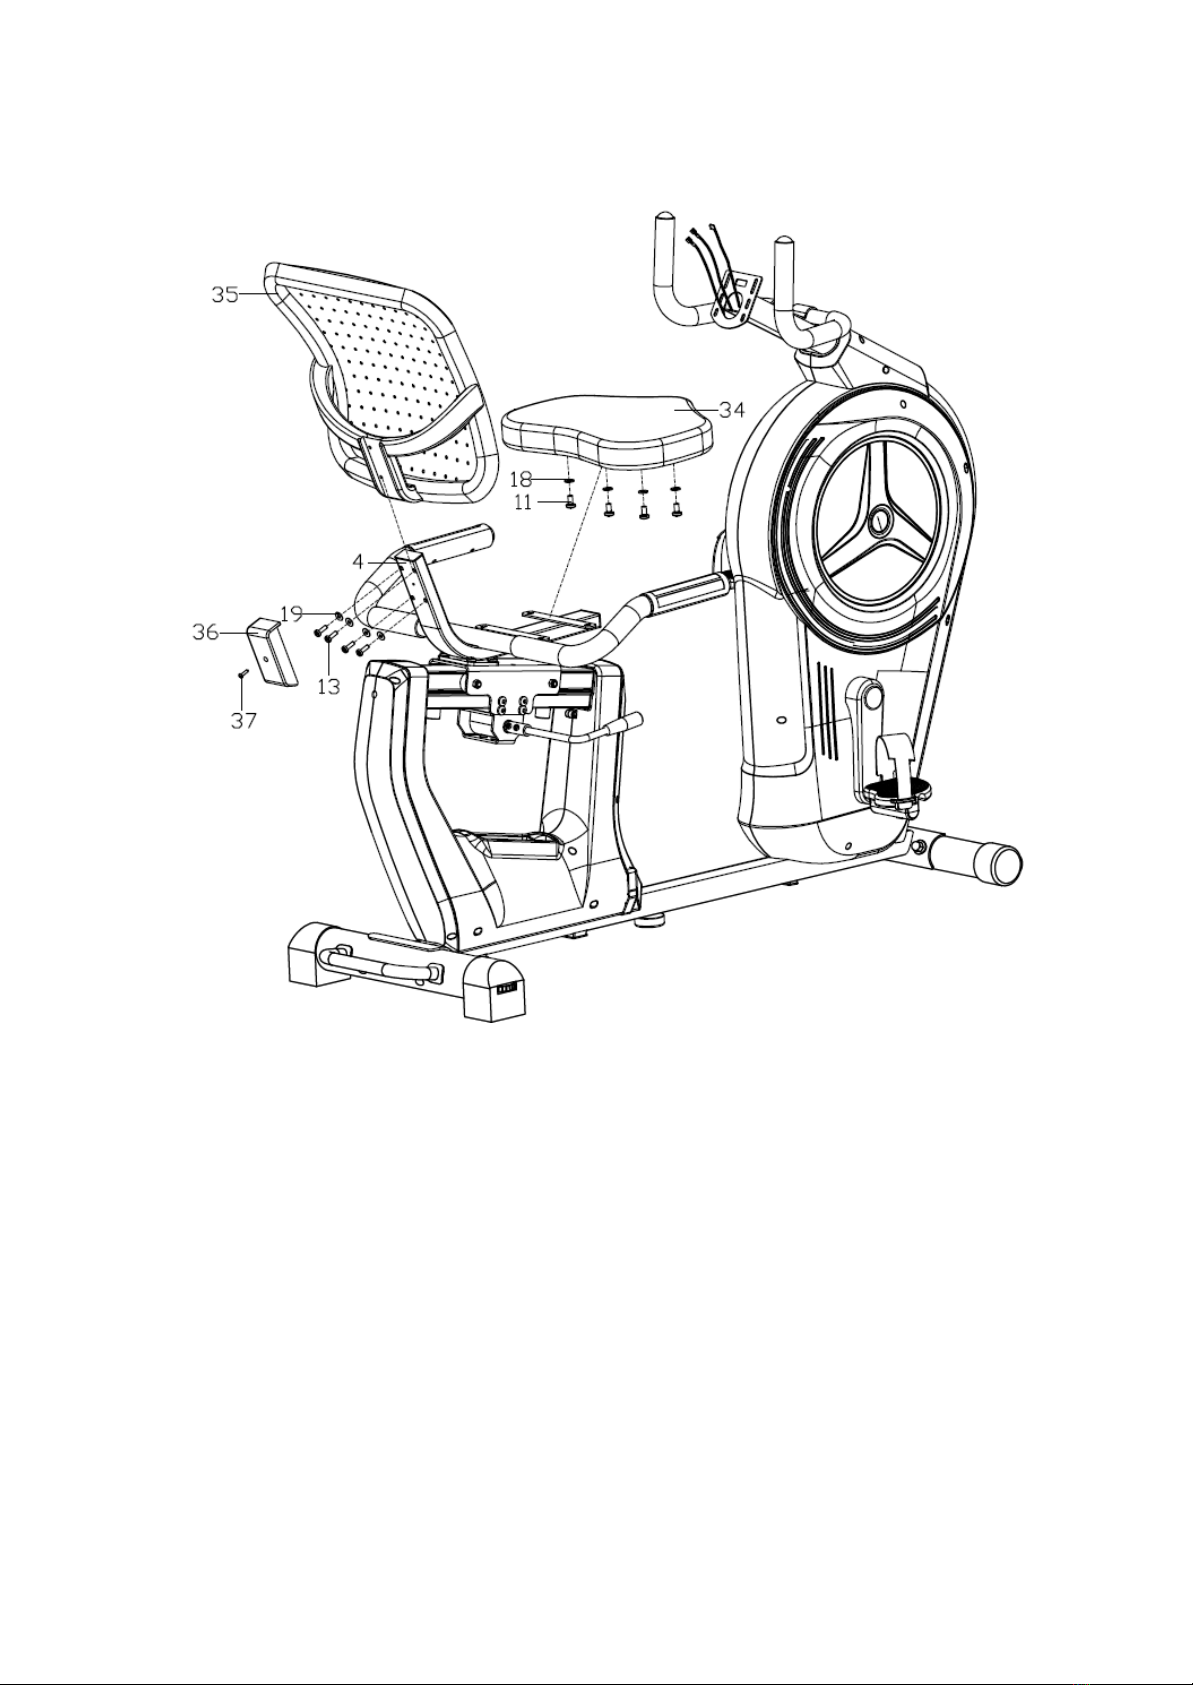
Step5
1.Fix the saddle (34) to the saddle frame (4) with flat washer (18) and inner hex
pan head bolt (11).
2.Fix the backrest (35) to the saddle frame (4) with inner hex pan head bolt (13)
and flat washer (19).
3.Press the end cover (36) to the saddle frame (4) and fasten it by cross pan
head screw (37).
13
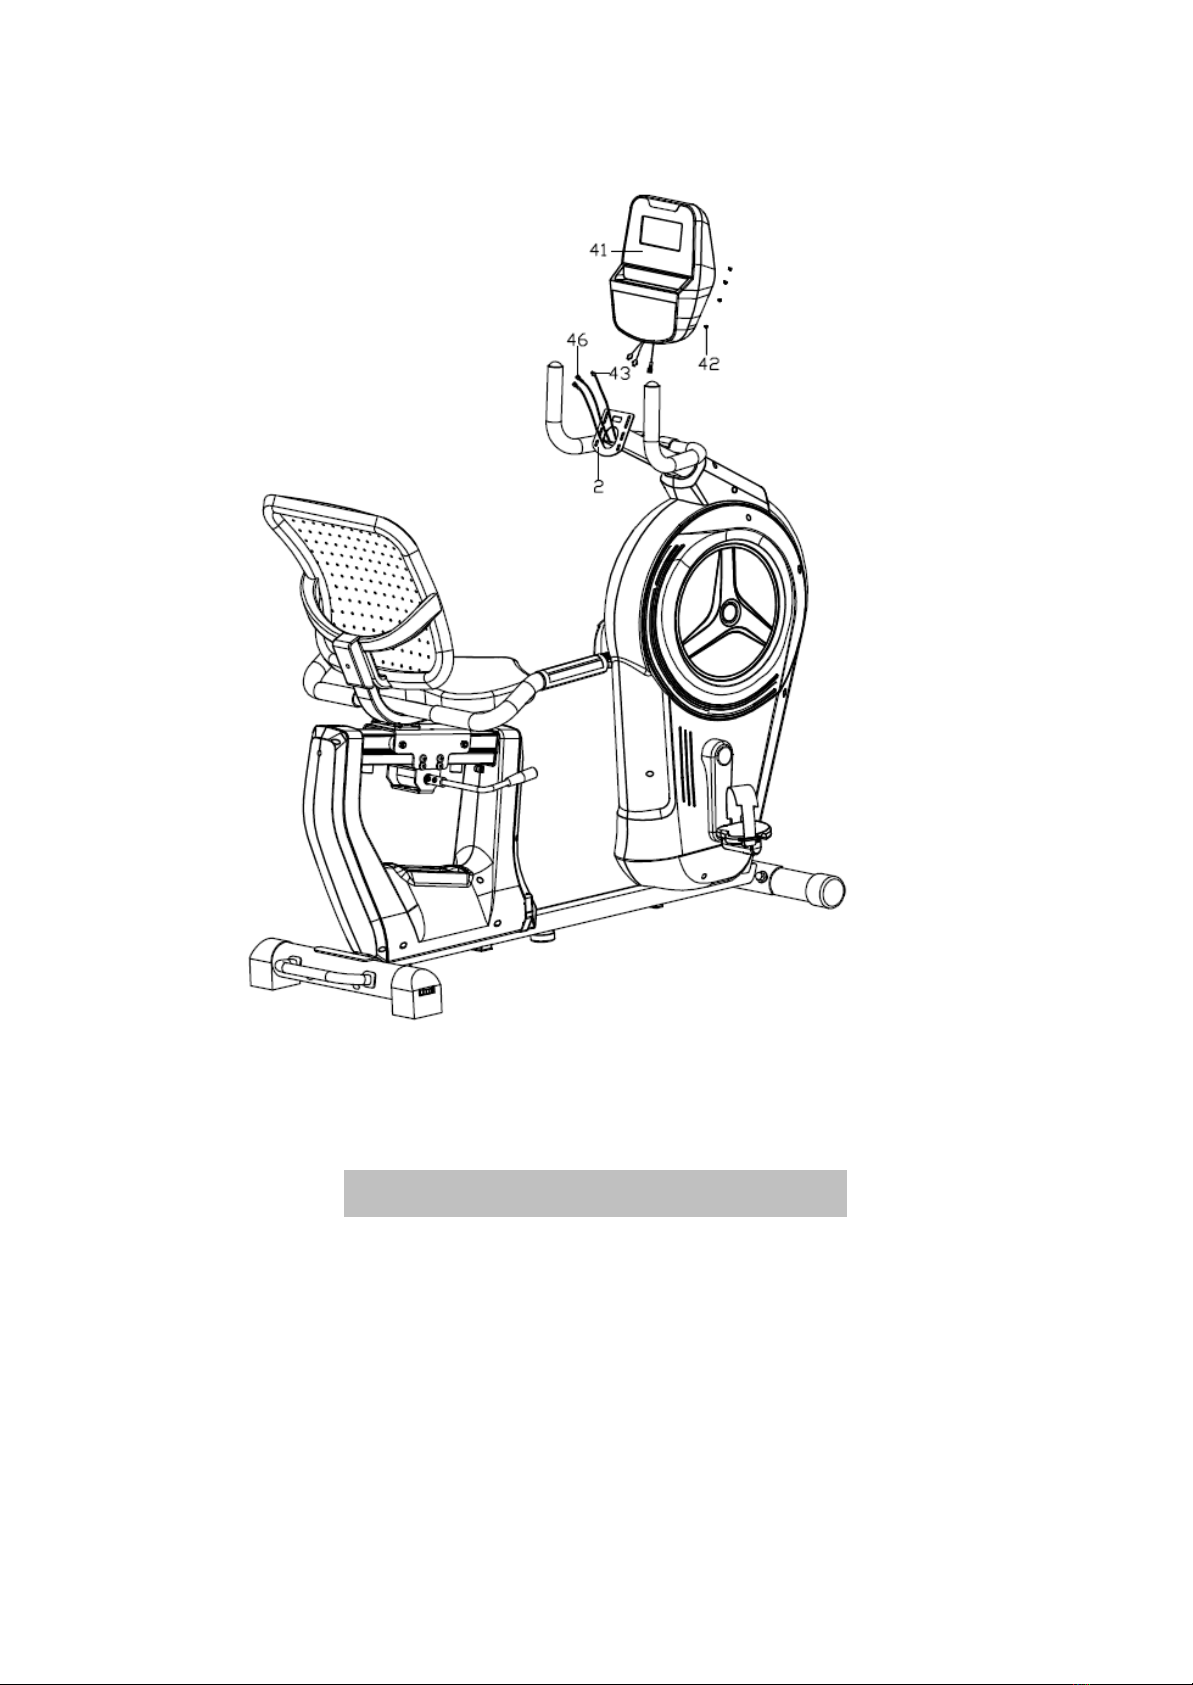
Step6
Connect the sensor trunk wire (43), pulse trunk wire 2(46) with the wire of
the console (41).Fix the console (41) to the handlebar post (2) with cross pan
head screw (42).
14
WARM-UP and COOL-DOWN
A successful exercise program consists of a warm-up, aerobic exercise, and a
cool-down. Do the entire program at least two and preferably three times a week,
resting for a day between workouts. After several months, you can increase your
workouts to four or five times per week.
WARM-UP
The purpose of warming up is to prepare your body for exercise and to minimize
injuries. Warm up for two to five minutes before strength-training or aerobic
15
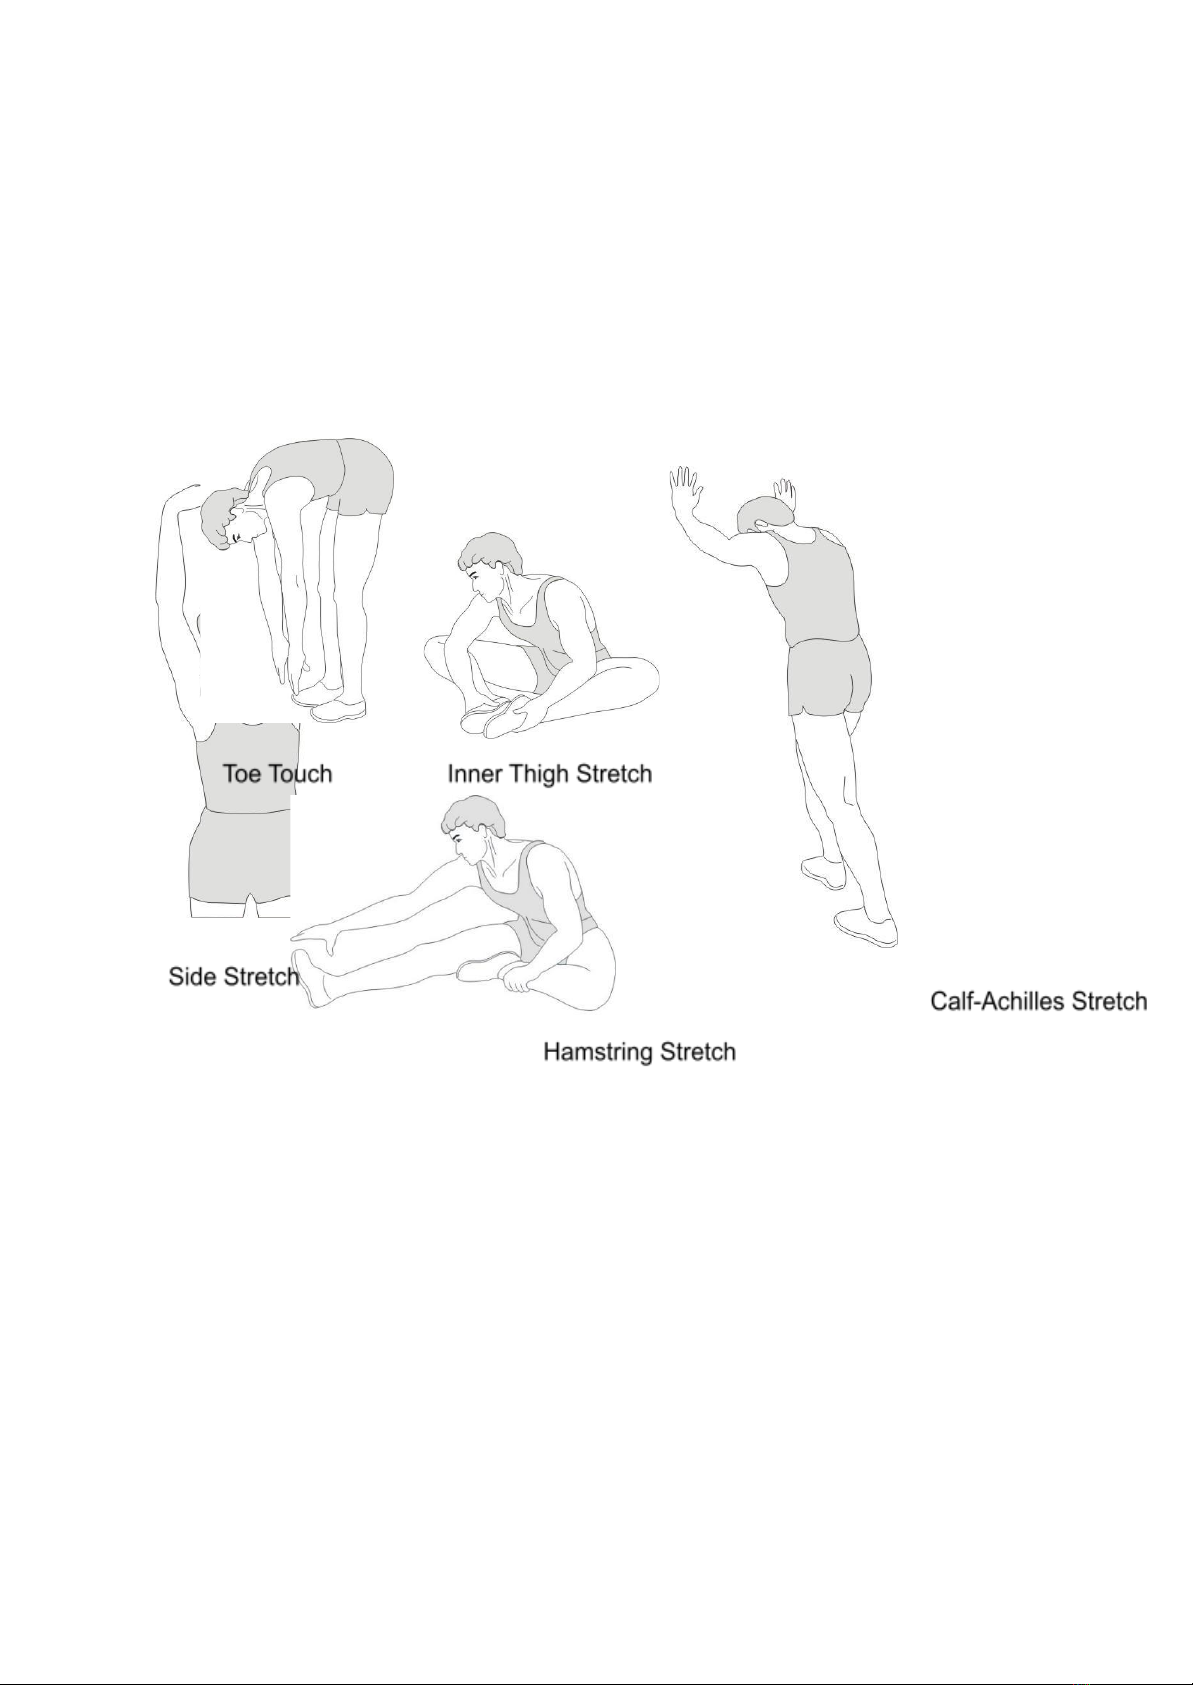
exercising. Perform activities that raise your heart rate and warm the working
muscles. Activities may include brisk walking, jogging, jumping jacks, jump rope, and
running in place.
STRETCHING
Stretching while your muscles are warm after a proper warm-up and again after your
strength
or aerobic training session is very important. Muscles stretch more easily at these
times because of their elevated temperature, which greatly reduces the risk of injury.
Stretches should be held for 15 to 30 seconds. DO NOT BOUNCE.
Remember always to check with your physician before starting any exercise
program.
COOL-DOWN
The purpose of cooling down is to return the body to its normal or near normal,
resting state at the end of each exercise session. A proper cool-down slowly lowers
your heart rate and allows blood to return to the heart.
16
Table of contents
Popular Exercise Bike manuals by other brands

Bowflex
Bowflex VeloCore 16 Assembly and owner's manual

DS Produkte
DS Produkte 8024 instruction manual

BH FITNESS
BH FITNESS HS8 - parts manual

Christopeit Sport
Christopeit Sport RS 3 Assembly and operating instructions

Insportline
Insportline Airbike Pro user manual

Stamina
Stamina Conversion II9003 owner's manual


